12 Installing ADP with Advanced Installation Options
This chapter describes how you can install Application Dependency and Performance (ADP) in the Enterprise Manager Cloud Control environment, using advanced installation options.
In particular, this chapter covers the following:
-
Overview of Application Dependency and Performance Architecture
-
Before you Begin Installing Application Dependency and Performance
-
Prerequisites for Installing Application Dependency and Performance
-
Installing Application Dependency and Performance Using Advanced Installation Options
12.1 Overview of Application Dependency and Performance Architecture
Application Dependency and Performance (ADP) is one of the critical functionalities in Enterprise Manager Cloud Control that allows you to analyze Java EE, SOA, and Portal applications. It captures the complex relationships among various application building blocks in its application schema model - the core of the Oracle intelligent platform. To manage these applications effectively, enterprises must first gain an understanding of the complex relationships among the business functions, associated interconnected components, and the underlying runtime environments. To enable clear and accurate understanding, IT organizations need holistic, service-oriented views that span across heterogeneous environments.
Using the insights stored in Application Schema, ADP is able to deliver an Application Service Management (ASM) environment that self-customizes out-of-the-box, evolves with change, minimizes expert involvement, and delivers a holistic, service-oriented view across heterogeneous environments.
ADP employs a multi-tier, fully distributed, configurable architecture to provide the scalability and flexibility to meet the changing needs of enterprise deployments.
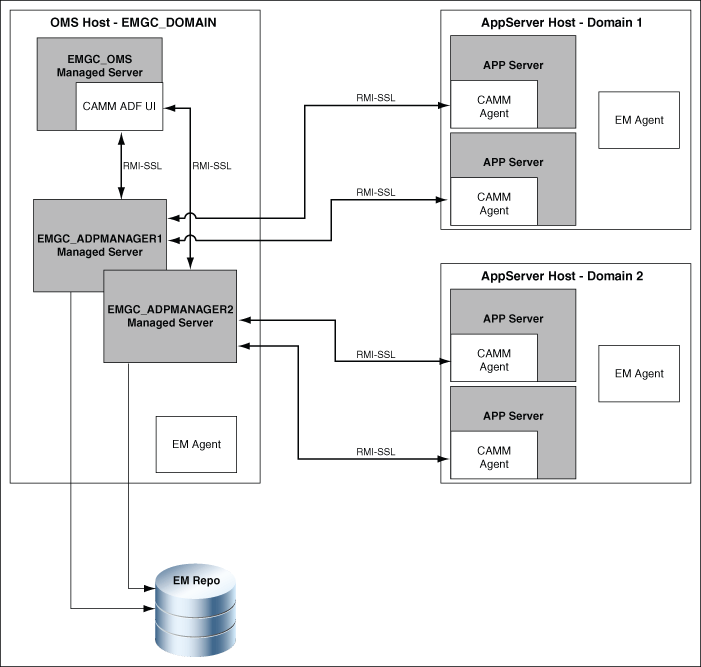
ADP Engine is the core analytical engine of the ADP ASM system. In real-time, ADP Engine performs complex mathematical modeling and statistical calculations with summarized data from all ADP Java Agents. ADP Engine can be configured with a backup to provide higher level of availability.
ADP Java Agents are the data collectors of the ADP ASM system. ADP Java Agents are deployed to all managed application servers to perform a series of tasks including collecting performance managements, tracking contextual relationships, and summarizing data in real-time while introducing as little overhead as possible.
12.2 Before you Begin Installing Application Dependency and Performance
Before installing ADP Engine or ADP Agent, review the points outlined in Oracle Enterprise Manager Basic Installation Guide.
12.3 Prerequisites for Installing Application Dependency and Performance
Before installing ADP Engine or ADP Agent, ensure that you meet the prerequisites described in Oracle Enterprise Manager Basic Installation Guide.
12.4 Installing Application Dependency and Performance Using Advanced Installation Options
This section describes how to install ADP manually, using scripts. It includes the following:
12.4.1 Deploying ADP Engine Manually Using ApmEngineSetup.pl
You can deploy ADP Engine manually, using the ApmEngineSetup.pl script. You can run this script in the following ways:
-
In interactive mode, where you are prompted for input details in an interactive manner
-
In silent mode, where you specify all the input details using a properties file
Important:
You can use theApmEngineSetup.pl script to deploy ADP Engine only on a host that is running the OMS, and not on a remote host.To deploy ADP Engine manually using the ApmEngineSetup.pl script, follow these steps:
-
Navigate to the following location on the OMS host:
$<MIDDLEWARE_HOME>/plugins/oracle.sysman.emas.oms.plugin_12.1.0.8.0/archives/jvmd/deployment_Scripts/engine/ -
View the
README.txtfile, for information on using theApmEngineSetup.plscript. -
Run the
ApmEngineSetup.plscript.If you want to run the
ApmEngineSetup.plscript in interactive mode, such that you are prompted for the input details, use the following command:perl ApmEngineSetup.plEnsure that you specify the operation as
deploy,and the Engine Type asADP.If you want to run the
ApmEngineSetup.plscript in silent mode, specify all the input details in a properties file, then use the following command:perl ApmEngineSetup.pl -silent -file <properties_file_name> -password <password><properties_file_name>is the name of the properties file where the ADP Engine and operation details are provided.<password>is the WebLogic console password.To learn how to specify the input details in a properties file, view the sample properties file
SAMPLE_engine.properties.
12.4.2 Deploying ADP Agents Manually Using deploy_adpagent.pl
You can deploy ADP Agents manually, using the deploy_adpagent.pl script. You can run this script only in silent mode, that is, you must specify all the input details using a properties file.
To deploy ADP Agents manually using deploy_adpagent.pl, follow these steps:
-
Navigate to the following location on the OMS host:
$<MIDDLEWARE_HOME>/plugins/oracle.sysman.emas.oms.plugin_12.1.0.8.0/archives/jvmd/deployment_Scripts/agent/adp/ -
View the
README.txtfile, for information on using thedeploy_adpagent.plscript. -
Specify all the inputs in a properties file, then use the following command:
perl deploy_adpagent.pl <properties_file_name>If you do not pass the name of the properties file as a parameter while running
deploy_adpagent.pl, deploy_adpagent.pllooks for a properties file namedadpagent.propertiesin the same folder. To learn how to specify the input details in a properties file, view the sample properties fileSAMPLE_adpagent.properties.
12.5 After Installing Application Dependency and Performance
This section describes the tasks you can perform after installing ADP Engines and ADP Agents. It consists of the following:
-
Configuring Oracle SOA Suite for Secure Connectivity (After Installing ADP)
-
Configuring ADP Agent When WebLogic Is Installed As a Windows Service
12.5.1 Verifying ADP Engine and ADP Agent Installation
For information on verifying the ADP Engine and ADP Agent installations, refer Oracle Enterprise Manager Basic Installation Guide.
12.5.2 Configuring Oracle SOA Suite for Secure Connectivity (After Installing ADP)
The Oracle SOA Suite may be configured to support RMIS (RMI over SSL) connectivity. In this case, ADP can be configured to use this secure connection. To configure ADP to do this, perform the following steps:
-
In the Oracle SOA Suite install, look at
ORACLE_HOME/j2ee/<instance>/config/rmi.xml, locate the<ssl-config>element, and identify the path in the keystore attribute. -
Copy the KeyStore file indicated to ADP Engine's
configdirectory (for example,em10/config) -
Import this KeyStore file following the instructions in Section 12.5.4.
12.5.3 Configuring Oracle WebLogic Server or Oracle WebLogic Portal (WLP) for Secure Connectivity (After Installing ADP)
To configure Oracle WebLogic Server 10.0 to handle connectivity using t3s, the location of the KeyStore files needs to be updated through the console. To do this, follow these steps:
-
Log in to the WebLogic Server Administration console and select the servers from the Environment Servers list that you plan to manage with ADP.
-
Select a server from the server list.
-
Select the Keystores tab, then click Load & Edit to update the KeyStore.
-
Identify the KeyStore and TrustStore file paths from the following properties:
Identity
Custom Identity Keystore
Trust
Custom Trust Keystore: location of the trust file
-
Repeat Steps 2 to 4 for additional server instances that you want to manage using ADP.
-
Copy the identified KeyStore and TrustStore files to the ADP Engine.
-
Copy the
BEA_HOME/license.beato the ADP Engine'sconfigdirectory (for example,em11g/config). -
Import the KeyStore and TrustStore files following the instructions in Section 12.5.4.
-
Locate the following properties in the
Acsera.propertiesfile, and set them as follows:weblogic.security.TrustKeyStore=CustomTrust weblogic.security.CustomTrustKeyStoreFileName=AcseraManagerTrust.jks weblogic.security.CustomTrustKeyStorePassPhrase=acseramanager
12.5.4 Importing a Certificate into ADP Engine's Keystore
To import entries from a Keystore or TrustStore, perform the following steps, replacing ServerStoreFile.jks with the KeyStore or TrustStore from your application server. You will generally need to complete these steps twice, once for the KeyStore and once for the TrustStore.
-
List the key aliases in the KeyStore/TrustStore file from the server:
keytool -list -keystore ServerStoreFile.jks –storepass DemoIdentityKeyStorePassPhrase Output: Keystore type: jks Keystore provider: SUN Your keystore contains 1 entry: demoidentity, Wed Nov 19 13:34:56 PST 2008, keyEntry, Certificate fingerprint (MD5): 36:06:C2:44:31:0A:28:FC:06:19:F7:AB:C0:7D:27:6A -
Export a key entry to an intermediate file:
keytool -export -alias demoidentity -keystore ServerStoreFile.jks -storepass
DemoIdentityKeyStorePassPhrase -file demo103

Output:

Certificate stored in file <demo103>
-
Import the key into the ADP store file (either
AcseraManagerKey.jksorAcseraManagerTrust.jksin the ADP Engine'sconfigdirectory)keytool -import -alias demoidentity1 -keystore AcseraManagerKey.jks -storepass acseramanager -file demo103 Output: Owner: CN=b91, OU=FOR TESTING ONLY, O=MyOrganization, L=MyTown, ST=MyState, C=US Issuer: CN=CertGenCAB, OU=FOR TESTING ONLY, O=MyOrganization, L=MyTown, ST=MyState, C=US Serial number: 510fb3d4b2872e3a093d436fcbe9b24b Valid from: Tue Nov 18 13:34:47 PST 2008 until: Sun Nov 19 13:34:47 PST 2023 Certificate fingerprints: MD5: 36:06:C2:44:31:0A:28:FC:06:19:F7:AB:C0:7D:27:6A SHA1: BB:85:6D:4C:0B:4A:92:63:CA:5E:E9:A8:54:42:80:2D:0D:BE:7C:91 Trust this certificate? [no]: yes Certificate was added to keystore -
Verify that the key was imported successfully:
keytool -list -keystore AcseraManagerKey.jks -storepass acseramanager

Output:

Keystore type: jks
Keystore provider: SUN

Your keystore contains 3 entries:

demoidentity1, Wed Apr 01 13:03:21 PST 2009, trustedCertEntry,Certificate fingerprint (MD5): 36:06:C2:44:31:0A:28:FC:06:19:F7:AB:C0:7D:27:6A
demoidentity, Fri Mar 13 15:15:06 PST 2009, trustedCertEntry,Certificate fingerprint (MD5): 0B:11:02:B5:44:0D:2A:CC:7F:C5:30:5C:1A:C9:A1:6C
mykey, Thu May 19 16:57:36 PDT 2005, keyEntry,Certificate fingerprint (MD5): 5D:B0:EC:28:14:33:26:1F:44:F5:BE:DD:A8:50:15:9D
-
Repeat Steps 2 to 4 for each key entry listed in Step 1.
-
Locate the following properties in the
Acsera.propertiesfile, and set them as follows:weblogic.security.TrustKeyStore=CustomTrust weblogic.security.CustomTrustKeyStoreFileName=AcseraManagerTrust.jks weblogic.security.CustomTrustKeyStorePassPhrase=acseramanager
At present, with ADP running with a bundled Sun HotSpot JDK, it is not possible for ADP to configure with PKCS12 type key/trust stores for secure connections. IBM JDK has built-in enhancements that allow it to work with PKCS12 key/trust stores, such as WebSphere 6.1's default key.p12 and trust.p12 stores. Also, there is a WebSphere 6.1 automatic function that is enabled with the property com.ibm.ssl.enableSignerExchangePrompt=true that allows a client connecting to a secure WebSphere port that allows automatic download of server's signer certificate and update of client's truststore. However, this automatic function is only available when ADP is running with an IBM JDK, which is not the case at present. This is the reason why we need to follow the above procedure to connect with a secured WebSphere 6.1.
12.5.5 Configuring ADP Agent When WebLogic Is Installed As a Windows Service
When the monitored WebLogic Server is installed as a Windows service, the automatic startup changes to deploy ADP Agent need to be manually applied to the registry entries that control the WebLogic startup.
The parameters that need to be changed are in the Windows registry key:
HKEY_LOCAL_MACHINE\SYSTEM\Current ControlSet\Services\$ServiceName\Parameters
Users should then consult the file on the ADP Engine:
deploy/agent/bea9/bin/agentoptions.bat (for WebLogic 9.x and higher)
Inspect this file and resolve the net results of its execution as parameters in the registry.