JD Edwards EnterpriseOne Tools
Table Design Guide
Release 9.1
E21486-01
December 2011
The JD Edwards EnterpriseOne Tools Table Design Guide contains the following topics:
Designing Tables
This section contains the following topics:
Understanding JD Edwards EnterpriseOne Table Design Aid
The Oracle's JD Edwards EnterpriseOne system uses a relational database. Tables are related using common key fields.
Database tables store the data that is used by applications in columns and rows. Each column is a data item, and each row is a record. You can create custom tables for use in JD Edwards EnterpriseOne applications.
You create tables by selecting data items from the data dictionary and assigning key fields as indices. An index enables a database management system to sort and locate records quickly. You must define a table so that the JD Edwards EnterpriseOne software recognizes that the table exists.
Use JD Edwards EnterpriseOne Table Design Aid to generate the table whenever you:
-
Create new tables.
-
Add or delete data items.
-
Add or modify an index.
Understanding Table Creation
When an existing or custom application requires that you create tables for the JD Edwards EnterpriseOne database, use JD Edwards EnterpriseOne Table Design Aid to create the custom tables. You can access JD Edwards EnterpriseOne Table Design Aid from the Oracle's JD Edwards EnterpriseOne Object Management Workbench.
To create tables:
-
Create a table object.
Use the recommended naming conventions when creating table objects.
-
Design the table.
Add data dictionary items as table columns and create indices. Include audit fields in the table.
-
Generate the table.
-
Add data to the table.
Creating Tables
This section discusses how to:
-
Create audit trail information.
-
Name tables.
-
Use index guidelines.
Creating Audit Trail Information
Before you add a new table to the JD Edwards EnterpriseOne system, determine whether an existing table contains the data items required. If an appropriate table does not exist, you must create a new table.
When you add a new table, you should include these audit trail columns:
-
User ID (USER)
-
Program ID (PID)
-
Machine Key (MKEY)
-
Date - Updated (UPMJ)
-
Time - Last Updated (UPMT)
Naming Tables
Use these naming conventions when adding tables:
The name of a table can be a maximum of eight characters and should be formatted as Fxxxxyyy, where:
F = Data table.
xx (second and third digits) = the system code, such as:
-
00 - Foundation
-
01 - Address Book
-
03 - Accounts Receivable
xx (fourth and fifth digits) = the group type, such as:
-
01 - Master
-
02 - Balance
-
1X - Transaction
yyy (sixth through eighth digits) = object version, such as programs that perform similar functions but vary distinctly in specific processing.
LA through LZ = Logical file.
JA through JZ = Table join.
Columns must include a two-character prefix that is used to uniquely identify the table columns. The first character must be alphabetic, while the second character can be alphanumeric. You cannot assign special characters to table columns: for example, $, #, or @. The data item alias follows the two-character column prefix. Typically, the column prefix indicates the type of data included in the table; for example, the prefix of the columns in the Address Book Master (F0101) table begin with AB.
A table description can be no more than 60 characters. Ensure that the table description is the topic of the table. If the table description comes from IBM i, it should be the same name as the file that it represents, such as F0101 (Address Book Master) and F4101 (Item Master).
Using Index Guidelines
If an index includes only one field, use the field name as the index name: for example, Address Number.
If an index includes two fields, list them consecutively: for example, Address Number, Line Number ID.
If an index includes more than two fields, and the first two fields are the same as the first two fields of another index, list the first two fields and follow them by an alpha character: for example, Address Number, Line Number, A. Place a comma and space between each index field and between the last index field and the alpha character. Do not include more than 10 fields in an index.
The total length of the index name cannot exceed 19 characters. If you exceed 19 characters, the compiler displays a warning. This situation affects fetches that use the wrong index ID in business functions.
Working with JD Edwards EnterpriseOne Table Design Aid
This section discusses how to:
-
Use Table Design Aid forms.
-
Select data items.
-
Define indices.
-
Review table information.
Using Table Design Aid Forms
JD Edwards EnterpriseOne Table Design Aid presents these forms within a single window:
-
Columns
Displays the data items that you select to include in the table.
-
Data Dictionary Browser
Provides a search method to locate the data items required for the table.
-
Indices
Provides a method to define unique data items for quick sorting and updating of the table.
-
Object Properties
Displays data item attributes for a data item that is selected in the Columns form.
Selecting Data Items
Use data items to create table columns. Table columns store information used by applications. Data items must exist in the data dictionary before you can use them in a table. In JD Edwards EnterpriseOne Table Design Aid, you can locate data items using the query by example (QBE) line of the Data Dictionary Browser. To select data items, you can double-click them or drag them to the Columns form. All selected data items appear on the Columns form. Tables can contain data items from multiple system codes.
When you modify or delete data items, you must regenerate the table. Changes that you make to a table can affect business views and forms that reference that table.
Use the Generate Table feature to generate a newly modified table. Generating an existing table clears all data from the table.
Important:
If you delete a table or delete columns from a table, then business views that reference that table, or the deleted table columns, are invalid. The system displays error messages when you generate the application.Defining Indices
Indices are used to locate specific records and to sort records faster. Table indices are like tabs in a card file. Each index is made up of one or more keys, which are individual data items. Use indices to access data in a simple manner, rather than to read the data sequentially.
Tables can have multiple indices, but every table must have only one primary index. The primary index is the one unique identifier for each record in the table. Additionally, you can use the primary index to build business views. The system does not allow you to save a table without defining a primary index.
When you modify or delete indices, you must regenerate the table. Changes that you make to a table can affect business views and forms that reference that table.
| Table Information | Description |
|---|---|
| Description | The description of each data item included in the table. |
| Type | The field type of each data item included in the table. |
| Len | The field length of each data item included in the table. |
| Alias | The alias of each data item included in the table. |
| Data Item | The name of each data item included in the table. |
| Table Column Prefix | The prefix of the table columns. |
| Indices | Information regarding all of the indices included in the table. |
Working with Tables
This section discusses how to:
-
Generate tables.
-
Generate indices.
-
Generate header files.
-
Copy tables.
-
Remove tables.
Generating Tables
You must generate tables to create the physical table in the database. Tables are created in the database based on the specifications that you defined. After the table is generated, you can add data to the table. Table generation also creates an .h file, or header file, that is used in business functions and table event rules.
JD Edwards EnterpriseOne Object Management Workbench provides a central location from which you can manage tables.
After you have selected data items for a table and assigned indices, you can configure the table for a specific data source. JD Edwards EnterpriseOne Object Management Workbench employs the Oracle's JD Edwards EnterpriseOne Object Configuration Manager (P986110) application to configure tables. You can configure the table within any existing data source. If you do not indicate a data source, the software automatically configures the table according to the default data source mapping. You can change the path code to generate tables in a different location. Doing so causes the system to perform a drop statement, similar to the remove table, after which the system recreates the table.
After you modify a table, you must regenerate it. If you regenerate an existing table, the table data is lost. To ensure that data is not lost, you must export the data, generate the table, and then copy the data back into the generated table.
Generating Indices
You must regenerate indices each time that you modify existing indices or create additional indices. Doing so modifies the .h file. When you regenerate indices, you do not lose existing data as you do when you regenerate the entire table.
Generating Header FIles
Header files, or .h files, are used in business functions and table event rules. Occasionally, you might run across a table that does not include a header file. You can generate header files without having to generate the entire table.
Header files are located in the Include folder in the path code in which the file was generated (for example, E812\DV812\Include).
Copying Tables
Use the Copy Table feature to copy tables from one data source to another. However, doing so does not copy the table specifications. You can also use Table Conversion to copy tables from one data source to another.
Removing Tables
You cannot physically delete a table using JD Edwards EnterpriseOne Table Design Aid. If you delete a table from JD Edwards EnterpriseOne Table Design Aid, the system deletes only the specifications; it does not delete the physical table.
To completely remove a table from the system, you must use the Remove Table From Database feature.
Viewing the Data in Tables
You can view data in tables using:
-
Oracle's JD Edwards EnterpriseOne Data Browser on the web client.
-
Oracle's JD Edwards EnterpriseOne Universal Table Browser (UTB) on the Microsoft Windows client.
Both tools enable you to verify the existence of data in tables, as well as determine the structure of the table. You can use both tools to view data in all JD Edwards EnterpriseOne supported databases, independent of the type of database that you use.
UTB is an executable application that is part of the JD Edwards EnterpriseOne Microsoft Windows client install. You cannot use JD Edwards EnterpriseOne security to control user permissions for UTB. However, you can apply form security to the Table and Data Source Selection form (W98TAMC). This action secures UTB because the executable cannot function without this form. All column and row security that you set up through the Oracle's JD Edwards EnterpriseOne application applies to UTB.
JD Edwards EnterpriseOne Data Browser is part of the Oracle's JD Edwards EnterpriseOne web client product. You can set up security for the JD Edwards EnterpriseOne Data Browser using JD Edwards EnterpriseOne Security Workbench.
Designing Custom Tables
This section discusses how to:
-
Add table objects.
-
Modify table objects.
-
Select data items for tables.
-
Define indices.
-
Preview tables.
-
Generate tables.
-
Generate indices.
-
Generate header files.
-
Copy tables.
-
Remove tables.
-
View the data in tables.
Forms Used to Create Tables
| Form Name | FormID | Navigation | Usage |
|---|---|---|---|
| Object Management Workbench | W98220A | EnterpriseOne Life Cycle Tools, Application Development (GH902), Object Management, Object Management Workbench | Select and view objects in projects and access the JD Edwards EnterpriseOne design tools. |
| Add EnterpriseOne Object to the Project | W98220C | Click the Objects node of a project and click Add on the Object Management Workbench form. | Add new objects to a project. |
| Add Object | W9861AF | Select Table and click OK on the Add EnterpriseOne Object to the Project form. | Enter the table name, description, product code, product system code, object use, and column prefix. |
| Table Design Aid | W9860AL | Complete the object information and click OK on the Add Object form. | Access Table Design Aid, generate header files, generate tables, generate indexes, remove tables from the database, and copy tables. |
| Generate Table | W9866E | Select the Table Operations tab, and click Generate Table on the Table Design form. | Generate tables. |
| Generate Indexes | W9866J | Select the Table Operations tab, and click Generate Indexes on the Table Design form. | Generate indices. |
| Copy Table | W9866M | Select the Table Operations tab, and click Copy Table on the Table Design form. | Copy tables. |
| Remove Table | W9866D | Select the Table Operations tab, and click Remove Table from Database on the Table Design form. | Remove tables. |
| Universal Table Browser | NA | EnterpriseOne Life Cycle Tools, Application Development Tools (GH902), Object Management | View the data in tables. |
Adding Table Objects
Access the Add Object form.
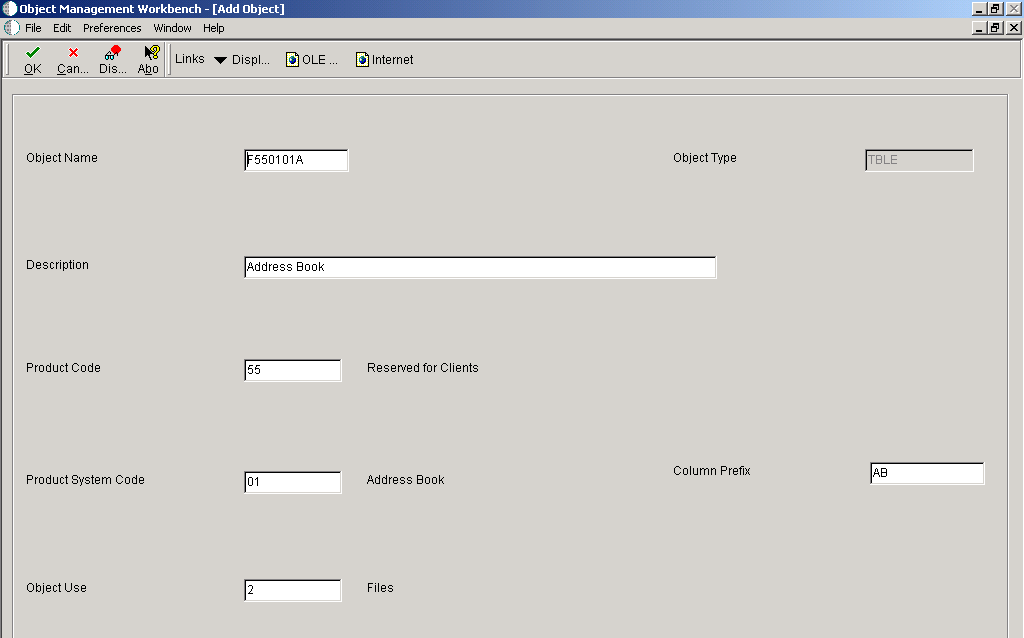
- Object Name
-
Enter a unique name for the new table. Use the recommended naming convention for naming JD Edwards EnterpriseOne objects.
- Description
-
Enter a meaningful description of the table.
- Product Code
-
Select a user-defined code (UDC) (98/SY). Use one of the values from the range of values reserved for clients: 55–59.
- Product System Code
-
Select a UDC (98/SY) that represents the JD Edwards EnterpriseOne system where the data is used. This value is used for reporting and jargon purposes. Example values include:
01: Oracle's JD Edwards EnterpriseOne Address Book
03B: Oracle's JD Edwards EnterpriseOne Accounts Receivable
04: Oracle's JD Edwards EnterpriseOne Accounts Payable
09: Oracle's JD Edwards EnterpriseOne General Accounting
11: Oracle's JD Edwards EnterpriseOne Multicurrency
- Object Use
-
Select a UDC that indicates the use of the object. For example, the object may be used to create a program, a master file, or a transaction journal. A 2, or any other value from the 200 series, represents a table.
- Object Type
-
The system displays an abbreviation that identifies the type of object being created. The object type for a table is TBLE. This field is populated by the system based on the type of object that you selected on the Add Object form.
- Column Prefix
-
Enter a two-character prefix to be used for the table column names.
Modifying Table Objects
Either click OK on the Add Object form or select a table in a project and click Design to access the Table Design form.
-
Select the Summary tab and revise these fields as appropriate:
-
Description
-
Product Code
-
Product System Code
-
Object Use
-
-
Select the Attachments tab and enter information in the text area to document the table.
Selecting Data Items for Tables
Select a table in a project and access JD Edwards EnterpriseOne Table Design Aid.
-
On the Data Dictionary Browser form, use the query by example (QBE) line to locate the required data dictionary items to include in the table.
-
Drag each required data dictionary item from the Data Dictionary Browser to the Columns form.
-
To remove a column from a table, select the column and select Delete from the Edit menu.
Defining Indices
Select a table in a project and access JD Edwards EnterpriseOne Table Design Aid.
-
Click the indices form so that it is active, and the indices menu is visible.
-
From the indices menu, select Add New.
You can also drag indices from the Columns form onto the Indices form.
The index description is Untitled, and the index is marked with a key icon that displays the letter P to indicate a primary index.
-
Enter a name for the index, and press Enter.
-
On the Columns form, drag appropriate columns to the index.
A unique index is marked with a single key. You can right-click the index and select Unique from the Index menu to toggle the unique status. The Unique Primary Index cannot be changed to a non-unique status.
-
Right-click the data item and select or clear the Ascending option to indicate the sort order of ascending or descending for an index column.
An upward-pointing arrow indicates that the index column is sorted in ascending order.
Previewing Tables
Select a table in a project and access JD Edwards EnterpriseOne Table Design Aid.
-
Click the Columns form so that it is active, and select Print Preview from the File menu.
A preview of the table appears on the Columns form in place of the column names.
-
On the Columns form, click Zoom In to enlarge the preview.
-
Click Print to send the information to the printer.
Generating Tables
Access the Generate Table form.
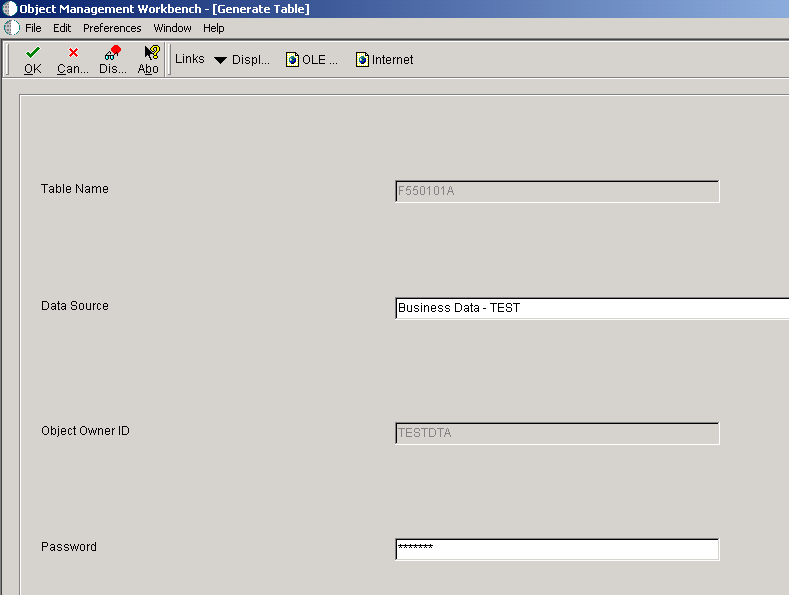
- Table Name
-
Displays the unique name of the table. This field is populated by the system based on the name that you gave the table when you created it.
- Data Source
-
Enter the name of the data source where the database resides.
- Object Owner ID
-
Enter the owner ID of the database that resides in the defined data source.
- Password
-
Enter the database password that corresponds to the owner ID.
Generating Indices
Access the Generate Indexes form.
- Table Name
-
Displays the unique name of the table. This field is populated by the system based on the name that you gave the table when you created it.
- Data Source
-
Enter the name of the data source where the database resides.
- Object Owner ID
-
Enter the owner ID of the database that resides in the defined data source.
- Password
-
Enter the database password that corresponds to the owner ID.
Generating Header Files
Access the JD Edwards Table Design Aid form.
-
Select the Design Tools tab, and click Generate Header File.
-
The system generates a .h, or header, file.
Copying Tables
Access the Copy Table form.
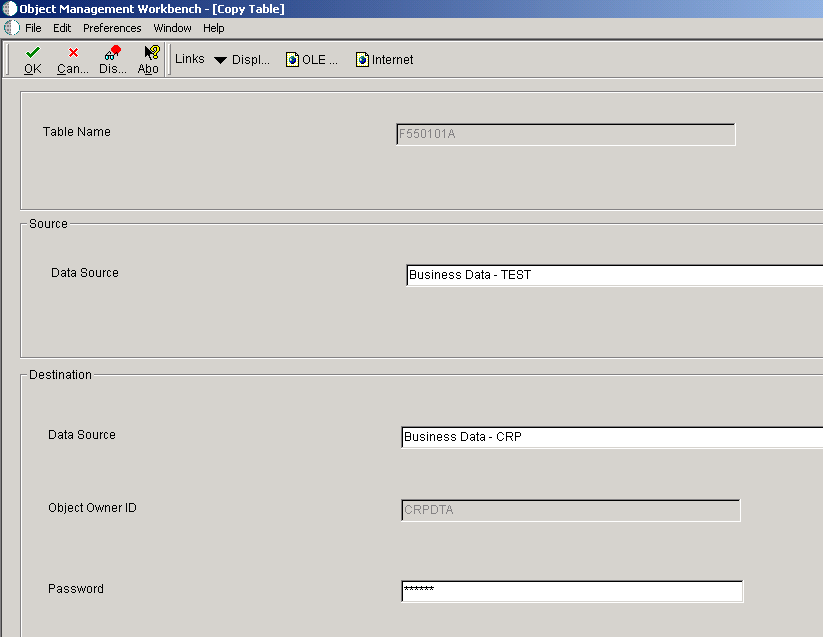
- Table Name
-
Displays the unique name of the table. This field is populated by the system based on the name that you gave the table when you created it.
- Source Data Source
-
Enter the name of the source data source, that is the data source to copy from.
- Destination Data Source
-
Enter the name of the target data source, that is the data source to copy to.
- Object Owner ID
-
Enter the owner ID of the database that resides in the defined data source.
- Password
-
Enter the database password that corresponds to the owner ID.
Removing Tables
Access the Remove Table form.
- Table Name
-
Displays the unique name of the table. This field is populated by the system based on the name that you gave the table when you created it.
- Data Source
-
Enter the name of the data source where the database resides.
- Object Owner ID
-
Enter the owner ID of the database that resides in the defined data source.
- Password
-
Enter the database password that corresponds to the owner ID.
Viewing the Data in Tables
Access the Universal Table Browser form.
- Table
-
Enter the name that identifies a table in JD Edwards EnterpriseOne. For example, F0101 is the name of the Address Book master table. You can use the visual assist to search for a table
- Data Source
-
Enter the name of the data source where the table resides. The default value is obtained from the JD Edwards EnterpriseOne Object Configuration Manager (OCM) settings for the environment in which the user is signed on. Use the visual assist to select from a list of valid JD Edwards EnterpriseOne data sources.
- Format Data
-
Select this option to indicate whether UTB should format the data once it is fetched from the database. JD Edwards EnterpriseOne Data Browser on the web does not provide this option. It always formats data after it is fetched from the database. The options are:
Formatted: UTB formats data according to the specifications of the JD Edwards EnterpriseOne data dictionary item. For example, assume that the data item PROC is a numeric field with a size of 15 and includes four display decimals. For a PROC value of 56.2185, UTB displays a formatted value (using the data dictionary editing) as 56.2185, even though the value is stored in the database as 562185.
Unformatted: UTB displays the data according to the specification of the database and the data item type (such as numeric). For example, assume that the table data item PROC is a numeric field stored in the database. Depending on the type of database, the default for this field might be 32 with a precision of 15. Because JD Edwards EnterpriseOne does not store the decimals in the database, a PROC value of 56.2185 would be stored by the database as 562185.000000000000000 and would appear the same in UTB.
Working with Table Input/Output
This section contains the following topics:
Understanding Table I/O
Use the Table I/O feature in Event Rules Design to create instructions that perform table input and output. The Table I/O feature enables you to access a table through event rules. You can use the Table I/O feature to:
-
Retrieve records.
-
Update or delete records.
-
Add records.
Table I/O event rules enable event rule support for database access.
Available Operations
This table describes the Table I/O features and the operations that you can perform:
| Operation | Description |
|---|---|
| FetchSingle | Combines the Select and Fetch options in a basic operation. Indexed columns are used for the Select, and non-indexed columns are used for the Fetch. The operation opens a table for input or output but does not close it. All tables that do not use handles close automatically when the form that uses them is closed. |
| Insert | Inserts a new row. |
| Update | Updates an existing row. Only those columns mapped (presently in tables with or without handles) are updated. You can do partial key updates with tables and handles to tables. If you do not specify all the keys, then several records might be updated. |
| Delete | Deletes one or more rows in a table. |
| Open | Opens a table or business view. |
| Close | Closes a table or business view. |
| Select | Selects one or more rows for a subsequent FetchNext operation. |
| SelectAll | Selects all rows for a subsequent FetchNext operation. |
| FetchNext | Fetches rows that you specify. You can fetch multiple records with multiple FetchNext operations or with a FetchNext operation in a loop. |
Valid Mapping Operators
The Mapping form displays available objects that you can map to selected table columns. For SELECT statements, the available objects are used to build a WHERE clause. For FETCH statements, the available objects are used to receive data fetched from the database.
Key columns have an asterisk (*) next to them.
This table describes the operators that you can use for mapping specific table I/O operations:
| Table I/O Operation | Mapping Operators |
|---|---|
| FetchSingle | Index Fields: =, <, <=, >, >=, !=, Like
Non-Index Fields: Copy Target |
| Insert | All Fields: Copy Source |
| Update | Index Fields: =
Non-Index Fields: Copy Source |
| Delete | All Fields: = |
| Open | NA |
| Close | NA |
| Select | All Fields: =, <, <=, >, >=, !=, Like |
| SelectAll | NA |
Understanding Buffered Inserts
You can use buffered inserts to improve the performance of inserting hundreds or thousands of records into a single database table as long as you don't need immediate feedback if an insertion failure occurs. You cannot use buffered inserts with interactive applications but you can use them with:
-
Table conversions
-
Table I/O
-
Batch processes
-
Business functions
Buffered inserts are not available with an Access database, post-insert triggers, or multiple-table views. They are available only with these databases:
-
Oracle (V8 and later)
-
DB2/400
-
SQL Server
The JD Edwards EnterpriseOne database middleware delivers records to the database management system one buffer load at a time.
When you request buffering, the database records are inserted individually and the buffer is automatically flushed when it fills; that is, the JD Edwards EnterpriseOne database middleware delivers the buffer to the database management system. The buffer can also be explicitly flushed. For example, the buffer flushes automatically when you commit a transaction or when you close a table or business view. The business function, table conversion engine, or Table I/O feature can explicitly request that the buffer be flushed as well.
Buffered Insert Error Messaging
Use caution when deciding to use buffered inserts. The system provides no immediate feedback while using buffered inserts if an insertion fails. If an insertion fails, the error appears in the log file. Consequently, buffered inserts are used primarily with batch applications.
Unless you are using the Oracle's JD Edwards EnterpriseOne Table Conversion application, you must request more detailed information from the middleware to get detailed error messages. In the JD Edwards EnterpriseOne Table Conversion application, the table conversion engine automatically performs this task. You can enable tracing to receive more detailed error messages. Otherwise, you get an error message that the insert failed. You should clear the output tables so that you do not receive duplicate error logging.
After you set up buffered inserts, you can use Special Operations to flush the buffers or get error messages.
Understanding Special Operations
In addition to the basic and advanced operations available on the Insert TableIO Operation form, there are two special operations:
-
Flush Insert Buffer
To maintain data integrity, you should flush the insert buffer before you perform any operations other than an insert. If you fail to do so, the results of recent inserts might not be reflected in other operations, and the operations might not work properly.
When you use the flush insert buffer option for a specific table, you must flush the buffer before you close the table.
-
Get Error Data
To retrieve errors for records that the system did not insert properly, use the Get Error Data option. Depending on when the buffers are flushed, or when you begin another insert, you might overwrite the error information for a specific insert. If error information is critical, retrieve the information before the next insert begins.
If you need to perform special error handling, set the error handling up after each table I/O insert and each Flush Insert Buffer option. Always retrieve the error information before you begin the next table operation.
Note:
The return code of each table I/O statement is stored in system variable SV File_IO_Status. If an Insert or Flush Insert Buffer operation failed, the SV File_IO_Status system variable might contain a value of CO ERROR_DETAILS_AVAILABLE. If so, you need to run the Get Error Data table I/O special operation to retrieve the error data. The Get Error Data operation returns the values used in the insert for all the requested columns.
Get Error Data Event Rules Example
This example illustrates how you can use CO ERROR_DETAILS_AVAILABLE:
F0101.Insert //Attempt an insert
  SL AgingDaysAP1 -> TK Address Number
  RC Page - -fi
fi
fi
fi
fi
fi
fi
> TK Tax ID
  SL TargetEnvironment -> TK Description - Compressed
If SV File_IO_fi
Status is equal to CO ERROR_DETAILS_AVAILABLE
 F0101.Get Error Data //Failed withfi
 errors so get errors
      //Map values used in insert to the
      //specifiedfi
 fields.
   SL AgingDaysAP1 <- TK Address Number
   RC TESTT <- TK Tax ID
   SLfi
 ReportName <- TK Description - Compressed
End If
Understanding Handles
In JD Edwards EnterpriseOne table I/O operations, the term handle refers to a type of file pointer. This file pointer connects the application or Universal Batch Engine (UBE) with the JD Edwards EnterpriseOne database middleware that communicates with the database manager. Handles point to a database table, and they are references to an address within the database middleware. Handles enable you to perform these operations, which cannot be performed using non-handle table I/O operations:
-
Concurrently open multiple instances of a single table or business view.
-
Open a table or business view in an environment other than the environment to which you are signed in.
This feature is particularly helpful when you receive an upgrade to JD Edwards EnterpriseOne software or when you need to convert data from another system into JD Edwards EnterpriseOne software.
-
Pass handles into a form, named event rule, or business function so that you do not need to open a table or business view more than once.
Note:
You cannot use handles in transaction processing.
If you pass a handle to a form or a named event rule, a HANDLE data item must be included as a member in the data structure for the form or named event rule. In the form interconnect or business function call, you must assign a handle value from the event rules to the HANDLE data structure member. You can use this handle in the form or named event rule in the same way that you use any other table I/O handle.
You must explicitly open and close handles, unlike other table I/O operations in which the system implicitly opens or closes the table for you. You must open a handle before you can use it. All of the table I/O operations, except Open, work the same for handles as they do for tables and business views. When you are finished using a handle, you must explicitly close it. Close the handle in the same way that you close a table or business view, except select the Handle option.
In order to use handles in table I/O event rules, you must:
-
Define the handle in the data dictionary.
-
Create a handle variable in event rules.
-
Open the handle explicitly.
You might be able to find an existing handle for the table I/O. Whether you use an existing handle or create a new handle, you must create a handle variable in Event Rules Design. Create a handle variable in the same way that you create other variables. You can use any scope that is necessary.
After you create a handle variable, you must explicitly open the handle. Then, after performing the required table I/O, you must explicitly close it.
Working with Table I/O
This section lists the prerequisites and discusses how to:
-
Create table I/O event rules.
-
Use buffered inserts in table I/O.
-
Use special operations for buffered inserts.
-
Create handles.
-
Use handles with table I/O.
Prerequisites
Before creating table I/O event rules, ensure that you:
-
Create a batch application.
-
If you want to update the database, ensure that the batch application is defined as an update report.
Creating Table I/O Event Rules
Open a batch application in Oracle's J.D. Edwards EnterpriseOne Report Design Aid (RDA) and access Event Rules Design.
-
Click the Table I/O button.
-
On the Insert TableIO Operation form, select an operation from Basic Operations, Advanced Operations, or Special Operations and click Next.
-
On the Data Source form, select a table, business view, or handle as the data source and click Next.
-
On the Mapping form, select fields from the Available Objects list to map to columns in the mapping.
The key field must be mapped. Map as many other fields as required to ensure that the correct data is associated with the correct record.
-
Click the Operation for each map until you locate the operator that you want.
The default operator is equal.
-
Click Finish to save the operation and return to Event Rules Design.
Using Buffered Inserts in Table I/O
Open a batch application in RDA and access Event Rules Design.
-
Click the Table I/O button.
-
On the Insert TableIO Operation form, select Open under Advanced Operations and click Next.
-
On the Data Source form, select the table that you want to use and click Advanced Options.
-
On the Advanced Options form, select Buffer Inserts and click OK.
Using Special Operations for Buffered Inserts
Open a batch application in RDA and access Event Rules Design.
-
At the point in which you want to perform either a Flush Insert Buffer or Get Error Data operation, click the Table I/O button.
-
On the Insert TableIO Operation form, select one of these options under Special Operations:
-
Flush Insert Buffer
-
Get Error Data
-
Creating Handles
In JD Edwards Solution Explorer access EnterpriseOne Life Cycle Tools, Application Development, Data Dictionary Design, select Work With Data Dictionary Items to access the Work With Data Items form.
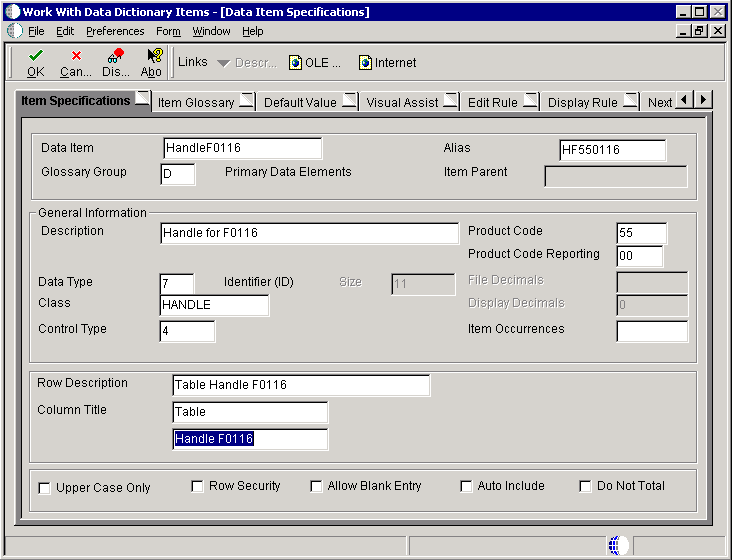
- Data Item
-
Enter the name of the data item. This is a 32-character alphabetical field that does not allow spaces or special characters.
- Alias
-
Enter a unique identifier.
- Glossary Group
-
Select a user-defined code (UDC) (H95/DG) that indicates the type of data item. A handle is glossary group D, Primary Data Elements.
- Description
-
Enter a meaningful description of the data item.
- Product Code
-
Select a UDC (98/SY) from the range of values reserved for clients: 55–59.
- Product System Code
-
Select a UDC (98/SY) that represents the JD Edwards EnterpriseOne system where the data is used. This value is used for reporting and jargon purposes. Example values include:
01: Oracle's JD Edwards EnterpriseOne Address Book
03B: Oracle's JD Edwards EnterpriseOne Accounts Receivable
04: Oracle's JD Edwards EnterpriseOne Accounts Payable
09: Oracle's JD Edwards EnterpriseOne General Accounting
11: Oracle's JD Edwards EnterpriseOne Multicurrency
- Data Type
-
Select the style or classification of data. Examples include, string, date, character, and identifier. A handle is an identifier data type.
- Size
-
Enter the field size of the data item.
- Class
-
Select a class that defines the essential attributes and characteristics of the data item. Examples include, name, email, and table handle.
- Control Type
-
Select the type of graphical user control that is associated with the data item. Examples include button, radio button, and user-defined code.
- Row Description
-
Enter the description of the data item as it will appear in a group report.
- Column Title
-
Enter the description of the data item as it will appear in a columnar report.
Using Handles with Table I/O
Open a batch application in RDA and access Event Rules Design.
-
Create an event rule variable using the appropriate handle data dictionary item.
-
Click the Table I/O button.
-
Select Open under Advanced Operations and click Next.
-
On the Data Source form, select the Handles tab.
-
Select the handle that you want to open and click Next.
-
Select a variable that contains the name of the environment in which you want to open the table and click Finish.
If you want to open the table in the login environment, select the system value SL LoginEnvironment. System values also exist for the source and target environments if you use the Table I/O in Table Conversion feature.
-
Click the Table I/O button.
-
Select Close and click Next.
-
On the Data Source form, select the Handles tab.
-
Select the handle that you want to close, and click Finish.
Creating Table Event Rules
This section contains the following topics:
This chapter provides an overview of table event rules and discusses how to work with table event rules.
Understanding Table Event Rules
Use table event rules to attach database triggers (or programs) that automatically run whenever an action occurs against the table. An action against a table is called an event. When you create a database trigger in Oracle's JD Edwards EnterpriseOne, you must first determine which event activates the trigger and then use Event Rules Design to create the database trigger.
Table event rules provide embedded logic at the table level. Table event rules have their own location, events, and system functions. When you use table event rules, neither the calling application nor the user is notified of changes or events to the table. No form or report interconnect is available with table event rules.
You can use table event rules for data integrity. For example, when you delete a record in Oracle's JD Edwards EnterpriseOne Address Book, you might want to delete all associated records, such as phone and category codes. You can also use table event rules for currency. The Currency Conversion is On event rule handles currency information in table event rules.
You can attach event rules on a table-by-table basis to these events:
-
After Record is Deleted
-
After Record is Fetched
-
After Record is Inserted
-
After Record is Updated
-
Before Record is Deleted
-
Before Record is Inserted
-
Before Record is Updated
-
Currency Conversion is On
This table describes the functions that you can use in table event rules:
| Functions | Description |
|---|---|
| Assignment\Expression | Enables you to create assignments and complex expressions. |
| If\While | Enables you to create IF/WHILE conditional statements. |
| Business Function | Enables you to call existing business functions. |
| System Function | Enables you to attach existing JD Edwards EnterpriseOne system functions. |
| Variables | Enables you to create Event Rule variables. |
| Else | Enables you to insert an ELSE clause, which is only valid within the boundaries of IF and ENDIF. |
| Table I/O | Enables you to create event rules used for database access. Performs table input and output, data validations, and record retrieval. |
You do not need to create and associate data structures to table event rule functions. The table itself is the data structure that is passed to the table event rule function.
Working with Table Event Rules
This section provides an overview of table event rule triggers and discusses how to add table event rules to table conversions.
Understanding Table Event Rule Triggers
To create table event rules, you must:
-
Create the table trigger in Event Rules Design.
-
Generate the JD Edwards EnterpriseOne table trigger as C code.
-
Build the table trigger.
When you build table triggers, the system performs these actions:
-
Converts the event rule to C source code, which creates the files OBNM.c and OBNM.hxx (OBNM = Object Name).
The source file contains one function per table event rule event.
-
Creates a make file to compile the generated code.
-
Runs the make file to compile the new functions and to add them into JDBTRIG.DLL.
This consolidated DLL contains table event rule functions.
-
Adding Table Event Rules to Table Conversions
Access the Object Management Workbench form.
-
Check out the table to which you want to attach event rules and click Design.
-
On the Table Design form, select the Design Tools tab and click Start Table Trigger Design Aid.
-
Select an event from the Events list.
-
On Event Rules Design, click one of the event rule buttons and complete the event rules.
-
Click Save to save the event rule specifications and then click Close.
-
If you are creating a new table in Oracle's JD Edwards EnterpriseOne Table Design Aid, select the Table Operations tab and click Generate Table.
Important:
Never perform this step on an existing table because it clears all data. -
On the Generate Table form, complete these fields and click OK:
-
Data Source
-
Password
-
-
On the Table Design form, select the Design Tools tab and click Build Table Triggers.
-
To review a log of the build, select Generate Header File, and then open the file that the system created.
The creation of the table event rules is complete. The newly created or modified table event rule is called from the JD Edwards EnterpriseOne database middleware whenever the corresponding event occurs against the table.
Documentation Accessibility
For information about Oracle's commitment to accessibility, visit the Oracle Accessibility Program website at http://www.oracle.com/pls/topic/lookup?ctx=acc&id=docacc.
Oracle customers have access to electronic support through My Oracle Support. For information, visit http://www.oracle.com/pls/topic/lookup?ctx=acc&id=info or visit http://www.oracle.com/pls/topic/lookup?ctx=acc&id=trs if you are hearing impaired.
JD Edwards EnterpriseOne Tools Table Design Guide, Release 9.1
E21486-01
Copyright © 2011, Oracle and/or its affiliates. All rights reserved.
This software and related documentation are provided under a license agreement containing restrictions on use and disclosure and are protected by intellectual property laws. Except as expressly permitted in your license agreement or allowed by law, you may not use, copy, reproduce, translate, broadcast, modify, license, transmit, distribute, exhibit, perform, publish, or display any part, in any form, or by any means. Reverse engineering, disassembly, or decompilation of this software, unless required by law for interoperability, is prohibited.
The information contained herein is subject to change without notice and is not warranted to be error-free. If you find any errors, please report them to us in writing.
If this is software or related documentation that is delivered to the U.S. Government or anyone licensing it on behalf of the U.S. Government, the following notice is applicable:
U.S. GOVERNMENT RIGHTS Programs, software, databases, and related documentation and technical data delivered to U.S. Government customers are "commercial computer software" or "commercial technical data" pursuant to the applicable Federal Acquisition Regulation and agency-specific supplemental regulations. As such, the use, duplication, disclosure, modification, and adaptation shall be subject to the restrictions and license terms set forth in the applicable Government contract, and, to the extent applicable by the terms of the Government contract, the additional rights set forth in FAR 52.227-19, Commercial Computer Software License (December 2007). Oracle America, Inc., 500 Oracle Parkway, Redwood City, CA 94065.
This software or hardware is developed for general use in a variety of information management applications. It is not developed or intended for use in any inherently dangerous applications, including applications that may create a risk of personal injury. If you use this software or hardware in dangerous applications, then you shall be responsible to take all appropriate fail-safe, backup, redundancy, and other measures to ensure its safe use. Oracle Corporation and its affiliates disclaim any liability for any damages caused by use of this software or hardware in dangerous applications.
Oracle and Java are registered trademarks of Oracle and/or its affiliates. Other names may be trademarks of their respective owners.
Intel and Intel Xeon are trademarks or registered trademarks of Intel Corporation. All SPARC trademarks are used under license and are trademarks or registered trademarks of SPARC International, Inc. AMD, Opteron, the AMD logo, and the AMD Opteron logo are trademarks or registered trademarks of Advanced Micro Devices. UNIX is a registered trademark of The Open Group.
This software or hardware and documentation may provide access to or information on content, products, and services from third parties. Oracle Corporation and its affiliates are not responsible for and expressly disclaim all warranties of any kind with respect to third-party content, products, and services. Oracle Corporation and its affiliates will not be responsible for any loss, costs, or damages incurred due to your access to or use of third-party content, products, or services.