4 Configuring an Orchestration
This chapter describes how to take the data from analysis to implementation. It contains the following topics:
-
Section 4.1, "Understanding Orchestrations and the Orchestration Directory Structure"
-
Section 4.8, "Setting Up Cross-References and White Lists in EnterpriseOne (P952000)"
4.1 Understanding Orchestrations and the Orchestration Directory Structure
An orchestration is a process that enables the transformation of raw data from disparate devices into actionable business processes in JD Edwards EnterpriseOne. An orchestration can be comprised of four components: service requests, rules, cross-references, and white lists. You define the metadata for each component in XML files, and then place each component's XML file in the appropriate folder for that component. The IoT Orchestrator processes an orchestration using the XML files in these folders:
-
Orchestrations. This folder contains orchestration XML files that provide the master information for an orchestration. An orchestration XML file contains one or more orchestration steps. Each orchestration step points to a service request, rule, cross-reference, or white list XML files located in the other folders.
-
ServiceRequests. This folder contains XML files with the service request information. The AIS Server uses this information to interact with EnterpriseOne applications.
-
Rules. This folder contains XML files with the conditions to be evaluated, such as true or false conditions that control the orchestration flow. With rules, a false outcome or true outcome can invoke further orchestration steps.
-
CrossReferences. This folder contains XML files with cross-references that map the third-party values to EnterpriseOne values.
-
WhiteLists. This folder contains XML files with an inclusive list of values permitted in the orchestration and terminates the orchestration process if incoming data is not recognized.
In most cases, the IoT Orchestrator enables you to use the orchestration metadata to perform AIS Server calls that invoke EnterpriseOne transactions; Java is not required. The AIS Server exposes each orchestration as an endpoint at:
http://<server>:<host>/jderest/orchestrator/<orchestrationName>
The orchestration name is the file name of the orchestration XML file. The file name must NOT include any spaces.
The orchestration requires a properly formatted JSON message for processing.
Figure 4-1 shows an example of the folders and files in an orchestration directory:
Figure 4-1 Orchestration Directory Folders and Files
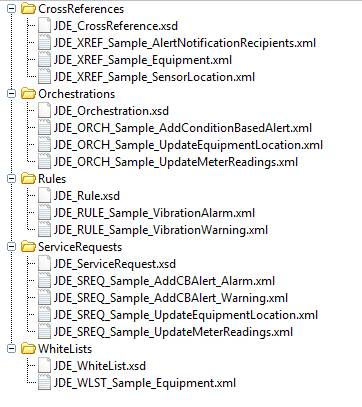
Description of ''Figure 4-1 Orchestration Directory Folders and Files''
4.2 Configuring Service Request XMLs
This section contains the following topics:
-
Section 4.2.2, "Understanding the Service Request XML Structure"
-
Section 4.2.3, "Defining the Service Request Metadata for the Orchestration"
4.2.1 Understanding Service Request XMLs
Service request XMLs provide the metadata that the IoT Orchestrator uses to invoke AIS endpoints on the AIS Server. AIS endpoints provide services for interacting with EnterpriseOne applications. The IoT Orchestrator converts the metadata into Java code that automatically calls the AIS service. See "Table 1-1 Endpoint URIs for Accessing EnterpriseOne Applications and Data" in the JD Edwards EnterpriseOne Application Interface Services Client Java API Developer's Guide for a description of the AIS endpoints.
The service request XML must conform to the service request .xsd file included with the project. Do not use any spaces when naming a service request XML file.
Not all AIS services can be invoked by metadata in the service request XML. For orchestrations that require EnterpriseOne actions not supported by the metadata definitions, you can create a custom Java class. See Chapter 5, "Creating Custom Java for Orchestrations."
4.2.2 Understanding the Service Request XML Structure
The ServiceRequest element contains secondary and tertiary child elements and attributes that provide the metadata for the orchestration. Figure 4-2 shows the basic XML structure of a service request:
Figure 4-2 Service Request XML Structure
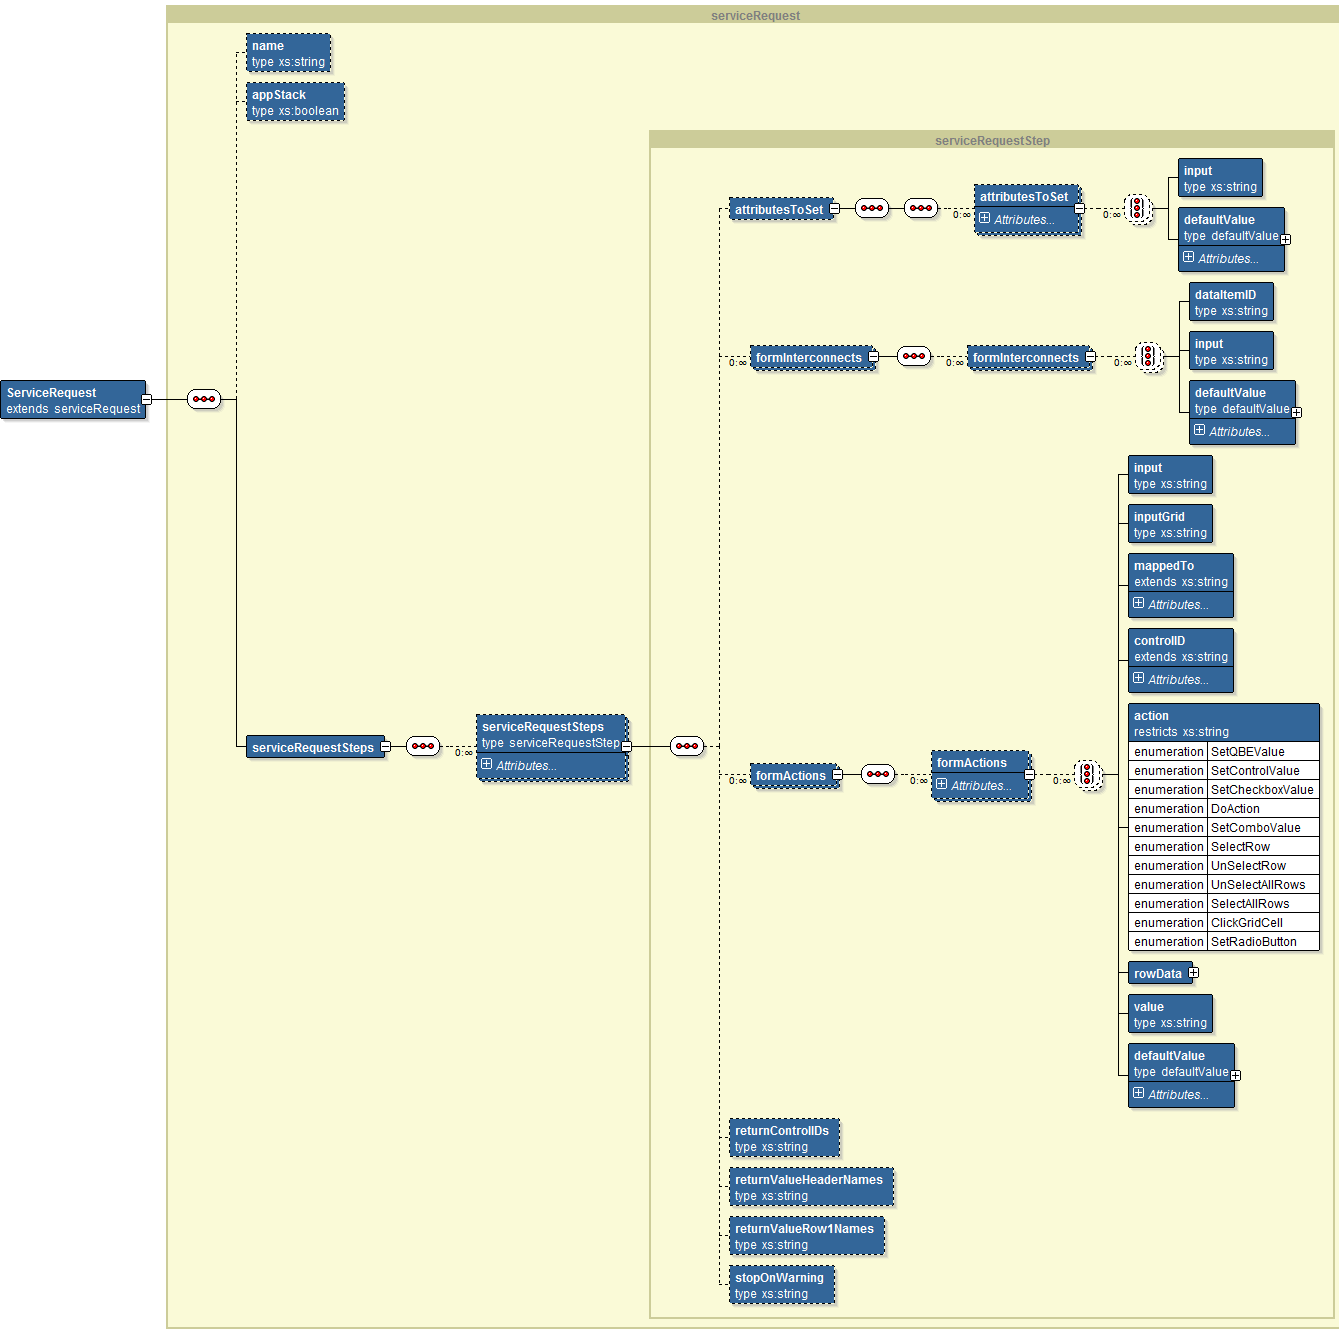
Description of ''Figure 4-2 Service Request XML Structure''
4.2.3 Defining the Service Request Metadata for the Orchestration
A service request XML file contains a parent or container serviceRequest element. The following list describes the child elements and attributes that comprise a serviceRequest element:
-
appStack. This element contains a boolean value of true or false, indicating if the service request follows the Application Stack Service pattern for calling service requests. To use this service, you must make sure that every form listed as a serviceRequestStep is included in the application stack flow as well. Also, each serviceRequestStep must match the form that was returned after the previous step. For more information, see "Application Stack Service" in the JD Edwards EnterpriseOne Application Interface Services Client Java API Developer's Guide.
-
serviceRequestSteps. This element contains one or more child serviceRequestSteps elements. A child serviceRequestSteps element provides the service request metadata for a single AIS call. It contains five attributes for the service request. See Table 4-1 for descriptions of the attributes. It also contains these child elements:
-
formInterconnects. An optional element that contains a list of formInterconnects elements. See Table 4-2 for a description of the elements and attributes in a formInterconnects element.
-
formActions. This element contains a list of formActions elements. A formActions element contains a type attribute that you set to
input,detail, oraction. The value in the type attribute determines the additional elements to complete for the formAction. See Table 4-3 for a description of each formActions type. -
returnControlIDs. This element contains the control IDs in the form that contains the data you want returned. If left blank, all data on the form is returned.
For example,
13|15|18|1[38,40,42]would return the values in the form controls with ID 13, 15 and 18 and grid columns 38, 40 and 42 corresponding to the grid with ID 1. -
returnValueHeaderNames. Allows the returned data to be named to be used in subsequent service request steps. For example:
A value of OrderNumber|OrderType|Description used with the returnControlIDs element would add the contents of control ID 18 to a value called OrderNumber; the contents of control ID 15 to a value called OrderType; and the contents of control ID 18 to a value called Description. OrderNumber, OrderType and Description can be used in subsequent service request steps of the same service request.
-
returnValueRow1Names. Allows the returned data of the first row of a grid to be used in subsequent service request steps. For example:
-
Table 4-1 Description of serviceRequestSteps Attributes
| Attribute | Description |
|---|---|
|
type |
Valid values are:
If you enter customServiceRequest, you must also define the following items:
|
|
appOID |
The application and form name to be called, for example |
|
version |
The version of the application, for example |
|
bypassFormServiceEREvent |
This is used to skip the form service request event on the form. Valid values are:
or
|
|
className |
Used only if type=
|
Table 4-2 Description of formInterconnects Elements
| Element | Description |
|---|---|
|
dataItemID |
The ID found in the Form Data Structure definition of the form being called. |
|
input |
The name of the input field to map into the form data structure element. |
|
defaultValue |
To be used if the input field is not specified or not found. defaultValue has one element called "value" which holds the value to be defaulted. defaultValue can have type and dateFormat attributes. |
Table 4-3 Description of formActions Types
| Type | Description |
|---|---|
|
input |
Use this type to set form controls and QBE values using these elements:
|
|
detail |
Use this type to populate rows of a grid. It contains the following elements:
|
|
action |
Use this type to invoke push buttons, set check box values, and set combo box values. It contains the following elements:
|
Table 4-4 Description of attributesToSet Elements and Attribute
| Element or Attribute | Description |
|---|---|
|
name (attribute) |
The value for this attribute should match the attribute name in the custom Java class. |
|
input (element) |
This element can have an input element with the name of a value from the input message. |
|
defaultValue (element) |
This element has one element, a value, and two attributes: type and dateFormat. See Table 4-10 in the Orchestration section for dateFormat definition. |
4.2.4 Example of a Service Request XML
Example 4-1 shows the service request XML in the "Add Condition Based Maintenance Alert" sample orchestration.
Example 4-1 Service Request XML in the "Add Condition Based Maintenance Alert" Sample Orchestration
<?xml version="1.0" encoding="UTF-8" ?>
<ServiceRequest xmlns:xsi="http://www.w3.org/2001/XMLSchema-instance" xsi:noNamespaceSchemaLocation="JDE_ServiceRequest.xsd">
    <serviceRequestSteps>
        <serviceRequestSteps type="formRequest" appOID="P1311_W1311B" version="ZJDE0001">
            <formActions>
                <formActions type="input">
                    <input>EquipmentNumber</input>
                    <mappedTo>20</mappedTo>
                    <action>SetControlValue</action>
                </formActions>
                <formActions type="input">
                    <input>MeasurementLocation</input>
                    <mappedTo>31</mappedTo>
                    <action>SetControlValue</action>
                </formActions>
                <formActions type="input">
                    <textSubstitution>
                        <string>Temp: {0}; Vibration: {1}</string>
                        <elements>
                            <elements>TemperatureReading</elements>
                            <elements>VibrationReading</elements>
                        </elements>
                    </textSubstitution>
                    <mappedTo>29</mappedTo>
                    <action>SetControlValue</action>
                </formActions>
                <!-- Alert Level -->
                <formActions type="input">
                    <mappedTo>33</mappedTo>
                    <action>SetControlValue</action>
                    <defaultValue>
                        <value>1</value>
                    </defaultValue>
                </formActions>
                <formActions type="input">
                    <input>Date</input>
                    <mappedTo>35</mappedTo>
                    <action>SetControlValue</action>
                </formActions>
                <formActions type="input">
                    <input>Time</input>
                    <mappedTo>48</mappedTo>
                    <action>SetControlValue</action>
                </formActions>
                <formActions type="input">
                    <input>WarningRecipient</input>
                    <mappedTo>66</mappedTo>
                    <action>SetControlValue</action>
                </formActions>
                <!-- Automated Response Type -->
                <formActions type="input">
                    <mappedTo>40</mappedTo>
                    <action>SetControlValue</action>
                    <defaultValue>
                        <value>1</value>
                    </defaultValue>
                </formActions>
                <formActions type="action">
                    <controlID>11</controlID>
                    <action>DoAction</action>
                </formActions>
            </formActions>
        </serviceRequestSteps>
    </serviceRequestSteps>
</ServiceRequest>
4.3 Configuring Rules XMLs
This section contains the following topics:
4.3.1 Understanding Rule XMLs
Rule XMLs contain conditional logic that the IoT Orchestrator uses to evaluate conditions, such as true or false conditions that determine how the orchestration processes the incoming data. You can define a rule with a list of conditions or you can define a more complex rule using a custom Java class. For more information about using a custom Java class for rules, see Chapter 5, "Creating Custom Java for Orchestrations."
An orchestration rule functions similar to an EnterpriseOne query in that each rule has:
-
A "Match Any" or "Match All" setting.
-
One or more conditions defined, each being a binary operation on two values.
Each rule XML file must conform to the rules .xsd file included with the project. Do not use any spaces when naming a rule XML file.
4.3.2 Understanding the Rule XML Structure
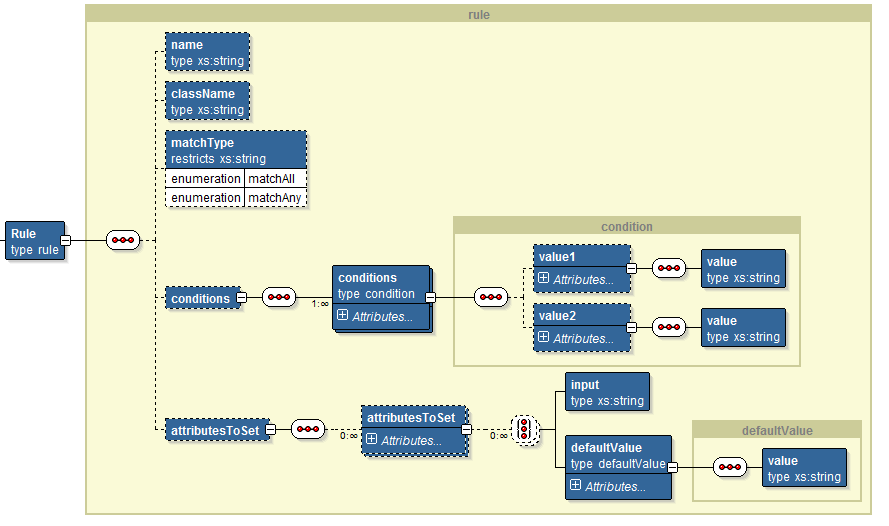
The Rule element in a rule XML file provides the metadata for the rule. Figure 4-3 shows the basic structure of a rule XML file.
4.3.3 Defining the Rule Metadata for the Orchestration
Table 4-5 provides a description of the Rule element attributes.
The following list describes the secondary and tertiary child elements that comprise a Rule element:
-
conditions. This container element can include one or more child conditions elements. A child conditions element provides the definition of the comparison. See Table 4-6 for a description of the attributes for the conditions element. The conditions element also contains these child elements:
-
attributesToSet. Custom rules have an attributesToSet element with a list of child attributesToSet elements just like the custom service request. See Table 4-4.
Table 4-5 Description of Rule Attributes
| Attribute | Description |
|---|---|
|
matchType |
Valid values are:
|
|
className |
Identifies the custom Java class for a custom rule. |
Table 4-6 Description of the conditions Element Attributes
| Attribute | Description |
|---|---|
|
operator |
Valid values are:
|
|
type |
Valid values are:
|
Table 4-7 Description of Elements and Attributes in Value1 and Value2 Elements
| Element or Attribute | Description |
|---|---|
|
value (element) |
Contains either a literal value or a named value. |
|
literalValue (attribute) |
Boolean type attribute used to indicate the value is literal. |
|
dateFormat (attribute) |
Identifies the format of the date if it is a literal value. |
4.3.4 Example of a Rule XML
Example 4-2 shows the rule XML in the "Add Condition Based Maintenance Alert" sample orchestration.
Example 4-2 Rule XML in the "Add Condition Based Maintenance Alert " Sample Orchestration
<?xml version="1.0" encoding="UTF-8"?>
<Rule xmlns:xsi="http://www.w3.org/2001/XMLSchema-instance" xsi:noNamespaceSchemaLocation="JDE_Rule.xsd">
  <matchType>matchAll</matchType>
  <conditions>
    <conditions operator=">=" type="Numeric">
      <value1>
        <value>VibrationReading</value>
      </value1>
      <value2 literalValue="true">
        <value>90</value>
      </value2>
    </conditions>
    <conditions operator=">=" type="Numeric">
      <value1>
        <value>TemperatureReading</value>
      </value1>
      <value2 literalValue="true">
        <value>250</value>
      </value2>
    </conditions>
  </conditions>
</Rule>
4.4 Configuring Cross-Reference XMLs
This section contains the following topics:
-
Section 4.4.2, "Understanding the Cross-Reference XML Structure"
-
Section 4.4.4, "Examples of Cross-Reference XML and Cross-Reference Records in EnterpriseOne"
4.4.1 Understanding Cross-Reference XMLs
Cross-referencing converts third-party IDs into EnterpriseOne values for use in EnterpriseOne applications. You define the cross-references used in an orchestration in two places:
-
P952000 in EnterpriseOne.
In this application, you define the cross-references using "AIS" as the cross-reference type. The application supports many to many lookups using | delimited strings in the Third Party Value and EnterpriseOne value columns. For more information, see Setting Up Cross-References and White Lists in EnterpriseOne (P952000) in this guide.
-
Metadata stored in a cross-reference XML file.
Cross-reference XML files contain elements that identify the cross-reference metadata for an orchestration. The cross-reference XML must conform to the cross-reference .xsd file included with the project. Do not use any spaces when naming a cross-reference XML file.
If a cross-reference lookup fails in an orchestration, the orchestration is terminated.
4.4.2 Understanding the Cross-Reference XML Structure
Figure 4-4 shows the structure of the cross-reference XML.
Figure 4-4 Cross-Reference XML Structure

Description of ''Figure 4-4 Cross-Reference XML Structure''
4.4.3 Defining the Cross-Reference Metadata
Use the elements in a cross-reference XML file to define the cross-reference metadata for an orchestration. A cross-reference XML file contains a parent or container CrossReference element. Table 4-8 describes the child elements in the CrossReference element. You use the child elements to define the cross-reference metadata for the orchestration.
Table 4-8 Description of CrossReference Elements
| Element | Description |
|---|---|
|
objectType |
The value in this element must correspond to the cross-reference object type in P952000. |
|
inputKeys |
This element contains a list of inputKey elements in which inputKey is a named value. If more than one inputKey value is present, the values are joined with a | separator. After all inputKey values are read, the entire value is used to query the F952000 table in EnterpriseOne. |
|
outputKeys |
This element contains a list of outputKey elements in which outputKey is a string value that becomes a named value for use in subsequent orchestration steps. If more than one outputKey value is present, the EnterpriseOne value returned from the P952000 lookup is parsed into multiple strings using | as the separator. |
4.4.4 Examples of Cross-Reference XML and Cross-Reference Records in EnterpriseOne
Example 4-3 shows the cross-reference XML in the "Add Condition Based Maintenance Alert" sample orchestration.
Example 4-4 shows the required cross-reference records in EnterpriseOne that correspond to the cross-reference XML defined in Example 4-3.
Example 4-3 Cross-Reference XML in the "Add Condition Based Maintenance Alert " Sample Orchestration
<?xml version="1.0" encoding="UTF-8"?>
<CrossReference xmlns:xsi="http://www.w3.org/2001/XMLSchema-instance"
                xsi:noNamespaceSchemaLocation="JDE_CrossReference.xsd">
  <objectType>SENSOR_LOCATION</objectType>
  <inputKeys>
    <inputKeys>SensorID</inputKeys>
  </inputKeys>
  <outputKeys>
    <outputKeys>EquipmentNumber</outputKeys>
    <outputKeys>MeasurementLocation</outputKeys>
  </outputKeys>
</CrossReference>
4.5 Configuring White List XMLs
This section contains the following topics:
-
Section 4.5.3, "Defining the White List Metadata for an Orchestration"
-
Section 4.5.4, "Examples of White List XML and White List Records in EnterpriseOne"
4.5.1 Understanding White List XMLs
A white list contains a list of IDs permitted in the IoT Orchestrator. If you use a white list in your orchestration, any data not represented by an ID in the white list is not permitted in the IoT Orchestrator. You set up the white list in two places:
-
P952000 in EnterpriseOne.
This is the same application that is used to set up and store orchestration cross-references. As with cross-references, use the "AIS" cross-reference type in P952000 for a white list. The Third Party App ID should have a value of
WHITELIST. The EnterpriseOne value is not used for white lists and will default to NA.For more information, see "Setting Up Cross-References and White Lists in EnterpriseOne (P952000)" in this guide.
-
Metadata stored in a white list XML file.
All white list metadata is stored in a white list XML. The white list XMLs must conform to the white list .xsd file included with the project. Do not use any spaces when naming a white list XML file.
If a white list lookup fails in an orchestration, the orchestration is terminated.
4.5.2 Understanding the White List XML Structure
Figure 4-5 shows the basic structure of the white list XML.
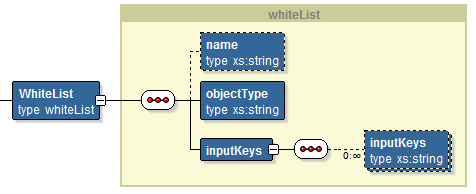
4.5.3 Defining the White List Metadata for an Orchestration
You use the elements in a white list XML file to define the white list metadata for the orchestration. A white list XML file contains a parent WhiteList element. Table 4-9 describes the elements in the WhiteList element.
Table 4-9 Description of WhiteList Elements
| Element | Description |
|---|---|
|
objectType |
The value in this element must correspond to the cross-reference object type in P952000. |
|
inputKeys |
This element contains a list of inputKey elements in which inputKey is a named value. If more than one inputKey value is present, the values are joined with a | separator. After all inputKey values are read, the entire value is used to query the F952000 table in EnterpriseOne. |
4.5.4 Examples of White List XML and White List Records in EnterpriseOne
Example 4-5 shows the white list XML in the "Add Condition Based Maintenance Alert" sample orchestration.
Example 4-6 shows the required white list records in EnterpriseOne that correspond to the white list entries defined in the "Add Condition Based Maintenance Alert" cross-reference XML in Example 4-7.
Example 4-5 White List XML in the "Add Condition Based Maintenance Alert" Sample Orchestration
<?xml version="1.0" encoding="UTF-8" ?>
<WhiteList xmlns:xsi="http://www.w3.org/2001/XMLSchema-instance" xsi:noNamespaceSchemaLocation="JDE_WhiteList.xsd">
  <objectType>EQUIPMENT</objectType>
  <inputKeys>
    <inputKeys>EquipmentNumber</inputKeys>
  </inputKeys>
</WhiteList>
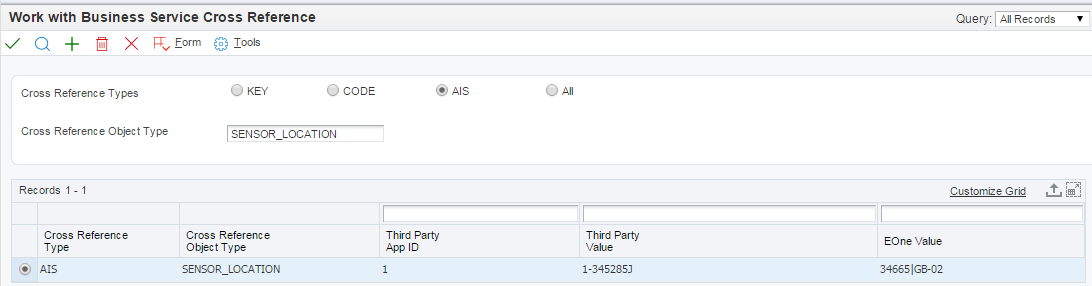
Example 4-6 White List Record in EnterpriseOne for the "Add Condition Based Maintenance Alert" Sample Orchestration
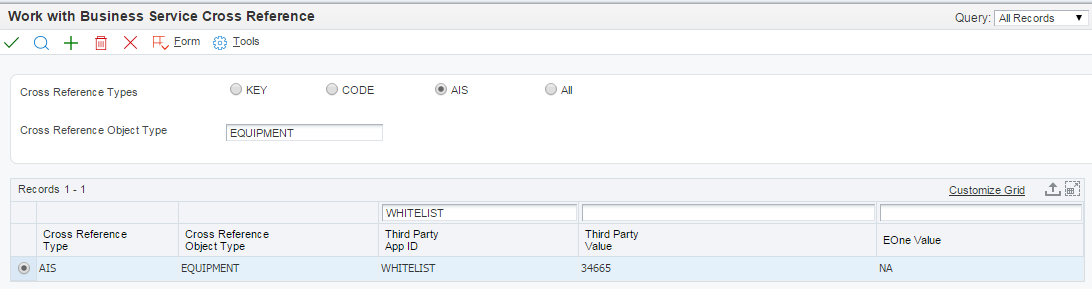
Description of the illustration ''ww_bus_serv_cross_ref_equip.png''
4.6 Configuring Orchestration XMLs
This section contains the following topics:
-
Section 4.6.2, "Understanding the Orchestration XML Structure"
-
Section 4.6.3, "Defining the Metadata for the Orchestration"
4.6.1 Understanding Orchestration XMLs
An orchestration XML file contains a series of orchestration steps that tie together the service request, rule, cross-reference, and white list metadata for an orchestration. The orchestration metadata is stored in an orchestration XML file. Orchestration XMLs must conform to the orchestration .xsd file included with the project.
The name of orchestration XML file is used to define an endpoint which is used to run the orchestration. The endpoint URL is:
http://<server>:<port>/jderest/orchestrator/<orchestrationname>
Do not use any spaces when naming an orchestration XML file.
4.6.2 Understanding the Orchestration XML Structure
Figure 4-6 shows the basic structure of an orchestration XML:
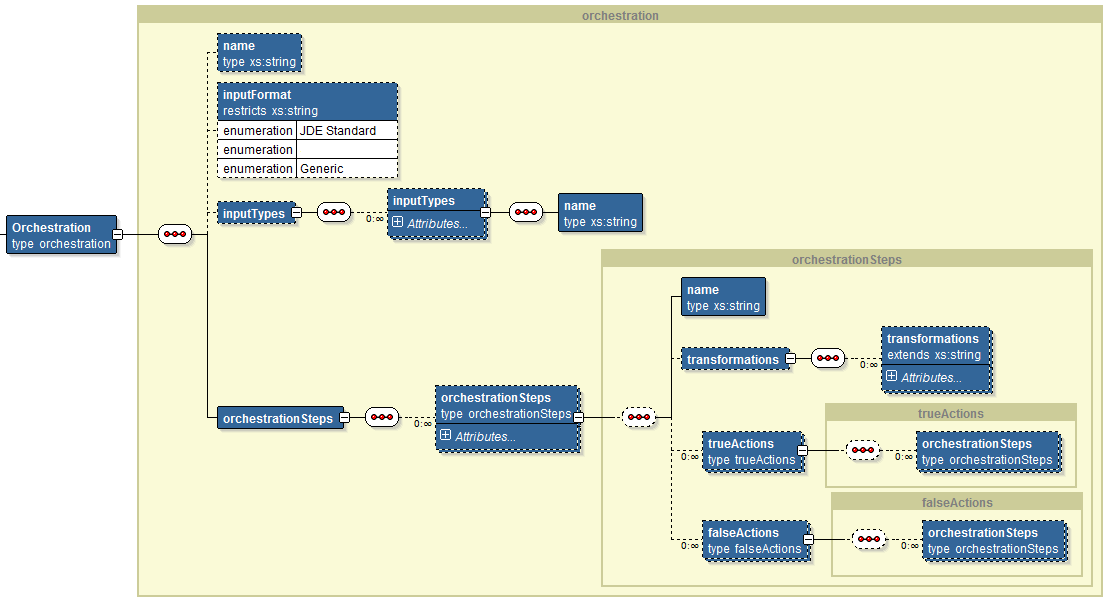
4.6.3 Defining the Metadata for the Orchestration
The following list describes the attributes and secondary and tertiary child elements that comprise an orchestration element. Use the following elements and attributes to define the metadata for the orchestration:
-
inputFormat element. Valid values include:
JDE Standard(default),Generic. -
inputTypes element. This element contains a list of inputTypes elements. See Table 4-10 for a description of the child elements and attributes of the inputTypes element.
-
orchestrationSteps element. This element contains a list of orchestrationSteps elements. See Table 4-11 for a description of the child elements and attributes of the orchestrationSteps element.
Table 4-10 Description of inputTypes Element and Attributes
| Element or Attribute | Description |
|---|---|
|
name (element) |
Identifies the input value. |
|
type (attribute) |
Valid values are:
|
|
dateFormat (attribute) |
Valid values are:
|
Table 4-11 Description of OrchestrationSteps Element and Attributes
| Element or Attribute | Description |
|---|---|
|
type (attribute) |
Valid values are:
If an orchestrationSteps element has a type
Rules can be nested as deeply as needed by defining more Rule orchestration steps in the trueActions of falseActions of a parent rule. |
|
iterateOver (attribute) |
You can include the name of a repeating structure in the input message. The orchestration step will be repeated for each occurrence of the structure in the input message. |
|
name (element) |
This value should correspond to a name in one of the other XML files based on the specified type. |
|
transformations (element) |
Use this element to change the name of input values. If you have an existing orchestration step such as a service request that you want to reuse, but the name of the incoming input does not match the name the orchestration step is expecting, use this element to change the name of the input value. The transformations element has repeating transformations child elements, each with an input and output attribute. The input value matching the input element will be available for the orchestration step as the output element name. transformations are specific to an orchestration step. The output names are not available in subsequent orchestration steps. However, if the transformations are on a rule orchestration step, the output names are available for all of the true actions and false actions of that rule. |
4.6.4 Example of an Orchestration XML
Example 4-7 shows the orchestration XML in the "Add Condition Based Maintenance Alert" sample orchestration.
Example 4-7 Orchestration XML in the "Add Condition Based Maintenance Alert" Sample Orchestration
<?xml version="1.0" encoding="UTF-8" ?>
<Orchestration xmlns:xsi="http://www.w3.org/2001/XMLSchema-instance" xsi:noNamespaceSchemaLocation="JDE_Orchestration.xsd">
    <inputTypes>
        <inputTypes type="Date" dateFormat="Milliseconds">
            <name>Date</name>
        </inputTypes>
    </inputTypes>
    <orchestrationSteps>
        <orchestrationSteps type="Rule">
            <name>JDE_RULE_Sample_VibrationAlarm</name>
            <trueActions>
                <orchestrationSteps type="CrossReference">
                    <name>JDE_XREF_Sample_SensorLocation</name>
                </orchestrationSteps>
                <orchestrationSteps type="CrossReference">
                    <name>JDE_XREF_Sample_AlertNotificationRecipients</name>
                </orchestrationSteps>
                <orchestrationSteps type="ServiceRequest">
                    <name>JDE_SREQ_Sample_AddCBAlert_Alarm</name>
                </orchestrationSteps>
            </trueActions>
            <falseActions>
                <orchestrationSteps type="Rule">
                    <name>JDE_RULE_Sample_VibrationWarning</name>
                    <trueActions>
                        <orchestrationSteps type="CrossReference">
                            <name>JDE_XREF_Sample_SensorLocation</name>
                        </orchestrationSteps>
                        <orchestrationSteps type="CrossReference">
                            <name>JDE_XREF_Sample_AlertNotificationRecipients</name>
                        </orchestrationSteps>
                        <orchestrationSteps type="ServiceRequest">
                            <name>JDE_SREQ_Sample_AddCBAlert_Warning</name>
                        </orchestrationSteps>
                    </trueActions>
                </orchestrationSteps>
            </falseActions>
        </orchestrationSteps>
    </orchestrationSteps>
</Orchestration>
4.7 Supported Input Message Formats
The IoT Orchestrator supports two input message formats for orchestrations: a standard JD Edwards EnterpriseOne format and generic format. Example 4-8 and Example 4-9 show an example of the code for each format.
Example 4-8 Standard JD Edwards EnterpriseOne Input Message Format
{
     "inputs": [
         {
             "name": "equipmentNumber",
             "value": "41419"
         },
         {
             "name": "description",
             "value": "test"
         },
         {
             "name": "date",
             "value": "1427774400000"
         },
         {
             "name": "time",
             "value": "12:15:15"
         },
         {
             "name": "temperature",
             "value": "99"
         }
     ]
}
Example 4-9 Generic Input Message Format
{
      "equipmentNumber": "41419",
      "description": "test",
      "date": "1427774400000",
      "time": "12:15:15",
      "temperature": "99"
}
Note:
Additional Supported Input Message FormatsAdditional formats are supported when using the generic input format, as long as the orchestration input values are defined using the full path to the elements used. You may have a deeper JSON structure like this.
{
    "equipmentNumber": "41419",
    "equipementDetail": {
        "type": "thermometer",
        "readingDetail": {
            "temperature": 200,
            "units": "F"
        }
    }
}
To reference the temperature within the orchestration you can use the full path delimited by periods, for example:
equipmentDetail.readingDetail.temperature
One difference between the two formats is the iterateOver attribute for the orchestrationStep element, which is supported only by the standard JD Edwards EnterpriseOne input message format. Also, when using the "detail" form action type with the standard format, it will automatically iterate over all detailInputs and repeatingInputs in order to add multiple rows to a grid. If the generic format is used, only a single grid row can be added.
As shown in Example 4-10, "detailInputs" would correspond to grid data; "repeatingInputs" would correspond to individual rows that contain "inputs" that correspond to columns.
If you have a power form with two grids, you could populate both grids using two "detailInputs" structures with different "name" values that correspond to the different grids. "repeatingInputs" would contain a list of rows and for each row you would define a list of "inputs".
You could also define a CrossReference orchestration step with iterateOver="GridData" that converts the item value into an EnterpriseOne specific item number. For example, if A123=220 and A124=230, the single orchestration step would convert both.
{
    "inputs": [
        {
            "name": "BranchPlant",
            "value": "30"
        },
        {
            "name": "customer",
            "value": "4242"
        }
    ],
    "detailInputs": [
        {
            "name": "GridData",
            "repeatingInputs": [
                {
                    "inputs": [
                        {
                            "name": "item",
                            "value": "A123"
                        },
                        {
                            "name": "Quantity",
                            "value": "3"
                        }
                    ]
                },
                {
                    "inputs": [
                        {
                            "name": "item",
                            "value": "A124"
                        }
                    ]
                }
            ]
        }
    ]
}
4.8 Setting Up Cross-References and White Lists in EnterpriseOne (P952000)
Use the EnterpriseOne Business Service Cross Reference (P952000) application to create and manage cross-reference and white list records for EnterpriseOne IoT orchestrations. Orchestration cross-references and white lists contain key-value data pairs used by the IoT Orchestrator. You must add records for all IoT orchestration key-value data pairs in P952000.
For example, an IoT device might provide a machine ID that equates to the Equipment Number field in EnterpriseOne. After including this in the cross-reference XML, you also have to add a record for this cross-reference to P952000 in order for the orchestration to invoke and perform the intended transaction in EnterpriseOne.
P952000 is generally used to set up cross-references for EnterpriseOne business services. Before you can use it for IoT orchestration cross-references and white lists, you must create a new user defined code (UDC) with which to associate the records for use with IoT orchestrations. See Creating the "AIS" User Defined Code for IoT Cross Reference and White List Records in this guide for details.
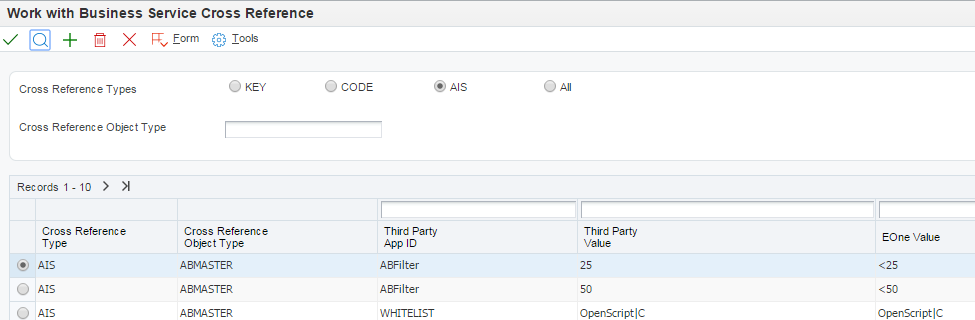
For instructions on how to add cross-reference and white list records, see the "Setting Up Orchestration Cross-References" in the JD Edwards EnterpriseOne Tools Interoperability Guide. When following the steps, make sure to perform these specific steps when creating records for IoT cross-references and white lists:
-
When creating a cross-reference or white list record, you must select the AIS option for the Cross Reference Type, which specifies that these records are for use with IoT orchestrations.
-
When you add a white list record, you must enter
WHITELISTfor the Third Party App ID. This automatically changes the EOneValue column value to NA because the EOneValue column is not applicable to a white list.
-
When setting up cross-references, you can enter multiple key cross-references by delimiting the values with a pipe (|). These will be consumed based on the cross-reference definition XML in the orchestration.
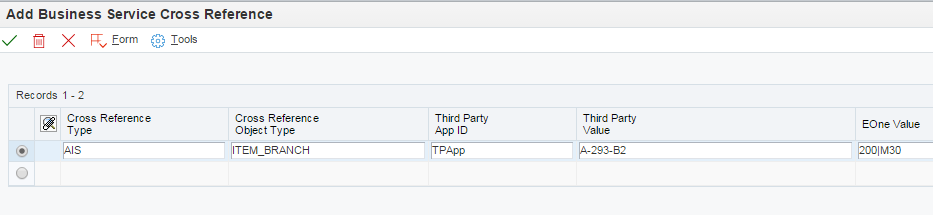
Description of the illustration ''ww_bus_serv_cross_ref_step3.png''
4.8.1 Creating the "AIS" User Defined Code for IoT Cross Reference and White List Records
Before you can create cross-reference and white list records in EnterpriseOne, you must create a user defined code (UDC) named "AIS" for these types of records.
Note:
You do not have to create this UDC if you applied the EnterpriseOne Applications ESU described in the Prerequisites section in this guide. The UDC is installed with the ESU.To create a UDC for AIS:
-
In EnterpriseOne, access Work With User Defined Codes (P0004A).
-
On Work With User Defined Codes, enter
H95in the Product Code field and enterCTin the User Defined Codes field and click Find. -
On the Work With User Defined Codes form, click Add.
-
On the User Defined Codes form, scroll to the last empty row of the detail area and complete each column with the values listed here:
-
Codes =
AIS -
Description 1 =
AIS Type Cross Reference -
Hard Coded =
N
-
-
Click the OK to save the new UDC.
See Also:
"Working with User Defined Codes" in the JD Edwards EnterpriseOne Tools Foundation Guide for more information about setting up UDCs.4.9 Setting up Orchestration Security
Before the EnterpriseOne Orchestrator can process an orchestration, authentication of the JD Edwards EnterpriseOne user ID and password must take place. It is the responsibility of the originator of the service request to tell the orchestration about the user. The user's credentials must be supplied in a basic authorization header or in the JSON body of the request. The user must also have authorized access to the EnterpriseOne application in which the resulting transaction takes place.
The AIS service used with orchestrations is stateless; each call passes credentials to establish a separate EnterpriseOne session. After the transaction is complete, the session closes.
In addition to passing credentials for authentication, you can employ a second level of security for the IoT Orchestrator through whitelisting. Whitelisting enables an initial rudimentary pass/fail check of the incoming device signature against a predefined list of signatures. A white list provides an additional layer of security to the IoT Orchestrator security. If a value passed to the IoT Orchestrator is not a valid value included in the orchestration's white list, the IoT Orchestrator rejects the input. For more information, see Configuring White List XMLs in this guide.
4.10 Using the EnterpriseOne Orchestrator Client to Build the Input Message and Test the Orchestration
The EnterpriseOne Orchestrator Client is a standalone web application that enables you to build input JSON messages and test your orchestrations. In the Orchestration Client, you can input a set of name-value pairs that represent the expected input of the orchestration, and then execute a call to the orchestration with this input. The Orchestrator Client works with the AIS Server and EnterpriseOne to test an orchestration configuration.
The Orchestrator Client is available with a deployed AIS Server and runs in a Web browser.
In the Orchestrator Client, you identify inputs that you defined in the XML, and then you enter values for these inputs that you want the orchestration to pass into EnterpriseOne. The Orchestrator Client invokes the orchestration, passing the test values to the orchestration, which in turn uses the orchestration's service request information to invoke an EnterpriseOne transaction through the AIS Server.
Oracle recommends that you use the Orchestrator Client with an EnterpriseOne test environment, as the test results in an EnterpriseOne transaction that adds data to the database.
To access the Orchestrator Client:
-
Enter the following URL in the Web browser's address bar:
http://<ais_server>:<port>/jderest/client -
On the Orchestrator Client Sign In screen, enter your EnterpriseOne user credentials, environment, and role. It is highly recommended that you enter an EnterpriseOne environment used for testing, not a production environment.
-
Click the Login button.
To use the Orchestrator Client:
Note:
Oracle recommends upgrading to EnterpriseOne Tools 9.1.5.6 before using the Orchestrator Client. If using Tools 9.1.5.5., you have to manually enter the name of the orchestration in the Orchestration Name field and manually enter the name of the inputs.-
In the Orchestrator Client, click in the Orchestration Name field, and then select an orchestration from the list of available orchestrations on the AIS Server. Depending on the browser you are using, you might have to double-click in the field to display the orchestration list.
-
After selecting the orchestration, tab out of the field or click anywhere else on the form.
The Orchestrator Client displays the inputs or name-value pairs, which should be defined in the orchestration.xml as the expected input for the orchestration. If the inputs do not appear, then they are not defined in the orchestration.xml. You need to update the orchestration.xml with a list of inputs before continuing.
-
In the Value column, enter a value for each input.
-
Click the add icon (plus symbol) to add and define additional inputs as necessary.
-
As an alternative to using the input fields, click the JSON Input check box if you want to enter the input in JSON format directly in the Input area. (Available with EnterpriseOne Tools release 9.1.5.6.)
-
Click the Generic Inputs check box if the orchestration uses the generic format for inputs. If this check box is cleared or left unchecked, it indicates that the orchestration uses the standard JD Edwards EnterpriseOne format.
For more information about input formats, see Supported Input Message Formats in this guide.
-
Click the Run button to test the orchestration.
The Input area shows the input message in JSON format.
The Output area shows the result of the orchestration. If successful, it shows the resulting forms from each form service call in JSON format. If unsuccessful, it shows an error response in JSON format.
To verify the orchestration invoked the transaction in EnterpriseOne, access the EnterpriseOne application and perform a search. If the results in the grid show records with the new values, then the orchestration test was successful.
If the orchestration fails, you might have to modify the XML files on the server. Make sure to click the XML Cache Refresh button to ensure the modified XMLs are used on the next run.
-
To test another orchestration or start over, click the Clear button to reset the Orchestration Client, which clears all values in the form.