18 Install a JD Edwards EnterpriseOne Data Access Driver
It is important to note that the Data Access Driver differs from the existing Data Access Server. In addition to implementation differences, the Data Access Driver utilizes a different, more efficient, read-only JDBC driver to access the database.
Tip:
For integration with BI Publisher, the recommended configuration is the Data Access Driver.For implementation details, refer to the JD Edwards Interoperability Guide on the Oracle Technology Network:
http://www.oracle.com/technology/documentation/index.html
This chapter discusses:
18.1 Prerequisites and Recommendation Installation Sequence for the Data Access Driver
This list shows the prerequisites and recommended installation sequence for the JD Edwards EnterpriseOne Data Access Driver:
-
Prerequisite: Management Agent is installed on target machine.
Refer to Install a Management Agent.
-
Prerequisite: The Data Access Driver Software Component is uploaded to the Management Console.
Refer to Upload Software Components.
-
Prerequisite: The Data Access Driver Software Component is distributed to the target Managed Home.
Refer to Distribute or Delete Managed EnterpriseOne Software Components.
-
Prerequisite: Create a Data Access Driver.
Refer to Create a Data Access Driver.
See Also:
-
Refer to the JD Edwards EnterpriseOne Interoperability Guide in the chapter Using Java Database Connectivity for additional tasks and topics related to the Data Access Driver.
-
JD Edwards EnterpriseOne BI Publisher for JD Edwards EnterpriseOne Guide
18.2 Create a Data Access Driver
You must use Server Manager to create a Data Access Driver.
See Also:
To install a JD Edwards EnterpriseOne Data Access Driver:
-
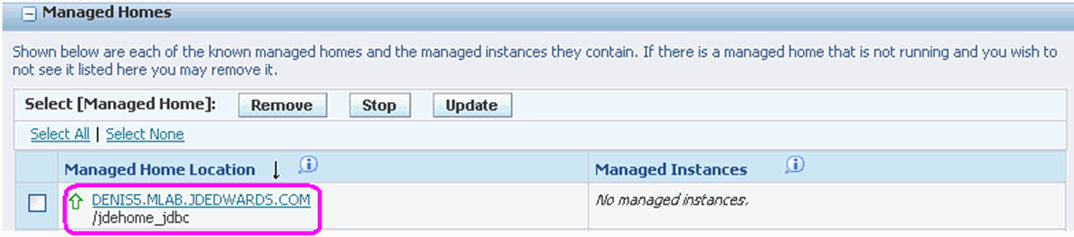
Select the Managed Home in which you wish to install the Data Access Driver.

-
Click the Create a New Managed Instance button to create the Managed Instance in the Managed Home.
-
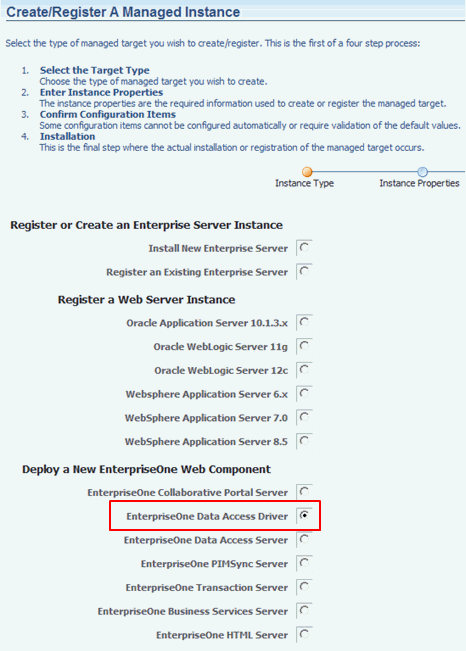
On Create/Register a Managed Instance, Instance Type, select this radio button:
EnterpriseOne Data Access Driver
Tip:
Ensure you choose the correct instance type for your intended installation. That is, there are two similar appearing instance types, one for Data Access Server and one for Data Access Driver. -
Click Continue.
Note:
The Propagate Enterprise Server Config drop-down appears only if any enterprise server is registered within the Server Manager console. The Propagate Enterprise Server Config drop-down contains the available enterprise server instances registered with the SM console within a particular selected server group. NONE is added to the drop-down by default. -
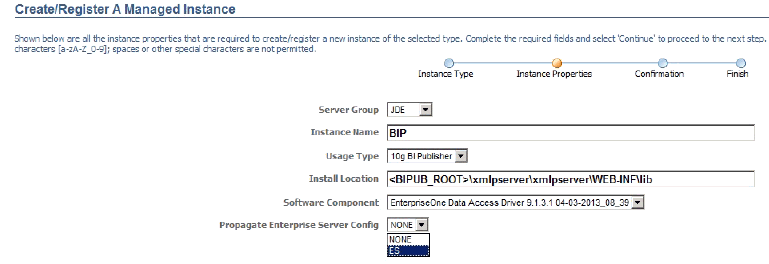
On Create/Register a Managed Instance, Instance Properties, complete these fields:
-
Server Group
Use the pull-down to select the Server Group to which you want this instance to belong.
Also refer to Chapter 21, "Administer Management Console Users and User Groups".
-
Instance Name
Enter a unique name for the instance name.
Tip:
A good business practice is to name your instances so that they are easily and consistently identifiable. For example:PRODUCT_SERVER_PORTwhere
PRODUCTis the JD Edwards EnterpriseOne instance type, such asData_Access_Driver, andwhere
SERVERis the machine on which the instance is installed, andwhere
PORTis the HTTP port which is defined for use by this server. -
Usage Type
Use the pull-down to select the usage type for this Data Access Driver.
If you choose BI Publisher, that application must already be installed. By default, Server Manager populates this field with the typical value for a BI Installation location, where you must manually complete this variable value for your installation:
<BIPUB_ROOT>For example, a typical completed location to a BI Publisher installation might be:
z:OraBIPub\oc4j_bi_j2ee\home\applications\xmlpserver\xmlpserver\WEB-INF\libIf you choose Generic, you must provide the complete path to the application directory into which you wish to install the Data Access Driver. For example:
C:\jde_generic_read_only_driver_applicationThis location must be unique, must be empty, and must not be within the Management Agent directory structure.
-
Software Component
Use the dropdown to select the version of this Software Component that you wish to install. For example:
EnterpriseOne Data Access Driver Version 8.98.0.5_09225
-
-
Click Continue.
Note:
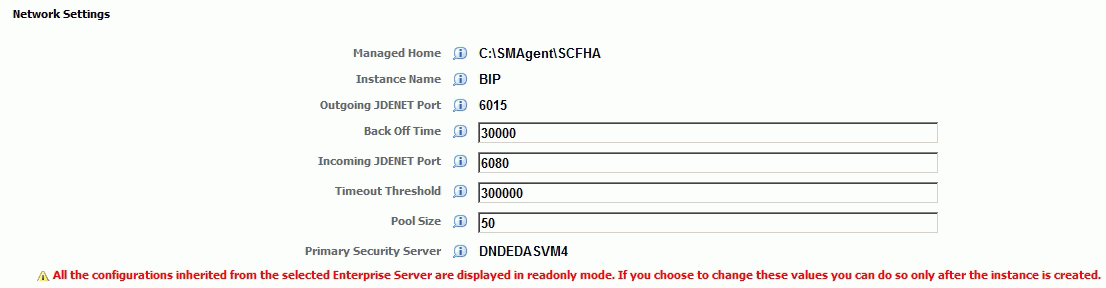
This example illustrates an installation by selecting an enterprise server to be propagated.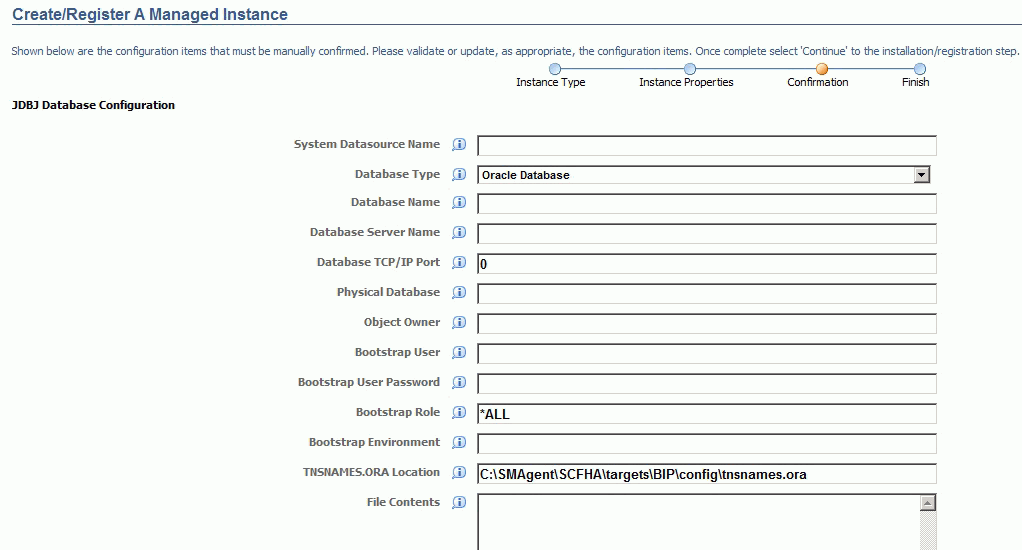
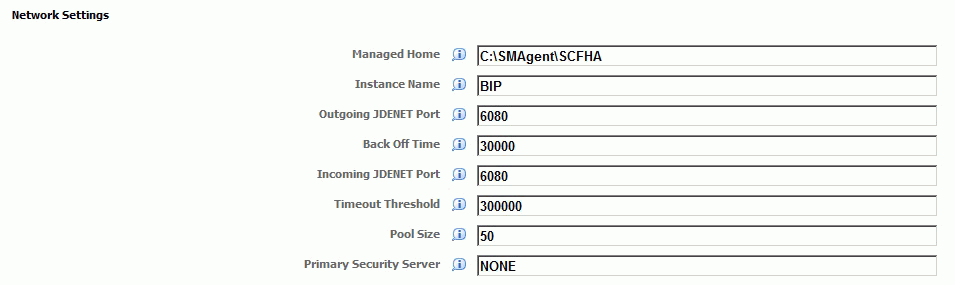
Note:
This example illustrates an installation by selecting NONE under Propagate Enterprise Server Config. -
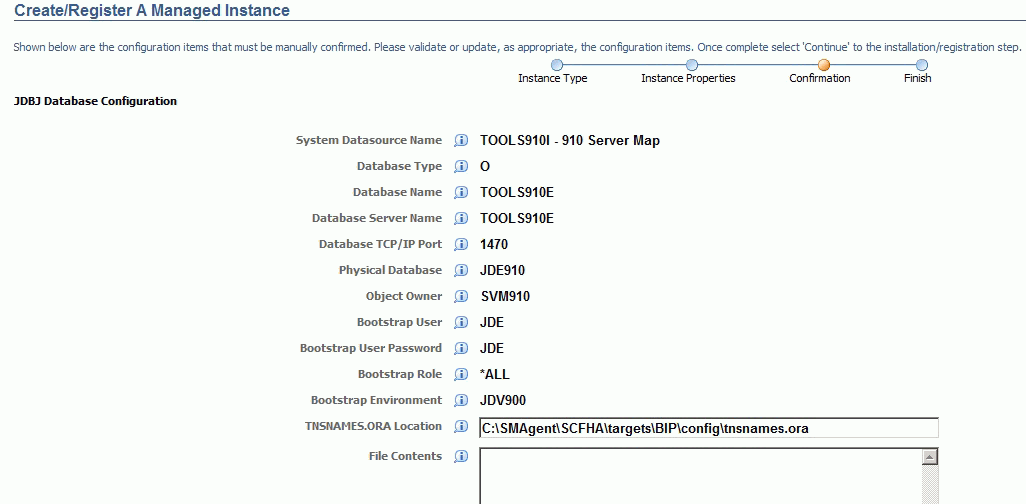
On Create/Register a Managed Instance, Confirmation, review the key configuration items. The values on this form must be manually confirmed. You must validate or update, as appropriate, all configuration items.
Tip:
For help, click the Information icon next to the title of a field. -
After you have validated and updated all configuration items, click Continue to proceed to the next installation step.

-
On Create/Register a Managed Instance, Finish, click the Create Instance button to complete the installation of the EnterpriseOne Data Access Driver.
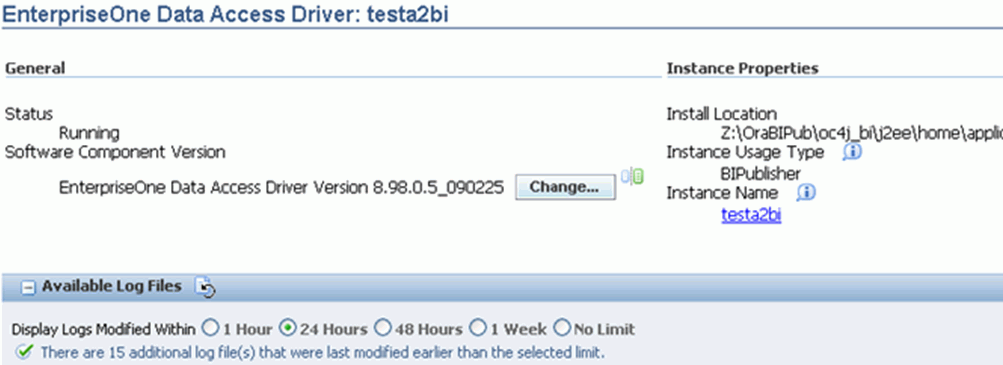
Once the installation is complete the browser is redirected to the Management Console page for the newly registered Data Access Driver. This driver also appears as a Managed Instance within the corresponding Managed Home.
For each registered Managed Instance, the Management Console displays appropriate information at the top of the page:
-
General
-
Status
Valid values are:
-
Running
This status is set whenever the Management Agent on the machine where the Data Access Driver is installed reports that the Java class is loaded for use by BI Publisher or the Generic application. The agent checks and reports status periodically so the status shown by Server Manager will be accurate within a few minutes.
Note that unlike Managed Instances for Servers, there is no option to Stop the driver from Server Manager. Therefore, no Stop button is displayed.
-
Stopped
This status is set whenever the Management Agent on the machine where the Data Access Driver is installed reports that the Java class is unloaded by BI Publisher or the Generic application. The agent checks and reports status periodically so the status shown by Server Manager will be accurate within a few minutes.
Note that unlike Managed Instances for Servers, there is no option to Start the driver from Server Manager. Therefore, no Start button is displayed.
-
-
Software Component Version
Displays the version of this Software Component.
You must stop the system using the Data Access Driver (BI Publisher or Generic) before you can change the Software Component Version.
-
-
Instance Properties
-
Install Location
The location where the Data Access Driver was installed.
-
Instance Usage Type
Identifies the usage type of the Data Access Driver as either BI Publisher or Generic.
-
Instance Name
The unique name assigned to the Managed Instance at the time it was created or registered.
-
For information on log files, refer to the chapter entitled: Available Log Files.