17 Create a JD Edwards EnterpriseOne Web-Based Server as a New Managed Instance
This chapter discusses:
-
Section 17.2, "Create a HTML Web Server as a New Managed Instance"
-
Section 17.3, "Create a Transaction Server as a New Managed Instance"
-
Section 17.4, "Create a Collaborative Portal Server as a New Managed Instance"
-
Section 17.5, "Create a Business Services Server as a New Managed Instance"
17.1 Prerequisites and Recommended Installation Sequence for Managed Instances for Web-Based Server Instances
These steps represent the prerequisites and recommended installation sequence Managed Instances for JD Edwards EnterpriseOne web-based servers:
-
Prerequisite: Management Agent is installed on the target machine.
Refer to Install a Management Agent.
-
Prerequisite: Application Server (WLS or WAS) is installed on target machine.
Refer to JD Edwards EnterpriseOne HTML Web Server Reference Guide for details on installing and configuring WLS and WAS.
-
Prerequisite: The Web-Based Server Software Component is uploaded to the Management Console.
Refer to Upload Software Components.
Note:
Exception. There is no Software Component available or required for creating the Business Services Server. -
Prerequisite: The Web-Based Server Software Component is distributed to the Managed Home.
Refer to Section 11.2.1, "Distribute Software Components to Managed Homes".
Note:
Exception. There is no Software Component available or required for creating the Business Services Server. -
Register an Application Server (WAS or WLS) to create a new Managed Instance for an Application Server in the target Managed Home.
For WLS 11g, refer to Section 13.4, "Register an Oracle WebLogic Server 11g".
For WLS 12c, refer to Section 13.5, "Register an Oracle WebLogic Server 12c".
For WAS 8.5, refer to Section 13.3, "Register a WebSphere Application Server, Version 8.5 (Tools Release 9.1 Update 2.3)".
For WAS 7.0, refer to Section 13.2, "Register a WebSphere Application Server, Version 7.0".
-
Create a J2EE Container (WLS) or J2EE Server (WAS) in the Application Server.
Note:
There is a one-to-one relationship between a web-based server and a J2EE container. You cannot install more than one web-based server in each J2EE container.For WLS 11g, refer to Section 13.4, "Register an Oracle WebLogic Server 11g".
For WLS 12c, refer to Section 13.5, "Register an Oracle WebLogic Server 12c".
For WAS 8.5, refer to Section 13.3, "Register a WebSphere Application Server, Version 8.5 (Tools Release 9.1 Update 2.3)".
For WAS 7.0, refer to Section 13.2, "Register a WebSphere Application Server, Version 7.0".
-
Install JDBC drivers to the J2EE Server (except Collaborative Portal Server).
Refer to Section 14.4.1, "Install JDBC Drivers to the J2EE Server (WLS or WAS)".
Note:
If you do not install the JDBC drivers before installing the Web-Based Server Instance, the Web-Based Server Instance does not start as expected at the end of the installation unless the server already has a bundled JDBC driver as part of the install. -
Install the web-based server Managed Instance
Refer to:
17.2 Create a HTML Web Server as a New Managed Instance
You must use Server Manager to install a new HTML Web Server instance.
WebSphere Security Consideration for Federated Servers. For WebSphere Federated Servers only, if Administrative Security is turned on for the profile containing the deployment manager, you must turn it OFF before proceeding with the creation of the Managed Instance for the HTML Web Server. After disabling security, you must restart the deployment manager. All nodes in the management domain will also have to be restarted and resynchronized. The Management Agent to which the WebSphere Application Server is registered must also be restarted. For additional details, refer Post Install for a Federated Server in Network Deployment Mode to in this chapter.
See Also
-
JD Edwards EnterpriseOne HTML Web Server Reference Guide for details on installing and configuring WLS or WAS and additional tasks and topics related to Server Manager.
To install an JD Edwards EnterpriseOne HTML Web Server instance:
-
Select the Managed Home in which you wish to install the HTML Web Server.

-
Click the Create a New Managed Instance button to create the Managed Instance in the Managed Home.
-
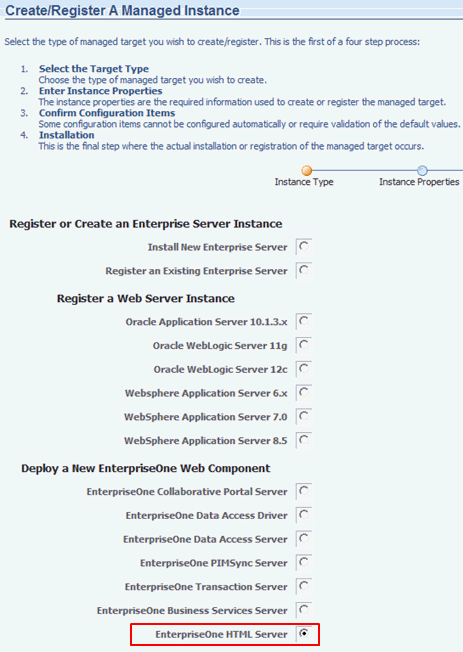
On Create/Register a Managed Instance, Instance Type, select this radio button:
EnterpriseOne HTML Server
-
Click Continue.

Note:
The Propagate Enterprise Server Config drop-down appears only if any enterprise server is registered within the Server Manager console. The Propagate Enterprise Server Config drop-down contains the available enterprise server instances registered with the SM console within a particular selected server group. NONE is added to the drop-down by default. -
On Create/Register a Managed Instance, Instance Properties, complete these fields:
-
Server Group
Use the dropdown to select the Server Group to which you want this instance to belong.
Also refer to Chapter 31, "Administer Server Groups".
-
Instance Name
Enter a unique name for the instance name.
Tip:
A good business practice is to name your instances so that they are easily and consistently identifiable. For example:PRODUCT_SERVER_PORTwhere
PRODUCTis the JD Edwards EnterpriseOne server type, such asEnterprise_Server, HTML_Web_Server, RTE_Transaction_Server, Collaborative_Portal, orBusiness_Services, andwhere
SERVERis the machine on which the instance is installed, andwhere
PORTis the HTTP port which is defined for use by this server. -
J2EE Server
Use the dropdown to select a valid J2EE server.
-
HTTP Port
You must ensure that the port that you specify is available and is not being used by any other application currently installed and running on the server on which the application server is running.
-
Software Component
Use the dropdown to select the version of this Software Component that you wish to install.
-
Propagate Enterprise Server Config (Release 9.1 Update 3.1)
Select the enterprise server from the drop-down list to propagate the configurations.
Note:
By default, the selected item is set to NONE. Selecting NONE signifies that you do not wish to propagate configurations from any available enterprise server. If any enterprise server is selected, all of the inherited values are seen in the next screen, otherwise the properties are seen with blank/default values. If propagated, the propagated values are not editable on the confirmation page, however they can be modified post installation.
-
-
Click Continue.
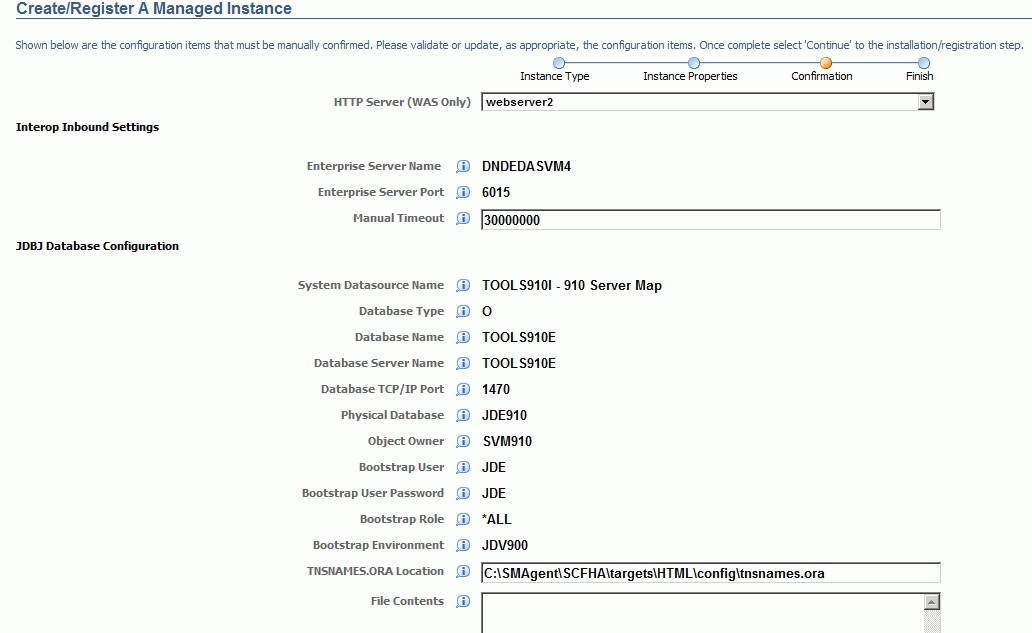
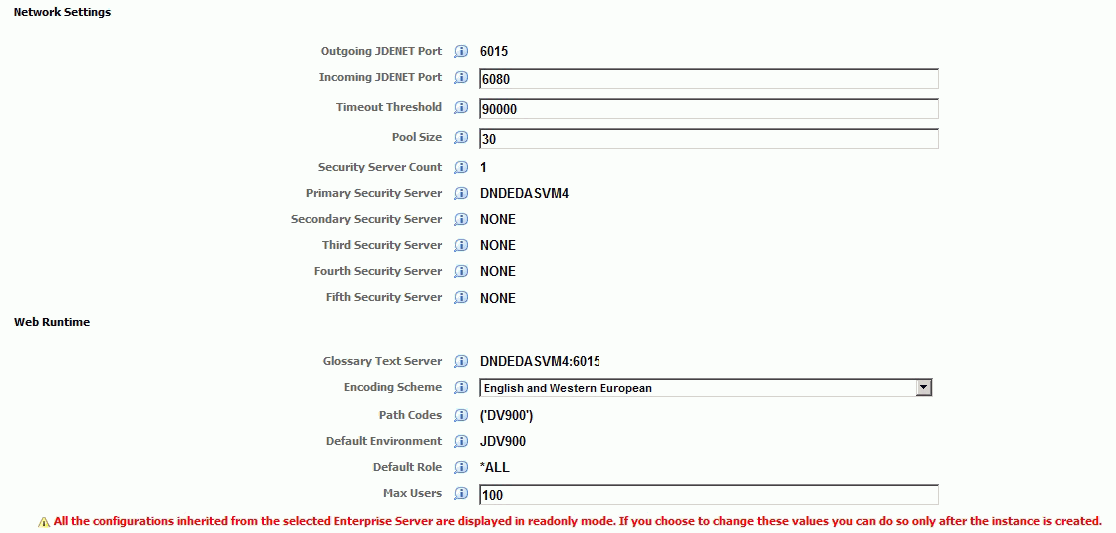
Note:
This example illustrates an installation on a WebSphere Application Server by selecting an enterprise server to be propagated. If installing on WLS, the HTTP Server (WAS Only) field is not displayed.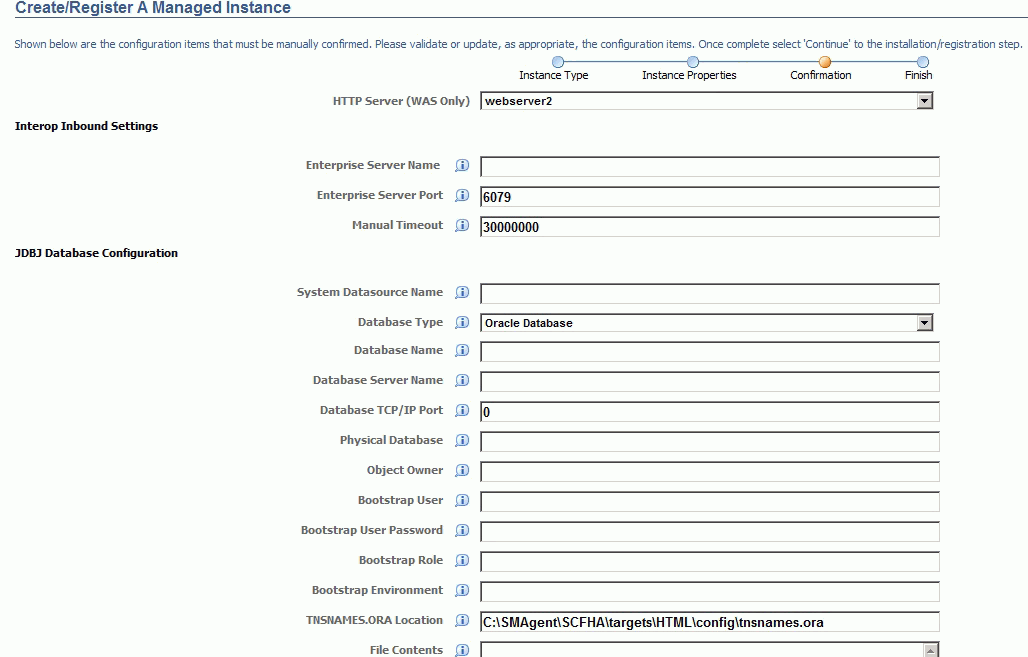
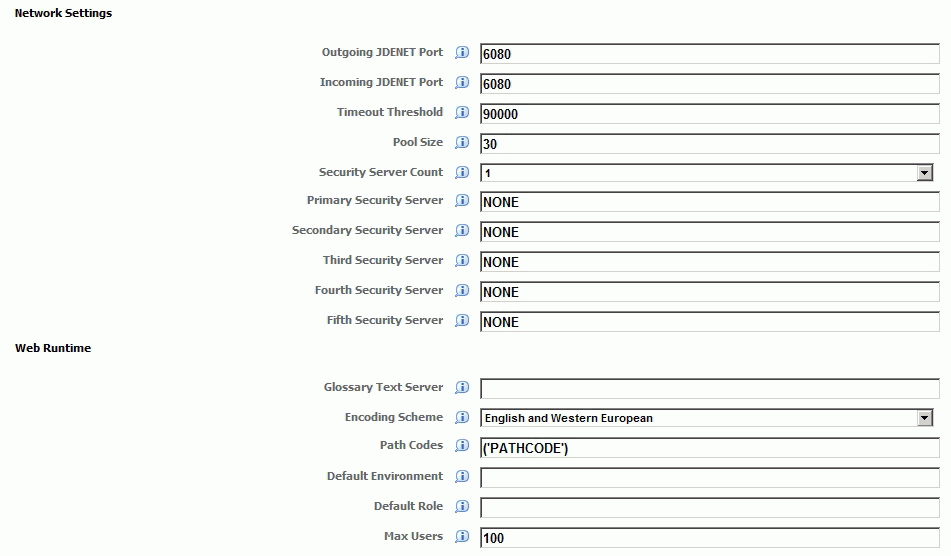
Note:
This example illustrates an installation on a WebSphere Application Server by selecting NONE under Propagate Enterprise Server Config. If installing on WLS, the HTTP Server (WAS Only) field is not displayed. -
On Create/Register a Managed Instance, Confirmation, review the key configuration items. The page displays a variety of fields depending on your application server (WAS or WLS). The values on this form must be confirmed manually. You must validate or update, as appropriate, all configuration items.
Tip:
For help, click the Information icon next to the title of a field. -
After you have validated and updated all configuration items, click Continue to proceed to the next installation step.

-
On Create/Register a Managed Instance, Finish, click the Create Instance button to complete the installation of the HTML Web Server.
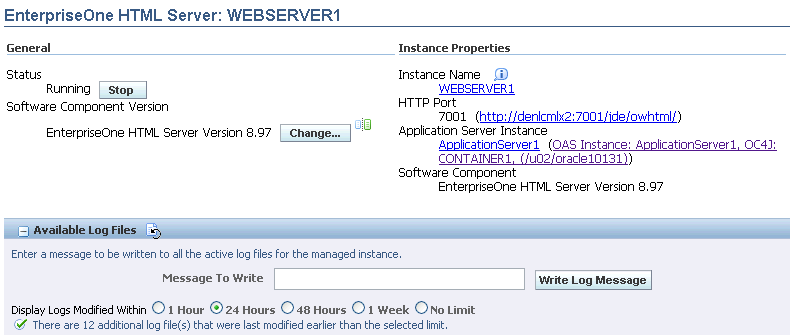
After you have completed the installation, the browser is redirected to the Management Console page for the newly registered HTML Server. This server also appears as a Managed Instance in the corresponding Managed Home.
For each registered Managed Instance, the Management Console displays appropriate information at the top of the page:
-
General
-
Status
Valid values are:
Running
When the status is Running, the Stop button is available.
Stopped
When the status is Stopped, the Start button is available.
-
Software Component Version
Displays the version of this Software Component.
-
-
Instance Properties
-
Instance Name
The unique name assigned to the Managed Instance at the time it was created or registered.
-
HTTP Port
Displays the HTTP Port for this server and also provides a link to the HTTP server.
-
Application Server Instance
Displays the application server into which this EnterpriseOne server is installed and also provides a link to the application server instance and associated OC4J (Oracle Application Server) or profile (WebSphere Application Server).
-
-
Note:
The display of some information is dependent on the status of the Managed Instances. For example, if a Managed Instance is not running, then the Software Component information cannot be displayed.For information on log files, refer to the chapter entitled: Chapter 23, "Available Log Files".
17.2.1 Post Install for a Federated Server in Network Deployment Mode
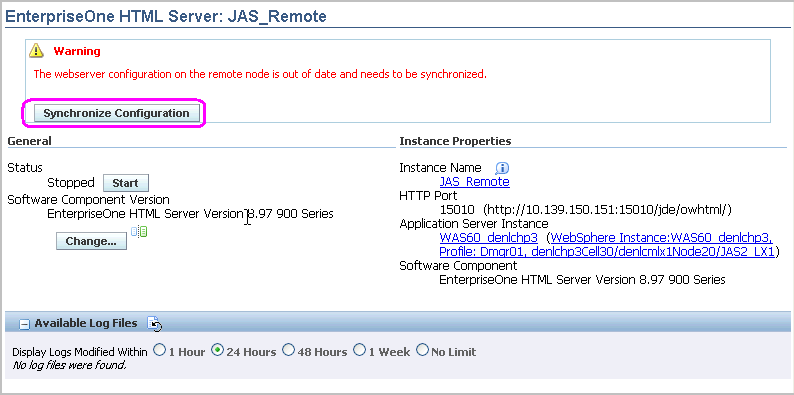
After you have completed the creation of a JD Edwards EnterpriseOne HTML Web Server as a Managed Instance in Server Manager the Management Console displays this warning:

Do not click the Synchronize Configuration button yet. Follow the steps in this section.
To install a HTML Web Server HTML Web Server to a WebSphere Federated Server in Network Deployment Mode:
Note:
Steps 1 and 3 below are only applicable if the J2EE server you selected to create the HTML Web Server managed instance resides on a machine different that the deployment manager. The remainder of the steps are applicable to all federated deployments. You may ignore steps 2 and 4 if the federated server you selected resides on the same machine as the deployment manager.-
If you are using an Oracle database, configure the
tnsnames.orasetting using these steps:-
Use this navigation path for the Managed Instance you just created in Server Manager:
Configuration > JDBJ Database Configuration > Oracle Database Settings > TNSNAMES.ORA Location
-
Configure the setting to
tnsnames.orawithout the full file path.For example:

-
-
If you have not already done so, install the JDBC driver to the J2EE container. Refer to Install JDBC Drivers to J2EE Servers in this guide.
-
After installing the JDBC driver, you must modify the WebSphere JDBC provider as described in these steps:
-
Copy the JDBC driver file(s) appropriate to your database to a location on the physical machine on which the federated server resides. For example:
/u01/JDBCDriver -
Use these steps to modify the JDBC provider for the remote J2EE container in WebSphere to point to the driver file in this new location.
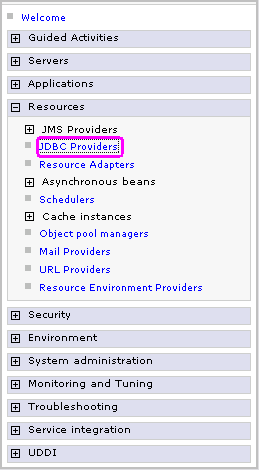
i. In the WebSphere Administrative Console (for the deployment manager), navigate to the section called JDBC Providers as shown in this screen:
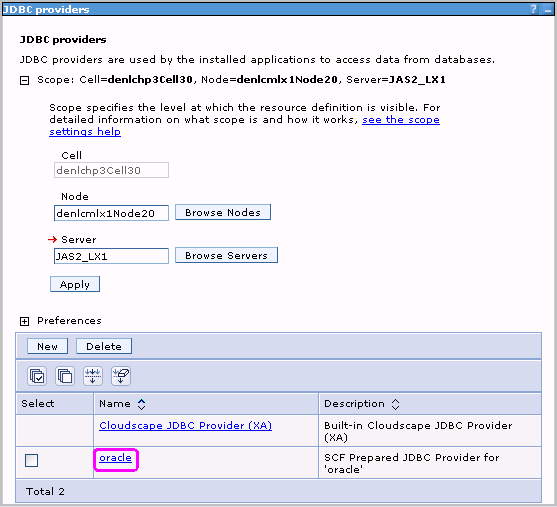
ii. Complete the filter fields with the appropriate Cell, Node and Server information for the J2EE Container to which the HTML Web Server was deployed.
For example:
iii. Click the Apply button.
iv. On JDBC Providers, click on the appropriate JDBC provider for the database which you are using with HTML Web Server.
Note:
The preceding example screen assumes an Oracle database.v. Replace the path to the JDBC driver files as configured by Server Manager to the machine-specific path where you previously placed the drivers. Refer to the preceding Step 3 where you copied the JDBC driver file(s) appropriate to your database to a location on the physical machine on which the federated server resides.
This example screen assumes Oracle JDBC driver files were placed in the location
/u01/JDBCDriver: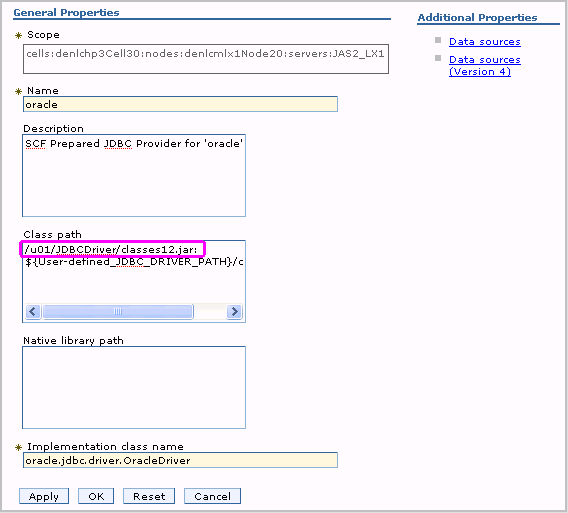
vi. Click the OK button to save the configuration change and initiate node synchronization through the deployment manager.
-
This completes the modification of the WebSphere JDBC provider.
-
-
Configure the HTTP Server by copying the appropriate text:
from this file:
JDE_HOME/targets/e1_html_server_instance_name/Readme.txtto this file:
The
httpd.conffile of the HTTP server you wish to use for this Managed Instance.where e1_html_server_instance_name is the name you defined in Server Manager.
You must modify the path to the
Readme.txtfile to reflect theJDE_HOMElocation and the Managed Instance name in your environment. This is an example of a properly configuredReadme.txtfile: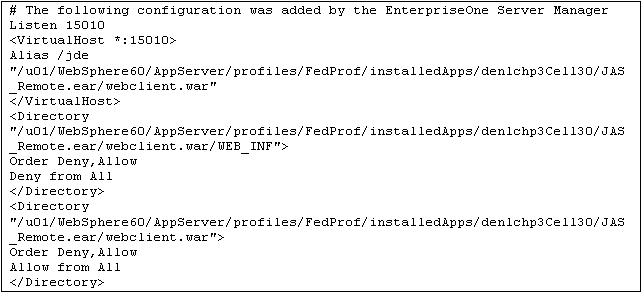
-
Make any other configuration changes required to define this Managed Instance.
-
In Server Manager, navigate to the page for the Managed Instance and click on the Synchronize Configuration button.
The synchronization process may take a few minutes to complete. The JD Edwards EnterpriseOne Managed Instance is configured and ready to use after the preceding steps have been completed.
For any subsequent configuration changes made to this Managed Instance, Management Console re-displays the Synchronize Configuration button with the corresponding warning message. You must click the button to apply the configuration changes to the remote server. After the changes are applied, the Management Console no longer displays the button and warning message.
17.3 Create a Transaction Server as a New Managed Instance
You must use Server Manager to install a new Transaction Server instance.
See Also:
-
Refer to the JD Edwards EnterpriseOne Transaction Server Reference Guide for details on additional tasks and topics related to Server Manager.
To install a Transaction Server instance:
-
Select the Managed Home in which you wish to install the Transaction Server.

-
Click the Create a New Managed Instance button to create the Managed Instance in the Managed Home.
-
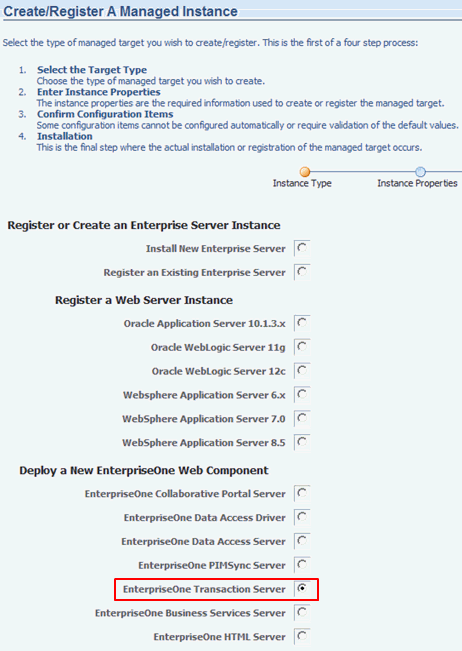
On Create/Register a Managed Instance, Instance Type, select this radio button:
EnterpriseOne Transaction Server
-
Click Continue.
Note:
The Propagate Enterprise Server Config drop-down appears only if any enterprise server is registered within the Server Manager console. The Propagate Enterprise Server Config drop-down contains the available enterprise server instances registered with the SM console within a particular selected server group. NONE is added to the drop-down by default. -
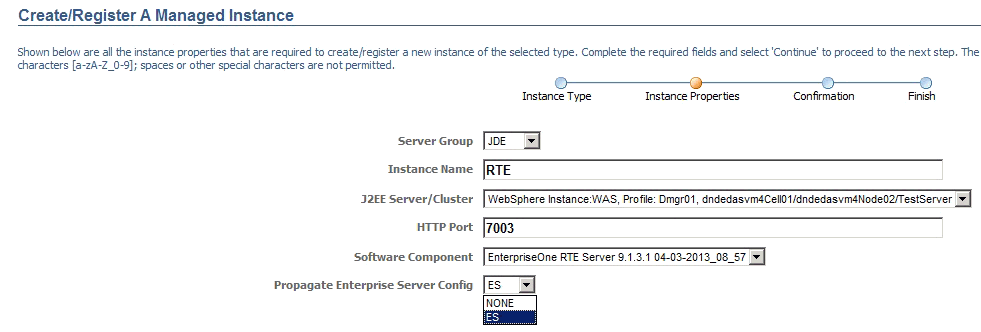
On Create/Register a Managed Instance, Instance Properties, complete these fields:
-
Server Group
Use the dropdown to select the Server Group to which you want this instance to belong.
Also refer to Chapter 31, "Administer Server Groups".
-
Instance Name
Enter a unique name for the instance name.
Tip:
A good business practice is to name your instances so that they are easily and consistently identifiable. For example:PRODUCT_SERVER_PORTwhere
PRODUCTis the JD Edwards EnterpriseOne server type, such asEnterprise_Server, HTML_Web_Server, RTE_Transaction_Server, Collaborative_Portal, orBusiness_Services, andwhere
SERVERis the machine on which the instance is installed, andwhere
PORTis the HTTP port which is defined for use by this server. -
J2EE Server
Use the dropdown to select a valid J2EE server.
-
HTTP Port
You must ensure that the port that you specify is available and is not being used by any other application currently installed and running on the server on which the application server is running.
-
Software Component
Use the dropdown to select the version of this Software Component that you wish to install.
-
Propagate Enterprise Server Config (Release 9.1 Update 3.1)
Select the enterprise server from the drop-down list to propagate the configurations.
Note:
By default, the selected item is set to NONE. Selecting NONE signifies that you do not wish to propagate configurations from any available enterprise server. If any enterprise server is selected, all of the inherited values are seen in the next scree, otherwise the properties are seen with blank/default values. If propagated, the propagated values are not editable on the confirmation page, however they can be modified post installation.
-
-
Click Continue.
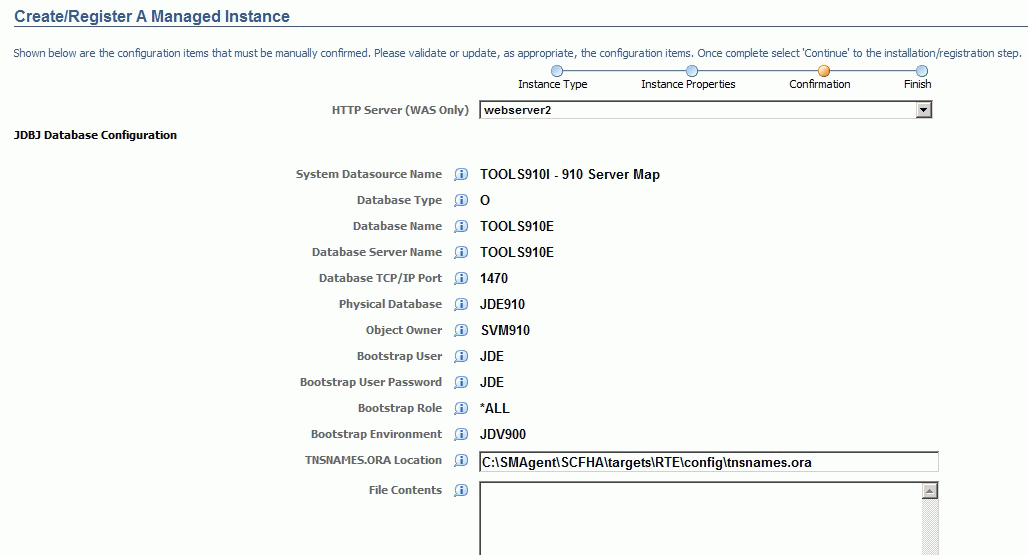

Note:
This example illustrates an installation on a WebSphere Application Server by selecting an enterprise server to be propagated. If installing on WLS, the HTTP Server (WAS Only) field is not displayed.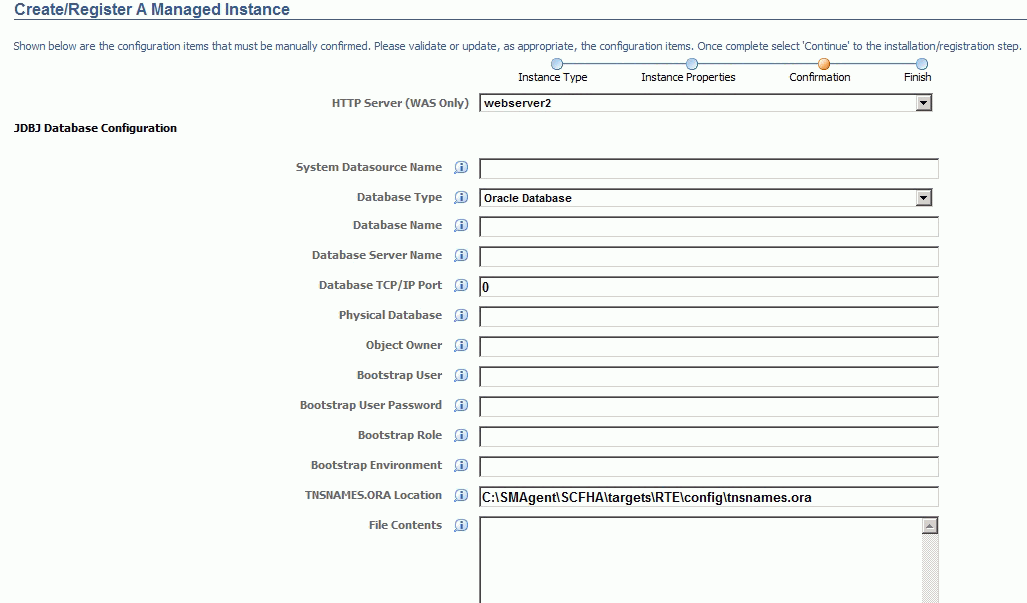
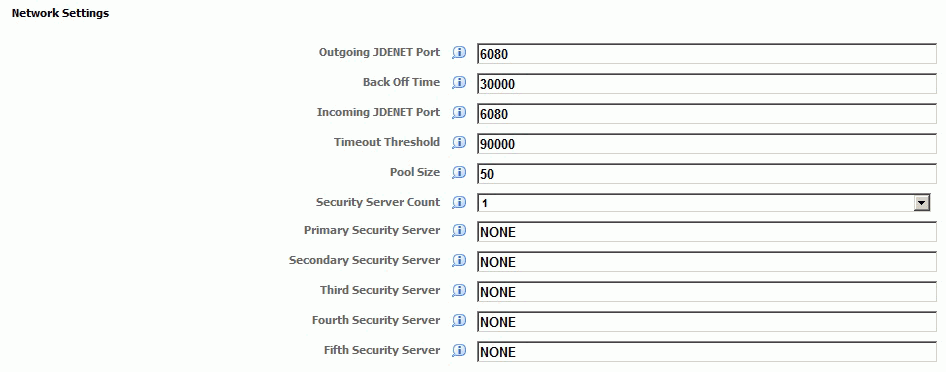
Note:
This example illustrates an installation on a WebSphere Application Server by selecting NONE under Propagate Enterprise Server Config. If installing on WLS, the HTTP Server (WAS Only) field is not displayed. -
On Create/Register a Managed Instance, Confirmation, review the key configuration items. The page displays a variety of fields depending on your application server (WAS or WLS). The values on this form must be confirmed manually. You must validate or update, as appropriate, all configuration items.
Tip:
For help, click the Information icon next to the title of a field. -
After you have validated and updated all configuration items, click Continue to proceed to the next installation step.

-
On Create/Register a Managed Instance, Finish, click the Create Instance button to complete the installation of the Transaction Server.
Note:
This process may take fifteen or more minutes to complete.After you have completed the installation, the HTTP server associated with the J2EE Server (WAS) must be restarted manually. If you do not restart the HTTP server, you will not be able to login to JD Edwards EnterpriseOne.
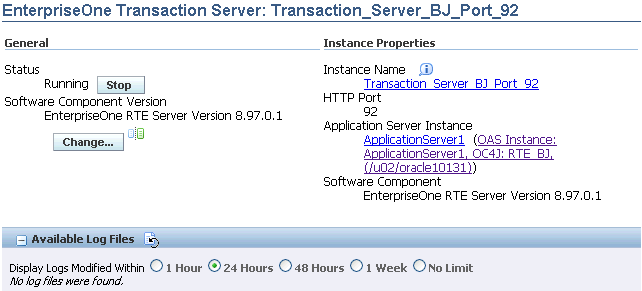
After you have completed the installation, the browser is redirected to the Management Console page for the newly registered Transaction Server. This server also appears as a Managed Instance in the corresponding Managed Home.
For each registered Managed Instance, the Management Console displays appropriate information at the top of the page:
-
General
-
Status
Valid values are:
Running
When the status is Running, the Stop button is available.
Stopped
When the status is Stopped, the Start button is available.
-
Software Component Version
Displays the version of this Software Component.
-
-
Instance Properties
-
Instance Name
The unique name assigned to the Managed Instance at the time it was created or registered.
-
HTTP Port
Displays the HTTP Port for this server and also provides a link to the HTTP server.
-
Application Server Instance
Displays the application server into which this EnterpriseOne server is installed and also provides a link to the application server instance and associated OC4J (Oracle Application Server) or profile (WebSphere Application Server).
-
-
For information on log files, refer to the chapter entitled: Chapter 23, "Available Log Files".
17.4 Create a Collaborative Portal Server as a New Managed Instance
You must use Server Manager to install a new Collaborative Server instance.
The WebSphere 7.0 or 8.5 installation must also include an HTTP Server.
See Also:
-
Refer to the JD Edwards EnterpriseOne Collaborative Portal Server Reference Guide for details on additional tasks and topics related to Server Manager.
To install a Collaborative Portal Server instance:
-
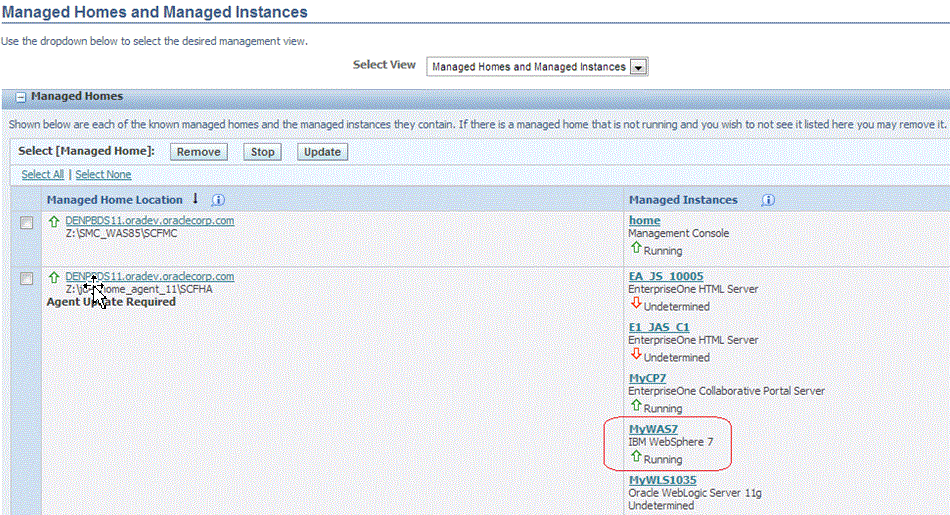
Select the Managed Home in which you wish to install the Collaborative Portal Server.
-
Click the Create a New Managed Instance button to create the Managed Instance in the Managed Home.
-
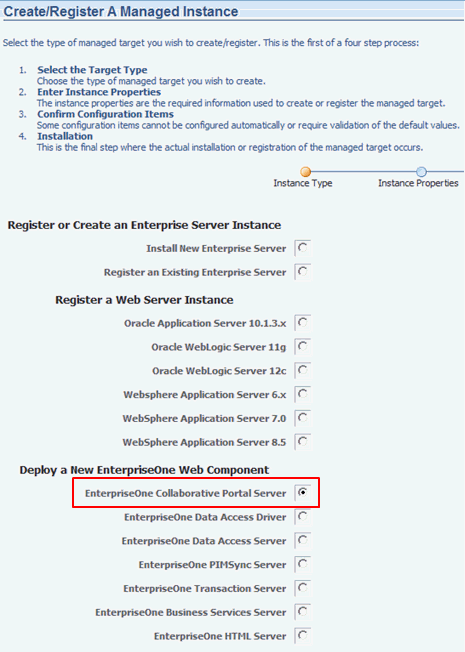
On Create/Register a Managed Instance, Instance Type, select this radio button:
EnterpriseOne Collaborative Portal Server
-
Click Continue.

-
On Create/Register a Managed Instance, Instance Properties, complete these fields:
-
Server Group
Use the dropdown to select the Server Group to which you want this instance to belong.
Also refer to Chapter 31, "Administer Server Groups".
-
Instance Name
Enter a unique name for the instance name.
Tip:
A good business practice is to name your instances so that they are easily and consistently identifiable. For example:PRODUCT_SERVER_PORTwhere
PRODUCTis the JD Edwards EnterpriseOne server type, such asEnterprise_Server, HTML_Web_Server, RTE_Transaction_Server, Collaborative_Portal, orBusiness_Services, andwhere
SERVERis the machine on which the instance is installed, andwhere
PORTis the HTTP port which is defined for use by this server. -
J2EE Server
Use the dropdown to select a valid J2EE server.
-
Software Component
Use the dropdown to select the version of this Software Component that you wish to install.
-
-
Click Continue.
-
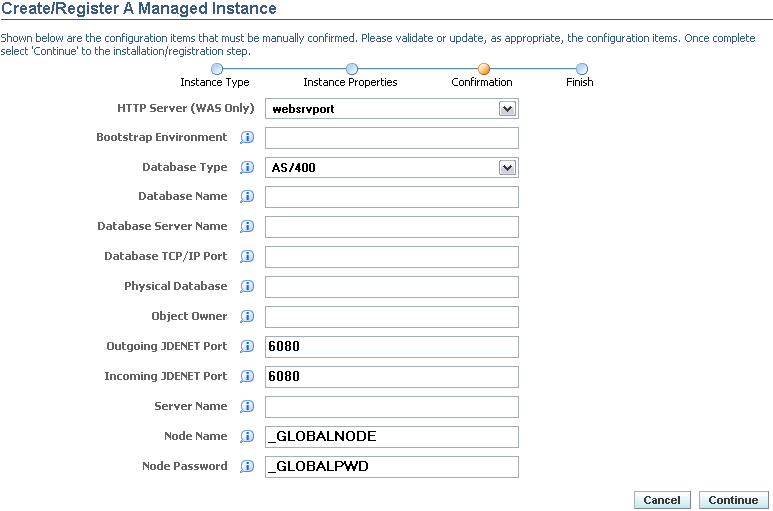
On Create/Register a Managed Instance, Confirmation, review the key configuration items. The values on this form must be confirmed manually. You must validate or update, as appropriate, all configuration items.
Tip:
For help, click the Information icon next to the title of a field. -
After you have validated and updated all configuration items, click Continue to proceed to the next installation step.

-
On Create/Register a Managed Instance, Finish, click the Create Instance button to complete the installation of the Collaborative Portal Server.

After you have completed the installation, the browser is redirected to the Management Console page for the newly registered Collaborative Portal. This server also appears as a Managed Instance in the corresponding Managed Home.
For each registered Managed Instance, the Management Console displays appropriate information at the top of the page:
-
General
-
Status
Valid values are:
Running
When the status is Running, the Stop button is available.
Stopped
When the status is Stopped, the Start button is available.
-
Software Component Version
Displays the version of this Software Component.
-
-
Instance Properties
-
Instance Name
The unique name assigned to the Managed Instance at the time it was created or registered.
-
Application Server Instance
Displays the application server into which this EnterpriseOne server is installed and also provides a link to the application server instance and associated WebSphere Application Server profile.
-
-
For information on log files, refer to the chapter entitled: Chapter 23, "Available Log Files".
17.5 Create a Business Services Server as a New Managed Instance
Caution:
This Caution is applicable only if you are creating a Business Services Server on a WebSphere application server.Ensure that you have already installed a version of WebSphere that is compatible with the Business Services Server (refer to Section 3.1, "Accessing the Certifications (Minimum Technical Requirements)" in this guide).
In order to enable Server Manager to install a Managed Instance for a Business Services Server, you must have configured the supported version of WebSphere with a secure profile. For general security settings directly related to Server Manager, refer to Section 13.2.1, "Configure WebSphere Application Server to Work With Server Manager When Administrative Security is Enabled" in this guide. For recommendations for securing the WebSphere profile, refer to the Business Service Server Reference Guide.
You should also ensure that the server profile associated with the J2EE Server that you created for the Business Services Server is in the Running state before installing the Business Services Server through Server Manager. If this server is not running, the installation will fail.
Note:
To deploy JAX-WS business services to a business services server instance on WLS or WAS, ensure that your Server Manager Console and Agent (under which the business services server instance on WLS or WAS are registered) are at JD Edwards EnterpriseOne Tools Release 9.1 update 2 or later.See Also
-
Refer to the JD Edwards EnterpriseOne Business Services Server Reference Guide for details on additional tasks and topics related to Server Manager.
-
Refer to the for details on other tasks and topics extraneous to Server Manager.
To install a Business Services Server Instance:

-
Select the Managed Home in which you wish to install the Business Services Server.

-
In the Managed Instances section of the page, click the Create a New Managed Instance button.
-
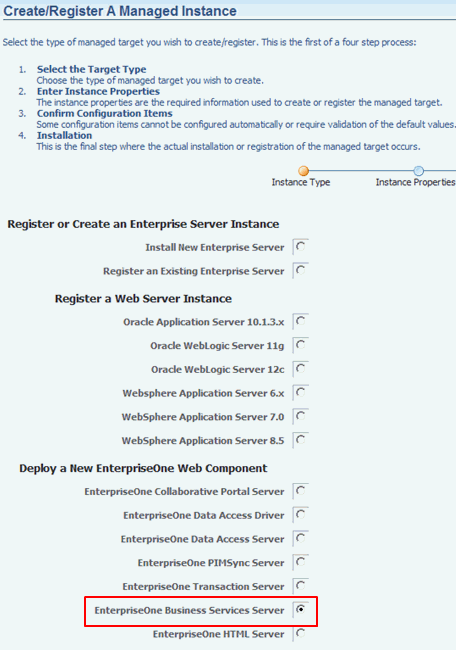
On Create/Register a Managed Instance, Instance Type, select this radio button:
EnterpriseOne Business Services Server

Note:
The Propagate Enterprise Server Config drop-down appears only if any enterprise server is registered within the Server Manager console. The Propagate Enterprise Server Config drop-down contains the available enterprise server instances registered with the SM console within a particular selected server group. NONE is added to the drop-down by default. -
On Create/Register a Managed Instance, Instance Properties, complete these fields:
-
Server Group
Use the dropdown to select the Server Group to which you want this instance to belong.
Also refer to Chapter 31, "Administer Server Groups".
-
Instance Name
Enter a unique name for the instance name.
Tip:
A good business practice is to name your instances so that they are easily and consistently identifiable. For example:PRODUCT_SERVER_PORTwhere
PRODUCTis the JD Edwards EnterpriseOne server type, such asEnterprise_Server, HTML_Web_Server, RTE_Transaction_Server, Collaborative_Portal, orBusiness_Services, andwhere
SERVERis the machine on which the instance is installed, andwhere
PORTis the HTTP port which is defined for use by this server. -
J2EE Server
Use the dropdown to select a valid J2EE server.
Ensure the J2EE Server that you choose is a secure WebSphere 7.0 or 8.5 profile (releases prior to 7.0 are not supported). Otherwise, Server Manager will not allow you to continue the installation.
-
HTTP Port
You must ensure that the port that you specify is available and is not being used by any other application currently installed and running on the server on which the application server is running.
-
Propagate Enterprise Server Config (Release 9.1 Update 3.1)
Select the enterprise server from the drop-down list to propagate the configurations.
Note:
By default, the selected item is set to NONE. Selecting NONE signifies that you do not wish to propagate configurations from any available enterprise server. If any enterprise server is selected, all the inherited values are seen in the next screen, otherwise the properties are seen with blank/default values. If propagated, the propagated values are not editable on the confirmation page, however, they can be modified post installation.
-
-
Click Continue.
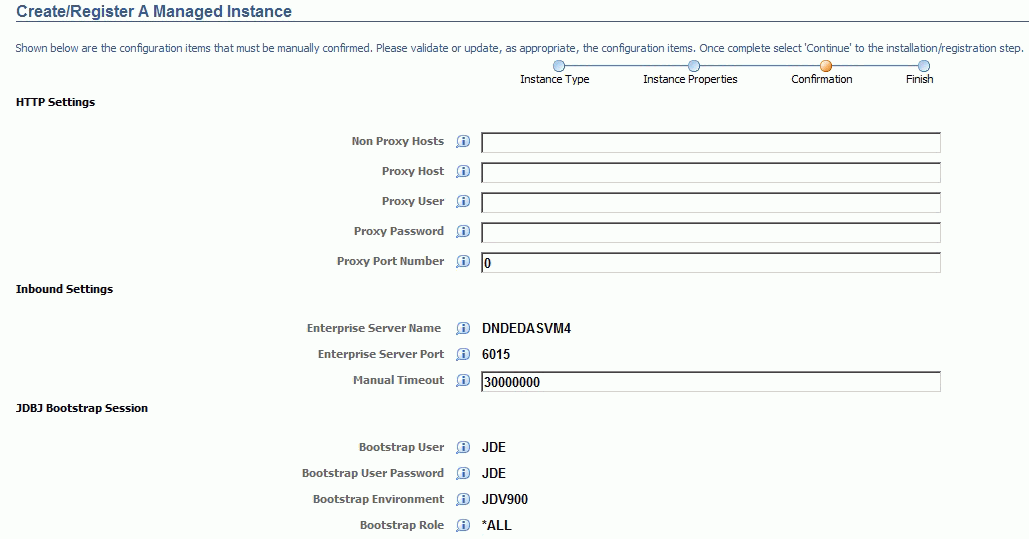

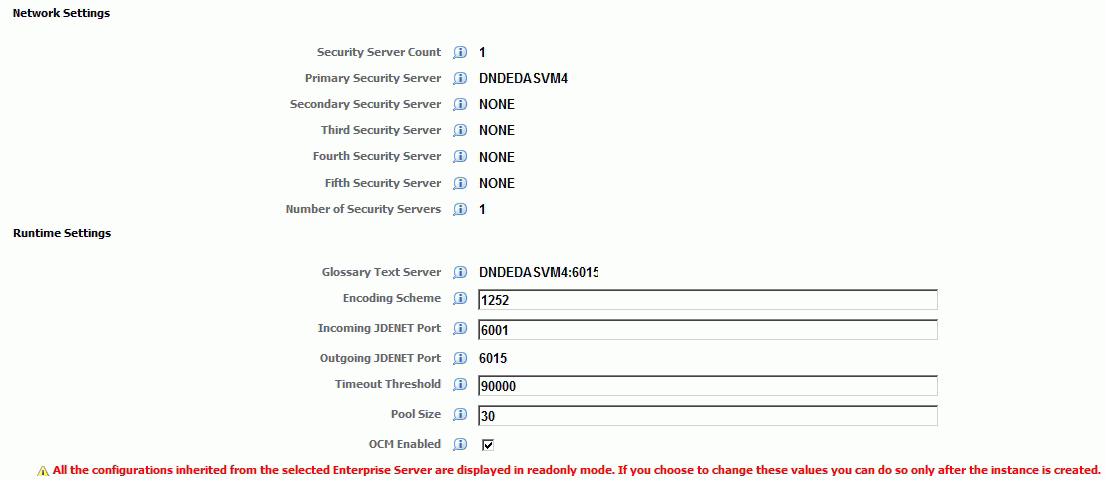
Note:
This example illustrates an installation by selecting an enterprise server to be propagated.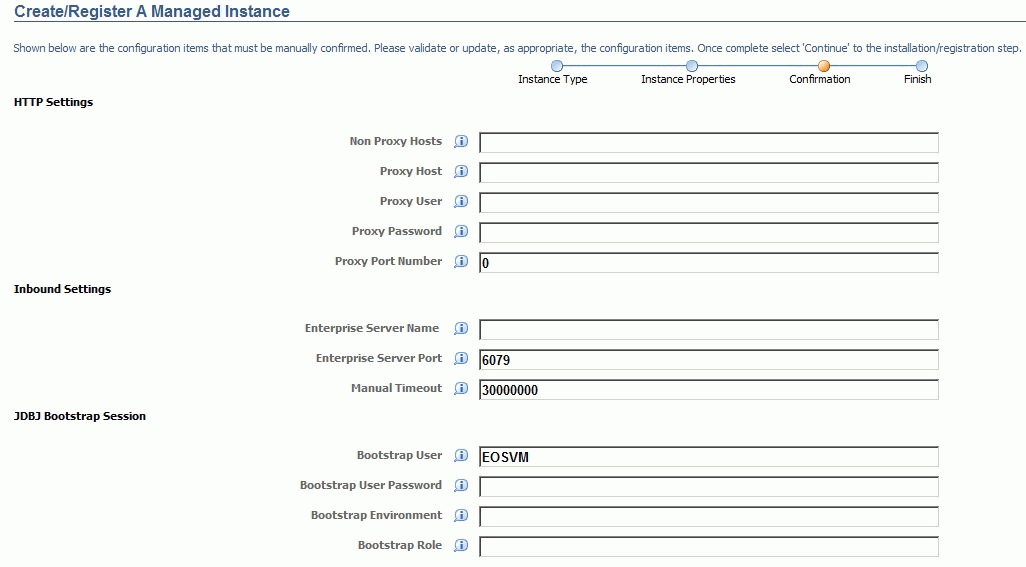
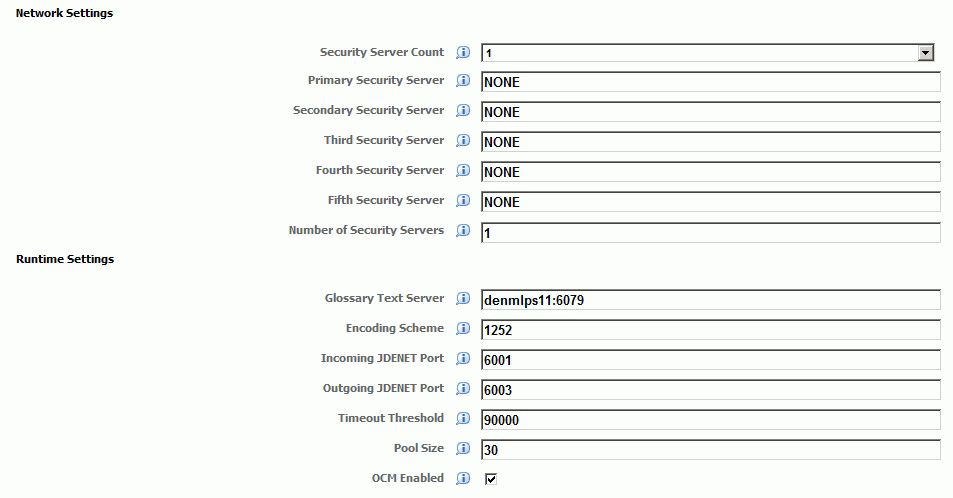
Note:
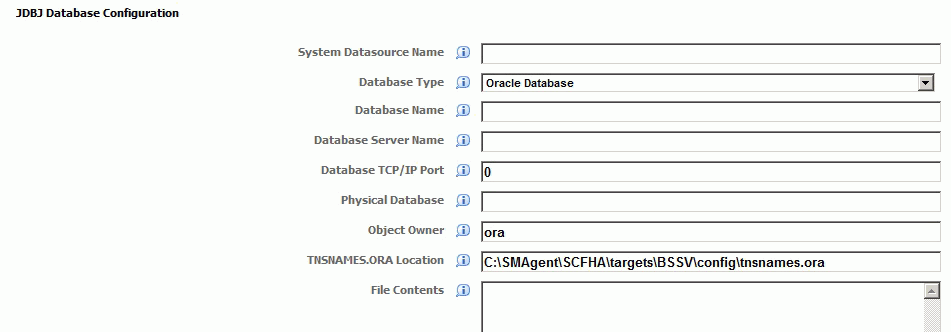
This example illustrates an installation by selecting NONE under Propagate Enterprise Server Config. -
On Create/Register a Managed Instance, Confirmation, review the key configuration items. The values on this form must be confirmed manually. You must validate or update, as appropriate, all configuration items.
Tip:
For help, click the Information icon next to the title of a field. -
After you have validated and updated all configuration items, click Continue to proceed to the next installation step.

-
On Create/Register a Managed Instance, Finish, click the Create Instance button to complete the installation of the Business Services Server.
After you have completed the installation, the browser is redirected to the Management Console page for the newly created Managed Instance. This Managed Instance also appears as a Managed Instance in the corresponding Managed Home.

Note:
After you have created the EnterpriseOne Business Services Server Managed Instance, unlike all other web-based server products it does not start automatically. This is because the Managed Instance is not functional until the Business Services components are installed in it through the special JD Edwards EnterpriseOne package build process designed for that product. Refer to the JD Edwards EnterpriseOne Tools Release 8.98 Package Management Guide.For each registered Managed Instance, the Management Console displays appropriate information at the top of the page:
-
General
-
Status
Valid values are:
Running
When the status is Running, the Stop button is available.
Stopped
When the status is Stopped, the Start button is available.
-
Software Component Version
Displays the version of this Software Component.
-
-
Instance Properties
-
Instance Name
The unique name assigned to the Managed Instance at the time it was created or registered.
-
HTTP Port
Displays the HTTP Port for this server and also provides a link to the HTTP server.
-
Application Server Instance
Displays the application server into which this EnterpriseOne server is installed and also provides a link to the application server instance and associated WebSphere Application Server profile.
-
-
For information on log files for Managed Instances, refer to the chapter entitled: Chapter 23, "Available Log Files".
17.5.1 Configuring a Clustered Business Services Server Instance for Consumer Business Services (Release 9.1 Update 5)
Note:
If you do not configure a clustered business services server instance, then clustering for consumer business services cannot be attained and only one business services server will run all consumer business services requests.This configuration is not applicable if you are using a standalone business services server instance.
You can configure a clustered business services server instance to support clustering for consumer business services. This clustering feature enables scalability, load balancing, and high availability for consumer business services by providing multiple incoming ports so that multiple servers in the cluster can open socket connection to different ports to receive incoming JDENet messages from the Enterprise Server, and the Enterprise Server can send JDENet messages to multiple clustered business services server ports.
After you create and register a managed instance of a business services server, you can configure the business services server instance to support clustering for consumer business services.
To create a cluster for consumer business services:
-
Open the Server Manager console.
-
In the Managed Homes pane, click the EnterpriseOne Business Services Server instance.
-
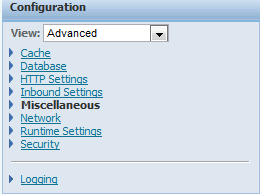
In the left-hand side Configuration pane, select Advanced from the View drop-down list, and then click the Miscellaneous link.
-
In the Miscellaneous pane, expand the cluster Outbound Configuration item.
-
In the Cluster Listen Host/Port field, enter cluster servers with assigned ports.

Specify multiple servers in the cluster with assigned JDENet listen ports for each server in host1:port1|host2:port2|host3:port3 format. Host can be specified with machine name or fully qualified machine name and IP address.
17.6 Create an Application Interface Services (AIS) Server as a New Managed Instance (Release 9.1 Update 4.2)
You must use Server Manager to install a new Application Interface Services instance.
See Also:
-
Refer to the JD Edwards EnterpriseOne Transaction Server Reference Guide for details on additional tasks and topics related to Server Manager.
To install an Application Interface Services Server instance:
-
Select the Managed Home in which you wish to install the AIS Server.
-
Click the Create a New Managed Instance button to create the Managed Instance in the Managed Home.
-
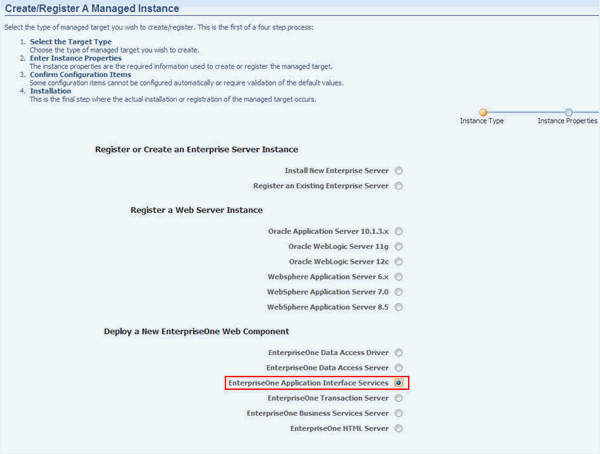
On Create/Register a Managed Instance, Instance Type, select this radio button:
EnterpriseOne Application Interface Services
-
Click Continue.
-
On Create/Register a Managed Instance, Instance Properties, complete these fields:
-
Server Group
Use the dropdown menu to select the Server Group where you want this instance to belong.
Also refer to Section 31, "Administer Server Groups"
-
Instance Name
Enter a unique name for the instance name.
Tip:
A good business practice is to name your instances so that they are easily and consistently identifiable. For example:PRODUCT_SERVER_PORTwhere
PRODUCTis the JD Edwards EnterpriseOne server type, such as JAS, RTE, CollabPortal, AIS, or BusSvcs;where
SERVERis the machine on which the instance is installed;where
PORTis the HTTP port which is defined for use by this server. -
J2EE Server
Use the dropdown to select a valid J2EE server.
-
HTTP Port
You must ensure that the port that you specify is available and is not being used by any other application currently installed and running on the server on which the application server is running.
-
Software Component
Use the dropdown to select the version of this Software Component that you wish to install.
-
-
Click Continue.
-
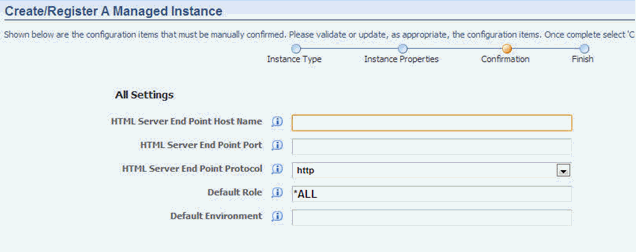
On Create/Register a Managed Instance, Confirmation, review the key configuration items. The page displays the settings that are typically required to successfully start your instance. The values on this form must be confirmed manually. You should validate or update, as appropriate, all configuration items.
Note:
When setting up an AIS server instance, you should also review the Allowed Hosts setting for the corresponding EnterpriseOne HTML server instance.Tip:
For help, click the Information icon next to the title of a field. -
After you have validated and updated all configuration items, click Continue to proceed to the next installation step.
-
On Create/Register a Managed Instance, Finish, click the Create Instance button to complete the installation of the AIS Server.
After you have completed the installation, if you are running on WebSphere, the HTTP server associated with the J2EE Server must be restarted manually. If you do not restart the HTTP server, you will not be able to login to the AIS instance.
To verify the installation is successful (Release 9.1 Update5):
-
Navigate to the AIS Server instance.
-
Click on the Test connection link.
Note:
The Test connection link is only enabled when the server is running. -
Review the DefaultConfig file.
After you have completed the installation, the browser is redirected to the Management Console page for the newly registered AIS Server. This server also appears as a Managed Instance in the corresponding Managed Home.
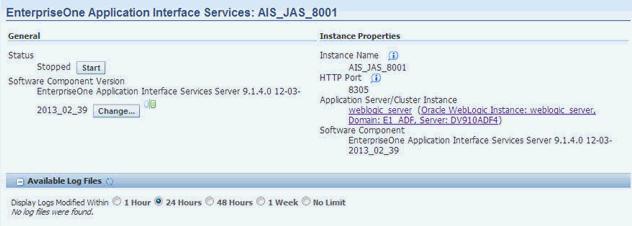
For each registered Managed Instance, the Management Console displays appropriate information at the top of the page:
-
General
-
Status
Valid values are:
Running
When the status is Running, the Stop button is available.
Stopped
When the status is Stopped, the Start button is available.
-
Software Component Version
Displays the version of this Software Component.
-
-
Instance Properties
-
Instance Name
The unique name assigned to the Managed Instance at the time it was created or registered.
-
HTTP Port
Displays the HTTP Port for this server and also provides a link to the HTTP server.
-
Application Server Instance
Displays the application server into which this EnterpriseOne server is installed and also provides a link to the application server instance and associated managed server (Oracle WebLogic Server) or profile (WebSphere Application Server).
-
For information on log files, refer to the chapter entitled: Section 23, "Available Log Files"

