6 Working With Installation Workbench
This section discusses:
6.1 Understanding Workbench Components
After planning the Release 9.1 installation using Installation Planner, you should run the plan using Installation Workbench. The logic of this program runs specific workbench programs according to the plan you created.
Installation Workbench can be run in attended mode or unattended mode. In attended mode, you start each workbench after the previous workbench completes. In unattended mode (the default value), each workbench runs without user intervention. You can set task breaks before or after any specific workbench to stop the process at any point. If using unattended mode, you must check that each task ran successfully.
This section describes:
-
Section 6.1.1, "Verifying the Network Share on the Deployment Server"
-
Section 6.1.2, "Loading Data (Demo Data and Production Data)"
As listed in this table, Installation Workbench includes the components, some or all of which might be used for your installation, depending on your installation plan:
| Installation Workbench Component | Functional Description |
|---|---|
| Initial Tasks Workbench | When using unattended workbench mode, this workbench runs Release Master after Installation Workbench is started and before Location Workbench begins. |
| Location Workbench | This workbench copies all locations that are defined in the plan from the F9654 and F984021 tables in the Planner data source to the System - 910 data source. |
| Data Source Workbench | Copies all data sources that are defined in the plan from the F98611 and F986115 tables in the Planner data source to your System - 910 data source. It also updates the F98401 table to indicate completion. |
| Environment Workbench | Copies the F0094, F00941, and F00942 tables, as well as the F986101 table for each environment, from your Planner data source to your System - 910 data source. It then updates the F98403 table to indicate completion. Depending on the plan settings, it also runs a batch application to copy new generic text and to create and populate Object Management Workbench and version tables. |
| Machine Workbench | Copies the F9650 and F9651 tables from the Planner data source to the System - 910 data source. It then updates the F98402 table to indicate completion and uses the environment information to populate the F986101 and F98611 tables in the Server Map data source. Only valid environments, data sources, and server map tables are created. |
| Control Table Workbench | Copies the language text from the local database that contains the language text into the control table database and central object database. This workbench runs only for users who are adding an alternate language to their installations. |
| Package Workbench | Transfers the F9603 and F9631 tables from the Planner data source to the System - 910 data source. It then updates the F98404 table to indicate completion. |
See Also
Chapter 20, "Major Technical Tables" in this guide for more information about individual tables and their uses.
6.1.1 Verifying the Network Share on the Deployment Server
When you created the plan, this network share was created:
\\depsvrname\E910
where depsvrname is the name of your Deployment Server.
Because several of the Workbenches update files through the network share, these workbenches will fail if the share is not writeable. Sometimes the security settings on your Deployment Server will prevent the Planner from creating the share as a writeable share.
Use this procedure to ensure that the share is writeable before proceeding:
-
On the Deployment Server, navigate to Start | My Computer | Manage
-
Open Shared Folders.
-
Open Shares.
-
Right click on E910 and select Properties and then Share Permissions.
-
Select properties then select Share Permissions
-
Make sure that Everyone is set to Full Control, Change, Read permissions.
Note:
Even after the Workbenches are complete, you will still need these settings on the Deployment Server's share in order to successfully perform client installs.6.1.2 Loading Data (Demo Data and Production Data)
While previous versions of JD Edwards EnterpriseOne used Workbench components to load data, for Release 9.1 the Platform Pack Installer loads appropriate data into specific environments as follows:
-
Demo data to Development and Pristine environments.
-
Production data to Production and Prototype environments.
To load demo data in Production or Prototype environments, you must run a UBE (R98403E) to copy the data to those environments.
Note:
The "from" (source) environment can be the Planner environment or your Pristine environment.Caution:
You should not change the record selection on this UBE.-
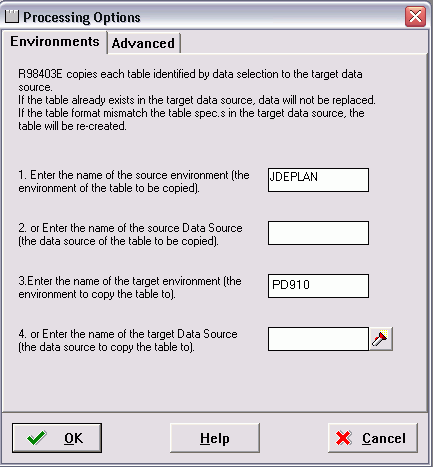
Run R98403E using the XJDE0009 version and set the processing options as follows:
-
On Processing Options 1-4, complete these fields:
-
Option 1
Enter the name of the source environment, which is the environment of the table to be copied. For example, JDEPLAN.
-
Option 2
This field must be blank because this UBE is used to copy a mixture of business data and control tables which are specified to environments, not data sources.
-
Option 3
Enter the name of the target environment, which is the environment to which you wish to copy the table. In this case, you would specify either the Production or Prototype environments. For example, PD910.
-
Option 4
This field must be blank because this UBE is used to copy a mixture of business data and control tables which are specified to environments, not data sources.
-
-
Click OK to continue specifying processing options.
-
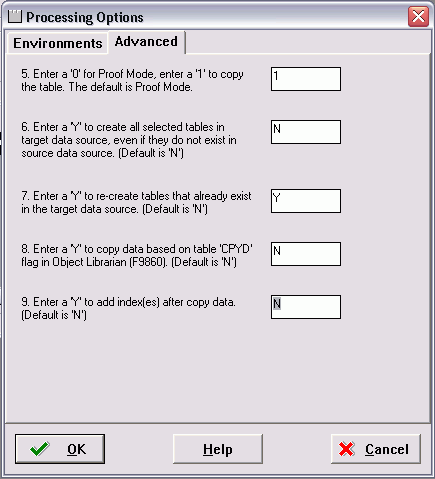
On Processing Options 5-9, complete these fields:
Field Description Option 5 The recommended value is 1, which copies the table. The default value is 0, Proof Mode.
Option 6 The recommended value is N, which copies tables only if they exist in the source. Enter Y to copy tables whether or not they exist in the source data source.
The default value is N.
Option 7 The recommended value is Y, which recreates tables that already exist in the target data source. Note: If you do not recreate the tables, you will end up with a mixture of production and demo data in the tables.
The default value is N.
Option 8 The recommended value is N, which forces a copy of the data, ignoring the CPYD flag. Note: A value of Y will leave almost all tables empty. That is, a production data load.
The default value is N.
Option 9 The recommended value is N, which creates the indexes on the tables before copying the data. This prevents duplicate rows. Note: A value of Y copies the data and then create the indexes.
The default value is N.
-
Click OK to accept the values and start the UBE.
6.1.3 Creating the Job Queue
You may set up the job queues before running the Installation Workbench. If you do not, Initial Tasks Workbench will create a default entry for QBATCH with a setting of maximum=4.
Note:
If running an Install, you can set up the queues at any stage before running a Package Build. If you set up queues after the Installation Workbench, sign onto DEP910.To create the job queue:
-
Enter GH9013 in the Fast Path field and start the Job Queues program (P986130).
-
Click Add.
-
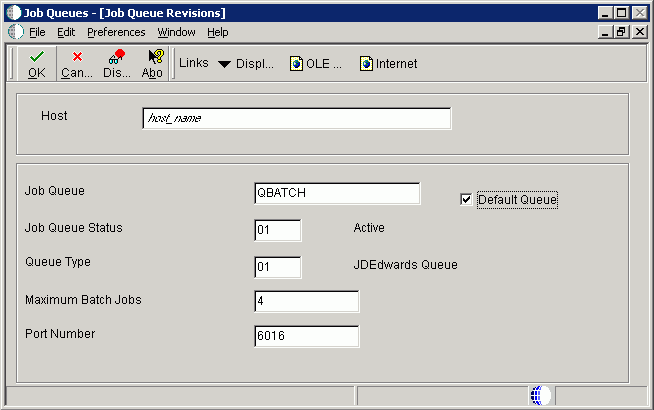
On Job Queue Revisions, add a queue by completing these fields:
Field Description Host Enter the Enterprise Server name. Job Queue Enter the job queue name. Default Queue Turn on this option by clicking the check box. Job Queue Status Enter 01. Queue Type Enter 01. Maximum Batch Jobs Enter a value that equals the number of processors on the Enterprise Server machine. Port Number Enter 6016. If you receive a Network Failed error, you can safely ignore it in this case.
-
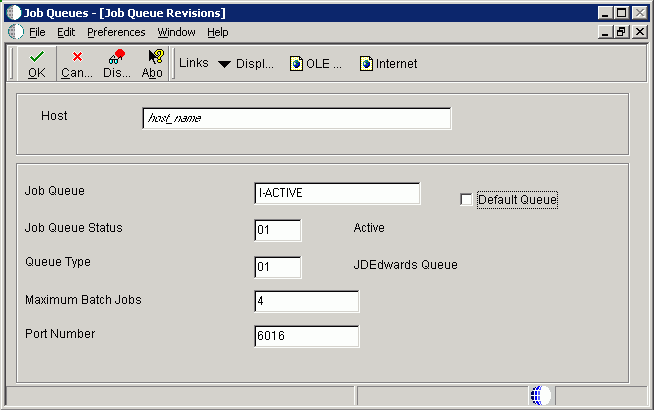
Add another queue called I-ACTIVE.
-
On Job Queue Revisions, add a queue by completing these fields:
Field Description Host Enter the Enterprise Server name. Job Queue Enter the Job Queue name: I-ACTIVE. Default Queue Turn off this option by clicking the radio button. Job Queue Status Enter 01. Queue Type Enter 01. Maximum Batch Jobs Enter a value that equals the number of processors on the Enterprise Server machine. Port Number Enter 6016.
6.2 Working with Unattended Workbench Mode
This section discusses:
-
Section 6.2.1, "Selecting Attended or Unattended Workbench Mode"
-
Section 6.2.2, "Setting a Task Break in Unattended Workbench Mode"
6.2.1 Selecting Attended or Unattended Workbench Mode
The workbenches can be run manually (attended workbench mode) or automatically (unattended workbench mode). When running Workbench in unattended mode, start Installation Workbench as described below, and then the status of each workbench is displayed as the workbench begins. Unattended workbench is the default value.
In unattended workbench, if an error is encountered in any of the individual workbenches, the process stops. After fixing the error, unattended workbench resumes where it left off.
To choose attended workbench mode:
-
Open the System Installation Tools menu (GH961).
-
Right-click on Installation Workbench.
-
Select Prompt For and then Values.
The Processing Options form appears.
-
In the appropriate field, enter 1 for unattended workbench mode or 0 (zero) for attended workbench mode.
The default value is 1 (unattended).
-
Click OK.
Work with Installation Plan appears.
6.2.2 Setting a Task Break in Unattended Workbench Mode
In unattended workbench, you can set task breaks before or after any of the individual workbenches. You can use the task break to verify successful completion of a workbench or for other tasks. For example, set a task break after Table Conversion Workbench to verify that all table conversions completed successfully. An automatic task break occurs after Control Table Workbench, preceding Table Conversion Workbench.
To set a task break in unattended workbench mode:
-
Open the System Installation Tools menu (GH961).
-
Select Advanced Operations.
-
Double-click Work with Task Breaks.
The Work with Task Breaks form appears.
-
Click Find.
A list of the workbenches appears.
-
To set a break before or after a workbench, choose the workbench name, and, on the Row menu, select Break Before or Break After.
You can clear task breaks on the Row menu.
-
On Task Break Revisions, specify the following fields:
-
email Address (optional)
Specify (or choose from a list) the address book number of the person who is to be notified when the task break occurs.
-
Task Break
Specify (blank) for no task break or 2 for a customer task break. If the field is left blank, then no task break is configured.
-
Task Break Short Text (required)
Enter a short text description of the task break.
-
Optional Detail (optional)
Enter detailed information about the task break.
-
-
Click OK.
Task Break Revisions closes, and Work with Task Breaks reappears. Specify any further task breaks.
-
Click Close.
6.3 Starting Installation Workbench
Caution:
Do not lock the Deployment Server during Installation Workbench processes (for example, with a screen saver password); doing so pauses some processes.Do not run Installation Workbench from a remote access program that simulates a local connection.
To start the Installation Workbench:
-
On your Deployment Server, log in to the Planner environment, which is JDEPLAN.
-
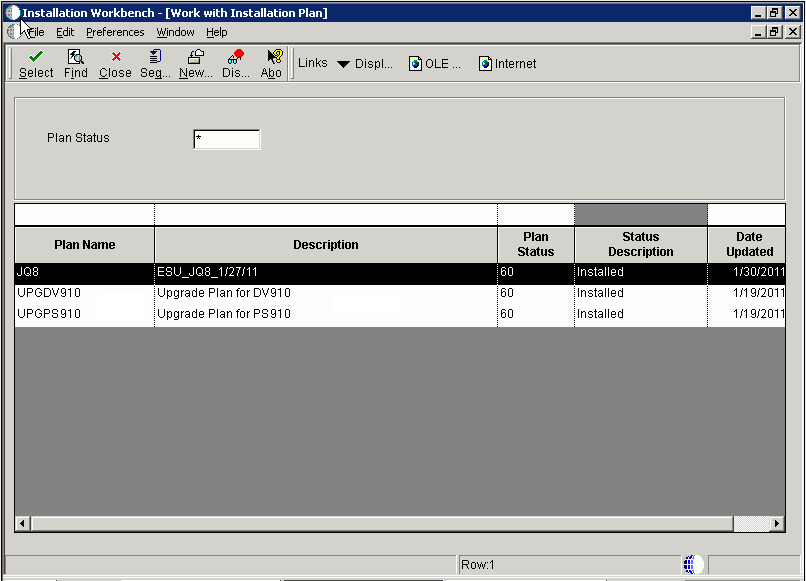
From the System Installation Tools menu (GH961), choose Installation Workbench.
When this application is run the first time, the system downloads all required objects using Just In Time Installation (JITI).
-
If you specified attended workbench mode, use the following procedures, including the Initial Tasks Workbench, to complete the workbenches.
-
If you specified unattended workbench mode, the process begins and all workbenches are completed automatically, unless task breaks are set. If you did not set any task breaks, continue with Chapter 7, "Working With the Enterprise Server".
-
-
On Work with Installation Plan, double-click your plan.
6.4 Working With Initial Tasks Workbench
Before the workbench is run, the F00945 table in the System data source is blank because it is no longer populated when a plan is validated. However, after you run the Initial Task Workbench several tables in the System data source are populated including the F00945 table.
The Initial Tasks Workbench form lets you complete the Release Master task before the individual workbenches begin.
You use this procedure if you are running Workbench in attended mode or if you set a task break before Initial Tasks Workbench.
6.4.1 Changing the Status of Initial Tasks Workbench
You use this procedure if you are running Workbench in attended mode or if you set a task break before Initial Tasks Workbench.
To change the status of Initial Tasks Workbench:
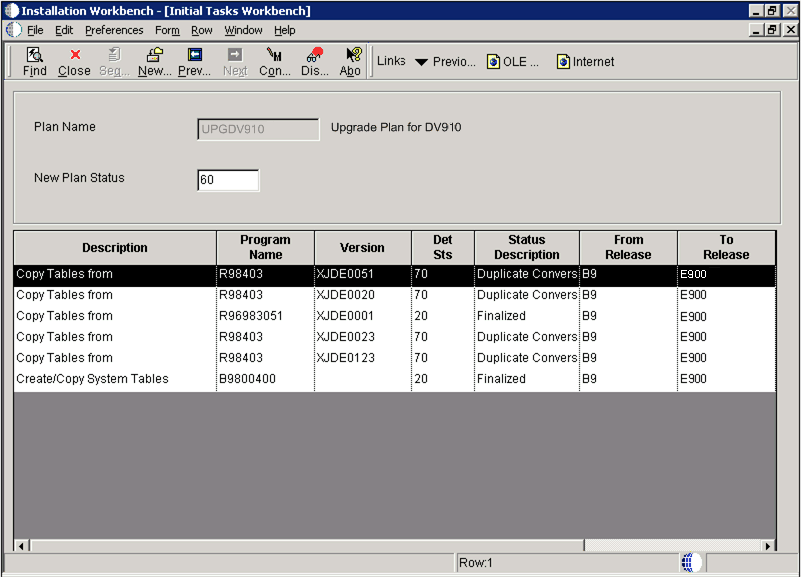
You might want to change the status of one or more of the initial workbench tasks. To change the status of a task, use the following procedure.
-
Enter GH961 in the Fast Path field to open the System Installation Tools menu.
-
Double-click Custom Installation Plan.
-
On Work with Installation Plans, select your installation plan.
-
Select Expand on the Row menu.
The plan components, including the initial tasks, appear.
-
Select the task whose status you want to change.
-
On the Row menu, click Disable, Enable, or Complete (see the table below).
The task status changes.
-
Disable
Displays a status of 70 to indicate the task is incomplete, and will not be rerun.
-
Enable
Displays a status of 10 to indicate the task will be rerun.
-
Complete
Displays a status of 60 to indicate the task is complete, and will not be rerun.
-
6.5 Configuring Your Locations
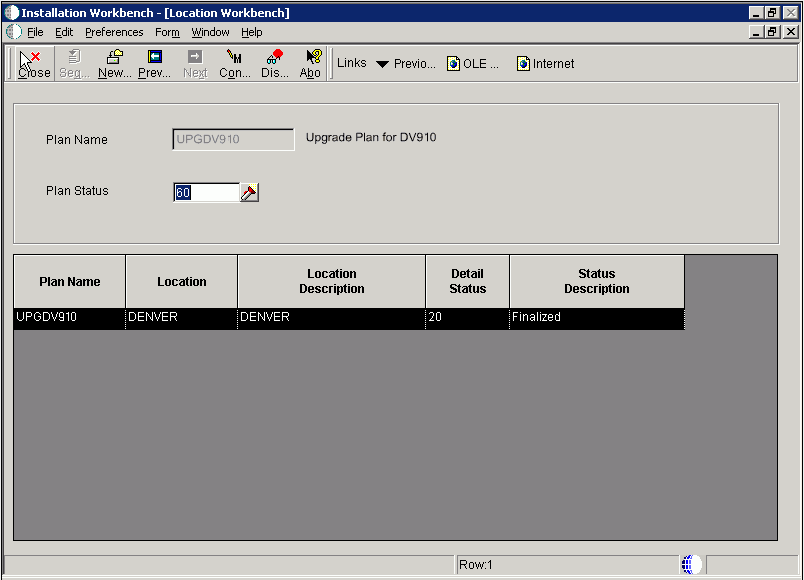
Location Workbench copies all locations that are defined in the plan from the F9654 table in the Planner data source to the System - 910 data source. It also updates the F984021 table. Use this procedure when running Workbench in attended mode or if you set a task break before Location Workbench.
-
On Location Workbench, verify that all of your locations are listed.
-
Select Configure from the Form menu.
Locations are configured, and the Data Source Workbench form appears.
The system updates the Detail Status to 60 and changes the Status Description from Validated to Installed.
6.6 Configuring Your Data Sources
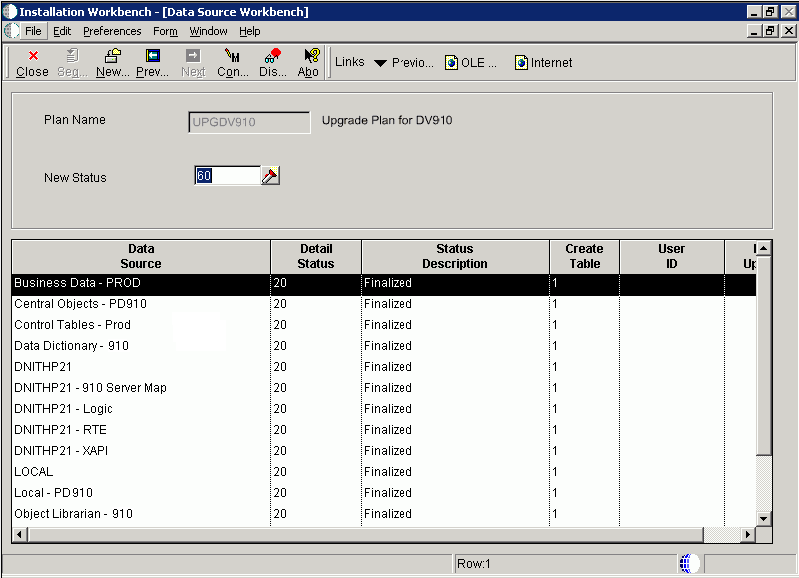
Data Source Workbench copies all data sources that are defined in the plan from the F98611 table and the F986115 table in your Planner data source to your System - 910 data source. It also updates the F98401 table to indicate completion. Use this procedure when running Workbench in attended mode or if you set a task break before Data Source Workbench.
-
On Data Source Workbench, verify that all of your data sources are listed as illustrated in this example.
-
Select Configure from the Form menu.
Your data sources are configured, and the Environment Workbench form appears.
When the system has configured your data sources, it updates Detail Status to 60 and changes the Status Description from Validated to Installed.
6.7 Configuring Your Environments
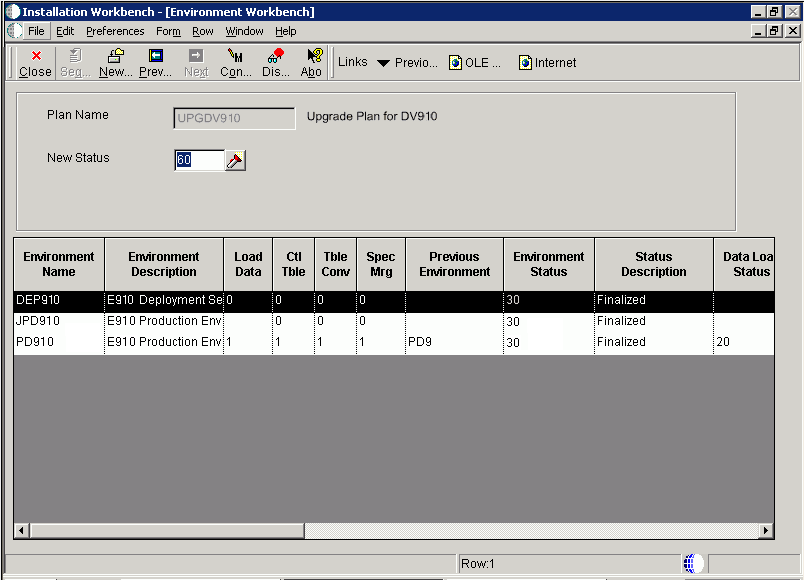
Environment Workbench copies the F0094, F00941, and F00942 tables, as well as the F986101 table for each environment, from your Planner data source to your System - 910 data source. It then updates the F98403 table to indicate completion. Depending on the plan settings, it also runs a batch application to copy new generic text and to create and populate Object Management Workbench and version tables.
Environment Workbench can run multiple batch applications simultaneously, which enables Release 9.1 to load multiple environments at the same time. This reduces the amount of time it takes to load environments.
Use this procedure when running Workbench in attended mode or if a task break is set before Environment Workbench.
-
On Environment Workbench, review each environment and its associated parameters to make sure the values are correct.
-
After you review the environments, select Configure.
-
When Environment Workbench has completed, verify that the status of each environment has been updated to 60 and that the status description has changed from Validated to Installed.
Caution:
The Table \ Index Change (R98407) report may stop on errors for DB2 UDB only with the following message in the jde.log:SQL1477N Table "schema.Fnnnnnnn" cannot be accessed. SQLSTATE=55019Such errors occur when a table is created in a previous release or ESU, and it is not subsequently updated nor is it saved. When you run the upgrade process, it tries to change that table. For example, the upgrade process changes the primary key in this upgrade. At that point the table is marked as unusable. The original table is by definition empty at this point. To recover, you must regenerate each table marked in error through OMW.
-
Using Adobe Acrobat, review all XJDE reports, and confirm that all configuration statuses indicate Success.
6.8 Using Machine Workbench
Machine Workbench copies the F9650 and F9651 table from the Planner data source to the System - 910 data source. It then updates the F98402 table to indicate completion and uses the environment information to populate the F986101 and F98611 tables in the Server Map data source.
Note:
Only valid environments, data sources, and server map tables are created.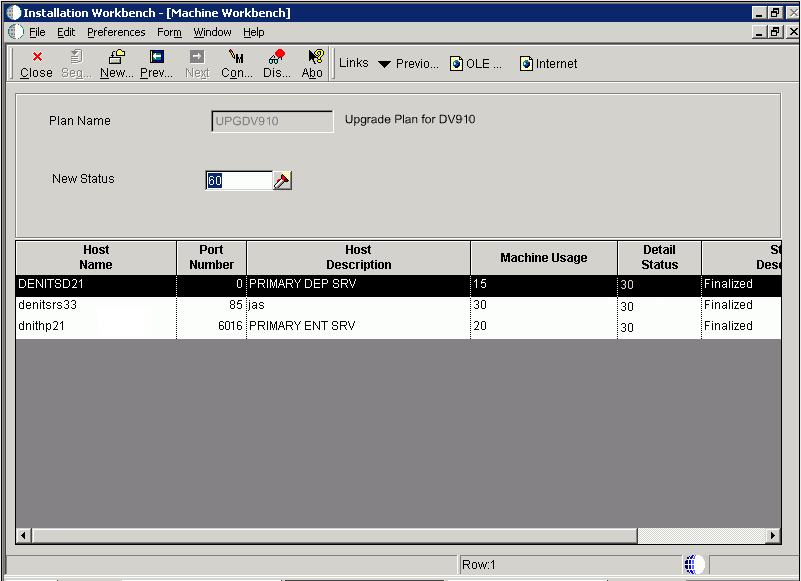
-
On Machine Workbench, review each server and its associated parameters for the correct values.
-
Select Configure from the Form menu.
When the system has configured your servers, it changes the detail status to 60, and Status Description changes from Validated to Installed.
6.9 Using the Package Workbench
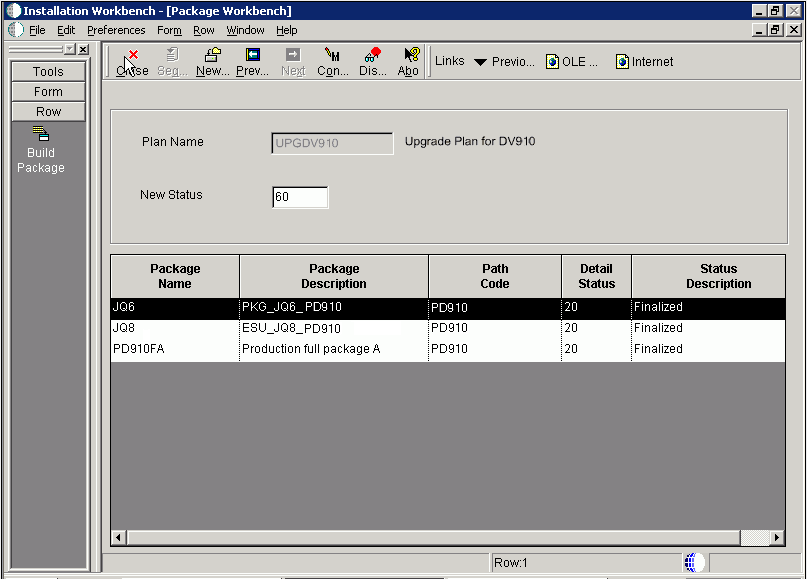
Package Workbench transfers the F9603 and F9631 tables from the Planner data source to the System - 910 data source. It then updates the F98404 table to indicate completion.
Use this procedure when running Workbench in attended mode or if a task break is set before Package Workbench. Refer to the JD Edwards EnterpriseOne Tools Package Management Guide for complete information about building and configuring packages.
-
On Package Workbench, review your packages.
-
Select Configure from the Form menu.
6.10 Using Remote Location Workbench
Note:
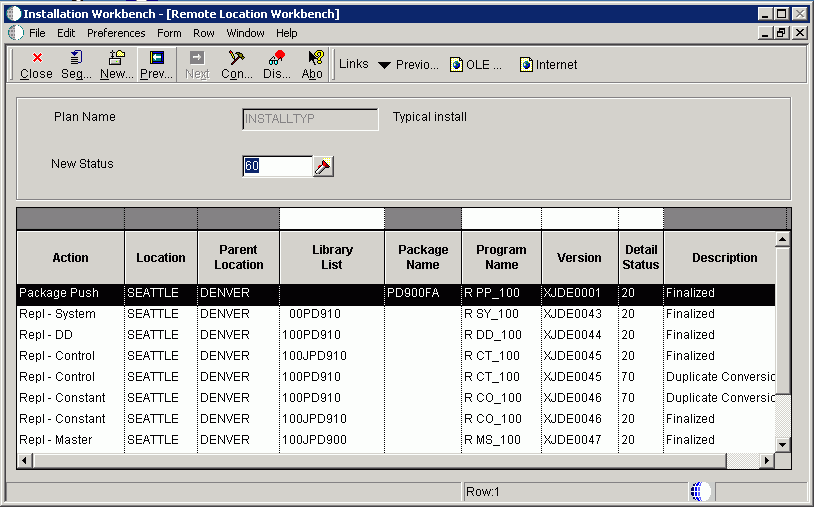
This workbench only appears when Remote Locations have been set up.Remote Location Workbench loads business (master and constant), control, data dictionary, and system tables from base location to remote location servers, by launching different versions of R98403 (XJDE0043, XJDE0044, XJDE0045, XJDE0046 and XJDE0047). It also pushes delivered packages to primary Deployment Servers at remote locations by launching the multi-tier UBE (R98825C). This workbench is processed only if you opted to install remote locations and chose to load replicated data and push packages.
Use this procedure when running Workbench in attended mode or if a task break is set before Remote Location Workbench.
6.10.1 Configuring Remote Locations
To configure remote locations:
To configure your remote locations:
-
On Remote Location Workbench, Release 9.1 displays all remote location activities in the detail area.
-
On the Form menu, select Configure to launch the workbench.
-
After all remote location activities are complete, click Next.
6.11 Finishing Installation Workbench
To finish the Installation Workbench:
-
From Congratulations, on the Form menu, click Finish.
-
From Work with Installation Plans, click Close.
Note:
Post Install Procedures still need to be completed from a client. See Chapter 10, "Performing Post Installation Tasks".
6.12 Deploying an Oracle or Partner Business Accelerator Configuration (optional)
If you choose to deploy a Business Accelerator Configuration, this must be done prior to installing any ESUs or Updates other than the Planner Update. The execution of the Q&A portion can be done even before JD Edwards EnterpriseOne has been installed. However, the resulting configuration cannot be deployed until all Installation Workbenches have successfully completed.
You must build a full package after deploying the Business Accelerator in order to see all the changes that the Business Accelerator delivers.
For detailed instructions on downloading and deploying Business Accelerators, see the Oracle Business Accelerators for JD Edwards EnterpriseOne Installation Guide, which is available from My Oracle Support (https:\\support.oracle.com). From that site, you can locate this document by search for this document ID: 705506.1.
6.13 Regenerating the Serialized Objects Table
The version of F989999 shipped on the Platform Pack CDs is not functional. To remedy, you must regenerate this table before trying to run any HTML services. Failure to do this will lead to errors when trying to run any large application, for example, P4210.
To regenerate the F989999 table for Serialized Objects:
-
On the Deployment Server, start OMW.
-
Add F989999 to the default project.
-
Design F989999 and select the Table Operations tab.
-
Generate F989999 for each path code you have installed. For example, in Central Objects - PY910.