A Working With Multiple Tools Release Foundations
As a best practice, you should always set up multiple tools release foundations, including a test environment for applying tools release fixes. This helps ensure that a stable environment exists before you promote fixes to your production environment. You can also use this same principle and procedure to set up multiple foundations of major tools releases, such as Tools Release 9.1 and Tools Release 9.2 (when applicable).
The procedures described in this document enable customers to target specific environments when they install a tools release. For example, customers can keep the production environment running on the existing foundation and apply the new tools release to all other environments. This configuration enables them to perform tests on the new foundation code without impacting the production environment. When they complete the testing, they can then apply the new tools release to production.
By completing the tasks below, you can configure your JD Edwards EnterpriseOne systems to handle many foundations on a single enterprise server. These tasks require that you reconfigure pathcodes and jde.ini files to set up multiple foundations, but once the initial tasks are completed, the new configuration requires very little maintenance.
Before you begin the installation, consider these factors:
-
The multiple foundation setup uses one security server process per port.
-
If you have multiple Enterprise Servers at different tools release levels, make sure each of them is pointing to the correct security data sources.
-
If you have multiple foundations or multiple Enterprise Servers at different tools release levels, a dual maintenance of users and passwords is required.
-
Before beginning installation of the Tools Release 9.1, check the associated
readme.txtfile for late-breaking information and requirements.
This appendix consists of the following tasks:
-
Section A.1, "Understanding Multiple Foundation Code on the Enterprise Server"
-
Section A.2, "Understanding Multiple Foundation Code on the Deployment Server"
-
Section A.3, "Working with Packages for Multiple Foundations"
-
Section A.6, "Setting up the Multiple jde.ini Files on the Deployment Server"
A.1 Understanding Multiple Foundation Code on the Enterprise Server
To install multiple foundations, you must first install and configure new system code on the Enterprise Server. This section includes these topics:
-
Section A.1.1, "Working With Tools Releases on the Enterprise Server"
-
Section A.1.2, "Registering an Existing Enterprise Server with Server Manager"
Note:
If your JD Edwards EnterpriseOne configuration includes multiple servers running JD Edwards EnterpriseOne host code (for example, additional application servers or data servers), then you will need to apply the procedures for installing multiple foundations to each server. For this type of configuration to work successfully:-
Make sure that the port settings for the
[JDENET]section in thejde.inimatch between all servers running the same foundation. -
Ensure the new services are running on all servers.
-
Run
PORTTESTsuccessfully on all servers for all foundation releases that you have installed.
A.1.1 Working With Tools Releases on the Enterprise Server
Refer to the JD Edwards EnterpriseOne Server Manager Guide as described in the section of this guide entitled: Section 1.3, "Understanding Server Manager and This Guide".
This section discusses these topics:
A.1.1.1 Creating a New User and Group
The section discusses how to create a new UNIX user and group, which varies by platform.
A.1.1.1.1 Creating Users and Groups on Solaris Platforms
This section discusses how to create users and groups on a Solaris Enterprise Server.
-
Personnel
System administrator
-
Logon status
On the Solaris Enterprise Server, logged on as root.
-
Prerequisites
None
-
Concurrent Tasks
None
Use the following procedure to create a new UNIX administrator user and group on a Solaris Enterprise Server.
-
Log on to the UNIX Enterprise Server as root (super user). You can log on directly from a UNIX workstation or use
telnetfrom the Microsoft Windows Deployment Server.-
Solaris
Run the
admintoolprogram and from theBrowsemenu, selectGroups. -
Solaris
From the
Editmenu, selectAdd. Enter the following value in the Group Name field:pssprelease_numberwhere release_number is the Service Pack base release being installed. For example, for Service Pack 1 you would enter:
pssp1
-
-
Click OK to display a list of groups.
-
Verify that the
pssprelease_numbergroup is listed.-
Solaris
From the
Browsemenu, selectUsers.
-
-
Select to Add users by following this procedure:
-
Solaris
From the
Editmenu, selectAdd.
-
-
Complete these fields:
-
Login Name
Enter the value:
pssprelease_numberwhere release_number is the Service Pack base release being installed. For example, for Service Pack 1 you would enter:
pssp1 -
Home Directory
Enter the value:
/home/pssprelease_numberwhere home is the name of the home directory of the JD Edwards EnterpriseOne user you just created. The system may fill this field automatically.
-
Primary Group
Enter the same value as you entered for the Login Name field. For example:
pssprelease_numberwhere release_number is the Service Pack base release being installed. For example, for Service Pack 1 you would enter:
pssp1 -
Start-up Program
Applicable to HP9100 only
Enter this value:
/usr/bin/kshAlternatively, you can select from a list of available shells.
-
Login Shell
Applicable to Solaris only
Enter this value:
/usr/bin/kshAlternatively, you can select from a list of available shells.
-
-
Click OK.
-
Specify password.
-
Solaris
Select
Normal Passwordfrom the drop down menu, enter a password, verify the password, and click OK.
-
-
Click OK.
-
Solaris
Exit the
admintool.
-
A.1.1.1.2 Creating Users and Groups on RS/6000 Platforms
This section discusses how to create users and groups on a RS/6000 Enterprise Server.
-
Personnel
System administrator
-
Logon status
On the RS/6000 Enterprise Server, logged on as root.
-
Prerequisites
None
-
Concurrent Tasks
None
Use the following procedure to create a new UNIX user and group on an RS/6000 Enterprise Server.
-
Log on to the RS/6000 as root (super user), or use
telnetfrom the Microsoft Windows deployment server. -
Run the
smitprogram. -
Select
Security and Users. -
Select
GroupandAdd a Group. -
Add a group called:
pssprelease_numberwhere release_number is the Service Pack base release being installed. For example, for Service Pack 1 you would enter:
pssp1Use the default values for the remaining fields.
-
To return to the Security menu, press
F3three times. -
Select
UsersandAdd a Userand complete these fields:-
User Name
Enter the value:
pssprelease_numberwhere release_number is the Service Pack base release being installed. For example, for Service Pack 1 you would enter:
pssp1 -
Primary Group
Enter the value:
/home/pssprelease_numberwhere home is the name of the home directory of the JD Edwards EnterpriseOne user you just created. The system may fill this field automatically.
-
Primary Group
Enter the same value as you entered for the Login Name field. For example:
pssprelease_numberwhere release_number is the Service Pack base release being installed. For example, for Service Pack 1 you would enter:
pssp1 -
Home Directory
Enter the value:
/home/pssprelease_numberwhere home is the name of the home directory of the JD Edwards EnterpriseOne user you just created. The system may fill this field automatically.
-
Initial Program
Enter this value:
/bin/ksh
-
-
Press
Enterto accept the values. -
To exit, press
F3. -
To assign a password for
pssprelease_number, enter this command:passwd pssprelease_number
A.1.1.1.3 Copying .oneworld and .profile from an Existing User to a New User
-
Go to the home directory of an existing UNIX user. For example, your user might be psft900.
-
Using this command, copy the
.oneworldfile to the home directory of the new user that you created in Creating a New User and Group:cp .oneworld .profile /home/userwhere user is the name of the new user you created in Creating a New User and Group.
A.1.1.2 Creating a New Host Code Directory
This section discusses how to create a host code directory on UNIX operating systems.
-
On the UNIX-based Enterprise Server, navigate to the directory where the JD Edwards EnterpriseOne host code is installed. For example:
mount_point/JDEdwards/ -
Create a new directory for the service pack you want to test. For example, your directory name might be
E910SPTESTorE910_DVJDPY.mkdir host_code_dirwhere host_code_dir is the name of the new host code directory.
The new directory will be used to store both the new service pack and the path codes that will access the service pack.
A.1.1.2.1 Granting Ownership and Authority
Enter these commands to grant ownership and authority to the directory you created in Creating a New User and Group:
chmod 777 host_code_dir
chown user host_code_dir
chgrp group host_code_dir
A.1.1.2.2 Editing the .oneworld File
This section discusses how to change the .oneworld file.
-
Navigate to the home directory of the new user created above.
-
Edit the
.oneworldfile to update theEVRHOMEpath with the new host code directory. For example:export EVRHOME=/mount_point/JDEdwards/host_code_dir -
If no
.oneworldscript exists check the.profilefile for a call to theenterpriseone.shscript. Edit theenterpriseone.shfile to update theEVRHOMEpath with the new host code directory. For example:export EVRHOME=/mount_point/JDEdwards/host_code_dir
A.1.1.2.3 Moving the Path Codes to the New Directory
-
From the
mount_point/JDEdwards/E910directory, determine the path codes that you want to access the new Tools Release. Move the selected path codes into the newly created directory using this command:mv path_code /mount_point/JDEdwards/host_code_dirwhere path_code is the path code selected to be moved where a valid value for path code might be PD910.
For example, if you wanted to test the new Tools Release with all environments except Production (PROD, PD), move the Development (DEV,DV), Pristine (PRST910, PS) and Prototype (CRP, PY) path codes.
Do not copy the path codes. Instead you should always move them. You should not associate more than one Tools Release or Service Pack with an environment at the same time.
-
Enter the following commands to grant ownership and authority to the path codes you moved:
chmod 775 /mount_point/JDEdwards/host_code_dir/path_codechown user /mount_point/JDEdwards/host_code_dir/path_codechgrp group /mount_point/JDEdwards/host_code_dir/path_code
A.1.1.2.4 Creating Remaining Directories
This section discusses creating the remaining directories necessary to complete the install.
-
Logon to the Enterprise server as the new user created above.
-
Navigate to the new directory created above. For example:
/mount_point/JDEdwards/host_code_dirIn the new directory, create the following subdirectories with these exact case-sensitive names:
-
ini -
packages -
PrintQueue
-
A.1.1.2.5 Copying the jde.ini to the New Directory
-
Navigate to this directory:
/mount_point/JDEdwards/e910/ini -
Use the following command to copy the
jde.inito the host code directory:cp JDE.INI /mount_point/JDEdwards/host_code_dir/ini -
Enter the following command to change the permissions of the file:
chmod 666 /mount_point/JDEdwards/host_code_dir/ini/JDE.INI
A.1.1.3 Editing the jde.ini File
This section discusses how to make modifications to the jde.ini file that is located on a UNIX Enterprise Server.
-
On the Enterprise Server, navigate to the
/inidirectory under the new host code directory. The file is typically located in this directory:/mount_point/JDEdwards/host_code_dir/ini -
Edit the
jde.inifile to change the paths in each of the entries below to point to the new host code directory:Note:
Replace host_code_dir in the entries below with the name of the new host code directory.[DEBUG] DebugFile=mount_point/JDEdwards/host_code_dir/log/jdedebug.log JobFile=mount_point/JDEdwards/host_code_dir/log/jde.log JDETSFile=mount_point/JDEdwards/host_code_dir/log/JDETS.log
[INSTALL]
B9=mount_point/JDEdwards/host_code_dir
[BSFN BUILD]
BuildArea=mount_point/JDEdwards/host_code_dir/packages
-
Locate the
[JDENET]section and find the port settings forserviceNameListandserviceNameConnect. For each entry, add 100 to the number. For example, if the settings are both 6013, change them to 6113.[JDENET] serviceNameList=6113 serviceNameConnect=6113
-
In the
[JDEIPC]section, add 1000 to thestartIPCKeyValueentry. For example:[JDEIPC] startIPCKeyValue=7000Note:
If thestartIPCKeyValuevalue is commented out, delete the comment mark to enable the setting. -
In the
[SECURITY]section, either clear security or editDefaultEnvironmentto reference a valid environment that accesses the new service pack. -
Replace all references to the production environment (for example, PD910) with a valid environment that will access the new service pack (for example, PY910).
A.1.2 Registering an Existing Enterprise Server with Server Manager
Any Enterprise Server running Tools Release 8.97 and greater should be registered with Server Manager. For details, refer to the section entitled: "Register or Create a JD Edwards Enterprise Server as a New Managed Instance" in the JD Edwards EnterpriseOne Server Manager Guide.
A.1.3 Understanding PORTTEST
To ensure that the new tools release is properly installed on the Enterprise Server, complete the following task to run PORTTEST on all environments accessing the new tools release.
Note:
If Security Server is on, then JD Edwards EnterpriseOne services must be running beforePORTTEST can be run.This section contains the following topics:
A.1.3.1 Running the PORTTEST
This section discusses the procedure to run the PORTTEST command on a UNIX Enterprise server.
-
Log on the Enterprise Server as the new user that you created in Creating a New User and Group.
-
Enter these commands:
cd mount_point/JDEdwards/host_code_dir/system/bin32PORTTEST userid password environmentwhere userid is a valid Release 9.1 user, password is the password for that user, and environment is the environment you are verifying. These parameters are case-sensitive.
-
Repeat the
PORTTESTcommand for each environment accessing the new service pack.
A.1.3.2 Starting the Services
This section discusses how to manage Services on a UNIX Enterprise Server.
-
Navigate to the drive and directory that contains the JD Edwards EnterpriseOne host code. For example:
cd /mount_point/JDEdwards/host_code_dir/system/bin32 -
Enter the following command:
./RunOneWorld.sh
A.2 Understanding Multiple Foundation Code on the Deployment Server
This chapter discusses:
A.2.1 Installing Multiple Tools Releases on the Deployment Server
-
Sign on to the Deployment server using the JDE user ID.
-
Make sure that all JD Edwards EnterpriseOne processes (for example, Solution Explorer) are not running.
-
On the Deployment server, navigate to this directory:
z:\JDEdwards\E910where z: is the drive on which the JD Edwards EnterpriseOne host code is installed.
-
In the
E910directory, create a directory calledSystem_TR_Originalwhere TR_Original is the release number of the tools release currently installed. For example,
System_894_M1. -
From the
\JDEdwards\E910directory, copy (not move) the following directories to the newSystemdirectory (System_TR_Original) that was just created. This will serve as backup or rollback location for the previous release.SystemSystemCompOneWorld Client InstallCaution:
Ensure you do not move these directories; they are required in both locations. This is because the installer needs to save a copy of thejdbj.iniandjas.inifiles so you can relocate them in the new system directory.Note:
If you get a warning message, it indicates files are locked. You need to ensure that JD Edwards EnterpriseOne or any other application is not running and causing a lock on any file. -
If the Deployment Server is directly connected to the Internet, run the installation using one of these two methods to acquire the tools release:
-
Change Assistant
-
Directly from the Update Center
In either case it is recommended to save the downloaded executable to a temporary directory and run it later from there.
-
-
When you run the downloaded executable, you will receive a dialog indicating that the files are extracting.
-
On Installation Complete, click OK.
The program installs the new
System,SystemComp, andOneWorld Client Installfiles and directories onto the Deployment Server. -
In the
E910directory, create another new directory calledSystem_TR_NewwhereTR_Newis the release number of the tools release being installed. For example,System_91_A1. -
Move the newly installed
System,SystemComp, andOneWorld Client Installfiles and directories into the new directory:\JDEdwards\E910\System_TR_NewFor example,
\JDEdwards\E910\System_91_A1. -
Restore the original directories by copying the
System,SystemComp, andOneWorld Client Installdirectories fromSystem_TR_originalto the base installation directoryx:\JDEdwards\E910. -
Locate the
jde.iniin this location:\JDEdwards\E910\System_TR_New\OneWorld Client Install\Misc -
Modify the above-located
jde.inito change the port to that on which you wish to run the multiple foundation. For example, valid ports might be 6014, 6015, etc.
A.2.2 Adding a New Machine Record for the New Tools Release
-
On the Deployment Server, log on to the deployment environment.
-
From the Fast Path menu, run P9654A.
-
On Work with Locations and Machines, click Find and expand the location tree.
-
Click Enterprise Servers and then click Add.
-
On Enterprise Server Revisions, complete the following fields:
Field Description Machine Name Enter the name of your existing primary Enterprise Server. Description Enter a description for the machine. Release Enter E910. Host Type Click the visual assist button and select the type of Enterprise Server. Port Number This should match the port number previously set in the new tools release jde.iniDatabase Type Click the visual assist button and select the type of database being used on the Enterprise Server. Installation Path Enter the installation directory path in which Release 9.1 is installed on the Enterprise Server. -
Click OK.
Note:
For Oracle databases, the program prompts for a connect string. Enter or verify the connect string and click OK. -
On Work with Locations and Machines, click Find and expand the tree.
-
Expand the Enterprise Server, click the newly added machine and click Select.
-
On Enterprise Server Revisions, click the Environments form exit.
-
On Machine Environments Revision, add the environments which you want to access with the new tools release. You can add the environments either by typing their names into the grid or by selecting them using the visual assist.
-
Click OK twice to return to Work with Locations and Machines.
A.2.3 Modifying the Existing Machine Record to Remove Environments
-
On the Deployment Server, log on to the deployment environment.
-
From the fast path menu, run P9654A.
-
On Work with Locations and Machines, click Find and expand the location tree.
-
Expand Enterprise Servers, click the initial Enterprise Server machine record and click Select.
-
On Enterprise Server Revisions form, click the Environments form exit.
-
Delete all the environments that you added in the previous section.
This should leave you with only those environments that you have defined to access the production tools release (for example, PD910).
-
Click OK twice.
A.3 Working with Packages for Multiple Foundations
Deploying the new tools release is easily done using the Package Build application by using a non-default foundation. Use these steps to create and include a new foundation for the multi-foundation tools release.
-
Sign on to the Deployment Server using the JDE user ID.
-
Sign on to EnterpriseOne using the JDE user ID into the Deployment (DEPXXX) environment.
-
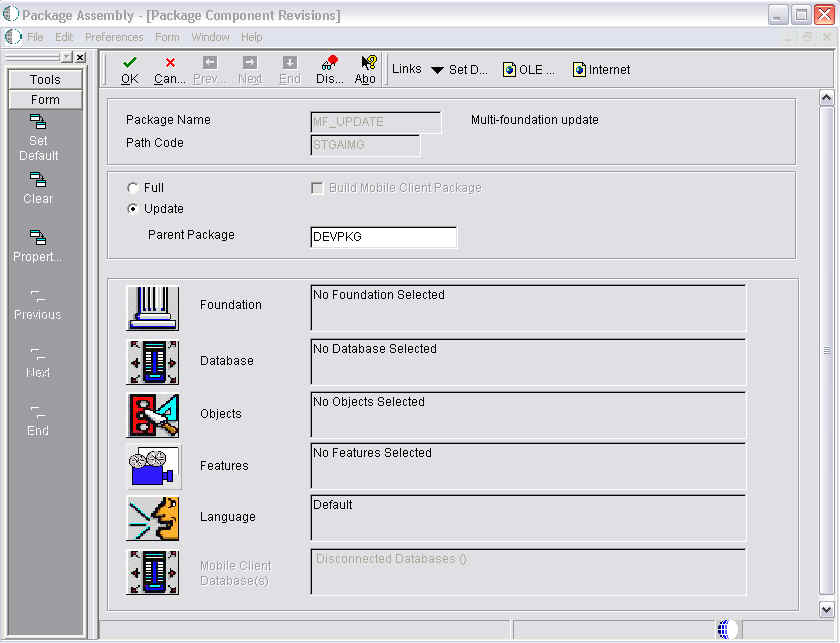
Launch the Package Assembly application from menu GH9083.
-
On Package Component Revisions, select the Multi-foundation Update Package and enter a valid value for the Parent Package.
-
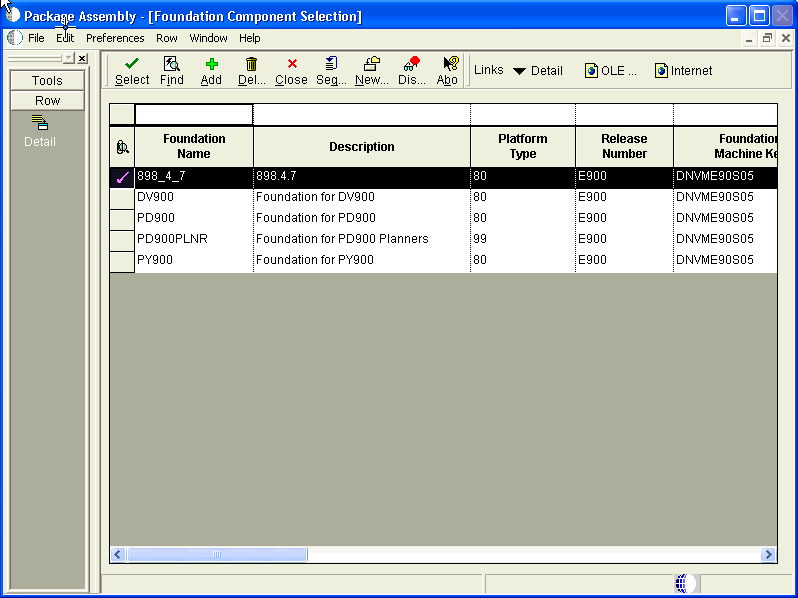
On Foundation Component Selection, search for and select the new update package you specified in the previous screen.
-
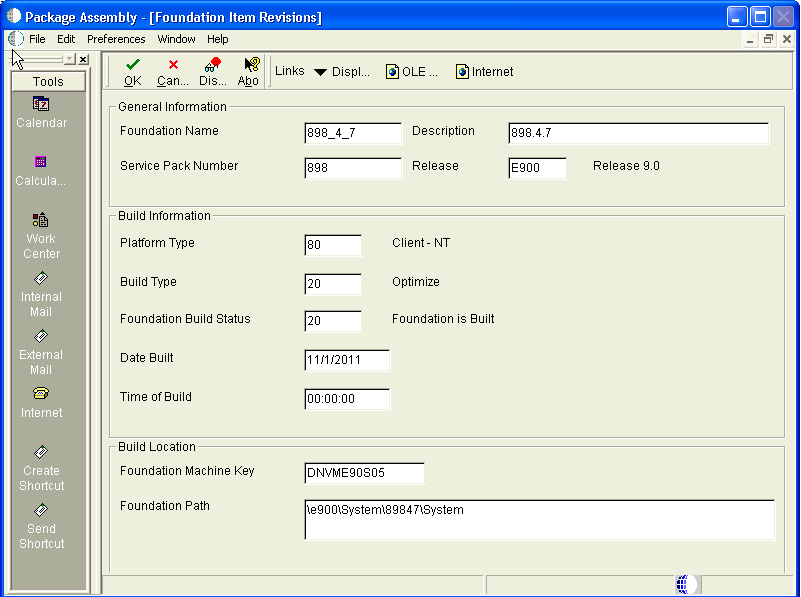
On Foundation Item Revisions, complete these fields:
Item Value Description Foundation Name TR_NewVersion Enter a unique name of the foundation. For example, 896_A1.
Description TR New Version Enter a description corresponding to the new foundation name. Service Pack Number TR New Number Enter an arbitrary tools release number where the maximum string value is four characters. For example: 896A.
Release E1 Release Use visual assist to appropriately select the EnterpriseOne release level. Platform Type 99 – Client Enter Client because the foundation is to be deployed to the development client workstation. Build Type 20 – Optimize You must select optimize as the build type. Foundation Build Status 30 – Build is Available You must identify the package build as available. Date Built Installed Date Enter the date the tools release was installed. Time of Build Time of Installation You can enter any time. Typically you should enter the approximate time the installation was performed.
Foundation Machine Key Deployment Server Name Enter the UNC name of the deployment server. Foundation Path path Enter the relative path to the new system folder. Be sure to include the front –\– and the System directory at the end. For example:
\E910\System_TR_New\System -
Click OK to save the Foundation Item Revision information.
-
On Foundation Item Revisions, select the browse button.

-
On Foundation Component Selection, select the Multi-foundation Update Package by clicking the first column of the selected row.
Ensure that the checkmark displays in the first column of the selected row record.
-
Click Add to create a new foundation to be used.

-
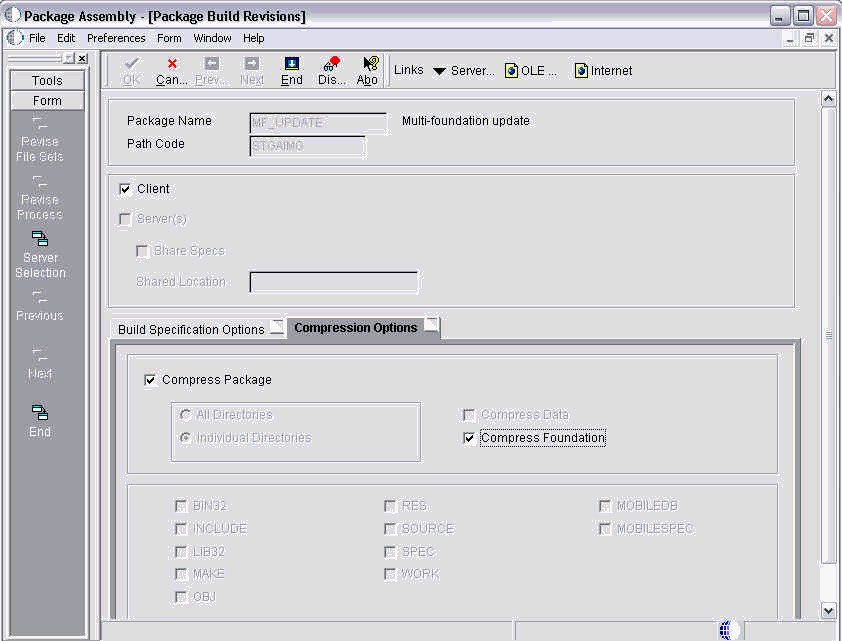
On Package Component Revisions, verify that the Multi-foundation Update Package you added is displayed in the Foundation field and click OK.
-
On Package Build Revisions, select the Compression Options tab and select your compression options.
-
Click End to complete the Package Assembly process.
-
Proceed to build and deploy the package.
A.4 Working with the Development Client
Use the procedure in this section to set up your Development Client.
-
On the GH9083 menu, launch the Package Build application.
-
Create an update package by selecting Package Assembly and then Add.
-
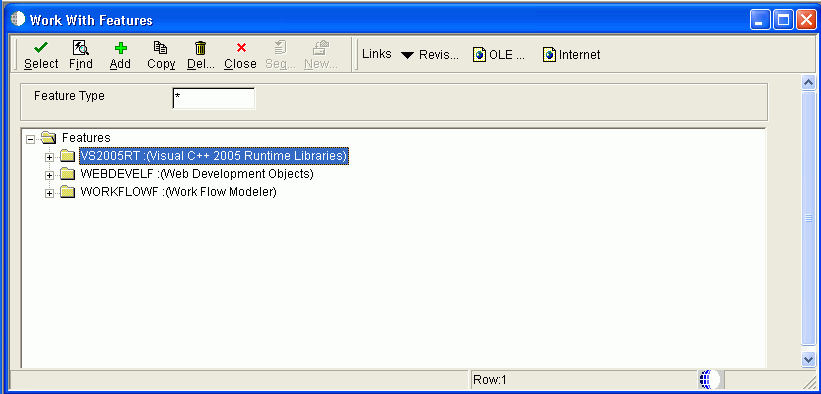
On the Work With Features, select Add.
-
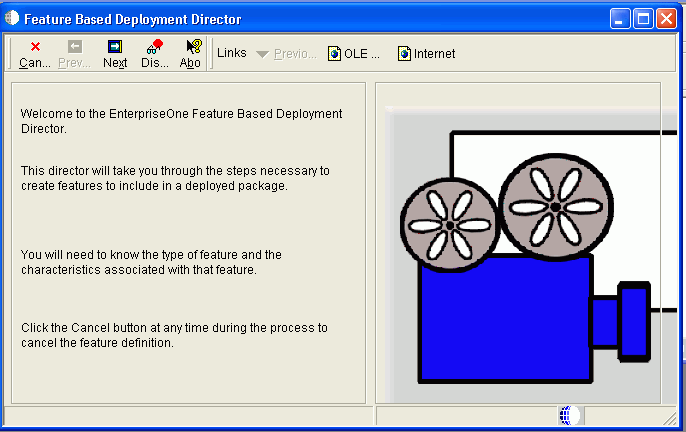
On Feature Based Deployment Director, click Next.
-
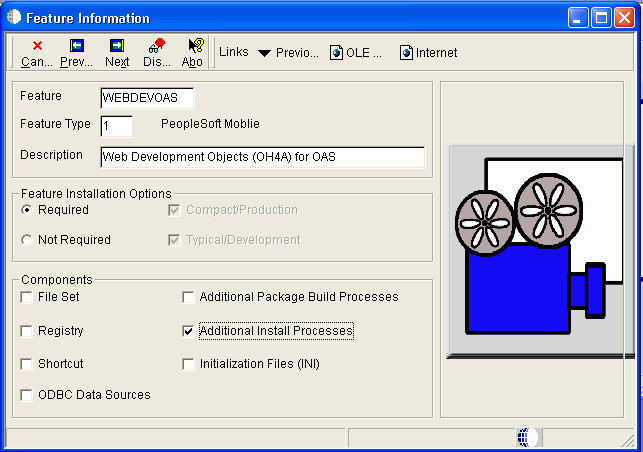
On Feature Information, complete these fields:
Field Description Feature Type Enter a valid value for this feature type. Description Enter a description for the machine. Feature Installation Options Select your feature installation options by checking the appropriate check boxes. Components Verify this check box is selected: Additional Install Processes -
Click Next.
-
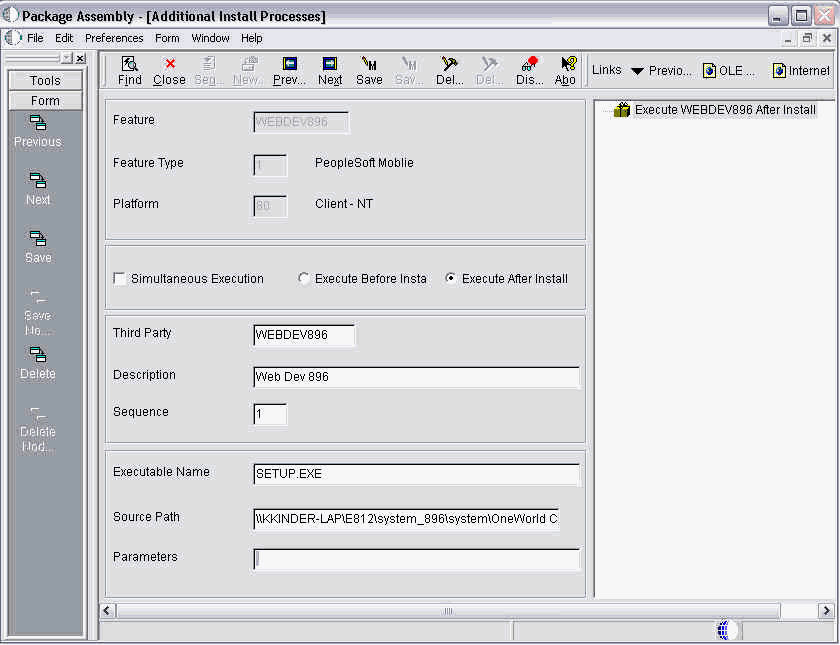
On Package Assembly, Additional Install Processes, complete these fields:
-
Feature
Enter a meaningful name for the feature. For example, if you are using OAS:
WEBDEVOAS
If you are using WAS, an example would be
WEBDEVWAS
You can specify any name for the feature.
-
Feature Type
Enter the value1.
-
Description
Enter a description. For example:
Web Development Objects (OH4A) for OAS
or
Web Development Objects (H4A) for WebSphere Express
You can specify any name for the description.
-
Required
Ensure this option is selected.
-
Additional Install Processes
Ensure this option is selected.
-
-
Click Save.
-
Click Next.
-
Continue with the rest of the package assembly; there is no need to select any objects.
-
Define the package and, when prompted, make sure to select:
Build Feature Inf -
Submit the package, which creates the new feature
.inffor Web Development.The newly created feature .inf file is located in the
package.infdirectory.Note:
For any subsequent package builds for the non-default foundation for which you want to include webdev feature, you can use the package that you created with this procedure.
A.5 Editing the Development Client jde.ini File
Note:
If you are using Snapshot, you do not need to manually edit thejde.ini file to manage multiple clients for multiple foundations, as described in this procedure.This section describes editing the jde.ini file for a Development Client.
In order for the Release 9.1 clients to access the new tools release, you must edit the jde.ini file on each client to point to the new directory.
Complete the following task on all Release 9.1 clients that have path codes that will access the new tools release.
Note:
You will be unable to access multiple tools releases with a single client. To access multiple tools releases, you will need to install a different client for each tools release. This will require using the Snapshot application to save each client before installing the next one.-
On the Release 9.1 workstation, open Microsoft Windows Explorer, and navigate to your Microsoft Windows directory. For example:
cd c:\WINDOWS -
Open the
jde.inifile. -
Locate the
[JDENET]section, and edit the port settings forserviceNameListenandserviceNameConnect. Change these entries to match those of the serverjde.inifile for the new tools release.
[JDENET]
serviceNameList=portNumber
serviceNameConnect=portNumber
where portNumber is the same port number you entered in the jde.ini file on the Enterprise Server.
A.6 Setting up the Multiple jde.ini Files on the Deployment Server
You may need to set up multiple jde.ini files on the Deployment Server to address the requirement for the Development Client to access different pathcodes and ports for different application releases of JD Edwards EnterpriseOne. For details, refer to the appendix of this guide entitled: Appendix C, "Data by Pathcode".