| Oracle® Application Testing Suite Getting Started Guide Version 9.01 for Microsoft Windows (32-Bit) Part Number E15487-02 |
|
|
View PDF |
| Oracle® Application Testing Suite Getting Started Guide Version 9.01 for Microsoft Windows (32-Bit) Part Number E15487-02 |
|
|
View PDF |
This tutorial walks you through the main features of Oracle Functional Testing for Web Applications. The tutorial consists of the following examples:
Recording a New Visual Script - describes basic recording of Visual Scripts.
Working with Visual Scripts - describes the features and components of Visual Scripts and how to modify the default tests.
Playing Back a Visual Script - explains the procedure for playing back Visual Scripts and the option settings for playback and the results log.
Analyzing Test Failures - explains how to analyze the differences found between the baseline set of Web pages and a new version.
Adding Test Cases to the Visual Script - explains how to add test cases to your Visual Scripts.
Using the Data Bank Wizard on a Search Form - introduces the Data Bank Wizard and explains how to use the Data Bank Wizard to run iterative tests on a search form using data from an external file.
Using the Data Bank Wizard on a Registration Form - explains how to use the Data Bank Wizard to create automated data-driven tests.
The tutorial is designed to be followed sequentially from beginning to end. Many of the examples are interrelated and build upon the steps in previous examples.
The tutorial uses two versions of web pages to demonstrate the capabilities of Oracle Functional Testing for Web Applications. To make sure the initial version of the tutorial web pages is the current version, do the following:
Select Programs from the Start menu and then select Build A - Home Superstores from the Oracle Application Testing Suite submenu. A command window will appear briefly as the batch file copies the Build A files.
Close the command window, if necessary.
This example illustrates the creation and recording of a Visual Script.
Select Programs from the Start menu and then select Oracle Functional Testing for Web Applications from the Oracle Application Testing Suite submenu to start Oracle Functional Testing for Web Applications.
Select Open Workspace from the File menu, select RSWDemo as the Workspace, and click OK to get to the main window.
Note:
If you installed this version of the Oracle Application Testing Suite over a previous version, your default installation directory will still be the old directory. If this version is the first time you installed the Oracle Application Testing Suite, the default installation directory is c:\OracleATS\OFT.Type c:\OracleATS\OFT\rswdemo\index.htm in the URL drop down list and then press ENTER. (The tutorial assumes that you installed Oracle Functional Testing for Web Applications in the default c:\OracleATS\OFT directory. If you installed to another directory, enter the appropriate path.)
Figure 4-1 Oracle Functional Testing for Web Applications Main Window
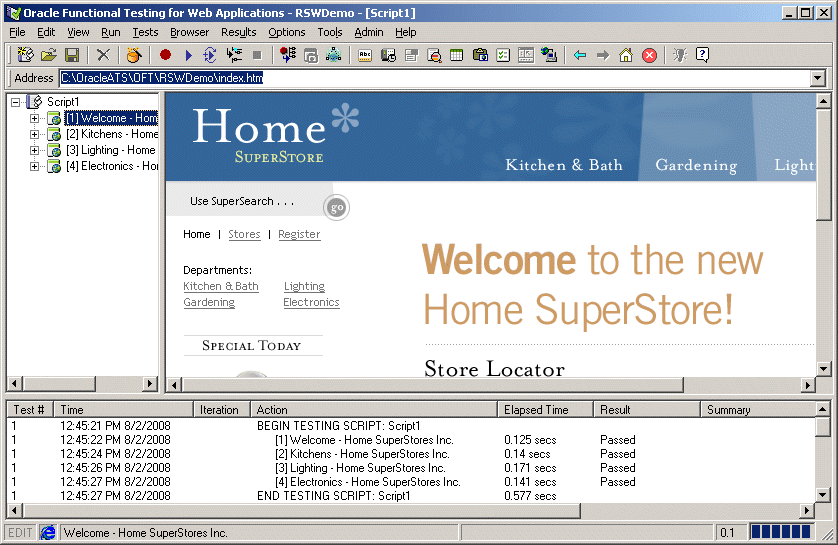
Oracle Functional Testing for Web Applications opens the Home Superstores tutorial Web page into the Browser pane.
Select New Script from the File menu and select No if asked to save changes to Script1.
Click the Record button on the toolbar. Oracle Functional Testing for Web Applications is now recording your actions as indicated by the REC in the status bar. The [1] Welcome - Home Superstores Inc. title is recorded into the Visual Script pane.
Click on the Kitchen and Bath link on this page. The Kitchen and Bath page appears in the Browser pane and the address should show c:\OracleATS\OFT\rswdemo\kitchen.htm. You should now see [2] Kitchens - Home Superstores Inc. in the Visual Script.
Click on the Lighting link on this page. The Lightings page appears in the Browser pane and the address should show c:\OracleATS\OFT\rswdemo\lighting.htm. You should now see [3] Lightings - Home Superstores Inc. in the Visual Script.
Click on the Electronics link on this page. The Home Electronics page appears in the Browser pane and the address should show c:\OracleATS\OFT\rswdemo\etronics.htm. You should now see [4] Electronics - Home Superstores Inc. in the Visual Script.
This example explains the features of the Visual Script tree and how to examine the structure and content of a Web page. It also explains how to modify the built-in Oracle Functional Testing for Web Applications tests.
Before starting this example, make sure the Visual Script that you recorded in Example 1 is still displayed.
Select Resize Visual Script View from the View menu to expand the Visual Script pane.
Click the [1] Welcome - Home Superstores Inc. node in the Visual Script and then click the Plus next to the node. The script shows the Address and Frame nodes to the page tree.
Click the right mouse button and select Expand Page to show the entire page tree, which should look similar to the following:
Figure 4-2 Oracle Functional Testing Visual Script Tree
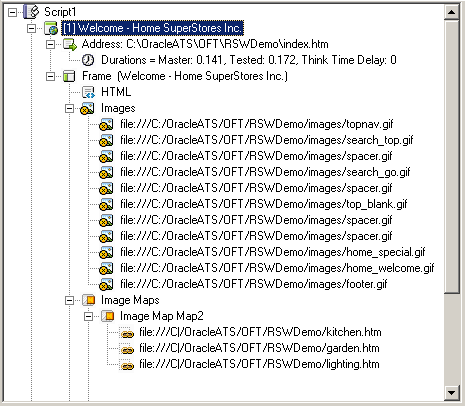
The [1] Welcome - Home Superstores Inc. page contains the following nodes in the tree:
A Duration node under the Address node that displays how long it took to download the page and the think time delay associated with the page. The think time delay is the actual amount of time the user spent on the page before going to another page. For additional information about think time delay, see the online help.
A Frame node that is the main frame for the entire page. Below this node are the other constituents of the page.
An Images node that has all the images in the page under it.
A Image Maps node that has all image maps in the page under it.
A Scripts node that has all the VBScripts and JavaScripts under it.
A Links node that has all the links in the page under it.
Note:
Web pages that include Frame Sets, Anchors, Forms, Elements, Active X objects, Java Applets, etc. will have additional tree nodes displayed in a similar fashion.Select the HTML node in the Visual Script.
Click the right mouse button and select HTML Properties. The following dialog box is displayed:
You can get more information about any item in the Visual Script using the Properties option. The properties for the different items vary.
Close the Properties dialog box.
Repeat steps 5 and 6 with any other items in the tree and view the properties.
Select the Frame node in the Visual Script.
Click the right mouse button and select Don't Test Frame. Notice a small yellow circle appears next to the Frame node to indicate that the automatic existence test for the frame is turned off, as shown below:
Click the right mouse button and select Test Frame. The yellow circle disappears to indicate that the automatic existence test is activated.
Note:
Oracle Functional Testing for Web Applications maximizes your productivity by virtually eliminating the need to program test scripts. When a Visual Script is recorded, it captures your interaction with the Web application under test. A series of default test cases are automatically generated and added to the Visual Script. These tests are designed for Images, Links, Frames, Forms, Elements, HTML, Java Applets, ImageMaps, and Active-X controls and can be customized to suit your requirements.Select Current Script (tutor1) from the Options menu and then select Content Tests in the Functional Tests section.
This dialog box indicates which comparison tests will be performed on which page attributes as default tests for the current script. You can enable or disable testing of specific attributes by selecting or clearing the appropriate check box(es). You can set global defaults for all Visual Scripts by selecting New Scripts (Global) from the Options menu and then selecting Content Tests in the Functional Tests section.
Make sure the following check boxes are selected:
HTML.
Images.
Scripts.
Links.
Frames.
Click OK.
Select the [1] Welcome - Home Superstores Inc. node in the Visual Script.
Click the right mouse button and select Page Content Tests Manager. The Content Tests Manager dialog box opens.
Figure 4-6 Content Tests Manager Dialog Box
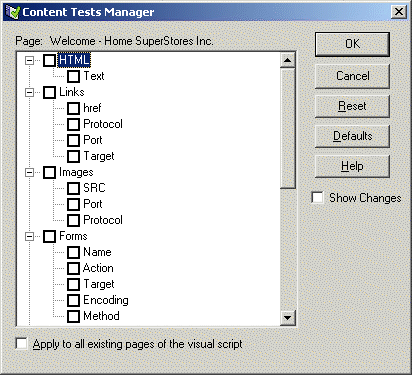
This dialog box indicates which comparison tests will be performed on which page attributes as default test cases for a specific page. You can enable or disable testing of specific page attributes by selecting or clearing the appropriate check box(es), and clicking the OK button.
Clear the Images check box, and press the OK button. A yellow circle appears next to the Images node in the Visual Script for the image collection, as shown below:
When the Visual Script is played back, all Image tests will be ignored.
This example explains the procedure for playing back Visual Scripts that you have recorded. It also shows the option settings for playback and the results log.
Select Current Script from the Options menu and then select Results Log in the Results section. Make sure the Append to log and All details radio buttons are selected.
Select Results Report in the Results section and make sure the Automatically create report after script playback option is selected.
Select General in the Playback section, make sure the Automatically Run Resource Validation After Playback check box is selected, and then click OK.
Select Resize Visual Script View from the View menu to expand the Browser pane.
Click the Playback Script button to play back the recorded script. The pages in the script will be played back in the order recorded. The Browser navigates to each page, executes the default tests for each page, and shows the results visually in the script. At the end of the play back, Oracle Functional Testing for Web Applications runs a Resource Validation test and shows the results.
The Resource Validation test checks the integrity of the referenced resources (i.e. links, images, etc.) in your pages.
The "passed" results indicate that all referenced resources are available.
Click the Close button to close the Resource Validation window.
Oracle Functional Testing for Web Applications automatically generates a results report and opens the report in a new browser window:
Note:
The Results Report uses active content. If the links in the report are not working, check if the browser shows the restricted active content security warning at the top of the browser. If so, click on the warning and select Allow Blocked Content. Use the browser Internet Options to set the default settings for allowing active content. Select Browser from the Options menu and click the Advanced tab. Select the Allow active content to run in files... setting under the Security section if you do not want the restricted active content security warning to appear each time the Results Report is generated.Click on the page names in the Script Summary section to view the information for each page.
Notice that all tests passed. This is because you played back the script using the same version of the Web pages that was used to record the script. This establishes a baseline of tests for the Web application or Web site's content and structure.
Close the browser window when finished with the report.
The Results pane also shows a summary of the playback actions.
In the next example, you'll see how playback and the results are affected by Web page changes.
This example explains how to analyze the differences found between the baseline Web pages and a new version with changes. The Oracle Functional Testing for Web Applications tutorial includes a batch file that copies a new version of three of the pages that you recorded in Example 1.
Select Programs from the Start menu and then select Build B - Home Superstores from the Oracle Application Testing Suite submenu. This runs a batch file that updates the Home Superstores page to a new version.
If necessary, close the command window after the batch file finishes copying the files.
Click the Playback Script button to play back the recorded script again. The pages are played back in the order recorded.
The resource validation test found one resource that failed. There is one failed image called moviei.gif. The results of the resource validation test are displayed in the output log window and the failure will be displayed under the appropriate pages with red flags.
Click the Close button to close the Resource Validation window and close the Results Report browser window.
Notice the red circles next to the pages in the Visual Script, as shown below:
Figure 4-11 Visual Script with Failure Markers

Note:
Oracle Functional Testing for Web Applications displays errors and problems encountered during playback using simple color-coded circles in the script itself. Test results are displayed dynamically in the Visual Script tree as the script is being played back. You can double-click on any error event in the result log pane to advance to the corresponding page in the script. Errors encountered upon Visual Script playback can be rejected, ignored, or can be accepted to create a modified baseline script.Select Find Next Failure from the Results menu, or press the F3 key to locate the next failure in the Visual Script. The first page [1] Welcome - Home Superstores Inc. has two places where differences are indicated: Different HTML and New Links with two new links under the Tested node. The new links are admlist.htm and adminfo.htm.
Occasionally, you may want to ignore a known problem or discrepancy that does not affect the overall test being performed.
Locate the Master: Html node under the Different Html node.
Click on the Different Html node, and then click the right mouse button and select Ignore This Failure. This adds a yellow circle to the Different Html node to indicate that the failure caused by the HTML change should be ignored, as follows:
Figure 4-13 Ignore This Failure Script Node Marker
Press the F3 key to get to the New Links item and expand the Tested node to view the new links.
Click on the New Links item, and then click the right mouse button and select Ignore This Failure. This adds a yellow circle to the New Links node to indicate that the failure caused by the presence of new links should be ignored.
Figure 4-15 New Links Script Node with Marker

Often, you will get new versions of Web pages that you want to use as the new baseline for testing.
Follow the red circles in the [2] Kitchens - Home Superstores Inc. page.
The problems on this page are indicated by the presence of two nodes called Different Html and Different Script. Below the Different Html node are the recorded and tested versions of the HTML for the current page. Below the Different Script node are the recorded and tested versions of the JavaScript function that has changed for the current page.
Figure 4-16 Different Html and Different Script Nodes
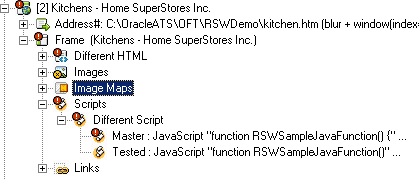
Double-click on the Different HTML node and a dialog box with the differences for the HTML opens.
Click Next Difference as many times as necessary to locate the following differences between Master and Tested page HTML source.
Figure 4-17 Master and Tested Page HTML Source Differences
Notice that the changes are textual changes to the Web page content. The Master text (baseline for testing) is shown in blue. The tested text (new version) is shown in red.
Click the Cancel button to close the window.
Repeat the same process for the Different Script node.
Select the [2] Kitchens - Home Superstores Inc. page node and select Accept Tested Page from the right-click shortcut menu. The red circles in the Visual Script for that page disappear. The accepted change becomes the new baseline for future testing of this page.
There may be times when you do not want a change to a Web page to be accepted as the new baseline for testing.
Follow the red circles in the [4] Electronics - Home Superstores Inc. page.
The problems on this page are indicated by the presence of two nodes called Different Html and Different Image. Below the Different Html node are the recorded and tested versions of the HTML for the current page. Below the Different Image node are the recorded and tested versions of the image found on this page.
If necessary, expand the Different Image node to display the Master and Tested Image nodes. You will notice that the file name of the image file is spelled differently [movie vs. movei]
Figure 4-18 Master and Tested Image Differences
The Master node has a red circle because playback revealed that the link to the image is no longer in the HTML. The Tested node has a red flag because the image failed the Resource Validation test.
Double click on the Different HTML node and you will see the same spelling change in the HTML source for the page.
Figure 4-19 Master and Tested Image Differences
We wish to discard these differences and continue to use the original spelling as the baseline for testing in the Visual Script.
Click the Cancel button.
Select the [4] Electronics - Home Superstores Inc. page node and select Discard Tested Page from the right-click shortcut menu. This causes the originally recorded baseline to be left intact. The baseline differences will be discarded and all red circles will be removed.
Click the Playback toolbar button to play back the script again. Oracle Functional Testing for Web Applications still flags the Different HTML and the image name spelling problem in the [4] Electronics - Home Superstores Inc. page of the Visual Script.
Close the Resource Validation window and the Results Report.
Enter the name tutor1.log and click Save.
Select Save Script from the File menu to save the changed Visual Script.
Select Clear Results Window from the View menu to clear the results log pane.
This example explains how to add four types of test cases to your Visual Scripts. In addition to the automatic existence and resource validation tests, Oracle Functional Testing for Web Applications provides the ability to add the following test cases to the pages in your Visual Script:
Text Matching
Server Response
Form Element
Table Test
WinForms Test
Siebel Test
Select Programs from the Start menu and then select Build A - Home Superstores from the Oracle Application Testing Suite submenu. This batch file restores the original Web pages for the Home Superstores site.
If necessary, close the command window.
Select New Script from the File menu to create a new Visual Script.
Reload the c:\OracleATS\OFT\rswdemo\index.htm page in the Browser pane by selecting it from the Browser drop-down list.
Click the Record button on the toolbar.
Click on the Register link in the Browser pane. The Registration page appears in the Browser pane and the address should show c:\OracleATS\OFT\rswdemo\register.htm.
Type Admin as the first name, enter any email address, and phone in the text area, and click the submit my entry button. The Browser returns the Database Authorization and Administration options of he registration page (regres.htm).
Click the Stop button on the toolbar to stop the recording. The Visual Script pane should list three pages in the script.
Text Matching test cases compare selected text from a Web page to the text you specify in the test case.
Select [3] Registered - Home Superstores, Inc. in the Visual Script.
Click the right mouse button and select Goto Page to open the Registered - Home Superstores, Inc page in the Browser.
Scroll the Browser pane so that the text "Database Authorization and Administration" is visible.
Highlight the "Database Authorization and Administration" text with the mouse.
Click the Insert Text Matching Test Case button on the toolbar.
Oracle Functional Testing for Web Applications captures the highlighted text and opens the Insert Text Matching Test Case dialog box.
Figure 4-20 Text Matching Test Properties Dialog Box
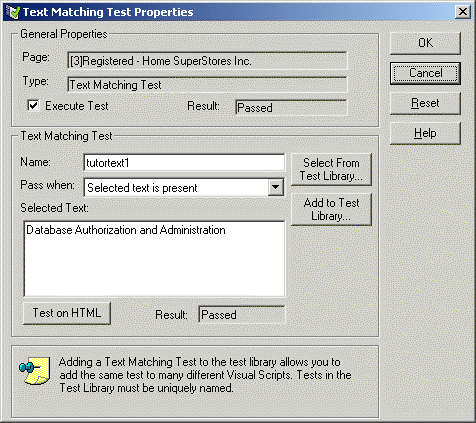
Type tutortext1 as the test case name.
Make sure the Pass when: option is set to Selected text is present.
Click OK and view the test case in the Visual Script. Oracle Functional Testing for Web Applications adds the test case to the Visual Script under the Frame node.
Figure 4-21 Text Matching Test Script Node
Server Response test cases measure the response time of a server access for a page in the Visual Script.
Select the [2] Registration - Home Superstores, Inc. item in the Visual Script.
Click the Insert Server Response test case button on the toolbar. Oracle Functional Testing for Web Applications opens the Insert Server Response Test Case dialog box.
Figure 4-22 Server Response Test Properties Dialog Box
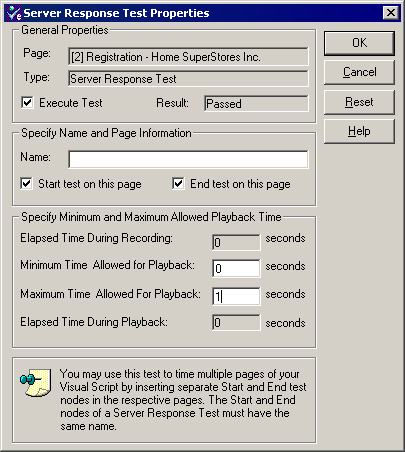
Type TutorTimer1 as the test case name.
Set the Maximum Time Allowed for Playback option to 5 seconds. Leave the Minimum Time at 0 seconds.
Click OK and view the test case in the Visual Script. Oracle Functional Testing for Web Applications adds the test case to the Visual Script between the Address and Frame nodes.
Figure 4-23 Server Response Test Script Node

Form Element test cases compare attributes and values of the elements in an HTML form.
Select Current Script from the Options menu and then select Content Tests in the Functional Test section. Make sure the Forms and Form Elements check box are selected and click OK.
Select the [2] Registration - Home Superstores, Inc. item in the Visual Script.
Expand the page and select the TodaysDate element of the regres.htm form.
Select Insert Form Element Test from the Tests menu. Oracle Functional Testing for Web Applications opens the Form Element Test dialog box.
Figure 4-25 Form Element Test Properties Dialog Box
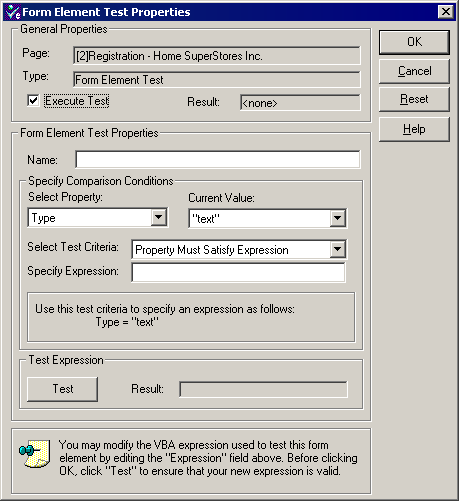
Type TodaysDate as the test case name.
Set the Select Test Criteria to Property Must Satisfy Expression.
Click the Test button. Oracle Functional Testing for Web Applications should return True in the Result field.
Click OK and view the test case in the Visual Script. Oracle Functional Testing for Web Applications adds the test case to the Visual Script under the Form Element node.
Figure 4-26 Form Element Test Script Node

Table test test cases let you define a custom test on a Web page table object. The Table Test Wizard lets you select the table object directly from the Web page by highlighting it with the mouse. The wizard also lets you specify the table object property to test and the type of test to perform.
Select [1] Welcome - Home Superstores, Inc. in the Visual Script.
Click the right mouse button and select Goto Page to open the Welcome - Home Superstores, Inc page in the Browser.
Select Insert Table Test from the Tests menu. Oracle Functional Testing for Web Applications opens the Table Test Wizard.
Figure 4-27 Table Test Wizard Welcome Dialog Box
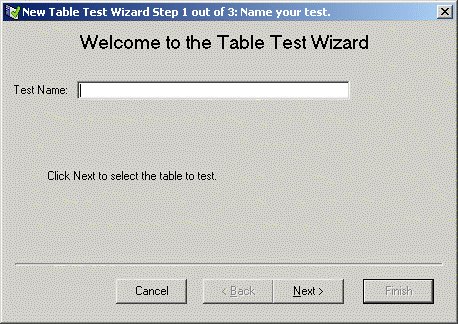
Type Depts as the test case name.
Click Next. The Select Table Element dialog box is displayed.
Figure 4-28 Select Table Element Dialog Box
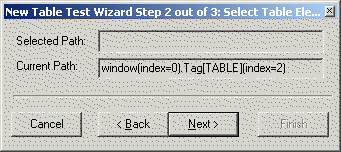
Moving the cursor over the web page highlights the tables on the page. Highlight the Departments area in the upper left-hand corner of the page.
Figure 4-29 Table Element Selected Example
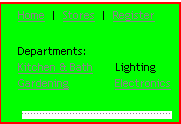
Select the table. The path is displayed in the Select Table Element dialog box. Click Next to display the Create your tests dialog box.
This dialog box displays the table in a spreadsheet format, showing the data that is in each table cell. The dialog box options change depending on the type of data in the cell. Cells that are checked will be tested. Select cell B2.
Figure 4-31 Create Table Test Dialog Box with Field Selected
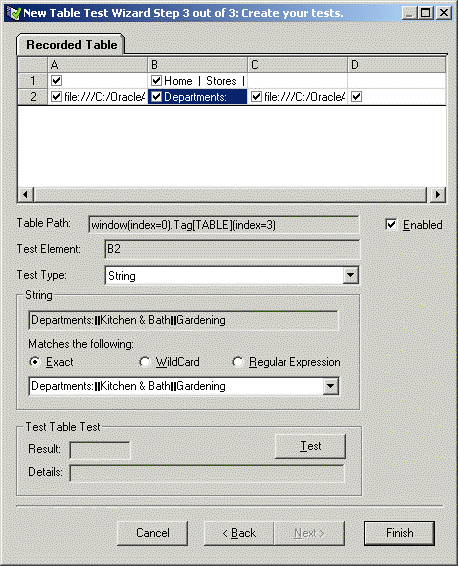
Make sure that Exact is selected in the Matches the following field.
Click Test to display the Last Played Table Tab. The result is displayed in the Result field.
Click Finish and view the test case in the Visual Script. Oracle Functional Testing for Web Applications adds the test case to the Visual Script under the User Defined Tests node.
Save the script as tutor2.
This example introduces the Data Bank Wizard and explains one way to use the Data Bank Wizard with the Text Matching test case to verify Search results pages. The Data Bank Wizard provides the capability to run iterative tests using data from a Data Bank file.
Select New Script from the File menu to create a new Visual Script (save the previous script if prompted).
Reload the c:\OracleATS\OFT\rswdemo\index.htm page in the Browser pane by selecting it from the Browser drop down list.
Click the Record button on the toolbar.
Scroll the Browser pane and click the Go graphic next to Use SuperSearch.
Enter Lamps in the Product Name field and click the Search button. Oracle Functional Testing for Web Applications records the search including the text you typed into the field.
Expand the [3] Results - Home Superstore, Inc page in the Visual Script. Notice the Search Parameter under the Address node of the tree.
Select Data Bank Wizard from the Edit menu.
Oracle Functional Testing for Web Applications opens the Data Bank Wizard window with the parameters from the Visual Script in the Parameters list.
Figure 4-34 Data Bank Wizard Variables Tab
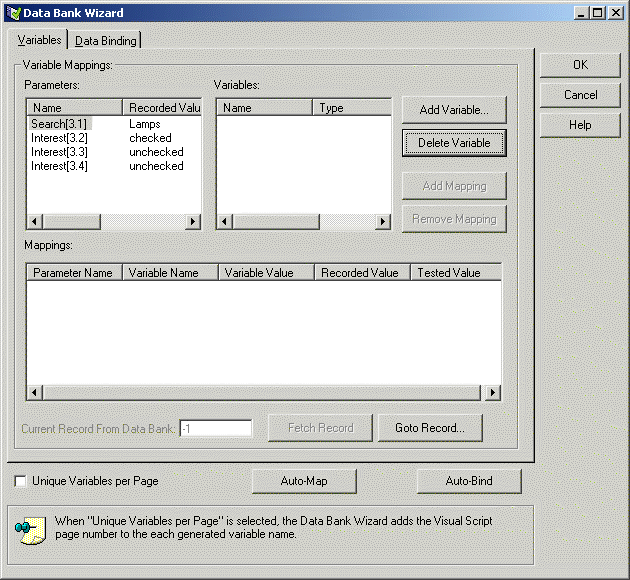
Click the Add Variable button. The Data Bank Wizard opens a dialog box for specifying a variable name.
Type SuperSearch as the variable name, and then click OK.
The Data Bank Wizard adds the name to the Variables list.
Figure 4-36 Data Bank Wizard with a Variable Added
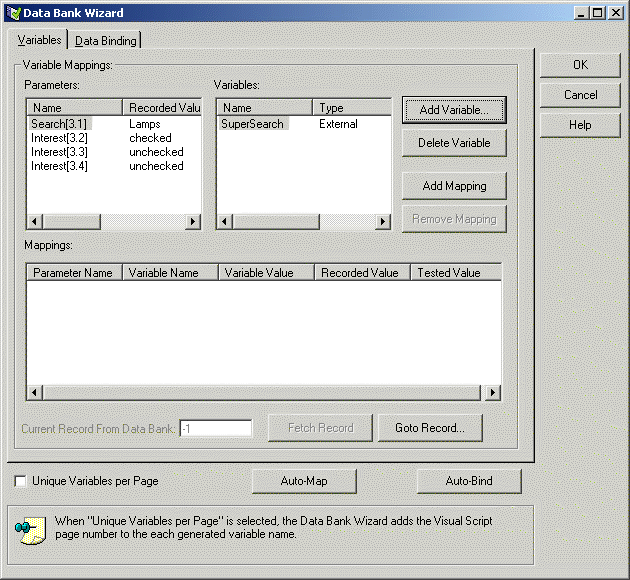
Select the Search[3.1] item in the Parameters list, and then click Add Mapping. The Data Bank Wizard creates a mapping between the Search[3.1] parameter and the SuperSearch variable. You now need to bind the variable name to a field in a Data Bank file.
Click the Data Binding tab. The Data Bank Wizard opens the Data Binding options with the variable name in the Variables list.
Figure 4-37 Data Bank Wizard Data Binding Tab
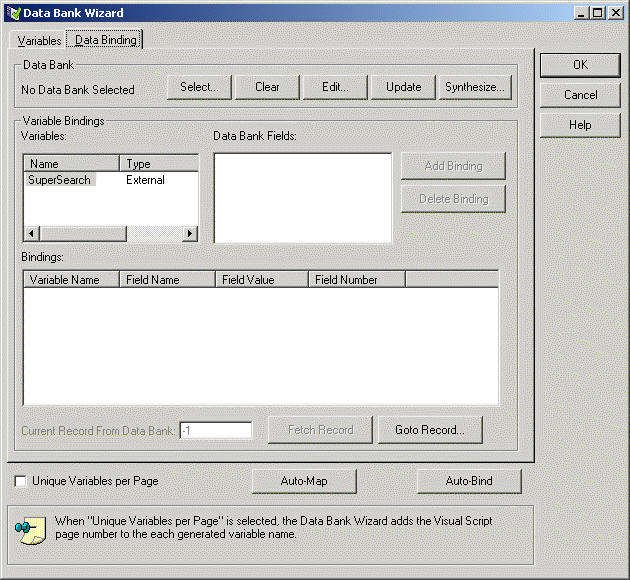
Now we want to select the Data Bank file that contains the values we want to use for iterative testing.
Click the Select button. The Data Bank Wizard opens a dialog box for selecting the Data Bank file.
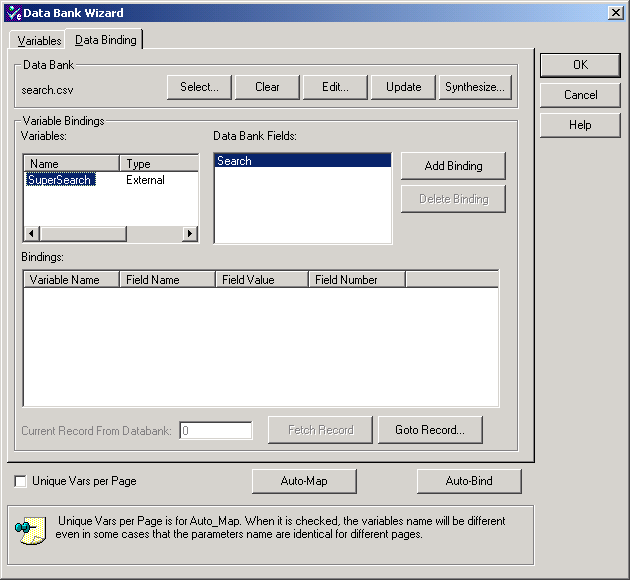
Select search.csv, and then click Open. The Data Bank Wizard adds the Field name from the Data Bank file.
Figure 4-39 Data Bank Wizard with a Data Bank File
Note:
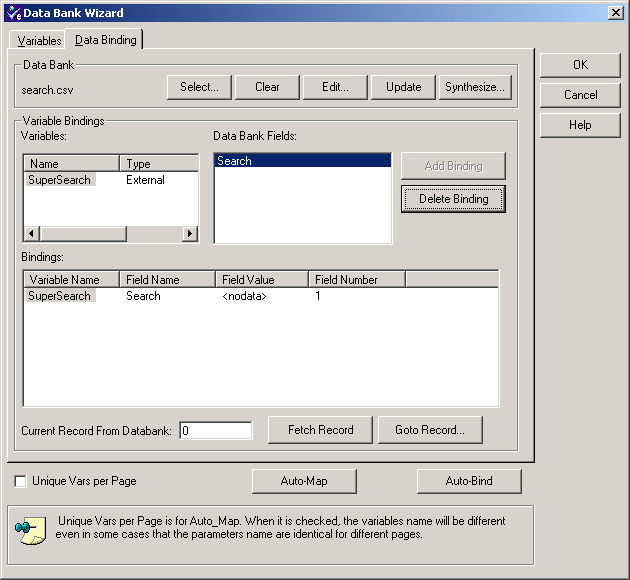
The Data Bank file is a comma-delimited ASCII file with the field names as column headers on the first line of the file. Subsequent lines of the file contain data. You can view the contents of any of the sample files in the c:\OracleATS\OFT\DataBank directory using Notepad or any other ASCII editor.Select the Search field in the Data Bank Fields list and then click the Add Binding button. The Data Bank Wizard adds the variable name to the Bindings list.
Figure 4-40 Data Bank Wizard with Bindings
Click Fetch Record to cycle through the records in the external data file.
Figure 4-41 Data Bank Wizard Fields and Records View.
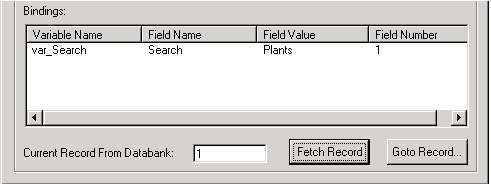
Continue clicking the Fetch Record button to cycle through all of the records in the file. There are five records in the sample Data Bank file.
Click the OK button to close the Data Bank Wizard.
Examine the Parameters node under the Address node of the Visual Script tree.
Figure 4-42 Data Bank Parameters Script Nodes

The Visual Script now includes the variable names as part of the Parameters. The check mark indicates that the parameter is mapped to a variable and bound to a field in a Data Bank file.
Now we want to insert a Text Matching text case that verifies that the search results were successful.
Highlight the text "successfully found" in the search results page shown in the Browser pane.
Click the Insert Text Matching test case button on the tool bar. Notice the text you highlighted is automatically captured by Oracle Functional Testing for Web Applications.
Type VerifySearch as the case name, make sure Pass when: is set to Selected text is present, and then click OK.
Select the HTML node in the Visual Script. Notice the yellow flag next to the HTML node. Oracle Functional Testing for Web Applications automatically turns off the HTML comparison test when you insert a Text Matching test.
Since the search criteria will be different for each search during iterative play back, we know the HTML and product images on the page will be different from the recorded master each time. Instead of testing the HTML and images, the Text Matching test case will be used to verify a successful search.
Save the Visual Script as tutor3.
Select Playback from the Run menu and then select Iterate. Oracle Functional Testing for Web Applications opens the Iterations dialog box.
Click the OK button to playback the Visual Script.
Watch as Oracle Functional Testing for Web Applications plays back the script several times using a different data value for the search each time.
Close the Results Report.
Notice the Results log indicates that the search using the Furniture value (record 3) fails. We now need to analyze this failure.
Select Data Bank Wizard from the Edit menu.
Click the Goto Record button. The Data Bank Wizard opens a dialog box for entering the record number.
Enter 3, and then click OK.
Click OK to close the Data Bank Wizard.
Click the Playback button on the toolbar to play back this one record.
Scroll the Browser pane to view the Search Results page. Notice that the page indicates there is no product information for Furniture. Oracle Functional Testing for Web Applications was able to find this problem because the Text Matching test case you added to test for a successful search produced a failure.
Make sure the [3] Results - Home Superstore, Inc page is still selected in the Visual Script.
Click the right mouse button and select Discard Tested Page from the shortcut menu. The red circles are removed from the Visual Script. The Master version of the Visual Script is still the baseline to use for testing of the Web page.
This example explains how the Data Bank Wizard makes it easy to create automated data-driven tests. Data Banks are used to hold unlimited amounts of input data that can be fed automatically into your Web application.
Select New Script from the File menu to create a new Visual Script.
Reload the c:\OracleATS\OFT\rswdemo\index.htm page in the Browser pane by selecting it from the Browser drop-down list.
Scroll the Browser pane and click the Register link. The Registration page contains a form for entering Name, Email Address, and Phone number information.
Enter your own information into the form and click the submit my entry button. The Results page returns showing the information you entered with a "successful registration" message.
Now we want to insert a Text Matching text case that verifies that the Registration results were successful.
Highlight the text "Your registration has been added" in the search results page.
Click the Insert Text Matching test case button on the tool bar. Notice the text you highlighted is automatically captured by Oracle Functional Testing for Web Applications.
Type VerifyRegistration as the test case name, make sure Pass when: is set to Selected text is present, and then click OK.
Select Save Script As from the File menu and save the file as tutor4.
Expand the [3] Registered - Home Superstore, Inc page in the Visual Script. Notice the Parameters under the Address node of the tree.
Figure 4-44 Parameters Script Nodes in the Script
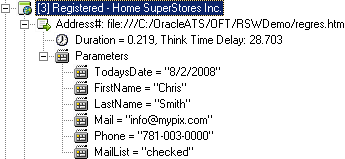
Make sure the [3] Registered - Home Superstore, Inc page is selected in the Visual Script.
Select Data Bank Wizard from the Edit menu.
Oracle Functional Testing for Web Applications opens the Data Bank Wizard window with all the parameters from the Visual Script in the Parameters list.
Figure 4-45 Data Bank Wizard Variables Tab
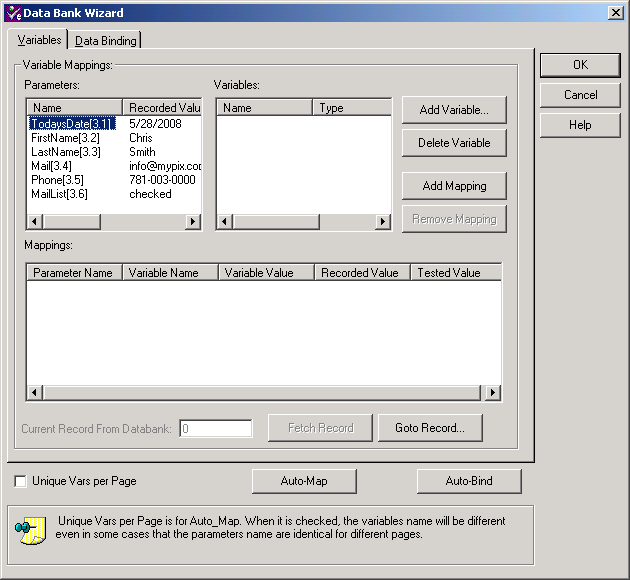
Click the Auto-Map button. The Data Bank Wizard automatically creates variable names and maps the variable names to the Parameter names.
Figure 4-46 Data Bank Wizard with Auto-mapped Parameters
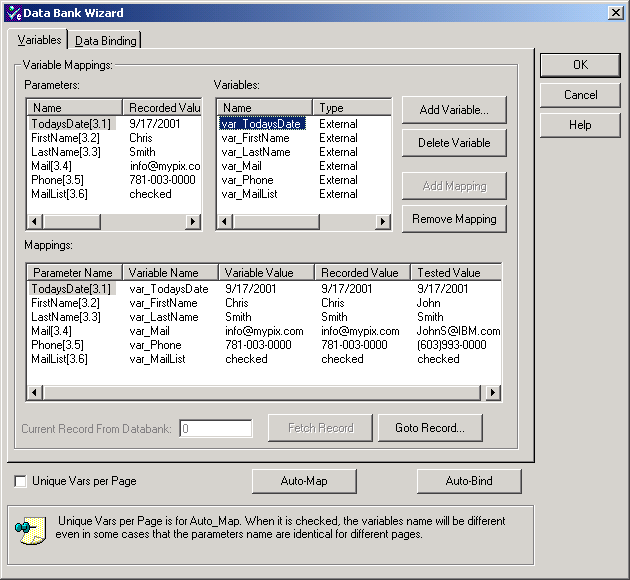
You now need to bind the variable names to fields in a Data Bank file.
Click the Auto Bind button. The Data Bank Wizard opens the Data Binding options with the variable names in the Variables list.
Note:
Auto Bind automatically creates a Data Bank file with field definitions and one record of data. It also automatically binds the fields to the variables created.Figure 4-47 Data Bank Wizard Data Binding Tab
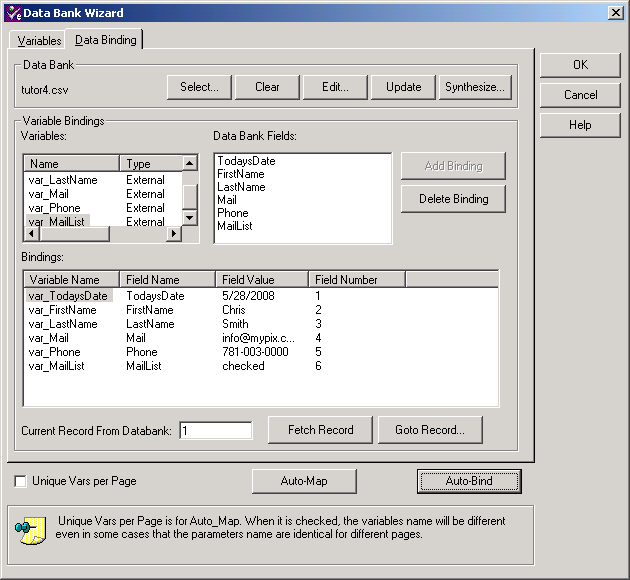
Now we want to select the data source that contains the values we want to use for iterative testing.
Click the Select button. The Data Bank Wizard opens a dialog box for selecting the Data Bank file.
Select customer.csv, and then click Open.
The Data Bank Wizard automatically re-binds the appropriate data field names from the Data Bank file to the variable names.
Figure 4-49 Data Bank Wizard with Bound Parameters
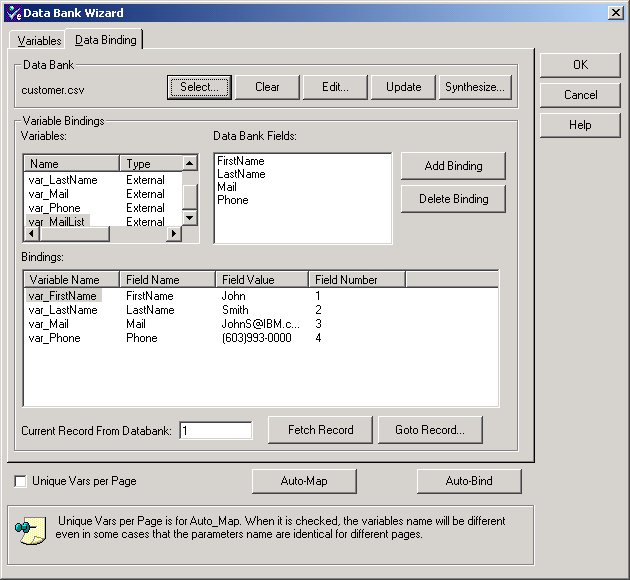
Note:
The Data Bank file is a comma-delimited ASCII file with the field names as column headers on the first line of the file. Subsequent lines of the file contain data. You can view the contents of any of the sample files in the c:\OracleATS\OFT\DataBank directory using Notepad or any other ASCII editor. The following illustration shows how Data Banks map to variables and Visual Scripts.Figure 4-50 How Scripts Map and Bind to Data Bank Records
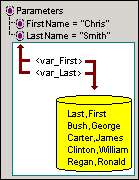
Click the Fetch Record button to cycle through the records in the Data Bank file.
Figure 4-51 Data Bank Wizard Fields and Records View
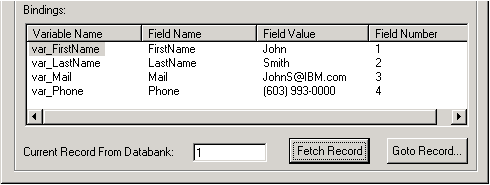
Continue clicking the Fetch Record button to cycle through all of the records in the Data Bank file.
Click the OK button to close the Data Bank Wizard.
Examine the Parameters node under the Address node of the Visual Script tree.
Figure 4-52 Script Nodes with Mapped and Bound Data Bank Variables

The Visual Script now includes the variable names as part of the Parameters. The check marks indicate the parameters that are mapped to variables and bound to fields in a Data Bank file. The triangles indicate variables that are mapped, but not bound to fields in a Data Bank file.
Save the Visual Script.
Select Current Script from the Options menu and then select Results Log, make sure the Failures Only radio button in the Results section is selected, and then click OK.
Select Playback from the Run menu and then select Iterate. Oracle Functional Testing for Web Applications opens the Iterations dialog box.
Click the OK button to play back the Visual Script.
Watch as Oracle Functional Testing for Web Applications plays back the script several times using different data values for the registration.
Notice that the Results log indicates a failure for Record 4 of the playback iteration. We now need to analyze this failure.
Select Data Bank Wizard from the Edit menu.
Click the Goto Record button. The Data Bank Wizard opens a dialog box for entering the record number.
Enter 4, and then click OK.
Click the OK button to close the Data Bank Wizard.
Click the Playback button on the toolbar to play back this one record.
Close Results Report.
You can play back the current record repeatedly using Current Script from the Options menu, select the Playback section, and then select the Use Current Record option.
Scroll the Browser pane to view the Registration Results page. Notice that the page indicates a server error. Oracle Functional Testing for Web Applications was able to find this error because the Text Matching test case you added to test for successful registration produced a failure.
Make sure the [3] Results - Home Superstore, Inc page is still selected in the Visual Script.
Click the right mouse button and select Discard Tested Page from the shortcut menu. The red circles are removed from the Visual Script. The Master version of the Visual Script is still the baseline to use for testing of the Web page.