| Oracle® Application Testing Suite Getting Started Guide Version 9.01 for Microsoft Windows (32-Bit) Part Number E15487-02 |
|
|
View PDF |
| Oracle® Application Testing Suite Getting Started Guide Version 9.01 for Microsoft Windows (32-Bit) Part Number E15487-02 |
|
|
View PDF |
This tutorial walks you through the main features of Job Scheduler. You can follow the examples in this chapter to become familiar with the features and use of Job Scheduler.
This tutorial consists of the following examples:
Creating a job and schedule - describes how to create a job using the Job Scheduler Wizard and then add it to a schedule.
Editing a Job - explains how to edit a job after you have created it.
Editing a Schedule - explains how to edit a schedule after you have created it.
The tutorial is designed to be followed sequentially from beginning to end and assumes you have completed the Oracle Functional Testing for Web Applications tutorial in Chapter 3. The examples in this tutorial refer to Visual Scripts recorded in the Oracle Functional Testing for Web Applications tutorial.
This example illustrates how to create a job using the Job Scheduler Wizard and then add it to the Current Schedule.
Select Programs from the Start and then select Job Scheduler from the Oracle Application Testing Suite submenu to start Job Scheduler.
Select New Job from the File menu or click the Job Scheduler Wizard toolbar button. Job Scheduler opens the Wizard Welcome screen. If you do not want the Welcome screen to appear each time you run Job Scheduler, select the kip this screen in the future check box.
Click the Next button to continue to the Workspace and Scripts [Step 1 of 2] screen.
The Workspace and Scripts [Step 1 of 2] screen of the Job Scheduler Wizard is where you specify the scripts to include in the job.
Figure 5-1 Job Scheduler Wizard Workspace and Scripts Dialog Box
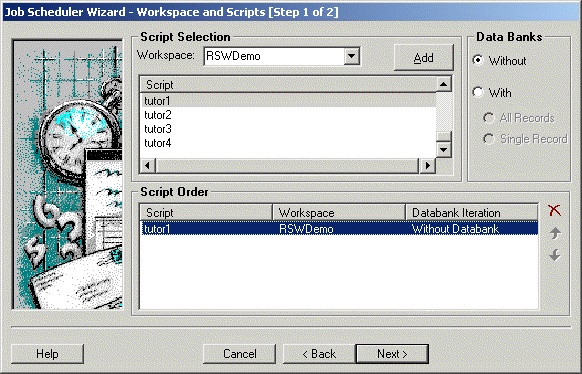
Select the RSWDemo workspace. Note that you can include scripts from more than one workspace in a job.
Select tutor3 and click on the Add button to add the script to the Script Order list.
Select tutor4 and click on the Add button.
Click the Next button to continue to the Job Notifications Log Window [Step 2a of 2] screen of the Job Scheduler Wizard.
The Job Notifications Log Window [Step 2a of 2] screen of the Job Scheduler Wizard is where you specify the message that will appear in the Results Pane and the Results Log if an error occurs during playback of a Visual Script.
Figure 5-2 Job Scheduler Wizard Log Window Dialog Box
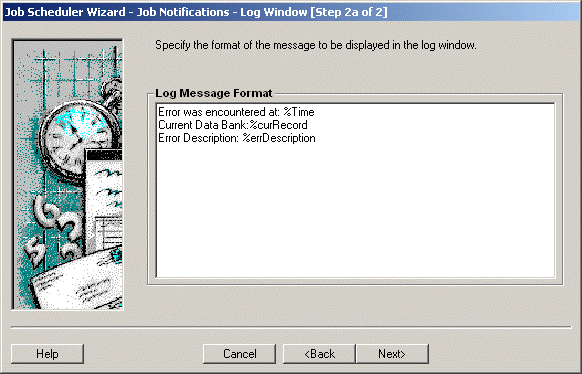
The default log message writes the following information to the results log if an error occurs during playback of a Visual Script:
Time of the error
Databank record
An error number
A description of the error
Click the Next button to continue to the Job Notifications Email [Step 2b of 2] screen of the Job Scheduler Wizard.
The Job Notifications Email [Step 2b of 2] screen of the Job Scheduler Wizard is where you specify who to notify when the job is finished and what information to send.
Figure 5-3 Job Scheduler Wizard Email Dialog Box
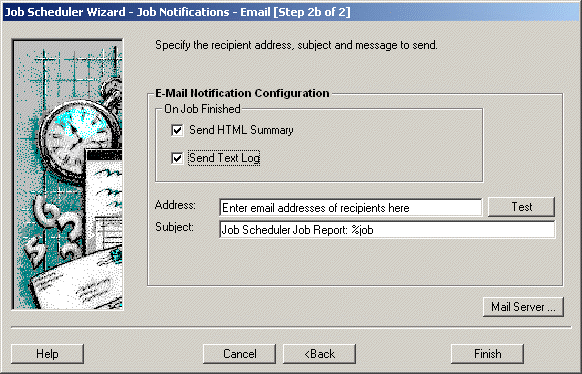
Select the Send HTML Summary check box to send the Job Report to the recipients.
Enter your email address in the Address field. Separate additional email addresses by a comma or semicolon.
Click Mail Server. Job Scheduler opens the server configuration dialog box.
Figure 5-4 Job Scheduler Wizard Mail Server Configuration Dialog Box
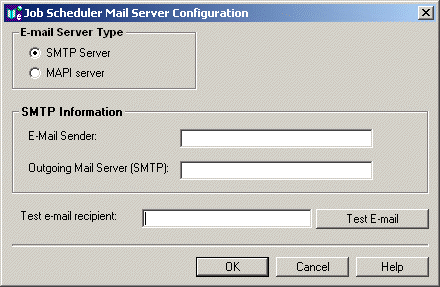
Select your email server type and enter the email information for your email system. Check with your system administrator if you are not sure of the information to enter for your email configuration. You can use the Test email recipient address and Test Email button to verify email capabilities from within Job Scheduler.
Click OK to return to the Job Scheduler Wizard.
Click the Test button next to the Address field if you want to verify the email notification from the wizard.
Click the Finish button. The Save Job As dialog box is displayed.
Enter tutorJob1 for the job name and click Save.
You are then asked if you want to schedule the job. Click Yes.
The Current Schedule window is displayed as well as the Edit dialog box for scheduling the job you just created.
Figure 5-5 Job Scheduler Wizard Edit Schedule Dialog Box
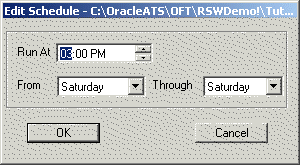
Change the Run At time to 12:00 pm.
Change the starting day in the From field to Sunday and the ending day in the Through field to Thursday
Click OK to schedule the job.
Figure 5-6 Job Scheduler Current Schedule Window
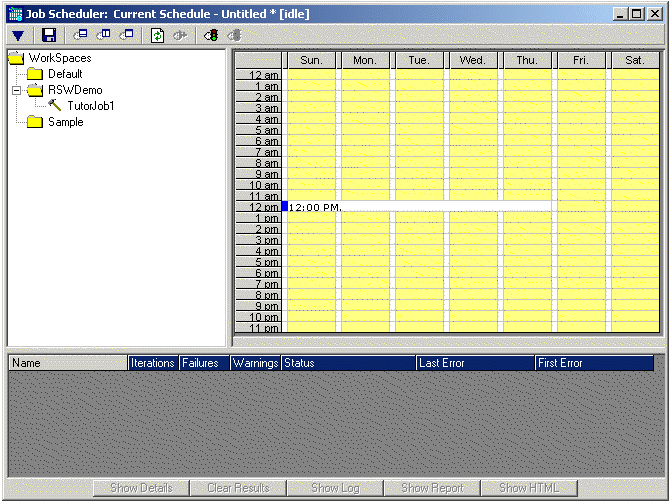
The job file is separate from the schedule file. The job is the list of scripts to run and the notification information. The schedule file contains the information about when the scripts will be played back and which jobs will be played back.
The file name is displayed in the title bar of the Current Schedule window.
In the Job Editor window, click the Start button to play back the job.
Watch as Job Scheduler processes the Visual Scripts. A yellow bar in the row of the script indicates that the script is being processed. A red bar indicates that the script failed; a green bar indicates that the script passed.
Upon completion an email will be sent to you with the job report and text log if you used your email address when setting up the job notifications.
When the schedule is activated, the scheduled jobs automatically run at the scheduled times.
Make the Current Schedule window active by clicking anywhere in it.
Select Activate Schedule from the Control menu or click on the Activate Schedule toolbar button. The results are displayed in the Job Summary pane of the Current Schedule window.
Only one schedule can be opened or activated at any one time.
Double-click on the job name in the Job Summary pane to view Job Details as the scripts are played back.
Select Deactivate Schedule from the Control menu or click on the Deactivate Schedule toolbar button to deactivate the schedule.
This example illustrates how to edit a job using the Job Editor window after the job has been created with the Job Scheduler Wizard. Note that you can have more than one job open at any one time.
Select Open Job from the File menu to open a job or make the Job Editor window active by clicking on it to edit the currently open job.
Click Scripts in the job tree to display the script selection options.
Figure 5-8 Job Editor Script Selection Window
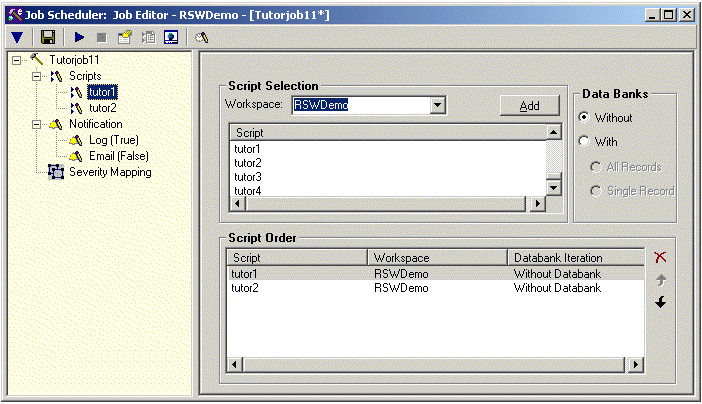
Select the RSWDemo workspace and add the tutor2 script to the Script Order list.
Click Email in the job tree to display the email options.
Select the Disable option button to disable sending emails on error.
Save the job by selecting Save tutorJob1 from the File menu.
This example illustrates how to edit a schedule by adding and changing playback times of jobs. This example uses only one job but you can schedule more than one job.
Select Open Schedule from the File menu to open tutorSch1.mjs or make the Current Schedule window active by clicking on it to edit the currently open job.
Figure 5-10 Job Scheduler Current Schedule Window

Double-click on the job in the calendar or right-click on the job and select Edit Schedule.
Change the time to 11:00 am, the starting day to Monday and the ending day to Friday.
Click on tutorJob1 in the job tree and drag it to Sunday at 6:00 pm.
Figure 5-12 Job Scheduler Current Schedule Window
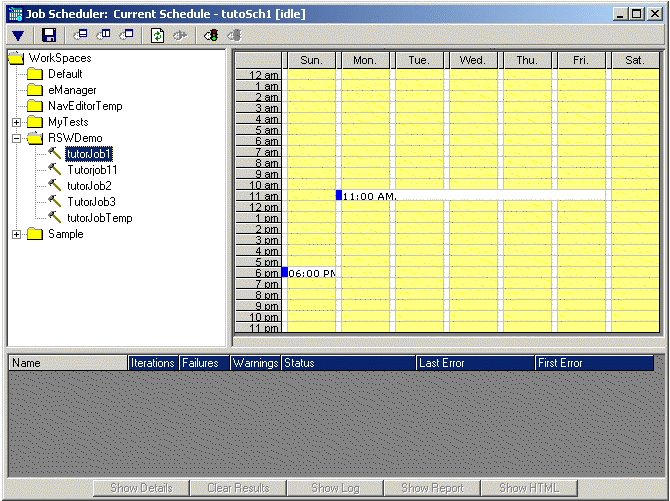
Save the schedule by selecting Save tutorSch1 from the File menu.