 Understanding Connected Query
This chapter provides an overview of Connected Query and discusses how to:
Use Connected Query Quick Start
Use Connected Query Manager
Use Connected Query Viewer
Use Connected Query Scheduler
Understanding Connected Query
Connected Query enables you to create a single XML file based on a set of queries with parent-child relationships.
A connected query is a hierarchical object built with existing PeopleSoft queries. A parent query can nest n levels of child queries and any child query can have m sibling queries within a hierarchy. No artificial limits exist for n and m, but typical use involves a single parent-child relationship or a few levels of nesting. Fields in a child query are mapped to related fields in the immediate parent query. A connected query returns a hierarchical data set in which data returned by child queries is filtered by the results of its immediate parent query.
Connected queries are used to analyze data, supply to other systems with PeopleSoft data using Web Services, and create BI Publisher reports that use connected query as a Data Source.
See Creating and Registering Data Sources, Running, Locating, and Viewing BI Publisher Reports.
Connected queries are significantly useful:
To simplify task for a business user.
User create a set of linked simple queries to collect data from multiple tables instead of creating a complicated query with multiple equal, outer joins, and grouping conditions.
When two or more SQL statements are linked with left outer join to the same query.
Connected Query enables you to collect data similar to query performing left outer joins. In contrast to query, Connected Query enables you to link multiple queries to a single parent query.
As a tool in the process of replacing Crystal reports (that use subreports) with BI Publisher reports.
Crystal reports can include the main reports and a set of subreports that could be combined in the same template. Using Connected Query, you can replace a Crystal reports having main reports and subreports with BI Publisher reports.
When outputs need to be in structured XML.
A simple query (including a query with multiple joins) creates a tabular plain layout. To have a hierarchical output, you need to use multiple grouping conditions that involve complicated logic and is not always straight forward. Connected Query processing creates a hierarchical output where a single row of data from parent query results in a set of rows in a child query. This data is processed row by row and produces structured data. It has similarity with SQR and Application Engine nested loops processing.
Instead of using Application Engine or SQR to collect data for file processing by BI Publisher, use Connected Query as the data collection tool because no conditional logic involves in this process. However, use SQR for processes with high volume of data or when high performance is required.
You can quickly create a single parent-child relationship using the Connected Query Quick Start component (CQ_WIZARD), and create complex connected queries using the Connected Query Manager (PSCONQRS).
Note. Queries with In-Tree prompt cannot be used in Connected Query.
 Connected Query Terms
|
Parent Query |
A parent query in a connected query is a query that has one or many child queries. The top level query in a connected query is the parent query. |
|
Child Query |
A child query in a connected query is a query that has a single parent query. A child query can also serve as a parent query if it has one or more child queries in the Connected Query definition. A child query can have one or more sibling queries. |
|
Sibling Query |
A sibling query in a connected query is a child query that shares a parent with another child query. |
|
Public Connected Query |
Public connected query is a query that can be used by all users. Note. Public connected queries cannot include any private query. |
|
Private Connected Query |
Private connected query is a query that can be used only by its creator. Note. Private connected queries include public queries and private queries that have been created by the same user. |
|
Mapping Query Fields |
Mapping query fields establishes the filtering relationship between values of selected fields in a child query and the corresponding fields in the parent query. |
|
|
Use the Help icon to retrieve help for a specific topic. Note. The Help icon is available only in Connected Query Quick Start. |
Connected Query Example
This example shows the structure that Connected Query uses to collect data of each employee, who directly and indirectly reports to specific departments:
In this example:
The first query (QE_DEPARTMENTS_ROLLUP_PERS) selects a list of departments that report to a specific department defined by user in the first query prompt.
The second query (QE_EMPLOYEE_FROM_PERSDATA_TREE) selects lists of employee based on the departments returned from the parent query.
Query QE_EMPLOYEE displays detailed information of every employee that is selected by query QE_EMPLOYEE_FROM_PERSDATA_TREE.
The last query (QE_DEPARTMENT_DATA) displays detailed information of each department that participated in the report.
Security for Connected Query
This table lists the delivered Connected Query permission lists and roles:
|
Permission List |
Role |
Description |
|
PTPT2700 |
Connected Query Developer |
Provides full access to Connected Query applications. |
|
PTPT2800 |
Connected Query User |
Provides access to run, preview results, and schedule a connected query. User will not be able to modify existing or create new Connected Queries |
Using Connected Query Quick StartThis section provides an overview of Connected Query Quick Start and discusses how to:
Enter a name and descriptive information.
Select a parent query.
Select a child query.
Map child query fields to parent query for filtering.
Preview the connected query.
Understanding Connected Query Quick Start
The Connected Query Quick Start is a wizard that walks you through creating a simple connected query with a single parent query and a single child query linked using a set of related fields.
Note. The parent and child queries must exist and be visible
in Query Manager before you can use them to create a connected query.
Connected Query Quick Start is used only for creating new connected
queries. You can edit existing connected queries using the Connected Query
Manager page.
Connected query uses query security permissions for each of it member
queries.
See Also
Understanding Connected Query Manager
Pages Used in Connected Query Quick Start Wizard|
Page Name |
Definition Name |
Navigation |
Usage |
|
Connected Query Quick Start - Enter a Name and Descriptive Information |
CQ_WZ_INFO |
Reporting Tools, Connected Query, Connected Query Quick Start |
Enter a connected query name and descriptive information, and define ownership of the connected query. |
|
Connected Query Quick Start - Select a Parent Query |
CQ_WZ_PARENT |
Reporting Tools, Connected Query, Connected Query Quick Start Enter a connected query and descriptive information, and click the Next button. |
Select an existing query to use as the parent query. |
|
Connected Query Quick Start - Select a Child Query |
CQ_WZ_CHILDQRY |
Reporting Tools, Connected Query, Connected Query Quick Start Enter a connected query and descriptive information, and click the Next button. Select an existing query to use as the parent query, and click the Next button. |
Select an existing query to use as the child query. |
|
Connected Query Quick Start - Map Child Query Fields to Parent Query for Filtering |
CQ_WZ_FLDMAP |
Reporting Tools, Connected Query, Connected Query Quick Start Enter a connected query and descriptive information, and click the Next button. Select an existing query to use as the parent query, and click the Next button. Select an existing query to use as the child query, and click the Next button. |
Map query fields from a child query to corresponding fields from a parent query. |
|
Connected Query Quick Start - Preview |
CQ_WZ_PREVIEW |
Reporting Tools, Connected Query, Connected Query Quick Start Enter a connected query and descriptive information, and click the Next button. Select an existing query to use as the parent query, and click the Next button. Select an existing query to use as the child query, and click the Next button. Map query fields from a child query to corresponding fields from a parent query, and click the Next button. |
Enable report developers to review a new connected query and preview the results by running it in a preview mode with a limited number of rows returned from each query. |
Step 1: Enter a Name and Descriptive Information
Access the Connected Query Quick Start - Enter a Name and Descriptive Information page by selecting Reporting Tools, Connected Query, Connected Query Quick Start.
This is an example of the Connected Query Quick Start - Enter a Name and Descriptive Information page:
|
Connected Query |
This is a required field. Enter a name for the connected query. Note. The name of the connected query cannot be changed after you enter the name into the Select a Child Query page of a Connected Query Quick Start. Because Connected Query uses node name as an XML node, query names used in a Connected Query must follow these naming rules:
If a query name starts with an alpha or underscore [ _ ] character, the query node name in an XML file will be the same as the query name. Otherwise, the query node name will be the query name with the prefix PS_. For example:
|
|
Public |
Indicate the query ownership. If the Public check box is selected, this query will be a public query. If the Public check box is not selected, this connected query will be a private query. Note. The ownership of the connected query cannot be changed after you enter data into the Select a Child Query page of a Connected Query Quick Start. |
|
Description |
(Optional) Enter a description for the connected query. |
|
Comments |
(Optional) Enter comments for the connected query. |
|
Next |
Note. The Next button is available after you enter the name of the connected query in the Connected Query field and move to any other field. Click to advance the wizard to the next page. |
Step 2: Select a Parent Query
Use these steps to access the Connected Query Quick Start - Select a Parent Query page:
Select Reporting Tools, Connected Query, Connected Query Quick Start.
Enter a connected query and descriptive information, and click the Next button.
The Connected Query Quick Start - Select a Parent Query page appears.
This is an example of the Connected Query Quick Start - Select a Parent Query page:
|
Parent Query |
Click the query Lookup icon to select a parent query from a list of queries for which you have been granted access. Note. You must use the query Lookup icon to select a parent query and be able to move to the next page. |
|
View Query |
Click to open Query Manager component in read-only mode to view the query. |
|
Next |
Note. This button becomes active after you select a parent query. Click to advance the wizard to the next page. |
Step 3: Select a Child Query
Use these steps to access the Connected Query Quick Start - Select a Child Query page:
Select Reporting Tools, Connected Query, Connected Query Quick Start.
Enter a connected query and descriptive information, and click the Next button.
Select an existing query to use as the parent query, and click the Next button.
The Connected Query Quick Start - Select a Child Query page appears.
This is an example of the Connected Query Quick Start - Select a Child Query page:
|
Child Query |
Click the query Lookup icon to select a child query from a list of queries for which you have been granted access. After you select a child query, its name appears in the Connected Query Structure section. |
|
View Query |
This button becomes active after you select a child query. Click to open Query Manager component in read-only mode to view the query. |
|
Next |
Note. This button becomes active after you select a child query using the lookup icon. Click to advance the wizard to the next page. |
Step 4: Map Child Query Fields to Parent Query for Filtering
Use these steps to access the Connected Query Quick Start - Map Child Query Fields to Parent Query for Filtering page:
Select Reporting Tools, Connected Query, Connected Query Quick Start.
Enter a connected query and descriptive information, and click the Next button.
Select an existing query to use as the parent query, and click the Next button.
Select an existing query to use as the child query, and click the Next button.
The Connected Query Quick Start - Map Child Query Fields to Parent Query for Filtering page appears.
This is an example of the Connected Query Quick Start - Map Child Query Fields to Parent Query for Filtering page:
This page displays two sets of fields coming from parent and child queries:
The parent query section displays parent query fields and is for informational purposes only.
This section is collapsed by default and you have the option to expand it.
The child query section displays child query fields and enables the report developer to select one or more fields for mapping.
For each child query field selection, a drop-down list box with possible parent query field lists appears. Those parent query field lists are filtered by compatible field data types. In some cases, Connected Query Manager uses smart thinking to map fields based on partial matching names but ultimate field matching is up to the user.
If parent and child queries are not linked with some fields, each row of data for a parent query will have all rows from a child query as no filtering from a parent to child will happen. For example, Project is a parent query and Project Description is a child query. The Project and Project Description queries are linked by the Project_ID field that will assume one-to-one relationship (assuming no EFFDT field exists in a second query). Therefore, if the Project query returns 100 rows, the Project Description query will return a single row for the Project query, and resulted data set will have 100 rows of data.
If no field is selected as a mapped field (Project_ID field), Connected Query returns 100 x 100 = 10000 rows. Sometimes mapped fields are not needed , in which case the system displays a warning message when you save the connected query (Connected Query design time).
|
Map Field |
Click to update the Connected Query structure. Note. The Fields column in the Connected Query Structure section displays the values that you just selected. |
|
Next |
Click to advance the wizard to the next page. Note. This button becomes active after you select the fields for mapping and click the Map Fields button. |
Step 5: Preview a Connected Query
Use these steps to access the Connected Query Quick Start - Preview page:
Select Reporting Tools, Connected Query, Connected Query Quick Start.
Enter a connected query and descriptive information, and click the Next button.
Select an existing query to use as the parent query, and click the Next button.
Select an existing query to use as the child query, and click the Next button.
Map query fields from a child query to corresponding fields from a parent query, and click the Next button.
The Connected Query Quick Start - Preview page appears.
This is an example of the Connected Query Quick Start - Preview page:
|
Preview XML |
Click to display the formatted XML output for this connected query. XML output appears in a Preview mode, in the lower section of the Preview page. |
|
Max Rows Fetched For Query |
Enter the maximum number of rows to display in Preview mode. Note. You should limit the number of rows that are being fetched. The default value is 6. If you enter 0 or clear this text box, no row limits will be imposed for a resulting XML, which can cause significant delay in getting results; and because the application runs in synchronized mode using the application server, you may get browser time-out or tuxedo time-out. |
|
Complete |
Click to transfer to Connected Query Manager page, where you can perform enhancements and save the connected query. Note. While working with a Connected Query Quick Start, you can modify your previous selections at any step by clicking the step number (in yellow or gray) icons. Changes in your selection could change a connection query structure. |
Note. In the Connected Query Quick Start - Preview page, when XML that contains CDATA sections is displayed at runtime, application users will see <![CDATA* and *]> in places of <![CDATA[ and ]]>.
Using Connected Query ManagerThis section provides an overview of Connected Query Manager and discusses how to:
Create a connected query.
Edit a connected query.
Copy a connected query.
Delete a connected query
Open a PeopleSoft query using Connected Query Manager.
Understanding Connected Query Manager
Connected Query Manager enables a report developer to create a new connected query, edit an existing connected query, copy existing connected queries, and delete a connected query object, as well as run connected queries in three modes:
Preview XML
Run to window
Schedule
Note. Currently, Connected Query Manager supports only XML output format.
Connected Query structure consists of a set of PeopleSoft queries that are linked by related fields. No limits exist for the number of fields being linked between two queries.
Note. Parent and child pairs of queries can be linked together using sets of correlated fields, though those linkages are not required.
Each query being selected in a connected query structure has a set of image icons, which enables you to perform various actions:
|
|
Insert a new query as a child of the selected query. |
|
|
Insert a new query as a sibling of the selected query. |
|
|
Delete a selected query. |
|
|
Open a related field selection section. |
|
|
Open a selected query in Query Manager in read-only mode. |
Note. While deciding which tool to use for reporting purposes,
report developer should consider using a single query with joins and unions
first. Using Connected Query could affect the performance of the reporting
application.
The main contributing factor to the Connected Query performance is the
number of nested levels. Application developer should try to minimize the
depth of nesting in a Connected Query structure. Another contributing factor
is the number of rows being returned from each query. To achieve a better
performance, queries that are positioned higher in a Connected Query hierarchy
should be limited in the number of rows being returned. This limitation could
be achieved by means of using filtering in parent queries.
See Also
Pages Used to Create and Maintain a Connected Query|
Page Name |
Definition Name |
Navigation |
Usage |
|
Connected Query Manager - Search |
PSCONQRSSRCH |
Reporting Tools, Connected Query, Connected Query Manager |
Edit a connected query, copy an existing connected query, delete a connected query, preview results of a connected query, schedule a connected query to run immediately with results displayed in a separate window, and schedule a connected query to run at the preset time. |
|
Connected Query Manager |
PSCONQRSBUILDER |
Reporting Tools, Connected Query, Connected Query Manager Click the Edit link. |
Create and maintain connected queries. |
|
Connected Query Properties |
PSCONQRSPROP |
Reporting Tools, Connected Query, Connected Query Manager Click the Edit link. On the Connected Query Manager page, click the Properties button. |
Used by Report developers to associate a set of properties with a connected query definition, modify values of execution or output XML file based on user-selected properties, and ensure that user-selected properties (with PeopleTools projects) are compatible with PeopleTools 8.50 and later releases. |
|
Copy a Connected Query |
PSCONQRSCOPY |
Reporting Tools, Connected Query, Connected Query Manager Click the Copy link for the connected query to copy. |
Copy a connected query. |
|
Connected Query Viewer |
PSCONQRSSRCH |
Reporting Tools, Connected Query, Connected Query Viewer |
View the results of a running connected query: preview the XML, schedule a connected query to run immediately with results displayed in a separate window, or schedule the connected query to run at a later time. |
|
Schedule Connected Query |
PSCONQRS_RUN_CNTRL |
|
Schedule a connected query to run in the PeopleSoft Process Scheduler. |
Creating a Connected Query
To access the Connected Query Manager page and create a new connected query:
Select Reporting Tools, Connected Query, Connected Query Manager.
Select the Add a New Value tab.
This is an example of the Connected Query Manager page:
|
Connected Query |
Enter a name for the connected query. |
|
Public |
Indicate the query ownership. Select to indicate that this is a public query. Clear this check box to indicate that this is a private query. Note. Public connected queries can be run by any user with adequate permissions. Private connected queries can be run and edited only by the owner. |
|
Status |
Select the status of the connected query. Values are:
|
|
Properties |
Click to access the Connected Query Properties page. Note. The Properties button is active only after you select a parent query. |
|
Description |
Enter a description for the connected query. |
|
Comments |
Enter comments for the connected query. |
|
Parent Query Selection |
Click the search icon to select a parent query from an existing list. Note. You must use the search icon to search for and select a parent query. After you select a parent query, all buttons become active and the Connected Query Structure section appears with active icons, which enables you to continue building a connected query. |
|
View Query |
Click to open the selected query in read-only mode in the Query Manager component. Query Manager opened from Connected Query is fully functional but does not allow you to save any changes. |
|
Connected Query Structure |
Note. This section appears after you select a parent query. Displays the image icons that you can use to further develop the Connected Query structure. |
|
Preview XML |
Note. This button becomes active after you select a parent query. Click at any time to preview the XML report in a separate window. |
|
Save |
Note. The Save button becomes
active after you select a parent query. Click to save your connected query. |
Setting Connected Query Properties
Access the Connected Query Properties page:
|
EXECUTIONLOG |
Available options are True and False. If EXECUTIONLOG is set to True, an execution log is recorded in an appropriate log file. Recording includes regular logging and output statistics section. |
|
ISDEBUGMODE |
Available options are True and False. If ISDEBUGMODE is set to True, an execution log is recorded in an appropriate log file. Recording includes regular logging and output statistics section. In addition, if application server executes the connected query (for example, PreView XML), the True mode preserves a directory that contains temporary files after a connected query is executed. Log also contains SQL statement that is generated by each member query as well as values of related fields used to link parent query to its child. |
|
IGNORERELFLDOUTPUT |
Available options are True and False. If IGNORERELFLDOUTPUT is set to True, the output XML file will not repeat mapped field nodes that are associated with a child query. For example, if a parent query has a field DEPTID linked to the child query field DEPARTMENT, node DEPARTMENT will not appear in the XML output file. |
|
SHOWFORMATTEDXML |
Available options are True and False. If SHOWFORMATTEDXML is set to True, an output XML file will contain node indentations used to format XML. This output is used for XML output shown in the Connected Query Quick Start. You should set the SHOWFORMATTEDXML property to True if you want to use non-XML editors to work with output XML files. However, if you set the SHOWFORMATTEDXML property to False (default option), the output files will be smaller. |
Note. You define all connected query properties as strings
using the name-value pairs concept. These properties are stored in database-managed
tables as a part of the connected query definition.
You can preview a connected query XML without storing its properties
in the database.
Using Effective Date Operator in the Connected Query Manager Page
Effective date operator is available in the Connected Query Manager page as a part of the field mapping process. You can select an effective date operator for any of the member queries if a child query has an EFFDT value selected as a related field.
This example shows the Connected Query Manager page and the Eff Date Operator (effective date operator) list:
Note that the effective date operator list:
Is available only if a selected field has a format of EFFDT.
Is available in the Connected Query Manager but not available in the Connected Query Quick Start.
Has a default operator—an equal operator—like other fields.
Need not be saved in the database before you preview the XML of a connected query.
Steps Used to Create a Connected Query
To create a connected query using Connected Query Manager:
Select Reporting Tools, Connected Query, Connected Query Manager.
Select the Add a New Value tab.
The Connected Query Manager page appears.
Enter a name in the Connected Query field.
The connected query name must be unique to all private and public queries.
Define query ownership using the Public check box.
By default, the Public check box is selected to indicate that this connected query is a public connected query. You can clear the Public check box if you want this connected query to be private .
Select the status of the connected query using the Status drop-down list box.
Note. The Inactive status indicates that a connected query does not pass a validation routine. When a connected query is not valid, this status is set automatically during the Save process.
Select the Active option to enable the user to schedule a connected query.
Select the In Progress option to indicate that this query can be previewed in Connected Query Manager, but can not be scheduled.
The In Progress status is useful when a connected query is not ready for end user to view using the Connected Query Viewer page.
Optionally, enter description and comments for the connected query using the Description and Comments fields.
If the Description field is blank, Connected Query populates the description using the connected query name.
In the Parent Query field, click the search icon to select a parent query from an existing list.
Note. You must use the search icon to search for and select a parent query. After you select a parent query, all buttons become active and the Connected Query Structure section appears with active icons, which enables you to continue building a connected query.
Optionally, click the View Query button to view the selected query.
Note. You can preview a connected query at any point without having previously saved it.
Optionally, continue building your connected query by adding child queries, linking fields between parent and child queries, and so on.
Save your connected query.
Because connected query can be created with one parent query presented, you can save your connected query and use it as a new connected query.
Editing a Connected Query
To edit existing connected queries:
Access the Connected Query Manager page by selecting Reporting Tools, Connected Query, Connected Query Manager.
Enter your search criteria and click the Search button.
In the Connected Query Manager search page, click the Edit link on the row with the connected query you want to edit.
Optionally, change the connected query structure, edit description fields, and change the connected query status.
This is an example of the Connected Query Manager search page:
Copying a Connected Query
To copy a connected query:
Access the Copy Connected Query page by selecting Reporting Tools, Connected Query, Connected Query Manager.
Enter your selection criteria and click the Search button.
On the Connected Query Manager page, click the Copy link next to the connected query to copy.
The Copy Connected Query page appears.
This is an example of the Copy Connected Query page:
To save a copy of the connected query:
Change the connected query name in the Target section with a new unique name.
Optionally, change ownership, descriptions, or the status of the query.
Click the OK button.
Deleting a Connected Query
To delete a connected query:
Access the Connected Query Manager page by selecting Reporting Tools, Connected Query, Connected Query Manager.
Click the Delete link next to the connected query to delete.
A confirmation message appears asking if you want to delete the existing connected query.
Click the OK button to continue and delete the connected query.
Alternatively, click the Cancel button to cancel the deletion and return to the Connected Query Manager page.
This is an example of the delete confirmation message:
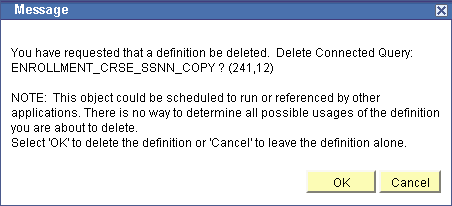
Example of the confirmation message
Opening a PeopleSoft Query Using Connected Query Manager
When you open a PeopleSoft query using the Connected Query Manager, the Query Manager component appears in a read-only mode along with a message informing you that no changes are allowed to the query that is opened. The Query Manager that is being opened through the Connected Query Manager is fully functional. It enables you to run a query, view SQL that is being generated by query, view the query structure, view query prompts, view query criteria, and so on, but it doesn't allow you to save any changes for the opened query.
This is an example of the message received when you open a PeopleSoft query in the Connected Query Manager:
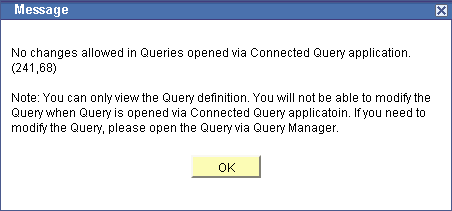
Sample message received when you open a PeopleSoft query in the Connected Query Manager
Using Connected Query Viewer
Connected Query Viewer is a read-only version of Connected Query Manager. It enables security administrators to limit users with a role of Connected Query User (permission list PTPT2800) to search for and view connected queries that have a status of Active. Connected query users can view results of running connected queries using these three methods: Preview XML, Run to Window, and Schedule.
You can access the Connected Query Viewer page by selecting Reporting Tools, Connected Query, Connected Query Viewer.
This is an example of the Connected Query Viewer page:
|
Search |
Click to search for a connected query using the basic search function. Combined with only the begins with condition, the basic search enables you to select the following Search by criteria: Connected Query Description, Connected Query Name, Connected Query Status, and Owner. |
|
Advanced Search |
Click the Advanced Search link to search for a connected query using the advanced search function. The advanced search enables you to perform a narrower search by using one or more Search by criteria and selections of conditions for each Search by criterion. You can select the following Search by criteria: Connected Query name, Description, Status, Ownership Type, and Case Sensitive Search. |
|
Preview - Max Rows For Query |
Enter a number of rows to be returned from each query in a preview mode. You should limit the number of rows that are being returned. The default value is 6. If you enter 0 or clear this text box, no row limits will be imposed for a resulted XML, which can cause a significant delay in getting results; and because the application runs in a synchronized mode using application server, you may get browser time-out or tuxedo time-out errors. |
|
Preview XML |
Click a Preview XML link for the selected connected query to view its results in a new browser window.
Note. The Preview XML action uses the Application Server
to generate and configure XML data, thus you have to wait for XML data to
be available. To keep working while system generates and configures XML data,
use the Run to Window link, which does not limit number of rows returned from
each query. |
|
Run to Windows |
Click a Run To Windows link for the selected connected query to schedule that query to be run immediately using PeopleSoft Process Scheduler, and then view its XML results in a new browser window. |
|
Schedule |
From the Connected Query Viewer search results page, click the Schedule link that is associated with the connected query. Connected Query Viewer interacts with PeopleSoft Process Scheduler to enable you to schedule connected queries. You can submit requests to schedule a connected query, check the status of your request using Process Monitor, and view connected query results using Report Manager. |
See Also
Running BI Publisher PeopleSoft Query Reports
Using Connected Query Scheduler
You can schedule a connected query in three ways:
Clicking the Run To Window link in the Connected Query Manager search page or the Connected Query Viewer search page.
Clicking the Schedule link in the Connected Query Manager search page or the Connected Query Viewer search page.
Selecting Reporting Tools, Connected Query, Connected Query Scheduler.
Connected Query interacts with Application Engine program PSCONQRS to enable you to schedule connected queries. You can search for an existing run control ID or create a new run control ID and schedule a connected query using the Schedule Connected Query page, check the status of your request using the Process Monitor link, and view your output using the Report Manager link.
This is an example of the Schedule Connected Query page:
|
Report Manager |
Click to access the Report Manager page to view the report content after the output file is posted and the output destination is set to Web or Window. The final output file is posted to the Report Manager repository for web access by authorized users. See Using Report Manager. |
|
Process Monitor |
Click to access the Process Monitor page and check the progress of your request. |
|
Update Parameters |
Click to update the runtime prompt values of connected query. |
|
Run |
Click to access the Process Scheduler Request page, where you can specify variables, such as where a process runs and in what format the process output is generated. The values for output type and output format appear by default per the report definition and can be changed if the report definition allows it. Note. The Run button in the Schedule Connected Query page functions as the Schedule link in the Connected Query Manager search page. |
|
Connected Query |
Enter or search for a connected query. Note. On the Schedule Connected Query page, you cannot modify the connected query name after you save the Run Control ID. |
See Also
Getting Started With PeopleSoft Process Scheduler
Running, Locating, and Viewing BI Publisher Reports