30 Work with Automatic Payments
This chapter contains these topics:
30.1 Working with Payments
From Accounts Payable (G04), choose Automatic Payment Processing
From Automatic Payment Processing (G0413), choose Work with Payment Groups
After you create payment groups, you must write payments. When you create payment groups, the system creates temporary payment records. When you work with payments, you use these records to print payments or create a bank tape table, depending on your setup.
30.1.1 What Happens When You Write Payments?
When you write payments, the system uses worktables to:
-
Create a matching document with a document type of PK (automatic payment), PT (electronic funds transfer), or P1 (draft). This payment closes the voucher.
-
Assign payment numbers.
-
Change the next status of the payment group from WRT (write) to UPD (update).
-
Print payments (or create bank tape tables) using control information for payment groups.
The system does not update the A/P Ledger table (F0411) until the update process.
30.2 Writing Payments
When you write payments, the system prints payments or creates a bank tape table. You can:
-
Write all payments in a payment group
-
Write selected payments in a payment group
To write all payments in a payment group
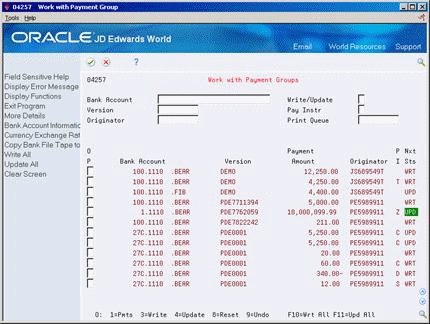
Figure 30-1 Work with Payment Groups screen

Description of "Figure 30-1 Work with Payment Groups screen"
-
Follow the steps for reviewing payment groups.
-
Do one of the following for a payment group with a next status of WRT and press Enter:
-
Choose Write for a payment group.
-
Choose Write All for all payment groups.
-
Choose Write or Copy to Tape/Update for a payment group. Use this option only if you are creating bank tape tables.
-
-
On Write Payments, verify the following fields and press Enter:
-
Payment/G/L Date
-
Next Payment
-
To write selected payments in a payment group
On Work with Payment Groups
-
Follow the steps for reviewing payments.
See Section 29.4, "Reviewing Payments within Payment Groups".
-
Choose Payments for a payment group with a next status of WRT.
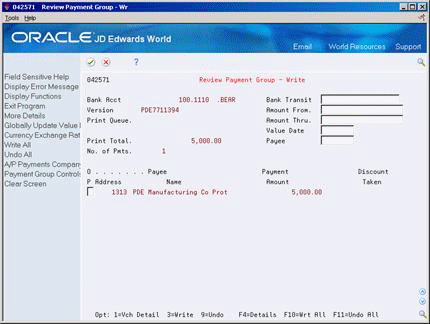
Figure 30-3 Review Payment Group - Write screen

Description of "Figure 30-3 Review Payment Group - Write screen"
-
To limit your search, on Review Payment Group - Write complete any of the following fields and press Enter:
-
Bank Transit
-
Amount From
-
Amount Thru
-
-
Do one of the following and press Enter:
-
Choose Write for a payment.
-
Choose Write for all payments.
-
Choose Write or Copy to Tape/Update for a payment group. Use this option only if you are creating bank tape tables.
-
-
On Write Payments, verify the following fields and press Enter:
-
Payment/G/L Date
-
Next Payment
-
30.2.1 What You Should Know About
| Topic | Description |
|---|---|
| Electronic payments | U. S. clients who transfer funds electronically must enter a beginning payment number. If a supplier has a pre-note status of P, the system generates a payment and a pre-note. |
| Next Number control for check numbers | You can set Print processing options in P04257 to prevent users from changing Next Payment Number. This reduces the risk of creating payments with duplicate numbers, especially when you have selected to output separate PCGs or those with the same bank account to one spool file. |
30.3 Resetting Payment Processing
You might need to reset payments because of an error, such as a forms jam, wrong payment number, or wrong payment date. You can write payments again by resetting the payment processing. Written payments have a next status of UPD (update). When you reset the payment you are returning the selected payment to a next status of WRT (write) so you can correct the problem and rewrite them.
In Work with Payment Groups (P04257) there is a processing option that gives you the choice whether to process void payments through the G/L for an audit trail.
If the processing option is set to 1 and you reset or undo the payment group after it has been written, the original payment numbers will be processed through the G/L as voids when you post the batch. The posting journal will show void PK records to the bank account with zero amounts. The payments that were not reset and any new payments that were re-written will have PK records to the bank account with the payment amounts.
If the processing option is set to 'blank' and you reset or undo the payment group you can use the check numbers again as no records will be created in the G/L for those payments. The process remains the same as shown in the examples below.
30.3.1 Examples & Processes
This section describes examples and processes.
30.3.1.1 Complete Payment Group Reset
Example: Payment group consists of 2 payments, PK 237 and 238. The payments were created with the wrong payment date so you will need to reset the entire payment group. The processing option in Work with Payment Group is set to process void payment to the G/L.
-
To reset a complete payment group, select the Reset option (8) next to the payment in Work with Payment Groups.
-
The window for Reset Payments (P04257W2) will show you what the next payment number will be, in this example the next payment number is 239..
-
Now you can write the payment group again. When the batch is posted the journal will print the PKs 237 and 238 as voids with zero amounts and payments 239 and 240 will be posted with the payment amounts.
30.3.1.2 Partial Payment Group Reset
Example: Payment group consists of 9 payments. Payments 246 - 249 printed without error, payments 250 - 252 forms jammed and need to be written again, payments 253 and 254 printed without error.
-
To reset a partial group select the Payments option (1) next to the payment group.
-
From Review Payment Group - Update (P042573) select the Reset option (8) next to the individual payments in the group that you want to re-write. In this example you would choose the Reset option for payments 250 - 252.
-
When the payments are rewritten and the batch is posted PK 246 through 249 will post with the payment amounts, PK 250 through 252 will post to the bank account with zero amount and PK 253, 254, 255, 256 and 257 (255-257 are the rewritten payments) will post to the bank account with the payment amounts.
30.4 Removing Processed Payments
After you write payments but before you update them, you might need to remove a payment from the current payment cycle.
To remove processed payments from the current payment cycle, you undo them. The system:
-
Voids the payment
-
Removes the voucher pay items from the payment group
-
Resets the pay status of the voucher from payment in-process to approved
You can then change vouchers and process them for payment at another time.
On Work with Payment Groups
-
Follow the steps for reviewing payment groups or reviewing payments.
See Section 29.3, "Reviewing Payment Groups" and Section 29.4, "Reviewing Payments within Payment Groups"
-
Choose Payments for a payment group with a next status of UPD.
-
On Review Payment Group - Update, choose one of the following:
-
Undo for a single payment
-
Undo All for all payments
-
30.4.1 What You Should Know About
| Topic | Description |
|---|---|
| Voiding payments | When you undo or reset processed bank tape payments, the system does not remove the payment record from the bank tape table. You must delete payment records from a bank tape table to complete the void.
If you have already written the payment and the processing option in Work with Payment Groups, P04257, is set to process void payments through the G/L the payment that has gone through the Undo process will be created in the G/L with a zero amount when the batch is posted. The posting journal will show the PK with a zero amount along with the payments that were processed. |
30.5 Copying Payments to Tape
From Accounts Payable (G04), choose Automatic Payment Processing
From Automatic Payment Processing (G0413), choose Copy Bank Tape File to Tape
When you write payments, the payment instrument can be an electronic format. In this case, writing payments creates bank tape tables rather than printing them. You must copy these tables to tape or diskette if you want to send the information to a financial institution.
Copying payments to tape consists of:
-
Reviewing and changing the status and detail for a tape table
You set tape format specifications in a processing option for the Produce Bank Tape program (P04572T). You can access these options through the versions list. You can also change many format specifications prior to copying the table to tape.
The A/P Payment Tape table (F0457) is a multimember table. This means that the system does not overwrite a bank tape table when you create a new one. The system also does not automatically delete records in this table. You can delete a member table after you verify that your bank has received the bank tape.
You can also re-copy a bank table to tape if, for example, your financial institution loses the original tape.
To review and change status and detail for a tape table
The detail for a tape table is generally preset by your MIS department in the processing options for A/P Payment Processing - Produce Bank Tape (P04572T). You should not change this information unless instructed to do so.
On Copy Bank Tape File to Tape
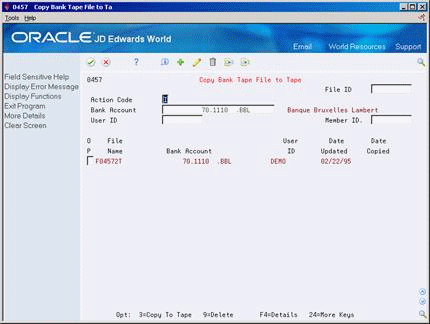
Figure 30-4 Copy Bank Tape file to Tape screen

Description of "Figure 30-4 Copy Bank Tape file to Tape screen"
-
To locate a tape table, complete the following optional fields and press Enter:
-
File ID
-
Bank Account
-
User ID
-
Member ID
-
-
Choose Details (F4).
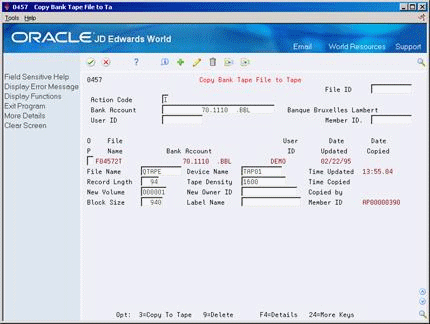
Figure 30-5 Copy Bank Tape File to Tape screen (Details area)

Description of "Figure 30-5 Copy Bank Tape File to Tape screen (Details area)"
-
Change the information in the following fields (optional):
-
File Name
-
Device Name
-
Record Length
-
Tape Density
-
New Owner ID
-
Block Size
-
Label Name
-
To copy a tape table to tape or diskette
On Copy Bank Tape File to Tape
Choose Copy To Tape for a table.
30.5.1 What You Should Know About
| Topic | Description |
|---|---|
| Reviewing tape tables | You can also use IBM system commands to view the tape table. You must specify the table and member IDs. This information appears in the detail area, for example, table ID F04572T and member ID AP00000390. |
| Transmitting tape tables via modem | Information in tape tables is stored in a standard format. Instead of copying a tape table to tape or diskette, you can upload a tape table to a financial institution via modem. |
