26 Save and Manage a Workfile
This chapter contains these topics:
26.1 Saving and Managing a Workfile
From the FASTR menu (G83), choose Financial Statements
You save and manage a workfile to:
-
Save the data for a report
-
Manage data that is generated by another report
If you are satisfied that your data is set up correctly, you can use it for multiple reports, which saves significant processing time.
When you save a workfile, the system:
-
Stores workfile values in the DREAM Writer Master Parameter table (F98301)
-
Assigns the member to which you save your data in the F83WORK table
-
Creates reports that use 52-period accounting on Override Default Information in the F83WORKB table
Saving and managing a workfile consists of:
-
Saving a workfile
-
Managing a workfile for input
-
Deleting expired workfiles
26.1.1 What You Should Know About
| Topic | Description |
|---|---|
| Member names | Whenever you work with a workfile, you must supply a member name. This name must be a valid IBM name for the member that you create or the member that you use in the report that you define. A member is used to store information, like a drawer in a filing cabinet. You can save the workfile with or without producing a report. You can use existing workfile data in subsequent reports. |
| Expiration dates | You must enter an expiration date when you save a workfile. If the balance auditor and PC download files are saved for an extended period of time, you may compromise the space available on the system. |
| Missing reports | If a report does not print, check Work File Save Parameters to determine if the report is designated as Output only. |
| Checking entries for accuracy | Check your entries on Work File Save Parameters for accuracy. The screen does not redisplay when the system processes the report. |
You create a workfile to consolidate information. After you save the workfile, multiple versions can use the information.
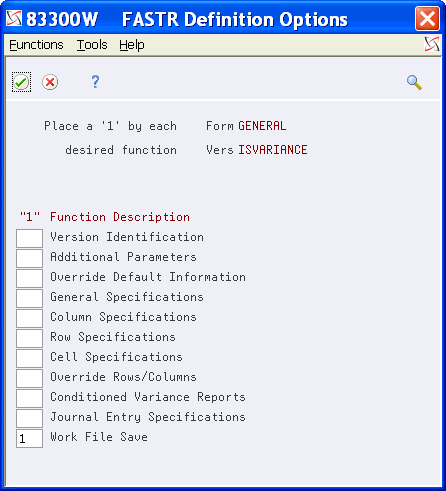
On Financial Statements
-
Access FASTR Definition Options.
Figure 26-1 FASTR Definition Options screen
Description of "Figure 26-1 FASTR Definition Options screen"
-
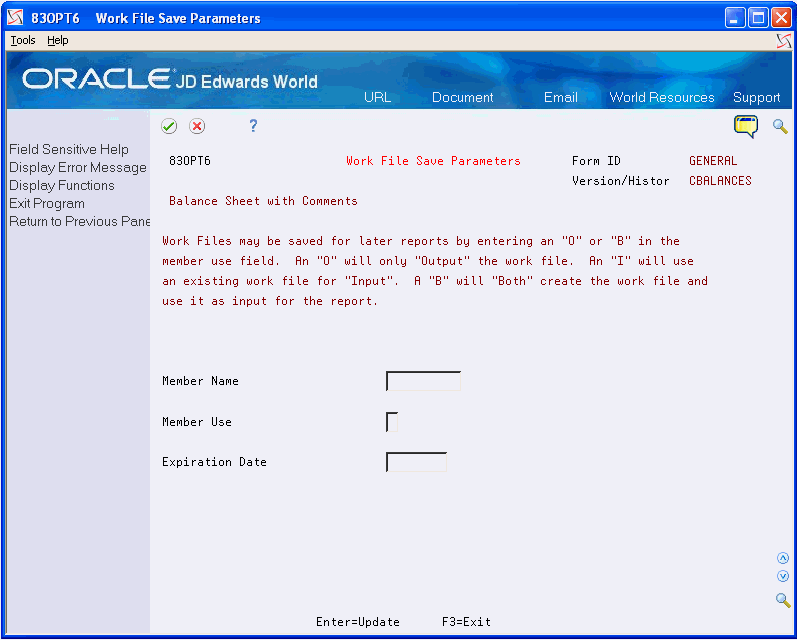
On FASTR Definition Options, select Work File Save.
Figure 26-2 Workfile Save Parameters screen
Description of "Figure 26-2 Workfile Save Parameters screen"
-
On Work File Save Parameters, complete the following fields:
-
Member name
-
Expiration date
-
-
Enter O or B in the following field:
-
Member use
-
| Field | Explanation |
|---|---|
| Expiration Date | This is the last day on which the data in the workfile is valid. The first FASTR version run after this date will delete this workfile. An expiration date is required for member use O or B, but is not used for member use I. |
| Member Use | The code that specifies how data is used. Values are:
I – Input. Use the data in the member named as input for the report. O – Output only. Create the workfile and save it, but do not generate a report. B – Both input and output. Create the workfile and produce a report. Note: There is no default code. |
To manage a workfile for input
After you save a workfile, you manage that workfile to process your reports. As a result, you do not have to rebuild a workfile. Managing a workfile for input improves processing time of your reports because you are using an existing workfile.
On Financial Statements
-
Access FASTR Definition Options.
-
On FASTR Definition Options, select Work File Save.
-
On Work File Save Parameters, complete the following field:
-
Member Name
-
-
Enter I in the following field:
-
Member Use
-
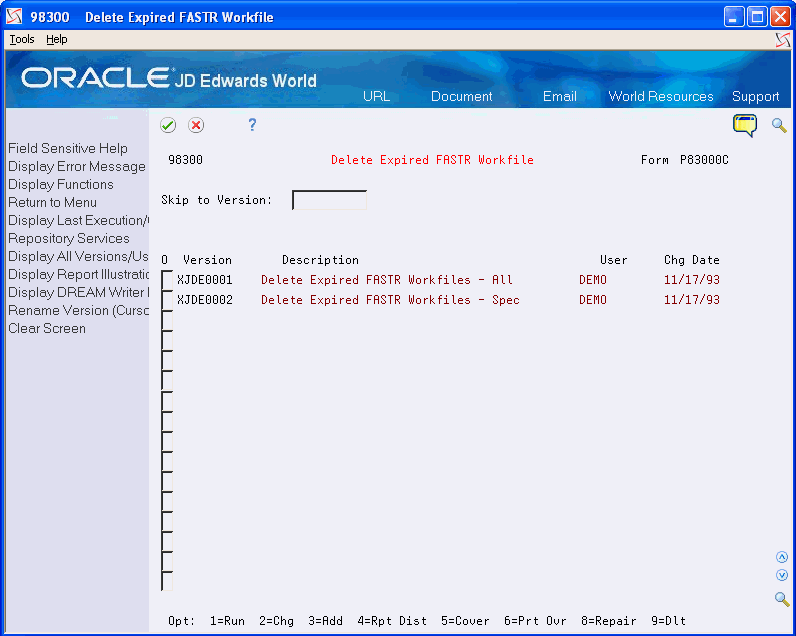
From FASTR Technical Operations (G8331), choose Delete Expired FASTR Workfile
You can set up a DREAM Writer program to read all expiration dates that are assigned to your workfiles and to delete any that are before the system date. For example, if your workfile has an expiration date in May and the current month is June of the same year, the DREAM Writer program deletes that workfile.
The Work File Save program contains the following DEMO versions:
-
A version to delete expired workfiles for all forms
-
A version to delete expired workfiles for selected forms
To delete expired workfiles for all forms, run the appropriate DEMO version. To delete expired workfiles for selected forms, copy the appropriate DEMO version and specify the program and versions on Data Selections.
On Delete Expired FASTR Workfile
Figure 26-3 Delete Expired FASTR Workfile screen
Description of "Figure 26-3 Delete Expired FASTR Workfile screen"
-
Enter 3 next to the DREAM Writer version that you want to copy.
-
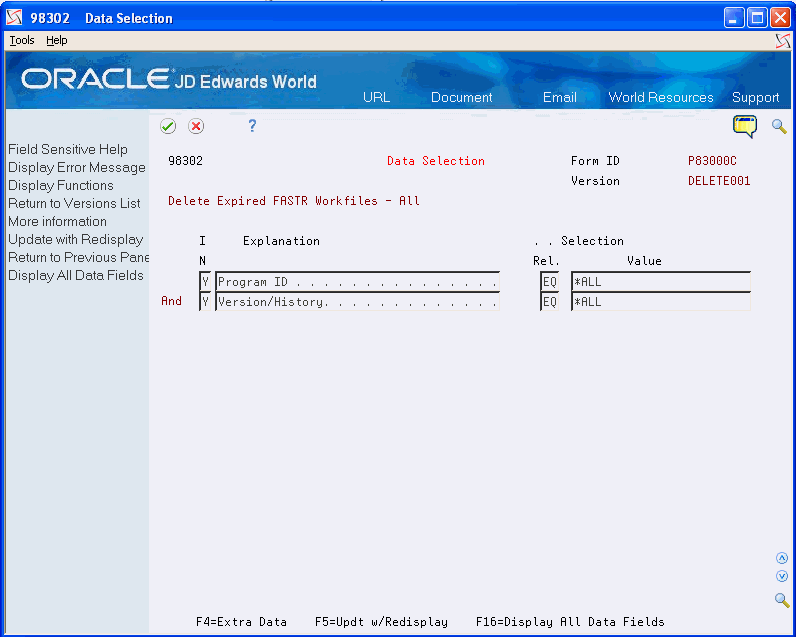
Press Enter until you access Data Selection.
-
On Data Selection, enter the form identification in the following field:
-
Program ID
-
-
Complete the following field:
-
Version
-
-
Press Enter until you access Delete Expired FASTR Workfile.
-
Enter 1 next to the DREAM Writer version that you want to run.
26.2 Changing the Number of days to Save a Workfile
The software is initially set up to save Balance Auditor and PC Download files for two days. All Balance and PC download files that are greater than two days are deleted. These spool files can be maintained longer than two days by changing the appropriate data area.
To View the Number of Days
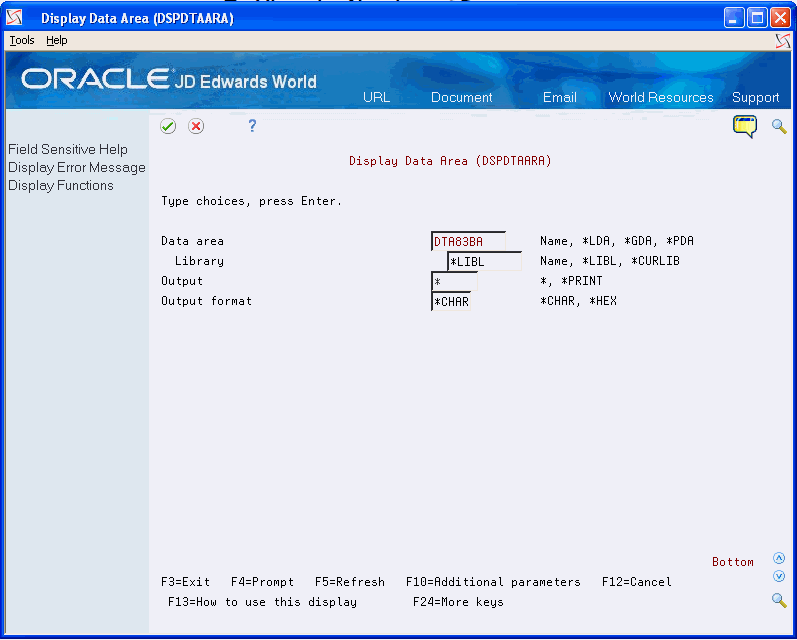
From FASTR Technical Operations (G8331), on the Command Line, enter DSPDTAARA and press F4
On Display Data Area
-
Enter DTA83BA in the following field:
-
Data area
-
-
Press Enter to display the information.
Figure 26-6 Data Display Area (Details) screen
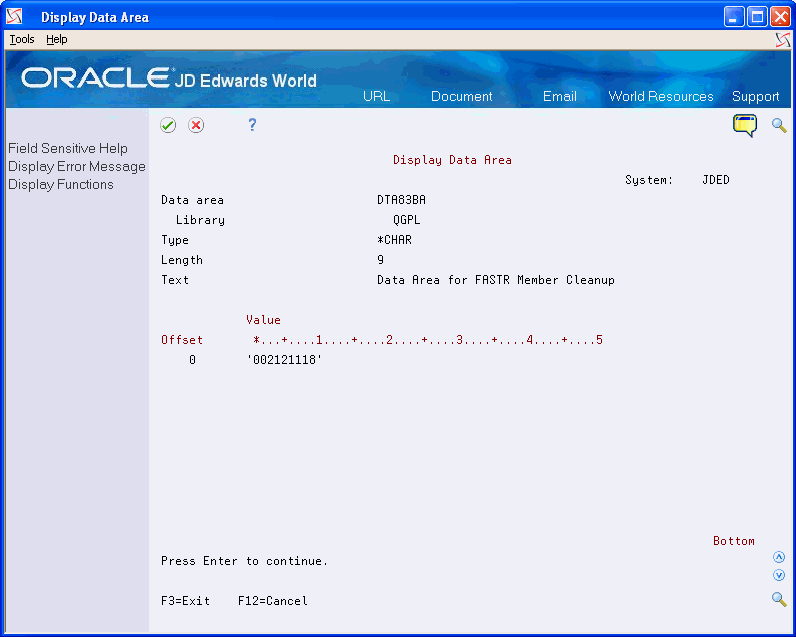
Description of "Figure 26-6 Data Display Area (Details) screen"
he date format will display as 'xxxyyyyyy', where xxx equals the number of days to save the file and yyyyyy is the current date.
To Change the Number of Days
From FASTR Technical Operations (G8331), Enter CHGDTAARA and press F4
On Display Data Area
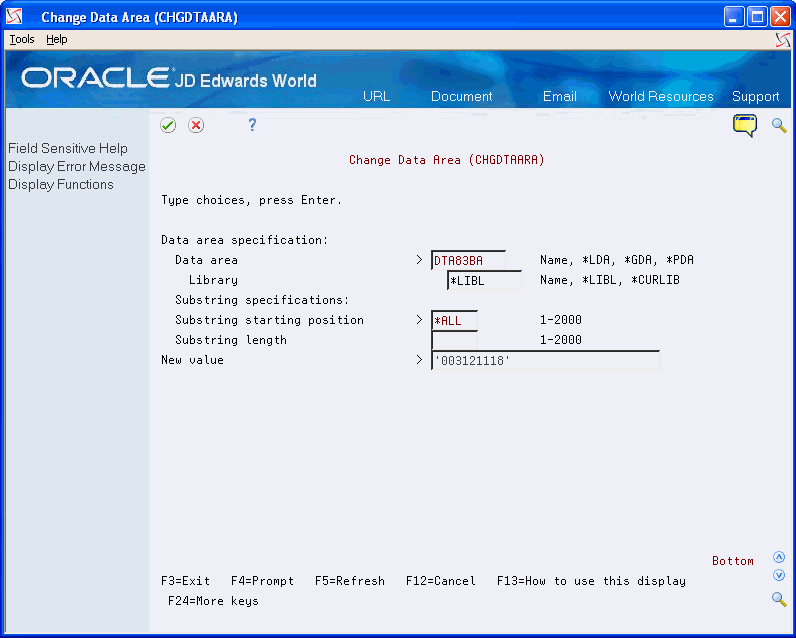
-
Enter DTA83BA in the following field:
-
Data area
-
-
Enter the days and date in the following field:
-
New value
Enter the days and date using the format 'xxxyyyyyy', where xxx equals the number of days to save the file and yyyyyy equals the current date.
Note:
Ensure you use single quotes around your entry ('xxxyyyyyy').
-
-
Press Enter.
-
Verify your entry by displaying the Data Area again.