2 Setting Up the Purchase Card Management System
This chapter contains these topics:
-
Section 2.1, "Understanding System Setup for Purchase Card Management,"
-
Section 2.4, "Setting Up UDCs for Purchase Card Management,"
-
Section 2.8, "Setting Up Employee Purchase Card Information,"
-
Section 2.10, "Setting Up Automatic Accounting Instructions (AAIs),"
-
Section 2.11, "Setting Up Additional Employee Purchase Card Information."
2.1 Understanding System Setup for Purchase Card Management
Before you use the JD Edwards World Purchase Card Management system, you need to define certain information that the system uses during processing. You define this information to customize the system for your business needs.
This table describes the setup information for the JD Edwards World Purchase Card Management system:
| Setup Feature | Description |
|---|---|
| Constants | Establish system basics, such as:
|
| User defined codes (UDCs) | Define customized codes according to your business needs for:
|
| Merchant category codes | Set up or import the unique four-digit code by credit card type that describes the merchant (supplier). |
| Profiles | Assign the allowed or restricted merchant category codes (MCCs) to each type of employee profile, which you can subsequently assign to the employee credit card record. |
| Bank information | Set up each bank or financial institution from which you receive purchase card transactions and statements. |
| Employee purchase card information | Set up each employee to whom you issue a purchase card. Assign the employee to a profile for allowed or restricted MCCs. Establish daily, monthly, and annual spending limits, and track other card information. |
| Merchant information | Set up or import information about merchants with whom you conduct business. |
| Automatic Accounting Instructions (AAIs) | Set up AAIs to provide a default expense account for the purchase card transmission and offset account for the corresponding journal entries. |
| Additional employee purchase card information. | Determine what additional information you want to track, and set up the fields and corresponding UDC tables and values using the Employee Cards-User Reserved program. |
2.2 Understanding the Audit Window
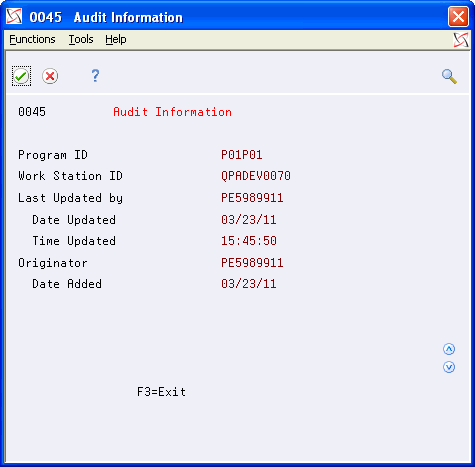
Many of the setup programs for the PCard system provide a program exit (function key) or option to display the Audit Information window, which you can use to see who entered or changed the information, as well as the date and time that the change occurred.
2.3 Setting Up Purchase Card Constants
Constants provide a basic framework for how your JD Edwards Purchase Card Management system works, based on your business needs. Generally, one person sets up all constants. JD Edwards World recommends that you do not change constants after they are set up because this might produce undesirable results. It is also recommended that you ensure that only authorized personnel can access and change purchase card management constants.
The system stores the purchase card management constants in the Purchase Card Constants file (F01P00).
2.3.1 Programs Used to Set Up Purchase Card Constants
| Program Name | Program ID | Navigation | Usage |
|---|---|---|---|
| Purchase Card Constants | P01P00 | From Purchase Card Processing (G01P), enter 29
From Purchase Card Set-Up (G01P41), choose Purchase Card Constants |
Set up the system constants for Purchase Card Management. |
| Parent/Child Relationships | P0150 | From Purchase Card Constants, choose Approvers Setup (F6) | Set up approvers for cardholder transactions. |
| Approvers by Business Unit | P01P25 | From Purchase Card Constants, choose PCard Approvers by Business Unit (F9) | Set up approvers by business unit to automatically create the cardholder approver record in P0150 when new cardholders are added. |
To set up purchase card constants
-
Access the Purchase Card Constants program (P01P00).
Figure 2-2 Purchase Card Constants screen
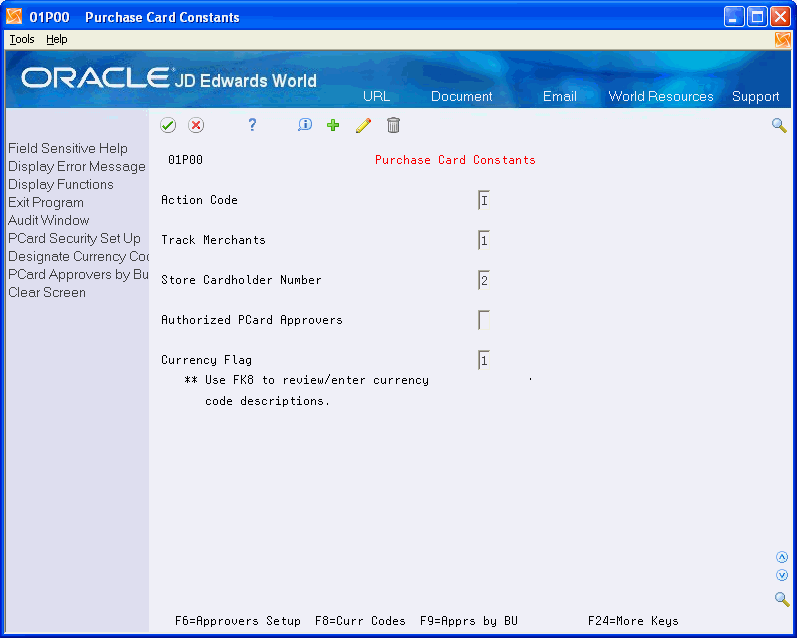
Description of "Figure 2-2 Purchase Card Constants screen"
- Track Merchants
-
Enter 1 to activate merchant tracking.
Tracking merchants allows you to perform inquiries and run reports by merchant so you can negotiate a better rate with those merchants with whom you do the most business or monitor the purchases from merchants designated as restricted.
When you track merchants, the system automatically updates the merchant's address book number to the journal entry that you create during PCard processing. Additionally, if you generate vouchers from the PCard system, although the system always assigns the bank as the payee on the voucher, you have the option to update the merchant as the supplier so that you can view all purchases for the supplier regardless of originating system.
- Store Cardholder Number
-
Use this field to indicate where you want to store the address book number of the employee (cardholder) in the Transaction Distribution File (F01P111). Valid values are:
-
Blank: Subledger
The system uses the Subledger field (SBL) and supplies A as the subledger type (SBLT).
-
1: Enhanced Subledger 1
The system uses the Enhanced Subledger 1 field (ABR1) and supplies A as the subledger type (ABT1).
-
2: Enhanced Subledger 2
The system uses the Enhanced Subledger 2 field (ABR2) and supplies A as the subledger type (ABT2).
When you generate journal entries for the PCard transactions, the system updates the corresponding fields in the Account Ledger file (F0911).
-
- Authorized PCard Approvers
-
Enter 1 to activate the authorized PCard approvers feature.
You can set up authorized approvers specifically for the review and approval process in the PCard system by setting up parent/child relationships for cardholder/approvers in the Structure Revisions program (P0150) for structure type PCD. You access this program by choosing PCard Security Setup (F6).
Because cardholders are the owners of their information, they are the parent in the relationship and the approver is the child. To set up the approval process, enter 1 in the Parent/Child 0/1 field to display the Child Address Number (approver) and then add the cardholder address book numbers in the detail area in the Parent Number field.
Additionally, to eliminate the necessity of setting up an approver for each new cardholder, you can set up Approvers by Business Unit (F9) and establish an approver for one or more business units. When Approvers by Business Unit is set up, the system automatically creates the cardholder/approver relationship record in F0150 when you add a new cardholder using Employee/Card Revisions (P01P01). You can set up multiple approvers for a single business unit, if desired. The system creates the cardholder/approver record for each approver you set up for the business unit. To set up an approver for all business units, enter *ALL in the Business Unit field.
If you do not activate authorized PCard approvers, all users can see all PCard transactions, regardless of the cardholder, unless you have other types of security set up, such as Business Unit, Action Code, and so forth.
If you activate authorized PCard approvers, but do not set up the relationship between the cardholder and authorized users, only the cardholder has access to their transactions and only the cardholder can approve their transactions.
- Currency Flag
-
Enter 1 to display the currency fields in the PCard system.
You should display the currency fields if your employees make purchases in a currency other than the one in which your company conducts business, even if you do not have multicurrency activated in the General Accounting Constants (P000909). If you have multicurrency activated, the system automatically displays the currency fields, regardless of the setting of this field.
The currency fields in the PCard system are informational; you use them only to record the amount of the purchase in the proper currency and only if your bank transmits this information. The system does not calculate domestic amounts or perform any currency validation, except for the currency code that you use.
Even if you operate in a multicurrency environment, the system does not generate foreign transactions in the General Accounting or Accounts Payable systems.
2.4 Setting Up UDCs for Purchase Card Management
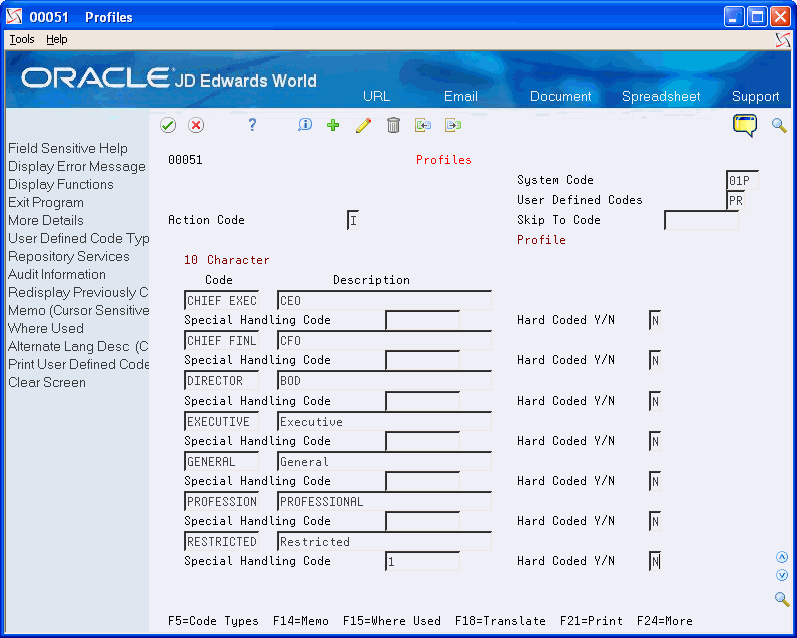
Many programs in the JD Edwards World Purchase Card Management system use UDCs to process information. Some of the UDCs are shipped with predefined data. You can change or delete the predefined data if it is not hard-coded, and can add UDCs to suit your business needs. Additionally, some UDCs utilize the Special Handling Code field (SPHD), which is located in the detail area of the screen. The value you enter in the SPHD field depends on the UDC table.
This is an example of the UDC table for Profiles that displays the Special Handling Code:
Because the following UDCs are required in one or more applications, if you choose not to use a UDC, you must set up blank value for each UDC table; otherwise, the system returns an error for an invalid value.
- Credit Card Types (00/CA)
-
You set up credit card type codes to represent the type of purchase card issued, such as American Express, VISA, Mastercard, or a specific merchant credit card.
- Profiles (01P/PR)
-
You set up profiles to establish allowed or restricted groups of MCCs according to some criteria. For example, you might categorize employees in your company or government entity by credit card privileges and allow executives to purchase from a broader pool of MCCs than you your administrative staff, or you might establish profiles for employee travel versus the purchase of employee supplies.
When you set up profiles, you use the Special Handling Code field (SPHD) to specify whether you want the system to validate the profile against a list of allowed MCCs or against a list of excluded MCCs. For example, if a profile has access to all MCCs except a few, you can specify those from which the profile is excluded instead of setting up all of the MCCs allowed for the profile.
-
If you are going to assign the allowed MCC codes to the profile, leave the Special Handling Code field blank.
-
If you are going to assign the restricted MCC codes to the profile, enter 1 in the Special Handling Code field.
If you do not want to use profiles, set up a blank value in the UDC table.
-
- Card Usage (00/CU)
-
You set up card usage codes to designate whether a card is used for a specific purpose, such as travel, the procurement of office supplies, and so forth.
- Deactivation Code (00/DA)
-
You set up deactivation codes to provide a reason, if applicable, for deactivating the purchase card.
- PCard Reason Code (01P/RC)
-
You set up PCard reason codes to assign to transactions that you do not approve. Optionally, you can assign a reason code to transactions for approval purposes.
- Employee/Cardholder Category Codes (01P/01 through 01P/10)
-
You set up category codes that you can assign to the employee (cardholder) for reporting purposes.
2.5 Setting Up Merchant Category Codes (MCCs)
Although MCCs are not required to process purchase card transactions, they are one of the core components of the PCard system. MCCs are standard four-digit numbers that the credit card industry uses to classify businesses by the type of goods or services that they provide. You use MCCs not only to categorize your merchant, but also when you set up profiles for allowed or restricted merchants. Your bank might be able to provide you with a list of the codes they use or you can locate them on the Internet.
When you set up MCCs, you can use the Map 1, 2, 3 fields to create a relationship among merchant category codes for tracking and reporting purposes. Similar to a category code, these three fields are user-defined; however, you do not have to establish valid values. For example, you might want to assign T to the Map 1 field for all MCCs that are travel related (air, hotel, car rental) or you might want to use O for all office-related MCCs.
You can set up MCCs manually or use the interactive import process to upload them. The system stores the MCCs in the Merchant Category (Commodity) Codes file (F01P21).
2.5.1 Program Used to Set Up Merchant Category Codes
| Program Name | Program ID | Navigation | Usage |
|---|---|---|---|
| Merchant Category Codes | P01P21 | From Purchase Card Processing (G01P), enter 29
From Purchase Card Set-Up (G01P41), choose Merchant Category Codes |
Assign a code that describes the merchant's business. |
To set up merchant category codes
-
Access the Merchant Category Codes program (P01P21).
Figure 2-4 Merchant Category Codes screen
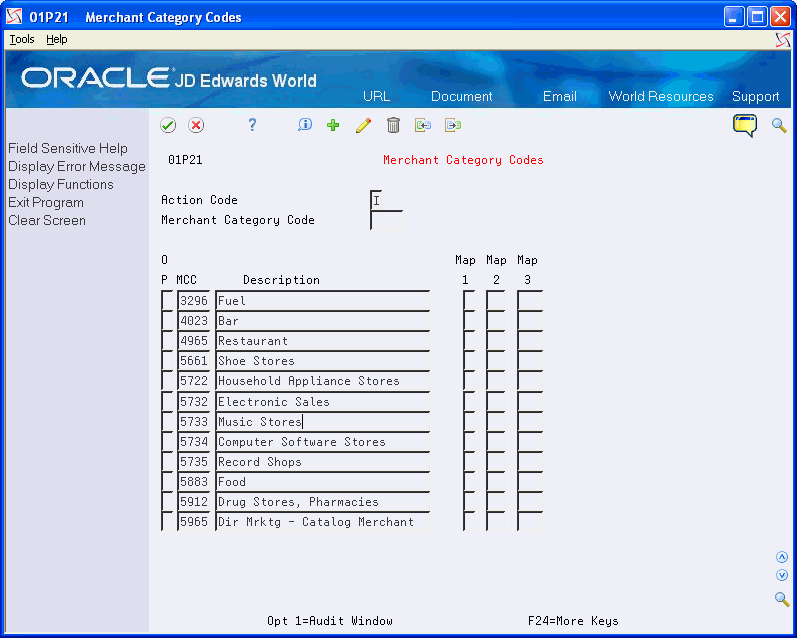
Description of "Figure 2-4 Merchant Category Codes screen"
- MCC
-
Enter the merchant category code each type of credit card that you process. Some examples include: 0742-Veterinarian Services, 1520-General Contractor, 5411-Grocery Stores, etc.
- Description
-
Enter the description of the MCC code.
- Map 1, Map 2, Map 3
-
A one-, two-, and three- character code field that you can use to create a relationship among MCC codes for reporting purposes.
2.5.2 Importing Merchant Category Codes
Instead of adding merchant category codes manually, you can import them from an Excel spreadsheet directly to the Merchant Category Codes screen (P01P21).
See Appendix A, "Importing Merchant Category Codes" for information about this process.
2.6 Setting Up Profiles
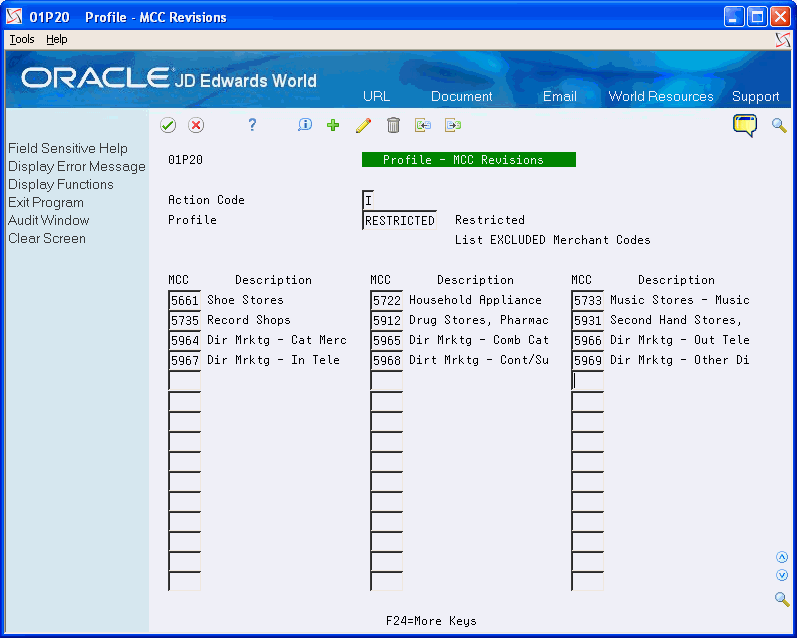
If you choose to use profiles, you must assign the list of allowed or excluded MCC values to it using the Profile - MCC Revisions program (P01P20). Using profiles enables you to monitor the use of restricted merchants, as well as track how often certain merchants are used by employee cardholders.
When you process purchase card transactions for MCCs that are excluded from the profile the system prints the offending MCC value followed by the message, 405H Merchant Cat Cd/Profile Mismatch WARNING, on the report. The warning does not prevent the transaction from processing, but it does provide an alert in the event that you do not want to approve the transaction later in the process.
The Special Handling Code (SPHD) in the Profiles UDC table (01P/PR) determines whether the MCCs you add to the profile are for allowed or restricted values:
-
Blank = Allowed
Only the MCCs established for this profile are allowed for the cardholder; all MCCs that are not set up are excluded.
-
1 = Excluded
The MCC values for this profile are exclusions; all MCCs that are not set up are allowed.
You also use the Profile - MCC Revisions program to make changes to profiles after you complete your system setup. To remove an MCC code from a profile, clear the value from the MCC field.
Each MCC that you set up is an individual record in the Purchase Card Profiles file (F01P20).
If you do not want to use profiles, set up a blank value in the Profiles UDC table (01P/PR).
2.6.1 Program Used to Set Up Profiles
| Program Name | Program ID | Navigation | Usage |
|---|---|---|---|
| Profile - MCC Revisions | P01P20 | From Purchase Card Processing (G01P), enter 29
From Purchase Card Set-Up (G01P41), choose Profile -MCC Revisions |
Assign MCCs to profiles. |
-
Access the Profile -MCC Revisions program (P01P20).
- Profile
-
Enter the value from the Profiles UDC table (01P/PR).
- MCC
-
Enter the allowed or restricted MCC code for the profile.
If you press F1 on the MCC field, the system displays the Merchant Category Codes screen (P01P21) from which you can select and return multiple MCC values using Option 4.
2.7 Setting Up Bank Information
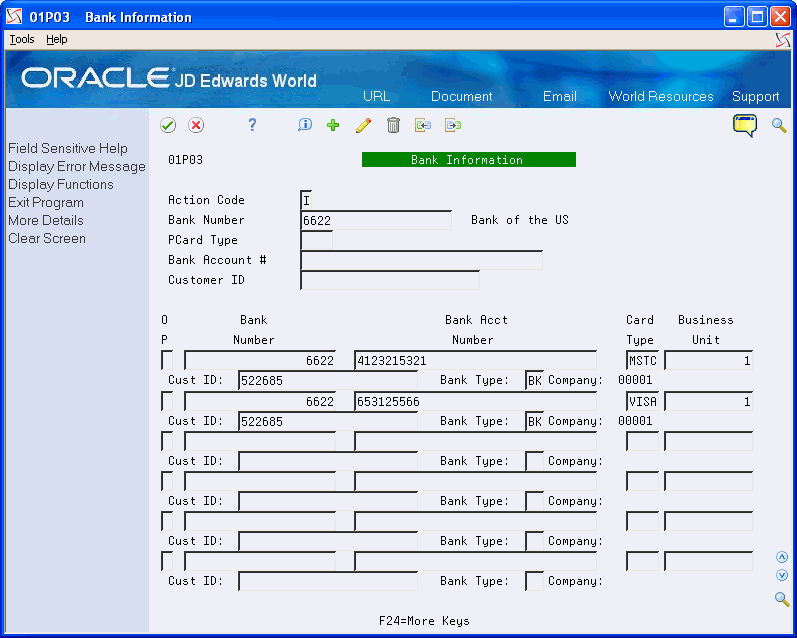
You set up credit card provider information using the Bank Information program (P01P03). You can then use this program to locate and revise bank information. Use the fields in the header portion of the screen to locate bank records and use the fields in the detail area to enter changes or add information. Because a bank can issue more than one credit card type, you must enter data in the Bank Number and Card Type fields. For example, your bank might issue both VISA and MasterCard to individuals in your organization.
You can also access Bank Information (F8) from the Employee/Card Revisions program.
-
Set up address book records or locate existing address book numbers for the banks that issue credit cards to your employees.
-
If you process vouchers, the bank is the payee and the system always assigns the address book number of the bank as the alternate payee on the voucher.
-
If you track merchants, the system uses the address book number of the merchant as the supplier number.
-
If you do not track merchants, the system uses the address book number of the bank as the supplier number.
-
2.7.1 Program Used to Set Up Bank Information
| Program Name | Program ID | Navigation | Usage |
|---|---|---|---|
| Bank Information | P01P03 | From Purchase Card Processing (G01P), choose Master Information Entry.
On Master Information Entry (G01P14), choose Bank Information. |
Add and revise credit card provider information. |
-
Access the Bank Information program (P01P03).
- Bank Number
-
Enter the address book number of the bank. The system validates the entry against the Address Book Master file (F0101).
- Bank Account Number
-
Enter the account number at the bank or financial institution.
- Business Unit
-
If you want to assign special security to the bank information record, enter the secured business unit. If you leave this field blank, the system retrieves the value of the Responsible Business Unit field (MCU) from the bank's address book record (F0101).
- Customer ID
-
Enter the number that the bank uses to identify your company for informational purposes, if desired.
- Bank Type
-
Enter a code from the Bank Types UDC table (00/BT) to identify the type of bank account. The default bank type for suppliers is V. If you use a value other than V, you must enter 2 in the Special Handling Code field of the UDC code to indicate an A/P bank type; otherwise, the system returns an error when you generate vouchers.
2.8 Setting Up Employee Purchase Card Information
You must set up information about each credit card that a bank issues to your employees. You can do this manually using the Employee Purchase Card Information program (P01P01) or you can use the batch import process.
The system stores this information in the Employee Card Information file (F01P01).
Using Pre-Assigned Credit Cards
If you do not currently have a credit card to issue to employees, you can enter information for a pre-assigned card by completing the Employee field and leaving the Bankcard ID field blank. The system allows you to enter only one pre-assigned card at a time per employee and card type. For example, if an employee requests a VISA card from two different banks, you can enter only one pre-assigned card. After you receive the credit cards, you can enter the Bankcard ID number to update your records or upload the credit card information using a Z-file process. The system then combines the employee ID and Bankcard ID to create the Bank Card Unique ID, which it uses in various purchase card programs.
-
Set up an Address Book Master record (F0101) for each employee to whom you issue a purchase card.
2.8.1 Program Used to Set Up Employee Card Information
| Program Name | Program ID | Navigation | Usage |
|---|---|---|---|
| Employee/Card Revisions | P01P01 | From Purchase Card Processing (G01P), choose Master Information Entry.
On Master Information Entry (G01P14), choose Employee/Card Revisions. |
Add and revise employee credit card information. |
2.8.2 Setting Processing Options for Employee/Card Revisions (P01P01)
Processing options enable you to specify the default processing for programs and reports.
1. Number of Days to Display Alert
Enter the number of days prior to the card expiration date that you want the system to use to display the message, Expired!, on the Employee Card Revisions screen (P01P01).
2. Character to Indicate Blank Value
If you use the batch import (Z) process to update employee card information, you can use this processing option to specify a special character to indicate that you want to clear a field. The system clears the value from any field that has the character you specify in this processing option on the spreadsheet when you process the changes using Purchase Card Revisions (P01P01Z). For example, suppose you use category code 01 to track the employee's job and the employee moves to another position that no longer requires use of a credit card. If you attempt to clear a value using the Z-file, the system does not distinguish that you are changing the value of the field. You assign a special character to the fields that you want to clear on the F01P01Z spreadsheet and then enter that character in the processing option for Z-File Processing. The system locates all fields with the special character that you specify in the processing option and clears the value in the field.
To set up employee purchase card information
-
Access the Employee/Card Revisions program (P01P01).
Figure 2-7 Employee/Card Revisions screen
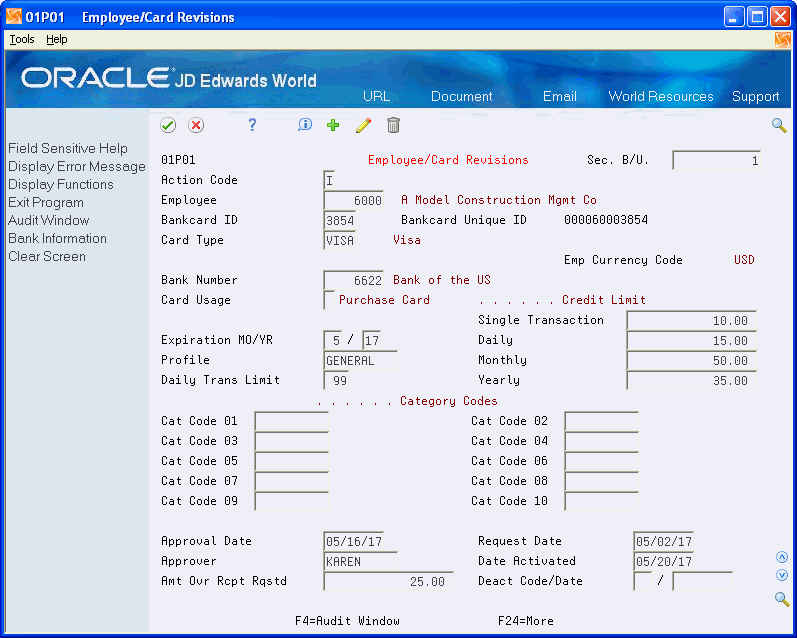
Description of "Figure 2-7 Employee/Card Revisions screen"
- Employee
-
Enter the address book number of the employee.
- Sec. B/U
-
The security business unit serves a dual purpose:
-
It establishes security for the PCard system; only users authorized to the business unit can review employee credit card information and purchases.
-
It is used to locate the company to retrieve the appropriate AAI when you generate journal entries and vouchers and might be used as part of the expense or offset account, if the business unit on the AAI is blank.
If you leave this field blank, the system retrieves the value from the Business Unit field (MCU) of the employee's Address Book Master record (F0101).
-
- Bankcard ID
-
Enter the last four digits of the purchase (credit) card number or leave this field blank to enter a preassigned credit card.
- Card Type
-
Enter a value from the Credit Cards Type UDC table (00/CA) to identify the type of credit card, such as VISA, Mastercard, American Express, and so forth.
- Employee Currency Code
-
The system displays this field only if you have the Currency Flag activated in the Purchase Card Constants program.
The system assigns the currency code that is assigned to the company to which the security business unit belongs. For example, if the security business unit is 1, which belongs to company 00001, and the currency code assigned to company 00001 is USD, the system assigns USD to this field.
- Bank Number
-
Enter the address book number of the bank.
- Card Usage
-
Enter a value from the Card Usage UDC table (00/CU) to specify the type of credit card, if desired.
- Expiration MO/YR
-
Enter the month and year that the credit card expires. If you do not provide the expiration date of the credit card, the system prints that the card as expired on transaction reports.
- Profile
-
Enter the profile that contains the list of allowed or restricted MCC codes from the Profile UDC table (01P/PR), if desired.
- Daily Transaction Limit
-
Enter the number of transactions the cardholder is allowed to make in a single day, if desired.
- Single Transaction, Daily, Monthly, Yearly
-
Enter the amount limits for processing single, daily, monthly, and yearly transactions. If you leave any field blank, the system uses the Data Dictionary default value. The system issues a warning if you exceed the established limit when you process PCard transactions.
- Category Codes 01 through 10
-
Enter the reporting values from the desired Category Codes UDC table (01P/01 through 01P/10).
- Approval Date
-
Enter the date on which the credit card is approved for processing. This field is informational only.
- Request Date
-
Enter the date on which the credit card is requested from the bank. This field is informational only.
- Approver and Approver Date
-
Enter the name or identifier of the person who approved the credit card and the date on which it was approved. These fields are informational only.
- Date Activated
-
Enter the date on which the credit card is active for use. This field is for informational purposes only and does not stop transactions from processing.
- Amount Over Receipt Requested
-
Enter the minimum amount for which a receipt is required. The system updates the Receipt Status field (CDSR) to 1 in the Transaction File, which displays on the PCard Transaction/Information screen (P01P11) when the purchase amount exceeds the amount specified.
- Deactivation Code/Date
-
Enter a value from the Deactivation Code UDC table (00/DA), if desired, to specify the reason for deactivating the credit card, as well as the deactivation date. These fields are information only and do not prevent the card from being used or from processing transactions.
2.8.3 Importing Employee Purchase Card Information
Instead of manually entering employee purchase card information, you can use the batch import process to upload it from a spreadsheet to a Z-file, and then you can run a program to process it from the Z-file to the Employee Card Information file (F01P01). You can also use this process to upload changes to the Employee Card Information file.
The following tasks comprise the import process for employee card information:
-
Reviewing the fields in the Employee/Card Revisions screen (P01P01) to determine those in which you want to enter data.
-
Creating a template (spreadsheet) for the Employee Purchase Card Z File (F01P01Z).
-
Processing information from the spreadsheet to F01P01Z.
-
Running a version of the Purchase Card Revisions program (P01P01Z) to process the information to F01P01.
For details about using the batch import process to upload employee credit card information and changes to the Employee Card Information file, see Appendix B, "Using the Batch Import Process to Upload Information for the PCard System."
2.9 Setting Up Merchant Information
You must set up merchant information in the PCard system for each merchant that you expect to use for each purchase card. Because each credit card company might use different merchant IDs, you might have multiple merchant records to represent the same supplier. For example, VISA and MasterCard might have different merchant IDs for ACME Oil.
The bank can provide you with a list of its merchant IDs so that you can enter the merchant information or you can send them a template (spreadsheet) to complete so that you can import merchant information into the system.
If you track merchants, you must set up an address book record for each merchant that you want to track. If you do not want to track all merchants you can set up and use a one-time-payment (OTP) supplier address book number; however, the system does not use this as the payee or supplier when you generate vouchers, instead, it uses the address book number of the bank for both.
If you do not track merchants but you want to make the address book field required, enter 1 in the Require Address Book # processing option.
The system stores merchant information in the Merchant Information file (F01P02).
-
If you track merchants, set up an address book record for each merchant that you want to track.
2.9.1 Program Used to Set Up Merchant Information
| Program Name | Program ID | Navigation | Usage |
|---|---|---|---|
| Merchant Information | P01P02 | From Purchase Card Processing (G01P), choose Master Information Entry.
On Master Information Entry (G01P14), choose Merchant Information. |
Add and revise information about each merchant. |
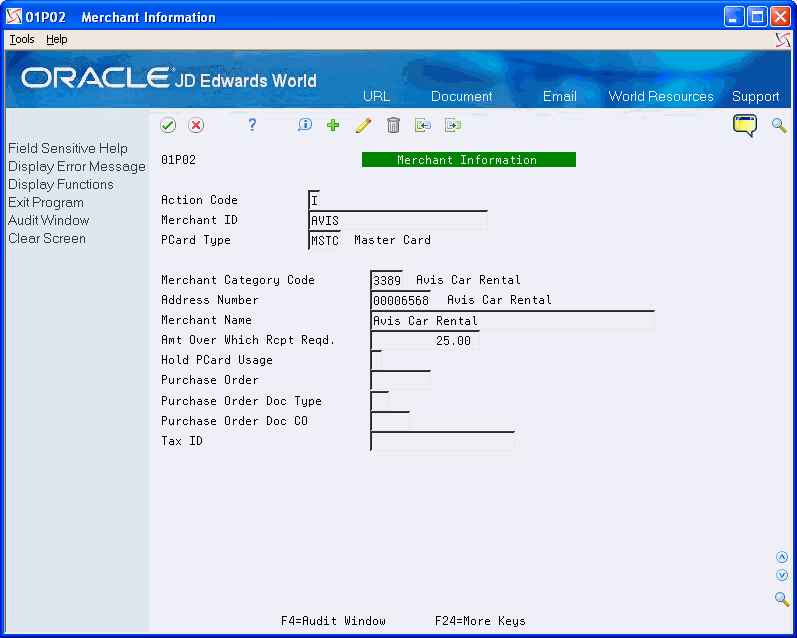
2.9.2 Setting Processing Options for Merchant Information (P01P02)
Processing options enable you to specify the default processing for programs and reports.
1. Enter 1 to require the address book number of the merchant. This processing option is valid only when merchant tracking is not activated in the Purchase Card Constants (P01P00).
To set up merchant information
-
Access the Merchant Information program (P01P02).
- Merchant
-
Enter the merchant ID provided to you by the bank to enable PCard processing.
- PCard Type
-
Enter a value from the Credit Card Type UDC table (00/CA) to identify the purchase card.
- Address Book Number
-
Enter the address book number of the merchant or bank, if you track merchants or have the processing option set to require the merchant address book number.
- Merchant Name
-
Enter the name of the merchant, if desired.
- Amt Over Which Rcpt Required
-
Enter the minimum amount for which a receipt is required. The system updates the Receipt Status field (CDSR) to 1 in the Transaction File, which displays on the PCard Transaction/Information screen (P01P11) when the purchase amount exceeds the amount specified.
- Hold PCard Usage
-
Enter 1 to identify the merchant as someone with whom you no longer conduct business. This field is informational only and does not prevent the system from processing transactions for the merchant; you must coordinate the restricted merchant with the bank that issued the card
- Purchase Order, Purchase Order Doc Type, Purchase Order Doc Company
-
Use these fields to specify the blanket purchase order number to use for purchases from this merchant. The system assigns this information to the corresponding fields of the journal entry that you generate during the PCard process.
- Tax I D
-
Enter the tax identification number of the merchant, if desired.
Note: The system uses the tax ID from the address book record (F0101) for 1099 processing.
2.9.3 Importing Merchant Information
Instead of manually entering merchant information, you can use the batch import process to upload it from a spreadsheet to a Z file, and then you can run a program to process it from the Z file to the Merchant Information file (F01P02). You can also use this process to upload changes to the Merchant Information file.
The following tasks comprise the import process for merchant information:
-
Reviewing the fields on the Merchant Information screen (P01P02) to determine those in which you want to enter data.
-
Creating a template (spreadsheet) for the Merchant Information PCard Z File (F01P02Z).
-
Processing the information from the spreadsheet to F01P02Z.
-
Running a version of the Merchant Revisions program (P01P02Z) to process the information to F01P02.
For details about using the batch import process to upload merchant information and changes to the Merchant Information file, see Appendix B, "Using the Batch Import Process to Upload Information for the PCard System."
2.10 Setting Up Automatic Accounting Instructions (AAIs)
The Purchase Card Management system provides two AAIs that you can use:
-
CC You use the CC AAI to establish a default expense distribution account by MCC and company.
-
CCP You use the CCP AAI for two purposes: to establish an offset account for the journal entries generated by the Create Journal Entry program (P01P520) and to establish the distribution account for vouchers generated by the Create A/P Vouchers program (P01P510).
2.10.1 CC (Expense Distribution)
The system uses the CC AAI during the transmission process to provide a default G/L expense distribution account. If you do not set up this AAI, you must enter the expense account and allocate the G/L distribution for the PCard transaction.
If you want to use the CC AAI to provide the default expense account for some MCCs, but not all, set up the CC AAI for company 00000 without defining an account. This setup allows the system to process the transmission without an account.
You can set up a CC AAI by MCC and company. The system derives the company based on the business unit you assign to the Employee Card Information record (F01P01). If you leave the Business Unit field blank in the AAI, the system uses the value of the business unit from the Employee Card Information record (F01P01) and concatenates it with the Object and Subsidiary in the AAI.
The system uses the following hierarchy to locate the expense account from the AAI, where xxxx = MCC:
-
CCxxxx + Employee Company
-
CCxxxx + Company 00000
-
CC + Employee Company
-
CC + Company 00000
2.10.2 CCP (Suspense/Distribution Account)
You set up the CCP AAI item for the system to use as the offset (suspense) account when you generate journal entries and as the distribution account if you create vouchers. You can set up the CCP AAI for both currency and company. The system retrieves the domestic currency code (CRCD) and employee company (COE) from the PCard transaction (F01P11).
Depending on processing option settings for Create Journal Entries and Create Vouchers programs, the system uses different criteria to retrieve the CCP AAI. See 0, "Setting Processing Options for Create Journal Entries (P01P520)" and 0, "Setting Processing Options for Create Vouchers (P01P510)" for the hierarchy the system uses to retrieve the appropriate CCP AAI and account number to use.
2.11 Setting Up Additional Employee Purchase Card Information
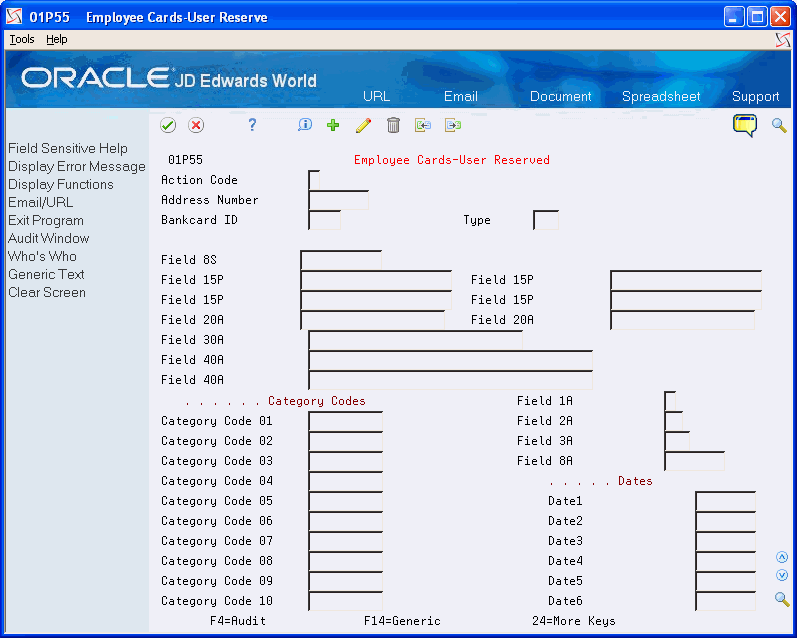
You can enter additional information about each purchase card and employee using the Employee Cards - User Reserved program (P01P55). The user reserved fields provide you with the flexibility to define and store additional information about the employee purchase card that might be unique to your business. Your organization must determine how to use these fields and set up the UDC tables to best suit your needs. You can then organize and group this information for reporting purposes.
You can set up multiple types of additional information to track in the User Reserved Types UDC table (0/T1). For example, you might set up the following:
-
BNK - Bank
-
INS - Insurance Benefits
-
PRO - Profile
The system stores this information in the Employee Card Info - User Reserved file (F01P55).
2.11.1 Program Used to Set Up Additional Employee Information
| Program Name | Program ID | Navigation | Usage |
|---|---|---|---|
| Employee Cards - User Reserved | P01P55 | From Purchase Card Processing (G01P), choose Master Information Entry.
On Master Information Entry (G01P14), choose Employee Cards - User Reserved. |
Add and revise user-defined information about employee credit card holders. |
2.11.2 Setting Processing Options for Employee Cards - User Reserved (P01P55)
Processing options enable you to specify the default processing for programs and reports.
Use the processing options under this heading to specify the value for the user defined Type field, as well as whether to allow changes to it.
1. Default Value
Enter the value from the User Reserved Type Code UDC table (00/T1) to use as the default value in the Type field (TYUR) when you select the program from the menu.
2. Field Protection
This processing works in conjunction with the previous processing option to prohibit changes to the default value for the Type field.
-
Blank - Do not protect the Type field from changes.
-
1 - Protect the Type field from changes.
If you do not specify a value in the first processing option and you set this processing option to 1, the system uses blank as the default Type value.
To set up Employee Card User Reserved Information
-
Access the Employee Cards - User Reserved program (P01P55).
Figure 2-9 Employee Cards - User Reserved screen
Description of "Figure 2-9 Employee Cards - User Reserved screen"
Each field on the Employee-User Reserved screen is identified by its type, length, attributes as described in the following table:
| Type | Type Description | Field Length | Attributes |
|---|---|---|---|
| Field | You can associate rules for each field that you defined using the Data Dictionary. | The number of characters you can store in the field. | A - Alphanumeric
S - Signed numeric (no decimals) P - Packed numeric (including decimals) |
| Category Code | You define the category codes values based on each Type that you set up in UDC 00/T1. | Up to 10 characters in length. | Alphanumeric |
| Date | Enter a date in the format defined by your system or user profile. | Six characters. | Date |
