25 Process a Tag Count
This chapter contains these topics:
A tag count is the method for counting all items in a location. When you perform a tag count, you physically tag and count all items twice by location, typically at the end of the year. That is, two teams independently perform the same physical inventory and record their data on two different parts of the tag. Later, you use each team's data to compare results and resolve variances.
Consider using a tag count in conjunction with a cycle count to ensure accuracy.
See Also:
-
Section 24.1, "Processing a Cycle Count"if you are considering processing both cycle and tag counts
25.1 Running the Select Items for Count Program
From Inventory Management (G41), choose Inventory Count Alternatives
From Inventory Count Alternatives (G4121), choose Select Items for Count (Tag)
Before you start the tag count process, you must run the Select Items for Count program. Select Items for Count is a DREAM Writer program that builds a Cycle Count Transaction record for each inventory item to be counted and records the current on-hand quantity and unit cost for each item.
25.2 Printing Inventory Tags
From Inventory Management (G41), choose Inventory Count Alternatives
From Inventory Count Alternatives (G4121), choose Print Inventory Tags
Although you can print tags at any time, you typically print tags at the beginning of the tag count process and distribute them to the teams who are counting items.
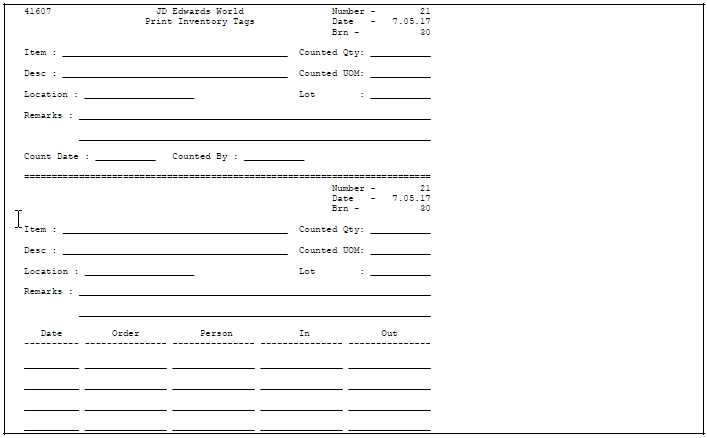
Run the Print Inventory Tags DREAM Writer program to print inventory tags for each location. The tag is a two-part form that includes the following information:
-
Branch/plant
-
Date printed
-
Tag number
You can vary the tag's format to accommodate your business needs. The system stores the tag number and tag status in the Tag Inventory table (F4160).
Figure 25-1 Print Inventory Tags printout
Description of "Figure 25-1 Print Inventory Tags printout"
25.2.1 What You Should Know About
| Topic | Description |
|---|---|
| Multiple tags for a single item | If your warehouse stores the same item in several physical locations, you can print multiple tags for a single location in the system. The Tag Count Entry program (P41602) allows the entry of multiple tags for a single system location. When your warehouse personnel enter counts on separate tags for the same item location, the system will tally those counts and apply them to a single location. |
25.3 Recording Tag Distribution Information
From Inventory Management (G41), choose Inventory Count Alternatives
From Inventory Count Alternatives (G4121), choose Tag Issues and Receipts
Before you distribute tags to the teams, you must record who is responsible for each tag number. You use this information to track:
-
Who tagged each item
-
Who returned the parts of each tag
To record tag distribution information
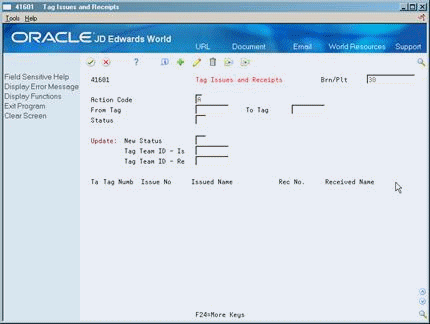
Figure 25-2 Tag Issues and Receipts screen
Description of "Figure 25-2 Tag Issues and Receipts screen"
Complete the following fields:
-
Brn/Plt (Branch/Plant)
-
From Tag
-
To Tag
-
Status
-
New Status
-
Tag Team ID-Is (Tag Team Identification-Issued)
-
Tag Team ID-Re (Tag Team Identification-Received)
| Field | Explanation |
|---|---|
| From Tag | A number that the system assigns to the tag using the Print Tag program, based on the next available tag number.
Form-specific information In the From Tag field, this is the beginning tag number. If you enter a tag number in this field, the system displays the tags that are equal to or after this number. |
| To Tag | A number that the system assigns to a specific location that contains inventory. You can use prenumbered, multi-part tags.
Form-specific information The ending tag number. If you enter a number in this field, the system displays the tags that are equal to or after the beginning tag number and equal to or before the ending tag number. |
| Status | A user-defined code (system 41/type TS) for the status of a tag in the tag inventory count process. |
| New Status | Use this field to change the maintenance status of selected records. |
| Tag Team ID - Issued | The address book number of the individual or team to whom you issued the tags.
Form-specific information You use the Update: Issued to field in conjunction with the Update: New Status field. This is the address book number of the person to whom you issued tags. |
25.3.1 What You Should Know About
| Topic | Description |
|---|---|
| Entering additional tags | You cannot enter additional tags to an existing group. Print a new group of sequentially-numbered tags using the Print Inventory Tags program.
See Section 25.2, "Printing Inventory Tags" for more information. |
| Deleting tags | You cannot delete tags on Tag Issues and Receipts because all tag numbers must be accounted for. You can, however, change the status of a tag to DS (destroyed) to indicate that the tag should not be used. |
| Additions to and movement of inventory | Inform personnel of receipts, shipments, and item breakage that occur during the count. Counters must record by location all items that are added and moved during the count. |
25.4 Recording Tag Receipt Information
From Inventory Management (G41), choose Inventory Count Alternatives
From Inventory Count Alternatives (G4121), choose Tag Issues and Receipts
After you receive the tags back from the counters, you need to record the following information:
-
The team who returned the tag
-
The tag number from the team
To record tag receipt information
Complete the following fields:
-
New Status
-
Tag Team ID-Re (Tag Team Identification-Received)
| Field | Explanation |
|---|---|
| Tag Team ID - Received | The address book number of the individual or team that you received tags from.
Form-specific information You use this field in conjunction with the Update: New Status field. |
25.5 Entering the Tag Count Results
From Inventory Management (G41), choose Inventory Count Alternatives
From Inventory Count Alternatives (G4121), choose Tag Count Entry
After the count is complete, you must enter the information from each tag into the system.
To enter the tag count results
To enter tag information, you must first inquire on a tag. Enter the program, populate the Brn/Plt and Tag No. fields, place I in the action code field and press Enter. The action code will change to A and the Tag No. field will be blanked out. You may also see information for previously entered tags in the lower portion of the screen. You can now populate the tag information and hit enter to record the count for the tag. Continue entering tags until complete. If you exit the program and reenter, you will again have to inquire on a tag before adding one.
On Tag Count Entry
Complete the following fields:
-
Brn/Plt (Branch/Plant)
-
Skip to Tag
-
Tag No.
-
Item Number
-
Quantity
-
UM
-
Location
-
Remark
-
Lot
-
Location
| Field | Explanation |
|---|---|
| Skip to Tag | A number that the system assigns to a specific location that contains inventory. You can use prenumbered, multi-part tags.
Form-specific information In the Skip to Tag field, this is the tag number you want the system to display. For example, if you enter 5, the system displays only the tags numbered 5 and after. |
| Tag No | A number that the system assigns to the tag using the Print Tag program, based on the next available tag number.
Form-specific information This is the tag number printed on the tag. |
| UM | A user-defined code (system 00/type UM) that indicates the quantity in which to express an inventory item, for example, CS (case) or BX (box). |
| Remark | A generic field that you use for a remark, description, name, or address. |
| Lot/SN | A number that identifies a lot or a serial number. A lot is a group of items with similar characteristics. |
25.5.1 What You Should Know About
| Topic | Description |
|---|---|
| Assigning lots to a single location through tag count entry | You can prevent the system from allowing you to assign lots to a single location if the lots meet the following criteria:
§ When the items in the lots are the same § When a single lot contains items with different statuses For more information, see Section 4.3, "Working with Item Locations" |
| Creating a lot | When you enter the tag count results, you might be able to create a lot if you have set the branch/plant constants appropriately.
For more information, see Section 33.1, "Setting Up Constants" |
| Reviewing lot information | You can review expiration date and status information for a lot by accessing the detail area of Tag Count Entry. You also can access the Lot Information form from the Lot field. This form displays item and location information for a lot as well as the lot expiration date, the lot status, and so on.
For more information, see Section 43.1, "Viewing Lot Availability" |
25.6 Reviewing the Tag Status
From Inventory Management (G41), choose Inventory Count Alternatives
From Inventory Count Alternatives (G4121), choose Tag Status Review
You can review the current status of any tag to check for lost or incomplete tags.
Complete the following tasks:
-
Review the tag status
-
Review the tag status summary
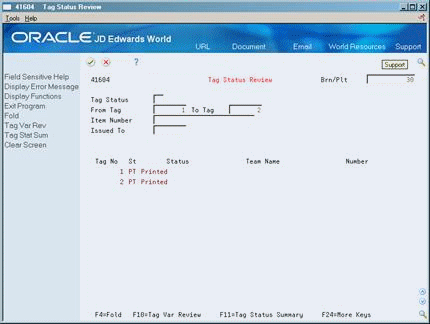
Complete the following fields:
-
Brn/Plt (Branch/Plant)
-
Tag Status
-
From Tag
-
To Tag
-
Item Number
-
Issued to
| Field | Explanation |
|---|---|
| Issued To | The address book number of the individual or team to whom you issued the tags. |
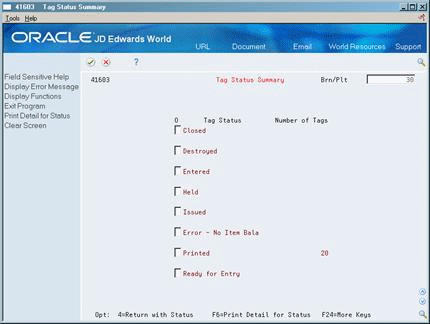
To review the tag status summary
-
Choose Access Tag Status Summary (F11).
-
Complete the following field:
-
Brn/Plt (Branch/Plant)
-
25.7 Reviewing the Tag Count Variances
From Inventory Management (G41), choose Inventory Count Alternatives
From Inventory Count Alternatives (G4121), choose Tag Status Review
After you enter the results of the tag count, you can review the variance between the amount and cost of inventory online and the amount of inventory that the teams counted.
You can print the Tag Variance Review by pressing (F6) from Tag Variance Review or by accessing the program from the menu (G4121).
To review the tag count variances
On Tag Status Review
-
Choose Tag Var Review (F10).
-
On Tag Variance Review, complete the following fields:
-
Brn/Plt (Branch/Plant)
-
Quantity/Amt (Quantity/Amount)
-
Amount/Percent
-
Relationship
-
Amount
-
-
Access the detail area (F4)
-
Review the following:
| Field | Explanation |
|---|---|
| Quantity/Amt | A code that indicates whether the system displays a quantity variance or an amount variance. |
| Amount/Percent | A code that determines whether the variance is an amount or a percentage variance from the expected quantity or amount. |
| Relationship | A code that indicates the relationship between the range of variances that you display. Valid codes are:
|
| Variance Amount | The calculated difference between the amount on hand at count contained in the Item Location file (F41021) and the Item Ledger records. |
25.8 Running Tag Count Updates
From Inventory Management (G41), choose Inventory Count Alternatives
From Inventory Count Alternatives (G4121), choose Tag Count Update
After you have entered the tag count results and reviewed variances, run the Tag Count Update program to perform the following functions:
-
Compare the online on-hand count to the physical count
-
Calculate the quantity and amount of variances
-
Update the new quantity information in the item location record and item ledger
-
Create entries to the general ledger based on automatic accounting instructions
The system does not accept any additional count entries for the group of tags that were used for the update.
The system updates the status in the Tag Inventory table to CL (Closed) or deletes the record, depending on how you set the processing options.
Verify the results of the update on Item Ledger Inquiry and General Journal Review.
25.9 Running a Quantity Count Comparison
From Inventory Management (G41), choose Inventory Count Alternatives
From Inventory Count Alternatives (G4121), choose Quantity Count Comparison
After you process the tag count, you can run the Quantity Count Comparison program to reconcile the inventory with the online records. Quantity Count Comparison is a World Writer report that shows items that were entered in the system, but not counted.
When the update is processed, every record in the F4141 with a count/tag entered in Tag Count Entry will be deleted from the F4141. The remaining records in the F4141 represent items/locations that have been selected for count but have no count entered. These items/locations will need to be selected for count again and the physical quantity, even if zero, should be entered in Tag Count Entry. Then run the update again. When the Quantity Count Comparison shows no records, all items/locations selected for count have an associated tag/count entered in the system.
Figure 25-7 Quantity Count Comparison report
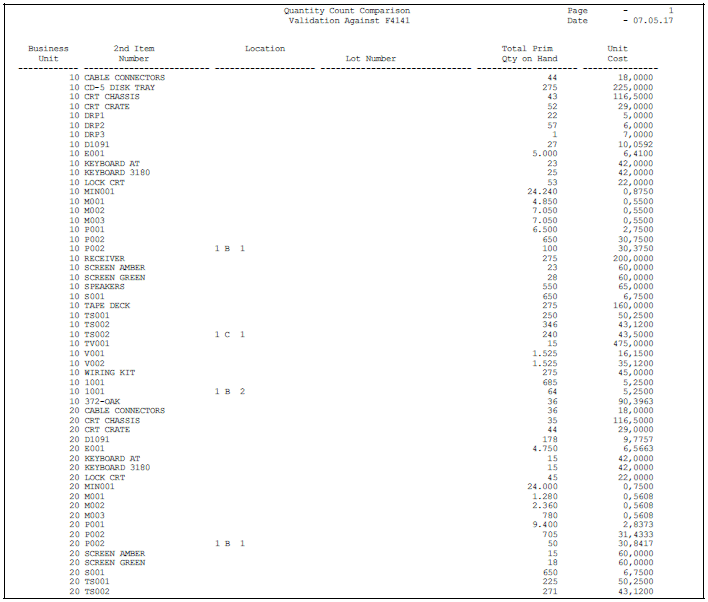
Description of "Figure 25-7 Quantity Count Comparison report"