10 Transfer Inventory
This chapter contains this topic:
You can use transfer transactions to record two types of inventory movement:
-
Between different locations in the same branch/plant
-
Between different branch/plants
An inventory transfer creates two journal entries in the general ledger. The first journal entry decreases inventory at the original location. The second entry increases inventory at the destination location.
10.1 Transferring Inventory
From Inventory Management (G41), choose Inventory Master/Transactions
From Inventory Master/Transactions (G4111), choose Transfers
To transfer inventory, you must enter transaction and item information for both the original and destination locations. You can set up processing options to provide default values and to display cost information.
If you transfer a kit, you must enter a transfer for each component in the kit. The Transfers program does allow you to transfer the parent item, although the system will not update quantity information for the components.
10.1.1 What You Should Know About
| Topic | Description |
|---|---|
| Assigning items with multiple lot or serial numbers to a location | When you transfer inventory, you might be able to assign items with multiple lot or serial numbers to a location.
For more information, see Section 4.2, "Assigning an Item to a Branch/Plant" |
| Assigning lots to a single location through transfers | You can prevent the system from allowing you to assign lots to a single location if the lots meet the following criteria:
For more information, see Section 4.3, "Working with Item Locations" |
| Creating a lot | When you transfer inventory, you might be able to create a lot if you have set the branch/plant constants appropriately.
For more information, see Section 33.1, "Setting Up Constants" |
10.2 Example: Transfer Transaction
If you transfer an item that costs more at one branch/plant than at another, automatic accounting instructions (AAIs) direct the cost variance to a general ledger account. In this example, an item that costs 25.50 is transferred from Branch/Plant A to Branch/Plant B, where it costs 25.00. This creates a credit of 25.50 to Branch/Plant A, a debit of 25.00 to Branch/Plant B, and a standard cost variance of .50. The .50 difference is recorded in a variance account.
| From Branch/Plant A | To Branch/Plant B |
|---|---|
| Credit 25.50 (standard cost) | Debit 25.00 (standard cost variance of .50 recorded in variance account) |
Caution:
The Transfers program in the Inventory Management system does not create any sales or purchase order documents. It updates only the costing method for the branch/plant. Also, it does not provide an adequate audit trail for transferring as a result of sales or purchase orders. Use this program for inventory purposes only.See Also:
-
Section 30.2, "About Kits"for information on parent and component items
On Transfers
-
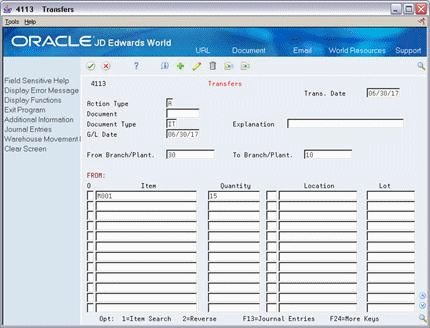
To enter transaction information, complete the following fields:
-
From Branch/Plant (Business Unit)
-
To Branch/Plant (BU for Account Duplication)
-
Trans. Date (Date-Order Transaction)
-
Document Number (Document)
-
Document Type
-
Explanation (Explanation-Transaction)
-
G/L Date (Date-For G/L)
-
-
To enter transfer information for each branch/plant in which the item is stored and to create a new location and lot record at the destination location, select Additional Information.
Figure 10-2 Transfers screen (Additional Information area)
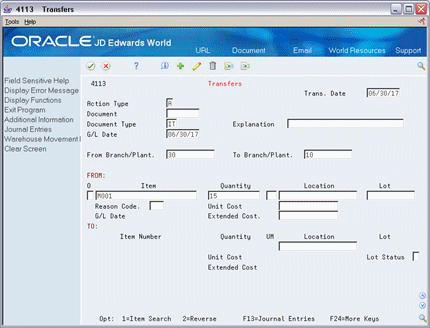
Description of "Figure 10-2 Transfers screen (Additional Information area)"
-
Complete the following fields:
-
Item Number
-
Quantity
-
UM (Unit of Measure)
-
Location (From)
-
Lot (From)
-
Location (To)
-
Lot (To)
-
Reason Code
-
Unit Cost (Amount-Unit Cost)
-
Extended Cost (Amount-Extended Cost)
The system processes the transaction and displays a document number, document type, and the batch number for the transaction.
-
10.2.1 What You Should Know About
| Topic | Description |
|---|---|
| Reviewing lot information | You can review expiration date and status information for a lot by accessing the detail area of Transfers. You also can access the Lot Information form from the Lot field. This form displays item and location information for a lot as well as the lot expiration date, the lot status, and so on.
For more information, see Section 43.1, "Viewing Lot Availability" |
| Correcting errors | You can correct a transfer that was made in error by entering a reversing entry. Because the system records each inventory transaction for account purposes, you cannot delete the record. A reversal enters a positive quantity and cost back into the item information at the original location and a negative quantity and amount to the item at the destination location. |
| Balancing for locations with no inventory | If you transfer inventory from a location that results in a quantity of zero, but is still associated with an amount, the system automatically creates journal entries to the appropriate accounts to balance the amount to zero. |
| Recording document numbers | In addition to a document type and batch number, the system displays a document number when you enter a transaction. Record this document number so that you can locate the transaction later. |