29 Work with Shipments
This chapter contains these topics:
After warehouse personnel pick the items for an order, you must verify that the item and shipping information is correct before shipping the order. You use the Confirm Shipments program to verify that the inventory has left the warehouse. You can verify the location from which the item was picked, the quantity, all item and shipping information, additional charges, and serial numbers before shipping the order.
How you set the processing options for the Confirm Shipments program determines how the system commits inventory, the information that displays, and the changes that you can make during shipment confirmation. For example, you can set a processing option to add detail lines for non-inventory items, such as handling charges. You can also set a processing option to calculate any additional charges and add them to the order.
For tracking purposes, certain items, such as appliances, require serial numbers. If you set up a serial number requirement for an item in the item's master information, but the serial number is not entered prior to shipment confirmation, you must enter one.
To ensure proper delivery and billing, you can use a version of the Print Shipping Documents program to print the documents, such as bills of lading, that you send with a shipment.
29.1 Confirming Shipments
You can verify sales order information, record additional information, such as packing or handling fees, and determine when the inventory leaves the warehouse.
Although you cannot add inventory items to a sales order during shipment confirmation, you can add amounts for non-stock items, such as handling charges, depending on how a processing option is set. You can have the system calculate and add any additional charges, such as freight, by setting a processing option.
When you confirm an order, the system advances the status codes for sales orders to the next status code following shipment confirmation. For example, an order with a status code of 540 advances to 560 after you confirm shipment.
To confirm shipments, complete the following tasks:
-
Confirm a shipment of items on an order
-
Confirm shipments from multiple locations
29.1.2 What You Should Know About
| Topic | Description |
|---|---|
| Confirming kits | You can confirm the shipment of kits in the following ways:
|
| Updating inventory during shipment confirmation | If the document type for the sales order is set up in the inventory update user defined code table (40/IU), the system updates the on-hand inventory, adjusts the hard- committed and soft-committed quantities, and updates item ledger and item history information.
If the document type is not set up in the user defined code table, the system only hard commits the inventory quantities and performs no other updates. |
| Confirming partial shipments | If the shipment quantity is less than the order quantity, you can adjust the shipment quantity on the sales order. If the system still cannot fill a quantity of items, it processes the order depending on how you set the following:
|
| Transfer orders | When you create a transfer order in the Sales Order Management system, the system generates a sales order and a purchase order. The sales order is for the branch from which you are transferring items. The purchase order is for the branch to which you are transferring items. The system inputs the branch from which you are transferring items as the supplier on the purchase order.
When you confirm shipment of the items on the sales order, you can have the system initiate receipt routing for the items on the purchase order. For example, you can have the system initiate receipt routing to show that the items are in transit to your warehouse. You use the processing options for Shipment Confirmation to specify that the system searches for a receipt route based on the route that is assigned to the supplier (branch) and item. You can specify a default receipt route, or the route type code that applies to the receipt route. See Working with Items in Receipt Routing in the JD Edwards World Procurement Guide. |
| Order line text | If the option field on an order line is highlighted, it indicates that associated text has been entered. You can view this via option 2. |
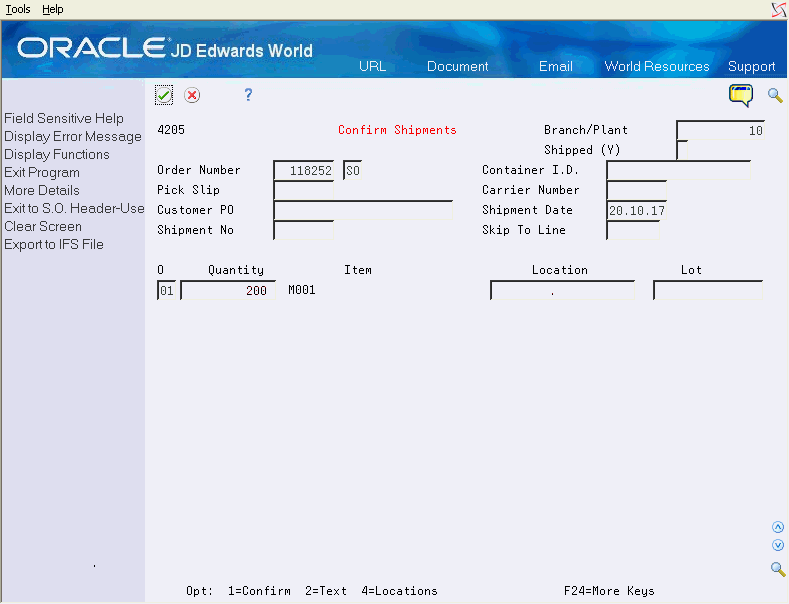
29.1.3 Confirming Shipment of Items on an Order
From Sales Order Management (G42), choose Sales Order Processing
From Sales Order Processing (G4211), choose Confirm Shipments
You can verify sales order information, record additional information, such as packing or handling fees, and determine when the inventory leaves the warehouse when you use the Confirm Shipments program.
To confirm shipment of items on an order
-
Complete the following fields:
-
Order Number
-
Branch/Plant
-
-
Review the following fields and make any necessary changes:
-
Pick Slip #
-
Container I.D.
-
Customer PO
-
Carrier Number
-
Shipment Date
-
-
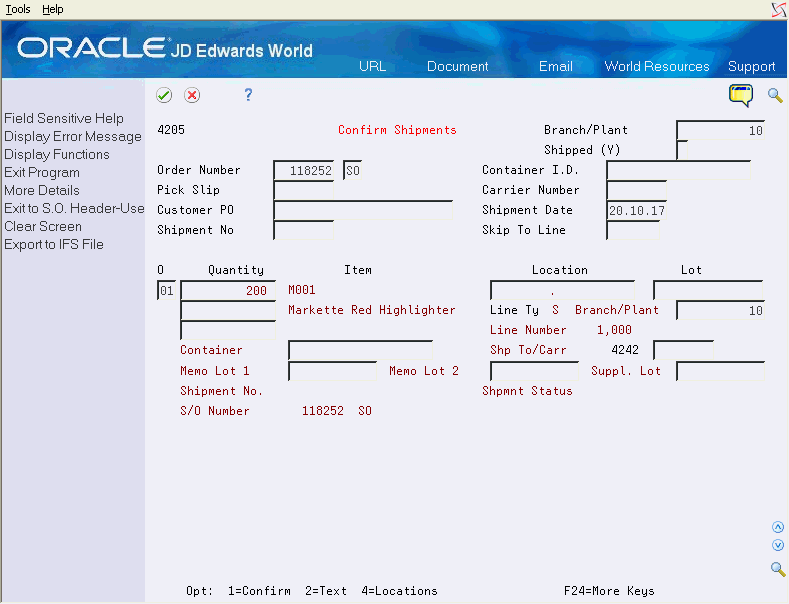
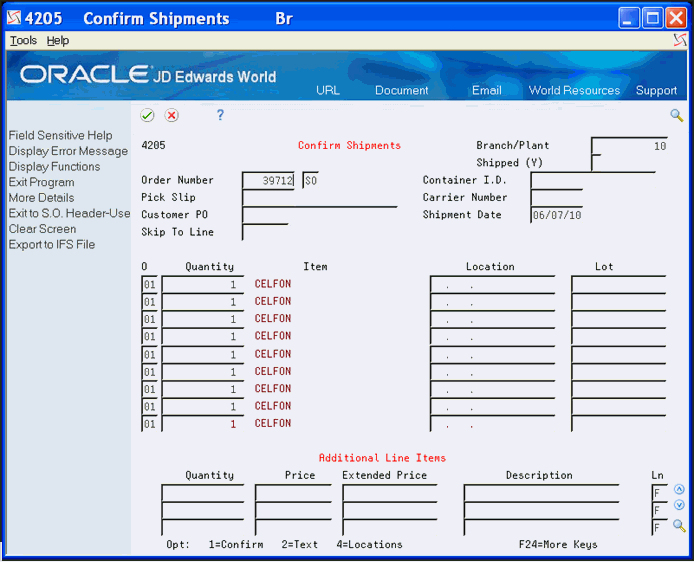
Access the detail area.
Figure 29-2 Confirm Shipments (Detail) screen

Description of "Figure 29-2 Confirm Shipments (Detail) screen"
-
Review the following fields:
-
Quantity
-
Item
-
Location
-
Lot
-
-
Confirm each order line by choosing the Confirm option.
29.1.4 Confirming Shipments from Multiple Locations
From Sales Order Management (G42), choose Sales Order Processing
From Sales Order Processing (G4211), choose Confirm Shipments
If the items on an order are picked from multiple locations, you can specify the locations and the quantity, and confirm shipment. Unless you have specified lot control during shipment confirmation, you can also choose quantity from a lot within the location.
To confirm shipments from multiple locations
-
Complete the following fields:
-
Order Number
-
Branch/Plant
-
-
Choose the locations option to access the Multiple Locations window for each line item.
The system displays the inventory available for the line item at the branch/plant from which the sales order originated.
Figure 29-4 Select Multiple Locations screen
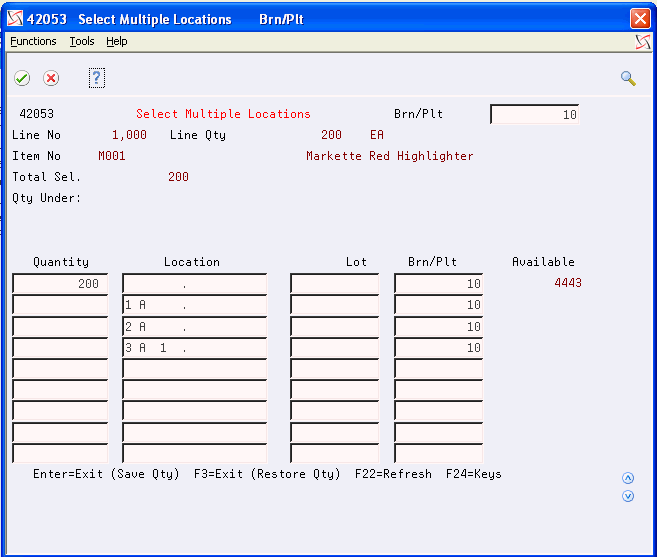
Description of "Figure 29-4 Select Multiple Locations screen"
-
To access information for inventory that is available from another location, complete the following field:
-
Branch/Plant
-
-
Complete the following fields for each location that you review:
-
Quantity
-
Item
-
Location
-
Lot
-
-
Save the quantity allocation and exit to Confirm Shipments.
The Confirm Shipments form displays the quantities that are allocated to multiple locations. You only confirm shipment to the original order line.
-
Confirm each order line by choosing the Confirm option.
| Field | Explanation |
|---|---|
| Pick Slip # | An automatic next number assigned by the system that can be used to track picking information through the system. This number is assigned during the printing of pick slips. The shipment confirmation program allows inquiry and confirmation by this number. |
| Container I.D | Identifier on the container or that you assign to the container in which the items on this purchase order or order line were shipped to you. You can assign container information to an order during receipts entry. |
29.2 Reversing Shipments (Release A9.3 Update)
If you enter a shipment in error, you can use the Order Confirmation program (P4205) to reverse the shipment.
For stock line items, the system performs the following updates when you reverse a shipped sales order line:
-
Restores the on-hand quantity for the item in the Item Location file (F41021)
-
Restates commitments for the item in the Item Location file (F41021)
-
Clears the On Hand Updated field in the Sales Order Detail File (F4211)
-
Clears the Actual Ship Date in the Sales Order Detail file (F4211)
-
Creates a new record in the Item Ledger file (F4111) for the quantity you reverse
-
Updates the Item History file (F4115)
-
Adjusts the Status Codes on the order line to reflect the reversal
The system reverses the Last and Next Status Codes on the order line. For example, if the Last and Next Status codes prior to the reversal are 560/580, after the reversal they are 580/560.
You can also use the Override Next Status Code for Reversals processing option to designate a Next Status Override Code when reversing an order line.
For non-stock line items, the system performs the following updates when you reverse a shipped sales order line:
-
Adjusts the Status Codes on the order line to reflect the reversal
The system reverses the Last and Next Status Codes on the order line. For example, if the Last and Next Status codes prior to the reversal are 560/580, after the reversal they are 580/560.
You can also use the Override Next Status Code for Reversals processing option to designate a Next Status Override Code when reversing an order line.
-
Clears the Actual Ship Date in the Sales Order Detail file (F4211)
You can reverse a shipped order line only when you set the Display Shipped Mode processing option to display the Shipped Mode field on the screen.
To reverse shipment of items on an order
From Sales Order Management (G42), choose Sales Order Processing
From Sales Order Processing (G4211), choose Confirm Shipments
-
On Confirm Shipments complete the following fields:
-
Order Number
-
Branch/Plant
-
-
Enter Y in the Shipped field.
-
Enter 10 in the Option field.
| Field | Explanation |
|---|---|
| Shipped (Y) | A code that determines whether the system displays sales order lines that have been shipped.
Valid codes are: blank - Display sales order lines that have not been shipped. You can only ship these order lines. Y - Display sales order lines that have been shipped. You can only reverse shipment of these order lines. |
| Container I.D |
29.3 Entering Serial Numbers
For tracking purposes, certain items, such as appliances, require you to enter serial numbers. You set up serial number requirements in the Inventory Management or Purchase Order Management system.
You can assign serial numbers at the following times:
-
Receipt of items into your inventory
-
During storage of items in the warehouse
-
Prior to ship confirmation
-
During ship confirmation
If the serial number requirement is set up for an item in the item's master information, but the serial number is not entered prior to shipment confirmation, you must enter one before you confirm the item for shipment.
Entering serial numbers includes the following tasks:
-
To enter serial numbers prior to shipment
-
To enter serial numbers at ship confirmation
To enter serial numbers prior to shipment
You can assign serial numbers using the Serial Number Revisions program (P42022) program. If you are using the Order Confirmation program (P4205) and an item requires a serial number, the system displays the P42022 program so you can enter the serial number.
Using batch shipment confirmation, you must assign serial numbers to items that require a serial number prior to running the Batch Order Confirmation program (P42051). Items with serial numbers include a Y in the Serial Number Required field. The Serial Number Required field is in both the Item Master (F4101) and in the Item Branch (F4102) tables.
Depending on the quantity you are shipping for a particular sales order, you must assign each item a serial number. For example, if the quantity on the sales order detail line is 3, then you must assign a serial numbers to all three items.
From Automated Shipment Confirmation (G4216), choose Serial Number Revisions
-
On Serial Number Revisions, complete the following field:
-
Branch/Plant
-
-
Complete the Item Number field or complete the following fields and click Inquire:
-
Order Number
-
Document Type
-
Document Type
-
-
Click F10.
Figure 29-6 Serial Number Revisions screen
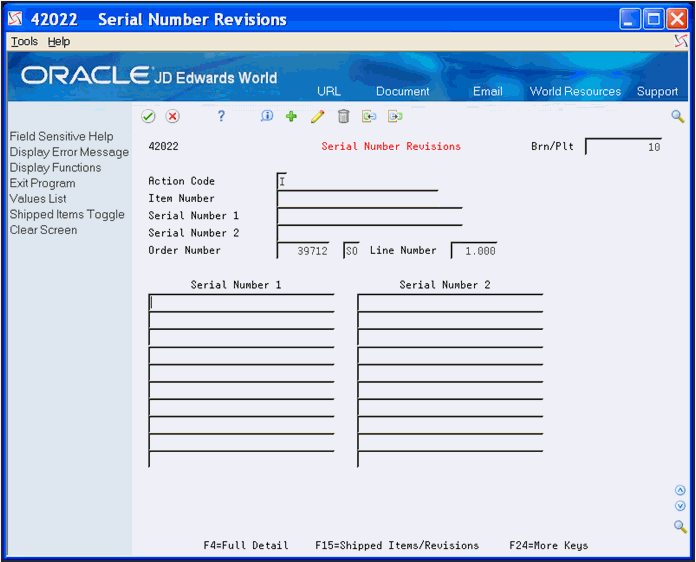
Description of "Figure 29-6 Serial Number Revisions screen"
-
On Serial Number Selection, review the following fields:
-
Serial Numbers
-
Item
-
Order
-
Line
Figure 29-7 Serial Number Selection screen
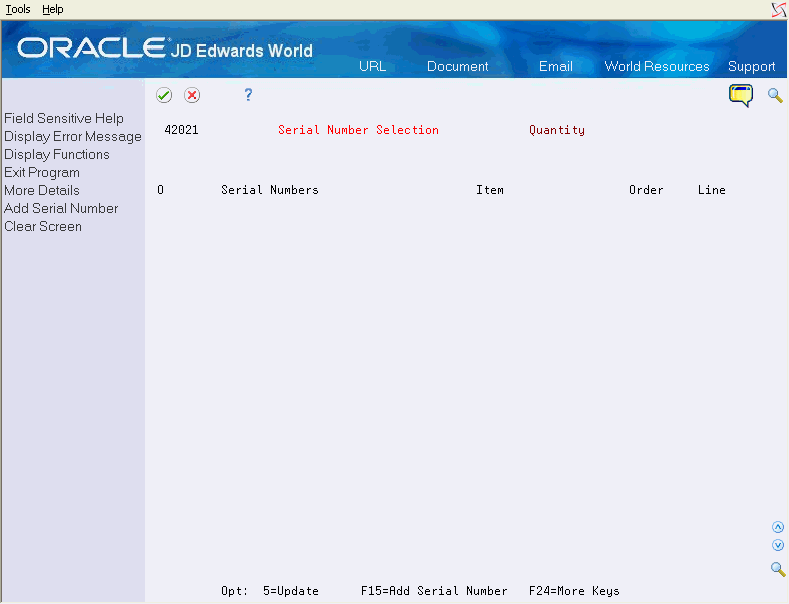
Description of "Figure 29-7 Serial Number Selection screen"
-
-
Perform one of the following:
-
Enter 5 in the Option field to choose serial numbers for the items and click Enter
-
To add a new serial number, press F15 to access Serial Number Revisions
Figure 29-8 Serial Number Revisions screen
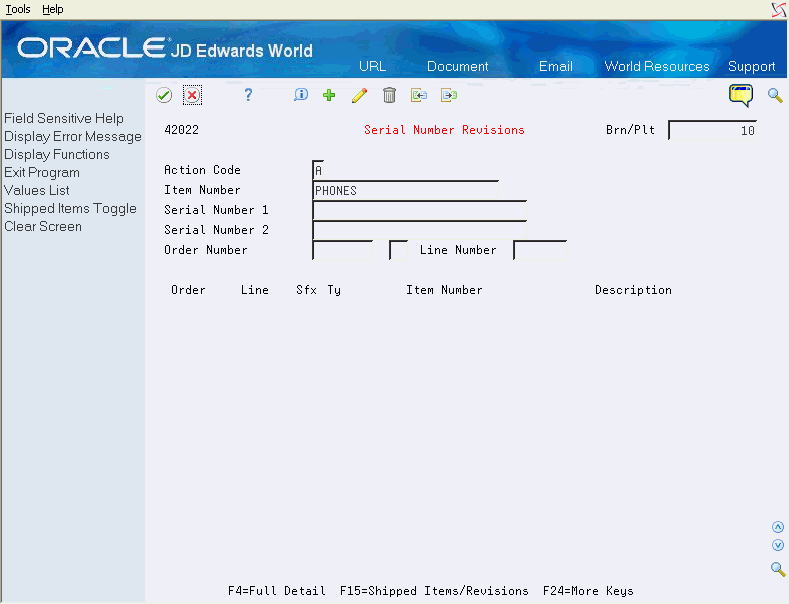
Description of "Figure 29-8 Serial Number Revisions screen"
-
-
On Serial Number Revisions, complete the following fields
-
Branch/Plant
-
Item Number
-
-
Complete the Serial Number 1 field.
-
To add a secondary serial number for an item, complete the Serial Number 2 field.
-
Press F15 to return to the Serial Number Selection Form.
-
Enter 5 in the Option field to choose a serial number for the item and click Enter.
To enter serial numbers at shipment
From Sales Order Management (G42), choose Sales Order Processing
From Sales Order Processing (G4211), choose Confirm Shipments
If you set the Serial Number Required field to Y for an item on the Item Master, the Serial Number Selection form displays.
-
Enter 1 in the Option field to confirm the order.
-
On Serial Number Selection, review the following fields:
-
Serial Numbers
-
Item
-
Order
-
Line
Figure 29-10 Serial Number Selection screen
Description of "Figure 29-10 Serial Number Selection screen"
-
-
Enter 5 next to the serial numbers for the items and click Enter.
29.4 Confirming Shipments by Batch
The Batch Order Confirmation program (P42051) allows you to quickly and easily perform ship confirmation on a select group of sales orders. You no longer need to locate and confirm each of the sales orders using the Order Confirmation program (P4205).
For tracking purposes, certain items in the order might require serial numbers. If you set up a serial number requirement for an item in the item's master information, you must then enter a serial number. If you use the Batch Order Confirmation program, you must assign serial numbers to items that require a serial number prior to running this program.
Using the Automated Shipment Confirmation menu (G4216), you can also perform additional ship confirmation tasks.
Use the Batch Order Confirmation program (P42051) to confirm shipments in batch mode. This program launches the Order Confirmation program (P4205) and allows you to confirm multiple shipments at one time. This program allows you to update sales order detail records based on the Sales Order Detail File (F4211) table.
If you include a sales order in the batch with an order detail line for an item quantity in which there is insufficient quantity, (partially shippable and partially backordered quantity at the time of order entry), this program confirms shipment of the available quantity and creates a sales order detail line for the backordered quantity.
You can run the program in either proof or final mode. JD Edwards World recommends that you run this program in proof mode first. If you locate any errors, you should fix these and run the program again in proof mode. When the program, run in proof mode, no longer produces errors, you can then run the program in final mode to perform file updates and advance the status codes.
You can set the Order Confirmation (P4205) processing option to launch the Freight/Additional Charge Calculations program (P40210), which also runs in batch mode, to create freight records.
There are two methods to assign shipment numbers to order lines using the Batch Order Confirmation program:
-
Automatically, by setting the Use Next Numbers for Shipment Number processing option in the Batch Order Confirmation program that assigns shipment numbers from next numbers. Additionally, you can set the Generate New Shipment Number processing option in the Batch Order Confirmation program to specify at which point this program generates a new next number for the shipment number it assigns to sales order detail records. In other words, the program groups sales order detail records with the same shipment number.
-
Manually, by using the Select S/O's (P42046) program. You can access this program either from the Shipment Workbench (P4207) program or from the Automated Shipment Confirmation menu (G4216).
You can use the Shipment Workbench to locate shipment numbers and review which sales order detail records constitute a shipment.
The Batch Order Confirmation program generates two reports when you run the program in proof mode. The Confirmed Shipment Report prints with sales order detail records that do not have errors. The Shipment Exception Report includes sales order detail records with errors.
You can set the processing options to specify that the Batch Order Confirmation program print the Shipment Exception and Confirmed Shipment reports. The items that print on the Confirmed Shipment report can include:
-
Shipments confirmed in the batch process
-
Kit components
-
Header text
-
Detail text
The Shipment Exception Report includes hard errors that the Batch Order Confirmation program produces. These include errors for the items to which you did not assign a serial number and that require a serial number.
The Order Confirmation program (P4205) also launches the Receipts by PO/Item/Account program (P4312) to process receipt routing. If the P4312 detects an error, it records the error and prints it on the Shipment Exception Report.
After you run this program, the Shipment Confirmed field (SO16) in the sales order detail record contains a 2 to indicate use of the Batch Order Confirmation program.
From Automated Shipment Confirmation (G4216), choose Batch Order Confirmation
29.5 Printing Shipping Documents
You can print shipping documents, such as bills of lading and delivery reports, before you ship the order. Shipping documents accompany the order to its destination. Delivery personnel can use these documents to compare what they are supposed to deliver with what they are transporting.
Printing shipping documents includes the following tasks:
-
Printing bills of lading
-
Printing delivery notes
29.5.1 Printing Bills of Lading
From Sales Order Management (G42), choose Sales Order Reports
From Sales Order Reports (G42111), choose Print Shipping Documents
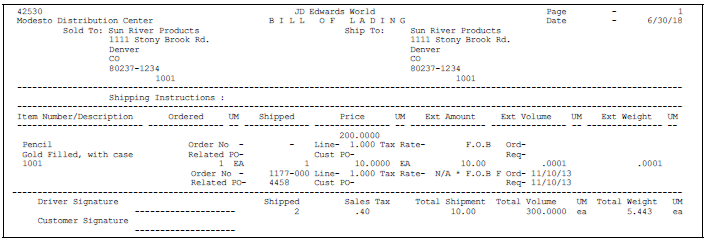
You run a version of the Print Shipping Document program to print bills of lading. The Sales Order Detail File (F4211) is the based on file for the Print Shipping Documents program (P42530). A bill of lading lists the following information about the order:
| Information | Description |
|---|---|
| Item | Includes item description, country of origin, quantity, weight, and volume. |
| Billing | Includes customer address and price. |
| Shipping | Includes shipping instructions, total weight, and total volume. |
| Delivery | Includes signature lines for the driver and the customer. |
You can specify the heading that prints at the top of the document, such as "Bill of Lading", when you run the program. Because a shipping document has signature lines for the delivery person and the customer, you can also use it as a receipt.
For informational purposes you can set up print messages and item notes to print on Bills of Lading. In addition, you can print Lot Category Codes on the Bill of Lading report by setting the appropriate processing options for P42530.
You can generate bill of lading numbers by setting the processing option. The program retrieves the bill of lading number directly from next numbers. Another option is to have the system assign a bill of lading number based on a concatenation of the character code assigned to the relevant company in UDC 41/UC and a next number. Next numbers for Bill of Lading are set up under the Product Category for Inventory (40). You assign a character code to a company in UDC 41/UC by designating the company in the Special Handling Code field. The program uses default company 00000 if the relevant company is not set up in UDC 41/UC.
See Also:
-
Set Up Messages in the JD Edwards World Inventory Management Guide, which explains how to set up print messages and item notes.
29.5.3 Printing Delivery Notes
From Sales Order Management (G42), choose Sales Order Reports
From Sales Order Reports (G42111), choose Print Delivery Notes
You run a version of the Print Delivery Notes program to print information that delivery personnel can use during delivery. For example, they can compare the items that they are supposed to deliver with the items that they have on the delivery vehicle. This is helpful if your company uses its own vehicle for deliveries instead of an outside company's vehicle.
You can only provide delivery notes to a customer if the customer's billing instructions are set up to allow delivery notes.
To ensure that the customer's invoice is accurate, you can print delivery notes after shipment confirmation but before you generate a customer invoice for an order.
-
Verify that the customer billing instructions for the customer are set up to allow delivery note printing. Chapter 48, "Set Up Customer Billing Instructions."
-
Verify that the order activity rules include a status code for printing delivery notes that is between shipment confirmation and printing invoices. See Chapter 51, "Set Up Order Activity Rules."