13 Enter Receipts
This chapter contains these topics:
-
Section 13.3, "Receiving Items Across Multiple Purchase Orders,"
-
Section 13.4, "Entering Receipts in Multiple Units of Measure,"
-
Section 13.5, "Assigning Locations, Lots, and Serial Numbers,"
After you receive the goods on a purchase order, you must record the details of the receipt. The system uses receipt information to:
-
Update item quantities and costs in the Inventory Management system
-
Update general ledger accounts
You can choose one of three formats to enter a receipt. The format you use depends on whether you want to locate detail line information by purchase order number, item number, or account number. Regardless of the format you access, you can toggle from one format to another.
13.1 Overview
From Stock Based Procurement (G43A), choose Purchase Order Processing
From Purchase Order Processing (G43A11), choose Enter Receipts by PO
When you receive goods, you must verify that the details of the receipt correspond to the information on the purchase order. You must verify item numbers, quantities, and units of measure, costs, and so forth. If the receipt details differ from those on the purchase order, you must adjust the purchase order detail lines to reflect the receipt.
You might receive an order in different types of containers, each of which holds a different item quantity. You must indicate the different units of measure in which you receive an order. You must also determine where to store the items you receive. If necessary, you can specify lot numbers and serial numbers for these items.
Figure 13-1 Enter Receipts by Purchase Order screen
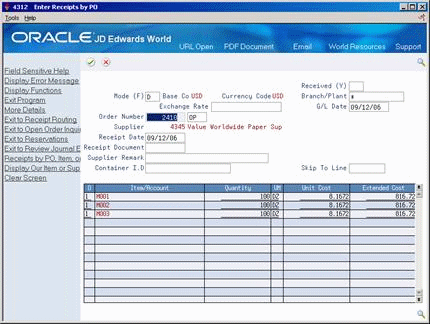
Description of "Figure 13-1 Enter Receipts by Purchase Order screen"
13.1.1 What You Should Know About
| Topic | Description |
|---|---|
| Disabling duplicate receipts | When you enter or reverse a receipt, the system locks the receipt record so only the current user is able to receive the order or reverse the receipt. |
| Notifying order originator of receipt | You can set processing options to notify the purchase order originator that an order has been received. |
| Landed costs | Landed costs are costs in excess of an item's purchase price, such as delivery charges, import taxes, and so forth. You can enter these costs for an order during the receipt process.
For more information, see Section 18.5, "Entering Landed Costs for Orders" and Section 18.2, "Setting Up Landed Costs." |
| File Updates | Each time you enter a receipt for an inventory item, the system:
|
| Match Types | Each time you receive an order the system creates a record in the Purchase Order Receiver file (F43121). When you cancel or reverse a receipt, the system updates this record.
The first field in each F43121 record is called Match Type. The valid values for this field are 1, 2, 3 and 4. The value identifies whether the record corresponds to a receipt (1), voucher (2), voucher reversal (3), or receipt reversal (4). |
| Commitments and encumbrances by G/L date | You can set processing options to forbid receipt of goods or services ordered in a different fiscal year, provided you're tracking commitments or encumbrances against the order line. This option prevents the relief of a commitment or encumbrance in a different year than it was created. |
| Negative Inventory Errors (Release A9.3 Update) | If you need to reverse a receipt after the product has been issued or sold and is no longer available, you can use a processing option for the Enter Receipts program (P4312) to issue a hard error, a warning, or ignore the error.
|
13.2 Entering Receipt Information
From Stock Based Procurement (G43A), choose Purchase Order Processing
From Purchase Order Processing (G43A11), choose Enter Receipts by PO
You must enter receipt information to verify the receipt of goods or services on a purchase order. You must verify the quantity, cost, and so forth, for each order you receive.
To enter a receipt, you must first locate the open purchase order detail lines that correspond to the receipt in the Enter Receipts program (P4312). An open detail line contains items that have not yet been received. The system retrieves all open detail lines for the item number, purchase order number, or account number you specify.
If the detail lines on a purchase order differ from the details of the actual receipt, you must adjust the purchase order detail lines to reflect the receipt. For example, if the order quantity on a detail line is 20, but you receive a quantity of 10, you must change the quantity on the detail line to 10. You specify whether to close the remaining balance on the line or to keep it open.
The system maintains open order information in the Purchase Order Detail file (F4311).
On Enter Receipts
-
To locate purchase order detail lines that correspond to a receipt, complete the following fields, as necessary, and press Enter:
-
Received
-
Branch/Plant
-
G/L Date
-
Order Number
-
Item Number
-
Account Number
The system displays only those detail lines with a next status code equal to that which you specified in processing options. As well, only those detail lines with an open quantity or amount, as contained in the Purchase Order Detail file, (F4311) will display.
-
-
Complete the following fields, as necessary:
-
Receipt Date
-
Receipt Document
-
Supplier Remark
-
Container I.D.
You use the fields above to update receipt information, that is, they are not meant for inquiry purposes.
-
-
Compare your receipt information to the detail lines and adjust the following fields, as necessary:
-
Quantity
-
UM
-
Unit Cost
-
Extended Cost
-
-
Adjust remaining information for each detail line, as necessary.
-
Type 1 in the following field for each detail line you want to receive and press Enter:
-
O (Option Exit)
The option you enter determines whether the system leaves the balance of the line open (option 1), closes the balance (option7), or cancels the line entirely (option 9).
-
| Field | Explanation |
|---|---|
| Received (Y) | A code that determines whether the system displays purchase order lines that have been received but not matched to a voucher.
Valid codes are: Blank – Display purchase order lines that have not been received. You can only receive these order lines. Y – Display purchase order lines that have been received but not matched to a voucher. You can only reverse receipt of these order lines. |
| Receipt Date | The date you received this purchase order line. |
| Receipt Doc | A number used to identify the receipt transaction. You can assign a number to the receipt, such as the supplier's sales order number or the purchase order number, or you can allow the system to assign a number through the Next Number facility. You specify in the processing options for Enter Receipts which document type you want the system to assign to each receipt. |
| Supplier Rmk | A free-form field in which you can enter any pertinent information.
Form-specific information For example, you can enter a remark in the Supplier Remark field in the upper portion of the screen if you want to associate the remark with each line on the order. The system carries that remark through to each line of the order in the Supplier Remark field in the fold area of the Match Voucher to Open Receipt screen. If you want to associate unique text with each line, enter text in the Supplier Remark field in the fold area for each line. This remark overrides the text you enter in the top portion of the screen and displays in the Supplier Remark field found in the fold area for each line on the Match Voucher to Open Receipt screen. You can use this text to differentiate order lines that are otherwise identical. |
| Container I.D | Identifier on the container or that you assign to the container in which the items on this purchase order or order line were shipped to you. You can assign container information to an order during receipts entry.
Form-specific information After you enter a receipt and assign a container number to an order or order line, you can inquire by container I.D. in the receipt routing process. |
13.2.1 What You Should Know About
| Topic | Description |
|---|---|
| Working with receipt costs | You can set processing options to determine whether costs appear when you review open purchase order information or whether the costs can be changed. |
| Locating open purchase order information | You can view open detail lines for a particular supplier, buyer, and so forth, by pressing F10 from the Enter Receipts screen to access the Open Order Inquiry screen. |
| Multiple account distribution | If you enter purchase order detail lines by account number, you can distribute the expense on a detail line to several different accounts at purchase order entry. You must perform a receipt based on the account number on the detail line as opposed to the individual accounts to which you distributed the expense. The system creates a single receipt record in the Purchase Order Receiver table (F43121) containing the original account on the detail line.
You can perform partial receipts for detail lines to which multiple account distribution applies. If you enter a receipt for a detail line, you must reverse the receipt before you can redistribute the expense in Purchase Order Entry. For more information about multiple account distribution, see Section 4.4, "Distributing an Expense to Multiple Accounts." |
| Kit items | You must receive kit items at the component level. For example, if you receive a stereo, which is a kit item made up of a receiver, tape deck, and speakers, you must receive the receiver, tape deck, and speakers individually. You must set processing options to display kit items at the component level. |
| G/L Information | Each time you enter or reverse a receipt, the system assigns a receipt document number to the transaction (document type OV), and also a general ledger batch number (provided you interface to the G/L). Both numbers display in the upper right hand corner of the Enter Receipts screen (P4312) immediately after a receipt transaction.
You can view the journal entries that correspond to a receipt document by pressing F13 to access the Journal Entries screen immediately after you enter the receipt. Once you exit the receipt screen or enter a new receipt, the journal entries for the prior receipt transaction no longer display. You can also review journal entries for receipt documents by accessing the Review G/L Receipts Journal program (J43201). This screen is not accessible from the Enter Receipts screen. The system creates receipt batches with a batch type of O. |
| Receipt routing | You set processing option 35 to specify that items go through a routing process before being put into stock. To determine where an order is in the routing process, you can press F8 from the Enter Receipts screen to access the Operation Status Inquiry screen.
For more information, see Chapter 37, "Work with Items in a Receipt Route." |
| Multi-currency | You can view amounts in both foreign and domestic currencies by changing the mode in the Enter Receipts screen from F to D and vice versa. If you change costs for an order line, ensure that you do so in the appropriate currency mode.
You use processing option 42 to specify the date the system uses to retrieve an exchange rate. You can have the system:
Regardless of the method you choose, you can override the exchange rate in the Enter Receipts screen provided you set processing option 43 to allow for changes to the exchange rate. When you receive orders in a foreign currency, the system creates journal entries for two different ledgers:
|
13.3 Receiving Items Across Multiple Purchase Orders
Cascading Receipts (P43125) provides the ability to receive multiple purchase orders for the same item, supplier and branch, simultaneously.
To receive items on multiple purchase orders
On Enter Receipts (P4312)
-
Inquire by item to display all open purchase order lines for that item.
-
Enter option 13 in front of a purchase order line for the supplier from whom you want to receive the items.
The Cascading Receipts window (P43125) displays, showing all the open purchase order lines for that item, supplier and branch. The system sequences the orders by Promised Delivery Date (PDDJ), and then by Purchase Order Number and Line Number, if multiple detail lines have the same Promised Delivery Date.
-
On Cascading Receipts (P43125), enter the Quantity to Receive.
-
Enter option 1 in front of the first purchase order you want to receive.
The system applies the total received quantity to the selected line item. If a balance of the Quantity to Receive still exists, the system then applies the remaining balance to the next open purchase order for that supplier. This will continue for the following line item until there is no more quantity to receive or there are no more purchase orders.
The system will preload the Option field with 1 in Cascading Receipts (P43125) for each purchase order line from which it intends to relieve quantity. It will also re-populate the Quantity column with the quantity it intends to receive against that particular line. Press Enter to return the data to Enter Receipts (P4312). In the Enter Receipts screen, proceed with receiving the selected purchase orders as you would any other receipt transaction
13.3.1 Set Up for Cascading Receipts
To activate cascading receipts, you must set processing option 55 behind the Enter Receipts program (P4312) to 1. You must also use a version of P4312 that has processing option 18 set to display the Receipts by Item format. Alternatively, you can press F15 within P4312 to toggle to the item format.
The following processing options behind P4312 apply to cascading receipts:
55. Enter '1' to initiate Cascading Receipts
56. Enter the type of tolerance check to perform in Cascading Receipts
1 = Percentage Tolerance
2 = Units Tolerance
57. Enter the tolerance value. The system uses this in conjunction with the previous option.
13.3.2 What You Should Know About
| Topic | Description |
|---|---|
| Tolerance Checking | You set up tolerance checking to allow the system to apply overshipments of orders to fill cascading receipt quantities. For example, you can allow overshipments of 10%. To do this, you set processing option 56 to 1 (percentage tolerance), and processing 57 to 10.
Say there are two open orders for item A, supplier 4343 at branch 10. The first order has quantity 50 and the second has quantity 40. In P43125, if you enter 1 next to the first order and enter Quantity to Receive of 100, the program will automatically change the shipment quantity on the second order from 40 to 50, thereby allowing for an overshipment of quantity 10 (100 * 10% = 10). The program adds the overshipment quantity to the last order line it will use to fulfill the receipt quantity. |
| Receiving cascading quantities in different units of measure | You can specify a unit of measure (UOM) for the Quantity to Receive in P43125. For example, say your item has a primary UOM of eaches and a secondary UOM of boxes. One BX equals 10 EA. Say there are two open orders for the item for 15 each and 25 each, respectively. If you enter a Quantity to Receive of 3 BX, and enter option 1 next to the first order, the system will pull 1 box from the first order and 2 boxes from the second order. |
13.4 Entering Receipts in Multiple Units of Measure
From Stock Based Procurement (G43A), choose Purchase Order Processing
From Purchase Order Processing (G43A11), choose Enter Receipts by PO
You might receive an order in different units of measure. For example, you might receive a portion of an order in crates and the remaining portion in boxes. You must specify all units of measure in which you receive an item. This provides the system with information to perform the conversions necessary to update item availability, calculate individual item costs, and so forth.
To enter receipts in multiple units of measure
On Enter Receipts
-
Enter option 2 next to a detail line to access Select Multiple UOM's.
-
On Select Multiple UOM's complete the following fields for each unit of measure in which you are receiving the item:
-
Quantity
-
UM
-

13.4.1 What You Should Know About
13.5 Assigning Locations, Lots, and Serial Numbers
From Stock Based Procurement (G43A), choose Purchase Order Processing
From Purchase Order Processing (G43A11), choose Enter Receipts by PO
If you work in an inventory environment, you can assign items to a specific location at the time of receipt. The system assigns an item to its primary location unless you specify otherwise. You can also spread a receipt quantity over several different locations. For example, if you receive 100 pens, you can assign 50 to one location and 50 to another location.
You can also assign a lot number to each quantity you receive. For example, if you receive a large quantity of batteries, you can assign them all to one lot, or you can assign portions of the quantity to different lots and specify different expiration dates for each of the lots.
To monitor individual items, you can assign serial numbers. The system requires you to assign unique serial numbers to items for which you have specified advanced serial number processing in Item Master Information (P4101). For example, if you receive guns, you must assign a unique serial number to each gun that you receive.
To work with locations, lots, and serial numbers for receipt items, you can:
-
Assign a single location, lot, and serial number to items
-
Assign multiple locations, lots, and serial numbers to items
To assign a single location, lot, and serial number to items
On Enter Receipts
Complete the following fields:
-
Location
-
Lot/SN (Lot or Serial Number)
-
Lot Description
-
Expiration Date
-
Lot Status
-
Supplier Lot
-
Memo Lot 1
-
Memo Lot 2
| Field | Explanation |
|---|---|
| Location | A code that identifies inventory locations in a branch/plant. You define the format of the location identifier by branch/plant.
Form-specific information If you select a location that is not the primary location specified on the parts list for a specific item, the system hard commits that item. |
| Lot | A number that identifies a lot or a serial number. A lot is a group of items with similar characteristics. |
| Lot Expire | The date on which a lot of items expires.
The system automatically enters this date if you have specified the shelf life days for the item on Item Branch/Plant Information (P41026). The system calculates the expiration date by adding the number of shelf life days to the date that you receive the item. You can commit inventory based on the lot expiration date for items. You choose how the system commits inventory for an item. |
| Lot Status | A user defined code (table 41/L) that indicates the status of the lot. If you leave this field blank, it indicates that the lot is approved. All other codes indicate that the lot is on hold.
You can assign a different status code to each location in which a lot resides on Item/Location Information (P41024) or Lot Master Revisions (P4108). |
| Supplier Lot | The supplier's lot number for the item. |
| Memo Lot 1 | A higher classification or grouping of serial number or lot processed items, maintained within the lot master (F4108). |
| Memo Lot 2 | A higher classification or grouping of memo lot 1 maintained within the lot master (F4108). |
To assign multiple locations, lots, and serial numbers to items
On Enter Receipts
-
Enter option 4 next to a detail line to access Select Multiple Locations.
Figure 13-3 Select Multiple Locations screen
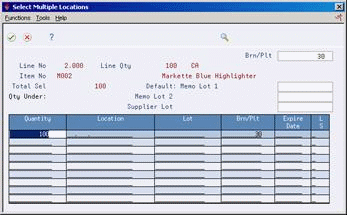
Description of "Figure 13-3 Select Multiple Locations screen"
-
On Select Multiple Locations, complete the following fields:
-
Quantity
-
Location
-
Lot/SN (Lot or Serial Number)
-
Brn/Plt
-
Expiration Date
-
Lot Status
-
Supplier Lot
-
Memo Lot 1
-
Memo Lot 2
The quantities you enter cannot exceed the total quantity on the detail line.
-
-
Press Enter twice to return to Enter Receipts.
The system replaces the single detail line on Enter Receipts with a detail line for each quantity that you specified in Select Multiple Locations.
13.5.1 What You Should Know About
| Topic | Description |
|---|---|
| Reviewing available locations and lots | You can review the locations and lots that are currently set up for an item and select a location and lot to assign to a receipt. You can access and return location and lot information to the Enter Receipt screen by pressing F1 on the Location field. |
| Lot numbers | You must enter an expiration date for each new lot you create for an item. You can also specify a lot status. You use the lot process type on Item Branch/Plant Information (P41026) to specify that a lot number is required for an item and how it is assigned.
The system maintains lot information by branch and item number in the Lot Master file (F4108). If you use advanced serial number processing, you can use the Memo Lot and Supplier Lot fields to specify lot numbers for serialized items. You can specify whether lot numbers are required for serial numbered items using the Serial Number Required field in Item Branch/Plant Information. |
| Serial numbers | If you use advanced serial number processing, you must use the Lot field to specify a serial number for each item. The expiration date and lot status apply to the serial number you enter.
For advanced serial number processing, the system maintains a record for each serial number in the Item Location file (F41021). You assign a Lot Process Type on Item Branch/Plant Information (P41026) to specify whether a serial number is required for an item and how it is assigned. You must assign a unique serial number to each item you receive. If you receive more than one item, you must enter a serial number for each item on the order. For basic serial number processing, you use the Serial Number Required field on Item Branch/Plant Information to specify whether a serial number is required for an item. The system does not maintain a record in the F41021 for basic serial number processing. Instead, you populate the Serial Number file (F4220) with pertinent serial numbers by invoking the Serial Number Revisions window (P42022) from P4312 using processing option 13. |
13.6 Entering Reversing Receipts
From Stock Based Procurement (G43A), choose Purchase Order Processing
From Purchase Order Processing (G43A11), choose Enter Receipts by PO
You can reverse a receipt as long as you have not yet created a voucher for the receipt. You might need to do this if you recorded a receipt by mistake or you recorded the wrong receipt.
When you reverse a receipt, the system accounts for the order as if it were never received. It reverses all accounting and inventory transactions.
On Enter Receipts
-
Complete the following field:
-
Received
-
-
Locate the received detail lines that you want to reverse.
-
Specify 8 in the following field for the receipts you want to reverse:
-
O (Option Exit)
-
13.6.1 What You Should Know About
| Topic | Description |
|---|---|
| Reversing a receipt in a receipt routing process | If an item goes through a receipt routing process, you must move it back to the first operation in the route before you can reverse the receipt. You must also reverse all dispositions.
For more information, see Chapter 37, "Work with Items in a Receipt Route." |
| Receipt records | When you reverse a receipt, the system updates the existing match type 1 record in the Purchase Order Receiver file to a match type 4. You can only view match type 4 records by looking at the file itself. |
| Reversing a receipt with a matched voucher | You can reverse a purchase order receipt; however, if you have vouchered the entire receipt quantity in the Voucher Match program (P4314); you must first delete the voucher. If you inquire on a receipt, and you get error 1838, it may be that you have vouchered the receipt. The error also may occur because you neglected to set the Received (Y) field to "Y".
Note: It is very important to note that you should not use Standard Voucher Entry (P04105) or Speed Voucher Entry (P041015) to delete a voucher created through Voucher Match (P4314). To delete a purchasing voucher, go into P4314 and inquire on:
Press Enter. When the inquiry brings up the voucher information, change the action code to "D" and press Enter. You cannot delete a voucher that is already paid. See also Voiding Posted Vouchers in the JD Edwards World Accounts Payable Guide. |