4 Enter Purchase Order Detail Information
This chapter contains these topics:
After you enter header information for a purchase order, such as the supplier to fill the order and the branch/plant requesting the order, you must provide information about each item or service that you want to purchase.
4.1 Overview
For each item or service, you must enter a line of detail that describes:
-
The item or service that you want to purchase
-
The quantity that you want to purchase
-
The cost of the item or service
Depending on your business objectives, you can use the following methods to enter purchase order detail lines:
-
By item number
-
By general ledger account number
If you run an inventory operation in which you stock items for resale or manufacturing purposes, you must enter detail lines by item number. If you purchase goods or services for internal use or for use in a certain job or program, you can enter detail lines by account number, item number, or both.
You specify information for each detail line based on that which is relevant to your purchasing process. For example, if you purchase items for inventory, you must specify the unit of measure for the item. You can also specify the location in which you plan to store the item upon receipt, and the weight, volume, lot, and manufacturing information for the item.
If you enter detail lines by account number, you can distribute the expense on a detail line to several different accounts. For example, if you purchase 100.00 worth of office supplies, you can distribute the cost of the supplies to several different departments on a percentage, amount, or quantity basis.
You can enter tax information for each detail line to have the system calculate taxes on the goods or services you are purchasing. If the supplier provides a discount on the order, you can enter the terms of the discount. By assigning reporting codes to a detail line, you can group items for reporting purposes.
Kits are inventory items that are made up of several different items. The procedures for entering a kit on a detail line differ from those for other items, because items that make up a kit can vary.
You can replace an existing item on a detail line with a substitute or replacement item. For example, the supplier might be out of the item you entered on a detail line. You can review a list of alternate items and choose an item to replace the existing item on a detail line.
The Purchase Order Entry program (P4311) supports import/export functionality. See Work with Import/Export in the JD Edwards World Technical Tools Guide for more information.
4.1.1 Detail Line Formats
The information you must enter on a detail line depends on the line format you choose in processing options. You can choose from four formats, including those that contain:
The primary differences between detail line formats are the column headings.
Format 1 appears on Purchase Order Detail above. Column headings for formats 2, 3, and 4 appear below.
Formats 1 and 2 are primarily for inventory environments. Formats 3 and 4 are more suitable for non-inventory environments. The format you use must correspond with the order line types you use.
You can enter additional information for a detail line by pressing F4 to access the fold area.
4.1.2 What You Should Know About
| Topic | Description |
|---|---|
| Approval Routes | When you enter a purchase order that is subject to an approval route, you must complete the order and exit from the Order Entry program before the system time out feature activates. If the program is allowed to time out, approval processing will not be triggered by the system. |
| Using the order prompt | To ensure that the detail line information that you enter is correct, you can display the following prompt after you enter a purchase order:
**** Enter 'Y' to record order **** This allows you to review the purchase order before you enter it in the system. You set processing option 18 for program P4311 to specify that the prompt displays. The system does not record the order until you enter Y (yes). |
| Default values | The system inputs several default values for detail lines based on header information that you entered for the purchase order. You can change the default values to accommodate a detail line. For example, if the ship-to address for a detail line differs from the ship-to address for the rest of the purchase order, you can override the ship-to address for the detail line.
When you enter an inventory item on a detail line, certain values for the item default from the inventory system. If you change the item on the line, values for the new inventory item will not override the previous item's default values. |
| Detail line status codes | You set processing options 3 and 4 for program P4311 to have the system enter a current status code and a next status code for each detail line; otherwise, the next status code defaults from Order Activity Rules (P40204). These codes determine the next process that the detail line goes through in the purchasing process.
For more information about status codes, see Section 58.1, "Setting Up Order Activity Rules." |
| Attaching a message to a detail line | You can attach a message to a detail line by entering text in the Associated Text Window. You can access this window from the detail line using Option 3. If text already exists, the system highlights the Option field. |
| Viewing a purchase order summary | You can review summary information for a purchase order, including items, account numbers, order quantities, prices, and extended volumes and weights. You can also review the total tax and dollar amount for the entire purchase order. You can access summary information from the purchase order detail screen by pressing F6. |
| Updating detail information with header changes | You can have the system update existing detail information with changes you make to header information. You use processing option 9 for program P4311 to specify whether the system automatically updates the changes or whether you must press F18 to update the detail. The updated values will override existing values for individual detail lines.
Regardless of the method you choose, the system updates only those fields you specify in Header File Defaults, which you access by pressing F20 from the purchase order header screen (P4310). The only exception is the Supplier field, which the system updates at all times. |
| Canceling a detail line | You can cancel purchase order information in the following ways:
To cancel a detail line, you choose an option 9 for the line. To cancel an entire order, you enter an action code of D. When you cancel an individual detail line, the system only closes that specific line. When you delete an order, the system closes all detail lines, assigning them a status of 999. You use processing option 22 to specify whether closed lines display when you review an order. You must run a purge to delete closed detail line information from the system. |
| Transfer orders | When you create a transfer order in the Sales Order Management system, the system generates a purchase order and a sales order for the transfer. You must use the Transfer Order Entry program (P4242) to make changes to an existing transfer order so the changes are updated to both the sales and purchasing sides of the transaction. |
| Multi-currency | If the supplier uses a different currency than your company's base currency, you must enter costs in terms of the foreign currency when the mode equals foreign, or the base currency when the mode equals domestic. If the base currency differs from the supplier currency, the program automatically defaults the mode to Foreign. The currency fields only display when currency is activated throughout the system. |
See Also:
-
Section 10.1, "Reviewing Open Orders" for information about viewing pending purchase orders,
4.2 Entering Detail Lines by Item Number
From Stock Based Procurement (G43A), choose Purchase Order Processing
From Purchase Order Processing (G43A11), choose Enter Purchase Orders
If you work in an environment in which you stock items for resale, internal use, or manufacturing purposes, you use the item numbers set up in the Inventory Management system to make purchases. After you enter an item number on a detail line, the system:
-
Validates that the item exists in the Inventory Management system
-
Retrieves information for the item from the Inventory Management system
The system retrieves information, such as the cost, description, and unit of measure for the item and enters it on the detail line. You can override these values and specify additional information for the item, such as a storage location, a lot number, an asset identifier, and manufacturing details.
You determine how the system processes information on each detail line. The line type for a detail line determines how the system edits against values entered on the line and also how the line is processed. For example, a line type S typically represents a stock item for which the system updates the on hand quantity at the time of receipt.
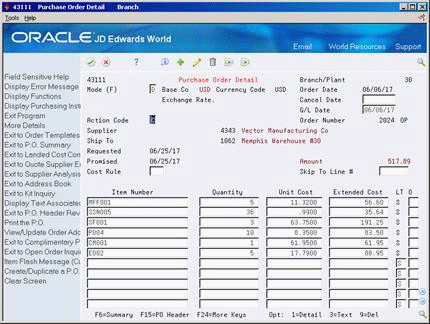
To enter detail lines by item number
Figure 4-5 Purchase Order Detail (Lines by Item Number) screen (Release A9.3 Update)
Description of "Figure 4-5 Purchase Order Detail (Lines by Item Number) screen (Release A9.3 Update)"
-
Complete the following fields:
-
Item No
-
Quantity
-
-
Complete the following fields as required and press Enter:
-
Unit Cost
-
Extended Cost
-
LT (Line Type)
-
Desc 1 (Description 1)
-
Asset I/D
-
Location
-
Trans UOM (Transaction Unit of Measure)
-
Purch. UOM (Purchasing Unit of Measure)
-
Lot
-
Last Sts (Last Status)
-
Next Sts (Next Status)
-
Cost Rule (Landed Cost Rule)
-
-
Enter 1 in the following field to enter additional information about the detail line:
-
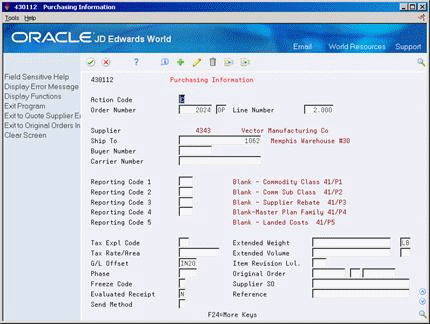
On Purchasing Information, complete the following fields:
-
G/L Offset
-
Extended Weight
-
Extended Volume
-
-
To enter manufacturing information for the item, complete the following fields:
-
Phase
-
Freeze Code
-
| Field | Explanation |
|---|---|
| Item Number | A number that the system assigns to an item. It can be in short, long, or 3rd item number format. |
| Quantity | The quantity of units affected by this transaction. |
| Unit Cost | The unit cost of one item, as purchased from the supplier, excluding freight, taxes, discounts, and other factors.
Form-specific information If you work in an inventory environment, the system retrieves this cost from either the Inventory Cost table (F4105) or the Purchase Price table (F41061) based on the purchase price level you specify for the item in master information. If you are in a non-inventory environment, you can enter a cost in this field. The system calculates the extended amount. |
| Extended Cost | The number of units multiplied by the unit cost.
Form-specific information The number of units multiplied by the unit cost. This might also represent a lump sum depending on the line type for the transaction. |
| Line Type | A code that controls how the system processes lines on a transaction. It controls the systems with which the transaction interfaces (General Ledger, Job Cost, Accounts Payable, Accounts Receivable, and Inventory Management). It also specifies the conditions under which a line prints on reports and is included in calculations. Codes include:
S – Stock item J – Job cost N – Non-stock item F – Freight T – Text information M – Miscellaneous charges and credits W – Work order |
| Description | A brief description of an item, a remark, or an explanation.
Form-specific information This text names or describes the item or account on the order line. The system retrieves this text from the Item Master table (F4101) if this is an inventory item and from the account description in the general ledger if this is an account. |
| Asset I/D | A 25-character alphanumeric number that you can use as an alternate asset identification number. You might use this number to track assets by the manufacturer's serial number. You are not required to use a serial number to identify an asset. Every serial number you enter must be unique.
Form-specific information When you enter a purchase order, you can enter an identifier in this field if you have fixed assets and order an item that the system must validate against fixed assets. This is optional and is not assigned by the system. |
| Location | A code that identifies inventory locations in a branch/plant. You define the format of the location identifier by branch/plant. |
| Trans. UOM | A user defined code (00/UM) that indicates the quantity in which to express an inventory item, for example, CS (case) or BX (box).
Form-specific information When specified in the processing options, the system retrieves the primary unit of measure from the Item Master table (F4101) for this field. |
| Purch. UOM | A user defined code (00/UM) that identifies the unit of measure in which you usually purchase the item.
Form-specific information If specified in the processing options, the system retrieves the purchasing unit of measure from the Item Master file (F4101) into this field. |
| Lot/SN | A number that identifies a lot or a serial number. A lot is a group of items with similar characteristics. |
| Last Sts | A user defined code (40/AT) that specifies the last step in the processing cycle that this order line successfully completed. |
| Next Sts | A user defined code (40/AT) that indicates the next step in the order process. |
| Cost Rule | A user defined code (41/P5) that indicates the landed cost rule for an item. The landed cost rule determines purchasing costs that exceed the actual price of an item, such as broker fees, commissions, and so forth. You set up landed cost rules on Landed Cost Revisions.
Form-specific information If there is a code in the Cost Rule field in the header portion of this screen, the code comes from either processing options or order heading information. This cost rule applies to the entire order unless you enter a different cost rule for a detail line. |
| G/L Offset | The table of Automatic Accounting Instruction accounts that allows you to predefine classes of automatic offset accounts for Accounts Payable, Accounts Receivable, and other systems.
G/L offsets might be assigned as follows:
If you leave this field blank during data entry, the system uses the default value from the Customer Master Information table (F0301) or the Supplier Master Information table (F0401). The post program uses the G/L Offset class to create automatic offset entries. Note: Do not use code 9999. It is reserved for the post program and indicates that offsets should not be created. Form-specific information This code tells the system which G/L offset account it should use to build the automatic accounting instructions for this transaction. If you are in an inventory environment, the system retrieves this code from the Item Location table (F41021). If you are in a non-inventory environment, the system retrieves this code from order line types. |
| Extended Weight | The total weight of the items on an order line. This is the quantity ordered in primary unit of measure multiplied by the item's unit weight. |
| Extended Volume | The total volume of the items on an order line. This is determined by multiplying the quantity ordered in primary unit of measure by the item's unit volume. |
| Phase | A user defined code (00/W1) that indicates the current stage or phase of development for a work order. You can assign a work order to only one phase code at a time.
Note: Certain forms contain a processing option that allows you to enter a default value for this field. If you enter a default value on a form for which you have set this processing option, the system displays the value in the appropriate fields on any work orders that you create. The system also displays the value on the Project Setup form. You can either accept or override the default value. |
| Freeze Code | A code that indicates if the order is frozen. MPS/MRP will not plan for frozen orders.
Valid codes are: Y – Yes, freeze the order N – No, do not freeze the order (Default) |
4.2.1 What You Should Know About
| Topic | Description |
|---|---|
| Non-stock items | If you work in a non-inventory environment, you might frequently purchase items for use in a specific job or program. In an inventory environment, you might purchase items that you do not account for as part of your inventory, such as office supplies.
You can enter item numbers to purchase non-stock items. The line type that you assign to this type of detail line must indicate that the transaction does not affect the Inventory Management system (Inventory interface of N or B). You can have the system retrieve default information for non-stock items by setting up master information for the items. For more information, see Section 65.1, "Setting Up Non-Stock Items." |
| Costs for items | If you have set up costs for items, you can have the system retrieve the unit cost for the item you are ordering.
If the line type you assign to a detail line indicates that the transaction involves an inventory item (Inventory interface of Y, B, or D), the system retrieves the unit cost for the item based on the value in the Purchase Price Level field on Item Master Information (P4101). You can also set up costs for non-stock items in the Item Master (P4101). When you enter a purchase order detail line for a non-stock item (using a line type with an inventory interface of N), the system will retrieve the cost. You set up the inventory interface for a line type in Order Line Types (P40205). For more information about setting up item costs in a supplier catalog, see Section 40.1, "Entering Supplier Prices." |
| Landed costs for inventory items | You can assign a cost rule to a detail line to determine the landed costs that apply to the inventory item you purchase. If you assigned a landed cost rule to header information, the system uses that cost rule as a default for all detail lines on the order. You can also set up landed costs by item number and branch, in which case it will override costs associated with a landed cost rule assigned to the line.
If you use landed costs, the field for reporting code 5 substitutes for the field for the landed cost rule. You can access landed cost information for an entire purchase order by pressing F8 in the purchase order detail screen. For more information, see Section 64.1, "Setting Up Landed Costs." |
| Viewing messages for inventory items | When the system highlights an item number, a message exists for the inventory item. To view the message, place the cursor on the item number and press F20. |
| Default Location for Stock Items | The primary location for an item and branch as set up in the Item Location file (F41021) always defaults to the purchase order detail line. You can override the value to a different location, however, the Quantity On Purchase Order field in the Item Location file is always updated to the primary location. |
| Multi-currency | If item costs come from the Inventory Management system, the system adjusts the costs according to the exchange rate for the supplier's currency. |
4.3 Entering Detail Lines by Account Number
From Stock Based Procurement (G43A), choose Purchase Order Processing
From Purchase Order Processing (G43A11), choose Enter Purchase Orders
If you work in an environment in which you purchase services or goods for internal use or for use in a certain job or program, you can charge purchases against general ledger account numbers. You enter a detail line for each account number against which you are purchasing. This allows for the general ledger to reflect expenses by job, program, or so on.
When you enter detail lines by account number, you can have the system perform commitment and budget tracking. For example, a certain account number represents your office supply expenses. Each time you purchase goods against the account number, you can have the system:
-
Track the amount and quantity of office supplies that you are committed to purchase.
-
Validate that the cost of the supplies does not exceed the budget for office supplies.
You determine how the system processes information on each detail line. The line type for a detail line determines how the system edits against values entered on the line and also how the line is processed. For example, a line type J typically represents an expense entered against an account number. Provided the line type J is set up with an Inventory Interface of A in Order Line Types (P40205), the order entry program will validate that an appropriate G/L account number is entered on the detail line.
To enter detail lines by account number
Figure 4-7 Purchase Order Detail (Lines by Account Number) screen
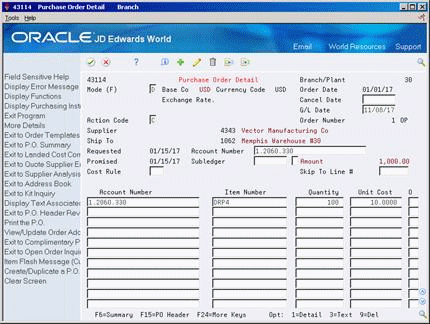
Description of "Figure 4-7 Purchase Order Detail (Lines by Account Number) screen"
-
Complete the following fields:
-
Account Number
-
-
Complete the following fields as necessary and press Enter:
-
Item No
-
Quantity
-
Unit Cost
-
Extended Cost
-
LT (Line Type)
-
Desc 1 (Description 1)
-
Desc 2 (Description 2)
-
G/L Date
-
Trans UOM (Transaction Unit of Measure)
-
Purch. UOM (Purchasing Unit of Measure)
-
Last Sts (Last Status)
-
Subledger
-
Subledger Type
-
Next Sts (Next Status)
-
-
Enter 1 in the following field to enter additional information about the detail line:
-
Option
The system displays Purchasing Information.
Figure 4-8 Purchasing Information (Lines by Account Number) screen

Description of "Figure 4-8 Purchasing Information (Lines by Account Number) screen"
-
-
On Purchasing Information, complete the following field:
-
G/L Offset
-
| Field | Explanation |
|---|---|
| Account Number | A field that identifies an account in the general ledger. You can use one of the following formats for account numbers:
The first character of the account indicates the format of the account number. You define the account format in the General Accounting Constants program. |
| G/L Date | A date that identifies the financial period to which the transaction is to post. The company constants table for general accounting specifies the date range for each financial period. You can have up to 14 periods. Generally, period 14 is for audit adjustments.
Form-specific information This date represents the entry of a commitment or encumbrance that results from this transaction. |
| Subledger | A code that identifies a detailed auxiliary account within a general ledger account. A subledger can be an equipment item number, an address book number, and so forth. If you enter a subledger, you must also specify the subledger type. |
| Subledger Type | A user defined code (00/ST) that is used with the Subledger field to identify the subledger type and subledger editing. On the User Defined Codes form, the second line of the description controls how the system performs editing. This is either hard-coded or user defined. For example:
A – Alphanumeric field, do not edit N – Numeric field, right justify and zero fill C – Alphanumeric field, right justify and blank fill |
4.3.1 What You Should Know About
| Topic | Description |
|---|---|
| Detail line format | The information you must enter on a detail line depends on the line type that you assign to the line, which must also correspond to the column format. For example, if the inventory interface specified for the line type in P40205 requires an account number and an item number (interface B), you must set processing option 16 for P4311 to format 4, so both the item number and account number fields display in Purchase Order Detail (P4311). There are 4 formats from which you can choose.
Program P4311 represents the Purchase Order Detail screen; however, you'll note the last digit that displays on the program number in the upper left corner of the screen indicates the format you're using (for example, P43111, P43112, P43113 or P43114). |
| Lump sums | If a quantity and unit cost are not relevant to an order, for example, if you are purchasing a service, you can enter a lump sum for the extended cost. A lump sum is applicable only to detail lines with a line type that indicates the transaction does not involve an item number (inventory interface of A in Order Line Types - P40205). After you enter a purchase order detail line with a lump sum, you cannot update the line with a quantity or unit cost. |
| Duplicating an item number or account number | You can duplicate an item number or account number from one detail line to another. To do this, press the Duplicate key in the Item Number or Account Number field for a blank line. The system copies the number from the last detail line that you entered or changed.
You can duplicate a portion of an account number from one detail line to another. To do this, in the Account Number field for a blank line, type a period in place of the business unit, object, or subsidiary of the most recent account number that you added or changed. For example, if the previous account number was 501.1344.02200, and you type 502.., the system inserts 502.1344.02200. You can apply the same account number and subledger to all detail lines by typing a value in the Account and Subledger fields in the header portion of the video. |
| General ledger accounts | The system tracks purchasing expenses in the general ledger based on the account number that you enter on the detail line. The G/L class code you assign to a detail line determines the received not vouchered (RNV) account to which the system applies a credit if you enter a formal receipt. (This is not the case for stock items. For stock items, the system looks at the G/L class code attached to the receiving location in Item Location Information - P41024 to determine the RNV account.)
For more information, see Chapter 14, "Work with Journal Entries for Receipt Transactions" and Chapter 61, "Set Up Automatic Accounting Instructions." |
See Also:
-
Section 4.2, "Entering Detail Lines by Item Number" for information about entering additional item information for detail lines.
4.4 Distributing an Expense to Multiple Accounts
From Non-Stock Procurement (G43B), choose Purchase Order Processing
From Non-Stock PO Processing (G43B11), choose Enter Purchase Orders
You can charge a single purchasing expense to multiple accounts. For example, you order services to paint the building in which several departments reside. You can have the system allocate a portion of the expense to each department.
You specify the accounts to which to distribute an expense when you enter a detail line. You can distribute an expense using percentages, amounts, or quantities. The system processes the detail line as a single order through the purchasing cycle.
You can distribute an expense to multiple accounts either when you enter a purchase order or when you create a voucher for the order. You must distribute the expense at the time of order entry if you want the system to:
-
Track a separate commitment for each account.
-
Perform budget checking for each account.
-
Create separate journal entries for each account (when you enter the receipt and create the voucher).
The system does not charge expenses, track commitments, or perform budget checking for the account number that you enter on the detail line. Instead, the system performs these functions for each distribution account that you specify.
If you have ongoing expenses that you distribute to the same accounts, you can set up a model that contains the account numbers and assign a percentage distribution to each account. You can select to use the model to distribute an expense.
To perform multiple account distribution, complete the following tasks:
-
Distribute an expense to multiple accounts.
-
Select an available model for account distribution.
To distribute an expense to multiple accounts
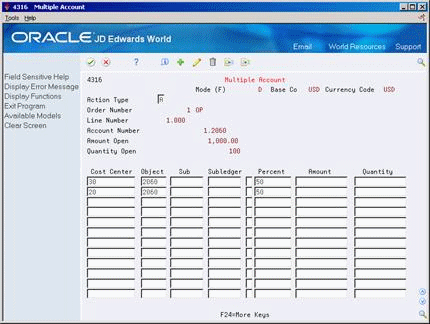
Figure 4-9 Purchase Order Detail (Distribute Expense) screen

Description of "Figure 4-9 Purchase Order Detail (Distribute Expense) screen"
On Purchase Order Detail
-
Type an account number on a purchase order detail line and complete the remaining information on the detail line.
-
Enter 12 in the following field for the detail line:
-
Option
-
-
On Multiple Account, complete the following fields for each account to which to distribute the expense:
-
Cost Center
-
Object
-
Subsidiary
-
Subledger
-
-
Complete one of the following fields for each account number.
-
Percent
-
Amount
-
Quantity
If you enter amounts or quantities, the total for all accounts must equal the amount or quantity on the detail line. If you enter percentages, the percentages for all accounts must equal 100 percent.
-
-
Press Enter and F3 to exit to Purchase Order Detail. Press Enter again to record the order.
To select an available model for account distribution
On Multiple Account
-
Press F8 to access Available Models (P4316A).
-
Enter option 4 next to the appropriate model to bring account distribution information back to the Multiple Account screen (P4316).
If you have set up only a single model, the distribution information pertaining to that model will automatically default to the Multiple Account screen when you press F8.
You set up models in Multiple Account Models (P4316M) which you can access from menu G43B41. To create a model, you must first set up the name of the model in UDC table 43/MA.
4.4.1 What You Should Know About
| Topic | Description |
|---|---|
| Line types for multiple account distribution transactions | You can distribute expenses only for those detail lines that have a line type that indicates that the line contains an account number (Inventory interface of A or B). |
| Distributing amounts or quantities | If you distribute an expense based on a quantity or amount, the system converts the quantity or amount to a percentage so that you can perform partial receipts and create vouchers for partial amounts.
For example, you enter a 100.00 expense on a detail line. You distribute 70.00 of the expense to one department and 30.00 to another. You receive only 50.00 of the order. The system converts the amounts to percentages (70 and 30 percent, respectively) to distribute the correct portion of the 50.00 receipt expense to each department. |
| Changing detail lines with multiple account distribution | The system protects the account number on a detail line if you distribute the expense to multiple accounts. If you change the quantity or amount on a detail line, you must also change the distributed quantities and amounts to reflect that which is on the detail line. |
| Entering receipts and creating vouchers | To enter a receipt or create a voucher for a distributed expense, you must locate the order based on the account number on the detail line, as opposed to the individual accounts to which you distributed the expense. |
| Tables for multiple account distribution | The system stores a single record for each detail line in the Purchase Order Detail table (F4311). The system stores account distribution information in the Purchase Order Multiple Account table (F4316). |
| Programs for which account distribution is not applicable | Multiple account distribution is not applicable to the following programs and procedures:
|
4.5 Entering Tax Information for a Detail Line
From Stock Based Procurement (G43A), choose Purchase Order Processing
From Purchase Order Processing (G43A11), choose Enter Purchase Orders
You can enter tax information that is specific to a detail line. This information determines whether taxes apply to the items or services on the detail line, and how the system calculates the taxes.
You specify whether a stock item is taxable for purchasing in Item Branch Information (P41026). The value you specify defaults to the detail line when you enter the item. For non-stock items and expense based purchases, the setup of the line type in Order Line Types (P40205) determines whether the line is taxable. The system retrieves the tax explanation code and tax rate area for each detail line from the tax information in the purchase order header. You can change the tax information defaults to accommodate each detail line.
To enter tax information for a detail line
On Purchase Order Detail
-
Complete the required information for the detail line.
-
Complete the following field and press Enter:
-
Taxable
-
-
Type 1 in the following field:
-
Option
The system displays Purchasing Information.
-
-
On Purchasing Information (P430112), complete or change the following fields, as necessary:
-
Tax Expl Code
-
Tax Rate/Area
-
| Field | Explanation |
|---|---|
| Taxable | A code that indicates whether the item is subject to sales tax when you purchase it. The system calculates tax on the item only if the supplier is also taxable.
Form-specific information If you do not enter a code in this field, the system retrieves a code from the line type if this is a non-inventory item or from the Item Location table (F4102) if this is an inventory item. |
4.6 Entering Discount Terms for a Detail Line
From Stock Based Procurement (G43A), choose Purchase Order Processing
From Purchase Order Processing (G43A11), choose Enter Purchase Orders
You can enter discount terms on a detail line to have the system calculate a discount on the items that you purchase. For example, a supplier might be offering a ten percent discount on certain items.
You can enter a specific discount factor for a detail line. The system enters a cost for the item on the detail line based on the discount factor. For example, to specify a 10 percent discount for an item, you enter a discount factor of 10. If the unit cost for the item is usually $10.00, the system enters a unit cost of $9.00. To add a 10 percent mark-up for an item, you enter -10.
You can also specify a discount for an item based on a price rule. The system applies a discount, mark-up, or override amount to the unit cost of an item based on the price rule.
To enter discount terms for a detail line
On Purchase Order Detail
Complete the following fields:
-
Discount Factor
-
Item Price Rule
-
Price Cat (Pricing Category)
| Field | Explanation |
|---|---|
| Discount Fctr | The factor that the system applies to the unit price of an inventory item to determine the net price. The system retrieves this value from the inventory pricing rules if you have assigned a rule to this item. The pricing rule setup determines if the system multiplies the unit price by this value or adds to or deducts from the unit price. |
| Price Rule | A user defined code (40/PI) that identifies an inventory price group for an item.
Inventory price groups have unique pricing structures that direct the system to incorporate discounts or markups on items on sales and purchase orders. The discounts or markups are based on the quantity, dollar amount, or weight of the item ordered. After you assign a price group to an item, the item uses the same pricing structure that was defined for the inventory price group. You must assign an inventory price group to the supplier or customer, as well as to the item, for the system to interactively calculate discounts and markups on sales orders and purchase orders. |
| Pricing Category Level | A pricing category or price rule can contain a variety of levels. Within each price rule, each level is defined by its effective date range and allowed quantity, and whether it is based on the item's cost, price, or an amount specified as an override. |
4.6.1 What You Should Know About
| Topic | Description |
|---|---|
| Default price rules for inventory items | The system retrieves a default price rule for an item if:
For more information, see Section 40.3, "Attaching Price Discount Rules to Items and Suppliers." |
See Also:
-
Section 40.2, "Creating Price Discount Rules for Purchasing" for information about setting up discounts for price rules and price groups.
4.7 Entering Reporting Codes for a Detail Line
From Stock Based Procurement (G43A), choose Purchase Order Processing
From Purchase Order Processing (G43A11), choose Enter Purchase Orders
You might want to group detail lines with similar characteristics so that you can generate reports based on the group. For example, you can group all detail lines for electrical items so that you can produce a report that lists open purchase order information for electrical items. To group detail lines, you assign reporting codes to each line.
Five categories of reporting codes are available for purchasing. Each category represents a specific group of codes. For example, you might have a category for commodities. Within this category would be different codes, each of which represents a specific type of commodity, such as aluminum or copper.
To enter reporting codes for a detail line
On Purchase Order Detail
-
Type 1 in the following field next to the detail line for which you want to specify reporting codes:
-
Option
-
-
On Purchasing Information, complete the following fields:
-
Reporting Code 1
-
Reporting Code 2
-
Reporting Code 3
-
Reporting Code 4
-
Reporting Code 5
To complete each field, access the corresponding user defined code table and choose the appropriate code.
-
| Field | Explanation |
|---|---|
| Reporting Code 1 | A reporting code that differentiates segments of the inventory in ways meaningful to those personnel responsible for the buying function in an organization. Depending upon the nature of the inventory, this code might be used to establish attributes such as:
JD Edwards World has predefined reporting code 1 as a purchasing code for commodity class. |
| Reporting Code 2 | A reporting code that differentiates segments of inventory in ways meaningful to those personnel responsible for the buying function in an organization. Depending upon the nature of the inventory, this code might be used to establish attributes such as:
JD Edwards World has predefined reporting code 2 as a purchasing code for commodity subclass. |
| Reporting Code 3 | A reporting code that differentiates segments of inventory in ways meaningful to those personnel responsible for the buying function in an organization. Depending upon the nature of the inventory, this code might be used to establish attributes such as:
JD Edwards World has predefined reporting code 3 as a purchasing code for supplier rebate codes. |
| Reporting Code 4 | A reporting code that differentiates segments of inventory in ways meaningful to those personnel responsible for the buying function in an organization. Depending upon the nature of the inventory, this code might be used to establish attributes such as:
JD Edwards World has predefined reporting code 4 as a purchasing code for master planning family. |
| Reporting Code 5 | A reporting code that differentiates segments of inventory in ways meaningful to those personnel responsible for the buying function in an organization. Depending upon the nature of the inventory, this code might be used to establish attributes such as:
JD Edwards World has predefined reporting code 5 as a purchasing code for landed cost rules. |
4.8 Entering a Kit on a Detail Line
From Stock Based Procurement (G43A), choose Purchase Order Processing
From Purchase Order Processing (G43A11), choose Enter Purchase Orders
You might want to purchase items that are made up of several components. These items, or kits, might contain:
-
Required components (always come with the kit)
-
Optional components (you choose whether they come with the kit)
-
Feature components (you choose the feature of a component, for example, a blue or a green component)
If you enter a kit on a purchase order detail line and the kit contains optional or feature components, the system enables you to choose which components to include with the kit.
To enter a kit on a detail line
On Purchase Order Detail
-
Enter the item number for a kit.
-
The Kit Component window displays (P4132), from which you use option 4 to select those components included in the kit.
If all components in a kit are set up as standard and required in the Bill of Material (P3002), the kit window will not display; instead, the components are automatically entered on the purchase order. You must re-inquire on the order number to see the component lines added for a kit item.
-
Press F13 in P4311 to display the bill of material for a kit. The system displays the Single Level Bill Inquiry screen.
Figure 4-11 Single Level Bill Inquiry screen
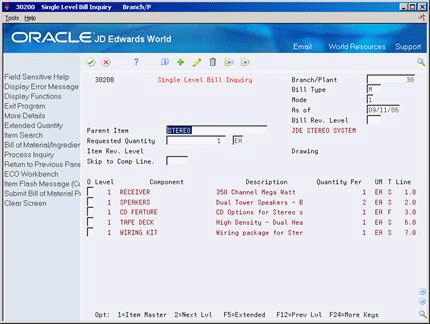
Description of "Figure 4-11 Single Level Bill Inquiry screen"
-
On Single Level Bill Inquiry, review the following fields:
-
Kit Number
-
O (Optional Kit Item)
-
Component Number
-
Description
-
Quantity
-
UM
-
| Field | Explanation |
|---|---|
| O | A code that indicates whether a component is standard or optional within a bill of material or for kit processing. Valid codes are:
S – Standard. The item is always included in any transaction involving the bill of material. O – Optional. In order entry, you can specify whether the item will be included in a particular sale. F – Feature. The item has features that you must specify at order entry. The default value is S. |
4.8.1 What You Should Know About
4.9 Entering Substitute or Replacement Items
From Stock Based Procurement (G43A), choose Purchase Order Processing
From Purchase Order Processing (G43A11), choose Enter Purchase Orders
You might enter a purchase order for an item, but the supplier does not have the quantity available to fill the order. You can review a list of substitute items and choose an item to replace the item on a detail line. If the system notifies you that the item on a detail line is obsolete, you can review and choose a replacement for the item.
You can review substitutes or replacements for an item after you type the item number on a detail line.
To enter substitute or replacement items
On Purchase Order Detail
-
Type an item number on a detail line and enter 7 in the Option field to access Substitute Item Processing.
You can access the same window for the purpose of replacing obsolete items by entering 10 in the Option field.
Figure 4-12 Substitute Item Processing screen
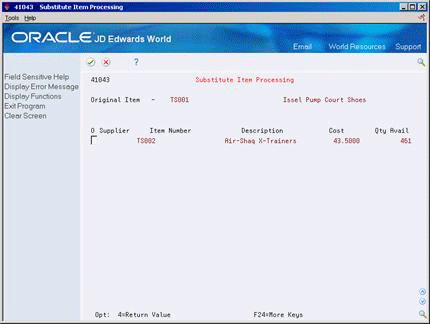
Description of "Figure 4-12 Substitute Item Processing screen"
-
On Substitute Item Processing, review the following fields:
-
Supplier
-
Item Number
-
Description
-
Cost
-
Qty Avail
-
-
Choose a substitute item or replacement item with option 4.
4.9.1 What You Should Know About
| Topic | Description |
|---|---|
| Substitute and replacement cross reference codes | Substitute and replacement items will not display in the Substitute Item Processing window unless you have entered the corresponding cross-reference type codes in processing options 43 and 44 of the Enter Purchase Orders program (P4311). |
| New items on existing detail lines | To access the window for substitute items before you record the detail line on an order, type the item number on a detail line and select option 7 to display the Substitute Item Processing screen. To select a substitute item, enter option 4.
You will also need to change the default values for the prior item that remain, such as the description, cost, g/l offset and so forth. |
4.10 Entering Pricing
From Procurement (G43), choose Price Management
From Price Management (G43A17), choose the appropriate program
4.10.1 Overview of Costs/Prices in Purchasing
Purchase order detail lines usually include a unit cost and extended cost. These costs are also considered the supplier's prices. In the Purchasing system, price and cost are one in the same. The system retrieves costs for items set up in the Inventory system based information on the following files:
-
Item Master (P4101)
-
Cost Ledger (F4105)
-
Supplier/Catalog Price (F41061)
-
Price by Item (F4207)
-
Price by Customer (F4208)
When entering a purchase order, you can manually enter a cost, or depending on the Purchase Price Level for the item, the cost can come from the Cost Ledger file (F4105) or the Supplier/Catalog Price file (F41061). You can also set up standard price adjustments to apply to the price.
If you manually enter a cost, this cost overrides any other default cost (price) normally entered by the system. Also, any adjustments you set up will not apply to a manually entered cost. The system sets the Price Override code, PDPROV, in F4311 to 1 when you manually enter the cost.
4.10.2 Purchase Price Level on Item Master
The Purchase Price Level (PPLV) is a code in Item Master that indicates where to retrieve the purchase price for an item when you enter a purchase order. Valid codes are:
| Purchase Price Level | Description |
|---|---|
| 1 | Uses the supplier/item price from the Supplier/Catalog Price table (F41061) |
| 2 | Uses the supplier/item/branch price from the Supplier/Catalog Price table (F41061) |
| 3 | Uses the inventory cost from the Inventory Cost Ledger table (F4105). The system bases this cost on the inventory cost level and the purchasing cost method you specify for the item. |
Codes 1 and 2 are applicable only if you set up supplier costs in the Purchase Order Management system. If you do not set up supplier costs, the system uses the inventory cost as the default for the purchase order.
4.10.3 Costs (F4105)
You set up costs for items in the Item Cost Revisions (P4105) program. Access the Cost Revisions program from the Item Revisions menu (G4112), or by choosing Cost Revisions (F6) from the Item Master or Item Branch screens. These costs are independent of the supplier. Costs set up in Cost Revisions are based on the primary unit of measure for the item. You cannot specify effective date ranges for F4105 costs.
4.10.4 Supplier/Catalog Prices (F41061)
Prices on items specific to suppliers are set up in the Speed Catalog Maintenance (P41061) program. You can set these prices up if the Purchase Price Level in item master is set to 1 or 2. Prices in F41061 are set up by unit of measure, whereas the costs in F4105 are not, so you can set up supplier prices by EA, BX and so on. You can set up catalogs that have different prices and effective dates. You can also define price breaks, establishing different prices depending on the quantity purchased.
4.10.4.1 Price Based on Date in the F41061
In Supplier/Item Price Revisions, effective dates are set up in the fold for each item. The system edits against the Order Date on the purchase order when checking for supplier prices.
Figure 4-13 Supplier/Item Price Revisions screen
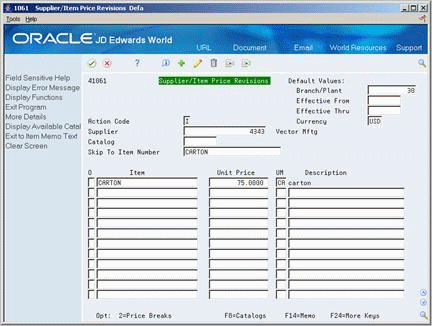
Description of "Figure 4-13 Supplier/Item Price Revisions screen"
4.10.4.2 Purchase Price Retrieval UOM
You can have the system retrieve supplier prices for an item based on either the primary unit of measure for the item, or the transaction or purchasing unit of measure as specified on the purchase order.
You also specify the unit of measure for which the system is to retrieve supplier prices in System Constants (P4009W). You access System Constants by pressing F10 in Branch Constants (P41204). You can access Branch Constants from menu G43A41.
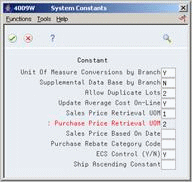
The valid values for the Purchase Price Retrieval UOM are:
| Value | Description |
|---|---|
| blank | Primary UOM |
| 1 | Transaction UOM |
| 2 | Purchasing UOM |
If the Purchase Price Retrieval UOM is set to a 2 in the system constants, the system will look at the purchasing unit of measure in the fold of Order Details (P4311) to retrieve a price for the purchase order.
If the Purchase Price Retrieval UOM is set to blank, the system will look at the primary unit of measure for the item in the Item Master (P4101). When you enter a purchase order, the system will look for a price in F41061 set up for the primary UOM.
Purchase Order Entry uses the Purchase Price Retrieval UOM setting in the system constants to look for a price in F41061. If there is no match for that unit of measure, it tries to locate a price at the primary unit of measure in F41061. If the system finds one, it will take that price and multiply it by the unit of measure conversion. If no matches are found in F41061, the program then uses the purchasing cost from the F4105 and multiplies it by the unit of measure conversion.
If you are working in a multi-currency environment, you will need to have a match for both the unit of measure and the currency.
4.10.5 Standard Pricing Adjustments (F4207 & F4208)
You can set up price adjustments to the F4105 cost or the F41061 Supplier Price. These adjustments can be discounts, markups, or override prices. The adjustments can be based on item number or item group, and on supplier number or supplier group. Standard pricing involves setting up Inventory and Supplier Pricing Groups and Rules, which allow discounts, markups, or override prices. The setup for standard pricing in purchasing is very similar to setting up standard customer pricing in sales.
In Sales, you must turn off Advanced Pricing for Standard Pricing to work, but this is not true for standard pricing in purchasing, as advanced pricing is not used in the Procurement software. The setup steps are summarized as follows:
| Step | Menu option | Description |
|---|---|---|
| Create item groups (optional) | G43A17 option 3 or G4222 option 19 | Creates group name, which is then attached to the item in the Item Price Group field in item/branch. |
| Create supplier groups (optional) | G43A17 option 5 or G4222 option 20 | Creates a supplier group name, which is then attached to the supplier in the Supplier Price Rule field in Purchasing Instructions. |
| Create Inventory Pricing Rules for price adjustments | G43A17 option 4 or G4222 option 21 | Creates a supplier group name, which is then attached to the supplier in the Supplier Price Rule field in Purchasing Instructions. |
| Attach rule to items and suppliers | G43A17 option 6 or G4222 option 22 | Attaches Inventory Pricing Rule to supplier or supplier group by entering 5 in option column |
4.10.5.1 Creating Item Groups
You must set up item group names in UDC table 40/PI. This UDC table is also shared with the Sales system.
You attach an item price group to an item by populating the name in the Item Price Group field in Item/Branch Information (P41026). The Item Price Group field also exists in Item Master, which defaults into new branch records.
4.10.5.2 Creating Supplier Groups
You must set up supplier group names in UDC table 40/PC. This UDC table is also shared with the Sales system.
You attach a supplier price group to a supplier by populating the name in the Supplier Price Rule field in Purchasing Instructions (P4306).
4.10.5.3 Creating Rules for Price Adjustments
You must create an inventory price rule to have the system apply price adjustments to items. These inventory price rules can have multiple adjustment levels.
For example, you can discount 10% off the price for purchases of up to 100 units, and 15% off for purchases of more than 100 units.
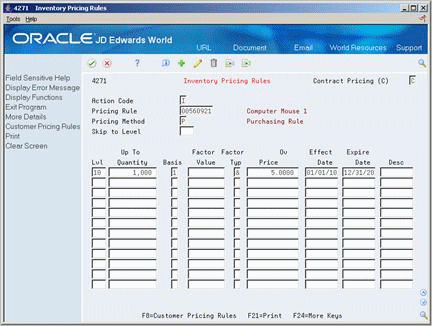
To create a rule for price adjustment
On Inventory Pricing Rules
Figure 4-15 Inventory Pricing Rules screen
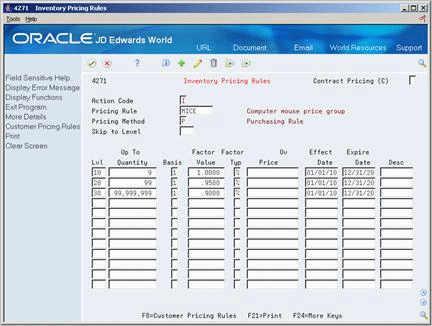
Description of "Figure 4-15 Inventory Pricing Rules screen"
Enter pricing rule information. For each rule, you must specify:
-
An alphanumeric code defining the level of the adjustment. This value is required. If you try to add a price rule without defining a level for each adjustment, you'll lose all your information upon pressing Enter.
-
Quantities you must purchase to get the adjustment
-
A basis code which defines the F4105 cost to which a discount or mark-up is applied. You can define hard coded cost methods 1 through 8, or use P to indicate the discount or mark up is to be applied to the supplier price in the F41061.
-
Discount (or markup) you will receive - percentage, dollar amount, or override price
-
Effective dates
| Fields | Description |
|---|---|
| Pricing Rule | You must set a pricing rule in UDC 40/PI, corresponding to the item price group that is attached to the item in item/branch. If you are setting up a contract price rule, the pricing rule is the short item number of the item. |
| Pricing Method | This must be P for purchasing. |
| Level | You can set up multiple levels, typically with different "Up To Quantity", adjustment criteria, and/or effective dates. The level is an alpha-numeric code that is user defined. |
| Up To Quantity | This is the volume or quantity break. The adjustment will apply to quantities or volumes equal to or below this number. |
| Basis | The costing method that the net price is based on. The allowable basis codes are:
1 – Last-In Cost 5 – Future Cost 2 – Average Cost 6 – Lot Cost 3 – Memo Cost 1 7 – Standard Cost 4 – Current Cost 8 – Purchasing Cost P – Unit Price Basis P used in purchasing uses the unit cost assigned as the Purchasing Cost Method set up in F4105, or the unit cost set up in F41061. |
| Factor Value | The factor value and % or $ determine the discount or markup. Enter % or $ in the % $ column to indicate whether the factor is multiplied by the basis cost (%) or is added to, subtracted from, or overrides the basis cost ($). The factor value is the percentage or additional or discount amount. Percentage is expressed as a multiplier. |
| Override Price | The price listed here overrides all other rules or prices (except those manually entered into the purchase order). |
| Effective and Expiration Dates | Dates of effectivity for the pricing rule. |
| Description | Optional description. |
To inquire on an inventory price rule, you must enter the price rule and the price method, which is always P, for rules that apply within the Purchasing system.
If the pricing rule is a contract pricing rule, populate the Contract Pricing field with C.
4.10.5.4 Attaching Pricing Rules
Once you define the inventory pricing rule, you need to:
-
Attach it to items, and
-
Attach it to suppliers.
On Item/Branch Plant Information
Figure 4-16 Item Branch/Plant Information screen
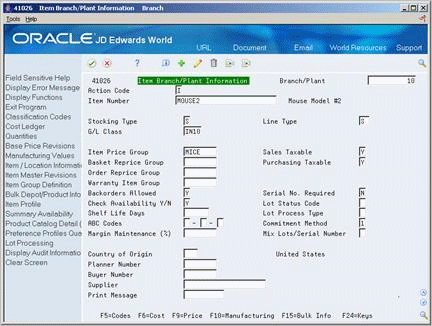
Description of "Figure 4-16 Item Branch/Plant Information screen"
Enter the name of the price rule in the Item Price Group field. You must then attach the rule to either a specific supplier or supplier group.
On Supplier Pricing Rules
Figure 4-17 Supplier Pricing Rules screen
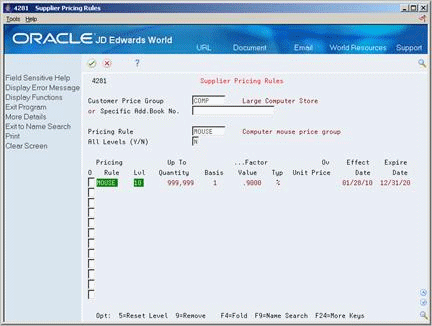
Description of "Figure 4-17 Supplier Pricing Rules screen"
-
Enter the name of the Supplier Price Group or the address book number of a supplier.
All the inventory pricing rules display.
-
Enter the inventory price rule in the Pricing Rule field.
All the levels of this pricing rule display.
-
Enter 5 in the option column of the lowest level of the rule (the first line of the rule) to attach this rule to the supplier.
If you enter 5 next to another level, the system will ignore all levels below it. The pricing rule highlights the attached line.
-
Enter 9 in the option column of the highlighted line to remove the attached rule from the supplier.
4.10.5.5 Setting Up a Contract Price
A supplier might provide you a discounted price on a specific item up to a maximum purchase limit. For example, you might have an agreement to purchase up to 1000 computer components at a special price of $4.00 each. After you purchase 1000 of these, the price returns to normal. You can create a contract price rule to cover this type of discounted price.
On Inventory Pricing Rules
Figure 4-18 Inventory Pricing Rules screen
Description of "Figure 4-18 Inventory Pricing Rules screen"
-
Populate the Contract Pricing (C) field with C.
The name of the pricing rule must be the same as the item's short item number as specified in the Item Master (P4101). You must also set up the short item number in UDC table 40/PI with leading zeros to make 8 digits. Since this is not an item group, you do not need to attach a contract rule to the Item Price Group field in Item Branch Information (P41026).
-
Enter the contract quantity limit in the Contract field in the fold.
A contract price will override all other prices applicable to an item, unless you manually enter a price in the purchase order. The system tracks the quantity that has been purchased against the contract price rule to date. You can see this in the Taken field in the fold of the Inventory Pricing Rule.
4.10.6 What You Should Know About
| Topic | Description |
|---|---|
| Deleting an inventory pricing rule | In order to delete an inventory pricing rule, it cannot be attached to a supplier. If you try to delete a price rule with a supplier relationship, the P4271 will generate error 2596.
Use option 9 in Supplier Pricing Rules to remove the attachment to a supplier. If you're unsure of the supplier or supplier group to whom a price rule is attached, you can query the F4208 on the name of the price rule (PGMCAT). |
| Changing an inventory pricing rule | When you change an existing price rule, the system will leave the original adjustment line and add a new line with the changed information. In order to delete the original line, you must blank out all the field values on the original line and press Enter to change. |
| Basket and order repricing | Basket and order repricing does not work in Purchasing. |
| Standard Pricing Files | Inventory pricing rule information is maintained in the Price by Item file (F4207). Information regarding the suppliers to whom price rules are attached is maintained in the Price by Customer file (F4208). |
| Purchase order detail lines | When you assign an inventory price rule to an item in Item Branch Information (P41026), that rule automatically defaults to the fold of the purchase order detail line (P4311) when you order the item. The level of the price rule applicable to the quantity also defaults to the detail line.
You can apply inventory price rules to a purchase order detail line on 'the fly' by simply entering a price rule and level in the fold |