10 Set Up Assembly Inclusion Rules
This chapter contains these topics:
10.1 Set Up Assembly Inclusion Rules
You must set up assembly inclusion rules that process requested options and features from sales order entry into the specific components, operations, and calculated values that are necessary to build and price the configured item.
There are five types of assembly inclusion rules:
10.1.1 Logic Statements
For each assembly inclusion rule, you can define an "if/then/else" logic statement for many conditions. The following assembly inclusion rule illustrates:
If Segment 10 equals 6000, and segment 30 is greater than 10, then include part F170, else include part F175.
You can use the following conditions:
-
If
-
Then
-
Else
-
And
-
Or
10.1.2 Advanced Assembly Inclusion Rules
For an assembly inclusion rule, you can define advanced assembly inclusion rules to:
-
Expand the derived calculation formula
-
Define smart parts
-
Reference external fields
-
Reference external programs
-
Reference a table
For each rule type, you can define calculations for a specific segment to determine the following:
| Rule | Calculation |
|---|---|
| Calculation (C) Rules | The value for a calculated segment |
| Routing (R) Rules | Run or machine hours multiplier for a routing or routing step |
| Pricing (X) Rules | Price multiplier |
| Component (P and Q) Rules | Quantity multiplier (similar to quantity per assembly) |
For each calculation, the following functions are available:
-
Segment referencing
-
Algebraic expressions
-
Trigonometric functions
-
Exponential/logarithmic functions
-
A substring function to select a subset of values from a segment
-
A concatenate function to combine values from two segments
-
References to fields from other files
-
Segment definition with a custom-written external program
You can define a derived calculation on either Assembly Inclusion Rules or Advanced Rules.
For quantity rules (P rules and Q rules), you can build "smart part" numbers from the segment values that you entered on the sales order. The simplest form of a smart part is that the answer to a segment question is a part number. The system calculates smart parts in a similar manner to derived calculation string-related operations.
As you define a derived calculation, you can include field values on External Files Reference. For example, a pricing assembly inclusion rule for FORKLIFT-A uses a field reference to retrieve a base price from the Base Price table (F4106).
You can reference an external custom program for special calculations. This is useful if the calculation requires several steps or requires more characters than available.
If a configured item includes multiple levels, the system processes each component down the item hierarchy before processing across. This process determines the order in which segments appear during sales order entry.
For example, in the following configured item, forms appear during sales order entry in the order A, B, C, D, E:
Figure 10-1 Multi-Level Processing Configuration
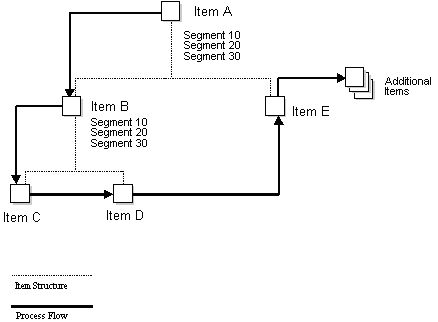
Description of "Figure 10-1 Multi-Level Processing Configuration"
Consider multi-level processing before you set up your rules, so that the system references segments for previously entered values. Use P type assembly inclusion rules to define your multi-level configured items. If you use configured items as components within multi-level configured items, ensure that the configured component items are unique.
You can use advanced rules to reference a table that returns calculated segment values, prices, and parts to the assembly inclusion rules.
| Reference | Description |
|---|---|
| Referencing segments | For both Q and P rules, you can reference upper and lower level segments from assembly inclusion rules, tables and derived calculations. |
10.2 Defining Assembly Inclusion Rules
From Configurator (G32), enter 29
From Configurator Setup (G3241), choose Assembly Inclusion Rules
Defining assembly inclusion rules consists of the following tasks:
-
Defining unconditional rules
-
Defining conditional rules
-
Defining values
-
Defining ranges
-
Setting up advanced rules (optional)
-
Copying rules (optional)
Before you define conditional rules, you can define unconditional rules to include parts, adjustments, calculated values, or routing steps regardless of the values in segment questions.
-
Complete the following fields:
-
Branch/Plant
-
Rule Type
-
Configured Item
-
-
Complete the following field with an asterisk:
-
And/Or
-
-
Complete the following fields:
-
Item
-
Line Type
-
On Assembly Inclusion
-
Complete the following fields:
-
Branch/Plant
-
Rule Type
-
Configured Item
-
If
-
Bracket
-
Segment
-
Relationship
-
Values
-
Bracket
-
Then
-
Item
-
Operation Sequence
-
Line Type
-
-
Access More Details.
Figure 10-3 Assembly Inclusion (Details) screen
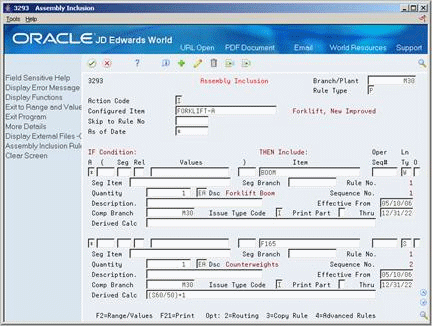
Description of "Figure 10-3 Assembly Inclusion (Details) screen"
-
Complete the following fields:
-
Quantity
-
Effective From
-
Component Branch
-
Effective Thru
-
-
Complete the following optional fields:
-
Segment Item
-
Segment Branch
-
Issue Type Code
-
Price Rollup
-
Derived Calculation
-
| Field | Explanation |
|---|---|
| Branch/Plant | A number that identifies a branch, plant, work center, or business unit.
Form-specific information You can define a generic or blank branch/plant for assembly inclusion rules and then use the rules for all branch/plants. |
| Rule Type | Designates the type of included components:
C – Calculation P – Part List Q – Work Order Component R – Route Sheet X – Price/Cost Adjustment |
| Configured Item | A number that the system assigns to an item. It can be in short, long, or 3rd item number format.
Form-specific information Header: The configured item number for which assembly inclusion rules are being defined. Detail: For P rules, this item is included in the parts list. For R rules, the routing for this item is copied. |
| And/Or Selection | A code that determines whether compound data selection logic is based on an A = AND condition or an O = OR condition.
Form-specific information For configuration management, you can include parts, prices, costs, or routings with the configured item. Additional values include: I – If E – Else * – Then For example: I – Seg 1 = A * – Part B E – Part C E – Part D If Seg 1 is A, include part B. If Seg 1 is not A, include part C and part D. |
| Price | The price charged for the unit of measure in the adjoining field. Use these fields, for example, if your primary unit of measure is EA (each), but you typically use a list price per box. |
| Cost | A user-defined cost the system uses based on information that you supply, which includes the name of the costing method and the method of calculation. |
| Op Seq | In routings, this number is used to sequence the fabrication or assembly steps in the manufacture of an item. You can track costs and charge time by operation.
In bills of material, this number designates the routing step in the fabrication or assembly process that requires a specified component part. You define the operation sequence after you create the routing for the item. The Shop Floor Control system uses this field in the backflush/preflush by operation process. In engineering change orders, this number is used to sequence the assembly steps for the engineering change. Skip To fields allow you to enter an operation sequence that you want to begin the display of information. You can use decimals to add steps between existing steps. For example, use 12.5 to add a step between steps 12 and 13. Form-specific information For R rules, this value defines which routing step should be added to the configured item's work order routing. For P and Q rules, this value controls the consumption of material during backflush or super backflush transactions. |
| Item Number - Unknown Format Entered | The item number entered which can be in any of the three formats (short, long, or 3rd item number).
Form-specific information The configured item number of the segment in the Assembly Inclusion Rule. Use this number to reference a previously selected segment. |
| Price Roll Up Flag | Determines whether the price/cost is rolled up into the parent item. The extended price/cost will be zero if the flag is set to roll up to the parent.
Y or 1 - Roll up price or cost to parent. N or 0 - Separate price/cost add-on. |
| Effective From | A date that indicates one of the following:
The default is the current system date. You can enter future effective dates so that the system plans for upcoming changes. Items that are no longer effective in the future can still be recorded and recognized in Product Costing, Shop Floor Control, and Capacity Requirements Planning. The Material Requirements Planning system determines valid components by effectivity dates, not by the bill of material revision level. Some forms display data based on the effectivity dates you enter. |
| Thru | A date that indicates one of the following:
The default is December 31 of the default year defined in the Data Dictionary for Century Change Year. You can enter future effective dates so that the system plans for upcoming changes. Items that are no longer effective in the future can still be recorded and recognized in Product Costing, Shop Floor Control, and Capacity Requirements Planning. The Material Requirements Planning system determines valid components by effectivity dates, not by the bill of material revision level. Some forms display data based on the effectivity dates you enter. |
| Comp Branch | A secondary or higher level business unit. Sometimes used to reference a branch or plant with several departments or jobs subordinate to it.
Branch/Plant - (MMCU) Dept A - (MCU) Dept B - (MCU) Job 123 - (MCU) |
| Issue Type Code | A code that defines how the system issues each component in the bill of material from stock. In shop floor control, it indicates how the system issues a part to a work order. Valid codes are:
I – Manual issue (default) F – Floor stock (no issue) B – Backflush (when part is reported as complete) P – Preflush (when parts list is generated) U – Super backflush (at pay-point operation) S – Sub-contract item (send to supplier) Blank – Shippable end item You can issue a component in more than one way within a specific branch/plant by using a different code on the bill of material and work order parts list. The bill of material code overrides the branch/plant value. |
| Print Part | This field will determine if the Configurator part should print on the sales order and work order. The flag will be used in the Pick Slip, Invoice Print, Bill of Lading, and Print Parts List.
Y – Print on sales and work order N – Do not print on sales and work order 2 – Print on sales order only 3 – Print on work order only You can also use 1 for Y and 0 for N. |
| Derived Calculation | Defines an algebraic formula that calculates the quantity, price, hours or a value associated with a rule.
For example: Segment References
Trigonometric and Logarithmic Functions
Substring
Concatenations CONCAT(S3,S4) combines the values of segments 3 and 4. External Fields
External Programs
Smart Parts
|
| Quantity - Standard Required Quantity | The number of units to which the system applies the transaction. |
10.2.1 What You Should Know About
10.2.2 What You Should Know About
| Topic | Description |
|---|---|
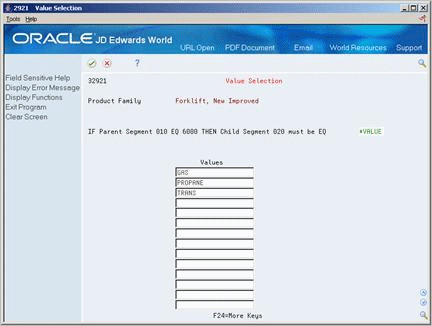
| Revising *VALUE | To revise existing *VALUE entries, place the cursor on *VALUE and choose the Range/Values function. |
-
Complete the following field with *RANGE:
-
Value
The system prompts you for all new and changed rules containing a *RANGE.
Figure 10-5 Value Selection (*RANGE) screen
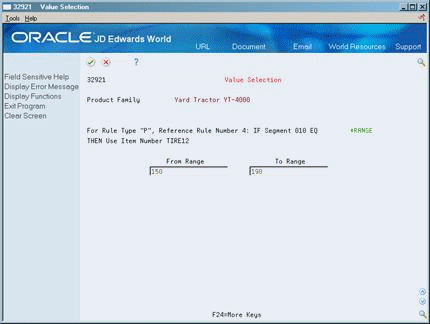
Description of "Figure 10-5 Value Selection (*RANGE) screen"
-
-
On Value Selection, complete the following fields:
-
From Range
-
To Range
-
10.2.3 What You Should Know About
| Topic | Description |
|---|---|
| Revising *RANGE | To revise existing *RANGE entries, place the cursor on *RANGE and choose the Range/Values function. |
-
Access Advanced Rule Functions.
Figure 10-6 Advanced Rule Functions screen
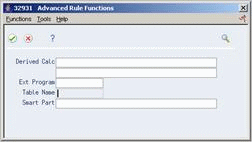
Description of "Figure 10-6 Advanced Rule Functions screen"
-
On Advanced Rule Functions, complete one or more of the following fields:
-
Derived Calculation
-
External Program
-
Table Name
-
Smart Part
-

10.3 Locating Assembly Inclusion Rules
You review assembly inclusion rule information to help you maintain these rules. You can determine the effect of component changes such as shortages and substitutions, and determine the effect of changes to valid segment values. For example, if a vendor discontinues a paint color, you can determine how many configurations will be affected.
Locating assembly inclusion rules consists of the following tasks:
-
Locating component information
-
Locating segment information
To locate component information
From Configurator (G32), enter 29
From Configurator Setup (G3241), choose Component Where Used
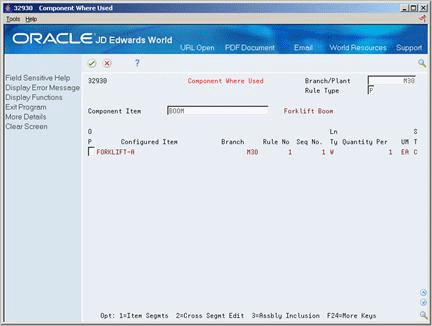
Complete the following fields:
-
Branch Plant
-
Rule Type
-
Component Item
From Configurator (G32), enter 29
From Configurator Setup (G3241), choose AIR Segment Where Used
Figure 10-9 AIR Segment Where Used screen
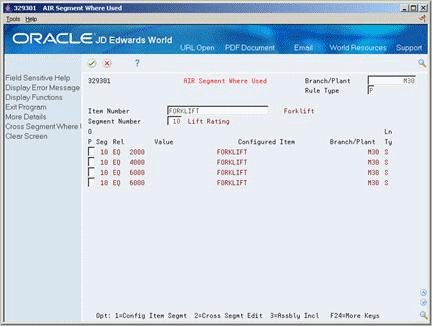
Description of "Figure 10-9 AIR Segment Where Used screen"
Complete the following fields:
-
Branch Plant
-
Rule Type
-
Item Number
-
Segment Number