35 Set Up Equipment
This chapter contains these topics:
35.1 Setting Up Equipment
Before you can use Equipment/Plant Maintenance, you must establish certain information about your equipment, including equipment data, supplemental data, and shop cost inquiries.
35.2 Setting Up Equipment Data
You set up equipment data to establish basic information about your equipment. The system accesses the equipment data you set up when it executes various programs within Equipment/Plant Maintenance.
Setting up equipment data consists of the following tasks:
-
Setting up equipment constants
-
Setting up equipment/plant AAIs
-
Setting up equipment next numbers
-
Setting up depreciation account rules
-
Setting up ledger depreciation rules
-
Mapping equipment category codes
35.2.1 Setting Up Equipment Constants
From Equipment/Plant Management (G13), enter 29
From Equipment/Plant Management Setup (G1341), choose Equipment Constants
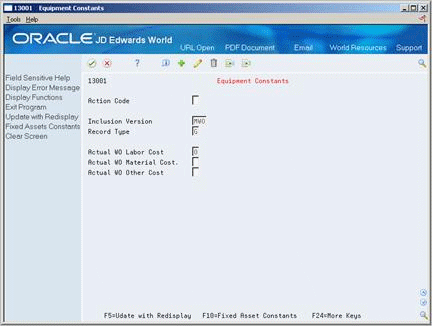
You set up equipment constants to control how your business uses Equipment/Plant Maintenance features. For example, when you define a default business unit for depreciation expense in equipment constants, the system automatically transfers this information to Depreciation Information whenever you add a new piece of equipment to the system. You can also specify the business unit that appears as a default value for the asset accounts when you create equipment master information for a new piece of equipment.
You set up equipment constants only one time for Equipment/Plant Maintenance. Typically, you should not change the system constants. However, if you need to change them for any reason, you should understand the consequences. For example, if you change the default business unit for asset accounts, the change affects only the equipment that you add to the system after the change, and not the equipment that exists in the system prior to the change.
For some equipment constants, you must perform an additional process to update the system with your latest change. For example, if you change the symbol for the item number on the Equipment Constants screen, you must also run the Refresh Item Number program in Fixed Assets Global Updates to ensure that other programs that use symbols to identify the item number reflect the change.
Note:
Equipment/Plant Maintenance shares system constants with the Fixed Asset system. You should work with the system administrator for Fixed Assets to ensure that the constants are set up to meet the needs of Fixed Assets and Equipment/Plant Maintenance.-
To define supply and demand inclusion rules for material planning, complete the following field:
-
Inclusion Version
-
-
To define the work order record type for maintenance loops, complete the following field:
-
Record Type
-
-
To specify whether entry of actual work order costs is allowed on Work Order Cost Summary, complete the following fields:
-
Actual Work Order Labor Cost
-
Actual Work Order Material Cost
-
Actual Work Order Other Cost
-
-
Choose Update with Redisplay.
-
Choose Fixed Assets Constants.
Figure 35-2 P & E Constants Revisions screen
Description of "Figure 35-2 P & E Constants Revisions screen"
-
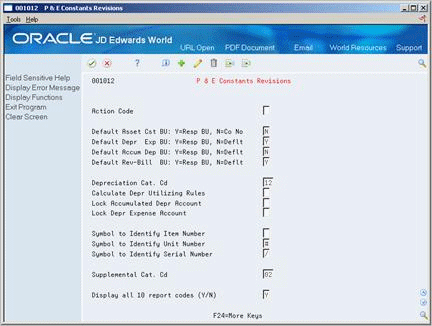
On P & E Constants Revisions, complete the following fields to establish default values for business units:
-
Default Asset Cost Business Unit
-
Default Depreciation Expense Business Unit
-
Default Accumulated Depreciation Business Unit
-
Default Revenue-Billing Business Unit
-
-
To specify how the system calculates depreciation, complete the following field:
-
Calculate Depreciation Utilizing Rules
-
-
To specify whether the system allows changes to depreciation accounts after entries have been posted, complete the following fields:
-
Lock Accumulated Depreciation Account
-
Lock Depreciation Expense Account
-
-
To specify the number of category codes that appear on applicable entry screens, complete the following field:
-
Display all 10 report codes (Y/N)
-
-
To specify how the system identifies equipment numbers, complete the following fields:
-
Symbol to Identify Item Number
-
Symbol to Identify Unit Number
-
Symbol to Identify Serial Number
-
-
To specify which equipment category code the system uses to assign supplemental data types, complete the following field:
-
Supplemental Category Code
-
| Field | Explanation |
|---|---|
| Inclusion Version | A user defined code (system 40/type RV) that identifies an inclusion rule that you want the system to use for this branch/plant. The Manufacturing and Advanced Warehouse Management systems use inclusion rules as follows:
Form-specific information This code determines whether the system submits capacity planning interactively when you create a work order or when you change the status of a work order. The value you enter defines which version of the supply/demand inclusion rules the system uses to update the capacity plan. If you leave this field blank, the system does not update the capacity plan when you create a work order or change the status of a work order. |
| Record Type | The detail specification record type. Record types are user defined. You can set them up on the Detail Specification Types screen and use them to describe certain types of work order or engineering change order information.
Form-specific information This is the work order record type that stores the associated equipment you define for maintenance routes. For example, if you enter record type E on this screen, when you set up a maintenance route, the system includes all equipment contained in record type E on the work order. |
| Actual WO Labor Cost | This code determines whether you can manually enter actual labor costs for a work order on the Work Order Cost Summary window. Valid values are:
0 – The system calculates actual labor costs from Payroll. 1 – Actual labor costs are manually entered and are not calculated by the system. |
| Actual WO Material Cost | This code determines whether you can manually enter actual material costs for a work order on the Work Order Cost Summary window. Valid values are:
0 – The system calculates actual material costs from Inventory Issues. 1 – Actual material costs are manually entered and are not calculated by the system. |
| Actual WO Other Cost | This code determines whether you can manually enter actual other costs for a work order on the Work Order Cost Summary window. Other costs are miscellaneous costs that are not associated with labor or materials, such as subcontracting costs. Valid values are:
0 – The system calculates actual other costs from general ledger transactions. 1 – Actual other costs are manually entered and are not calculated by the system. |
| Default Asset Cst BU | This code determines where the business unit for the asset cost account comes from when you add a new asset. When you add a new asset, the system uses the business unit that this value represents on Depreciation Information. Valid codes are:
Y – Responsible Business Unit. The system uses the business unit from the responsible business unit on the Master Information screen. N – Company. The system uses the business unit from the company number on the Master Information screen. Typically the business unit and company share the same number. For example, business unit 50 usually contains general accounts for company 50. |
| Default Depr Exp BU | This code determines where the business unit for the depreciation expense comes from when you add a new asset. When you add an asset, the system uses the business unit that this value represents on Depreciation Information. Valid codes are:
Y – Responsible business unit. The system uses the business unit from the responsible business unit on the Master Information screen. N – Default. The system uses the business unit from the Item Setup Default Coding screen. |
| Default Accum Dep BU | This code determines where the business unit for accumulated depreciation comes from when you add a new asset. When you add an asset, the system uses the business unit that this value represents on Depreciation Information. Valid codes are:
Y – Responsible business unit. The system uses the business unit from the responsible business unit on the Master Information screen. N – Default. The system uses the business unit from the Item Setup Default Coding screen. |
| Default Rev-Bill BU | This code determines where the business unit for revenue and billing comes from when you add a new asset. When you add an asset, the system uses the business unit that this value represents on Depreciation Information. Valid codes are:
Y – Responsible business unit. The system uses the business unit from the responsible business unit on the Master Information screen. N – Default. The system uses the business unit from the Item Setup Default Coding screen. |
| Display all 10 report codes (Y/N) | This code controls the number of category code fields the system displays on various screens. Examples of these fields might include Accounting Class, Equipment Class, and so on. Valid codes are:
Y – Display first 10 category codes N – Display only the first five category codes Set the number of category codes that appear on your screens to accommodate the number of category codes you use in your system. You can change the value in this field at any time. |
| Symbol to Identify Item Number | You can assign one of three different numbers to an asset. These numbers are:
When you enter an asset number, you may use a prefix or symbol to designate the number you enter. If you use this number most often, you should leave the symbol blank so that you just need to enter the number. If it is not the number you use most often, you should define a symbol, such as / or *, that you will type before you enter the number so that the system knows which number you are representing. Note: You can leave only one asset number blank. The other two must have a symbol so that all three numbers are unique. Verify that the symbols you use are not significant for any other purposes of data entry, for example, a period or comma. |
| Symbol to Identify Unit Number | You can assign one of three different numbers to an asset. These numbers are:
When you enter an asset number, you may use a prefix or symbol to designate the number you enter. If you use this number most often, you should leave the symbol blank so that you just need to enter the number. If it is not the number you use most often, you should define a symbol, such as / or *, that you will type before you enter the number so that the system knows which number you are representing. Note: You can leave only one asset number blank. The other two must have a symbol so that all three numbers are unique. Be sure that this symbol is not significant for any other purposes of entry, for example, a period or comma. |
| Symbol to Identify Serial Number | You can assign one of three different numbers to an asset. These numbers are:
When you enter an asset number, you may use a prefix or symbol to designate the number you enter. If you use this number most often, you should leave the symbol blank so that you just need to enter the number. If it is not the number you use most often, you should define a symbol, such as ' or *, that you will type before you enter the number so that the system knows which number you are representing. Note: You can leave only one asset number blank. The other two must have a symbol so that all three numbers are unique. Be sure that this symbol is not significant for any other purposes of entry, for example, a period or comma. |
| Supplemental Cat. Cd | Enter the number of the equipment category code that controls which supplemental data types the system displays on the Equipment Management supplemental data screens.
When you set up supplemental data, you use Data Type Cross Reference to specify which types of data appear on supplemental data screens. For example, on Equipment Constants, you can specify equipment category code 2 (Major Equipment Class) as the supplemental data category code. Then, on Data Type Cross Reference, you can specify which data types are appropriate for each class of equipment you set up under Major Equipment Class, such as specification sheets and transportation notes for heavy equipment. |
35.2.2 What You Should Know About
35.2.3 Setting Up Equipment/Plant AAIs
From Equipment/Plant Management (G13), enter 29
From Equipment/Plant Management Setup (G1341), choose Automatic Accounting Instructions
Many JD Edwards World programs need information about your account structure and specific account values to process business transactions properly. You define your account structure and specific account values by using automatic accounting instructions (AAIs). The system stores the AAI values that you define for your company in the Automatic Accounting Instructions table (F0012). Whenever a program performs an accounting function, it accesses the Automatic Accounting Instructions table.
Equipment/Plant AAIs define the rules by which Equipment/Plant Maintenance and the General Accounting system interact. When you define AAIs, you establish how the system processes transactions for various programs. For example, AAIs set the rules by which general ledger transactions can post to Equipment/Plant Maintenance.
You set up AAIs by company, based on account numbers, and in some cases, ranges of account numbers. The system includes predefined ranges. You must specify the business unit and object account for the AAIs as necessary. Additionally, you must specify subsidiary accounts for certain AAIs.
The system uses single AAI values to find individual accounts and AAI ranges to find account ranges. When you set up AAI ranges, you must observe the following guidelines:
-
You can set up a maximum of 49 account ranges for a single company.
-
The maximum number of account ranges that you can set up for all your companies combined is 200.
-
Do not skip AAI ranges. For example, do not set up FX range 01 - 02 and FX05 - 06, leaving FX03 - 04 blank for later use. If the system searches the AAIs for an account and finds a gap in a range, the search is stopped.
-
You must set up your AAI ranges in numerical order. However, you are not required to set up your object accounts in numerical order.
AAIs for Equipment/Plant Maintenance include the following categories:
See Also:
-
Working with AAIs in the JD Edwards World General Accounting I Guidefor more information about adding or changing AAIs
The guidelines that follow pertain only to AAIs relevant to Equipment/Plant Maintenance.
The system uses the FX range in the AAIs to determine which journal entries in the general ledger can post to equipment. You must specify all equipment accounts within the FX range of accounts. For example:
-
FX01 - FX02. Beginning and ending range for asset cost accounts
-
FX03 - FX04. Beginning and ending range for accumulated depreciation accounts
-
FX05 - FX06. Beginning and ending range for depreciation expense accounts
When you set up the FX range of AAIs, you must apply the following rules:
-
Define up to 49 FX ranges, starting with FX01 - FX02 and ending with FX97 - FX98.
-
Ending ranges must be even numbers, such as FX02 and FX98.
-
FX ranges can be company specific, or you can use the default company 00000 to set up the FX range for all your companies at the same time. If you set up a company-specific FX range for one company, you must set up the FX ranges for all companies. In addition, you must begin the FX range for each company with FX01.
-
Specify an object account for each FX range.
-
Subsidiary accounts are optional. To include all subsidiaries in the FX range, include .99999999 in the ending range. For example, if you use subsidiary accounts, you might have a range of accounts that includes accounts 3000 - 4000.99999999. If you add other subsidiaries to your chart of accounts at a later time, you do not have to change your AAIs.
The system uses the FC range in the AAIs to determine which accounts are reserved for asset cost accounts.
When you set up the FC range of AAIs, you must apply the following rules:
-
Define up to 49 FC ranges.
-
Define account ranges for all asset cost accounts.
-
Set up FC account ranges for company 00000 only. The FC range is not company specific.
The system uses the AT range of AAIs to determine which general ledger accounts are included in the summary lines on the Cost Summary screen. Use AT01 - AT99 to specify these interim total accounts and wording that appear for each total on Cost Summary. Use AT00 to define the account in which to store statistical information for hours. The AT range of AAIs is optional.
For example, you might specify that your balance sheet accounts are in account range 1000 - 3999 and your income and expense accounts are in the 4000 - 8999 range. You could set up your AT range as follows:
-
AT01. Object account 4000. This interim total sums all object accounts below 4000, or accounts 0 - 3999. The system does not include object account 4000.
-
AT02. Object account 9000. This interim total sums all object accounts between 4000 - 8999. The system does not include object account 9000.
When you set up the AT range of AAIs, you must apply the following rules:
-
Define interim totals between AT01 - AT99.
-
Use AT00 to define the account number that stores statistical information for hours.
-
Do not specify an interim total for the Cost Summary grand total. The system automatically creates a grand total on Cost Summary.
The system uses these AAIs to determine the statistical accounts to use when equipment accumulates units, such as miles, hours, and fuel. The system uses statistical units to track equipment use. Programs that use these AAIs include:
-
Meter Readings
-
Item PM Schedule
-
Update PM Schedule
-
PM History and Completion
-
Equipment Cost Analysis
When you set up FMA, FMB, and AT00 AAIs, you can set them up to be company-specific. In addition, you must apply the following rules:
-
Include a business unit and object account for each AAI
-
Do not include a subsidiary account
If you perform preventive maintenance based on equipment use measured by billed hours, you can use the same accounts for these AAIs as you use for billing accounts. AAIs applicable to equipment billing include:
-
FTC
-
FTC1 - FTC0
-
FTxx
See Also:
The system uses these AAIs to define the statistical account that records the original meter reading determined by the Meter Readings program. Each of these AAIs corresponds to a statistical account as follows:
-
FMC corresponds to the FMA account
-
FMD corresponds to the FMB account
-
FME corresponds to the AT00 account
When you set up FMC, FMD, and FME AAIs, you can set them up to be company-specific. Additionally, you must apply the following rules:
-
Include a business unit and object account for each AAI
-
Do not include a subsidiary account
The system uses the FP AAI to determine which account to charge when you create a purchase order from the work order parts list. You can set up the FP AAI to be company-specific. Additionally, you must apply the following rules:
-
Include an object account for each AAI.
-
Optionally include a business unit or subsidiary account. If you do not include a business unit or subsidiary account, the system uses the Charge to Business Unit and Repair Code from the work order for which you are purchasing parts.
Additionally, you must verify that line types have been set up in the system.
See Also:
-
Appendix A, "Inventory Concepts and Setup" for more information about setting up line types
The Automatic Accounting Instructions screen shows an index, or list, of the AAIs used in the JD Edwards World systems. Select Automatic Accounting Instructions from the Equipment/Plant Management setup menu (G1341) to view the AAIs for Equipment/Plant Maintenance.
You can use the roll keys or the page up and page down keys to move through the screens and view all the AAIs. Or, you can skip to a specific AAI by entering its sequence number in the Skip to Sequence Number field.
You can access other AAI entry screens to make either single or multiple AAI revisions. Use Single AAI Revisions to revise any AAI for a particular company. Use Multiple AAI Revisions to revise or add more than one AAI for a company or specific AAIs for multiple companies.
35.2.4 What You Should Know About
35.2.6 Setting Up Equipment Next Numbers
From Equipment/Plant Management (G13), enter 29
From Equipment/Plant Management Setup (G1341), choose Next Numbers
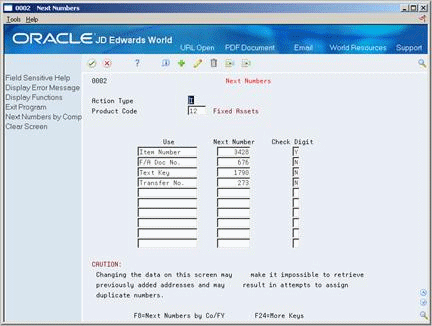
When you set up equipment next numbers, you enable the system to automatically assign unique numbers for certain items. For example, when you create an equipment master for a new piece of equipment, the system assigns a unique item number to the equipment. You must set up next numbers for the following items:
| Item | Description |
|---|---|
| Item number | The system generates an item number to uniquely identify each piece of equipment. Depending on how you set up equipment constants, you can use the item number as the primary equipment number.
See Section 35.2.1, "Setting Up Equipment Constants" for more information about equipment numbers. |
| Document number | The system assigns unique document numbers to identify documents that it creates when you run various Fixed Assets programs, including:
|
| Text key number | The system generates a text key number to uniquely identify each location and to associate location tracking text to the location. The system assigns every location a text number, whether you enter text for the location. |
| Transfer number | The system generates a transfer number to group location transfers. The transfer number can include multiple location information lines for multiple pieces of equipment. For example, when you enter location tracking information for several pieces of equipment on one screen, the system generates a transfer number to group each line of information as one transfer order. |
The system stores these next numbers in the Fixed Assets system (system 12). The system generates next numbers from the Next Numbers table (F0002).
Caution:
JD Edwards World strongly recommends that you do not use blank as a next number value.To set up equipment next numbers
-
To locate next numbers for a particular system, complete the following field:
-
System Code
-
-
Complete the following fields for each number that you need to set up:
-
Next Number
-
Check Digit
-
| Field | Explanation |
|---|---|
| Next Number | The next number which will automatically be assigned by the system. Next numbers can be used for many types of documents including voucher numbers, invoice numbers, journal entry numbers, employee numbers, address numbers, and so on. Next numbers can be reviewed from the Operations Control Menu. You must adhere to the next numbers that have been pre-established unless custom programming has been provided. |
| Check Digit | A number that prevents the Next Numbers program (P0002) from assigning transposed numbers. If you use check digits, the system automatically adds a number to the end of each number that it assigns through Next Numbers. |
35.2.7 What You Should Know About
35.2.8 Setting Up Depreciation Account Rules
From Equipment/Plant Management (G13), enter 29
From Equipment/Plant Management Setup (G1341), choose Depreciation Account Rules
Before you create equipment masters, you must set up depreciation account rules. Depreciation account rules define links between asset cost accounts and depreciation accounts. Depreciation account rules simplify the creation of equipment masters by defining how the system classifies equipment. In addition, the system posts depreciation amounts to the accounts that you specify in the depreciation account rules.
You can set up date-sensitive depreciation account rules. For example, if depreciation for a particular class of assets, such as heavy equipment, must be posted to different accounts after January 1, you can set up a rule with an effective date of January 1. As of January 1, the system posts depreciation for heavy equipment to the accounts that you specify in the date-specific rule.
The values that you set up on Company Depreciation Account Rules are also used by the Fixed Assets system. JD Edwards World recommends that you coordinate with your accounting department when you set up or change depreciation account rules.
You must set up depreciation account rules for every combination of company and asset cost account. Ensure that you set up depreciation account rules for any new cost accounts or companies that you add to your system at a later time. If you make any changes to depreciation account rules, you should verify that the values are correct before you create new equipment masters.
To set up depreciation account rules
On Company Depreciation Account Rules
Figure 35-4 Depreciation Account Rules screen

Description of "Figure 35-4 Depreciation Account Rules screen"
-
Complete the following fields:
-
Company Number
-
Asset Cost Object
-
-
Complete the following optional fields:
-
Asset Cost Subsidiary
-
Effective From Date
-
Major Accounting Class
-
Major Equipment Class
-
-
To specify an accumulated depreciation account, complete the following fields:
-
Accumulated Depreciation Business Unit
-
Accumulated Depreciation Object
-
Accumulated Depreciation Subsidiary
-
-
To specify a depreciation expense account, complete the following fields:
-
Depreciation Expense Business Unit
-
Depreciation Expense Object
-
Depreciation Expense Subsidiary
-
-
To specify a default account for revenue credit, complete the following fields:
-
Revenue Default Credit Business Unit
-
Revenue Default Credit Object
-
Revenue Default Credit Subsidiary
-
| Field | Explanation |
|---|---|
| Company Number | A code that identifies a specific organization, fund, entity, and so on. This code must already exist in the Company Constants table (F0010). It must identify a reporting entity that has a complete balance sheet. At this level, you can have intercompany transactions.
Note: You can use company 00000 for default values, such as dates and automatic accounting instructions (AAIs). You cannot use it for transaction entries. |
| Asset Cost Object | The general ledger account (object number) used to record a fixed asset's acquisition cost. Within each company, you define default coding instructions for asset cost accounts. Then, based on these default codes, when you set up a new asset, the system automatically assigns the following:
|
| Major Accounting Class | A user defined code (12/C1) that determines the accounting class category code. You use this accounting category code to classify assets into groups or families, for example, 100 for land, 200 for vehicles, and 300 for general office equipment.
JD Edwards World recommends that you set up major class codes that correspond to the major general ledger object accounts in order to facilitate the reconciliation to the general ledger. Note: If you do not want to use the major accounting class code, you must set up a value for blank in the user defined code table. |
| Major Equipment Class | A user defined code (12/C2) that is used to classify assets into groups or families. You use the equipment category code as a subclass to further define the accounting class, for example, 310 for copy equipment, 320 for projectors, and 330 for typewriters within the accounting class for general office equipment.
Note: If you do not want to use the major equipment class, you must set up a value for blank in the user defined code table. |
35.2.9 What You Should Know About
35.2.10 Setting Up Ledger Depreciation Rules
From Equipment/Plant Management (G13), enter 29
From Equipment/Plant Management Setup (G1341), choose Ledger Depreciation Rules
Before you can create equipment masters, you must set up ledger depreciation rules. When you set up ledger depreciation rules, you define the depreciation methods that the system uses to calculate depreciation for specific ledger types. As a minimum, you must set up a depreciation rule for the AA (Actual Amounts) ledger type for each company and asset cost account combination that you have in the system. You can set up as many ledger depreciation rules as you need, based on any combination of the following:
-
Company
-
Accounting category
-
Depreciation category
-
Asset cost account
-
Effective From
The values that you set up on Company Ledger Depreciation Rules are also used by the Fixed Assets system. JD Edwards World recommends that you coordinate with your accounting department when you set up or change ledger depreciation rules.
See Also:
-
Understanding Depreciation Methods and Setting Up User Defined Depreciation in the JD Edwards World Fixed Assets Guide for more information about valid field combinations that you can apply to ledger depreciation rules
To set up ledger depreciation rules
On Company Ledger Depreciation Rules
Figure 35-5 Ledger Depreciation Rules screen

Description of "Figure 35-5 Ledger Depreciation Rules screen"
-
For each ledger depreciation rule that you want to set up, complete at least one of the following fields:
-
Company
-
Accounting Category
-
Depreciation Category
-
Asset Cost Object
-
-
Complete any of the following optional fields:
-
Asset Cost Subsidiary
-
Asset Cost Subledger
-
Subledger Type
-
Effective From Date
-
-
For each ledger depreciation rule that you want to set up, complete a valid combination of the following fields:
-
Ledger Type
-
Depreciation Method
-
Life Periods
-
Investment Term Apportionment Code (TA)
-
Compute Direction
-
Method Percent
-
Production Units Schedule
-
| Field | Explanation |
|---|---|
| Company | A code that identifies a specific organization, fund, entity, and so on. This code must already exist in the Company Constants table (F0010). It must identify a reporting entity that has a complete balance sheet. At this level, you can have intercompany transactions.
Note: You can use company 00000 for default values, such as dates and automatic accounting instructions (AAIs). You cannot use it for transaction entries. |
| Accounting Category | A user defined code (12/C1) that determines the accounting class category code. You use this accounting category code to classify assets into groups or families, for example, 100 for land, 200 for vehicles, and 300 for general office equipment.
JD Edwards World recommends that you set up major class codes that correspond to the major general ledger object accounts in order to facilitate the reconciliation to the general ledger. Note: If you do not want to use the major accounting class code, you must set up a value for blank in the user defined code table. |
| Depreciation Category | The depreciation category an asset belongs to. The value is derived from the User Defined Code specified as the "Depreciation Category Code", DPCC, in the Fixed Assets constants. Generally, a depreciation category will be used to group assets with identical depreciation characteristics for depreciation calculation and reporting purposes. |
| LT | A user defined code (system 09/type LT) that specifies the type of ledger, such as AA (Actual Amount), BA (Budget Amount), or AU (Actual Units). You can set up multiple, concurrent accounting ledgers within the general ledger to establish an audit trail for all transactions. |
| Me | The user defined code (system 12, type DM) that indicates the method of depreciation for the specified book. In addition to any user defined depreciation methods you set up for your company, the following standard depreciation methods are available in the Fixed Assets system:
00 – No depreciation method used 01 – Straight Line Depreciation 02 – Sum of the Year's Digits 03 – 125% Declining Balance to Cross-Over 04 – 150% Declining Balance to Cross-Over 05 – Double Declining Balance to Cross-Over 06 – Fixed % on Declining Balance 07 – ACRS Standard Depreciation 08 – ACRS Optional Depreciation 09 – Units of Production Depreciation 10 – MACRS Luxury Cars - Domestic 11 – Fixed % Luxury Cars - Foreign 12 – MACRS Standard Depreciation 13 – ACRS Alternative Depreciation 14 – ACRS Alternate Real Property 15 – Fixed % of Cost 16 – Fixed % on Declining Balance to Cross-Over 17 – AMT Luxury Auto 18 – ACE Luxury Auto Note: Any additional depreciation methods you create for your organization must have an alpha code. |
| Life Per | The life of an asset in months or periods. The system uses months or periods only to express the life of an asset. For example, if your company uses a 12-month calendar, then a five-year ACRS asset has a 60-month life. If your company uses a 13-month calendar, then a five-year ACRS asset has a 65-month life, and so on. You must specify a life month value for all user defined depreciation methods, and for all standard depreciation methods, except the standard methods 00, 06, 09, 11, and 15. |
| T A | A code for additional depreciation information. This code is used for Investment Tax Credit (ITC) and averaging conventions. The system validates the code you enter in this field against user defined code table 12/AC. Valid codes are:
0 – No ITC Taken 1 – Three Year Method (3 1/3%) 2 – Five Year Method (6 2/3%) 3 – Seven Year Method (10%) 4 – ACRS Method with Basis Reduction (10% ITC) 5 – ACRS Method without Basis Reduction (2% ITC or No ITC) A – Actual Date of Depreciation Start Period M – Mid-Month Convention Q – Mid-Quarter Convention Y – Mid-Year Convention P – Middle of Period F – First-half/Second-half W – Whole Year N – First Day of Next Period R – First Day of Next Year S – Actual Start Date for Primary Rule/First Day of Period for Secondary Rule Note: Numeric codes apply to standard depreciation methods only. To determine the date for F (First-half/Second-half), use the following guidelines:
|
| C D | A code that indicates the method of computation that the system uses to calculate depreciation based on the depreciation method you specify.
Valid codes are: C – Current year to date. Calculates only the current year's depreciation. I – Inception to date. Recalculates the entire depreciation amount from the start date through the current year. Prior-year depreciation is then subtracted to determine current year depreciation. This method results in a one-time current period correction for any errors in prior period depreciation. F – Inception to date. Calculates inception to date for the first rule (if there are two rules) and uses a C for the second rule. P – Current period. Calculates depreciation for the current period and then extrapolates the annual amount based on the cumulative percent from the period pattern and year-to-date posting. Any depreciation calculated for the current period is subtracted. R – Remaining months. Depreciates the net book value as of the beginning of the current tax year over the remaining life of the asset. This results in the amortization of prior period calculation errors over the remaining life of the asset. |
| Meth | Enter the percentage you want the system to use when calculating depreciation. Use whole numbers. For example, enter 10 for 10%. The system uses a percentage when computing the following methods of depreciation:
06 – Fixed % on Declining Balance. (This method of depreciation is commonly used by Canadian and utility companies.) 11 – Fixed % Luxury Car - Foreign. 15 – Fixed % of Cost. 16 – Fixed % on Declining Balance to Cross-Over. The system also uses this field to compute any user defined depreciation method in which you specify a percentage. |
| Prod Units Schedule | The alphanumeric code you assign to a units of production schedule. You must set up the schedules you want to use for method 09 (Units of Production Depreciation) in advance on the Units of Production Schedule screen. |
35.2.12 Mapping Equipment Category Codes
From Equipment/Plant Management (G13), enter 29
From Equipment/Plant Management Setup (G1341), choose Category Code Mapping
If you set up category codes for your business unit that would also be helpful for tracking and reporting on your equipment, you can set up default values to map, or tie specific business unit category codes to specific equipment category codes. You can also map specific equipment category codes to specific work order category codes.
When you set up an equipment master for a new piece of equipment, the system automatically enters the category codes that you specified from the responsible business unit on Equipment Master. Similarly, when you set up work orders for equipment, the system automatically enters the category codes that you specified from the equipment master on the work order.
To map equipment category codes
On Category Code Mapping
-
To indicate how you want to map the category codes, complete the following field:
-
Mapping Type
-
-
Complete the following fields:
-
Map to Category Code
-
Map From Category Code
-
| Field | Explanation |
|---|---|
| Mapping Type | Enter a 1 in this field to map Business Unit Category Codes to Equipment Category Codes.
Enter a 2 in this field to map Equipment Category Codes to Work Order Category Codes. |
| Map to Category Code | Use this field to specify defaults for your category codes. If the mapping type is 1, the equipment category code number in this field receives its default value from the Business Unit category code you specify in the Map From Category Code field on this screen. If the mapping type is 2, the Work Order category code in this field receives its default value from the Equipment category code you specify in the Map From Category Code field. |
| Map From Category Code | Use this field to set up defaults for your category codes. If the mapping type is 1, the Business Unit category code value you enter in this field is the default value for the Equipment category code you specify in the Map To Category Code field on this screen. If the mapping type is 2, the Equipment category code value you enter in this field is the default value for the Work Order category code you specify in the Map To Category Code field. |
35.2.13 What You Should Know About
35.3 Setting Up Supplemental Data
You can use supplemental data to further define the equipment in your system. The system stores detailed equipment information as supplemental data. After you set up supplemental data, you can use it to report on and track details about equipment which are important to your company, but are not included on the equipment master. You can define as many types of supplemental data as you need. You can also control which users have access to specific types of supplemental data.
You define and maintain supplemental data by equipment class. For example, you might set up supplemental data for an equipment class that includes motor graders. The data might include fuel capacities, oil readings, and so on. You can also set up a specific supplemental data type (SP) for specification sheets. Use specification sheets to track nameplate data and other static information.
You can use the following formats to record supplemental data:
The system stores the supplemental data types you set up in the Supplemental Data Types table (F12090).
Setting up supplemental data consists of the following tasks:
-
Defining supplemental data types
-
Defining specification data types
-
Assigning supplemental data types to equipment
-
Setting up supplemental data security
35.3.1 Defining Supplemental Data Types
From Equipment/Plant Management (G13), enter 29
From Equipment/Plant Management Setup (G1341), choose Supplemental Data
From Supplemental Data Setup (G1344), choose Data Type Definition
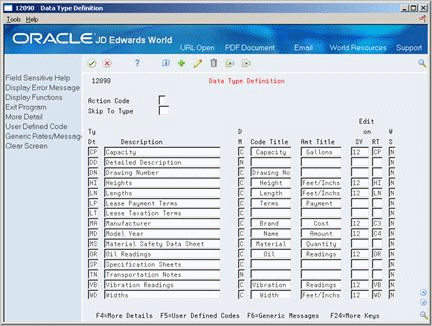
You must define the data types for the supplemental data that you want to maintain for your system. You can define as many types of supplemental data as you need. You can also specify that certain information stored in supplemental data be included as word search data when you perform query searches from Equipment Search.
To define supplemental data types
-
Complete the following fields:
-
Type Data
-
Description
-
Display Mode
-
-
Complete the following optional fields:
-
Code Title
-
Amount Title
-
System Code (SY)
-
System Code (RT)
-
Word Search
-
-
Choose More Details.
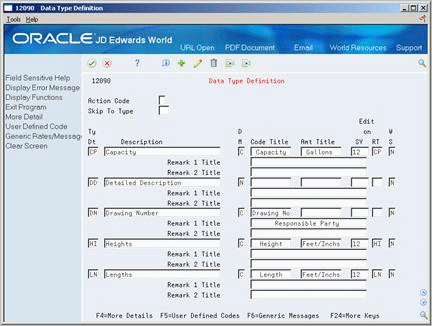
Figure 35-8 Data Type Definition screen (Details area)
Description of "Figure 35-8 Data Type Definition screen (Details area)"
-
Complete the following optional fields:
-
Remark 1 Title
-
Remark 2 Title
-
| Field | Explanation |
|---|---|
| Ty Dt | A user defined code (system 12, type RT) used to group data. This code is alphanumeric and is typically an abbreviation, such as PT for lease payment terms, TX for lease taxation terms, and so on. |
| D M | The format of a data type. This code determines the display mode for supplemental data. Valid codes are:
C – Code format, which displays the screen for entering code-specific information. These codes are associated with User Defined Codes table (F0005). N – Narrative format, which displays the screen for entering narrative text. P – Program exit, which allows you to exit to the program you specified in the Pgm ID field. M – Message format, which displays the screen for entering code-specific information. However, the system can edit the code values you enter against values in the Generic Rates and Messages table (F00191). This code is not used by the Human Resources or Financials systems. Form-specific information Display Mode P is not used by the Equipment/Plant Management or Fixed Assets systems. |
| W S | This field determines whether you want to include the data stored under a particular supplemental data type in a word search of the supplemental database. The fields included in the word search are User Defined Code, Remark, Remark 2, and Narrative Text. To rebuild the data into the word search file, you must run the Build Search File for Fixed Assets program (P12BDWRD). This allows you to use the query search function on the Asset Search and Location screen (P1204) for the data in Supplemental Data. Valid codes are:
Y – Include in word search N – Do not include in word search You can enter 1 for yes or 2 for no. |
| Code Title | The heading for a column on Supplemental Data Entry that relates to user defined codes. Enter the user defined codes for the supplemental data type in this column. For example, if the supplemental data type relates to the educational degrees of employees (BA, MBA, PHD, and so on), the heading could be Degree. |
| Amt Title | The heading for a column on Supplemental Data Entry that relates to an amount. This column contains statistical or measurable information. For example, if the data type relates to bid submittals, the heading could be Bid Amounts. |
| SY | A user defined code (98/SY) that identifies a JD Edwards World system.
Form-specific information A system code (system 98, type SY), such as 12 for Fixed Assets. The system uses this code for verification when you enter a value in a Type Data field. If you enter a value that is not in the table, the system displays an error message. The Edit on SY field works with the Edit on RT field. It is available for data types with user defined codes, but is not required. If you do not enter values in the Edit on SY and Edit on RT fields, the Type Data field is free form and no cursor-sensitive help is available. Note: The Edit On function is not available for data types with narrative text. |
| RT | Identifies the table that contains user defined codes. The table is also referred to as a code type.
Form-specific information A user defined code, such as PT for lease payment terms that the system uses for verification when you enter a value in a Type Data field. If you enter a value that is not in the table, the system displays error message. The Edit On function is available for data types with user defined codes, but it is not required. If you do not enter values in the Edit on RT and Edit on SY fields, the Type Data field is free form and no cursor-sensitive help is available. Note: The Edit On function is not available for data types with narrative text. |
35.3.2 What You Should Know About
| Topic | Discussion |
|---|---|
| Defining user defined codes as valid values for a data type | Use the following guidelines to define user defined codes as valid values for a data type:
JD Edwards World recommends that you define the new tables for install systems 55 - 59. System 55 - 59 are reserved for client use. User defined code tables that you create for these systems will not be modified during any reinstall processes. See the JD Edwards World Technical Foundation Guideor more information about user defined codes. |
| Defining specification sheets as a supplemental data type | If you want to use specification sheets, you must define Specification Sheets as a type of supplemental data. Enter SP as the data type.
See also Section 35.3.3, "Defining Specification Data Types" |
See Also:
-
Section 5.1.5, "Searching for Equipment by Query"for more information about performing query searches.
35.3.3 Defining Specification Data Types
From Equipment/Plant Management (G13), enter 29
From Equipment/Plant Management Setup (G1341), choose Supplemental Data
From Supplemental Data Setup (G1344), choose Specification Cross Reference
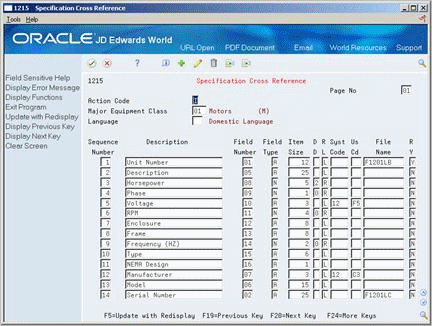
Use specification data to define which types of static data, such as nameplate information, you want to record for a particular equipment class. For each equipment class, you can create up to 99 pages of data with as many as 16 data fields per page. You can set up the sequence in which the data appears and specify the names for the various data fields.
35.3.4 Before You Begin
-
Define Specification Sheets as a supplemental data type. See Section 35.3.1, "Defining Supplemental Data Types".
To define specification data types
On Specification Cross Reference
Figure 35-9 Specification Cross Reference screen
Description of "Figure 35-9 Specification Cross Reference screen"
-
Complete the following fields:
-
Category Code
-
-
Complete the following fields for each type of specification data that you want to define:
-
Sequence Number
-
Description
-
Field Number
-
Field Type
-
Item Size
-
Display Decimals (optional)
-
Right or Left (optional)
-
Required Field (optional)
-
-
To edit specification data against a user defined code, complete the following fields:
-
System Code
-
User Defined Code
-
-
To edit specification data against information in a specific table, complete the following field:
-
File Name
-
If an equipment class requires more than 16 specification data types, complete the following field to create a new page:
-
Page Number
-
| Field | Explanation |
|---|---|
| Sequence Number | A number that is used to sequence specification data. For any item of specification data, enter the number in the order you want it to appear on the Specification Data Entry screen (V1216). |
| Field Number | This number defines which field in the Specification Data table you are setting up. For this field number, you can define a description, the sequence in which it will display, and any editing rules that you want to apply to the data. |
| Field Type | Enter the type of data that the user will enter in the field on the Specification Data Entry screen. Valid values are:
A – Alpha Numeric N – Numeric D – Date T – Time |
| Item Size | The field size of the data item.
Note: All amount fields should be entered as 15 bytes, 0 decimals, and the data item type should be P (packed). Form-specific information Enter the size of the data item. The lowest value you can enter is 1 character and the highest value is 99,999 characters. |
| File Name | The number of a specific table. For example, the General Ledger Master table name is F0901. See the Standards Manual on the programmers' menu for naming conventions.
Within the Cross Reference Search facility, this represents names of all types of objects (that is, programs, tables, field names, data dictionary names, and so on). One special reserved name for displaying overall total RPG statistical information is "XRPGTOT" in combination with type="P" and to display type="#". For example, the table name for a French Electronic Funds Transfer is F04572F. Form-specific information Enter the number of the table you want the system to edit specification data values against. You can choose any table within any JD Edwards World system to edit against. However, the following tables have special features within the Equipment/Plant Management system:
If you specify one of these tables, the cursor-sensitive help screens for that field display a search screen or window for the table specified. In addition, the description of the data contained in the table appears as the description of the field on Specification Data Entry (V1216). |
| Disp Dec | Use this parameter to designate the number of decimals in the currency, amount, or quantity fields the system displays. For example, U.S. Dollars would be 2 decimals, Japanese Yen would be no decimals, and Cameroon Francs would be 3 decimals.
Form-specific information For numeric specification data, if you do not enter a value in this field, the system uses a default value of 0. |
| Req Y/N | A code that specifies whether a value is required. The default is N for Not Required. Valid codes are:
Y or 1 - This value is required to be valid. N or 0 - This value is not required. |
35.3.5 What You Should Know About
35.3.6 Assigning Supplemental Data Types to Equipment
From Equipment/Plant Management (G13), enter 29
From Equipment/Plant Management Setup (G1341), choose Supplemental Data
From Supplemental Data Setup (G1344), choose Data Type Cross Reference
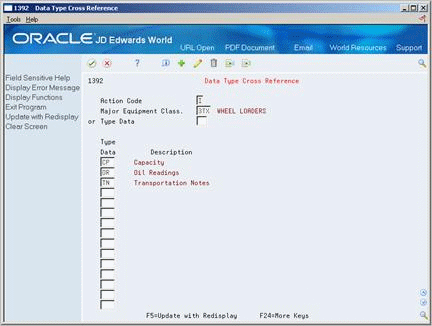
You can define which types of supplemental data appear for a specific class of equipment. For example, you might want to track separate supplemental data types for electrical equipment and diesel-powered equipment. You can specify that supplemental data types for electrical equipment, such as voltage, amperage, and so on, do not appear for equipment for which the data is not applicable.
If you choose not to assign supplemental data types, all supplemental data types that you define will appear for all classes of equipment. You specify the category code that you want to use to define the equipment class on Equipment Constants.
35.3.7 Before You Begin
-
Define the supplemental category code on Equipment Constants. See Section 35.2.1, "Setting Up Equipment Constants".
To assign supplemental data types to equipment
Figure 35-10 Data Type Cross Reference screen
Description of "Figure 35-10 Data Type Cross Reference screen"
-
Complete the following field:
-
Category Code Value
The value that you enter must be a value from the user defined code table you defined in equipment constants for supplemental data. For example, if you defined equipment category code 2 as your supplemental category code in equipment constants, you can enter any value from equipment category code 2 in this field.
-
-
Assign all data types that you want to associate with the type or class of equipment.
35.3.9 Setting Up Supplemental Data Security
From Equipment/Plant Management (G13), enter 29
From Equipment/Plant Management Setup (G1341), choose Supplemental Data
From Supplemental Data Setup (G1344), choose Supplemental Data Security
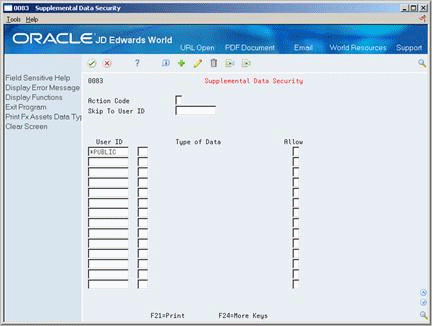
You can set up supplemental data security to prevent or permit access to some or all supplemental data types according to the user ID. For example, you can allow a user to access all data types except the data type for lease payment terms (PT) or prevent a user from gaining access to any supplemental data. Supplemental data security allows you to maintain sensitive information about equipment.
All users have access to supplemental data types until you set up security.
Setting up supplemental data security consists of the following tasks:
Figure 35-11 Supplemental Data Security screen
Description of "Figure 35-11 Supplemental Data Security screen"
To prevent access to a data type
On Supplemental Data Security
-
Complete the following fields:
-
User ID
-
Type of Data
-
-
Type N in the following field:
-
Allow
-
| Field | Explanation |
|---|---|
| Allow | A code that indicates whether a user is allowed access to the function key or selection. Valid codes are:
Y – Yes, allow access N – No, prevent access blank – Yes, allow access (default). |
To permit access to a data type
On Supplemental Data Security
-
Complete the following fields:
-
Type of Data
-
User ID
-
-
Type Y in the following field:
-
Allow
-
-
Type *PUBLIC in the following field:
-
User ID
-
-
Type N in the following field:
-
Allow
Note:
Typing N in the Allow field for *PUBLIC prevents all users other than those for whom you have allowed access from accessing supplemental data types. -
35.4 Setting Up Shop Cost Inquiry
You use Shop Cost Inquiry to review maintenance costs for an individual shop by repair code. Before you can use Shop Cost Inquiry, you must define the information that you want to review, and the sequence in which you want to view it. You define the information that you want to review by defining and naming inquiry columns, such as budget amount, actual amount, and so on. You must also provide the system with a formula for calculating the amount or quantity that corresponds to an inquiry column. You can define as many columns as you need.
After you define the columns, you can combine them into different inquiry formats. You use inquiry formats to group specific columns of information into a meaningful display. You can set up different inquiry formats for Shop Cost Inquiry that meet your specific business needs. You can include up to four columns of information in an inquiry format. You can then name the inquiry format and provide a description of the information that the columns represent, such as Maintenance - Budget to Actual Comparison, where Maintenance is the name of the inquiry format, and Budget to Actual Comparison is the description.
After you set up inquiry formats, you can set up the sequence in which the formats appear. You use inquiry paths to set up this sequence. When you access Shop Cost Inquiry, you can toggle between the different inquiry formats according to the sequence you set up.
Setting up Shop Cost Inquiry consists of the following tasks:
-
Defining inquiry columns
-
Defining inquiry formats
-
Defining inquiry paths
35.4.1 Defining Inquiry Columns
From Job Cost (G51), enter 29
From Job Cost System Setup(G5141), choose Define Inquiry Columns
You must define the columns for Shop Cost Inquiry. When you define a column, you can include the following information.
-
Heading: The description of the information that the column represents
-
Formula: The calculation that the system uses to determine the amounts or units that appear for the column
-
Display format: Information about how the amounts or units appear, such as decimal position, whether to include commas, and so on
-
Glossary item: Information from the data dictionary appears when the user accesses field help for the inquiry column
Inquiry column information is stored in the Inquiry Columns table (F5192).
Figure 35-12 Define Inquiry Columns screen
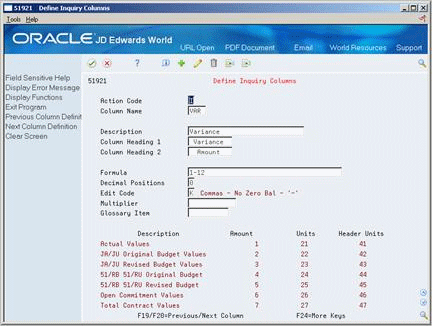
Description of "Figure 35-12 Define Inquiry Columns screen"
-
Complete the following fields:
-
Column Name
-
Formula
-
-
Complete the following optional fields:
-
Description
-
Column Heading 1
-
Column Heading 2
-
Decimal Positions
-
Edit Code
-
Multiplier
-
Glossary Item
-
| Field | Explanation |
|---|---|
| Column Name | Identifies a column set up for the Job Status Inquiry screen. It is an alphanumeric code. |
| Formula | A calculation that the system uses to input an amount or quantity in this column. You can use a single predefined value or multiple predefined values in conjunction with mathematical operators to enter a formula. Valid mathematical operators are:
+ – Add - – Subtract * – Multiply / – Divide ( ) – Left and right parentheses for nesting For example, you can enter the following formula to have the system calculate on-time percentages: 20/(20+21+22) The formula above equals on-time percentages because:
|
| Column Heading 1 | The first line in the heading that describes the column. The system automatically centers this line for the column. |
| Decimal Positions | The number of characters that display to the right of the decimal point. For example, if you enter 2, the amount or quantity in this column would have two characters to the right of the decimal point, such as 7.00. |
| Edit Code | Determines how data is printed or displayed. Depending on the code, you can change the appearance of the fields as follows (standard IBM edit codes):
Refer to user defined codes (system 98/ type EC) for all valid codes, including additional JD Edwards World edit codes. |
| Multiplier | The factor by which the amounts or unit quantities in a column are multiplied. The result of the calculation in the Formula field is multiplied by this factor before it is displayed on the Job Status Inquiry screen.
For example, if you want to scale down extremely large numbers to thousands, type .001 in this field. If you want percentages to be displayed as whole numbers, type 100. |
| Glossary Item | The item in the Data Dictionary file (F9201) that describes the information a column represents on the Job Status Inquiry screen. The related glossary description is displayed when the cursor is in the column and you press F1 (cursor sensitive help). |
35.4.2 What You Should Know About
35.4.3 Defining Inquiry Formats
From Job Cost (G51), enter 29
From Job Cost System Setup(G5141), choose Define Inquiry Formats
After you define the columns for Shop Cost Inquiry, you can group them into formats. A format can include up to four columns, which appear on Shop Cost Inquiry in the same order that you define them in the format. You are not required to assign a column to each of the four column fields. The system stores format definitions in the Inquiry Formats table (F5193).
35.4.4 Before You Begin
-
Define inquiry columns. See Section 35.4.1, "Defining Inquiry Columns"
Figure 35-13 Define Inquiry Formats screen
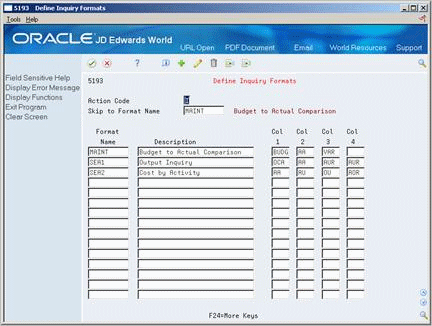
Description of "Figure 35-13 Define Inquiry Formats screen"
Complete the following fields for each format:
-
Format Name
-
Description
-
Column 1
-
Column 2
-
Column 3
-
Column 4
| Field | Explanation |
|---|---|
| Format Name | Identifies a format, which is a sequence of up to four columns for the Job Status Inquiry screen. It is an alphanumeric code.
Form-specific information The Skip to Format Name field in the upper part of the screen lets you specify the format you want displayed at the top of the list. |
35.4.6 Defining Inquiry Paths
From Job Cost (G51), enter 29
From Job Cost System Setup(G5141), choose Define Inquiry Paths
After you define the inquiry formats for Shop Cost Inquiry, you can group them into paths. A path is a sequence of inquiry formats. When you access Shop Cost Inquiry, you can toggle between the different formats in the sequence that you have defined. The system stores path definitions in the Inquiry Paths table (F5194).
Defining inquiry paths consists of the following tasks:
35.4.7 Before You Begin
-
Define inquiry formats. See Section 35.4.3, "Defining Inquiry Formats"
Figure 35-14 Define Inquiry Formats screen
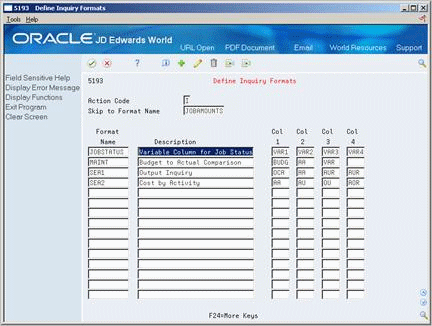
Description of "Figure 35-14 Define Inquiry Formats screen"
On Define Inquiry Paths
-
Complete the following fields:
-
Path Name
-
Description
-
-
Complete the following fields for each format in the path:
-
Format Name
-
Sequence Number
-
To arrange formats into a new sequence
On Define Inquiry Paths
-
Complete the following field:
-
Path Name
-
-
Complete the following field for each format according to the new sequence:
-
Sequence Number
-
| Field | Explanation |
|---|---|
| Path Name | Identifies a path, which is a sequence of formats for the Job Status Inquiry screen. It is an alphanumeric code. |
