39 Set Up Maintenance Planning
This chapter contains these topics:
39.1 Setting Up Maintenance Planning
Before you can use maintenance planning features in Equipment/Plant Maintenance, you need to set up information that the system uses to process material plans and labor plans. This consists of:
39.2 Setting Up General Planning
Before the system can generate material and labor plans and create planning messages, you must define general planning information for each branch or plant in your organization.
Setting up general planning consists of the following tasks:
-
Setting up planning constants
-
Setting up the workday calendar
39.2.1 Setting Up Planning Constants
From Equipment/Plant Management Setup (G1341), choose Planning
From Planning Setup (G1346), choose General Planning Constants
You must define material and resource planning values for each branch or plant. For example, you can specify rules that govern how the system commits and routes inventory. You can also specify that the system log changes you make to standard parts lists if you need to track the changes. You can also define the number of hours per day that each branch or plant operates. The system uses this information to determine the maximum workload for each work center in a branch or plant.
Figure 39-1 General Planning Constants screen
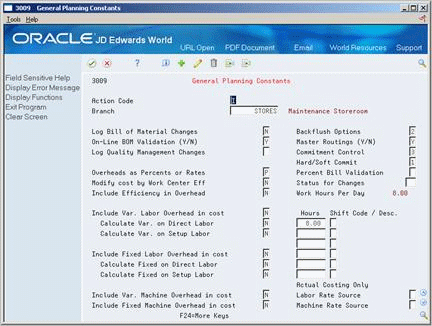
Description of "Figure 39-1 General Planning Constants screen"
-
Complete the following fields:
-
Branch
-
Hard/Soft Commit
-
-
To specify the work hours per day, complete the following field:
-
Hours
Equipment/Plant users complete only one field under the Hours column to specify work hours per day. The remaining five fields must remain blank. After you set up the planning constants for a branch, the system calculates a value for work hours per day, based on the value you enter in the Hours field.
-
-
Verify that the Shift Code fields are blank
Shift codes are not applicable to Equipment/Plant Maintenance.
-
Complete the following optional fields:
-
Log Bill of Material Changes
-
On-Line BOM Validation (Y/N)
-
| Field | Explanation |
|---|---|
| Hours | The number of work hours that the manufacturing plant operates per day.
Form-specific information For repetitive manufacturing, identify the number of work hours per shift for the specified branch. The Resource Generation program uses the corresponding shift hours to calculate the available resource units for each shift, and the total for the day. Since the shift hours may apply to different days of the week, the system uses the total of the first three hours to define the work hours per day value. |
| Hard/Soft Commit | Determines how the Shop Floor Control system commits inventory. Valid codes are:
1. The system performs a hard commitment at the creation of the parts list. The hard commitment remains in effect until inventory is relieved. 2. The system performs a soft commitment at the creation of the parts list. Changed to a hard commitment during the pick list print process for the work order. The hard commitment remains in effect until inventory is relieved. 3. The system performs a soft commitment at creation of the parts list. The soft commitment remains in effect until inventory is relieved. For World: When the hard/soft commit option is set to 2 or 3, any line item in the parts list may be hard committed prior to printing or relieving the inventory. Note: When you set the Commitment Method field in the Branch/Plant Constants screen to 2 or 3, you must use 1 or 2 for this field because a hard commitment must be performed. |
| Log Bill of Material Changes | This field determines whether changes to the bill of material are recorded in the Bill of Material Change table (F3011). Valid values are:
Y – Yes, log changes. N – No, do not log changes. Blank will assume an N. When you log bill of material changes, the system saves the old bill of material and the new changed bill of material. |
| On-Line BOM Validation (Y/N) | Determines whether the system performs an online component/parent validation and low-level code assignment when you revise a bill of material.
Valid values are: Y – Yes, validate items online. N – No, do not validate items online. Note: JD Edwards World recommends that you validate items online (enter Y) unless your bills of material are extremely large. Important: If you enter N, you must validate the items in batch. Run the Print Integrity Analysis program (P30601) after bill of material updates and before you run the Frozen Cost Update program (P30835) or perform a DRP/MPS/MRP generation (P3482). |
39.2.3 Setting Up the Workday Calendar
From Equipment/Plant Management Setup (G1341), choose Planning
From Planning Setup (G1346), choose Work Day Calendar
You must set up workday calendars for each maintenance branch or plant. You use the calendar to specify which days are workdays, holidays, and so on. You need to set up a workday calendar for every month for which you want to generate parts and labor plans. The system uses workday calendar information to plan and schedule labor resources, based on the workdays you specify. You should set up calendars six months to a year at a time.
When you initially set up a workday calendar, the system automatically specifies all weekdays as workdays and all Saturdays and Sundays as non-work days. You can accept these values or change the days to suit your business needs.
To set up the workday calendar
-
Complete the following field:
-
Branch
-
-
Complete the following fields for the time period that you want to set up for the workday calendar:
-
Calendar Year
-
Calendar Month
-
-
Verify that the following fields are blank:
-
Shift
-
Calendar Name
-
-
For each day you want to set up, enter a valid day type on the entry calendar.
JD Edwards World provides several predefined day type codes (00/DT). With the exception of Workday (W), which is hard coded, you can use these, revise them, or add new ones. For more information about user defined codes, see the JD Edwards World Technical Foundation Guide.
| Field | Explanation |
|---|---|
| Day - Type | A user defined code (00/TD) that indicates the type of day, that is, how work should be scheduled. Examples are:
W– Work Day E – Weekend H – Holiday M – Maternity Leave L – Leave of Absence With the exception of W, which is hard coded, you can use and revise these and add new codes. |
39.3 Setting Up Parts Planning
Before you can generate and review a parts plan, you must set up information that the system uses to process the plan. For example, you must set up a table of user defined quantity types that the system uses to calculate and display the supply and demand of parts. You must also specify the action messages that you want to appear when the system detects a conflict between the availability and the demand for a part.
In addition, you can set up different versions of the supply and demand inclusion rules to accommodate different types of parts plans that you want to generate. For example, you can generate a long-range parts plan and a short-range parts plan. You use supply and demand inclusion rules to specify the document types that you want the system to include when it processes each plan.
Setting up parts planning consists of the following tasks:
-
Setting up parts planning codes
-
Setting up supply and demand inclusion rules for parts plans
39.3.1 Setting Up Parts Planning Codes
Before you can use the parts planning features in Equipment/Plant Maintenance, you must set up the following user defined codes:
-
Quantity types
-
MRP calculation display
-
MRP action messages
The system uses these codes to calculate and display the availability of parts. The system also uses these codes to determine which action messages appear when it detects a conflict between the availability and the demand for a part.
See Also:
-
Section 36.1, "Setting Up User Defined Codes" for additional guidelines on setting up user defined codes
From Equipment/Plant Management (G13), enter 29
From Equipment/Plant Management Setup (G1341), choose Planning
From Planning Setup (G1346), choose Quantity Types
Quantity types are user defined codes (system 34, type QT) that represent the availability of parts. JD Edwards World provides several predefined codes, including the following:
-
+ Beginning available (unadjusted)
-
+ Beginning available
-
+ Purchase orders
-
- Lot Expired
-
- Firm work orders
-
= Ending available (unadjusted)
The system uses codes that have unadjusted values to calculate part availability with the assumption that any outstanding action messages will not be implemented by the responsible planner. The system uses all other codes to calculate the availability of parts with the assumption that the planner will implement planning messages.
Caution:
The table for quantity types is shared with the Manufacturing system. Under no circumstances should you delete this table. Values within this table have special meaning to the system, but you can change the description fields. JD Edwards World recommends that you leave this table unaltered.From Equipment/Plant Management Setup (G1341), choose Planning
From Planning Setup (G1346), choose MRP Calculation Display
You must set up the MRP Calculation Display table (system 34, type MM) with the quantity type codes you want the system to consider when it calculates the availability of a part. You can revise the codes in this table to meet your specific calculation or display purposes.
For example, you can set up a table to specify that the system:
-
Use the beginning available quantity for a part
-
Add quantities from existing purchasing orders
-
Subtract quantities from maintenance work orders
-
Provide the ending available amount
Example: MRP Calculation Display Table
Figure 39-3 MRP Calculation Display screen
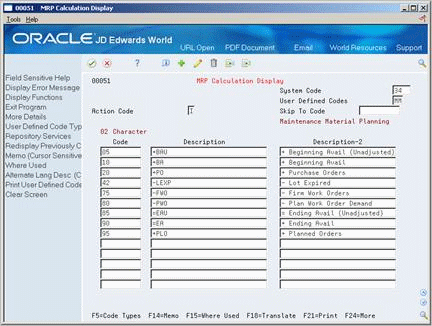
Description of "Figure 39-3 MRP Calculation Display screen"
39.3.2 What You Should Know About
From Equipment/Plant Management Setup (G1341), choose Planning
From Planning Setup (G1346), choose MPS/MRP Action Messages
You must define the action messages that you want to appear when the system notifies you of parts planning conflicts. For example, depending on the severity of a parts shortage, you can direct the system to provide messages to place an order for a part, expedite an existing order, increase the quantity of an existing order, and so on.
The system stores MRP action message codes in user defined codes (system 34, type MT). You can change the description of the codes to meet your business needs.
39.3.3 Setting Up Supply and Demand Inclusion Rules for Parts Plans
From Equipment/Plant Management Setup (G1341), choose Planning
From Planning Setup (G1346), choose Supply/Demand Inclusion Rules
You typically use the same version of supply and demand inclusion rules that you set up for work orders. However, you can set up other versions of the supply and demand inclusion rules to accommodate your parts planning needs. You use supply and demand inclusion rules to specify the documents that create a supply for parts, such as purchase requests, and the documents that create a demand for parts, such as work orders. In addition, you specify the statuses at which the various documents create supplies or demands.
When you generate a parts plan, the system considers only the documents you specify in the inclusion rules when it calculates parts availability. For example, you can set up a version of the supply and demand inclusion rules that includes all purchase orders, regardless of status, but only PM work orders up to and including a status of MC (work order in planning.)
Using this example, the system calculates supply according to parts for which any purchase orders exist. The system calculates demand according to the parts requirements of PM work orders whose statuses are within the range you specified. The system does not take into consideration parts requirements for work orders whose status you have not specified in the inclusion rules.
39.4 Setting Up Resource Planning
Before you can generate and review a labor plan, you must set up information that the system uses to process the plan. For example, you must set up the work centers that are responsible for maintenance and specify the number of employees in each maintenance work center. You must also set up additional user defined codes, such as the codes that the system uses to calculate the availability of labor resources.
In addition, you can set up different versions of the supply and demand inclusion rules to accommodate different types of labor plans that you want to generate. For example, you can generate a long-range labor plan and a short-range labor plan. You use supply and demand inclusion rules to specify the document types that you want the system to include when it processes each plan.
Setting up resource planning consists of the following tasks:
-
Setting up resource units
-
Setting up resource planning codes
-
Setting up supply and demand inclusion rules for labor plans
39.4.1 Setting Up Resource Units
You must set up resource units to enable the system to calculate labor demands and labor costs for maintenance tasks. The system calculates resource units by multiplying the work hours per day by the number of employees in a work center. In Equipment/Plant Maintenance, a work center usually represents the employees who perform maintenance work, although it can also represent a department or a machine. You must set up your work centers before the system can calculate resource units and labor costs.
In addition, you must establish standard labor rates. The system uses standard labor rates to calculate rate information on work order labor routings and on the work order Estimate to Actual Variance program.
Setting up resource units consists of the following tasks:
-
Setting up work centers
-
Running the Resource Units Refresh program
-
Setting up standard labor rates
39.4.2 Before You Begin
-
Set up workday calendars for each branch or plant. See Section 39.2.3, "Setting Up the Workday Calendar"
From Equipment/Plant Management Setup (G1341), choose Planning
From Planning Setup (G1346), choose Resource Revisions
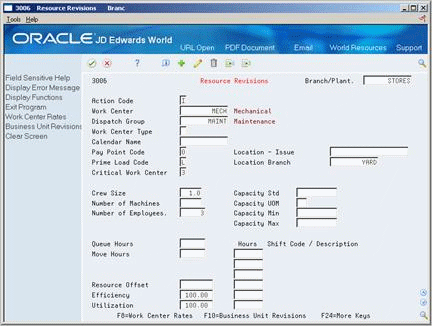
You must provide the system with the following types of information about each of your maintenance work centers:
-
Basic information, such as work center names, crew sizes, job processing time, and so on
-
Grouping information, so that you can combine similar work centers for planning and reporting
-
Labor rate information
-
Complete the following fields:
-
Branch/Plant
-
Work Center (a Business Unit)
-
Dispatch Group (a Business Unit)
-
Number of Employees
-
-
Verify that the following fields are blank:
-
Work Center Type
-
Calendar
-
-
Complete the following optional fields:
-
Prime Load Code
-
Critical Work Center
-
Efficiency
-
-
Choose Work Center Rates.
Figure 39-5 Work Center Rate Revisions screen
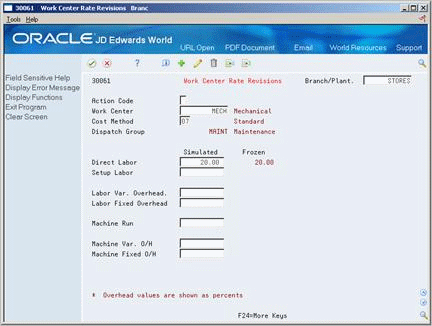
Description of "Figure 39-5 Work Center Rate Revisions screen"
-
On Work Center Rate Revisions, complete the following field:
-
Direct Labor-Simulated
-
| Field | Explanation |
|---|---|
| Work Center | An alphanumeric field that identifies a separate entity within a business for which you want to track costs. For example, a business unit might be a warehouse location, job, project, work center, or branch/plant.
You can assign a business unit to a voucher, invoice, fixed asset, and so on, for purposes of responsibility reporting. For example, the system provides reports of open accounts payable and accounts receivable by business units to track equipment by responsible department. Security for this field can prevent you from locating business units for which you have no authority. Note: The system uses this value for Journal Entries if you do not enter a value in the AAI table. |
| Dispatch Group | A super category code to group work centers within an overall business unit. For example, you can group like machines operating out of several work centers that report to one business unit under a dispatch group. |
| Branch/Plant | A code that represents a high-level business unit. It can be used to reference a branch or plant that might have departments or jobs, which represent lower-level business units (data item MCU), subordinate to it. For example:
Business unit security is based on the higher-level business unit. |
| Number of Employees | This represents the normal number of employees in this work center. When you run the Work Center Resource Units Refresh program, the system multiplies this number by the Number of Work Hours Per Day from the Manufacturing Constants table (F3009) to generate the total gross labor hours available in the work center each day. |
| Prime Load Code | This value determines if a work center is machine or labor intensive. These codes are also used in Resource Requirements Planning and Capacity Requirements Planning calculations to develop load profiles.
Valid codes are: L – Run labor hours only M – Machine hours only B – Run labor plus setup labor hours C – Machine plus setup hours O – Other (will not generate resource units) |
| Critical Work Center | A code that identifies the work center as critical or not critical when the system calculates capacity. Valid values are:
N – Not a critical work center 1 – A critical work center in calculating resource requirement planning only 2 – A critical work center in calculating capacity requirements planning only 3 – A critical work center in calculating resource requirements planning and capacity requirements planning 4 – Not a capacity work center (will not be generated in capacity planning) Note: The system displays Type 3 work centers whenever type 1 or type 2 is selected in this field. |
| Efficiency | A user defined value that indicates how efficiently a work center operates. This value usually refers to people efficiency. When you enter a value in this field, and the Modify Cost by Work Center Efficiency field in the Job Shop Manufacturing Constants table (F3009) is set to Y, the system creates a new cost component (B4) from the cost calculated from the direct labor cost (B1). The system also uses this value to calculate rated capacity.
Example: If the constant is set to Y, the value of this field is 80%, and the direct labor cost is 10, the system creates a B4 cost component for 2 in the Item Cost Component Add-Ons table (F30026). Enter percents as whole numbers, for example, enter 80% as 80.00. |
| Direct Labor Simulated | This rate, in cost per hour, is the rate used to calculate the current labor cost as of the last simulation and update. |
Running the Resource Units Refresh Program
From Equipment/Plant Management Setup (G1341), choose Planning
From Planning Setup (G1346), choose Resource Units Refresh
After you set up work centers on Resource Revisions and whenever you revise work center information, you must run the Resource Units Refresh program to calculate available resource units. You specify a time period and a branch or plant for which you want the system to calculate resource units. The system uses the Prime Load Code field on Resource Revisions to determine how to calculate the resource units that a work center is capable of generating over a particular period of time. To calculate resource units for maintenance work centers, you typically use a prime load code of L for labor hours.
If you use a prime load code of L, the system calculates resource units using the following information:
-
Number of employees from Resource Revisions
-
Work hours per day from General Planning Constants
When you run the Resource Units Refresh program, a versions list appears. The versions list contains DEMO versions that you can run, or copy and modify to suit your needs. When you run a version, the system displays Processing Options Revisions before submitting the job for processing.
39.4.3 Processing Options
See Section 56.13, "Work Center Resource Units Refresh (P3007G)"
Setting Up Standard Labor Rates
From Equipment/Plant Management Setup (G1341), choose Planning
From Planning Setup (G1346), choose Standard Cost Update
When you set up work centers, you enter a value for simulated labor rates on Work Center Rates Revisions. You must run the Standard Cost Update program to create the frozen direct labor rate. The system uses the frozen direct labor rate to calculate the estimated labor routing costs to work orders.
When you run Standard Cost Update, the system submits the job directly to batch.
39.4.5 Setting Up Resource Planning Codes
Before you can use the labor planning features in Equipment/Plant Maintenance, you must set up the following user defined codes:
-
CRP display
-
Message types
The system uses these codes to calculate and display labor availability when you generate a labor plan. The system also uses these codes to determine which action messages appear when it detects a conflict between the availability of labor resources and demand for labor resources.
See Also:
-
Chapter 36, "Set Up User Defined Codes" for additional guidelines on setting up user defined codes
You must set up the CRP Display table (system 33, type MM) with the codes that you want to appear on Capacity Load. The system provides several predefined codes, such as:
-
10 - Released Load
-
40 - Load Versus Capacity
-
80 - Available Capacity
-
90 - Accumulated Available Capacity
You can use these codes or modify them to meet your specific calculation or display purposes.
You use message type codes (system 33, type MM) to define the action messages that you want to appear when the system notifies you of load and capacity conflicts. For example, you can define messages that indicate an over-capacity condition, an under-capacity condition, and so on.
39.4.6 Setting Up Supply and Demand Inclusion Rules for Labor Plans
From Equipment/Plant Management Setup (G1341), choose Planning
From Planning Setup (G1346), choose Supply/Demand Inclusion Rules
You typically use the same version of supply and demand inclusion rules that you set up for work orders. However, you can set up other versions of the supply and demand inclusion rules to accommodate your labor planning needs. You use supply and demand inclusion rules to specify what type of work orders and range of work order statuses you want the system to include when it calculates available labor resources.
For example, you can set up a version of the supply and demand inclusion rules that includes only PM work orders up to and including a status of MC (work order in planning).