38 Set Up Work Orders
This chapter contains these topics:
-
Section 38.7, "Setting Up Standard Parts Lists and Work Order Instructions"
-
Section 38.9, "Setting Up Supply and Demand Inclusion Rules"
38.1 Setting Up Work Orders
Before you can use the work order features in Equipment/Plant Maintenance, you must provide the system with information necessary to customize work orders for your business needs. For example, you can set up different managers and supervisors for work orders, based on work order category codes. When you assign category codes to a new work order, the system automatically assigns the correct managers and supervisors.
In addition to setting up managers and supervisors, you must set up the following:
Due to system integration, you must access other JD Edwards World systems to complete certain setup tasks. The guidelines for completing these tasks are discussed as needed in this chapter.
38.2 Setting Up Default Managers and Supervisors
From Equipment/Plant Management Setup (G1341), choose Work Order Setup
From Work Order/Service Billing Setup (G4841), choose Default Managers and Supervisor
When you create a work order, you can specify that the system automatically enter the address book information for managers and supervisors based on any combination of the first three work order category codes. The system automatically enters address book values in the following fields on Work Order Entry and Backlog Management:
-
ANPA (Supervisor)
-
ANSA (Manager)
You can set up as many versions of default managers and supervisors as you need. For example, you can assign a specific manager and supervisor to every work order with a failure code (category code 02) of F1 - Improper start-up or operation. You can assign another manager and supervisor to every work order with a failure code of F2 - Improper installation or repair.
To set up default managers and supervisors
On Default Managers and Supervisor
Figure 38-1 Default Managers & Supervisor screen
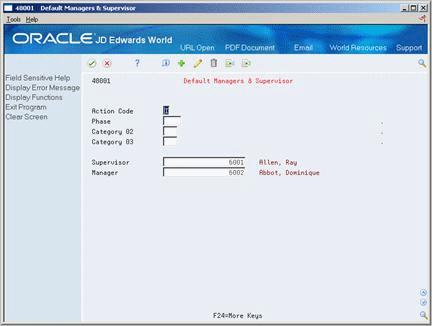
Description of "Figure 38-1 Default Managers & Supervisor screen"
Complete any of the following fields:
-
Phase (Category Code 1)
-
Category Code 02
-
Category Code 03
-
Supervisor
-
Manager
You must complete at least one category code field and one address book field for each version of default managers and supervisors that you set up.
| Field | Explanation |
|---|---|
| Phase | A user defined code (00/W1) that indicates the current stage or phase of development for a work order. You can assign a work order to only one phase code at a time.
Note: Certain forms contain a processing option that allows you to enter a default value for this field. If you enter a default value on a screen for which you have set this processing option, the system displays the value in the appropriate fields on any work orders that you create. The system also displays the value on the Project Setup screen. You can either accept or override the default value. |
| Supervisor | The address book number of the supervisor.
Note: A processing option for some forms allows you to enter a default value for this field based on values for Category Codes 1 (Phase), 2, and 3. Set up the default values on the Default Managers & Supervisor screen. After you set up the default values and the processing option, the information displays automatically on any work orders you create if the category code criterion is met. You can either accept or override the default value. |
| Manager | The address book number of a manager or planner.
Note: A processing option for some forms lets you enter a default value for this field based on values for Category Codes 1 (Phase), 2, and 3. Set up the default values on the Default Managers and Supervisors screen. After you set up the default values and the processing option, the information displays automatically on any work orders you create if the category code criterion is met. (You can either accept or override the default value.) |
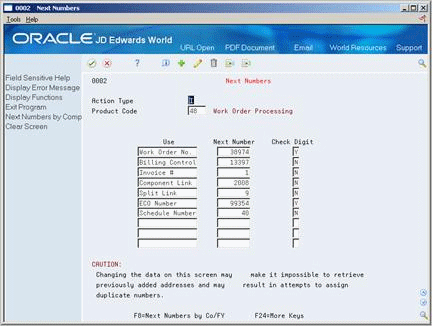
38.3 Setting Up Work Order Next Numbers
From Equipment/Plant Management Setup (G1341), choose Next Numbers
When you set up work order next numbers, you enable the system to automatically assign unique numbers for each work order generated by you or the system.
The system stores next numbers for work orders in the Work Orders/Service Billing system (system 48). The system generates next numbers from the Next Numbers table (F0002).
Caution:
JD Edwards World strongly recommends that you do not use blank as a next number value.To set up work order next numbers
On Next Numbers
-
To locate next numbers for a particular system, complete the following field:
-
System Code
-
-
Complete the following fields for each number that you need to set up:
-
Next Number
-
Check Digit
-
38.4 Setting Up Record Types
From Equipment/Plant Management Setup (G1341), choose Work Order Setup
From Work Order/Service Billing Setup (G4841), choose Detail Spec. Over Titles
You use record types to organize the detail information that you track for work orders. For example, you can organize information, such as original task description, tools required, safety provisions, and so on.
For each record type that you use, you can specify how the information appears. You can also control the display format for these record types. For each record type that you set up, you can specify a format that is text only or a format that includes text and three columns. If you use the format for text and three columns, you must specify at least one of the column headings that you want to appear. The text-only format does not include headings. If you specify even one column heading for the record type, the record type changes to the format that includes text and three columns.
You can review record types, formats, and column headings by choosing Record Types from Work Order Entry.
38.4.1 Before You Begin
-
Define work order record types. See Chapter 36, "Set Up User Defined Codes" for more information about defining work order record types.
Figure 38-3 Detail Spec. Over Titles screen
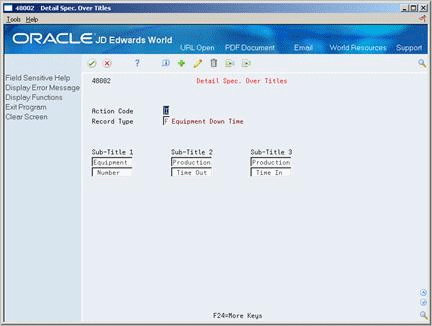
Description of "Figure 38-3 Detail Spec. Over Titles screen"
-
Complete the following field:
-
Record Type
-
-
To define column headings, complete the following fields:
-
Sub-Title 1
-
Sub-Title 2
-
Sub-Title 3
-
| Field | Explanation |
|---|---|
| Record Type | The detail specification record type. Record types are user defined. You can set them up on the Detail Specification Types screen and use them to describe certain types of work order or engineering change order information. |
| Sub-Title 1 | A subtitle, description, remark, name, or address.
The text you type in this field appears as a column head on the Work Order Detail Entry screen for the record type indicated. |
38.4.2 What You Should Know About
| Topic | Discussion |
|---|---|
| Required record types | You must set up the following record types for Equipment/Plant Maintenance:
The record type that you set up for maintenance loops should coincide with the record type that you set up in equipment constants. See Section 15.4, "Creating a Maintenance Loop"for more information about maintenance loops. The record type you set up for associated PMs must be assigned to record type Z. This record type stores all associated service types to be performed on a work order. See Section 15.3, "Linking Service Types" for more information about associated PMs. |
| Changing the format for a record type | When you change the format of a record type, the system updates the format of that record type for all work orders. |
38.5 Setting Up the Work Order Life Cycle
You can set up rules that specify what statuses (steps) a work order must go through, such as work order entered, work order approved, and so on. You can also specify who can approve work orders. In addition, you can specify a currency amount, over which an approver must approve the work order.
Setting up the work order life cycle consists of the following tasks:
-
Setting up work order activity rules
-
Setting up work order approval routes
-
Setting up work order approver profiles
38.5.1 Before You Begin
-
Set up work order status codes. See Chapter 36, "Set Up User Defined Codes" for more information about setting up work order status codes.
38.5.2 Setting Up Work Order Activity Rules
From Equipment/Plant Management Setup (G1341), choose Work Order Setup
From Work Order/Service Billing Setup (G4841), choose Work Order Activity Rules
You can set up work order activity rules that differ by work order document type and work order type. Document types are user defined codes that you use to specify how a document is processed by the general ledger. For example, you might define separate document types for PM work orders and corrective work orders. A work order type is a user defined code that you can use to classify work orders, such as maintenance work orders, model work orders, and so on. Use work order activity rules to:
-
Define the sequence of work order statuses at any point in the work order life cycle.
-
Specify whether the work order is active or inactive at a particular status.
-
Commit inventory at a particular status.
-
Change the PM status when the work order changes status.
-
Determine whether to update the capacity plan at a particular status.
-
Determine whether a work order can be changed at a particular status.
38.5.3 To set up work order activity rules
Figure 38-4 Work Order Activity Rules screen
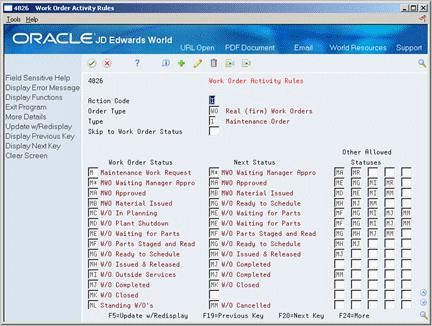
Description of "Figure 38-4 Work Order Activity Rules screen"
-
To locate a classification of work orders, complete the following fields:
-
Order Type
-
Type
-
-
To define the activity rules for that classification of work orders, complete the following fields:
-
Work Order Status
-
Next Status (optional)
-
Other Allowed Statuses (optional)
You must define a status code as a work order status in the work order activity rules table before you can use it as a next status or another allowed status.
-
-
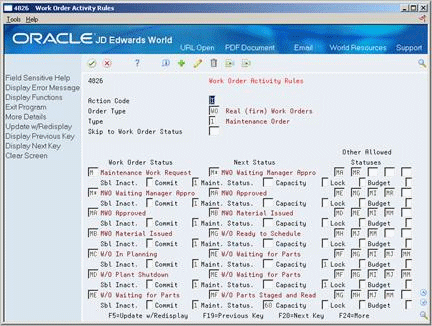
Choose More Details.
Figure 38-5 Work Order Activity Rules screen
Description of "Figure 38-5 Work Order Activity Rules screen"
-
Complete the following optional fields:
-
Subledger Inactive
-
Commit Inventory
-
Maintenance Status
-
Capacity
-
Lock
-
| Field | Explanation |
|---|---|
| Order Type | A user defined code (00/DT) that identifies the type of document. This code also indicates the origin of the transaction. JD Edwards World has reserved document type codes for vouchers, invoices, receipts, and time sheets, which create automatic offset entries during the post program. (These entries are not self-balancing when you originally enter them.)
The following document types are defined by JD Edwards World and should not be changed: P – Accounts Payable documents R – Accounts Receivable documents T – Payroll documents I – Inventory documents O – Purchase Order Processing documents J – General Accounting/Joint Interest Billing documents S – Sales Order Processing documents Form-specific information Enter the work order document type for which these rules apply. |
| Type | A user defined code (00/TY) that indicates the type classification of a work order or engineering change order.
You can use work order type as a selection criteria for work order approvals. |
| Skip to Work Order Status | A user defined code (system 00, type SS) that describes the status of a work order. |
| Next Status | The next status for a work order, according to the work order activity rules, as the work order flows through the chain of approval.
You must define a status code as a work order status in the Work Order Activity Rules table before you can use it as a next status. |
| Sbl Inact | A code that indicates whether a specific subledger is active or inactive. Any value other than blank indicates that a subledger is inactive. Examples are jobs that are closed, employees that have been terminated, or assets that have been disposed. If a subledger becomes active again, set this field back to blank.
If you want to use subledger information in the tables for reports but want to prevent transactions from posting to the master record, enter a value other than blank in this field. |
| Commit | A code that determines whether inventory is committed when the status of a work order changes. Values are:
1 – Inventory is not committed. 2 – Inventory is committed. |
| Maint. Status | A user defined code (12/MS) that indicates the maintenance status of a piece of equipment, such as 50 for maintenance due or 60 for waiting for parts.
Note: Status code 98 is reserved for canceled maintenance. Status code 99 is reserved for completed maintenance. Status code 01, the default, is reserved for initial maintenance setup. |
| Capacity | The capacity flag determines whether the system runs the capacity plan generation when a work order changes status.
Values are: blank – Do not run the capacity plan generation. 1 – Run the capacity plan generation. 2 – Run the capacity plan generation and provide a warning message when labor resources are over capacity. The warning message appears on the work order header and on Backlog Management when you inquire on the work order. |
| Lock | A code that determines whether a work order can be changed at a particular status. The lock applies to records in both the Work Order Master table (F4801) and the Work Order Instruction table (F4802). Values are:
blank – Do not lock the work order. 1 – Lock the work order. 2 – Lock the work order with a completion date. 3 – Do not lock the work order with a completion date. 4 – Lock the work order with a parts list and routing. 5 – Lock the work order with a completion date, parts list, and routing. 6 – Lock the document type and the work order type. |
38.5.5 Setting Up Work Order Approval Routes
From Equipment/Plant Management Setup (G1341), choose Work Order Setup
From Work Order/Service Billing Setup (G4841), choose Work Order Approval Routing
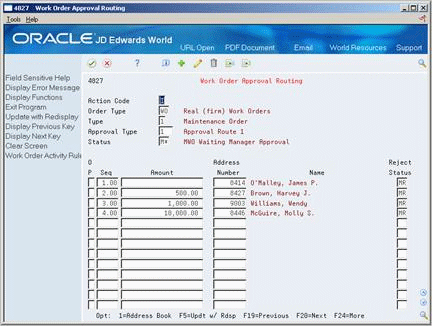
You can create a variety of approval routes for all the individuals who need to receive notification that a work order requires their approval.
Use the address book number of the individual responsible for the approval of a work order to include them in an approval route. You can also establish specific approval routes based on:
-
The type of work order document, such as actual work orders, planning work orders, and so on
-
The classification of the work order, such as maintenance work orders, model work orders, and so on
-
The status of a work order in the work order life cycle, such as waiting for parts, completed, and so on
-
The amount of a work order
To set up work order approval routes
On Work Order Approval Routing
Figure 38-6 Work Order Approval Routing screen
Description of "Figure 38-6 Work Order Approval Routing screen"
-
Complete the following fields:
-
Order Type
-
Type
-
Approval Type
-
Status
-
Seq (Sequence)
-
Address Number
-
Reject Status
-
-
Complete the following optional field:
-
Amount
-
| Field | Explanation |
|---|---|
| Approval Type | A user defined code (system 48, type AP) indicating the type of work order approval path that a work order follows. You can use processing options to specify a default approval type based on the type of work order. |
| Seq | A number that the system uses to sequence information.
Form-specific information You can set up alternate approvers at any sequence. If you set up more than one approver at a sequence, only one of the approvers at that sequence needs to approve the work order. |
| Address Number | A number that identifies an entry in the Address Book system. Use this number to identify employees, applicants, participants, customers, suppliers, tenants, and any other Address Book members.
Form-specific information Enter the address number of the person who can approve the work order. |
| Reject Status | The reject status is the status that the work order will default to if an approver rejects a work order. |
| Amount | A number that identifies the actual amount. Type debits with no sign or a plus sign (+). Type credits with a minus sign (-) either before or after the amount. You can use decimals, dollar signs, and commas. The system ignores non-significant symbols.
Form-specific information The estimated amount on the work order over which the approver needs to approve the work order. |
38.5.6 What You Should Know About
| Topic | Discussion |
|---|---|
| Substitute approvers | You can set up multiple approvers at any approval sequence. Use this feature when there is a possibility that an approver might be unavailable at the time a work order reaches the approval stage, and another person must approve the work order. |
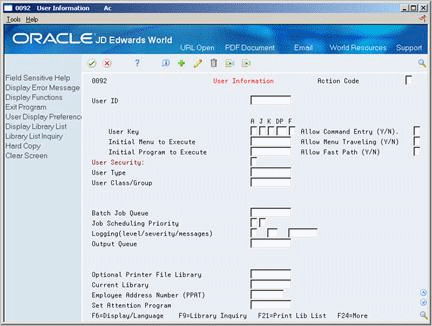
38.5.7 Setting Up Work Order Approver Profiles
From Security Officer (G94), choose User Information
You must set up profiles for all of your designated work order approvers. The system uses the approver's address book number to send electronic mail messages associated with work approvals and to define the work order approval route.
When an approver enters a password to complete the approval process on Work Order Approval, the system validates the password against the approver's user ID number. The system uses the user ID number to verify that the address book number is valid for the approver.
To set up work order approver profiles
-
Locate a user by completing the following field:
-
User ID
-
-
Complete the following field:
-
Employee Address Number (PPAT)
-
38.6 Setting Up Work Order Supplemental Data
From Equipment/Plant Management Setup (G1341), choose Work Order Setup
From Work Order/Service Billing Setup (G4841), choose Define Your Own Data Types
Use supplemental data to further define the work orders in your system. You can use supplemental data to report on and track work order details that are important to your company, but are not included in the work order master or record types. You can define as many types of supplemental data as you need.
You define and maintain supplemental data by work order database. Work order databases are user defined. For example, you might set up supplemental data for a database specific to maintenance work orders. The data types might include safety procedures, responsible personnel, and so on.
38.6.1 Before You Begin
-
Set up the user defined codes table for the valid work order databases with which you want to associate supplemental data. See Chapter 36, "Set Up User Defined Codes".
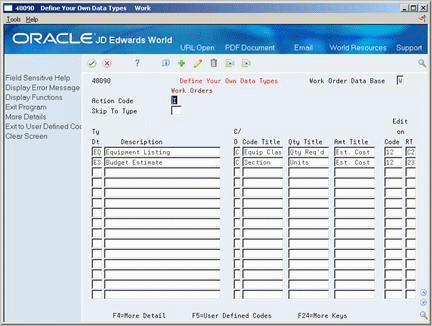
38.6.2 To set up work order supplemental data
Figure 38-8 Define Your Own Data Types screen
Description of "Figure 38-8 Define Your Own Data Types screen"
-
To specify a work order database, complete the following field:
-
Work Order Data Base
-
-
To define a data type, complete the following fields:
-
Type Data
-
Description
-
Code or Order (CO)
-
-
Complete the following optional fields:
-
Code Title
-
Quantity Title
-
Amount Title
-
System Code (Cod)
-
User Defined Code (RT)
-
-
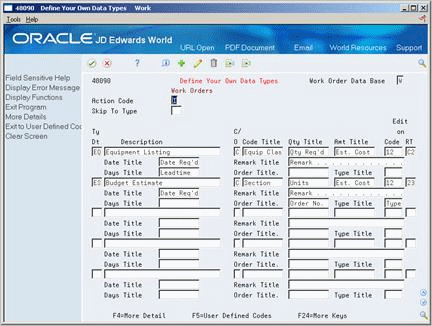
Choose More Details.
Figure 38-9 Define Your Own Data Types screen (Details area)
Description of "Figure 38-9 Define Your Own Data Types screen (Details area)"
-
Complete the following optional fields:
-
Date Title
-
Remark Title
-
Days Title
-
Order Title
-
Type Title
-
| Field | Explanation |
|---|---|
| Work Order Data Base | The code that represents what Work Order Data Base to use. |
| Ty Dt | User defined code (00/WT) that indicates the type of data being entered within the supplemental database. The code is often an abbreviation for the data it represents, for example, EC might represent Engineering Change. |
| C/O O | A code that determines the display mode for Supplemental Data. Valid codes are:
C – Automatically takes you to the Data Entry program where you can enter code-specific information. The code values you enter can be edited against values in the User Defined Codes file (F0005). O – Automatically takes you to the Related Order Entry program, bypassing code-specific information. If you use an O, narrative text will not be tied to specific codes. |
| Code Title | The heading for a column on Supplemental Data Entry that relates to user defined codes. Enter the user defined codes for the supplemental data type in this column. For example, if the supplemental data type relates to the educational degrees of employees (BA, MBA, PHD, and so on), the heading could be Degree. |
| Qty Title | This code is used for the column heading of a User Defined Quantity to be tracked within the supplemental data.
For example, if you want to keep track of Quantity to be Scrapped, a logical column heading would be Scrapped. |
| Amt Title | The heading for a column on Supplemental Data Entry that relates to an amount. This column contains statistical or measurable information. For example, if the data type relates to bid submittals, the heading could be Bid Amounts. |
| Code | A user defined code (98/SY) that identifies a JD Edwards World system. |
| RT | Identifies the table that contains user defined codes. The table is also referred to as a code type. |
| Date Title | The title of a supplemental data column heading for the Date field (EFT). For example, a possible column heading for the date field linked to the education data type might be Graduation. |
| Remark Title | The heading for a column on Supplemental Data Entry that relates to user defined codes. This heading describes the first Remark field on the data entry screen. It contains additional information and remarks. For example, if the data type relates to bid submittals, the heading could be Subcontractor. |
| Days Title | The title of a row heading you can use to describe the Date field (EFTE). For example, if you set up a record type for professional licenses, a possible row title for the date field might be Expires. |
| Order Title | The row heading that is used to describe the order field. |
| Type Title | The row heading that is used to describe the type field. |
38.6.3 What You Should Know About
| Topic | Discussion |
|---|---|
| Defining user defined codes as valid values for a data type | You can set up your system to edit the values that you enter on supplemental data forms against the valid values you set up in user defined code tables. Use the following guidelines to define user defined codes as valid values for a data type:
See the JD Edwards World Technical Foundation Guide for more information about user defined codes. |
38.7 Setting Up Standard Parts Lists and Work Order Instructions
You can set up standard parts lists and standard work order instructions for work orders. You use a standard parts list when the maintenance task for which the work order applies is routine and repetitive, and for which you have advance knowledge of the parts requirements.
Work order instructions specify the sequence of operations required to complete a work order, as well as the work centers responsible for each operation. You use standard work order instructions when the maintenance task for which the work order applies is routine and repetitive, and for which you have advance knowledge of the labor requirements. To use standard work order instructions, you must set up work center information and information about the sequence of operations.
You can set up as many standard parts lists and standard work order instructions as you need. In addition, you can use a standard parts list or a version of standard work order instructions on as many work orders as you need. Typically, you assign standard parts lists and standard work order instructions to model work orders, but you can also use information from standard parts lists and standard work order instructions to create parts lists and routing instructions that you can attach to corrective work orders.
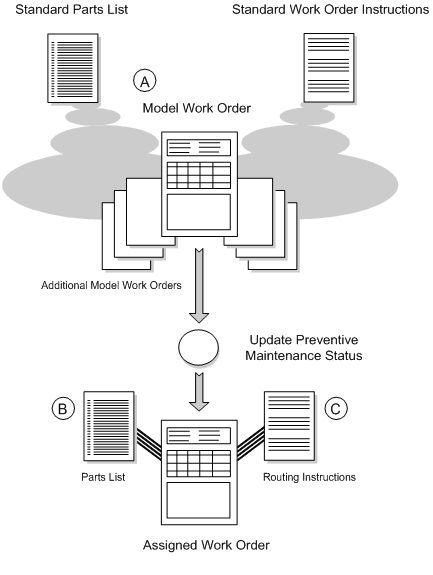
The following graphic shows how the system uses information from a standard parts list and standard work order instructions to generate a parts list and labor routing instructions for a work order that is assigned to a specific maintenance task.
Figure 38-10 Generating a Parts List and Labor Routing Instructions for a Work Order Assigned to a Specific Maintenance Task
Description of "Figure 38-10 Generating a Parts List and Labor Routing Instructions for a Work Order Assigned to a Specific Maintenance Task"
-
A - You can use standard parts lists and standard work order instructions for as many model work orders as you need.
-
B - Parts information for the assigned work order comes from the model work order. The system copies the standard parts list that is attached to the assigned work order.
-
C - Routing instructions for the assigned work order come from the model work order. The system copies the standard work order instructions to the routing instructions that are attached to the assigned work order.
Setting up standard parts lists and standard work order instructions consists of the following tasks:
-
Revising processing options for parts lists and labor routings
-
Setting up a standard parts list
-
Setting up standard work order instructions
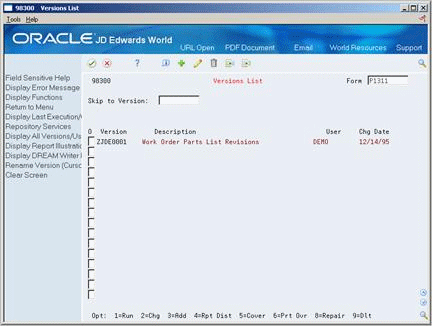
38.7.1 Revising Processing Options for Parts Lists and Labor Routings
From the DREAM Writer menu (G81), choose Versions List.
The system provides a variety of processing options when you assign parts lists and labor routings to a work order. You can specify when the system should create purchase orders for parts, whether to signal the user when a labor resource is over capacity, and so on. You can review the processing options for these programs and change them if necessary before you assign parts or labor routings to a work order.
Note:
You can only access these processing options by following the procedures given below.To revise processing options for parts lists and labor routings
-
Complete the following field to access a list of DREAM Writer versions:
-
Form
Enter P1311 (Work Order Parts List Revisions) to view processing options for parts lists. Enter P1312 (Equipment Work Order Routings) to view processing options for labor routings.
-
-
Review the processing options and change them as necessary.
38.7.2 What You Should Know About
| Topic | Discussion |
|---|---|
| Processing option security | You might not have authority to change processing options associated with parts and routings.
See the JD Edwards World Technical Foundation Guidef or your system security officer for more information about security issues. |
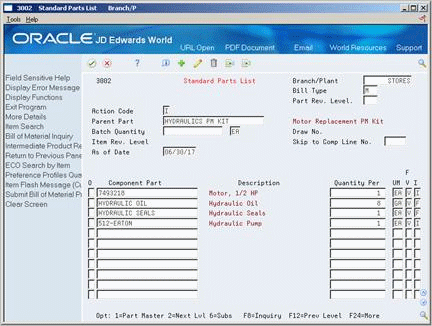
38.7.4 Setting Up a Standard Parts List
From Equipment/Plant Management Setup (G1341), choose Planning
From Planning Setup (G1346), choose Standard Parts List
You can create standard parts lists that you can attach to work orders. This is especially useful when you have routine maintenance tasks that require identical parts.
For example, for a particular piece of equipment, you overhaul the hydraulic assembly every 250 hours. Because the overhaul procedure requires the same repair kit, you would set up a standard parts list that includes all of the parts necessary to overhaul the hydraulic assembly.
38.7.5 Before You Begin
-
Verify that you have purchased and installed the following systems. You must have installed these systems to be able to set up a standard parts list.
-
· System 40: Inventory Base and Order Processing
-
· System 41: Inventory Management
-
-
Verify that inventory masters have been created for all parent items (part assemblies) and component items you want to include on a standard parts list. See Entering Item Master Information in the JD Edwards World Inventory Management Guide for more information about creating inventory master records.
To set up a standard parts list
-
Complete the following fields:
-
Branch/Plant
-
Parent Part
-
Component Part
-
Quantity Per
-
-
Complete any of the following optional fields:
-
Fixed or Variable
-
Bill Type
-
Item Revision Level
-
Batch Quantity
-
Unit Of Measure
-
Issue Type
-
-
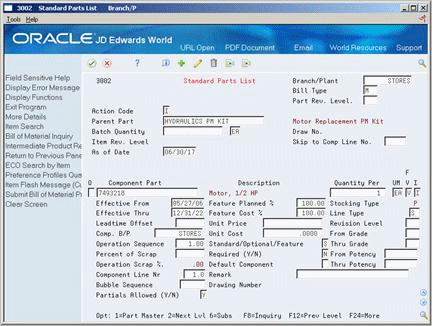
Choose More Details.
Figure 38-13 Standard Parts List screen (Details area)
Description of "Figure 38-13 Standard Parts List screen (Details area)"
-
Complete any of the following fields:
-
Effective From
-
Effective Through
-
Line Type
-
Operation Sequence
-
Note:
The following fields have no application within Equipment/Plant Maintenance: Feature Planned Percent, Feature Cost Percent, Grade From and Thru, Potency From and Thru| Field | Explanation |
|---|---|
| Parent Part | A number that the system assigns to an item. It can be in short, long, or 3rd item number format.
Form-specific information Header: The Parent field contains the item number of the parent item. Detail: The Component Item field contains the item number of the component item. |
| Quantity Per | The number of units to which the system applies the transaction.
Form-specific information A number that indicates how many components you use to manufacture the parent item. A quantity of zero is valid. The default value is 1. |
| F V | Indicates if the quantity per assembly for an item on the bill of material varies according to the quantity of the parent item produced or is fixed regardless of the parent quantity. This value also determines if the component quantity is a percent of the parent quantity. Valid values are:
F – Fixed Quantity V – Variable Quantity (Default) % – Quantities are expressed as a percentage and must total 100% For fixed quantity components, the Work Order and MRP systems do not extend the component's quantity per assembly value by the order quantity. For Process Manufacturing, the system stores percent components. Therefore, the system treats zero batch sizes like variable quantity components, and treats batch sizes greater than zero like fixed quantity components. |
| Bill Type | User defined code system 40, type TB, which designates the type of bill of material. You can define different types of bills of material for different uses. For example, you can differentiate between bills of material for maintenance and manufacturing.
The system enters bill type M in the work order header when you create a work order, unless you specify another bill type. The system reads the bill type code on the work order header to know which bill of material to use to create the work order parts list. MRP uses the bill type code to identify the bill of material to use when it attaches MRP messages. Batch bills of material must be type M for shop floor control, product costing, and MRP processing. Form-specific information Type M is not required, but MRP uses it to explode component requirements for work orders without parts lists. Enter an asterisk (*) to display all bill types. This value defaults from the processing options for Enter/Change Bill (P3002). |
| Part Rev. Level | Indicates the revision level of a bill of material. It is usually used in conjunction with an engineering change notice or order (ECN or ECO). The revision level of the bill of material should match the revision level of its associated routing (data item RREV), although the system does not check this. This value is defined and maintained by the user. |
| Batch Quantity | This is the quantity of parts needed for the maintenance task. |
| I | A code that defines how the system issues each component in the bill of material from stock. In shop floor control, it indicates how the system issues a part to a work order. Valid codes are:
I – Manual issue (default) F – Floor stock (no issue) B – Backflush (when part is reported as complete) P – Preflush (when parts list is generated) U – Super backflush (at pay-point operation) S – Sub-contract item (send to supplier) Blank – Shippable end item You can issue a component in more than one way within a specific branch/plant by using a different code on the bill of material and work order parts list. The bill of material code overrides the branch/plant value. |
| Effective From | A date that indicates one of the following:
The default is the current system date. You can enter future effective dates so that the system plans for upcoming changes. Items that are no longer effective in the future can still be recorded and recognized in Product Costing, Shop Floor Control, and Capacity Requirements Planning. The Material Requirements Planning system determines valid components by effectivity dates, not by the bill of material revision level. Some forms display data based on the effectivity dates you enter. |
| Effective Thru | A date that indicates one of the following:
The default is December 31 of the default year defined in the Data Dictionary for Century Change Year. You can enter future effective dates so that the system plans for upcoming changes. Items that are no longer effective in the future can still be recorded and recognized in Product Costing, Shop Floor Control, and Capacity Requirements Planning. The Material Requirements Planning system determines valid components by effectivity dates, not by the bill of material revision level. Some forms display data based on the effectivity dates you enter. |
| Line Type | A code that controls how the system processes lines on a transaction. It controls the systems with which the transaction interfaces (General Ledger, Job Cost, Accounts Payable, Accounts Receivable, and Inventory Management). It also specifies the conditions under which a line prints on reports and is included in calculations. Codes include:
S – Stock item J – Job cost N – Non-stock item F – Freight T – Text information M – Miscellaneous charges and credits W – Work order Form-specific information The Branch/Plant table (F4102) supplies the default for this field. You can use line type T to display a text line on this screen in the sequence you define. The text does not display on review forms. |
| Operation Sequence Number | In routings, this number is used to sequence the fabrication or assembly steps in the manufacture of an item. You can track costs and charge time by operation.
In bills of material, this number designates the routing step in the fabrication or assembly process that requires a specified component part. You define the operation sequence after you create the routing for the item. The Shop Floor Control system uses this field in the backflush/preflush by operation process. In engineering change orders, this number is used to sequence the assembly steps for the engineering change. Skip To fields allow you to enter an operation sequence that you want to begin the display of information. You can use decimals to add steps between existing steps. For example, use 12.5 to add a step between steps 12 and 13. Form-specific information JD Edwards World recommends that you do not use an operation number more than once within the same work center. |
38.7.7 Setting Up Standard Work Order Instructions
From Equipment/Plant Management Setup (G1341), choose Planning
From Planning Setup (G1346), choose Standard WO Instructions
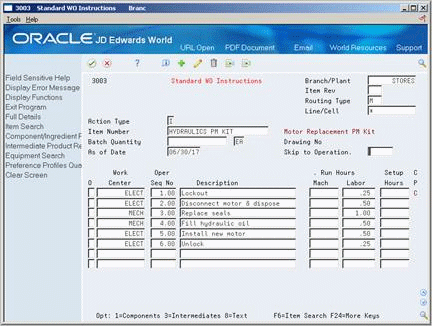
You can create standard work order instructions that establish labor routing steps for work orders. For example, assume that you have created a standard parts list for routine hydraulic maintenance. The hydraulic maintenance has multiple steps that must be performed in a specific sequence, such as machine lockout, disconnect motor, and so on. In addition, some of the steps must be performed by different work centers (crafts), such as electrical, mechanical, and so on. For this task, you would create standard work order instructions that specify the work centers and sequence of operations necessary to install the parts. You can then attach the instructions to each actual (firm) work order created for hydraulic maintenance.
38.7.8 Before You Begin
-
Verify that you have purchased and installed the following systems. You must have installed these systems to be able to set up standard work order instructions.
-
· System 40: Inventory Base and Order Processing
-
· System 41: Inventory Management
-
-
Verify that inventory masters have been created for all parent numbers specified in Standard Instructions. See Entering Item Master Information in the JD Edwards World Inventory Management Guide for more information about creating inventory master records.
-
Verify that work centers have been set up as business units. See Section 39.4.1, "Setting Up Resource Units"for more information about setting up work centers as business units.
To set up standard work order instructions
Figure 38-14 Standard WO Instructions screen
Description of "Figure 38-14 Standard WO Instructions screen"
-
Complete the following fields:
-
Branch/Plant
-
Item Rev
-
Work Center (Resource)
-
Oper Seq No (Operation Sequence Number)
-
Description
-
Run Hours - Labor
-
-
Complete the following optional fields:
-
Item Revision
-
Routing Type
-
Line/Cell
-
As of Date
-
Machine Hours
-
-
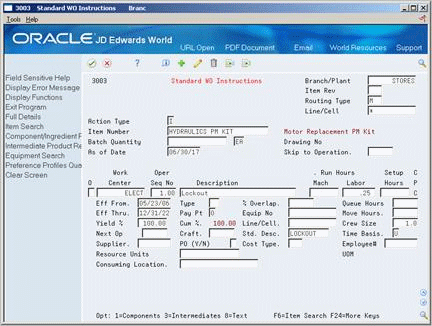
Choose Full Details.
Figure 38-15 Standard WO Instructions screen
Description of "Figure 38-15 Standard WO Instructions screen"
-
Complete the following field:
-
Time Basis
This field might already contain a default value.
-
-
Complete any of the following optional fields:
-
Eff (Effective) From
-
Eff Thru
-
Type (Operation)
-
% Overlap
-
Queue Hours
-
Equip No (for reference only)
-
Move Hours
-
Supplier
-
PO (Y/N)
-
Cost Type
-
Crew Size
-
Next Op
-
Craft
-
Stnd Desc
-
| Field | Explanation |
|---|---|
| Work Center | An alphanumeric field that identifies a separate entity within a business for which you want to track costs. For example, a business unit might be a warehouse location, job, project, work center, or branch/plant.
You can assign a business unit to a voucher, invoice, fixed asset, and so on, for purposes of responsibility reporting. For example, the system provides reports of open accounts payable and accounts receivable by business units to track equipment by responsible department. Security for this field can prevent you from locating business units for which you have no authority. Note: The system uses this value for Journal Entries if you do not enter a value in the AAI table. Form-specific information For Equipment users, this is the craft/resource responsible for completing the maintenance activity. |
| Labor Run Hours | This is the standard hours of labor expected in the normal production of this item.
The run labor hours in the Routing Master table (F3003) are the total hours it takes the specified crew size to complete the operation. The hours are multiplied by the crew size during shop floor release and product costing. Form-specific information For Equipment/Plant, this is the estimated number of hours needed to complete a maintenance activity. |
| Item Rev | Indicates the revision level of a routing. It is usually used in conjunction with an engineering change notice or order (ECN or ECO). The revision level of the routing should match the revision level of its associated bill of material (data item BREV), although the system does not check this.
This value is user defined and not maintained by the system. |
| Routing Type | User defined code (system 40, type TR) that designates the type of routing. You can define different types of routing instructions for different uses. For example, you can differentiate between equipment maintenance routings and manufacturing routings.
You define the routing type on the work order header. The specific type of routing defined will then be used in the work order routing. |
| Line/Cell | Defines a production line or cell. Detailed work center operations can be defined inside the line or cell. For rate based manufacturing to use this value for reporting, this value must match the line cell in the header. |
| As of Date | This field is used for effectivity checking. Enter a specific date to display documents (orders, bills of material, routings, as applicable) that are effective on or after that date. The current system date is the default, but you can enter any future or past date. |
| Mach Run Hours | This is the standard machine hours expected to be incurred in the normal production of this item. |
| Time Basis | A user defined code (system 30, type TB) that identifies the time basis or rate to be used for labor hours entered for any routing step. You can set rates per unit, per 10, per 1000, and so on. For example, if the time basis code is 10, then the labor hours represents the number of hours to complete the routing step for 10 units. For Equipment/Plant Maintenance, the value you enter in this field is normally U (Unit).
The system uses the values in the Description-2 field on the User Defined Codes screen for costing calculations. The Description field is a description of what the code represents, but is not used in calculations. |
38.7.9 What You Should Know About
| Topic | Discussion |
|---|---|
| Entering machine hours | Entering machine hours has several consequences that you should be aware of. If you are not using manufacturing systems, do not enter machine hours. If you are using manufacturing systems, the machine you specify must be set up as a work center.
If you enter a value in the Machine Hours field, the system indicates a demand for those machine hours based on the time commitment of the work order. You should plan on taking the machine out of service for the entire time necessary to complete the work order. If you enter machine hours, you can optionally complete the Percent of Overlap field to indicate any operations that can overlap previous operations. For planning purposes, the system determines the total duration of the work order based on values you enter for machine hours and percent overlap. |
38.8 Defining Default Location and Printers
From Inventory System Setup (G4141), choose Default Location and Printers
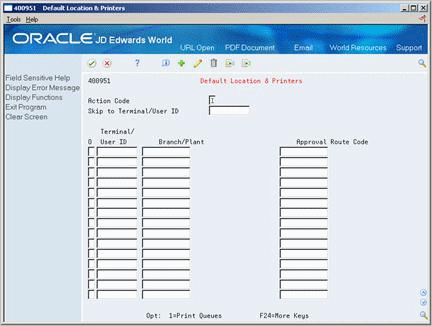
Many of the forms within the Work Order Processing system require that you specify a location, such as a branch or plant, to which you are assigned. You can set up default locations for each person in your organization that uses the Work Order Processing system. A default location is the branch/plant that is assigned to your user ID or terminal ID. If you do not set up a default location for your user ID or terminal ID, you must enter a location manually.
You can also assign a default print queue to each person who uses the Work Order Processing system. When you print a work order, the system uses the default print queue that you set up, unless you specify otherwise. If you do not assign a default print queue, the system uses either the print queue assigned in the particular version for which the Work Order Print program applies or the print queue assigned to your user profile.
To define default location and printers
On Default Location and Printers
Figure 38-16 Default Location & Printers screen
Description of "Figure 38-16 Default Location & Printers screen"
-
Complete the following fields:
-
User ID
-
Branch or Plant
-
-
Choose Print Queues.
-
Complete the following field:
-
Print Queue
-
| Field | Explanation |
|---|---|
| Print Queue | The waiting area a job goes to after it has processed. Output Queues are sometimes attached to printers. If an OUTQ is not specified, it defaults from the user's job description.
Form-specific information The name of the print queue that you want the system to use for the adjacent document. |
38.8.1 What You Should Know About
| Topic | Discussion |
|---|---|
| Approval routing | The approval routing code on this screen refers to purchase orders only.
See Section 38.5.5, "Setting Up Work Order Approval Routes"for more information about approval routing for work orders. |
38.9 Setting Up Supply and Demand Inclusion Rules
From Equipment/Plant Management Setup (G1341), choose Planning
From Planning Setup (G1346), choose Supply/Demand Inclusion Rules
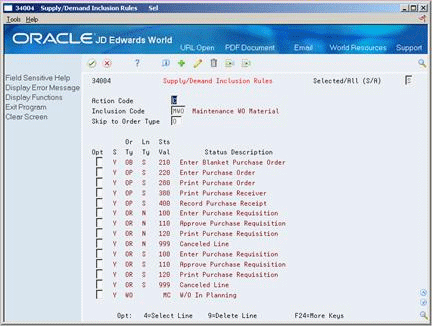
To balance your parts inventory with the demand for parts created by maintenance work orders, you must set up supply/demand inclusion rules. You use supply and demand inclusion rules to specify the documents that create a supply for parts, such as purchase requests, and the documents that create a demand for parts, such as PM work orders, corrective work orders, and so on. In addition, you specify the statuses at which the various documents create supplies or demands.
The following programs use supply and demand inclusion rules:
In Equipment/Plant Maintenance, the following document types create a supply for parts:
-
Purchase requests
-
Purchase orders
-
Blanket purchase orders
In Equipment/Plant Maintenance, the following document types create a demand for parts:
-
System-generated maintenance work orders, such as PM work orders
-
Corrective maintenance work orders
After you set up supply and demand inclusion rules, you can use the information that the system provides to balance the supply and demand for parts. For example, if demand is greater than supply at a given point, you can expedite purchase orders or postpone work orders.
When you review a version of the supply and demand inclusion rules, all document types and related statuses that are available appear. You choose the document types and document statuses that you want to include in the version.
38.9.1 Before You Begin
-
Set processing options to include work order document types WO, WM, and any other work order document types that you have defined. See Chapter 36, "Set Up User Defined Codes" for more information about defining work order document types.
38.9.2 To set up supply and demand inclusion rules
On Supply/Demand Inclusion Rules
Figure 38-18 Supply/Demand Inclusion Rules screen
Description of "Figure 38-18 Supply/Demand Inclusion Rules screen"
-
Complete the following field:
-
Inclusion Code
-
-
Choose Select Line for each document type and status for the inclusion rules to apply.
When you apply inclusion rules to work order documents, line types do not appear. Line types are not applicable to the Work Order system.
| Field | Explanation |
|---|---|
| Inclusion Code | A user defined code (system 40/type RV) that identifies an inclusion rule that you want the system to use for this branch/plant. The Manufacturing and Advanced Warehouse Management systems use inclusion rules as follows:
|
| Skip to Order Type | A user defined code (00/DT) that identifies the type of document. This code also indicates the origin of the transaction. JD Edwards World has reserved document type codes for vouchers, invoices, receipts, and time sheets, which create automatic offset entries during the post program. (These entries are not self-balancing when you originally enter them.)
The following document types are defined by JD Edwards World and should not be changed: P – Accounts Payable documents R – Accounts Receivable documents T – Payroll documents I – Inventory documents O – Purchase Order Processing documents J – General Accounting/Joint Interest Billing documents S – Sales Order Processing documents Form-specific information If you are using the Skip to Order Type field, you can enter an order type code and press Enter to display only rules about that order type. To see the whole set of order types included in the resource rules, leave this field blank and use the Roll keys. |
