9 Revise Employee Information
This chapter contains these topics:
9.1 Revising Employee Information
After you add an employee record, you can change, correct, or update the employee's information as necessary. For example, when an employee receives a promotion, you might need to update the employee's salary, job type, and pay grade.
You can enter changes that take effect either immediately or on a future date. You can also enter changes that apply to a group of employees.
You can change employee information at any time. Typical changes include:
-
Promotions
-
Raises
-
Leaves of absence
-
Transfers
You can enter rate changes by setting up planned increases for an individual employee and specifying effective dates for those increases.
You enter future changes to specify that a change to a data item for an individual employee takes effect on a future date.
You process mass changes to specify new data for a selected data item for a group of employees.
9.2 Revising the Status of an Employee
You revise the status of an employee if there is a change to the employee/employer relationship, such as the employee's pay or employment status. The Payroll system verifies this information before issuing a payment for an employee.
Revising the status of an employee allows you to indicate to the system that an employee's status has changed due to termination or rehire. Revising employee information changes the Employee Master table (F060116).
When you revise the status of an employee, you can:
-
Define a reason for termination or reactivation
-
Determine when an employee was last paid
-
Store leave of absence dates
-
Change pay status and employment status
If your system is integrated with the Human Resources system, the system might require requisition information when you terminate and rehire employees.
Complete the appropriate task:
-
Terminate an employee
-
Rehire an employee
See Also:
From Canadian Payroll Master (G77), choose Employee Information
From Employee Information (G7711), choose Termination/Rehire
When you terminate an employee you are indicating to the system that employment has ended as a result of any of the following reasons:
-
Retirement
-
Resignation
-
Layoff
-
Termination
-
Leave of absence
Depending on the combination of values you use when you enter an employee's pay status and termination date, the system responds in different ways. You can terminate an employee using the following methods:
JD Edwards World recommends setting up a special numeric pay status to indicate that an employee has been terminated and that the final payment is to be processed in the future. After the last payment is processed for the employee, update the employee's pay status to an alpha code. You can automate this process by using the Employee Master Revisions program.
-
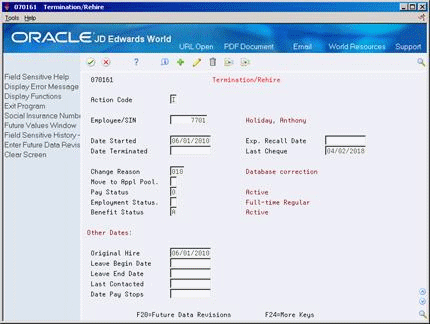
To locate the employee you are terminating, complete the following field:
-
Employee
-
-
Complete the following fields:
-
Date Terminated
-
Change Reason
-
Move to Applicant Pool
-
Pay Status
-
-
Complete the following optional field:
-
Expected Recall Date
-
-
Review the value supplied by the system for the following field:
-
Last Cheque
-
-
If you use the JD Edwards World Human Resources system and are creating requisitions, enter requisition information.
| Field | Explanation |
|---|---|
| Date - Terminated | The date that the employee was terminated, if applicable.
Form-specific information If you enter a date in this field, you must also enter an alphabetical termination code in the Change Reason field, change the pay status code, and enter Y (Yes) or N (No) in the Move to Applicant Pool field. If you are reactivating an employee, remove the date from this field. |
| Change Reason | A user defined code (07/T) that indicates:
Note: The default reason code for new hires is the default value for the Change Reason data item. |
| Move to Appl Pool | You can enter a value in this field only when you terminate an employee (enter a termination date).
Use this code to indicate whether the information entered for the terminated employee should be moved, by batch job, to the applicant database. Valid codes are: Y – Yes, move the employee's information to the applicant database N – No, do not move the employee to the applicant database When you enter Yes in this field, the system:
When you enter No in this field, the system changes the employee's search type to Terminated (X). |
| Pay Status | A code that indicates whether an employee's pay status is active or inactive.
Codes for active pay status employees are numeric. Codes for inactive pay status employees are alphabetic. The system omits all employees with alphabetic pay status codes from the payroll run. To process an employee's last cheque, the pay status must contain a numeric code. After the system processes the cheque through final update, you can change the pay status to an alphabetic code. |
| Last Cheque | The date of the last payroll cheque issued to the employee. The system automatically updates this field when you run a payroll. If you leave this field blank, the system uses the cheque date as the default. |
| Exp. Recall Date | The date on which the employee can be recalled for employment. |
9.2.1 Rehiring an Employee
From Canadian Payroll Master (G77), choose Employee Information
From Employee Information (G7711), choose Termination/Rehire
You can rehire former employees that have a termination status attached to their records.
On Termination/Rehire
-
To locate the employee you are rehiring, complete the following field and press Enter:
-
Employee
-
-
Remove the value from the following field:
-
Date Terminated
-
-
Complete the following fields:
-
Change Reason
-
Pay Status
-
Employment Status
-
Date Started
-
Benefit Status
-
| Field | Explanation |
|---|---|
| Date Started | The date on which the employee actually reported to work for the most recent period of hire. When an employee initially begins working, the default is the original hire date. If no original hire date exists, the system uses the current date. This field can be updated multiple times if, for example, an employee is a seasonal worker.
For the calculation tables in Payroll and the eligibility tables and date codes in Human Resources, the system also uses this date as a start date when it calculates deductions, benefits, and accruals. |
9.3 Entering Changes for Rates Only
From Canadian Payroll Master (G77), choose Employee Information
From Employee Information (G7711), choose Additional Employee Data & Reports
From Additional Employee Data & Reports (G77111), choose Pay Rate Information
When you know that an employee's pay rate is scheduled to change on a specific date, you can enter a pay rate change for the employee. You can enter a change that takes effect immediately, or you can enter a change that takes effect on a future date.
To enter a change that takes effect on a future date, you can enter an effective date for the change. When the future date occurs, the system automatically updates the employee's pay rate information. For example, Cathy is scheduled to receive a five percent pay increase on May 15, 2008. Because you will be on vacation for the entire month of May, you enter Cathy's increase on April 30, 2008, before it actually takes effect. On May 15, the system increases Cathy's pay rate by five percent.
You can specify the change as a monetary amount or as a percentage of the employee's current pay rate. Alternatively, you can enter a new salary or hourly pay rate.
You can revise the following types of pay rates:
-
Annual salary
-
Hourly rate
-
Billing rate
-
Piecework rate
This program updates the Employee Master table (F060116). Time entry programs and pre-payroll processing use the information based on the effective dates. You can use this program to update only one employee record at a time.
To enter changes for rates only
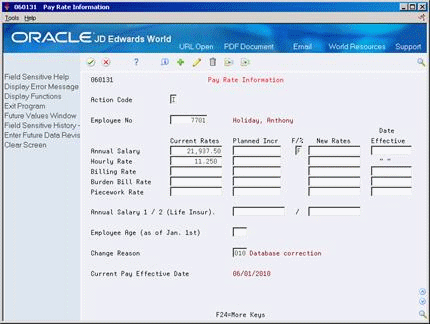
On Pay Rate Information
-
To locate the employee, complete the following field:
-
Employee Number
-
-
To enter a new or current rate, complete the appropriate fields in the following column:
-
Current Rates
-
-
To define a future pay change as a percent or flat amount increase calculated by the system, complete the following fields:
-
Planned Increase
-
F/% (Method for Pay Increase)
-
Date Effective
-
-
To define a future pay rate, complete the following fields
-
New Rates
-
Date Effective
-
-
Complete the following optional fields:
-
Annual Salary 1
-
Annual Salary 2
-
Employee Age
-
Change Reason
-
The Burden Billing Rate fields are for future use and are inactive for this release.
| Field | Explanation |
|---|---|
| Planned Incr | The amount of increase that you specify either as a monetary amount or as a percentage. The system adds this amount to the current annual salary to obtain the new annual salary.
Form-specific information When you enter F as the method and a flat dollar amount in the New Rate field, the system calculates and displays the planned increase. When you enter a % as the method and a percentage amount in the New Rate field, the system calculates the planned increase as a flat dollar amount and displays the planned increase. To decrease the pay rate, enter a minus sign (-) either before or after the flat dollar amount or percentage amount in the Planned Increase field. |
| F/% | The method by which the pay increase amount is to be calculated. The increase can either be a percentage of the current amount or a monetary amount.
Form-specific information Although you defined the method on the Annual Salary row, the system uses that method for all other rows. |
| New Rates | The employee's new annual salary for all payroll entries that are either manually entered or automatically generated for the payroll period after the Date of Next Raise from the employee's record. |
| Effective | The date on which the hourly or annual pay rate for the employee increases. The new rates go into effect after the payroll processing run that has a payroll date on or after the date of next raise.
Form-specific information Changes become effective as indicated below: All changes - The final update step of the payroll cycle updates the new annual salary, hourly rate, and salary per pay period in the Employee Master table. DBAs - DBAs based on annual salary become effective at the next payroll after the effective date Hourly employees - Time entry uses the changed information when the effective date is less than or equal to the time entry work date. Autopay employees - The new rate applies when the effective date is less than or equal to the pay period end date of the payroll being processed. |
| Annual Salary 1 / 2 (Life Insur) | A value that the system uses to calculate deductions, benefits, and accruals (DBAs) for an employee's life insurance premium. Any table method that begins with an I (Insurance) uses this field. |
| Annual Salary 1 / 2 (Life Insur) | A value that the system uses to calculate deductions, benefits, and accruals (DBAs) for a spouse's life insurance premium. Any table method that begins with an F or U uses this field. |
| Employee Age (as of Jan 1) | The age of the employee as of a certain date (for example, August 1st) for a given year. You can manually update this field or update it each year using the future data facility. |
9.4 Processing Future Changes for Any Data Item
You enter future changes to specify that a change for an individual employee takes effect on a future date. For example, if an employee changes home business units on a certain date, you enter the new information prior to the employee actually changing business units. You process the changes by requesting a batch job that updates employee records. However, if the system is currently processing records in final update for payroll, you cannot update those records.
You can choose when to have the system process the changes:
-
During the final update steps of the payroll cycle
-
When you request a batch job to update the changes
Processing future changes for any data item includes the following tasks:
-
Entering future changes
-
Updating employee master records (optional)
9.4.2 Entering Future Changes
From Canadian Payroll Master (G77), choose Employee Information
From Employee Information (G7711), choose Employee Entry
Entering future changes allows you to:
-
Enter changes to the employee master prior to the effective date of the change
-
Enter multiple changes to the same data item with different effective dates
-
Enter changes in employee records that are locked in a payroll cycle
The system updates the Employee Master during the final update step of the appropriate payroll cycle or you can submit the program manually.
On Employee Entry
-
To locate the employee whose data item you want to change, complete the following field:
-
Employee Number
-
-
Place your cursor on the field containing the value you want to change.
-
Choose the Automatic Employee Update Revisions function.
Figure 9-3 Employee Master Revisions screen
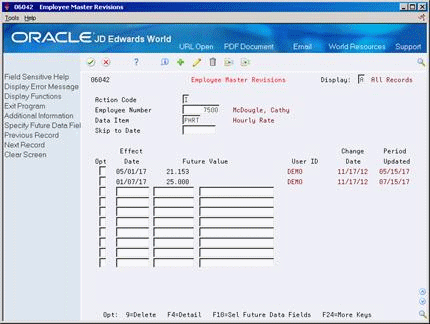
Description of "Figure 9-3 Employee Master Revisions screen"
-
On Employee Master Revisions, review the following fields:
-
Employee Number
-
Data Item
-
Display
-
-
Complete the following fields:
-
Effective Date
-
Future Value
-
-
Figure 9-4 Employee Master Revisions screen
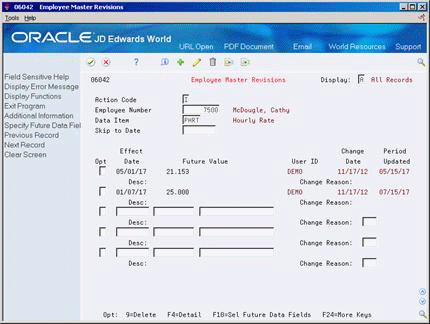
Description of "Figure 9-4 Employee Master Revisions screen"
-
Complete the following optional field:
-
Change Reason
-
| Field | Explanation |
|---|---|
| Data Item | The technical name of the field to which the change will apply. You must first specify the fields allowed to have changes by using the Specify Future Data Fields form. |
| Display Cleared Records | This field controls which records in the Future Employee Master Data file (F06042) will be displayed. The possible values are:
A – All records will be displayed Y – Only Processed (Cleared) records will be displayed Blank – Only Unprocessed records will be displayed |
| Effect | The date that the revision goes into effect. The update program identifies the pay period ending date of the version being processed to determine whether the future value qualifies for the update.
Use Skip to Date on Enter Future Data Revisions to specify the first date to display in the detail area. Form-specific information The date that the system updates the HR History table (F08042) with the revised information. The update program identifies the pay period ending date of the payroll ID being processed to determine whether the future value qualifies for the update. You can think of the effective date as the date to update. When updating the Employee Master using Final Update, the system updates any changes with an effective date less than or equal to the pay period end date of the payroll. The system automatically submits the update program as part of the final update step. Only those employees included in the payroll are processed for future changes. |
9.4.3 What You Should Know About
| Topic | Description |
|---|---|
| Alternative revision methods | You can also enter future changes on Employee Master Revisions from the Change Control and Monitoring menu (G07112, G77112, or G05112). |
| Hourly and salary rates | If you enter a future value for the annual salary, the system recalculates the hourly rate during the future data update for salary employees. If you enter a future value for hourly rate, the system recalculates the annual salary. |
| Terminating an employee | When you are terminating an employee and the last payment is processed for the employee, you must update the employee's pay status to an alpha code. You can automate this process by using this program. |
| Future Values | Choose the Select Future Data Fields function to review previously entered changes for the field where your cursor is located.
You cannot access Future Values if the value in the field is not specified as valid for future changes. Access to this window is also available on several other employee forms. See Choosing Fields for Future Data Revisions in JD Edwards World Canadian Payroll II Guide. |
| Future Data table (F06042) | The Future Data table is a permanent table. Note the following information about this table and future data changes:
|
| Employees with contract calendars attached | If an employee has a contract calendar attached, you cannot make changes to any of the data items for the employee's salary. You must make changes to salary information on Contract Calendar Window. |
9.4.4 Updating Employee Master Records
From Canadian Payroll Master (G77), choose Employee Information
From Employee Information (G7711), choose Change Control & Monitoring
From Change Control & Monitoring (G77112), choose Employee Master Update
After you enter future changes for one or more employees, you can do one of the following:
-
Allow the system to update the Employee Master table during the final update step of the appropriate payroll cycle.
-
Manually submit the Employee Master Update program to apply future changes to the information in the Employee Master table.
When you run the update, you can control when the update occurs and which records the system updates. You can set the processing options for a specific date. The system updates any records with an effective date on or before that date. You can identify all employees or a specific employee in the data selection values.
When you allow the system to make the changes during the payroll cycle, the system processes future changes only for the employees who are included in the current payroll cycle. When you choose to run the master update, you can select employees who are included in different payroll cycles. For example, you can select some employees who are included in the payroll cycle for hourly employees and some employees who are included in the payroll cycle for salaried employees.
See Also:
-
Section 9.3, "Entering Changes for Rates Only"for an alternative rate change method.
9.4.5 What You Should Know About
| Topic | Description |
|---|---|
| Employees who are locked in the payroll cycle | If an employee's record is not available because it is locked in the payroll cycle, the system displays a message at the bottom of the form. In addition, the word Update flashes beside any data item that will be updated during the processing of the current payroll cycle. During a payroll cycle, you can enter data changes before, but not during, the final update step. This applies only to values that will be updated within the active dates of the payroll. |
9.5 Processing Mass Changes
From Canadian Payroll Master (G77), enter 27
From Payroll Advanced/Technical Operations (G773), choose Data Integrity/Global Update
From Data Integrity/Global Update (G7731), choose Employee Master Mass Change
You process mass changes to specify and process new data for a selected data item for groups of employees. For example:
-
All employees currently in Building 1 are moving to Building 2. Because you use the cheque route code to indicate the location of employees, you must reassign the cheque route code for employees currently in Building 1.
-
Your company is restructuring departments. You must change the category code for all employees currently in department 10 to department 110.
When you process mass changes, you can also:
-
Specify employees in the data selection values
-
Omit individual employees after selection occurs
-
Specify the effective date and reason for the change
-
Use percentages or flat amounts when changing the salary or hourly rate
-
Review both old and new data
-
Override the mass change data and effective date for specific employees
-
Apply changes immediately or at a later date
9.5.1 Before You Begin
-
Create a program version for Employee Master Mass Change that specifies the employees for whom you need to process the change.
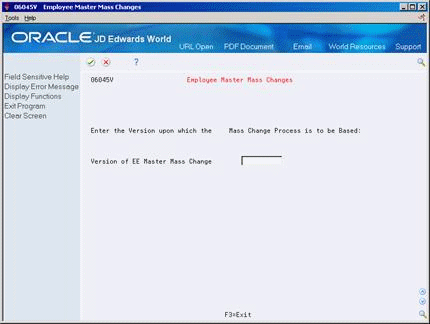
On Employee Master Mass Change
Figure 9-5 Employee Master Mass Changes screen
Description of "Figure 9-5 Employee Master Mass Changes screen"
-
Complete the following field:
-
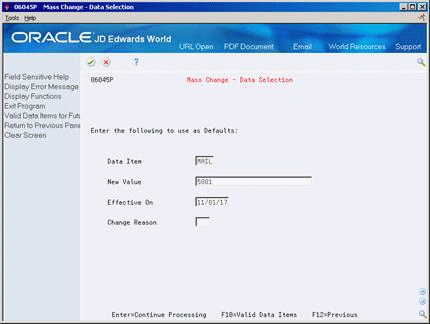
On Mass Change - Data Selection, complete the following fields and press Enter:
-
Data Item
-
New Value
-
Effective On Date
-
Change Reason
-
-
If you are revising a rate field, complete the following field:
-
Method
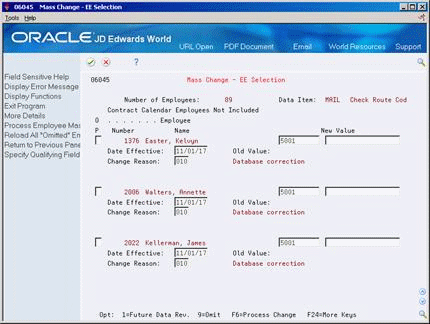
Figure 9-7 Mass Change - EE Selection screen

Description of "Figure 9-7 Mass Change - EE Selection screen"
-
-
On Mass Change - Employee Selection, review the list of employees that will be affected by the mass change.
If the field to the left of the employee's name contains an L, the employee is locked in payroll processing.
-
Change the following field if necessary:
-
New Value
-
-
Choose one of the following options if necessary:
-
Add the employee to a future data revision
-
Omit the employee from the mass change
-
-
Access the detail area to review additional information about locked employees and the current step in the payroll cycle.
Figure 9-8 Mass Change - EE Selection screen
Description of "Figure 9-8 Mass Change - EE Selection screen"
-
Change the following fields if applicable:
-
Effective Date
-
Change Reason
-
-
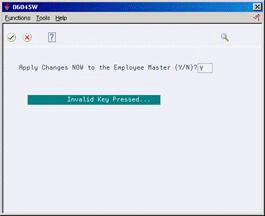
Choose the Process Change function.
-
Complete the following field:
-
Apply Changes Now to the Employee Master
-
| Field | Explanation |
|---|---|
| New Value | A code that indicates a selection or a future set of information. When the effective date of the revision arrives, the value you enter in this field replaces an existing value in the Employee Master table. |
| Date Effective: | The date that the revision goes into effect. The update program identifies the pay period ending date of the version being processed to determine whether the future value qualifies for the update.
Use Skip to Date on Enter Future Data Revisions to specify the first date to display in the detail area. |
9.5.2 What You Should Know About
| Topic | Description |
|---|---|
| Applying changes | If you answer yes to the prompt question:
If you answer no to the prompt question:
For locked employees:
|
| Omitting and reloading employees | You can choose an option to omit an employee from the mass change.
You can choose a function to reload all employees that you previously omitted from the mass change. |
| Processing changes for contract calendar employees | If your company assigns contract calendars to employees, you cannot use this method to process salary-related changes for employees with contract calendars attached to their records. You must either change the individual's record on Contract Calendar Window or use Recalculate Contract Calendar Salary.
See Updating Employee Records for Contract Calendars in JD Edwards World Canadian Payroll II Guide. |