15 Work with COBRA Profile Data
This chapter contains these topics:
15.1 Working with COBRA Profile Data
You can track information on qualified beneficiaries and COBRA coverage. You can identify profile data for qualified beneficiaries just as you can identify profile data for applicants and employees. After you enter COBRA profile data you can review it online and in printed reports.
Working with COBRA profile data includes the following tasks:
-
Entering COBRA Profile Data
-
Reviewing Profile Data by Beneficiary
-
Reviewing Profile Data by Type
-
Reviewing the Beneficiary Profile Report
-
Reviewing the Beneficiary by Data Type Report
15.2 Entering COBRA Profile Data
You can enter profile data and track information on COBRA participants and coverage. Profile data is any additional information you want to record in the COBRA qualified beneficiary and dependent database. For example, you can record COBRA notification or payment history.
When you set up your system, you specify the types of profile information, or data types, that you want to track. For each data type, you specify if you want to track information in narrative or code format.
For narrative format data types, you enter free-form text. For code format data types, you enter information in predefined columns. When you enter information in code format, you also can associate narrative information with it.
Entering profile data includes:
-
Entering profile data in narrative format
-
Entering profile data in code format
15.2.1 What You Should Know About
15.2.2 Entering Profile Data in Narrative Format
From Human Resources (G08), choose COBRA Compliance
From COBRA Compliance (G08C1), choose Profile Data Entry
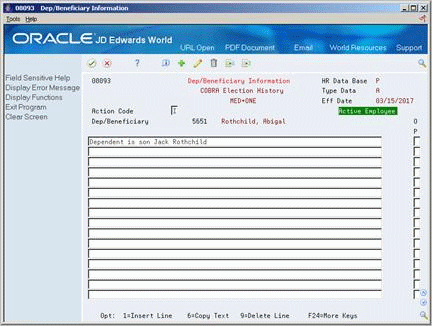
When you enter profile data in narrative format, you enter free-form text. You typically use narrative format for general information that is unique for each employee. For example, you might use narrative format for medical services information.
To enter profile data in narrative format
On Profile Data Entry
-
Locate the qualified beneficiary for whom you want to enter profile data.
-
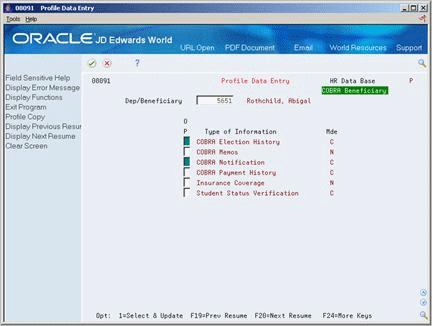
To determine which types of profile data are in narrative format, review the information in the following field:
-
Mode
-
-
Choose the Select and Update option for one or more types of narrative format information and press Enter.
-
Enter the appropriate information and press Enter.
Figure 15-2 Dep/Beneficiary Information screen (COBRA Election History MED + ONE area)

Description of "Figure 15-2 Dep/Beneficiary Information screen (COBRA Election History MED + ONE area)"
-
Choose narrative text to enter notes.
-
Choose the Field Exit function to advance to the next type of data you chose.
| Field | Explanation |
|---|---|
| Display Mode - Code or Narrative | The format of a data type. This code determines the display mode for supplemental data. Valid codes are:
C – Code format, which displays the form for entering code-specific information. These codes are associated with User Defined Codes table (F0005). N – Narrative format, which displays the form for entering narrative text. P – Program exit, which allows you to exit to the program you specified in the Pgm ID field. M – Message format, which displays the form for entering code-specific information. However, the system can edit the code values you enter against values in the Generic Rates and Messages table (F00191). This code is not used by the Human Resources or Financials systems. |
15.2.3 What You Should Know About
| Topic | Description |
|---|---|
| Deleting narrative format information | To delete an entire form of narrative information, use the Delete action. To delete only some information from a form, use the change action. To delete information, you can either type over it or choose the Delete Line option. |
15.2.4 Entering Profile Data in Code Format
From Human Resources (G08), choose COBRA Compliance
From COBRA Compliance (G08C1), choose Profile Data Entry
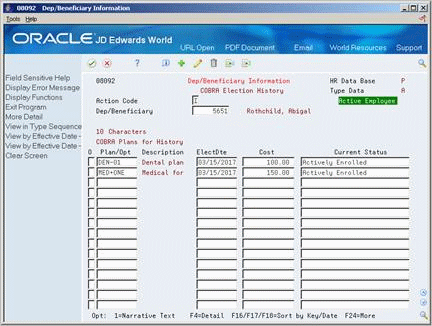
When you enter profile data in code format, you enter information in predefined columns. For example, the form for entering COBRA information might have columns for plan, election date, and costs.
To ensure consistency of data entry, code fields are typically associated with user defined code tables. Any value that you enter in one of these fields must be included in the associated user defined code table. For the key fields in the first column that are associated with a user defined code table, the length of the field and the user defined code description display above the column.
When you enter information in code format, you also can associate narrative information with it.
To enter profile data in code format
On Profile Data Entry
-
Locate the dependent or beneficiary for whom you want to enter profile data.
-
To determine which types of profile data are in code format, review the information in the following field:
-
Mode
-
-
Choose the Select and Update option for one or more types of code format information.
The system displays the form for the first type of data you choose.
Figure 15-4 Dep/Beneficiary Information screen (COBRA Election History area)

Description of "Figure 15-4 Dep/Beneficiary Information screen (COBRA Election History area)"
-
To add additional information in narrative format, use the Change action and choose the Narrative Text Option.
-
Enter the additional information and press Enter twice.
-
Choose the Field Exit function to advance to the next type of data you chose.
15.2.5 What You Should Know About
15.3 Reviewing Profile Data by Beneficiary
From Human Resources (G08), choose COBRA Compliance
From COBRA Compliance (G08C1), choose Profile by Beneficiary
After you enter the profile data you can review the information for each qualified beneficiary. You might need to review the information to answer specific questions from a qualified beneficiary or COBRA representatives.
To review profile data by beneficiary
On Profile by Beneficiary
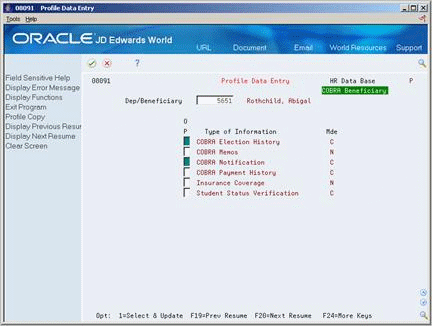
Figure 15-5 Profile by Beneficiary screen

Description of "Figure 15-5 Profile by Beneficiary screen"
15.4 Reviewing Profile Data by Type
From Human Resources (G08), choose COBRA Compliance
From COBRA Compliance (G08C1), choose Profile by Data Type
Frequently, companies want to review profile information for a specific type of profile data. For example, if you maintain current status information, you can review status information for the medical plan. You can review this information online to answer questions from your company or COBRA representatives.
15.5 Reviewing the Beneficiary Profile Report
From Human Resources (G08), choose COBRA Compliance
From COBRA Compliance (G08C1), choose Beneficiary Profile
Review the Beneficiary Profile report to review all the additional information, or profile data, that has been entered for qualified beneficiaries and their dependents. You can choose whether the system compiles the list alphabetically by last name or numerically by beneficiary number.
15.6 Reviewing the Beneficiary by Data Type Report
From Human Resources (G08), choose COBRA Compliance
From COBRA Compliance (G08C1), choose Beneficiary by Data Type
Review the Beneficiary by Data Type report to identify all dependents or beneficiaries who have information in a particular data type, for example, all dependents or beneficiaries who have information in payment history.
This report prints the information by data type. The report lists all dependents or beneficiaries who have had information entered under that data type. You can choose whether the system compiles the list of qualified beneficiaries alphabetically by last name or numerically by beneficiary number.


