24 Set Up COBRA Coverage
This chapter contains these topics:
-
Section 24.4, "Reviewing the COBRA General Constants Report"
-
Section 24.5, "Setting Up the Constants for Qualifying Events"
-
Section 24.6, "Reviewing the COBRA Qualifying Events Report"
24.1 Setting Up COBRA Coverage
The Consolidated Omnibus Reconciliation Act (COBRA) requires that employers who sponsor group health plans offer qualified beneficiaries continuation of coverage at group rates that the employee or qualified beneficiary would have otherwise forfeited due to a qualifying event, such as termination of employment or going from full-time employment to part-time. You must set up all the components of COBRA before anyone can enroll in a COBRA plan.
The setup for a COBRA plan is the same as setting up any other benefit plan. You can either use an existing benefit plan or set up a new COBRA plan.
To set up COBRA coverage, complete the following tasks:
-
Setting Up a Plan Master for COBRA Coverage
-
Setting Up the General Constants
-
Reviewing the COBRA General Constants Report
-
Setting Up the Constants for Qualifying Events
-
Reviewing the COBRA Qualifying Events Report
-
Setting Up Profile Data
-
Setting Up Security for Profile Data
-
Generating the Title Search Table
-
Transferring Profile Data
A qualified beneficiary for COBRA coverage is any individual entitled to the benefits of COBRA coverage. Beneficiaries for COBRA coverage can include a current or former employee and the employee's spouse or dependents.
24.2 Setting Up a Plan Master for COBRA Coverage
From Human Resources (G08), choose COBRA Compliance
From COBRA Compliance (G08C1) enter 29
From COBRA Compliance Setup (G08C4), choose Plan Master Information
You must set up the COBRA plan's details before coverage can take effect. You can use an existing plan and identify it as a COBRA plan or you can create a new plan specifically for COBRA. Only those plans that you set up for COBRA coverage appear in the COBRA enrollment options that the qualified beneficiary can elect.
To set up a plan master for COBRA coverage
Figure 24-1 Plan Master Information screen
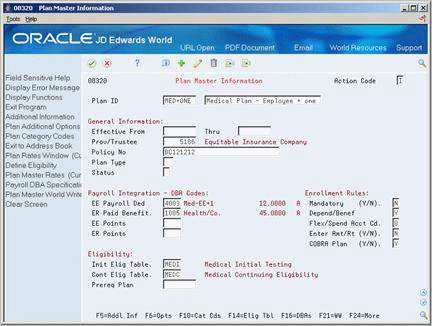
Description of "Figure 24-1 Plan Master Information screen"
-
To locate the plan, complete the following field:
-
Plan ID
-
-
Complete the following field:
-
COBRA Plan (Y/N)
-
-
Choose the DBAs function.
-
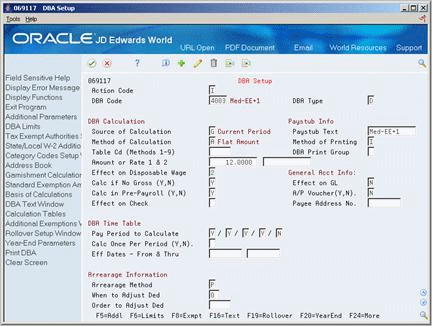
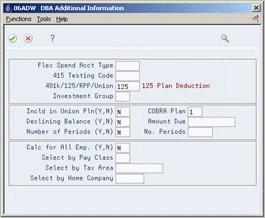
On DBA Setup, choose the Additional function.
Figure 24-3 DBA Additional Information screen
Description of "Figure 24-3 DBA Additional Information screen"
-
On DBA Additional Information, complete the following field and press Enter:
-
COBRA Plan
-
-
Exit DBA Setup and return to Plan Master Information.
-
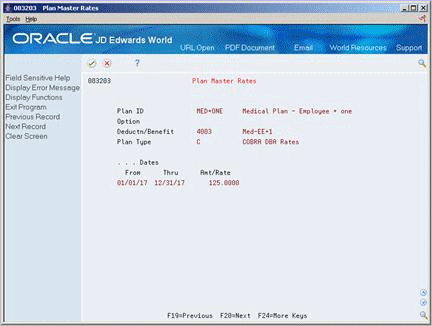
On Plan Master Information, choose the Plan Master Rates function from the Employee Payroll Deduction field.
-
On Plan Master Rates, complete the following fields:
-
Type
-
Date - From
-
Date - Through
-
Amount or Rate
-
-
Choose the Update function and return to Plan Master Information.
-
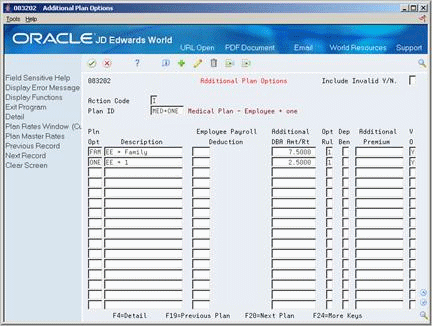
If you set up the plan with options, choose the Plan Additional Options function.
Figure 24-5 Additional Plan Options screen
Description of "Figure 24-5 Additional Plan Options screen"
-
On Additional Plan Options, choose the Plan Master Rates function from the following field:
-
Employee Payroll Deduction
-
-
On Plan Master Rates, complete the following fields for the option:
-
Type
-
Date - From
-
Date - Through
-
Amount or Rate
-
-
Choose the Update function and return to Plan Master Information.
-
On Plan Master Information, use the Change action.
| Field | Explanation |
|---|---|
| COBRA Plan (Y/N) | A code that indicates one of the following:
Valid codes are: Y – The plan is a COBRA plan. N – The plan is not a COBRA plan. Note: If you enter a Y in this field, you must define each DBA with the COBRA plan equivalent equal to 1. This field is found on DBA Additional Information. |
24.3 Setting Up the General Constants
From Human Resources (G08), choose COBRA Compliance
From COBRA Compliance (G08C1) enter 29
From COBRA Compliance Setup (G08C4), choose COBRA General Restraints
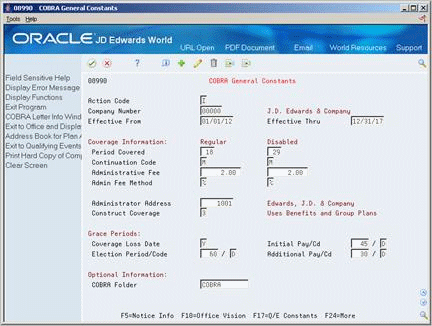
After you set up the COBRA plan, you must set up the COBRA general constants. The constants control COBRA continuation at the company level. You must set up company 00000 as the default company, but you can set up specific companies if a company needs constants different from the default company.
You must also enter the same corresponding information for the qualifying events constants as you enter for the COBRA general constants.
To set up the general constants
On COBRA General Constants
Figure 24-6 COBRA General Constants screen
Description of "Figure 24-6 COBRA General Constants screen"
-
Complete the following fields:
-
Company Number
-
Effective From
-
Effective Thru
-
-
To identify the coverage information, complete the following fields:
-
Period Covered - Regular
-
Period Covered - Disabled
-
Continuation Code - Regular
-
Continuation Code - Disabled
-
Administrative Fee - Regular
-
Administrative Fee - Disabled
-
Administrative Fee Method - Regular
-
Administrative Fee Method - Disabled
-
Administrator Address
-
Construct Coverage
-
-
To define the information for grace periods, complete the following fields:
-
Coverage Loss Date
-
Initial Payment
-
Initial Payment Code
-
Election Period
-
Election Code
-
Additional Payment
-
Additional Payment Code
-
-
Complete the following optional field:
-
COBRA Folder
-
| Field | Explanation |
|---|---|
| Company Number | A code that identifies a specific organization, fund, entity, and so on. This code must already exist in the Company Constants table (F0010). It must identify a reporting entity that has a complete balance sheet. At this level, you can have intercompany transactions.
Note: You can use company 00000 for default values, such as dates and automatic accounting instructions (AAIs). You cannot use it for transaction entries. |
| Continuation Period - COBRA Admin Reg | The length, in months, of the continuation coverage period. |
| Continuation Period - COBRA Admin Dis | The length, in months, of the disabled continuation coverage period. |
| Code - Admin. Fee Freq. Reg | The frequency of the administrative collection period. M = Month |
| Amount - Admin Fee Reg | The flat amount or percentage (up to 2% of the COBRA premium amount) a company can charge for administering COBRA benefits. |
| Amount - Admin Fee Disabled | The amount of the disabled coverage administrative fee. It can be up to 150% of the cost. |
| Method - Admin Fee Regular | A code that specifies the method that the system uses to calculate administrative fees for qualified employees who elect Consolidated Omnibus Budget Reconciliation Act (COBRA) coverage. Valid values are:
A – Monetary amount % – Percentage |
| Method - Admin Fee Disabled | A code that specifies the method that the system uses to calculate administrative fees for disabled employees who elect Consolidated Omnibus Budget Reconciliation Act (COBRA) coverage. Valid values are:
A – Monetary amount % – Percentage |
| Administrator Address | The Address Book number of the plan administrator. The administrator can be an outside organization or a person within your organization.
You can save time and keystrokes by entering a plan administrator number on COBRA General Constants (P08990). Then, each time that you enter a qualifying event for a beneficiary, you can leave the plan administrator number blank and the system supplies the default value that you entered in the constants. |
| Construct Coverage | A code that determines where the system is to retrieve information in order to construct the COBRA coverage.
Valid codes are: 1 – Use benefits administration information only. 2 – Use payroll group plans only. 3 – Use both benefits administration and group plan records. |
| Coverage Loss Date | A code that indicates whether the date that regular coverage ends should be used as the beginning date for COBRA coverage.
Codes are: Y – Yes, use the date that regular coverage ends plus one day as the beginning date for COBRA coverage. N – No, do not use the date that regular coverage ends. Instead, use the date of the qualifying event plus one day. |
| Grace Period - Initial Payment | The limit on the number of days during which the qualified beneficiary must make the initial COBRA payment to remain qualified for coverage. |
| Initial Payment Code | The method used to calculate the length of the initial payment period. The method is expressed in days (D). |
| Period - COBRA Election | The time frame during which the participant may choose to elect COBRA continuation coverage.
Currently, the election period ends 60 days after the later of either:
|
| Election Period Code | The method used to calculate the length of the election period. The method is expressed in days (D). |
| Grace Period - COBRA Payment | The number of days grace period that the participant has to make the COBRA payments and remain qualified for coverage. |
| Addition Payment Code | The method used to calculate the length of the additional payment period. The method is expressed in days (D). |
| COBRA Folder | The name of the folder where COBRA notice documents are stored. Documents in this folder, such as initial COBRA notices and qualifying event notices, are sent to COBRA participants. |
24.4 Reviewing the COBRA General Constants Report
From Human Resources (G08), choose COBRA Compliance
From COBRA Compliance (G08C1) enter 29
From COBRA Compliance Setup (G08C4), choose Print General Constants
You can print the General Constants report to review the COBRA general constants and verify the accuracy of the information. You can also use this report as a cross reference when you enter the constants for qualifying events.
24.5 Setting Up the Constants for Qualifying Events
From Human Resources (G08), choose COBRA Compliance
From COBRA Compliance (G08C1) enter 29
From COBRA Compliance Setup (G08C4), choose Qualifying Events Constants
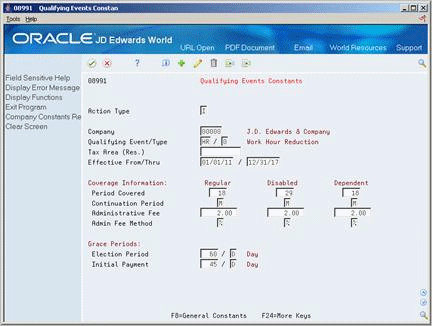
After you set up the COBRA general constants, you must set up the constants for qualifying events. A qualifying event is any event that results in the employee or qualified beneficiary losing group health coverage. These constants control specific qualifying events at the company level. You must set up company 00000 as the default company, but you can set up specific companies if the data is different from the default company. If necessary, you can also set up different qualifying events for a specific tax area.
When you set up the constants for qualifying events, you can refer to the COBRA general constants. Although there might be some exceptions, typically you enter the same corresponding information for the qualifying events constants as you enter for the COBRA general constants.
To set up qualifying events constants
On Qualifying Events Constants
Figure 24-7 Qualifying Events Constants screen
Description of "Figure 24-7 Qualifying Events Constants screen"
-
Complete the following fields:
-
To identify the coverage information, complete the following fields:
-
Period Covered - Regular
-
Period Covered - Disabled
-
Period Covered - Dependent
-
Continuation Period - Regular
-
Continuation Period - Disabled
-
Continuation Period - Dependent
-
Administrative Fee - Regular
-
Administrative Fee - Disabled
-
Administrative Fee - Dependent
-
Administrative Fee Method - Regular
-
Administrative Fee Method - Disabled
-
Administrative Fee Method - Dependent
-
-
To define the information for grace periods, complete the following fields:
-
Election Period
-
Election Period Code
-
Initial Payment
-
Initial Payment Code
-
| Field | Explanation |
|---|---|
| COBRA Qualifying Event 1 | A user defined code (08/QE) that indicates the first (initial) event that qualified a participant for COBRA continuation. You define the coverage months in the Qualifying Event Coverage Months table (F08990).
See also data item QET (Qualifying Event Type). |
| Code - Qualifying Event Type | The number that the system uses to edit and identify an event that qualifies a participant for COBRA coverage. Valid codes are:
0 – Reduction in Hours 1 – Termination of Employment 2 – Divorce or Separation 3 – Medicare Entitlement 4 – Dependent Status Change 5 – Bankruptcy 6 – Death This number is Description-2 of user defined code list (08/QE). It is linked to the specific qualifying event. You should not change it if you change the two-character code that identifies an event. |
| Tax Area (Res.) | A code that identifies a geographical location and the tax authorities for the employee's residence. Authorities include both employee and employer statutory requirements. In Vertex payroll number tax terminology, this code is synonymous with GeoCode. Refer to the Master GeoCode List in the JD Edwards World Tax Reference Guide for valid codes for your locations. |
| Effective From | The first date in a range of dates.
Form-specific information The date on which the qualifying event occurred. Set the from date to encompass the start dates for all qualifying event records that you will be entering. |
| Effective Thru | The date on which the item, transaction, or table becomes inactive or through which you want transactions to display. This field is used generically throughout the system. It could be a lease effective date, a price or cost effective date, a currency effective date, a tax rate effective date, or whatever is appropriate.
Form-specific information The date on which COBRA coverage ends. This date can be several years in the future. |
| Period Covered - Regular | The length, in months, of the continuation period for qualifying coverage for regular participants. |
| Period Covered - Dependent | The length, in months, of the continuation period for qualifying coverage for dependents. |
| Period Covered - Disabled | The length, in months, of the continuation period for qualifying coverage for disabled participants. |
| Continuation Period - Regular | The length of the COBRA regular continuation period. The length is expressed in months (M). |
| Continuation Period - Disabled | The length of the COBRA disabled continuation period. The length is expressed in months (M). |
| Continuation Period - Dependent | The length of the COBRA dependent continuation period. The length is expressed in months (M). |
| Administrative Fee - Regular | The flat amount or percentage (up to 2% of the COBRA premium amount) a company can charge for administering COBRA benefits. |
| Administrative Fee - Disabled | The amount of the disabled coverage administrative fee. It can be up to 150% of the cost. |
| Administrative Fee - Dependent | The amount of the administrative fee. It can be up to 102% of the cost. |
| Administrative Fee Method - Reg | A code identifying whether the administrative fee for qualified employees is dollars (A) or is a percentage (%). The default value is dollars. Valid values are:
A – Monetary amount % – Percentage |
| Administrative Fee Method - Disabled | A code identifying whether the administrative fee for disabled employees is in dollars (A) or is a percentage (%). The default value is dollars (A). Valid values are:
A – Monetary amount % – Percentage |
| Administrative Fee Method - Dependent | A code identifying whether the administrative fee for dependents . is in dollars (A) or is a percentage (%). The default value is dollars (A).Valid values are:
A – Monetary amount % – Percentage |
| Election Period | The time frame during which the participant may choose to elect COBRA continuation coverage.
Currently, the election period ends 60 days after the later of either:
|
| Election Period Code | The method used to calculate the length of the election period. The method is expressed in days (D). |
| Initial Payment | The number of days that the qualified beneficiary has to make the initial COBRA payment and remain qualified for coverage. |
| Initial Payment Code | The method used to calculate the length of the election period. The method is expressed in days (D). |
24.6 Reviewing the COBRA Qualifying Events Report
From Human Resources (G08), choose COBRA Compliance
From COBRA Compliance (G08C1) enter 29
From COBRA Compliance Setup (G08C4), choose Print Qualifying Events
You can print the Qualifying Events report to review all the constants for qualifying events and verify the accuracy of the information.
24.7 Setting Up Profile Data
From Human Resources (G08), choose COBRA Compliance
From COBRA Compliance (G08C1) enter 29
From COBRA Compliance Setup (G08C4), choose Define Types of Data
You set up profile data to track additional information on COBRA qualified beneficiaries. You can track data, such as payment history and address changes.
Depending on your specific requirements, you can choose to set up a profile type in the following formats, or modes:
Defining types of profile data includes:
-
Defining profile data types in narrative format
-
Defining profile data types in code format
-
Defining profile data types in program format
24.7.1 Example: Setting Up a Code Format Data Type
When you define a code format data type, you specify a code title and, typically, a related date or amount. You also associate the code title with a user defined code table. The following example shows how to set up a code format data type that you use to track COBRA election history. The data type is associated with a user defined code table that you have already set up.
Define the information:
-
Code title - Plan/Opt (benefit plans or options that you track)
-
Date title - ElectDte (date coverage was elected)
-
Amt title - Cost (amount of plan and fees)
-
Sy - 08 (system code for the user defined code table that you set up for the COBRA plan type)
-
RT - CP (record type for the user defined code table that you set up for the COBRA plan type)
24.7.2 Before You Begin
-
Set up user defined codes for the profile information that you want to enter in the code format. See Setting Up User Defined Codes in JD Edwards World Human Resources Guide
To define profile data types in narrative format
Figure 24-8 Define Types of Data screen (Dep/Beneficiary Information area)
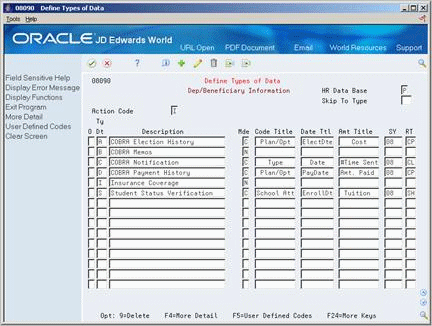
Description of "Figure 24-8 Define Types of Data screen (Dep/Beneficiary Information area)"
-
Complete the following fields:
-
HR Data Base
-
Type Data
-
Description
-
-
Enter N in the following field:
-
Mode
-
| Field | Explanation |
|---|---|
| HR Data Base | A user defined code (08/RC) that specifies a particular database within the Human Resources system. The letter in this field indicates that the database from which the program is drawing information. The databases are:
A – Applicant Information E – Employee Information J – Job Description H – Injury/Illness Case Number P – Dependent/Beneficiary Information R – Requisition Information |
| Ty Dt | A code that you define and use to categorize data within a specific database. The code is often an abbreviation for the data it represents. For example, CC could represent company cars, and EC could represent emergency contacts.
You define these codes using Define Types of Data (P08090). Form-specific information Enter the code for the type of data that you want to track in the Human Resources and Payroll systems. |
| Mde | The format of a data type. This code determines the display mode for supplemental data. Valid codes are:
C – Code format, which displays the form for entering code-specific information. These codes are associated with User Defined Codes table (F0005). N – Narrative format, which displays the form for entering narrative text. P – Program exit, which allows you to exit to the program you specified in the Pgm ID field. M – Message format, which displays the form for entering code-specific information. However, the system can edit the code values you enter against values in the Generic Rates and Messages table (F00191). This code is not used by the Human Resources or Financials systems. |
To define profile data types in code format
-
Complete the following fields:
-
HR Data Base
-
Type Data
-
Description
-
-
Enter C in the following field:
-
Mode
-
-
To specify the information you want to track for this data type, complete the following fields:
-
Code Title
-
Date Title
-
Amount Title
-
-
To associate a user defined code table with the code title, complete the following fields:
-
System Code
-
Record Type
-
-
To enter additional information for the data type, access More Detail.
Figure 24-9 Define Types of Data screen (Dep/Beneficiary Information More Detail area)
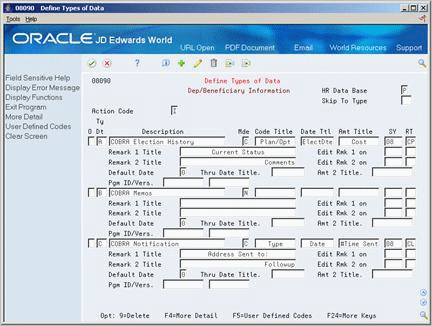
Description of "Figure 24-9 Define Types of Data screen (Dep/Beneficiary Information More Detail area)"
-
Complete any of the following optional fields:
-
Remark 1 Title
-
Edit Remark 1 on
-
Edit Remark 2 on
-
Remark 2 Title
-
Default Date
-
Through Date Title
-
Amount 2 Title
-
-
To create a new user defined code table for this data type, choose the User Defined Codes function.
Figure 24-10 User Defined Code Revisions screen
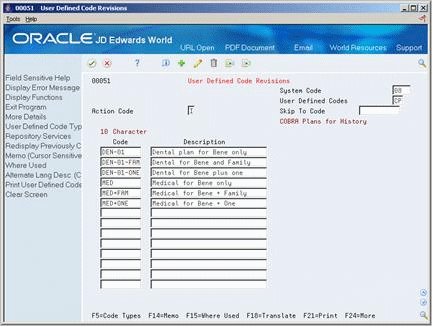
Description of "Figure 24-10 User Defined Code Revisions screen"
-
On User Defined Code Revisions, choose the Code Types function.
Figure 24-11 User Defined Code Types screen
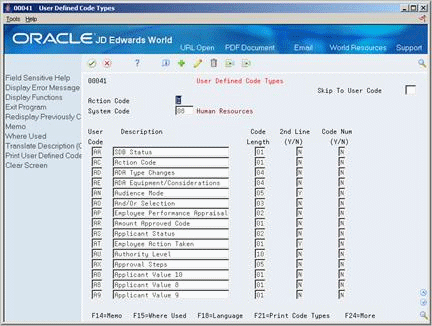
Description of "Figure 24-11 User Defined Code Types screen"
-
On User Defined Code Types, complete the following fields:
-
System Code
-
User Code
-
Description
-
Code Length
-
-
Complete the following fields, if appropriate, and use the Add action:
-
2nd Line
-
Code Number
-
-
To specify the codes to include on the new table, return to User Defined Code Revisions.
-
To locate the new table on User Defined Code Revisions, complete the following fields:
-
System Code
-
User Defined Codes
-
-
Complete the following fields:
-
Code
-
Description
-
Description 2
-
| Field | Explanation |
|---|---|
| Code Title | The heading for a column on Supplemental Data Entry that relates to user defined codes. Enter the user defined codes for the supplemental data type in this column. For example, if the supplemental data type relates to the educational degrees of employees (BA, MBA, PHD, and so on), the heading could be Degree.
Form-specific information Enter the heading you want to display for a column on Profile Data Entry. For example, in Human Resources Benefits this could indicate the COBRA plan, option, type, and so forth. |
| Date Ttl | The title of a supplemental data column heading for the Date field (EFT). For example, a possible column heading for the date field linked to the education data type might be Graduation. |
| Amt Title | The heading for a column on Supplemental Data Entry that relates to an amount. This column contains statistical or measurable information. For example, if the data type relates to bid submittals, the heading could be Bid Amounts. |
| SY | A user defined code (98/SY) that identifies a JD Edwards World system.
Form-specific information The system for the user defined code that is related to the data type. This field works with the RT field to identify the code type table against which the system verifies the data type. If the SY and RT fields are blank, the system does not verify the data type. For example, a valid code for data type SKILL (skills) must exist in the table for (08/SK). If you enter a skill code that is not in the table, the system displays an error message. This field applies only to the code format (C). |
| RT | Identifies the table that contains user defined codes. The table is also referred to as a code type. |
| Remark 1 Title | The heading for a column on Supplemental Data Entry that relates to user defined codes. This heading describes the first Remark field on the data entry form. It contains additional information and remarks. For example, if the data type relates to bid submittals, the heading could be Subcontractor. |
| Remark 2 Title | The heading for a column on Supplemental Data Entry that relates to user defined codes. This heading describes the second Remark field on the data entry form. It contains additional information and remarks. For example, if the data type relates to the educational degrees of employees, the heading could be College or University. |
| Default Date | This flag enables you to control the type of date to allow the system to use in the date field. Valid codes are:
0 – Do not use the system date as the default. Require manual entry of date. 1 – Use the system date as the default when the date is left blank. 2 – Do not display the Date field. |
| Thru Date Title | The title of a row heading you can use to describe the Date field (EFTE). For example, if you set up a record type for professional licenses, a possible row title for the date field might be Expires.
Form-specific information Enter the title you want to display on Profile Data Entry as an end or through date. For example in Human Resources Benefits, you might use this for the title of the field that indicates when the COBRA coverage expires. |
| Amt 2 Title | The title of a row heading which appears next to the Amount 2 field (AMTV). For example, if you set up a record type for stock options, a possible row title for the second amount field might be Strike Price.
Form-specific information The title you want to appear for Amount 2. |
To define profile data types in program format
-
Complete the following fields:
-
HR Data Base
-
Type Data
-
Description
-
-
Enter P in the following field:
-
Mode
-
-
Access the detail area.
-
To specify the program that you want this data type to access, complete the following fields:
-
Program ID
-
Version
-
| Field | Explanation |
|---|---|
| Member ID | The identification, such as program number, table number, and report number, that is assigned to an element of software. |
| Pgm ID/Vers | For World, identifies a group of items that the system can process together, such as reports, business units, or subledgers.
For OneWorld, the name of the version. It is created when the version is added. Form-specific information The DREAM Writer version of the program that you want this data type to access. |
24.8 Setting Up Security for Profile Data
From Human Resources (G08), choose COBRA Compliance
From COBRA Compliance (G08C1) enter 29
From COBRA Compliance Setup (G08C4), choose Data Type Security
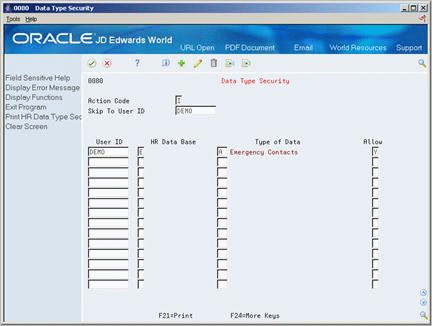
You can restrict access to profile data by database or by data type within a database. You might set up a data type for tracking confidential information that only a few users need to access. For example, you might want to allow only certain individuals access to the COBRA data. Typically, users have access to all profile data types unless you set up security to restrict their access. JD Edwards World system security also applies to profile data.
To set up security for profile data
-
For each user for whom you want to allow or restrict access to profile data, complete the following fields:
-
User ID
-
HR Data Base
-
Allow
-
-
To limit the restriction or inclusion to a specific data type within the profile database that you specified, complete the following field:
-
Type of Data
-
| Field | Explanation |
|---|---|
| HR Data Base | A user defined code (08/RC) that specifies a particular database within the Human Resources system. The letter in this field indicates that the database from which the program is drawing information. The databases are:
A – Applicant Information E – Employee Information J – Job Description H – Injury/Illness Case Number P – Dependent/Beneficiary Information R – Requisition Information Form-specific information The database to which you are restricting access. |
| Type of Data | A code you define and use to categorize data within a specific database. The code is often an abbreviation for the data it represents. For example, CC could represent company cars, and EC could represent emergency contacts.
You define these codes using Define Types of Data (P08090). Form-specific information The specific type of data to which you are restricting employee from access. |
| Allow | A code that indicates whether a user is allowed access to the function key or selection. Valid codes are:
Y – Yes, allow access N – No, prevent access blank – Yes, allow access (default). |
See Also:
-
JD Edwards World Technical Foundation Guide for information about JD Edwards World system security
24.8.1 What You Should Know About
24.9 Generating the Title Search Table
From Human Resources (G08), choose COBRA Compliance
From COBRA Compliance (G08C1) enter 29
From COBRA Compliance Setup (G08C4), choose Build Word Search
When you review profile data by data type or search profile data for people who meet multiple criteria, you can use the Help function to search for a data type by its title. For example, if you are using Profile by Data Type to review prior employment information, and you cannot remember the data type for prior employment, you can use the Help function to search for the data type by its description.
Before you can search for data types in this manner, you must run a program that generates the title search table. When you set up your system, you generate the table after you have defined the types of profile data that you will use. To keep your system up-to-date, you must also generate the title search table after you change profile data types, descriptions, or column headings.
When you generate a word search file, the system automatically submits the batch for processing.
24.10 Transferring Profile Data
From Human Resources (G08), choose COBRA Compliance
From COBRA Compliance (G08C1) enter 29
From COBRA Compliance Setup (G08C4), choose Profile Data Copy/Move
After you define the types of profile data that you will use, you can transfer data from one data type to another within the same database. If you change the data type code for a type of profile data, you can use this program to transfer data from the old data type to the new one. For example, you might have a data type S for skills that contains employee information. If you change the data type code to SK, you can use this program to move that employee information from Data type S to data type SK.
Transferring profile data saves you time and reduces keying errors. You can set processing options to transfer data by:
-
Copying the information, which retains it in one data type and also transfers it to another
-
Moving the information, which deletes it from one data type and transfers it to another
When you copy data, the system retains the information in one data type and transfers it to another data type. When you move data, the system deletes the information from one data type and transfers it to another data type. A report prints whenever you copy or move profile data.
