23 Set Up Benefits Administration
This chapter contains the following topics:
-
Section 23.3, "Setting Up Deductions, Benefits, and Accruals"
-
Section 23.9, "Linking Plans to Categories within a Benefit Group"
-
Section 23.12, "Setting Up Eligibility Tables for Benefit Plans"
-
Section 23.15, "Verifying the Setup of Benefits Administration"
23.1 Setting Up Benefits Administration
Benefit plans include such things as medical coverage, vacation time, and 401(k) plans. Many benefits, such as vacations, require that you set up specific pay types. Eligibility for such plans might depend on a variety of factors, such as length of employment or the position an employee holds in your company. Before you can notify and enroll employees in benefit plans, you must set up benefits administration, including benefit pay types, the DBAs for each benefit, and benefit groups and categories.
To set up benefits so that you can administer the plans, complete the following tasks:
-
Setting Up Pay Types
-
Setting Up Deductions, Benefits, and Accruals
-
Setting Up Benefit Groups
-
Setting Up Group Categories
-
Linking Categories to Groups
-
Setting Up Benefit Plans
-
Setting Up Options for a Benefit Plan
-
Linking Plans to Categories within a Benefit Group
-
Setting Up Date Codes
-
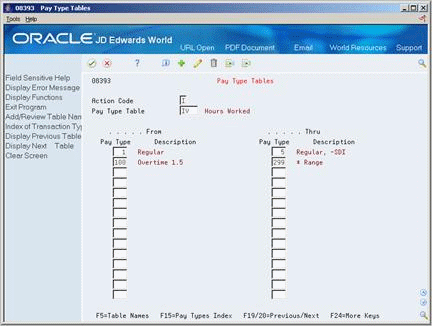
Setting Up Pay Type Tables
-
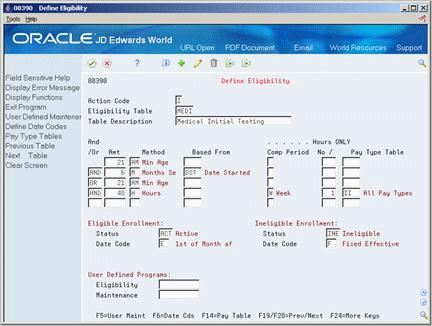
Setting Up Eligibility Tables for Benefit Plans
-
Setting Up Enrollment Parameters
-
Linking 401(k) Allocations Funds to Plans
-
Verifying the Setup of Benefits Administration
Before you can set up a benefit plan, you must set up at least one DBA for each benefit plan and, if wanted, some options. You must also set up pay types. The system uses pay types as the basis to calculate the DBAs for the benefits. You base the calculation for the DBAs on employees' pay. When the system calculates the employees' pay, it also calculates the amount to deduct from each employee's paycheck for medical insurance.
When you set up the benefit plan, you include the DBAs and specify:
-
Effective dates
-
Provider or trustee
-
Payroll deduction and benefit information
-
Eligibility tables
You can set up benefit groups and benefit categories. For example you could set up a benefit group for all management personnel. Your company could have several benefit categories that applied to the management group such as medical, dental, and life insurance. In one of the steps of the setup process you can link the benefit categories to the benefit groups.
After you set up the DBAs, benefit plans, groups, and categories, you can link the benefit plans and options to the benefit categories.
The following graphic illustrates how benefit groups, categories, and plans are linked.
Figure 23-1 How Benefit Groups, Categories and Plans are Linked
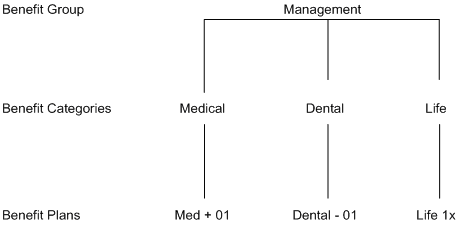
Description of "Figure 23-1 How Benefit Groups, Categories and Plans are Linked"
The system stores the information you set up in various tables. The following graphic illustrates in which tables the system stores the benefit group, category, plan, and option information.
Figure 23-2 Tables that Store Benefit Group, Category, Plan, and Option Information
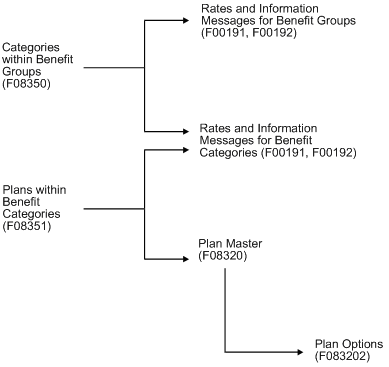
Description of "Figure 23-2 Tables that Store Benefit Group, Category, Plan, and Option Information"
After you set up a benefit plan, you must set up the initial and continuing eligibility tables to define the eligibility rules for the benefit plan. The system uses this information to verify an employee's eligibility for a benefit plan before being enrolled and maintaining participation in the plan. Types of eligibility can include:
-
Age
-
Length of service
-
Hours worked
Date codes determine the enrollment dates for the benefit plan once the employee has passed or failed the eligibility tests. You can set up date codes in one of the following ways:
-
By a specific day of the month
-
By amount of time after a specific date
-
By a specific enrollment date
When you set up the enrollment parameters, you define which action the system uses to determine eligibility when you enroll employees by batch or benefit group selections.
Many companies offer employees a pre-tax savings retirement plan that is generally referred to as a 401(k) plan. After setting up a 401(k) plan, you can link allocation investment funds to the 401(k) plan to manage contributions to the funds.
After you complete the setup steps, you can run reports to review your work and verify that you have correctly set up the plans for your benefits program.
23.2 Setting Up Pay Types
From Human Resources (G08), choose Benefits Administration
From Benefits Administration (G08B1), enter 29
From Benefits Administration Setup (G08B4), choose Pay Type Setup
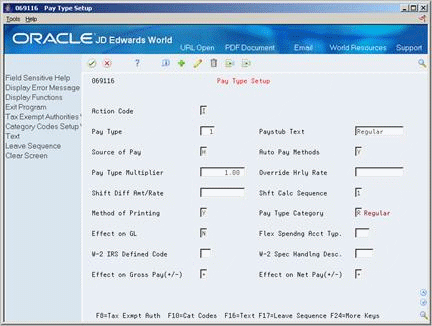
You set up pay types to categorize the various earnings employees receive to direct labor to different accounts in the general ledger. You can specify up to 999 different pay types, using the range of numbers 001 to 999. For example, most companies need to set up different pay types for holiday, sick, and vacation pay or for personal leave pay.
Setting up pay types also allows you to:
-
Specify how different pay types are used when computing employee pay
-
Define different pay types for different benefits
-
Specify that a pay type is tax exempt
-
Specify information to be printed on 1099 and W2 forms for the associated pay type for U.S. payroll
-
Specify if hours and dollar amounts should be passed to the general ledger
-
Complete the following fields:
-
Pay Type
-
Pay stub Text
-
Source of Pay
-
Automatic Pay Methods
-
Pay Type Multiplier
-
Shift Differential Calculation Sequence
-
Method of Printing
-
Pay Type Category
-
Effect on General Ledger
-
Effect on Gross Pay
-
Effect on Net Pay
-
-
Complete the following optional fields:
-
Override Hourly Rate
-
Shift Differential Amount/Rate
-
W-2 IRS Defined Code
-
W-2 Special Handling Code
-
| Field | Explanation |
|---|---|
| Pay Type | A code to define the type of pay, deduction, benefit, or accrual.
Pay types are numbered from 1 to 999. Deductions and benefits are numbered from 1000 to 9999. Form-specific information Pay type 001 is typically defined for regular pay. JD Edwards World recommends that you do not change this pay type. Autopay uses pay type 001 as the default pay type unless otherwise noted at the employee level. |
| Pay stub Text | A description, remark, explanation, name, or address.
Form-specific information The text that you want the system to print on the employee's pay stub. For the Time Accounting system: The Time Accounting system does not create paychecks. However, this field is required to complete the form. Generally, the information you enter in this field is a description of the pay type. |
| Source of Pay | A user defined code (07/PB) that identifies the value upon which the system bases the employee's pay, for example, H for hours worked.
Valid values include:
|
| Auto Pay Methods | A code that determines how the system treats this pay type when computing automatically generated pay (typically for salaried employees). It also identifies supplemental pay. Valid codes are:
Y – The dollars with this pay type are part of the employee's base pay, for example, regular, holiday, sick, and vacation pay. N – The dollars with this pay type are in addition to the employee's base pay, for example, overtime pay and time off without pay. S – The hours with this pay type are subtracted from the employee's base pay at standard rate and added back at the entered pay rate. B – The dollars with this pay type are in addition to the employee's base pay and are treated as supplemental pay for taxation purposes, for example, bonuses, commissions and payoffs. C – The hours/dollars entered using this pay type override all autopay instructions. If multiple jobs are used, a Y in this field might cause the pay type to be paid in addition to the regular pay. If you have overridden the job code/job step, home business unit, or position at time entry, multiple active jobs exist for this employee, and the overridden information does not match an existing active job record, this system processes this as additional pay. JD Edwards World recommends that you always use a pay type with N in this field when paying someone for work in addition to their regular pay. This ensures that the system processes the pay type the same in multiple-job or single-job situations. If your company docks employees' pay when they take leave in excess of what has been earned, you should have pay type 997 set up as the pay type to dock pay. Enter N as the autopay method for this pay type. If your company attaches contract calendars to employees to accumulate wages, you should have pay type 996 set up as the pay type to dock pay. Enter C as the autopay method for this pay type. |
| Pay Type Multiplier | A factor by which the base hourly rate is multiplied to obtain the actual payment hourly rate. For example, you could use 1.5 to designate time-and-one-half for overtime pay. Zero (0) is not a valid multiplier. |
| Shft Calc Sequence | A code that specifies how the system should calculate shift differential.
1 – The pay type multiplier is applied to the shift differential: Gross = (rate + shift differential) x (multiplier) x hours 2 – The pay type multiplier is applied only to the hourly rate and does not include the shift differential: Gross = (rate x multiplier) + (shift differential) x hours The multiplier is the pay rate multiplier from the Pay Type file. When the pay rate is derived from the Union Rate Table, the multiplier is assumed to be 1 as it is built into the table. In this case, both methods produce the same result. Form-specific information You can specify a code in this field or on the Shift Rate Differentials form. |
| Method of Printing | Identifies whether the item is to be printed on the pay stub and whether the item is to be printed on a separate check from other payroll items. Valid codes are:
Pay Types/Payroll Taxes: Y – Print on pay stub (default) S – Print separate check (one item per check) C – Print separate check (C types combined) N – Do not print on pay stub Deduction/Benefit/Accrual Types: Y – Print as total deductions (default) S – Print separate check (one item per check) C – Print separate check (include detail) N – Do not print on pay stub I – Print individual transactions T – Print by DBA Print Group The separate check feature is not available for any payroll taxes being withheld from the employee's paycheck. |
| Pay Type Category | A user defined code (07/PC) that specifies the pay type categories you want to use:
Form-specific information Pay type category codes provide a method for grouping different pay types. Enter the pay type category code that corresponds to the desired group. Standard codes are
You can have more than one type of pay for each category. For example: R – Might include four pay types: regular, holiday sick, and vacation V – Might include two types of pay: time and a half and double-time O – Might include pay types such as: time without pay, short-term disability, jury duty, military leave The Automatic Timecard Generator program uses the hours associated with each pay type in the group to determine an individual's overtime hours. To include a timecard in automatic overtime calculation, its pay types must be included in the pay type category you specify. |
| Effect on GL | A code that indicates whether you want journal entries passed from payroll to the general ledger and the method you want to use. Valid codes are:
Y – Pass dollars only to the general ledger. N – Pass dollars and hours to the general ledger. M – Do not pass dollars or hours to the general ledger and do not calculate workers' compensation and general liability. H – Pass hours only to the general ledger. This code is valid for Generate Timecard Journals. It should not be used when journals are generated through the pay cycle. W – Do not pass dollars or hours to the general ledger but calculate workers' compensation and general liability. Workers' compensation and general liability amounts will be passed to the general ledger. |
| Effect on Gross Pay(+/-) | This code indicates whether the pay type is added to, subtracted from, or does not affect the employee's gross pay. Valid values are:
(+) – Pay type will be added to the employee's gross pay. (-) – Pay type will be subtracted from the employee's gross pay. ( ) – Pay type will not effect the employee's gross pay. A pay type should not have a negative effect on gross pay. If you set up a pay type to have a negative effect on gross or net pay, gross-to-net errors appear on the Payroll Register. |
| Effect on Net Pay(+/-) | This code indicates whether the pay type is added to, subtracted from, or does not affect the employee's net pay. Valid values are:
(+) – Pay type will be added to the employee's net pay. (-) – Pay type will be subtracted from the employee's net pay. ( ) – Pay type will not have an effect on the employee's net pay. A pay type should not have a negative effect on net pay. If you set up a pay type to have a negative effect on gross or net pay, gross-to-net errors appear on the Payroll Register. |
| Override Hrly Rate | The value in this field is either a percentage, a monetary amount, or an hourly rate, depending on where it is used:
1 – For a deduction, benefit, or accrual, the meaning of this field depends on the Method of Calculation. The method determines if the deduction is a flat dollar amount, a percentage, or a multiplication rate. Table method DBAs, depending on which table method they use, can either use this amount in the calculation or ignore it. If there are exceptions to the table calculation, you can override the table code in the fold area, set up a flat dollar DBA amount, or override the amount in One Time Overrides. 2 – For a pay type, amounts entered in this field override the hourly rate. Form-specific information A dollar amount or hourly rate that overrides any default values for rate, for example, per diem rates. |
| Shift Diff Amt/Rate | An additional rate, expressed in dollars or percent, added to an employee's hourly rate, depending on the shift worked. This rate can be applied in one of two ways as defined by the Shift Differential Calculation Sequence (data item CMTH).
Form-specific information Percentage amount not applicable to this form. This amount should be expressed in dollars only. |
23.2.1 What You Should Know About
23.3 Setting Up Deductions, Benefits, and Accruals
Before you can administer your benefits, you must set up a deduction, benefit, or accrual (DBA) for each benefit your company offers. DBAs integrate your benefits with payroll. A DBA identifies monetary amounts or percentages that must be deducted from, contributed to, or included with an employee's wages. After you set up the DBAs, you attach them to the appropriate benefit plan. You can define up to 9000 different DBAs. Valid numbers range from 1000 to 9999.
Setting up deductions, benefits, and accruals includes the following tasks:
-
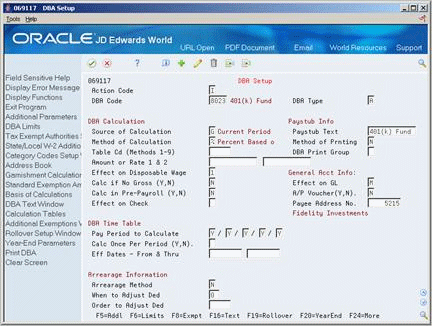
Setting up a DBA
-
Identifying additional information and limits for a DBA
-
Setting up tax status for a DBA
-
Setting up a tax-deferred compensation deduction
-
Setting up calculation tables
Different types of benefits require different steps in the setup process. You might not need to complete each step for all benefits in your plan. For example, you must set up tax-deferred status for your 401(k) benefit, but you would not need to complete this step when you set up a vacation benefit.
Deductions are amounts withheld from an employee's pay. For example, you can set up deductions for the employee's contribution to a medical plan or to a 401(k) plan.
Benefits are amounts that the company provides for a particular employee benefit. For example, you can set up a benefit so that the company matches an employee's 401(k) contribution or for the company portion of the medical plan expense.
Accruals are typically sick time and vacation time accrued by the employee. You also set up 401(k) allocation funds as accruals.
See Also:
23.3.1 Setting Up a DBA
From Human Resources (G08), choose Benefits Administration
From Benefits Administration (G08B1), enter 29
From Benefits Administration Setup (G08B4), choose DBA Setup
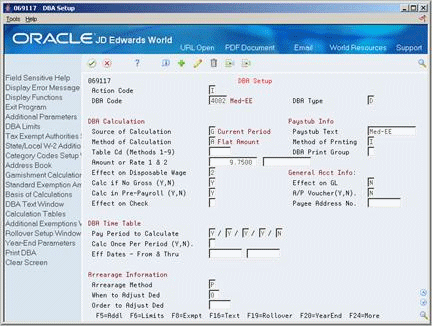
You can set up a simple DBA that specifies the minimum amount of information the system needs to perform the calculation. Typically, you will want to calculate a simple DBA in one of two ways:
When you set up a DBA, you can do one of the following:
-
Specify the actual amount or rate to calculate
-
Omit the actual amount or rate to calculate
If you omit the actual flat dollar amount or the percentage rate information during setup, you can enter it when you assign the DBA at the group, employee, or timecard level.
-
To designate whether this is a deduction, a benefit, or an accrual complete the following field:
-
DBA Type
-
-
Complete the following fields:
-
DBA Code
-
Source of Calculation
-
Method of Calculation
-
-
If you want the same amount or rate to apply to all employees assigned the DBA, complete the following field:
-
Amount or Rate 1
-
-
To include a brief description of the DBA, complete the following field:
-
Pay stub Text
-
-
If this is a benefit, complete the following field:
-
Effect on Check
-
-
If you want the DBA to be effective for a specific period of time, complete the following fields:
-
Effective Date From
-
Effective Date Thru
-
-
Use the Add action.
-
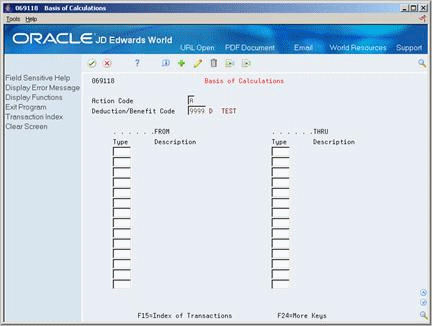
On Basis of Calculations, if you want to include all pay types (1 - 999) for calculating the DBA, exit the Basis of Calculation form without making any entries.
-
On Basis of Calculations, if you want to limit the PDBAs, complete the following fields with the range of pay types you want included in the calculation and press Enter:
-
From PDBA Type
-
Thru PDBA Type
-
-
On DBA Setup, locate the DBA.
-
Review the values supplied by the system for the following fields:
-
Effect on Disposable Wage
-
Calculate if No Gross
-
Effect on General Ledger
-
A/P Voucher
-
Pay Period to Calculate
-
Calculate Once Per Period
-
Arrearage Method
-
When to Adjust Deductions
-
-
If you want DBA information to appear on the employees' pay stubs, verify the following fields:
-
Method of Printing
-
Calculate in Pre-Payroll
-
| Field | Explanation |
|---|---|
| DBA Type | A code used to distinguish between the following types of payroll entries:
P – Time Cards (Earnings) D – Deductions withheld B – Benefit (both cash and non cash) A – Accrual of sick, vacation, compensation, and so forth Note: These codes may only be changed by JD Edwards World If you enter an * in this field the system displays all four types of PDBAs. |
| DBA Code | A code to define the type of pay, deduction, benefit, or accrual.
Pay types are numbered from 1 to 999. Deductions and benefits are numbered from 1000 to 9999. Form-specific information The DBA code 9997 is reserved for Overpayment. Do not change this deduction code. Sick and vacation accruals must have a specific numbering order. You must assign a higher number for the time available code when you are also assigning a time accrued code. For example, if vacation accrued is 8001, vacation available must be 8002 or greater. |
| Source of Calculation | A user defined code (07/DB) that defines what the deduction, benefit, or accrual (DBA) is based on. A numeric code indicates that the DBA is based on a disposable net wage calculation. When the system calculates the gross amount for a disposable net wage, it does not use the basis of calculation. The gross amount includes all earnings that have a +/+ effect on gross/net.
For wage attachments use one of the following codes: 1 - 7 – Garnishment Tax levy Wage assignment (child support and maintenance) R – Loan Interest 0 – Fees |
| Method of Calculation | A user defined code (07/DM) that indicates which method the system uses to calculate the deduction, benefit, or accrual.
The method values are pre-set by JD Edwards World. If you use methods 0 - 6, 8, 9, G, or Z, you must also enter a value in the Table Code field. For wage attachments use one of the following methods: C – Wage assignment (child support and maintenance) G – Garnishment K – Loan L – Tax levy A – Fees % – Interest |
| Method of Printing | Identifies whether the item is to be printed on the pay stub and whether the item is to be printed on a separate check from other payroll items. Valid codes are:
Pay Types/Payroll Taxes: Y – Print on pay stub (default) S – Print separate check (one item per check) C – Print separate check (C types combined) N – Do not print on pay stub Deduction/Benefit/Accrual Types: Y – Print as total deductions (default) S – Print separate check (one item per check) C – Print separate check (include detail) N – Do not print on pay stub I – Print individual transactions T – Print by DBA Print Group The separate check feature is not available for any payroll taxes being withheld from the employee's paycheck. |
| Amount or Rate 1 & 2 | The value in this field is either a percentage, a monetary amount, or an hourly rate, depending on where it is used:
1 – For a deduction, benefit, or accrual, the meaning of this field depends on the Method of Calculation. The method determines if the deduction is a flat dollar amount, a percentage, or a multiplication rate. Table method DBAs, depending on which table method they use, can either use this amount in the calculation or ignore it. If there are exceptions to the table calculation, you can override the table code in the fold area, set up a flat dollar DBA amount, or override the amount in One Time Overrides. 2 – For a pay type, amounts entered in this field override the hourly rate. Form-specific information The first amount or rate associated with a deduction, benefit, or accrual. Because many DBA types require multiple tiers, two Amounts (Rates) exist. The system uses Amount (Rate) 1 until the first annual limit is reached. Then the system uses Amount (Rate) 2, beginning with the next time the employee is paid and continuing until the second annual limit is reached. These fields work in conjunction with the annual limit fields. |
| Effect on Disposable Wage | This code designates whether a DBA is subtracted from gross to determine an employee's disposable wages. Valid codes are:
1 – Voluntary. These deductions are subtracted from gross to determine disposable wages for deductions with a Source of Calculation of 1, 5, and 7. 2 – Mandatory. These deductions are subtracted from gross to determine disposable wages for deductions with Source of Calculation of 1, 2, 4, 5, 6, and 7. |
| Effect on GL | A code indicating whether you want journal entries passed from payroll to the general ledger and the method you want to use. Valid codes are:
N – Pass dollars only to the general ledger. M – Do not pass dollars or hours to the general ledger. This code allows an accrual to be tracked in employee payroll history and the dollars to be omitted from the general ledger. Form-specific information When you enter B in the Method of Calculation field to accumulate wages, use the following values to indicate the effect on the general ledger: If your organization uses accrual basis accounting, enter N. If your organization uses cash basis accounting, enter M. |
| Calc in Pre-Payroll (Y,N) | A code specifying whether a benefit or accrual is calculated during pre-payroll processing. Valid codes are:
Y – Yes, calculate during pre-payroll processing. N – No, calculate during the journal entry step of the payroll cycle. In general, all benefits and accruals are calculated during the processing of journal entries because they do not affect the gross-to-net calculation. However, certain benefits, such as group life insurance and the corresponding excess life insurance benefit, must be calculated in pre-payroll because they affect the gross-to-net calculation. If you want the benefit or accrual to print on the employee's pay stub, use Y and complete the Method of Printing field. |
| A/P Voucher(Y,N) | A code used to determine whether the system should generate a voucher for the DBA, tax, or wage attachment during the final update phase of the payroll processing cycle. Valid codes are:
N – No, do not generate a voucher Y – Yes, generate a voucher |
| Pay Period to Calculate | A code designating the pay period in which the system calculates the DBA or auto deposit. Valid codes are:
Y – Take the DBA or auto deposit during the current period. N – Do not take the DBA or auto deposit during the current period. * – Take the DBA or auto deposit only during the first pay period of each month that the employee works based on the ending date of this month's pay period. blank – Continue to look for a code at the lower level. The system searches for DBA or auto deposit rules first at the employee level, then at the group level, and finally at the DBA master level. If the field is blank at all levels, the system does not calculate the DBA or auto deposit in that period. M – Use this value only in the field for a fifth period to calculate the benefit during the special, or manual, timecard post. M applies only to benefits based on gross hours or dollars. An M implies a Yes for a weekly withholding frequency. You should not use this value for any DBA with B in the Method of Calculation field. |
| Arrearage Method | A code indicating how to adjust deductions when the employee is in a negative pay situation. Valid codes are:
P – Do a partial or full deduction as needed. This is the default. F – Do a full reduction or none at all. N – Do not reduce. Q – Same as code P. Place the amount in arrears, but do not apply the limits when collecting the arrearage. R – Same as code P. Place the amount in arrears and apply the limits when collecting the arrearage. G – Same as code F. Place the amount in arrears, but do not apply the limits when collecting the arrearage. H – Same as code F. Place the amount in arrears and apply the limits when collecting the arrearage. |
| Calc Once Per Period (Y,N) | A code that indicates whether the deduction, benefit, or accrual should be calculated only once in a pay period if the employee receives more than one check. |
| DBA Time Table | A code that indicates when to adjust (back out) deductions. Valid values are:
0 – Adjust deductions marked with 0 before payroll taxes. 1 – Adjust deductions marked with 0, then those marked with 1 before payroll taxes. 2 – Adjust payroll taxes before the deductions marked with 2. |
23.3.2 What You Should Know About
See Also:
-
Section 23.3.7, "Setting Up a Calculation Table" if you need to set up a DBA on a calculation table instead of a flat monetary amount or a percent of wages.
23.3.3 Identifying Additional Information and Limits for a DBA
From Human Resources (G08), choose Benefits Administration
From Benefits Administration (G08B1), enter 29
From Benefits Administration Setup (G08B4), choose DBA Setup
To identify additional information and limits for a DBA
On DBA Setup
-
Complete the steps to set up a DBA.
-
Choose the Additional Parameters.
Figure 23-6 DBA Additional Information screen
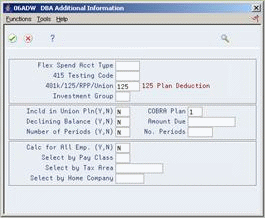
Description of "Figure 23-6 DBA Additional Information screen"
-
On the DBA Additional Information window, complete the following fields, as needed:
-
Flexible Spending Account
-
COBRA Plan
-
Include in Union Plan
-
Calculate for All Employees
-
Select by Pay Class
-
Select by Tax Area
-
Select by Home Company
-
-
For most benefits, you can accept the default values for the following fields:
-
Declining Balance
-
Number of Periods
-
-
Exit DBA Additional Information.
-
On DBA Setup, locate the DBA and choose the Limits function.
-
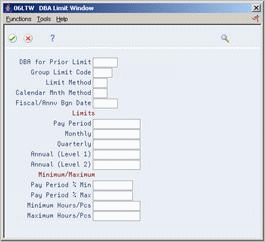
On DBA Limit Window, complete any of the following optional fields:
-
DBA for Prior Limit
-
Group Limit Code
-
Limit Method
-
Calendar Month Method
-
Fiscal Anniversary Beginning Date
-
Pay Period Limit
-
Monthly Limit
-
Quarterly Limit
-
Annual Limit (Level 1)
-
Annual Limit (Level 2)
-
Pay Period Percent - Minimum
-
Pay Period Percent - Maximum
-
Minimum Hours/Pieces
-
Maximum Hours/Pieces
-
| Field | Explanation |
|---|---|
| Investment Group | A user defined code (07/AI) that indicates the grouping to be used when balancing accruals for investing in various funds. For "split" investments, the total deduction must total 100% of the amount specified. For example, an employee has a 401(k) deduction which has been elected to be split three ways:
10% 20% 70% These "splits" are three additional DBAs. To ensure that the three "splits" (or accruals) total 100%, you must:
Form-specific information The dollar limit for dependents is $5000. The company-defined limit for medical is usually $2500. |
| COBRA Plan | A code to designate if a DBA is valid for COBRA. Valid codes are:
0 – No 1 – Yes |
| Incld in Union Pln(Y,N) | A code that indicates if a DBA is associated with a union or group plan. If you enter Y, the union/group plan, job type, and job step from the Employee Master are carried into the DBA Detail table (F0609) when the DBA is created from the Employee DBA Instructions.
Adding the union/group plan, job type, and job step to a DBA affects the following: 1 – Which timecards the DBA is allocated to during the payroll journal process. For more information on the allocation, see the help for P062902 (U.S.) or P07290 (Canada). 2 – Historical reporting, which uses the information for selection purposes. |
| Calc for All Emp. (Y,N) | A code specifying whether the DBA is required.
If you enter Y (Yes) in this field, the system calculates the DBA for all employees who qualify. If the DBA is specified as required, it is not necessary to define the DBA at any level other than the DBA setup level. The system automatically processes the DBA for all qualifying employees. When you use this code, it reduces the information you must maintain for the DBAs that you set up for plans or employees. The system further screen the records when applying DBAs to employees, if you complete the following fields on DBA Additional Information:
A blank in any of these fields will include all employees. Note: The system also uses Tax Area (TARA) and Home Company (HMCO) as screening criteria for DBAs that are not required. If either of these two fields are filled, regardless of whether Calculate for All Employees = Y, the system checks employees' tax areas and home company prior to calculating the DBA. |
| Select by Pay Class | A code that indicates how an employee is paid. Valid codes are:
" " – Blank H – Hourly S – Salaried P – Piecework |
| Select by Tax Area | A code that identifies a geographical location and the tax authorities for the employee's work site. Authorities include both employee and employer statutory requirements. In Vertex payroll tax terminology, this code is synonymous with GeoCode. Refer to the Master GeoCode List in the JD Edwards World Tax Reference Guide for valid codes for your locations. |
| Select by Home Company | The company number in which the employee generally resides. |
| DBA for Prior Limit | A code that identifies another DBA whose limit must be met first before this DBA calculates. For example; deduction 1400 has an annual limit of $2,000.00. After this limit is met, deduction 1500 begins calculation and withholding.
The DBA number of the predecessor must be lower than the successor's number. |
| Group Limit Code | A user defined code (07/GR) that groups together DBAs that share common limitations. Use this field to group together wage assignments for the split of available wages. |
| Limit Method | Indicates which history file the system uses for DBA limits. Valid values are:
blank – This is the default. The system applies monthly, quarterly and annual limits to calendar month history. The system stores fiscal and anniversary history by pay period ending date. 1 – The system applies monthly, quarterly and annual limits to payroll month history. Use this method for retirement plans such as 401(k) or RRSP. The system stores fiscal and anniversary history by check date. 2 – The system applies monthly and quarterly limits to calendar month history. It applies annual limits to fiscal and anniversary history. It stores fiscal and anniversary history by pay period ending date. 3 – The system applies monthly and quarterly limits to payroll month history. It applies annual limits to fiscal and anniversary history. The system stores fiscal and anniversary history by check date. |
| Calendar Mnth Method | This method determines how the system stores transition months for calendar month history. Transition months occur when the pay period crosses into another month. Valid codes are:
blank – This is the default. If timecards exist for both months, the system prorates DBAs to the pay period ending date and the last day of the previous month. 1 – The system allocates DBAs to the pay period ending date. |
| Fiscal/Annv Bgn Date | A user defined code (07/AF) that specifies when the rollover year begins. If blank, the system rolls the accrual over at the end of the standard calendar year (December 31, XXXX).
To specify a fiscal year, enter the user defined code FISC. The system will use the fiscal year setup for the employee's home company. To specify an anniversary year, enter any of the other codes in the user defined code table. For instance, if you want the rollover year to begin on the employee's date of birth, use code DOB. |
| Pay Period | The maximum amount that can be withheld or accrued in a pay period. For a deduction or a benefit, this amount is expressed in dollars. For an accrual, this amount is expressed as a limit on hours. |
| Monthly | The maximum amount that can be withheld or accrued in a month. For a deduction or a benefit, this amount is expressed in dollars. For an accrual, this amount is expressed as a limit on hours. |
| Quarterly | The maximum amount that can be withheld or accrued in a quarter. For a deduction or benefit, this amount is expressed in dollars. For an accrual, this amount is expressed as a limit on hours. |
| Annual (Level 1) | The maximum amount to be withheld or accrued in a year. For a deduction or a benefit, this amount is expressed in dollars. For an accrual, this amount is expressed as a limit on hours.
Note: For the Payroll system, this field can represent either an initial annual limitation or a final limitation in a year:
|
| Annual (Level 2) | The maximum amount to be withheld or accrued in a year for a DBA. For a deduction or a benefit, this amount is expressed in dollars. For an accrual, this amount is expressed as a limit on hours.
Note: This field represents the second level annual limitation. It is used when there is an initial limitation, and a corresponding rate, which is followed up by a new rate and final limitation. This field can not be used independently. There must always be a value in the Annual (Level 1) field. |
| Pay Period % Min | The minimum percentage amount that can be specified for the DBA. The amount of the transaction can never be less than this minimum. |
| Pay Period % Max | The maximum percentage of pay that the calculated deduction or benefit amount may not exceed. This percentage works in conjunction with the dollar limits of the deduction or benefit, so whichever limit is reached first stops the calculation. For accrual transactions, this field represents an hour's limit. |
| Minimum Hours/Pcs | The minimum number of hours worked or pieces produced in order for a DBA to be calculated. If the number of hours worked or pieces produced is less than this amount, the system assumes zero hours when it calculates the DBA. The system uses this field only if the source of calculation or arrearage method is H or I. |
| Maximum Hours/Pcs | The maximum number of hours worked or pieces produced that a DBA can be based on. If the actual hours worked or the pieces produced are greater than the specified maximum, the system bases the calculation on the maximum. |
23.3.4 Setting Up the Tax Status for a DBA
From Human Resources (G08), choose Benefits Administration
From Benefits Administration (G08B1), enter 29
From Benefits Administration Setup (G08B4), choose DBA Setup
Whenever you set up a benefit you must identify it as one of the following:
Caution:
Do not change taxable status for any DBA in the middle of the year. Previously calculated taxable amounts and taxes do not automatically change as the taxable status changes.Additionally, you can identify any DBA as exempt from one or more taxes even though it might be taxable for other tax types.
To set up tax status for a DBA
On DBA Setup
-
Complete the steps for setting up DBA.
-
If you are entering a benefit, complete the following field to identify the tax status:
-
Effect on Check
-
-
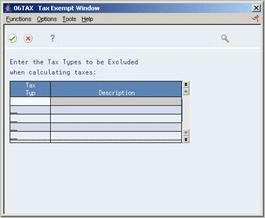
If you want the DBA to be exempt from one or more taxes, choose the Exempt function.
-
On Tax Exempt Window, enter one or more taxes in the following field:
-
Tax Type
-
| Field | Explanation |
|---|---|
| Effect on Check | This field is used to indicate the effect a benefit has on gross and net income. Valid codes are:
1 – Non-cash benefit that is non-taxable. The benefit will not have an effect on gross or net income (journal entry only). 2 – Cash benefit that is taxable. The benefit will be added to both gross and net income. 3 – Non-cash benefit that is taxable. The benefit will be added to gross income and has no effect on net income. (No effect on net income other than the tax withheld.) 4 – Cash benefit that is non-taxable. There is no effect on gross income and the benefit will be added to net income. |
| Non-Taxable Authority Types 01 | You can specify up to 15 tax types for which the respective payroll tax is not to be computed for a pay, deduction, or benefit code.
If you enter an asterisk (*) in the first element of this list, no taxes are computed. Form-specific information For U.S. state and local tax types, you can use two methods of coding:
During payroll processing, both methods of coding result in the DBA being exempt from taxes of the specified type. For example, with either F or *F, the system exempts the DBA amount from income taxation in all states. W-2 processing differs depending on the presence or absence of an asterisk. If you need to add back wages to specific states at year-end, you need to specify F in this field when setting up DBA or Pay types. For single-character state and local tax types that are to be added back during W-2 processing, specify the tax areas on the State/Local W-2 additions window. |
23.3.5 What You Should Know About
| Topic | Description |
|---|---|
| Year-end considerations | There are important considerations for DBAs during year-end processing.
See the Payroll Year End Guide for the current year. |
23.3.6 Setting Up a Tax-Deferred Compensation Deduction
From Human Resources (G08), choose Benefits Administration
From Benefits Administration (G08B1), enter 29
From Benefits Administration Setup (G08B4), choose DBA Setup
You set up a tax-deferred compensation deduction when you are deducting an amount from the employee's pay for compensation programs that defer taxes until the funds are distributed or until the funds are removed from the plan. RRSP and 401(k) plans are examples of a deduction for tax-deferred compensation. This type of deduction is generally a percentage of the employee's gross pay, for example, an employee might contribute 10% of gross pay to an RRSP retirement plan.
When you set up tax exempt or pre-tax deductions other than 401(k), 403(b), 408(k), 457, 501c, Section 125, or RRSP deductions, you can enter the tax types that are exempt instead of setting up the DBA to defer the compensation from taxes.
Caution:
Do not change taxable status for any DBA in the middle of the year. Previously calculated taxable amounts and taxes do not automatically change as the taxable status changes.To set up a tax-deferred compensation deduction
On DBA Setup
-
Complete the steps for setting up a simple deduction.
-
Choose the Additional Information function.
Figure 23-9 DBA Additional Information screen
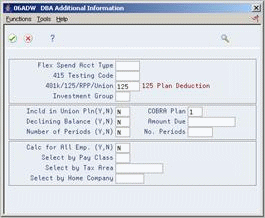
Description of "Figure 23-9 DBA Additional Information screen"
-
On DBA Additional Information to indicate that this is a tax-deferred deduction, enter the appropriate value in the following field:
-
401k/125/RPP/Union
-
-
Review the values supplied by the system for the following fields and press Enter:
-
Include in Union Plan
-
Declining Balance
-
Number of Periods
-
Calculate for All Employees
-
| Field | Explanation |
|---|---|
| 401k/125/RPP/Union | If one of the pre-determined user defined codes is entered, your selected tax package (for example Vertex) will use current tax laws in the various jurisdictions to determine whether the DBA is pre-tax in that tax area.
Code 401 represents all deferred compensation plans (401k, 403b, 408k, 457 and 501c). Code 125 represents Section 125 plans. Using either of these codes eliminates the need to set up tax-exempt status in the P06TAX window or have multiple deductions to accommodate pre-tax status in one state but not another. For Canadian users, code RPP represents Canadian Registered Pension Plans or Registered Retirement Savings Plans. Code UN is used for Canadian union dues. Form-specific information For flexible spending accounts (U.S. only), this field indicates that pre-tax dollars are used. |
23.3.7 Setting Up a Calculation Table
From Human Resources (G08), choose Benefits Administration
From Benefits Administration (G08B1), enter 29
From Benefits Administration Setup (G08B4), choose DBA Setup
You set up calculation tables to define the parameters for calculating DBAs that are based on variable values. You define valid ranges and amounts that are a function of certain method codes.
Calculation tables contain user defined information to more completely define the standard DBA methods of calculation. Calculation tables provide the following features:
-
User defined tables
-
Calculations based on values that vary from employee to employee
When you define a calculation table, you must first determine what the calculation is based on, for example:
-
Age
-
Annual salary
-
Months of service
-
Hours worked in a pay period
After you have defined the calculation table, you must determine the appropriate method of calculation. The calculation tables only work with certain method of calculation codes. The method of calculation indicates what the ranges in the table represent, such as age ranges or salary ranges. The method of calculation codes include the following:
-
0 - Withholding periods
-
1 - Salary range
-
2 - Date range
-
3 - Age range (calculated by date of birth)
-
4 - Hours worked
-
5 - Pieces produced
-
6 - Variable periods
-
8 - Gross pay range
-
9 - Age (calculated as of the date you enter in the Employee Age field on Pay Rate Information)
-
Z - Age range by actual date of birth
For example, to base a DBA on employee age, you can use codes 3, 9, or Z for the method of calculation.
Browse through the list of table methods and choose one appropriate to the method of calculation. Read the description to find one that matches how you want the system to perform the calculation.
On DBA Setup
-
Complete the steps to set up a DBA.
-
Complete the following fields:
-
Method of Calculation
-
Table Code
-
-
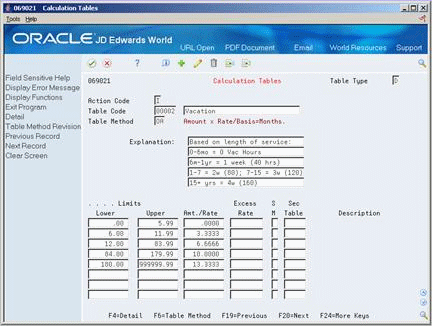
Choose the Calculation Tables function.
-
On Calculation Tables, complete the following fields:
-
Table Type
-
Table Code
-
Table Method
-
-
To define the parameters of the table, complete the following fields:
-
Lower Limit
-
Upper Limit
-
Amount or Rate
-
-
Complete the following optional fields:
-
Excess Rate
-
Secondary Calculation Method (SM)
-
Secondary Calculation Table
-
-
Repeat steps 2 and 3 as often as necessary to define all the parameters needed for the table.
| Field | Explanation |
|---|---|
| Table Type | A code that defines the purpose of the table. Valid values are:
D – The system uses the table to calculate DBAs. R – The system uses the table to determine limits for rolling over sick and vacation accruals. |
| Table Code | A numeric code that identifies this table in the Table file (F069026). |
| Table Method | A code that specifies the method the system uses to calculate the DBA.
Form-specific information This code indicates the type of information in the Amount field, for example, hours or dollars. |
| Lower | The lower or minimum amount to be compared. |
| Upper Limits | The upper or maximum amount to be compared. |
| Amt./Rate | The amount or rate the system uses to calculate a DBA. When you enter 1, 2, 3, 4, 5, or 6 as the method of calculation, you must enter a value in this field to use in the calculation in conjunction with the basis table. |
| Rate | A rate that the system applies to the amounts that exceed the table defined amount. |
| S M | A user defined code (07/DS) that indicates which method the system uses to calculate DBAs.
Form-specific information The secondary method the system can use in calculating the DBA. When the system uses the secondary method, the first table serves as an eligibility table. Eligibility on the primary table is based on salary range, date range, and age range, in that order. |
| Table Sec | A code which specifies the method under which the DBA is to be calculated.
This calculation table serves as the secondary calculation table for the system. You must enter a code in this field if you enter a code in the secondary method field. |
23.3.8 What You Should Know About
23.4 Setting Up Benefit Groups
From Human Resources (G08), choose Benefits Administration
From Benefits Administration (G08B1), enter 29
From Benefits Administration Setup (G08B4), choose Benefit Group Descriptions
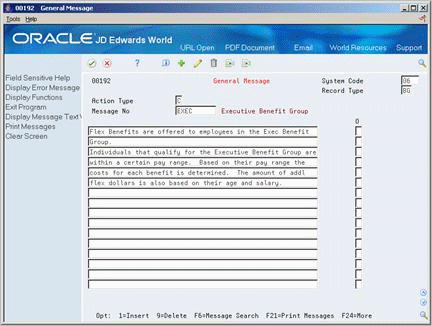
You set up benefit groups to assign the same benefit plans to a specific group of employees. A benefit group is unique because of the benefits offered to that group, for example, the pay frequency, deduction amount, and eligibility rules. Examples of benefit groups might include executive staff, hourly employees, management, and part-time employees.
When you set up the benefit group, the system stores the information in the Generic Rate Message table (F00191). Any additional, or detail, information you include is stored in the General Message Detail table (F00192). You cannot access these tables from a user defined codes window or form.
After you set up a benefit group, you must link employees to that group. This provides the employee with the plans available, provided eligibility is met.
Figure 23-11 Benefit Group Descriptions screen
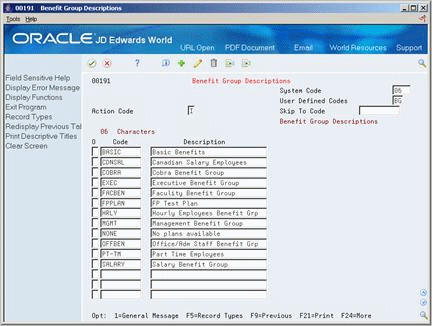
Description of "Figure 23-11 Benefit Group Descriptions screen"
-
Complete the following fields:
-
System Code
-
User Defined Code
-
-
Choose the General Message option.
-
On General Message, enter the description you want to appear on the Benefit Group Selections form and on the employee's Enrollment form for this benefit group.
-
Complete steps 2 and 3 for each benefit group.
23.5 Setting Up Group Categories
From Human Resources (G08), choose Benefits Administration
From Benefits Administration (G08B1), enter 29
From Benefits Administration Setup (G08B4), choose Group Category Descriptions
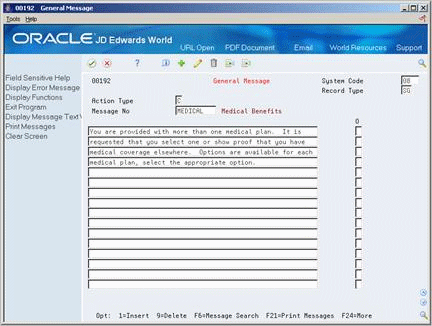
You can have several different categories of benefits within the group. Set up group categories to name the different categories of benefits your company offers. Examples of benefit group categories include medical, dental, life, and disability insurance and flexible spending accounts.
When you set up the group categories, the system stores the information in the Generic Rate Message table (F00191). Any additional, or detail, information you include is stored in the General Message Detail table (F00192). You cannot access these tables from a user defined codes window or form.
On Group Category Descriptions
Figure 23-13 Group Category Descriptions screen
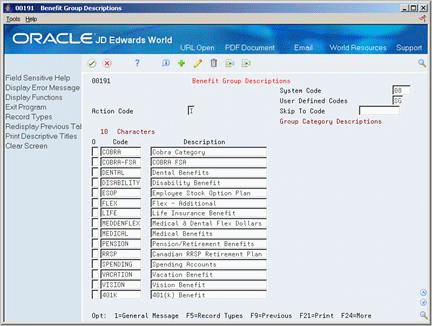
Description of "Figure 23-13 Group Category Descriptions screen"
23.6 Linking Categories to Groups
From Human Resources (G08), choose Benefits Administration
From Benefits Administration (G08B1), enter 29
From Benefits Administration Setup (G08B4), choose Categories by Benefit Group
After you set up a benefit group, you must link corresponding benefit categories to that benefit group. For example, you can link all the benefit categories available to employees in the management benefit group.
When you link categories to groups, you can also:
-
Specify the benefit group rule
-
Define the sequence of the categories
-
Define the election criteria for a benefit category
On Categories by Benefit Group
Figure 23-15 Categories by Benefit Group screen
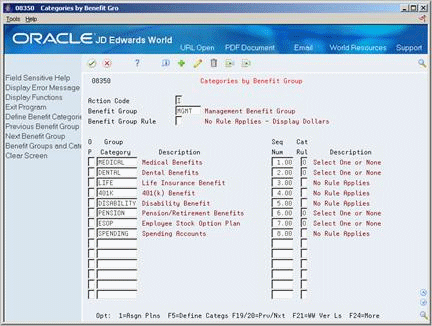
Description of "Figure 23-15 Categories by Benefit Group screen"
Complete the following fields:
-
Benefit Group
-
Benefit Group Rule
-
Group Category
-
Sequence Number
-
Category Rule
| Field | Explanation |
|---|---|
| Benefit Group Rule | The rule previously assigned to the benefit group that determines where amounts or points are displayed on the form. The hard-coded values are:
blank – No rule applies, display dollars. 1 – No rule applies, display points. 2 – Don't allow leftover flexible dollars, display dollars. 3 – Don't allow leftover flexible points, display points. |
| Group Category | The category of a benefit group. The category is used to group benefit plans according to the type and rule. For example:
Medical - Required Medical Selections Dental - Optional Dental Selections Life - Required Life Insurance Selections Valid categories are set up in the Generic Rate and Message table (F00191) for user defined code list (08/SG). Associated text for categories is stored in the General Message Detail table (F00192). For more information, see program P00191. |
| Seq Num | If you leave this field blank, items display in alphabetical order. |
| Benefit Group Rule | The rule previously assigned to the benefit group that determines where amounts or points are displayed on the form. The hard-coded values are:
blank – No rule applies, display dollars. 1 – No rule applies, display points. 2 – Don't allow leftover flexible dollars, display dollars. 3 – Don't allow leftover flexible points, display points. |
23.7 Setting Up Benefit Plans
From Human Resources (G08), choose Benefits Administration
From Benefits Administration (G08B1), enter 29
From Benefits Administration Setup (G08B4), choose Plan Master Information
You must set up every plan that your company offers. The system stores the information in the Plan Master table (F08320). When you set up a plan you specify information such as:
-
Effective dates
-
Provider or trustee
-
Enrollment rules
-
Eligibility tables
You must also assign the DBAs that integrate the benefit plan with the Payroll system.
23.7.1 Before You Begin
-
Set up the DBAs you assign to the plan
-
Set up the provider or trustee in the Address Book system
-
Set up any eligibility tables assigned to the plan
On Plan Master Information
Figure 23-16 Plan Master Information screen
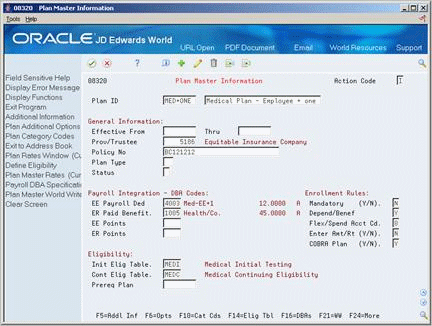
Description of "Figure 23-16 Plan Master Information screen"
-
Complete the following fields:
-
Plan ID
-
Description
-
Provider or Trustee
-
Employee Payroll Deduction
-
Employer Paid Benefit
-
Initial Eligibility Table
-
Continuing Eligibility Table
-
-
Complete the following optional fields:
-
Effective From
-
Effective Thru
-
Prerequisite Plan
-
-
Accept the default values or complete the following fields:
-
Mandatory
-
Dependent or Beneficiary
-
Flexible Spending Account
-
Enter Amount or Rate
-
COBRA Plan
-
-
If your company uses a point system for benefits, complete the following fields:
-
Employee Points
-
Employer Points
-
| Field | Explanation |
|---|---|
| Plan ID | An abbreviation or number that identifies a specific employee benefit. Examples are:
Benefit plans might not involve payroll activity. For example, a medical plan requires a deduction, benefit, or accrual, whereas an employee stock appreciation plan does not. |
| Address Number-Provider/Trustee | The Address Book number for the supplier who receives the final payment.
In Benefits Administration, this is the Address Book number of the company that issues the plan and receives premium payments for it. For Wage Attachments, Payee is the Address Book number of the agency, company, individual, or court who is to receive the payment of the check. |
| Effective From | The date on which the exchange rate takes effect. The effective date is used generically. It can be a lease effective date, a price or cost effective date, a currency effective date, a tax rate effective date, or whatever is appropriate.
Form-specific information The date that the benefit plan goes into effect. This date determines whether the plan displays on the Benefit Group Selections form and on the employee's Personal Enrollment form. For example, if the plan has an effective date that is after the employee's effective date on Benefit Group Selection or in the batch enrollment, the employee cannot enroll in the plan. |
| Thru | The date on which the item, transaction, or table becomes inactive or through which you want transactions to display. This field is used generically throughout the system. It could be a lease effective date, a price or cost effective date, a currency effective date, a tax rate effective date, or whatever is appropriate.
Form-specific information The date that the benefit plan ends. If this date exists on the Plan Master Information form prior to an employee's enrollment, the effective through date becomes the employee's ending enrollment date when you enroll the employee. |
| EE Payroll Ded | The DBA defined in the Payroll Transactions Constants table (F069116) that is used to calculate the dollar amount that the employee contributes by enrolling in the plan. In most cases, this DBA is defined to deduct pay from the enrolled employee's check.
For example, Plan 1000, Employee Health Insurance, can be cross-referenced to the payroll as follows: DBA: Deduction 7541 - Employee portion of health insurance Benefit 7542 - Employer portion of health insurance |
| Mandatory (Y/N) | A code that indicates whether the plan is required for all employees. Valid codes are:
Y – Yes, all employees must participate in this plan. You should not use this code unless all employees are required to participate in the plan. N – No, all employees are not required to participate in this plan. It is optional. Form-specific information If you specify that participation in the master plan is mandatory, the plan will also be mandatory for the plans within the category setup. |
| ER Paid Benefit | The DBA defined in the Payroll Transactions Constants table (F069116) that the system uses to calculate the dollar amount that the employer contributes to the employee enrolled in the plan. In most cases, this DBA is defined as a benefit to add pay to the enrolled employee's check.
For example: Plan 1000 - You can cross-reference Employee Health Insurance to the payroll as follows: Deduction 7541 - Employee portion of health insurance (SDBA) Benefit 7542 - Employer portion of health insurance |
| Depend/Benef (Y/N) | A code that indicates whether beneficiary information is required for employees participating in the plan or plan additional option. Valid codes are:
Y – Yes, beneficiary information is required. N – No, beneficiary information is not required. |
| EE Points | The DBA defined in the Payroll Transactions Constants file (F069116) that is used to calculate the points amount that the employee contributes by enrolling in the plan in a flexible spending environment.
DBAs used for points in a benefit plan or option must meet two requirements: 1. The DBA must have blanks in the specification for Gross Effect and Net Effect (see data items PAYG and PAYN) so that the use of (non-dollar) points does not add or subtract dollars from employee pay. 2. The DBA must have an M in the specification for Journal Entry (Y/N/M) (see data item NMTH) so that the use of (non-dollar) points does not affect the G/L system. |
| ER Points | The DBA defined in the Payroll Transactions Constants table (F069116) that will be used to calculate the points amount that the employer contributes to an employee enrolled in a flexible spending environment.
DBAs used for points in a benefit plan or option must meet two requirements: 1. The DBA must have blanks in the specification for gross effect and net effect (see data items PAYG and PAYN) so that the use of (non-dollar) points does not add or subtract dollars from employee pay. 2. The DBA must have an M in the specification for Journal Entry (Y/N/M) (see data item NMTH) so that the use of (non-dollar) points does not affect the G/L system. |
| Flex/Spend Acct Cd | A code that defines whether the combined deduction or benefit amount for this plan contributes to the enrolled employee's reimbursable spending account. The code also identifies whether the spending account is for medical or other types of expenses. Valid codes are:
0 – Not part of a flex plan, not a spending account. 1 – Not part of a flex plan, a medical spending account. 2 – Not part of a flex plan, a spending account not for medical expenses 3 – Part of a flex plan, not a spending account. 4 – Part of a flex plan, a medical spending account. 5 – Part of a flex plan, a spending account not for medical expenses. |
| Enter Amt/Rt (Y/N) | A code that indicates whether you can enter an amount or rate when you enroll an employee in a benefit plan. Typically, you enter Y (yes) when the employee has input into the amount to be used for a deduction or a benefit. Examples include 401(k) percentages, dependent care, and health care reimbursements. |
| COBRA Plan (Y/N) | A code that indicates one of the following:
Valid codes are: Y – The plan is a COBRA plan. N – The plan is not a COBRA plan. Note: If you enter a Y in this field, you must define each DBA with the COBRA plan equivalent equal to 1. This field is found on DBA Additional Information. |
| Init Elig Table | The table used to specify the rules, if any, for the employee's initial enrollment in the plan.
Even when a plan has no eligibility criteria, it is necessary to set up a table, such as NONE, for initial eligibility testing. |
| Cont Elig Table | A code used to specify the rules, if any, for an employee's continuing enrollment in the plan.
Even when a plan has no eligibility criteria, it is necessary to set up a table, such as NONE, for continuing eligibility testing. |
| Prereq Plan | The benefit plan, if any, the employee must be enrolled in before becoming eligible to participate in this plan. |
| Monthly Premium | The premium payment amount that applies to this plan. |
| Amount | The dollar amount of coverage that this plan provides to every employee enrolled in the plan. |
23.7.2 What You Should Know About
| Topic | Desscription |
|---|---|
| Deleting a Plan | Once you attach an employee to a plan, you cannot delete the plan. Even when employees are not active, they are considered to be attached to the plan. If the Employee Enrollment table (F08330) contains a record, either active or ended, you cannot delete the plan. |
23.8 Setting Up Options for a Benefit Plan
From Human Resources (G08), choose Benefits Administration
From Benefits Administration (G08B1), enter 29
From Benefits Administration Setup (G08B4), choose Plan Master Information
When the coverage for a plan can vary from employee to employee, you can set up a separate plan for each variation or you can set up a plan with options. For example, after you set up a dental category, you can set up a dental plan in one of the following ways:
-
Define employee only, employee plus one, and employee plus family as separate dental plans and link each of these plans to the dental category.
-
Define a dental plan, for example, DEN-01 for an employee and include options such as, dental plus one or dental plus family. When you link DEN-01 to the dental category, the system also links the options. An o appears next to DEN-01 on Benefit Group Selections to indicate that you have linked options to the plan.
You can add an option to an existing benefit plan or set up a new benefit plan. The system stores the information in the Plan Additional Options table (F083202).
When you set up options for a benefit plan, use the option rule to determine how the system calculates additional coverage costs. You can use one or more of the following for the calculation:
-
Benefit plan
-
DBA for the option
-
Additional amount
-
Additional rate
When the employee enrolls in the additional option, the system uses this information to either add the additional cost to or replace the amount in the DBA identified in the plan master. For example, the plan DBA identifies the amount that the employee pays for employee coverage when enrolled in DEN-01 only. If the employee enrolls in DEN-01 plus one, you can add an additional amount to deduct for the additional coverage. If the employee enrolls in the DEN-01 plus family option, you can set up an even greater amount to deduct for the coverage for an entire family.
You can use one of three rules for the option plan. Depending on the value you select for the option rule you can include additional factors that the system uses in the calculation. The following table illustrates the DBA and additional amounts or rates allowed with each rule.
| Option Rule | DBA for Plan ID | DBA for Option | AdditionalAmount or Rate |
|---|---|---|---|
| 1 | X | X | |
| 2 | X | X | X |
| 3 | X | X |
You use the rules for any of the DBA codes used for the plan: employee payroll deduction, employer-paid deduction, employee points, and employer points.
To set up options for a benefit plan
On Plan Master Information
Figure 23-17 Plan Master Information screen

Description of "Figure 23-17 Plan Master Information screen"
-
Complete the steps to set up a benefit plan or locate an existing plan.
-
Figure 23-18 Additional Plan Options screen
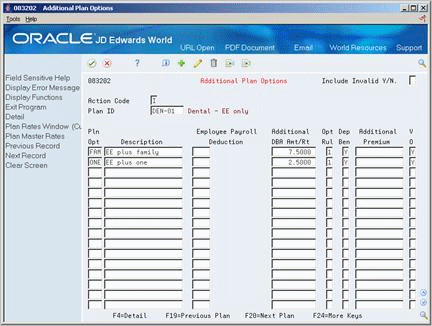
Description of "Figure 23-18 Additional Plan Options screen"
-
On Additional Plan Options, complete the following fields:
-
Plan Option
-
Description
-
Option Rule
-
Dependent or Beneficiary
-
Valid Option (VO)
-
-
Based on the Option Rule, complete the following fields:
-
Employee Payroll Deduction
-
Additional DBA Amount or Rate
-
Additional Premium
-
-
Access the detail area.
Figure 23-19 Additional Plan Options screen
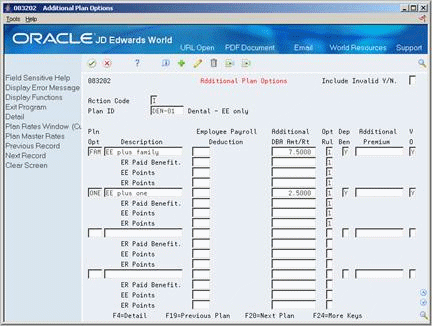
Description of "Figure 23-19 Additional Plan Options screen"
-
To set up the employer-paid information, complete the following fields:
-
ER Paid Benefit Payroll Deduction
-
Additional DBA Amount/Rate
-
Option Rule
-
Additional Premium
-
-
If your company uses a point system for benefits, complete the following fields:
-
EE Points Benefit Payroll Deduction
-
Additional DBA Amount/Rate
-
Option Rule
-
Additional Premium
-
ER Points Benefit Payroll Deduction
-
Additional DBA Amount/Rate
-
Option Rule
-
Additional Premium
-
| Field | Explanation |
|---|---|
| Pln Opt | A code that identifies any additional options available for a benefit plan that have been defined in the Plan Master table (F08320).
Additional options must have the same provider, policy number, and enrollment and eligibility rules as the benefit plan to which they are associated. |
| Additional DBA Amt/Rt | The employee's additional payroll deduction (employee share amount) for optional coverage. |
| Opt Rul | A rule that indicates the specific DBA to add to the employee's DBA instructions when an employee is enrolled in a plan.
This rule also includes the amount or rate to use. Valid rules are: 1 – Plan DBA The system uses the employee share from the DBA for the specified plan. You can also include an additional amount or rate that the system adds in the calculation. You cannot use a DBA for the option. 2 – Plan and Option DBAs The system uses both the DBA for the plan and the DBA for the option. The two DBAs must have different code numbers. You can also include an additional amount or rate that the system adds in the calculation. 3 – Option DBA The system uses the employee share from the DBA. You can also include an additional amount or rate that the system adds in the calculation. |
| V O | A code to indicate whether an option is valid for the plan. This code allows you to cancel options when they are no longer valid. Valid values are:
Y – Yes, this is a valid plan option. N – No, this is not a valid plan option. When you make an option invalid, that option does not appear on any enrollment form, print or online, and no employee can enroll in that option. |
23.9 Linking Plans to Categories within a Benefit Group
From Human Resources (G08), choose Benefits Administration
From Benefits Administration (G08B1), enter 29
From Benefits Administration Setup (G08B4), choose Plans Within Categories
After you set up a benefit group and link categories to it, you link the plans and the assigned options to the categories. You can link specific plans for each benefit, or you can link a plan with attached options.
For example, you can set up a group category of medical and link the following three plans:
-
MED for the employee only
-
MED+ONE for the employee plus one other person
-
MED+FAM for the employee and the employee's entire family
Alternatively, you can set up the group category medical and link a medical plan with options for the plus one and family coverage.
When you link plans to categories, you can also enter effective beginning and ending dates. These dates default to the employees' records when you enroll them in the specific plan.
To link plans to categories within a benefit group
Figure 23-20 Plans within Categories screen
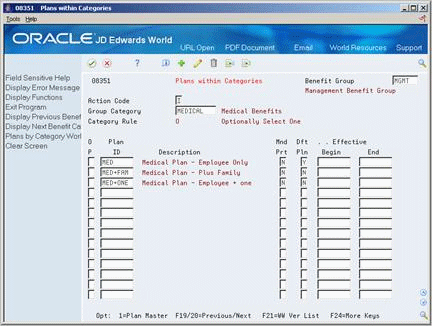
Description of "Figure 23-20 Plans within Categories screen"
-
Complete the following fields:
-
Benefit Group
-
Group Category
-
Plan ID
-
Mandatory Participation
-
Default Plan
-
-
Complete the following optional fields:
-
Effective Begin
-
Effective End
-
| Field | Explanation |
|---|---|
| Group Category | The category of a benefit group. The category is used to group benefit plans according to the type and/or rule. For example:
MEDICAL - Required Medical Selections DENTAL - Optional Dental Selections LIFE - Required Life Ins Selections Valid categories are set up in the Generic Rate and Message table (F00191) for (08/SG). Associated text for categories is stored in the General Message Detail table (F00192). For more information, see program P00191. |
| Mandatory Participation | A code that indicates whether the plan is required for all employees. Valid codes are:
Y – Yes, all employees must participate in this plan. You should not use this code unless all employees are required to participate in the plan. N – No, all employees are not required to participate in this plan. It is optional. |
| Default Plan | A code that specifies if the plan is a default plan in the category. An employee is automatically enrolled in this plan if no other plans within the category are selected. Valid codes are:
Y – Yes, this is a default plan. N – No, this is not a default plan. |
23.10 Setting Up Date Codes
From Human Resources (G08), choose Benefits Administration
From Benefits Administration (G08B1), enter 29
From Benefits Administration Setup (G08B4), choose Define Date Codes
When you set up eligibility tables, you enter date codes to determine eligible and ineligible enrollment dates. You must set up the date codes you need to include on the eligibility table for the benefit.
Eligibility tables and date codes work together. For example, an eligibility table can test for 30 days from the date of hire, and the date code can assign the first of the month following eligibility as the enrollment date.
You can set up date codes in one of the following ways:
-
Set up for a specific date following a particular date of the month
-
Set up for the last day of the month following a particular date
-
Set up by an amount of time after a specific date
-
Set up by a specific enrollment date
To set up for a specific date following a particular date of the month
Use this method to set up a date code when you want enrollment to begin on a specific date within the month immediately following a particular date.
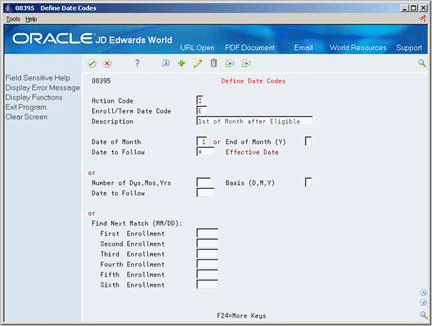
For example, when you want enrollment to begin on the 15th of any month after date of hire, enter 15 as the date of the month and the code for start date as the date to follow. If an employee begins work on May 30th, eligibility for enrollment in the benefit plan begins on June 15th, (the first 15th of a month after the employee's hire date).
In another example, if you want enrollment to begin on the 1st of the month after passing eligibility, enter 1 in Date of Month field and an asterisk (*) as the date to follow. When an employee passes eligibility on June 1st, enrollment in the plan begins on June 1st. If the employee passes eligibility on June 2nd, enrollment in the plan begins on July 1st.
On Define Date Codes
Complete the following fields:
-
Enrollment/Termination Date Code
-
Description
-
Date of Month
-
Date to Follow
| Field | Explanation |
|---|---|
| Enroll/Term Date Code | A code that identifies the terms for beginning and ending enrollment dates. |
| Date of Month | The date during any month that you want plan enrollment to begin or end. You can use either this field or the End of Month field in conjunction with the Date to Follow field. You cannot use both.
For example, a value of 05 in this field means that enrollment either begins or ends on the fifth of the month following the date specified in the Date to Follow field. If you enter 05 in this field, you cannot also enter Y in the End of Month field. |
| Date to Follow | A code that identifies the date that you want the system to use in conjunction with either the Date of Month field (data item DYMO) or the End of Month (data item ENDM) field. The codes allowed coincide with the dates that are on the Dates, Eligibility, and EEO screen (P060190). You can define this code using user defined code table( 08/D2).
An asterisk (*) indicates the fixed effective date. The fixed effective date is the date that the employee either passes or fails eligibility. |
To set up for the last day of the month following a particular date
Use this method to set up a date code when you want enrollment to begin on the last day of the month immediately following a particular date.
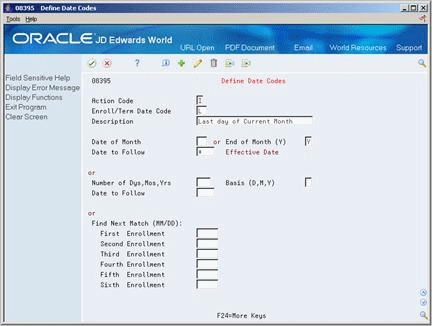
For example, when you want enrollment to begin on the last work day of the month of the date of hire, enter Y (yes) in the End of Month field and the code for the start date as the date to follow. In this case, an employee becomes eligible for enrollment on the last day of the month after being hired. If an employee begins work on May 30th, eligibility for enrollment in the benefit plan begins May 31st. If an employee is hired on the 31st, then enrollment begins on that day.
On Define Date Codes
Complete the following fields:
-
Enroll/Termination Date Code
-
Description
-
End of Month
-
Date to Follow
| Field | Explanation |
|---|---|
| End of Month (Y) | A code that defines whether you want plan enrollment to begin or end at the end of any month. You can use either this field or the Date of Month field in conjunction with the Date to Follow field. You cannot use both.
For example, a value of Y in this field means enrollment either begins or ends at the end of the month following the date specified in the Date to Follow field. If you enter Y in this field, you cannot also enter a number in the Date of Month field. |
To set up by amount of time after a specific date
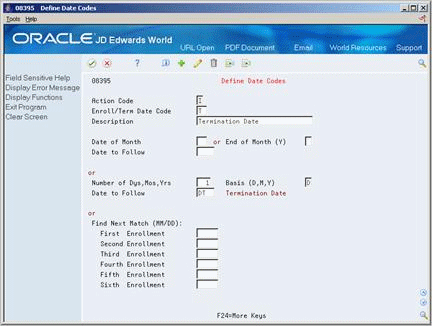
You can set up a date code that is a certain number of days, months, or years after a particular date. For example, you can define an enrollment date in a particular stock option plan as being two years after the employee's hire date.
On Define Date Codes
Complete the following fields:
-
Enrollment/Termination Date Code
-
Description
-
Number of Days, Months, Years
-
Basis
-
Date to Follow
| Field | Explanation |
|---|---|
| Number of Dys,Mos,Yrs | This field works in conjunction with the Basis (D, M, Y) field and the Date to Follow field to define an enrollment date that is a certain number of days, months, or years after a particular date.
For example, if you want the effective date of enrollment to be one year after the employee's original hire date, define these fields as follows: 1. Type a 1 in this field. 2. Type a Y in the Basis (D, M, Y) field. 3. Type the user defined code (08/D2) that indicates Original Hire in the Date to Follow field. When you run an eligibility test, the system searches the Employee Master file for employees eligible to enroll in the plan because they meet these requirements. |
| Basis (D,M,Y) | This field works in conjunction with the Number of Days, Months, Years field and the Date to Follow field to define an enrollment date that is a certain number of days, months, or years after a particular date.
For example, if you want the effective date of enrollment to be one year after the employee's original hire date, define these fields as follows: 1. Type a 1 in the Number of Days, Months, Years field. 2. Type a Y in this field to specify a year. 3. Type the user defined code (08/D2) that indicates Original Hire in the Date to Follow field. When you run an eligibility test, the system searches the Employee Master file for employees eligible to enroll in the plan because they meet these requirements. |
| Date to Follow | This field works in conjunction with the Number of Dys, Mos, Yrs field and the Basis (D, M, Y) field to define an enrollment date that is a certain number of days, months, or years after a particular date.
An asterisk (*) in this field indicates the fixed effective date. The fixed effective date is the date the employee either passes or fails eligibility. For example, if you want the effective date of enrollment to be one year after the employee's original hire date, define these fields as follows: 1. Type 1 in the Number of Dys, Mos, Yrs field. 2. Type Y in the Basis (D, M, Y) field. 3. Type the user defined code (08/D2) that indicates original hire in this field. When you run an eligibility test, the system searches the Employee Master table for employees eligible to enroll in the plan because they meet these requirements. |
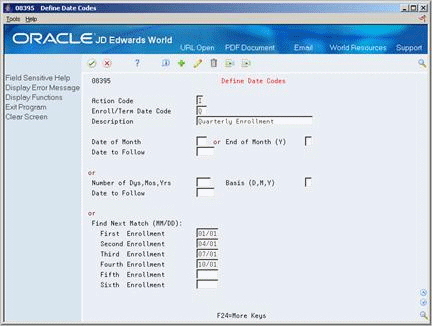
To set up by a specific enrollment date
You can set up date codes by an enrollment date. You can enter up to six different enrollment opportunities for a date code. For example, you can enter the first day of each fiscal quarter as enrollment dates, so that the system enrolls any employee who meets the other eligibility requirements on the first day of the next quarter. Conversely, if you want enrollment eligible on only one particular date each year, enter only that date.
On Define Date Codes
-
Complete the following fields:
-
Enrollment/Termination Date Code
-
Description
-
-
Enter a month and day in one or more of the following fields:
-
First Enrollment
-
Second Enrollment
-
Third Enrollment
-
Fourth Enrollment
-
Fifth Enrollment
-
Sixth Enrollment
-
| Field | Explanation |
|---|---|
| First Enrollment | A month and day that represents a date each year on which plan enrollment can begin or end. Plans can have up to six of these dates each year, designed to indicate quarterly enrollment, bi-monthly enrollment, and so forth.
When you test for eligibility using the Batch Enrollment program (P083800), the enrollment record being processed begins or ends on the enrollment date that is after the date of the eligibility test. |
23.11 Setting Up Pay Type Tables
From Human Resources (G08), choose Benefits Administration
From Benefits Administration (G08B1), enter 29
From Benefits Administration Setup (G08B4), choose Pay Type Tables
If you have set up any eligibility tables based on hours worked (method H), you must set up a pay type table for each standard. When you set up a pay type table, you enter a range of pay type numbers for the system to include when it tests the number of hours worked for an employee's eligibility.
For example, if you want to include all pay types in the eligibility test, you could enter pay type 001 through 999. If you want to exclude certain pay types, you could set up a table with more than one range. For example, to exclude pay type 450 only, you could set up two ranges as follows:
-
001 through 449
-
451 through 999
You can set up as many ranges as necessary on a table, but you cannot overlap any of the rages within a table. For example, the system will not accept the following table:
-
001 through 449
-
445 through 999
23.11.1 Before You Begin
-
Set up the user defined codes (08/TT) for the pay type tables
-
Complete the following fields:
-
Pay Type Table
-
From Pay Type
-
Thru Pay Type
-
-
To set up additional ranges, complete the following fields as often as necessary:
-
From Pay Type
-
Thru Pay Type
-
| Field | Explanation |
|---|---|
| Pay Type Table | The name of the table you defined on user defined code table (08/TT). |
| From Pay Type | The number and description of the PDBA you want the system to use to calculate the corresponding DBA.
Form-specific information When you are defining the range of pay types, and the range includes only one pay type, the from and thru fields must contain the same pay type number. |
| Thru Pay Type | The number and description of the pay type you want the system to use to calculate the corresponding pay type. This is the ending number in the range that is the basis of the calculation.
Test for conditional import. Nancy b Form-specific information When you are defining the range of pay types, the thru value must be greater than or equal to the value in the from field. If the range includes only one pay type, the from and thru fields must contain the same pay type number. |
23.12 Setting Up Eligibility Tables for Benefit Plans
From Human Resources (G08), choose Benefits Administration
From Benefits Administration (G08B1), enter 29
From Benefits Administration Setup (G08B4), choose Define Eligibility
Some benefit plans require that employees meet certain eligibility standards before they qualify for or maintain enrollment in a benefit. If a benefit requires eligibility rules, you enter the name of the eligibility table on the master plan for the benefit.
You must set up an eligibility table to define each of the rules or standards you use to determine eligibility. For example, your company might require that employees be employed with your company full time for six months and have worked a minimum of 40 hours in the last week before they qualify for medical insurance and dental insurance. You can use the same table for more than one benefit plan if the rules and standards are the same
After you have set up an eligibility table and included it in the master plan for a benefit, the system can test an employee's eligibility for enrollment in a benefit plan. When the system tests for eligibility, one of the following occurs:
-
When an employee passes the eligibility test, the system assigns the enrollment record an eligible status and a beginning enrollment status date based on the date code. When the enrollment status begins with an A (for active), the system passes the DBA code to the Payroll system so that the system can make the necessary deductions or contributions. The system also assigns a participation date and an eligibility date equal to the beginning enrollment date.
-
If an employee does not pass the eligibility test, the system assigns an ineligible enrollment status to the enrollment record and a beginning enrollment status date based on the date code. The system does not pass the DBA code to the Payroll system. In this case, the system does not assign eligibility and participation dates.
Note:
You must set up an eligibility table called None, or something similar, to indicate that no eligibility rules or standards are required. Use this table for all benefit plans that do not require employees to meet or maintain eligibility standards to participate in a benefit.Setting up eligibility tables includes the following tasks:
-
Setting up eligibility tables
-
Setting up an eligibility table when none is needed
23.12.1 Before You Begin
-
Set up the user defined codes (08/ES) to define the enrollment status. See Setting Up User Defined Codes for Human Resources in the JD Edwards World Human Resources Guide
-
Set up pay type tables to include in any table based on hours worked. See Section 23.11, "Setting Up Pay Type Tables"
-
Set up the date codes to define eligible and ineligible enrollment. See Section 23.10, "Setting Up Date Codes"
On Define Eligibility
-
To name the table, complete the following fields:
-
Eligibility Table
-
Table Description
-
-
To define the parameters or standards of the plan, complete the following fields:
-
And/Or
-
Amount
-
Method
-
Based From
-
Eligible Enrollment Status
-
Ineligible Enrollment Status
-
Eligible Enrollment Date Code
-
Ineligible Enrollment Date Code
-
-
If the table method is H, complete the following fields:
-
Hours Only Computation Period
-
Hours Only Number of Periods
-
Hours Only Pay Type Table
-
| Field | Explanation |
|---|---|
| And /Or | A code that designates whether the test parameters or criteria are based on an AND condition or an OR condition. |
| Amt | Refers to an eligibility minimum that must be met to satisfy the eligibility requirements. The minimum is tied to the method entered.
See data item MTHD for more information. |
| Method | A code used to calculate eligibility. This field is used in conjunction with the Amount field (data item ELMH).
For example, if the eligibility criteria for a plan includes minimum age, you enter AM (Minimum Age) in this field and the specific age in the Amount field. JD Edwards World provides codes for six of the most common methods. These codes are hard-coded and cannot be changed or deleted: H – Hours of service D – Days of service M – Months of service Y – Years of service AM – Minimum age AX – Maximum age. If you use a user defined eligibility program, you can add different methods to user defined code list (08/EL). |
| Based From | A code that defines the date from which eligibility is calculated. The allowed codes coincide with the dates that are on the Dates, Eligibility, and EEO form (P060190), and that are defined in user defined code list (08/D1). If you do not enter a code in this field, the system uses the date that the employee started. |
| Comp Period | The computation period used to calculate if a person has the minimum number of hours necessary to be eligible for a plan. Valid codes are:
W – Week (seven days prior to effective date) M – Previous calendar month Y – Year (previous year to effective date) |
| Hours ONLY No / | The number of consecutive periods used to calculate eligibility. |
| Pay Type Table | The pay type table that the system uses to calculate the hours an employee worked to determine plan eligibility. You can define this table using user defined code list (08/TT). |
| Eligible Enrollment: Status | The status to be assigned to the enrollment record after the employee becomes eligible for a plan.
You can define this code using user defined code list (08/ES). See Enrollment Status (data item XDFS) for restrictions on the allowed values for this field. Form-specific information If the Eligible or Ineligible Enrollment Status code begins with an A, for example, ACT or AC2, the system writes the DBA code from the Plan Master to the Employee DBA Instructions table. When a Begin Enrollment Status code begins with a letter other than A, no record is written to the Payroll system. To indicate an ending status that does not result in a new enrollment, such as termination, you must define the code with an X in the first position on the Description 2 field of the General User Defined Codes form. Use a status that begins with an X as an ending status to indicate a mistaken enrollment. The system does not write instructions to the Employee DBA Instructions table when the status begins with X. |
| Eligible Enrollment: Date Code | A code that indicates the date that the employee's new enrollment record should begin after it is determined that the employee is eligible for a plan. You define these codes in the Define Date Codes table (F08395). |
| Ineligible Enrollment: Status | The status to be assigned to the enrollment record after it is determined that an employee is not eligible for a plan.
You can define this code using user defined code list (08/ES). See Enrollment Status (data item XDFS) for restrictions on the allowed values for this field. Form-specific information If the Eligible or Ineligible Enrollment Status code begins with an A, for example, ACT or AC2, the system writes the DBA code from the Plan Master to the Employee DBA Instructions table. When a Begin Enrollment Status code begins with a letter other than A, no record is written to the Payroll system. To indicate an ending status that does not result in a new enrollment, such as termination, you must define the code with an X in the first position on the Description 2 field of the General User Defined Codes form. Use a status that begins with an X as an ending status to indicate a mistaken enrollment. The system does not write instructions to the Employee DBA Instructions table when the status begins with X. |
| Ineligible Enrollment: Date Code | A code that indicates the date that the employee's new enrollment record should begin after it is determined that the employee is not eligible for a plan, or if no eligibility test is specified in the enrollment setup. These codes are defined in the Define Date Codes table (F08395). |
To set up an eligibility table when none is needed
On Define Eligibility
-
Complete the following fields:
-
Eligibility Table
-
Table Description
-
-
Complete the following field with any valid value:
-
Method Code
-
-
Enter ACT (active) in the following fields:
-
Eligible Enrollment Status
-
Ineligible Enrollment Status
-
-
Complete the following fields:
-
Eligible Enrollment Date Code
-
Ineligible Enrollment Date Code
-
23.12.2 What You Should Know About
23.13 Setting Up Enrollment Parameters
From Human Resources (G08), choose Benefits Administration
From Benefits Administration (G08B1), enter 29
From Benefits Administration Setup (G08B4), choose Enrollment Parameters
When you use benefit group selections or batch enrollment to enroll employees in a benefit plan, you can also set up enrollment parameters. Enrollment parameters define which action the system takes when it tests for eligibility. The system compares the employee enrollment information to each parameter to determine which eligibility test and date code to use to determine when to enroll an employee in a benefit plan or when to terminate the employee's participation.
You base the parameters on certain search items. The system always begins with the most detailed parameter and searches for the following information:
-
Plan ID
-
Benefit Status
-
Enrollment Status
-
Valid Plan
The system begins the search at the bottom of the list of parameters. When the search does not result in a match with the employee information on the first parameter searched, the system searches the next parameter. It continues searching until it identifies the parameter to use.
If you do not set up enrollment parameters, the system performs the following:
-
When an employee is actively enrolled in a benefit plan, the system tests continuing eligibility in a plan.
-
In all other cases, the system tests initial eligibility for employees.
If you set up parameters for a specific plan, you must also set up the basic parameters for initial and continuing eligibility.
23.13.1 Example: Search Hierarchy for Enrollment Parameters
The following form illustrates a sample setup for enrollment parameters.
Figure 23-27 Enrollment Parameters screen
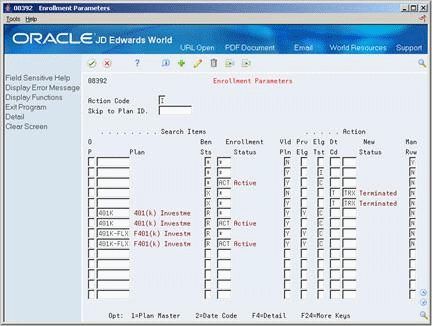
Description of "Figure 23-27 Enrollment Parameters screen"
Based on these parameters, the system would compare the information to the 401K-FLX plan first, as it is the most detailed parameter. Because this parameter is for the 401K-FLX plan only, it applies only to enrollment eligibility in that plan.
If the system could not match the employee enrollment information to this parameter, it would continue to the next parameter and then the next, until it located a parameter that was not specific to one plan.
When the system locates a parameter that matches the enrollment information it is searching, it conducts the eligibility test or assigns the date code indicated in that parameter.
In this example, when the system searched enrollment information and located any valid plan with X in the Benefit Status field and any enrollment status (as indicated with an *), it ends the plan with the T date code as set up on Define Date Codes.
As illustrated below, the system follows a specific order of search criteria to match employee enrollment to the parameters. In this illustration, an * indicates that value in the field and Z indicates any other valid value for the field.
| Plan | Benefit Status | Enrollment Status | Valid Plan |
|---|---|---|---|
| Plan | Z | ZZZ | Z |
| Plan | Z | * | Z |
| Plan | * | ZZZ | Z |
| Plan | * | * | Z |
| Z | ZZZ | Z | |
| Z | * | Z | |
| * | ZZZ | Z | |
| * | * | Z |
23.13.2 Before You Begin
-
Set up your benefit plans. See Section 23.7, "Setting Up Benefit Plans".
-
Set up the eligibility tables. See Section 23.12, "Setting Up Eligibility Tables for Benefit Plans".
-
Define the date codes that establish when an employee becomes eligible or ineligible for a benefit plan. See Section 23.10, "Setting Up Date Codes"
To set up enrollment parameters
Figure 23-28 Enrollment Parameters screen
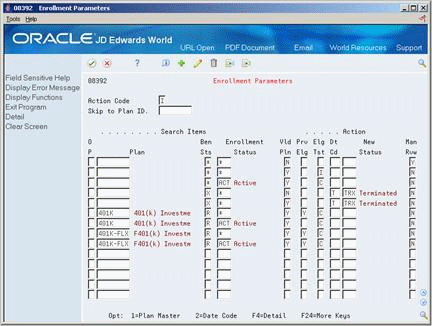
Description of "Figure 23-28 Enrollment Parameters screen"
-
For the most detailed parameter, complete the following field:
-
Benefit Status
-
Enrollment Status
-
Valid Plan
-
Manual Review
-
-
Complete the following optional fields:
-
Plan
-
Previous Eligibility
-
Eligibility Test
-
-
If Eligibility Test is blank, complete the following fields:
-
Date Code
-
New Status
-
-
Repeat this step for each parameter that you want to set up by completing only the relevant fields.
| Field | Explanation |
|---|---|
| Ben Sts | A user defined code (07/EA) that allows the system to test an employee's eligibility for benefits and to determine for enrollment parameters (guidelines) for benefits administration.
This code specifies the employee action for which the system searches as it tests for eligibility. An asterisk (*) indicates the guidelines refer to all employee actions not otherwise specified. Do not change the codes that are hard-coded, such as A (Active) and X (Terminated). These are required codes in the system. |
| Enrollment Status | A code that indicates the status of an employee's enrollment in a plan. It is a user defined code (08/ES), and you must use the following restrictions for the definitions:
Form-specific information This code indicates the enrollment status that the system should search for as it tests for eligibility. |
| Valid Plan | A code that indicates whether the specified plan is a valid plan for the employee. A valid plan is one that is available within the employee's benefit group. Valid codes are:
Y – The plan is a valid plan for the employee, N – The plan is not a valid plan for the employee. |
| Previous Eligibility | A code that indicates whether the employee was previously eligible for the plan. Valid codes are:
blank – Do not check for previous eligibility. Y – Yes, the employee was previously eligible. N – No, the employee was not previously eligible. If the system finds a code in this field, it then searches the fold area for further information. |
| Elg Tst | A code that tells the system which eligibility test to run. Valid codes are:
Blank – Do not test for eligibility. I – Test for initial eligibility. C– Test for continuing eligibility. |
| Dt Cd | A code that indicates the date that the employee's new enrollment record should begin after it is determined that the employee is not eligible for a plan, or when no eligibility test is specified in the enrollment setup. These codes are defined in the Define Date Codes table (F08395). |
| New Status | A code that indicates the ending status of an employee's enrollment in a plan. This status represents the reason for ending the old enrollment, and is used as the beginning status of any resulting new enrollment.
You can define this code using user defined code list (08/ES). See data item XDFS (Status - Enrollment) for restrictions on the allowed values. Note: An ending status that begins with the letter X represents a mistaken enrollment. The system does not store employee DBA instructions for mistaken enrollments. |
| Manual Review | A code that indicates whether the enrollment being processed should be printed on the Manual Review Requested report so the record can be handled manually rather than through the batch process. |
23.14 Linking 401(k) Allocations Funds to Plans
From Human Resources (G08), choose Benefits Administration
From Benefits Administration (G08B1), choose Fund Allocation Setup
If your company offers a 401(k) plan as a benefit to employees, you can link it to the investment programs, or funds, from which the employees can choose to allocate their deductions. You must set up allocation funds as accrual DBAs that are a percentage of the employee and employer contributions. For example, if your 401(k) offers employees several different investment programs from which they can choose for their 401(k) deduction, you can link each investment program to the plan.
23.14.1 Before You Begin
-
Set up the funds as payees in the Address Book system.
-
Set up the deduction DBA for the employee-paid deduction and the benefit DBA for the employer-paid contribution to the 401(k) plan. See Section 23.3, "Setting Up Deductions, Benefits, and Accruals".
-
Include the DBAs on the plan master. See Section 23.7, "Setting Up Benefit Plans".
To link 401(k) allocation funds to plans
Figure 23-29 Fund Allocation Setup screen
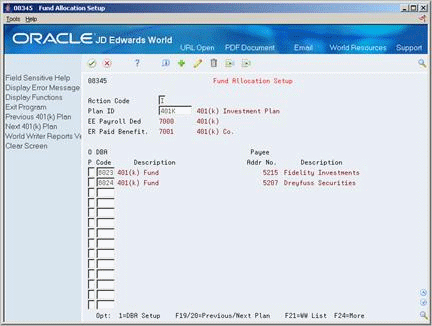
Description of "Figure 23-29 Fund Allocation Setup screen"
-
To locate the 401(k) plan, complete the following field:
-
Plan ID
-
-
Choose the DBA Setup option.
-
On DBA Setup, enter a number that is greater than both the employee-paid deduction DBA and the employer-paid benefit DBA in the following field:
-
DBA Code
-
-
Enter A in the following field:
-
DBA Type
-
-
Enter G in the following field:
-
Source of Calculation
-
-
Enter % in the following field:
-
Method of Calculation
-
-
Enter N in the following fields:
-
Calculate if No Gross
-
Calculate in Pre-Payroll
-
-
Enter the same values that you enter for the DBA for the employee-paid 401(k) deduction in the following field:
-
Pay Period to Calculate
-
-
Use the Add action.
Figure 23-31 Basis of Calculations screen
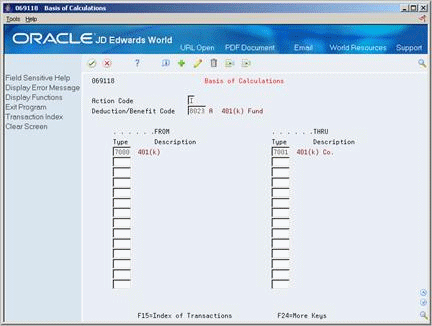
Description of "Figure 23-31 Basis of Calculations screen"
-
On Basis of Calculation, enter the codes for the employee-paid and the employer-paid DBAs in the following fields:
-
From PDBA Type
-
Thru PDBA Type
-
-
Return to DBA Setup
-
Return to Fund Allocation Setup.
Figure 23-32 Fund Allocation Setup screen
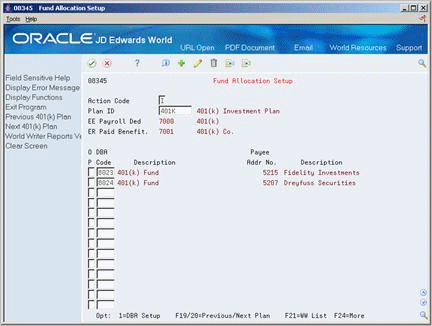
Description of "Figure 23-32 Fund Allocation Setup screen"
-
On Fund Allocation Setup, enter the Fund Allocation DBA you set up in the following field:
-
DBA Code
-
23.15 Verifying the Setup of Benefits Administration
From Human Resources (G08), choose Benefits Administration
From Benefits Administration (G08B1), choose Benefits Reports
From Benefits Reports (G08B11), choose World Writer Reports
After you complete the setup process for benefits administration you can print several World Writer reports. Each report lists different information for the setup process. Use these reports to verify the accuracy of your setup. The reports are also useful cross-reference tools to use during the setup process, for example, use the Benefit Structure report to identify all the plans and options currently assigned to a benefit group.
Choose the reports from the World Writer list. Use the following reports to verify the setup of benefits administration.
Groups, Categories, Plans, and Options report
This report lists all benefit groups and benefit categories assigned to each group. It also lists the benefit plans and options assigned to each benefit category.
Groups, Categories, and Plans report
This report lists all benefit groups and benefit categories assigned to each group. It also lists the benefit plans assigned to each benefit category.
This report lists the plan ID and description for each benefit plan you set up. It also includes information from the plan master including the employee and employer DBA codes.
