38 Set Up General Information
This chapter contains these topics:
Setting up general information allows you to enter specific information about how your organization accounts for labor. This information consists of:
-
Company constants - You set up company constants to control the labor accounting for the employees of each company.
-
Business unit constants - You set up business unit constants to define default information associated with a business unit.
-
Fields for future data revisions - You choose fields for future data revisions to activate data items in the employee master record that can be updated using the future data functions.
38.1 Setting Up Company Constants
From Time Accounting (G05), enter 29
From Time Accounting Setup (G054), choose Payroll Constants and Tables
From Additional Constants and Tables (G0541), choose Company Constants
You set up company constants to control processing information for employees of each company. You must set up default company constants before you can account for labor. JD Edwards World recommends that you enter company constants when significant changes occur, such as the addition of a new company.
When you set up company constants, you set up the default company and each individual company. You enter information for Company 00000, the default company, to define the overall operating environment. You also enter information for each of your companies.
Setting up company constants consists of the following tasks:
-
Setting up the default company
-
Setting up an individual company
38.1.3 Setting Up the Default Company
You enter information for Company 00000, the default company, to define the overall operating environment. If you have multiple companies, the parameter settings for Company 00000 must include all of the possible variations that cover all of the companies you set up.
At the default company level, you can indicate whether you want the Time Accounting system to integrate with the JD Edwards World General Ledger system.
Figure 38-1 Company Constants (Set Up Default) screen

Description of "Figure 38-1 Company Constants (Set Up Default) screen"
-
For Company 00000, complete the following fields:
-
Company
-
Company Name
-
Company Address
-
Employee Number Mode
-
-
To pass journal entries to the general ledger, enter a T in the following field:
-
G/L Integration
-
-
To identify the standard time worked by salaried employees, complete the following fields:
-
Hours/Day
-
Days/Week
-
Weeks/Year
-
Hours/Year
The remaining payroll company constants fields are not applicable to Time Accounting. The system enters default values for any required fields, if you leave them blank.
The Batch Control and Standard Interest Rate fields are for future use and are inactive for this release.
-
| Field | Explanation |
|---|---|
| Employee No. Mode | This code identifies which form of the employee number displays on an inquiry screen. Valid values are:
1 – Display the eight-digit Address Book number. This is the default code. 2 – Display the nine-digit Social Security number. 3 – Display the eight-digit Additional Employee number preceded by a slash (/). All forms of employee number remain valid. This code controls only what displays. |
| G/L Integration | Code that indicates how batches of payroll journals are posted to the General Ledger. Valid codes are:
A – Automatic. If batches are in balance and there are no errors, the system posts batches automatically during the final update step of the payroll cycle. This is the default value. M – Manual. Each batch must be posted manually. N – None. There is no General Ledger interface. T – Time Accounting |
38.1.4 Setting Up an Individual Company
You can set up company constants for each of your companies for which you account for time. When you set up an individual company or make changes to an existing company's name or address, the system updates the Address Book system.
To set up an individual company
On Company Constants
Figure 38-2 Company Constants (Individual Company) screen
Description of "Figure 38-2 Company Constants (Individual Company) screen"
-
Complete the following fields:
-
Company
-
Company Name
-
Company Address
-
-
To identify the standard time worked by salaried employees, complete the following fields:
-
Hours/Day
-
Days/Week
-
Weeks/Year
-
Hours/Year
-
38.2 Setting Up Business Unit Constants
From Time Accounting (G05), enter 29
From Time Accounting Setup (G054), choose Payroll Constants and Tables
From Additional Constants and Tables (G0541), choose Business Unit Constants
You set up business unit constants to define default information associated with a business unit to expedite time entry and automatically process information such as flat burden at the business unit level.
Setting up business unit constants also allows you to specify a business unit as a certified job for governmental reporting purposes.
When you set up a business unit, the system adds it to the General Accounting Business Unit Master table (F0006) if the business unit does not already exist in that table. Generally, business units are set up in the JD Edwards World General Accounting system by the Accounting department.
You must use the General Accounting System and not the Time Accounting system to change any of the following information:
-
Level of detail
-
Posting edit code
-
Company number
38.2.1 Before You Begin
-
Review any existing business unit information
To set up business unit constants
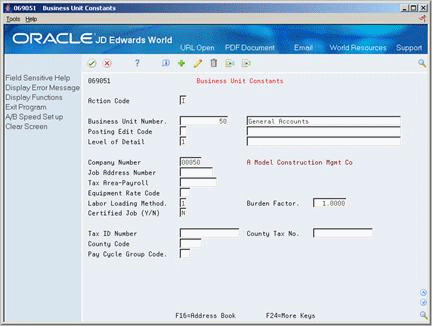
Figure 38-3 Business Unit Constants screen
Description of "Figure 38-3 Business Unit Constants screen"
-
Complete the following field:
-
Business Unit Number
-
-
Complete the following optional fields:
-
Job Address Number
-
Labor Loading Method
-
Burden Factor
The remaining business unit constants fields are not applicable to Time Accounting. The system enters default values for any required fields, if you leave them blank.
The County Tax Number, County Code, Job Type, and Denomination Minimum fields are for future use and are inactive for this release.
-
| Field | Explanation |
|---|---|
| Labor Loading Method | A code indicating that flat burden is to be calculated. Valid codes are:
0 – Flat burden percentage will always be 1.000 and, therefore, the flat burden amount will equal zero. Basically, this means that there is no distribution. 1 – Flat burden percentage will always be greater than 1.000. Choose this option when distributing the percentage. There are various places within the Payroll system where flat burden rules and percentages can be defined, such as: Business Unit Pay Rates table Employee level |
| Burden Factor | A multiplier to load direct labor costs with burden. For example, a factor of 1.32 loads every dollar of labor cost with 32 cents worth of burden. |
38.3 Choosing Fields for Future Data Revisions
From Time Accounting (G05), enter 29
From Time Accounting Setup (G054), choose Specify Future Data Fields Methods
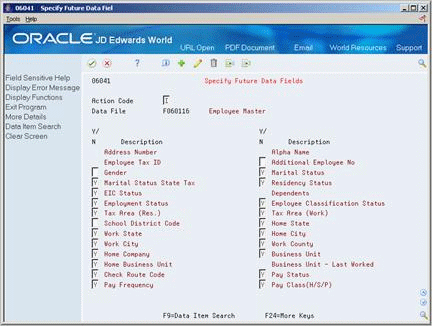
You choose fields for future data revisions to activate data items in the employee master that can be updated using the future data functions. For example, you activate the Marital Status field so that, in the event of marriage, you can change the employee's marital status in the employee master using the Future Data function.
You cannot change the activation value of some fields.
To choose fields for future data revisions
Figure 38-4 Specify Future Data Fields screen
Description of "Figure 38-4 Specify Future Data Fields screen"
-
Enter a Y in the following field next to the data item that you would like to activate:
-
Yes/No
-
-
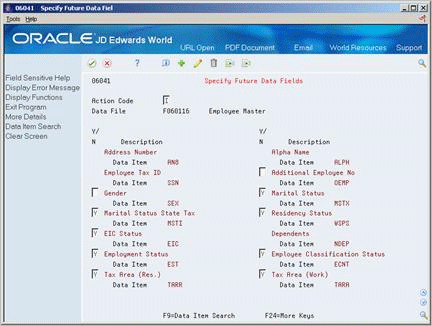
Access More Details.
Figure 38-5 Specify Future Data Fields (Details) screen
Description of "Figure 38-5 Specify Future Data Fields (Details) screen"