39 Set Up Earnings Information
This chapter contains these topics:
You set up earnings information to define the types of pay that your employees receive.
When you set up earnings information, you set standards by which individual employee salaries can be evaluated. You also define the amounts and ranges of pay you use for your business. Defining pay standards provides you with an orderly and equitable method of compensating your employees and a stable basis for controlling payroll costs. Earnings information consists of:
| Earnings Information | Description |
|---|---|
| Pay types | You set up pay types to categorize the various earnings employees receive to direct labor to different accounts in the general ledger. |
| Pay grades | You set up pay grade information to control the standards by which individual employee salaries are evaluated, as well as the amounts and ranges of pay you use for your business. |
| Shift rate differentials | You set up shift rate differentials to add a flat dollar or percentage amount to an employee's hourly rate when the employee works a shift that receives an additional amount of pay per hour. |
| Pay rate tables | You set up pay rate tables to associate pay rates with a specific group. |
39.1 Setting Up Pay Types
From Time Accounting (G05), enter 29
From Time Accounting Setup (G054), choose Payroll Constants and Tables
From Additional Constants and Tables (G0541), choose Pay Type Setup
You set up pay types to categorize the various earnings that employees receive to direct labor to different accounts in the general ledger. You can specify up to 999 different pay types, using the range of numbers 001 to 999.
Setting up pay types also allows you to:
-
Specify how different pay types are used when computing employee pay
-
Transfer number of hours and dollar amounts to the general ledger
Complete the following fields:
-
Pay Type
-
Paystub Text (informational only)
-
Pay Type Multiplier
-
Effect on General Ledger
The remaining fields to set up a pay type are not applicable to Time Accounting. If you leave these fields blank, the system enters default values.
| Field | Explanation |
|---|---|
| Pay Type | A code to define the type of pay, deduction, benefit, or accrual.
Pay types are numbered from 1 to 999. Deductions and benefits are numbered from 1000 to 9999. Form-specific information Pay type 001 is typically defined for regular pay. JD Edwards World recommends that you do not change this pay type. Autopay uses pay type 001 as the default pay type unless otherwise noted at the employee level. |
| Paystub Text | A description, remark, explanation, name, or address.
Form-specific information The text that you want the system to print on the employee's paystub. For the Time Accounting system: The Time Accounting system does not create paychecks. However, this field is required to complete the form. Generally, the information you enter in this field is a description of the pay type. |
| Pay Type Multiplier | A factor by which the base hourly rate is multiplied to obtain the actual payment hourly rate. For example, you could use 1.5 to designate time-and-one-half for overtime pay. Zero (0) is not a valid multiplier. |
| Effect on GL | A code that indicates whether you want journal entries passed from payroll to the general ledger and the method you want to use. Valid codes are:
Y – Pass dollars only to the general ledger. N – Pass dollars and hours to the general ledger. M – Do not pass dollars or hours to the general ledger and do not calculate workers' compensation and general liability. H – Pass hours only to the general ledger. This code is valid for Generate Timecard Journals. It should not be used when journals are generated through the pay cycle. W – Do not pass dollars or hours to the general ledger but calculate workers' compensation and general liability. Workers' compensation and general liability amounts will be passed to the general ledger. |
39.1.1 What You Should Know About
39.2 Setting Up Pay Grades
From Time Accounting (G05), enter 29
From Time Accounting Setup (G054), choose Pay Grades by Class
To establish categories for grouping employees according to pay ranges, you can set up pay grades for each pay class within your organization. (A pay class indicates how an employee is paid, such as salary, hourly, and so on.) For example, within the pay class, salaried, you can set up pay grades 1 through 10. For each of these pay grades, you define a minimum, midpoint, and maximum salary amount. These amounts define the pay range for the pay grade. For example, the pay range for pay grade 1 might be:
Minimum = 20000.00
Midpoint = 25000.00
Maximum = 30000.00
This means that the annual salary for an employee in pay grade 1 can be any amount between 20000.00 and 30000.00.
When you define pay grades by class, you establish a permanent record of the pay ranges for your organization's pay grades. When you enter employee information, the system displays an error or warning message when you enter a rate that is not within the pay range for the employee's pay grade.
This program updates the Pay Grade and Salary Range table (F082001).
-
Complete the following field:
-
Pay Class (H/S/P)
-
-
To specify information that applies to all (or most) of the pay grades in this pay class, complete any of the following fields:
-
Source
-
Union Code
-
Locality
-
Effective Date
-
-
To define a pay grade, complete the following fields:
-
Pay Grade
-
Minimum
-
Midpoint
-
Maximum
-
-
To enter information that varies from the information that you entered for the pay class, complete the following optional fields:
-
Union
-
Locality
-
Effective Date
-
-
Access More Detail (F4).
Figure 39-3 Pay Grades by Class (Detail) screen

Description of "Figure 39-3 Pay Grades by Class (Detail) screen"
-
Complete any of the following optional fields:
-
Remark (Rmk)
-
Source
-
| Field | Explanation |
|---|---|
| Pay Class(H/S/P) | A code that indicates how an employee is paid. Valid codes are:
" " – Blank H – Hourly S– Salaried P – Piecework |
| Source | A user defined code (08/SS) that identifies the source of the salary information. To display all pay grades regardless of the source, place an asterisk (*) in this field. |
| Union | A user defined code (07/UN) that represents the union or plan in which the employee or group of employees work or participate. |
| Locality | A user defined code (07/SL) that defines the different salary localities within an organization. For example, you can compare salaries for employees on the East Coast with employees in the Midwest.
Form-specific information This field appears in following two sections of this form:
|
| Effective Date | The date on which this transaction takes effect. The effective date is used generically. It can be the date of the next raise, a lease effective date, a price or cost effective date, a currency effective date, a tax rate effective date, change in well status, or whatever is appropriate. |
| Pay Grade | A code that designates a category for grouping employees according to pay ranges. For each pay grade, you enter a pay range that includes a minimum, a midpoint, and a maximum pay rate. The system uses these pay ranges to calculate compa-ratios for the employees that you assign to pay grades. After you enter a pay grade for an employee, the system displays an error or warning message if you enter a rate for the employee that is not within the pay range for the employee's pay grade.
To set up pay grades, use Pay Grades by Class (P082001). |
| Minimum | The minimum salary or hourly rate allowed for a pay grade.
The system displays a warning or error message (depending on processing options) when you enter a pay rate for an employee that is lower than the minimum rate for the pay grade. |
| Midpoint | The midpoint salary or hourly rate for a pay grade or pay range.
For job IDs with a defined pay grade, you enter the midpoint amount in the Pay Grade table (F082001). For job IDs that you evaluated by points, the system calculates the midpoint amount using a Pay Range Formula table (F08290). The system calculates a compa-ratio (data item #CRA) for an employee by dividing the employee's salary or rate by the midpoint for the employee's pay grade. |
| Maximum | The maximum salary or hourly rate for a pay grade.
The system displays a warning or error message (depending on processing options) when you enter a pay rate for an employee that is higher than the maximum rate for the pay grade. |
| Rmk | A generic field that you use for a remark, description, name, or address. |
39.2.1 What You Should Know About
| Topic | Description |
|---|---|
| Setting up pay grades in the Pay Grade/Step table | If you are using pay grade steps, you can define the pay grades at the same time that you define pay grade steps. You do not need to define a pay grade in the Pay Grade and Salary Range table (F082001) to set up pay grade steps. |
39.3 Setting Up Pay Grade Steps
From Time Accounting (G05), enter 29
From Time Accounting Setup (G054), choose Pay Grade Step Table
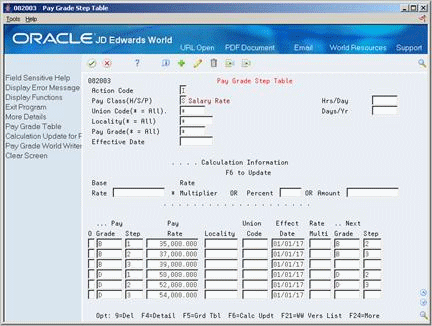
To ensure that all of the employees working in a job receive the same rate of pay, and to establish progression within a pay grade, you can set up pay grade steps. For example, you might have a pay grade A, which contains pay steps A1, A2, and A3. Employees in step A1 receive 15.00 per hour, employees in step A2 receive 15.50 per hour, and employees in step A3 receive 16.00 per hour.
Setting up pay grade steps lets you automate the process of:
-
Tracking pay information for employees. When you enter employee information, the system calculates the employee's salary or hourly rate, based on the pay grade step that you enter for the employee.
-
Moving employees from one pay grade step to the next.
-
Updating pay rates for multiple pay grades and pay steps.
When you set up pay grade steps, you can save time and reduce calculation errors by having the system automatically calculate the pay rates for a group of steps. You enter a base pay rate that applies to the group of steps, and then enter a pay rate multiplier for each step. The system calculates the rate for each step by multiplying the base pay rate by step's pay rate multiplier.
Setting up pay grade steps consists of the following tasks:
-
Setting up pay grade steps individually
-
Setting up pay grade steps using a pay rate multiplier
When you set up pay grade steps individually, you enter a pay rate for each pay grade step. When you set up pay grade steps using a pay rate multiplier, you enter a base pay rate, and apply a pay rate multiplier to each pay grade step.
This program updates the Pay Grade and Salary Range table (F082001).
39.3.1 What You Should Know About
| Topic | Description |
|---|---|
| Setting up pay grades in the Pay Grade/Step table | You can define the pay grades at the same time that you define pay grade steps. You do not need to define a pay grade in the Pay Grade and Salary Range table (F082001) to set up pay grade steps. |
To set up pay grade steps individually
-
Complete the following field:
-
Pay Class
-
-
To specify information that applies to all (or most) of the pay grade steps you need to define, complete any of the following fields:
-
Union Code
-
Locality
-
Hours/Days
-
Days/Year
-
Effective Date
-
-
For each step that you need to define, complete the following fields:
-
Pay Grade
-
Pay Grade Step
-
Pay Rate
-
-
Complete the following option fields:
-
Next Pay Grade
-
Next Pay Grade Step
-
-
Access More Details.
Figure 39-5 Pay Grade Step Table (Detail) screen

Description of "Figure 39-5 Pay Grade Step Table (Detail) screen"
-
To specify information for this step that varies from the information that you entered for the pay class, complete the following fields:
-
Locality
-
Union Code
-
Effective Date
-
Hours/Day
-
Days/Year
-
To set up the pay grade steps using a pay rate multiplier
-
Complete the following field:
-
Pay Class
-
-
To specify information that applies to all (or most) of the pay grade steps that you need to define, complete any of the following fields:
-
Union Code
-
Locality
-
Hours/Days
-
Days/Year
-
Effective Date
-
-
Complete the following field:
-
Base Rate
-
-
For each step that you need to define, complete the following fields:
-
Pay Grade
-
Pay Grade Step
-
Rate Multiplier
-
-
Complete the following optional fields:
-
Next Pay Grade
-
Next Pay Grade Step
-
-
Access the detail area.
-
To specify information for this step that varies from the information that you entered for the pay class, complete the following fields:
-
Locality
-
Union Code
-
Effective Date
-
Hours/Day
-
Days/Year
-
-
To cause the system to calculate the pay rate for each pay grade step you entered, choose the Calculation Update function.
39.4 Setting Up Shift Rate Differentials
From Time Accounting (G05), enter 29
From Time Accounting Setup (G054), choose Payroll Constants and Tables
From Additional Constants and Tables (G0541), choose Shift Rate Differentials
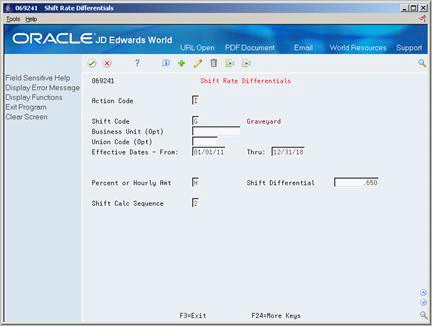
A shift differential is a flat dollar or percentage amount added to an employee's hourly rate. You set up shift rate differential codes and assign them to employees who receive additional compensation for shift work.
You assign shift rate differentials to user defined shift codes (07/SH). You can also assign business units and union codes to shift differentials. When you define a shift differential, you must set effective dates for the table. The system compares the effective dates to the work dates you enter in time entry.
The system uses a flat dollar amount or a percentage shift differential with either of two methods.
-
The first method is hourly rate plus the shift differential, multiplied by the pay type multiplier and then multiplied by the hours worked.
-
The second method is hourly rate multiplied by the pay type multiplier plus the shift differential and then multiplied by the hours worked.
The difference between the two methods is significant only when a multiplier other than 1 is specified.
Use shift code information to ensure that an employee is paid the correct amount for working on a shift with a rate differential.
-
If an employee always works a shift for which a shift rate differential is applicable, include the shift code in the employee's master record.
-
If an employee occasionally works a different shift, you can override the information on the applicable time card.
To set up shift rate differentials
Figure 39-6 Shift Rate Differentials screen

Description of "Figure 39-6 Shift Rate Differentials screen"
-
Complete the following fields:
-
Shift Code
-
Effective Date From
-
Effective Date Thru
-
Percent or Hourly Amount
-
Shift Differential
-
Shift Calculation Sequence
-
-
Complete the following optional fields:
-
Business Unit
-
Union Code
-
39.5 Setting Up Pay Rate Tables
From Time Accounting (G05), enter 29
From Time Accounting Setup (G054), choose Payroll Constants and Tables
From Additional Constants and Tables (G0541), choose Pay Rates for Groups and Unions
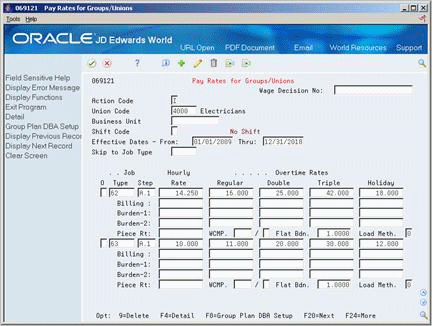
You set up pay rate tables to associate pay rates with a specific group of employees. You set up hourly rates by job type and job step. Any amounts that you enter in the pay rate tables can override rates set up in the employee master record. As you enter time for various job types and job steps, the system finds the appropriate hourly rate.
The system uses pay rate tables in conjunction with the time entry programs. You must set a processing option on the appropriate time entry menu selection so that the system uses the pay rate tables.
Setting up pay rate tables allows you to:
-
Make rates specific to a job (business unit) or shift
-
Establish up to five different rates per job type and step
-
Establish workers compensation codes for each job type and step
-
Establish a flat burden factor for each job type and step
-
Establish a recharge billing rate
On Pay Rate for Groups/Unions
Figure 39-7 Pay Rate for Groups/Unions screen

Description of "Figure 39-7 Pay Rate for Groups/Unions screen"
-
Complete the following fields:
-
Union Code
-
Effective Date From
-
Effective Date Thru
-
Job Type
-
Hourly Rate
-
-
Complete the following optional fields:
-
Wage Decision Number
-
Business Unit
-
Shift Code
-
Job Step
-
Regular Overtime Rate
-
Double Overtime Rate
-
Triple Overtime Rate
-
Holiday Overtime Rate
-
-
Access Detail (F4).
Figure 39-8 Pay Rates for Groups/Unions (Detail) screen

Description of "Figure 39-8 Pay Rates for Groups/Unions (Detail) screen"
-
Complete one or more of the following fields:
-
Billing Rate
-
WCMP (Workers Compensation Method)
-
Flat Burden
-
Labor Load Method Code
The Recharge Burden Rate-1 and Recharge Burden Rate-2 fields are for future use and are inactive for this release.
-


