4 Enter Additional Employee Information
This chapter contains these topics:
-
Section 4.4, "Entering Dates, Eligibility, and EEO Information,"
-
Section 4.6, "Entering User Defined Information for Employees."
After you enter employee information, you can enter additional employee information. Additional employee information is commonly used for reporting purposes or other requirements of your company.
Entering additional employee information is optional. When you enter additional information, you can simplify system processes. For example, you can simplify the time entry process by entering labor distribution instructions for an employee. By entering labor distribution instructions, you can choose a function on an employee time entry form that copies the instructions that you have entered for the employee.
4.1 Entering Basic Employee Data
From Time Accounting System (G05), choose Employee Information
From Employee Information (G0511), choose Basic Employee Data
Entering basic employee data is an alternative method to the Employee Entry program that you can use to create an employee master record. You might limit individuals who have authority to enter only non-confidential information to using this method. You might use this method to enter a large number of new employees into your system. The Time Accounting system allows you to limit the information that users can access, for example, you might want to limit temporary employees from accessing salary information. Employees with access to more sensitive information would use the Employee Entry program to update the initial record.
You can also enter other employee data, such as the record type code that identifies employees whose timecards are processed using recharge only.
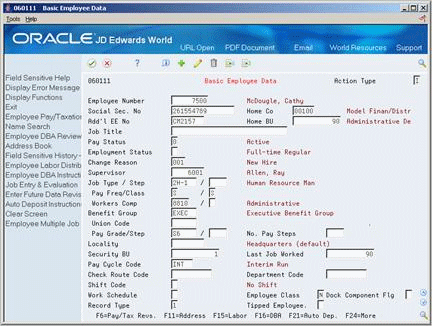
On Basic Employee Data
-
To assign a specific employee number, complete the following field:
-
Employee Number
-
-
Complete the following fields:
-
Home Company
-
Home Business Unit
-
Pay Status
-
Pay Frequency
-
Pay Classification
-
Security Business Unit
-
-
Complete the following optional fields and press Enter:
-
Employment Status
-
Supervisor
-
Locality
-
Shift Code
-
Work Schedule Code
-
Record Type
-
Employee Classification Status
-
-
To override system-supplied information, complete the following fields:
-
Last Job Worked
-
Pay Cycle Code
Figure 4-2 Address Window (Override Default) screen
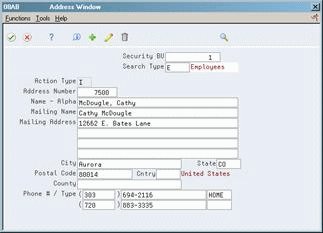
Description of "Figure 4-2 Address Window (Override Default) screen"
-
-
On Address Window, complete the following fields and press Enter:
Depending on how you set up your system constants for history and turnover information, the system might display History and Turnover Information.
Figure 4-3 History and Turnover Information screen
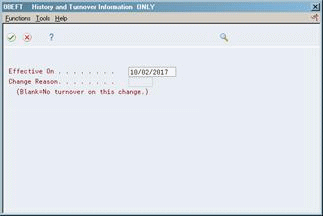
Description of "Figure 4-3 History and Turnover Information screen"
-
On History and Turnover Information Only, to override system-supplied values, complete the following fields and press Enter:
-
Eff. Date
-
Change Reason
-
| Field | Explanation |
|---|---|
| Employment Status | A user defined code (07/ES) that identifies an employee's status within the company. You can change the default codes or set up new codes to meet the needs of your company. For example:
1 – Full-time temporary 2 – Part-time temporary 3 – Part-time regular 4 – Seasonal 5 – Casual |
| Supervisor | The address book number of the supervisor.
Note: A processing option for some forms allows you to enter a default value for this field based on values for Category Codes 1 (Phase), 2, and 3. Set up the default values on the Default Managers & Supervisor form. After you set up the default values and the processing option, the information displays automatically on any work orders you create if the category code criterion is met. You can either accept or override the default value. |
| Locality | A user defined code (07/SL) that defines the different salary localities within an organization. For example, you can compare salaries for employees on the East Coast with employees in the Midwest. |
| Shift Code | A user defined code (07/SH) that identifies daily work shifts. In payroll systems, you can use a shift code to add a percent or amount to the hourly rate on a timecard.
For payroll and time entry: If an employee always works a shift for which a shift rate differential is applicable, enter that shift code on the employee's master record. When you enter the shift on the employee's master record, you do not need to enter the code on the timecard when you enter time. If an employee occasionally works a different shift, you enter the shift code on each applicable timecard to override the default. |
| Record Type | A code that identifies whether the employee is to be handled through the Recharge processing option for the Payroll Journal Entry program. Valid codes are:
1 – Payroll Processing Only 2 – Payroll and Recharge Processing 3 – Recharge Processing Only After a timecard has been added, you cannot change its record type. |
| Employee Class | A code that represents the employee's classification status. Valid values are:
Y – Contract labor (non-employee) N – Regular employee S – Employee to be included in step progression process |
4.1.1 What You Should Know About
4.2 Entering Labor Distribution Instructions
From Time Accounting System (G05), choose Employee Information
From Employee Information (G0511), choose Employee Entry
You enter labor distribution instructions for individual employees to allocate time worked to multiple general ledger accounts. You can enter labor distribution instructions for hourly and salaried employees.
Labor distribution instructions simplify time entry by allowing you to retrieve the instructions when you manually enter timecards.
Use labor distribution instructions to:
-
Distribute time to multiple general ledger accounts
-
Distribute time by either percentage or number of hours
-
Set effective dates for distributions
-
Create a template for time entry
-
Specify job type information when using multiple jobs
-
Override position ID and AAI accounts for an employee
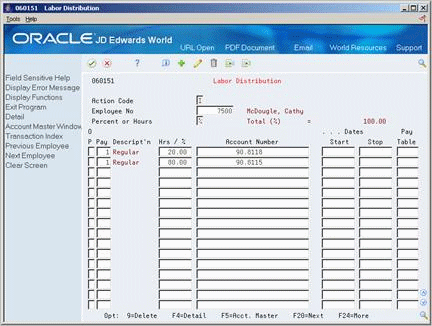
4.2.1 To enter labor distribution instructions
On Employee Entry
-
To locate an employee, complete the following field:
-
Employee Number
-
-
Choose Labor Distribution Instruction Revisions (F15).
-
On Labor Distribution, complete the following fields:
-
Percent or Hours
-
Pay Type
-
Hours Worked or %
-
Account Number
-
-
If you choose an hourly method of distribution, complete the following optional fields:
-
Start Date
-
Stop Date
-
-
Access the detail area.
Figure 4-5 Labor Distribution (Detail) screen
Description of "Figure 4-5 Labor Distribution (Detail) screen"
-
To enter recharge billing information, complete the following fields:
-
Distribution Rate
-
Burden Rate
-
-
To enter pay rate information, complete the following fields:
-
Hourly Rate
-
Gross Pay
-
-
To override system-supplied information, complete the following fields:
-
Workers Compensation Code
-
Shift Code
-
Week Day
-
-
Complete the following optional field:
-
Home Business Unit
-
You can use Toggle Display Format (F2) to change the display of the fields in the detail area (fold). If you set up Enhanced Subledger Accounting, you can view and change these values in the detail area. See Work with Enhanced Subledger Accounting in the JD Edwards World General Accounting I Guide for more information.
| Field | Explanation |
|---|---|
| Percent or Amount | This field represents the method of distribution used for employee labor (either percentage or hours). Valid codes are:
% – Percentage (must equal to 100%) H – Hours Form-specific information If you enter H for hours in this field, you must enter a valid pay type in the Pay Type field and a general ledger account number in the Account Number field. You can, however, leave the number of hours blank, retrieve the distribution instruction during time entry, and enter the number of hours there. |
| Hours Worked | The number of hours associated with each transaction.
When you enter labor distribution with the hours method, this field can be blank. You must make an entry when using the percent method. Form-specific information When used in conjunction with the employee labor distribution instructions for an individual employee, you can use this field to enter a percentage. To account for all hours that an employee worked during the pay period, the sum of the percentages defined on all labor instruction entries must equal 100% for each job type, job step and home business unit. The system converts the percentages to hours when it copies the labor instruction records into actual time entry (timecard) records. |
| Account Number | A field that identifies an account in the general ledger. You can use one of the following formats for account numbers:
The first character of the account indicates the format of the account number. You define the account format in the General Accounting Constants program. |
| Rate - Distribution (or Billing) | A rate used for the billing of labor services. This rate is often referred to as the billing or recharge rate. The extended amount based on this rate will be charged to the primary distribution account on the timecard with an offset being made to an account derived from the Accounting Rules table. This rate will not affect the employee's payroll. To allow billing rates in time entry, you must set the employee's record type as either 2 or 3 on the Basic Employee Entry form.
A rate entered on any of the following forms overrides the rate in the Employee Primary Job table:
|
| Rate - Recharge Burden | An hourly rate to be used when charging 'burden' associated with the actual billing (recharge) amounts. |
4.2.2 What You Should Know About
| Topic | Description |
|---|---|
| Workers compensation code | The processing options for labor distribution instructions indicate where to find the workers compensation code. |
| Multiple active jobs | If you specify multiple active jobs on Employee Multiple Job Entry, you must enter the home business unit, job code, and job step for each job. The system uses the default value in the Position field if you leave it blank.
Labor distribution is used to override position ID accounts or AAIs both in the multiple job and single job environment. The total of all jobs must total to 100% if the percent method is used. Home business unit, position ID, job type, and job step specify which job is being entered. If you are using multiple jobs, these fields must match an active job in the Employee Multiple Job table (F060118). See also Section 5.1, "Entering Employee Multiple Job Information." |
| Functionality for the Time Accounting system | The following fields are not applicable to Time Accounting:
|
4.3 Defining Occupational Pay Rate Tables
From Time Accounting System (G05), choose Employee Information
From Employee Information (G0511), choose Occupational Pay Rates
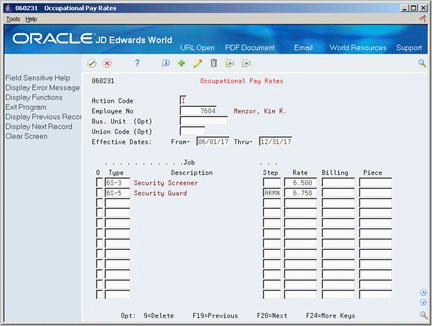
You define occupational pay rates for employees who perform various job types and have different hourly rates for each job type. Pay rates are specific to an employee. They can be specific to a business unit and union for that employee.
To define occupational pay rate tables
On Occupational Pay Rates
-
Complete the following required fields:
-
Employee Number
-
Effective Dates
-
Job Type
-
-
Complete the following optional field:
-
Job Step
-
-
Complete the following fields, as applicable:
-
Hourly Rate
-
Billing Rate
-
| Field | Explanation |
|---|---|
| Rate | The employee's hourly rate, which is retrieved during time entry. If you enter a rate in this field on any other form, that rate can override the value in the Employee Master table.
In the Employee Master table, this is the employee's base hourly rate. In the Union Rates table, this is the straight time rate. Note: If you change the number of the data display decimal digits for this field, you must also change fields Rate - Base Hourly (BHRT) and Rate - Hourly (SHRT) so that they have exactly the same number of data display decimal digits. |
| Billing Rate | A rate used for the billing of labor services. This rate is often referred to as the billing or recharge rate. The extended amount based on this rate will be charged to the primary distribution account on the timecard with an offset being made to an account derived from the Accounting Rules table. This rate will not affect the employee's payroll. To allow billing rates in time entry, you must set the employee's record type as either 2 or 3 on the Basic Employee Entry form.
A rate entered on any of the following forms overrides the rate in the Employee Primary Job table:
|
4.3.1 What You Should Know About
4.4 Entering Dates, Eligibility, and EEO Information
From Time Accounting System (G05), choose Employee Information
From Employee Information (G0511), choose Dates, Eligibility, and EEO
You enter dates, eligibility, and EEO information for reporting purposes or for any other business requirements. You can enter dates and EEO data, such as:
-
Date of the employee's next review
-
Date an employee's leave of absence expires
-
Date of the last contact with a seasonal employee
-
U.S. employee's I9 status
To enter eligibility information, you assign eligibility codes to employees. Eligibility codes are additional user defined codes that you define when you set up your system. Use these codes when you want reporting capabilities for classifications not already defined by the system.
To enter dates, eligibility, and EEO information
On Dates, Eligibility and EEO
Figure 4-7 Dates, Eligibility and EEO screen
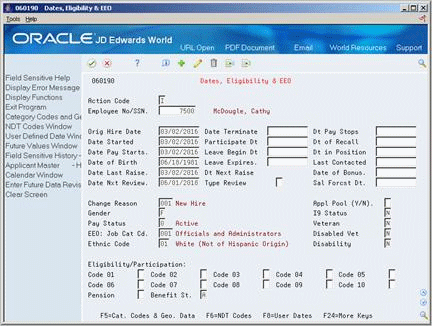
Description of "Figure 4-7 Dates, Eligibility and EEO screen"
-
-
Employee Number
-
-
To enter additional date information, complete the following fields as appropriate:
-
Date Pay Stops
-
Participation Date
-
Leave Begin Date
-
Leave Expires Date
-
Date in Position
-
Date of Recall
-
Last Contacted
-
Date of Last Raise
-
Date of Bonus
-
Date of Next Review
-
Type of Increase Next Review
-
Salary Forecast Data
-
-
To enter eligibility information, complete the following fields as appropriate:
-
Eligibility Codes 01-10
-
-
To enter EEO information, complete the following fields as appropriate:
-
Applicant Pool
-
I9 Status (U.S. only)
-
Veteran
-
Disabled Veteran
-
Disability
-
| Field | Explanation |
|---|---|
| Code 01 | A code to specify an employee's eligibility for or participation in various user defined plans or programs. For example, these codes can be used to designate the following:
Voluntary Accidental Death & Dismemberment Insurance Overtime Call Up Profit Sharing Political Action Committee Coffee Fund U.S. Citizen |
| Veteran | A user-defined code (05/HO) that indicates the veteran status of the employee or applicant. For example:
N – Not a Veteran O – Other Protected Veteran A – Armed Forces Service Medal Veteran S – Recently Separated Veteran L – Other Protected Veteran - No Self-Identification |
| Disabled Veteran | A code that indicates whether the employee or applicant is a disabled veteran. Valid codes are:
Y – Yes, this employee is a disabled veteran. N – No, this employee is not a disabled veteran. |
| Disability | A user-defined code (05/HQ) that indicates whether this employee or applicant has a mental or physical disability. Examples include:
D – Do not wish to answer N – No U – Unknown Y – Yes |
See Also:
-
Entering User Defined Information for Employees in the JD Edwards World Human Resources Guide to enter veteran and disability self-identification responses.
4.4.1 What You Should Know About
4.5 Entering International Employee Information
From Time Accounting System (G05), choose Employee Information
From Employee Information (G0511), choose International Data
If your company has international employees, you can use Employee International Data to record information, such as maiden name, alien registration number, and country code. For Canadian employees, you can also enter information that is required for Canadian employment equity.
To enter international employee information, complete the following tasks:
-
Enter personal information for international employees
-
Enter additional information for Canadian employees
4.5.1 Before You Begin
-
To track personal and employment equity information for Canadian employees, verify that the employees' home company is Canadian.
-
Verify that the International Flag is set to Y (Yes) for Company 00000 in the payroll company constants.
To enter personal information for international employees
On Employee International Data
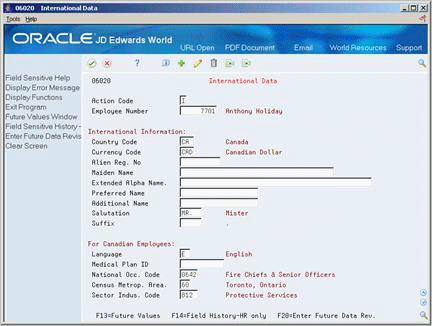
Complete any of the following optional fields:
-
Country Code
-
Currency Code
-
Alien Registration Number
-
Maiden Name
-
Extended Alpha Name
-
Preferred Name
-
Additional Name
-
Salutation
-
Suffix
| Field | Explanation |
|---|---|
| Alien Reg. No | The alien registration number for employees who have more than one ID. For instance, if you have a foreign employee who is working under a work permit, you would record that number in this field. |
| Extended Alpha Name | A 50-character alphabetical field for the extended name for an employee. You can use this field on certain designated reports in place of the normal 40-character name.
Form-specific information The standard JD Edwards World name field is 30 characters long. This field allows you to enter the complete legal name of an employee whose name is between 30 and 50 characters long. You can run a World Writer report on the Extended Alpha Name field to obtain a listing of the complete name of all your employees with names longer than 30 characters. |
| Preferred Name | The preferred name of the employee. For instance, an employee might have the legal name of Catherine, but she might be known as Cathy. |
| Suffix | A code that identifies the credentials for a given employee. Some examples are PhD, MD, CPA, and so on. |
To enter additional information for Canadian employees
On Employee International Data
-
Complete the following fields:
-
Language
-
Medical Plan ID
-
-
To enter Canadian employment equity information, complete the following fields:
-
National Occupation Classification
-
Census Metropolitan Area
-
Sector Industrial Code
-
| Field | Explanation |
|---|---|
| National Occ. Code | A code that identifies the National Occupational Classification (NOC) for a job or employee. The Canadian government defines NOC codes. For more information about NOC codes, see the Canadian Employment Equity documentation.
Form-specific information You enter the default value for National Occupational Classification (NOC) codes at the job level. This default value does not appear on the Employee International Data form. However, any value you enter in this field on Employee International Data overrides the default value that you entered at the job level. The override value appears on the Employee International Data form. |
| Census Metrop. Area | A code that identifies the Census Metropolitan Area code of work. Valid codes are defined by the Canadian government and can be found in the Canadian Employment Equity documentation. |
| Sector Indus. Code | A code that identifies the Sector Industrial Code. These codes are defined by the Canadian government and can be found in the Canadian Employment Equity documentation. |
4.5.2 What You Should Know About
4.6 Entering User Defined Information for Employees
After you add an employee, you can add information to the employee's record. Typically, this information is unique to your organization or your industry. For example, you might need to track the dates which employees' drivers' licenses expire.
JD Edwards World provides codes and fields that make it easy for you to track this information. You define these codes and fields when you set up your system.
When you enter employee information, you enter values in the codes and fields that you have defined.
Entering user defined information for employees includes:
-
Entering category and geographic data codes
-
Entering user defined dates
4.6.1 Entering Category and Geographic Data Codes
From Time Accounting System (G05), choose Employee Information
From Employee Information (G0511), choose Category Codes and Geographic Data
You can use these category and geographic data codes for reporting and analysis purposes.
For example, you might assign employees to a category code that you define to determine stock option eligibility. After you define the category codes and assign your employees to them, you can run a report listing the employees eligible to own stock options.
You assign geographic data codes for reporting purposes. Geographic data codes are user defined codes. For example, in the United States some states use these codes to prepare unemployment reports.
To enter category and geographic data codes
On Category Codes and Geographic Data
Figure 4-9 Category Codes and Geographic Data screen
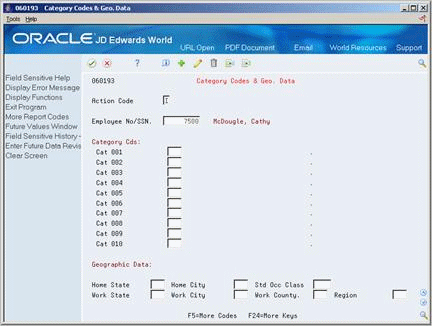
Description of "Figure 4-9 Category Codes and Geographic Data screen"
-
To locate an employee, complete the following field:
-
Employee Number/SSN
-
-
Complete the following fields as necessary:
-
Category Codes 1-20
-
-
For Time Accounting, complete the following fields for informational purposes only:
-
Home State
-
Work State
-
Home City
-
Work City
-
Standard Occupational Class
-
Work County
-
Region
-
4.6.2 Entering User Defined Dates
From Time Accounting System (G05), choose Employee Information
From Employee Information (G0511), choose Dates, Eligibility, and EEO
When you define codes and fields, you enter a name (label) for the information you want to track. For example, you might enter Drivers License Expiration Date for user defined date field 1. You can use user defined dates for reporting and analysis purposes.
On Dates, Eligibility, and EEO
-
To locate an employee, complete the following field:
-
Employee Number/SSN
-
-
Choose the User Dates function.
Figure 4-10 Dates, Eligibility, and EEO (Defined Dates) screen
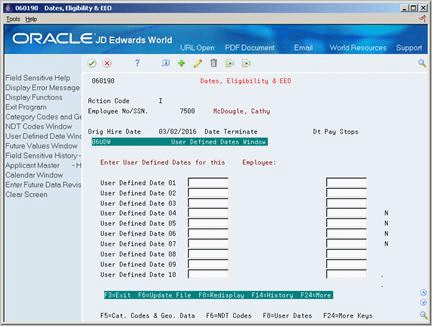
Description of "Figure 4-10 Dates, Eligibility, and EEO (Defined Dates) screen"
-
On User Defined Dates Window, complete the following fields:
-
User Defined Dates 1-10
-
| Field | Explanation |
|---|---|
| User Defined Date 01 | A user defined date. Because this field is not linked to any specific function or application within the system, you can use this date for any purpose needed by your company. For example, you can use this date field to track the expiration of a license or certification. |