25 Create Invoices Manually
This chapter contains these topics:
25.1 Creating Invoices Manually
You can manually generate invoices without running the Invoice Generation program. When you generate invoices manually, you can:
-
Create a new batch header and add the invoices to the new batch
-
Add invoices to an existing batch
-
Add transactions to the invoices
For example, you might have an existing batch which includes invoices that you have already reviewed and revised. You can add another invoice to the batch manually without having to delete and regenerate the entire batch.
Creating invoices manually consists of the following tasks:
-
Creating a batch header manually
-
Creating an invoice manually
-
Adding transactions to an invoice
-
Revising an invoice amount for non-T&M
-
Releasing retainage
See Also:
-
Chapter 23, "Generate Invoices Automatically" to create invoices automatically.
25.2 Creating a Batch Header Manually
From Contract Billing Processing (G52), choose Invoice Generation
From Invoice Generation (G5221), choose Batch Review (P48221)
You can manually create a new batch header for invoices. When you create a new batch header, you create a new, empty batch. Creating a new batch is optional because you can add invoices to an existing batch. If you do not want to create a new batch, you do not need to create a batch header.
To create a batch header manually
On Batch Review
-
Complete the following field:
-
User ID
-
-
Choose Create Empty Batch (F6).
The system displays the new batch on Batch Review. You can then add invoices to the batch on Invoice Entry Review (P48222).
25.3 Creating an Invoice Manually
From Contract Billing Processing (G52), choose Invoice Generation
From Invoice Generation (G5221), choose Batch Review (P48221)
You can manually create a new invoice. You can add the invoice to an existing batch or to a new batch header. Creating a new invoice is optional. You can also add transactions to an existing invoice.
On Batch Review
-
Complete any of the following fields to locate a batch of invoices:
-
Batch Number
-
Batch Date From
-
Batch Date Thru
-
User ID
If you place an asterisk in the User ID field, the system displays all batches created by all users regardless of the batch activity status. The system displays the most current batch last.
-
-
To further limit the list of batches, complete the following optional fields:
-
Skip To Batch Number
-
Batch Status
-
Current Activity
-
-
To review the invoice information for a specific batch, choose Detailed Batch Review (Option 1).
Figure 25-1 Invoice Entry Review (Manual) screen
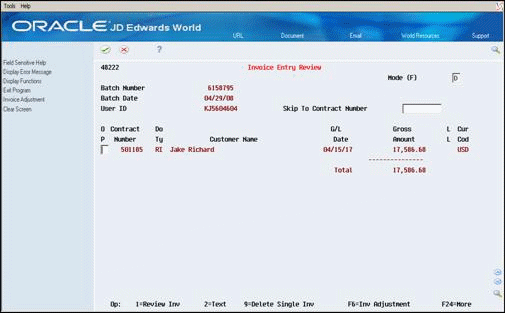
Description of ''Figure 25-1 Invoice Entry Review (Manual) screen''
-
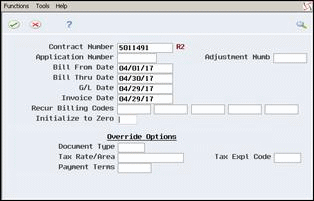
On Invoice Entry Review, choose Invoice Adjustment (F6).
-
On Invoice Adjustment Window, complete the following fields:
-
Contract Number
-
Bill From Date
-
Bill Thru Date
-
G/L Date
-
Application Date
-
-
Complete the following optional fields:
-
Application Number
-
Adjustment Number
-
Recurring Billing Codes
-
Initialize to Zero
-
-
To override the information from the system constants and contract master information, complete the following optional fields:
-
Document Type
-
Tax Rate/Area
-
Tax Explanation Code
-
Payment Terms
-
-
Choose Edit and Submit (F6).
The system prompts you to verify the submission.
-
Choose Submit Job (F6).
The system displays the new invoice on Invoice Entry Review. You can then:
-
Add workfile transactions to the invoice
-
Add billing amounts for non-T&M billing lines
-
Release retainage
| Field | Explanation |
|---|---|
| G/L Date (DG) | The date that identifies the financial period to which the source transaction was posted. Based on the company's fiscal year and current accounting period, the system edits the date for PBCO (posted before cutoff), PYEB (prior year ending balance), PACO (post after cutoff), and WACO (post way after cutoff).
Form-specific information The system assigns the G/L date during the invoice generation process. You can override that date, however, when you select an invoice batch for invoice journal generation. You control this override function with the billing system constants. |
| Application/Invoice Date (APDT) | The date of the last or current application. (An application is assigned each time an invoice is issued for the contract.)
Form-specific information The date that the system assigns to the invoice. This date is updated during the invoice generation process, but you can override it when you select an invoice batch for invoice journal generation. This override function is controlled by the billing system constants. |
| Application Number (APPL) | The last or current application number for the specified contract. (The system assigns a new application number each time an invoice is issued for the contract.) |
| Adjustment Numb (ADJN) | A number used to control changes to closed applications. Closed applications represent invoices that have been sent. This number is always zero unless you reopen a previous application. |
| Initialize to Zero (#INZ) | This field creates a new application or adjustment with zero current billing amounts. Valid codes are:
Y – Create empty invoices with no billing amounts N – Do not create empty invoices |
25.3.1 What You Should Know About
| Topic | Description |
|---|---|
| Reviewing the batch number for contracts | When a contract is in an active invoice batch, the system displays the batch number for the invoices on Contract Master Revisions (P5201) and Contract Billing Line Details (P5202). |
| Calculating invoice amounts for non-T&M | When you create invoices automatically, the system processes workfile transactions related to T&M, including components. At this time, the system can also calculate the invoice, fee, and retainage amounts for non-T&M billing lines, such as lump sum or unit price, if you have defined cross-references for the respective billing lines.
See Section 12.3, "Defining Billing Lines for Lump Sum" and Section 12.4, "Setting Up Lump Sum Billing Lines for Manual Calculation." |
| Recurring invoices | You can define recurring invoices for a lump sum billing line. When you generate invoice amounts, the system calculates the recurring amount if:
|
| Retainage on fee lines | The system automatically calculates the retainage on invoice amounts for all applicable billing lines.
In some cases, the invoice amount for a fee line does not exist or is incomplete. This occurs for fee lines with cross-references that include lump sum or unit price. The system does not automatically calculate fees for those billing lines if you enter the billing amounts manually. You must manually revise the pay item amount for both the fee line and retainage. See Section 24.4, "Calculating Retainage Manually for Billing" and Section 24.5, "Calculating Fee Lines Manually." |
| Adjusting a previous application for payment | A previously billed invoice or application might need a revision after you have applied cash to the invoice. Instead of voiding the invoice and cash receipt, you can create an adjustment to the previous application.
To do this, follow the steps for creating an invoice manually and enter the application number for the invoice that needs adjusting. The system automatically assigns the adjustment number and creates a new invoice number for the adjusted application. |
25.4 Adding T&M Transactions to an Invoice
From Contract Billing Processing (G52), choose Invoice Generation
From Invoice Generation (G5221), choose Batch Review (P48221)
An invoice might not contain all the billable amounts for time and material (T&M) that you have entered during the accounting cycle. To account for this, you need to:
-
Review the existing T&M transactions in the Billing Workfile (F4812) that are not currently in an invoice batch
-
Manually add T&M transactions that exist in the Billing Workfile
-
Manually add T&M costs that exist in the Account Ledger table and are not currently in the Billing Workfile, if necessary
You can add workfile transactions for time and material to:
-
A new invoice for a contract
-
An existing pay item for a contract
Adding transactions to an invoice consists of the following:
-
Adding transactions for T&M from the workfile
-
Adding existing G/L transactions for T&M
-
Adding ad-hoc transactions to a T&M billing line
To add T&M transactions from the workfile
On Batch Review
-
Locate a batch of invoices.
-
To review the invoice information for a specific batch, choose Detailed Batch Review (Option 1).
-
On Invoice Entry Review, choose Review Invoice (Option 1) to review the details for a contract.
Figure 25-3 Pay Item Billing Inquiry (Review Invoice) screen
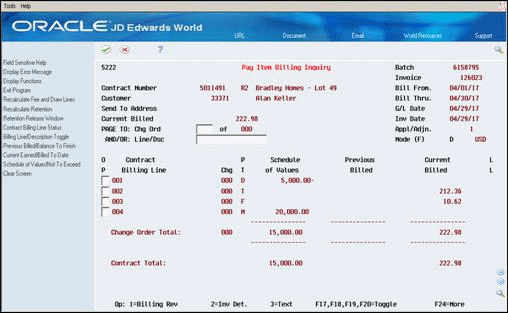
Description of ''Figure 25-3 Pay Item Billing Inquiry (Review Invoice) screen''
-
On Pay Item Billing Inquiry, choose Invoice Detail Maintenance (Option 2) for a pay item for a T&M billing line.
Figure 25-4 Invoice Detail Revisions (T&M Billing Line) screen
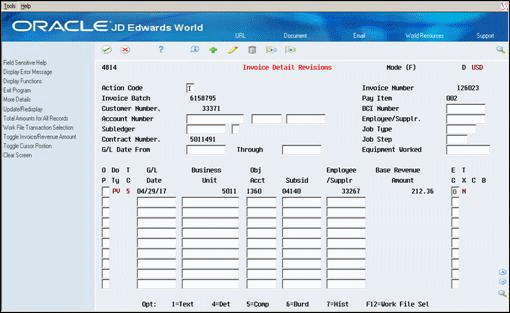
Description of ''Figure 25-4 Invoice Detail Revisions (T&M Billing Line) screen''
-
On Invoice Detail Revisions, choose Workfile Selection (F12).
Figure 25-5 Workfile Transaction Selection screen
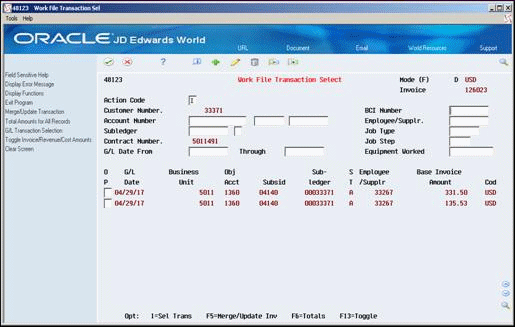
Description of ''Figure 25-5 Workfile Transaction Selection screen''
-
On Work File Transaction Select, choose Select Transaction (Option 1) for one or more available transactions.
-
Choose Merge/Update Invoice (F5).
The system moves the workfile transaction to the invoice pay item.
Caution:
The system prevents you from merging taxable and nontaxable transactions into the same pay item. If you merge taxable transactions into the same pay item, the transactions must have the same tax rate area and tax explanation. A blank in the Tax Rate/Area field is a valid tax code indicating that the pay item is nontaxable. -
Choose Exit Program (F3).
-
On Invoice Detail Revisions, review the transactions.
To add existing G/L transactions for T&M
On Batch Review
-
Locate a batch of invoices.
-
To review the invoice information for a specific batch, choose Detailed Batch Review (Option 1).
-
On Invoice Entry Review, choose Review Invoice (Option 1) to review the details for a contract.
-
On Pay Item Billing Inquiry, choose Invoice Detail Maintenance (Option 2) for a pay item for a T&M billing line.
-
On Invoice Detail Revisions, choose Workfile Selection (F12).
-
On Work File Transaction Select, choose G/L Selection (F10).
-
On G/L Transaction Selection, complete the following field:
-
Business Unit
-
-
To limit the list of transactions, complete one or more of the following fields:
-
Date From
-
Date Thru
-
Object
-
Subsidiary
-
Subledger
-
Subledger Type
-
-
Choose one of the following for a specific transaction or a group of transactions:
-
Select at Cost (Option 1)
-
Select with Markup (Option 2)
The system processes the source transactions.
-
-
Choose Exit Program (F3).
-
On Work File Transaction Select, use the Inquire action to review the available transactions.
-
For the G/L transaction you added, complete the steps for adding transactions for T&M from the workfile.
To add ad hoc transactions to a T&M billing line
You can add transactions to a T&M billing line on an as-needed basis. For example, you might want to add a transaction to an invoice to create a credit memo.
On Batch Review
-
Locate a batch of invoices.
-
To review the invoice information for a specific batch, choose Detailed Batch Review (Option 1).
-
On Invoice Entry Review, choose Review Invoice (Option 1) to review the details for a contract.
-
On Pay Item Billing Inquiry, choose Invoice Detail Maintenance (Option 2) for a pay item for a T&M billing line.
-
On Invoice Detail Revisions, complete the following fields:
-
G/L Date
-
Business Unit
-
Object
-
Subsidiary
-
Employee/Supplier (optional)
-
Eligibility Code
-
-
Choose More Details (F4).
-
Complete the following optional fields, then choose the Change action:
-
Subledger
-
Subledger Type
-
-
Choose the Inquire action, then choose Transaction Detail (Option 4).
-
On Amounts/Units Information, complete the following field:
-
Total Billing
You can add more detailed information. See Section 19.5, "Entering Ad Hoc Workfile Transactions" for more information.
-
-
Choose Transaction Update with Redisplay (F5).
-
Choose Exit Program (F3).
-
On Invoice Detail Revisions, choose Update and Redisplay (F5).
-
To review the detail for the contract on Pay Item Billing Inquiry, choose Exit Program (F3).
25.4.1 What You Should Know About
| Topic | Description |
|---|---|
| Removing ad hoc transactions from an invoice | Caution: Ad hoc transactions that you add to an invoice are not represented in the Account Ledger (F0911) table. If you void the invoice, the system returns the ad hoc transactions to the workfile. Ad hoc transactions in the workfile are eligible for processing. You must change the status of the ad hoc transactions and remove them from the workfile to prevent billing for the transactions in error.
See Section 19.5, "Entering Ad Hoc Workfile Transactions" for more information. |
25.5 Revising an Invoice Amount for Non-T&M Billing Lines
From Contract Billing Processing (G52), choose Invoice Generation
From Invoice Generation (G5221), choose Batch Review (P48221)
You can enter an amount to an existing invoice that already contains pay items. In this case, you can manually:
-
Enter the non-T&M billing amount
-
Revise a related retainage amount
-
Revise a related fee line amount
You can update only certain fields, depending on the pricing type of the billing line. You cannot update any field for direct and rated draw pricing types. After you enter the information, the system updates the Invoice Summary Workfile (F4822).
To revise an invoice amount for non-T&M billing lines
On Batch Review
-
Locate a batch of invoices.
-
To review the invoice information for a specific batch, choose Detailed Batch Review (Option 1).
-
On Invoice Entry Review, choose Review Invoice (Option 1) to review the details for a contract.
-
On Pay Item Billing Inquiry, choose Billing Revisions (Option 1) for a specific pay item.
-
On Pay Item Billing Revisions, complete the following fields in the appropriate column:
-
Current
-
Earned to Date
The column names vary according to the pricing type. The first column is:
-
Work In Place for lump sum, fees, milestone billing, progress billing, direct draw, and rated draw
-
In Place - Quantity for unit price
The second column is:
-
Stored Material for lump sum
-
Unit Price for unit price
-
Not applicable for fees, milestone billing, progress billing, direct draw, and rated draw
The Total Billed column is applicable only to lump sum and unit price.
-
-
To revise the retainage, complete one of the following fields:
-
Current Retainage
-
Retainage To Date
The system automatically calculates the other amount.
Caution:
After you update the retainage amount for a pay item and return to Pay Item Billing Inquiry, the system warns you that the billing amount has been changed. Do not choose Recalculate Retention (F13). If you do, the system overrides the retainage amount you entered on Pay Item Billing Revisions. -
-
Choose Update with Redisplay (F5).
| Field | Explanation |
|---|---|
| Current (THPD) | The amount that is being billed for this contract pay item.
Form-specific information You can enter this amount using the following three methods:
Note: Use the Toggle (F17) to switch between the dollar format and percent format on this screen. |
| Stored Materials (STML) | Use this field to accrue or defer additional costs to a job. A deferred cost can be the value of stored materials which have been received but have not been used on a job.
A positive amount in this field is a deferred cost that decreases the job-to-date actual costs. A negative amount in this field is an accrued cost that increases the job-to-date actual costs. |
| Earned to Date (EATD) | The total amount earned to date. |
| Stored Material - Total to Date (STTD) | The total amount of stored material to date. |
25.5.1 What You Should Know About
| Topic | Description |
|---|---|
| Working with percentages | You can choose Toggle (F17) to review and enter percentages rather than amounts or units. Then, if you know the percentage to bill or to have retained, you can enter the percent, and the system automatically calculates the respective amount for the contract billing line. |
| Stored materials | You can bill for an inventory of materials on the job in addition to the work in place for lump sum. To do this:
|
| Alternate format for T&M and Component | On Pay Item Billing Revisions, the column names are different for the T&M and component billing lines. The first column is Cost and the second column is Markup. The Total Billed column is also applicable to these billing lines. |
| Retainage on fee lines | The system automatically calculates the retainage on invoice amounts for all applicable billing lines when you run Invoice Generation.
In some cases, the invoice amount for a fee line either might not exist or be incomplete. This occurs for fee lines with cross-references that include lump sum or unit price. The system does not automatically calculate fee lines for those billing lines if you enter the billing amounts manually. You must recalculate both the fee line amount and the retainage on the fee line amount as separate tasks. |
25.6 Releasing Retainage
From Contract Billing Processing (G52), choose Invoice Generation
From Invoice Generation (G5221), choose Batch Review (P48221)
You release retainage (retention) when a job has been completed and your customer authorizes the reduction of the retained amounts. The Contract Billing system decreases the retained amount for each contract billing line. You can release partial retained amounts at the levels of a contract, change order, or billing line.
On Batch Review
-
Locate a batch of invoices.
-
To review the invoice information for a specific batch, choose Detailed Batch Review (Option 1).
-
On Invoice Entry Review, choose Review Invoice (Option 1) to review the details for a contract.
-
On Pay Item Billing Inquiry, choose Retention Release Window (F15).
Figure 25-6 Retention Release Window screen
Description of ''Figure 25-6 Retention Release Window screen''
-
On Retention Release Window, complete one of the following fields:
-
Retained to Date at Level
-
Incremental (Retained to Date)
-
Aggregate Percent Retained at Level
-
Incremental (Aggregate Percent Retained)
-
-
Choose Update with Redisplay (F5).
| Field | Explanation |
|---|---|
| Retained Amount at Level | The amount that is currently retained for the level specified in the Retainage Release Level.
Use this field to change the total percent of retainage for this level. If you enter a change, the system distributes the amount over all pay items that are included in the specified change order level. Distribution is based on the percentage of the actual billing amount computed for the pay items. |
| Retained Amount at Level - Incremental (#IRL) | An incremental amount by which you want to change the calculated retainage to date. You can specify a positive or negative amount in this field.
When you enter an incremental change, the system distributes the amount specified over all pay items that are included in the change order level indicated in the Retainage Release Level field. Distribution is based on the percentage of the actual billing amount computed for the pay items. |
| Aggregate Percent Retained (#PLR) | The aggregate percent retained at the change order level defined in the Retainage Release Level field. The percentage in this field reflects the ratio of the retained-to-date amount and the actual billed-to-date amount for the defined level.
Use this field to change the total percent of retainage for this level. If you enter a change, the system distributes the amount over all pay items that are included in the specified change order level. Distribution is based on the percentage of the actual billing amount computed for the pay items. |
| Aggregate Percent Retained - Incremental (#IPR) | An incremental percent by which you want to change the calculated retainage to date. When you enter an incremental change, the system distributes the percentage specified over all pay items that are included in the change order level indicated in the Retainage Release Level field. Distribution is based on the percentage of the actual billing amount computed for the pay items. |
25.6.1 What You Should Know About
| Topic | Description |
|---|---|
| Releasing retainage for a change order | The system automatically releases retainage for all change orders related to a contract. To release retainage for a specific change order, specify the number of the change order in the Retention Release Level field. |
| Distributing retainage | You can increase or decrease the retainage amounts for a contract by specifying an amount or percent on Retention Release Window. The system distributes the new retainage amounts to all the pay items for a contract by using the following calculations:
(Amount of Pay Item in Invoice / Total Amount of Invoice) X Retainage Amount. |
25.6.2 Multiple Retainage Release Levels on a Single Invoice
If you have different retention rules for different change orders on the same contract, you may issue multiple retention releases on the same $0 invoice. If you release retention on specific change orders first, and then use release level "all" on the same invoice, the amount shown for change retainage will be the sum of the amounts already released on the current invoice. If you now want to fully release retention for the contract, you must enter the amount. This is determined as the sum of the change retainage amount plus the negative of the amount to retain.