19 Revise the Billing Workfile
This chapter contains these topics:
19.1 Revising the Billing Workfile
The transactions in the Billing Workfile (F4812) are the basis for the rest of the revenue and billing processes. You should make any necessary additions and revisions to the workfile transactions before you continue. For example, you can:
-
Add informational text that you want to print on an invoice.
-
Add any G/L transactions that were omitted from the workfile without running the Workfile Generation program again.
-
Change the markup for a transaction.
-
Add transactions directly to the workfile without entering them into the Account Ledger (F0911) first, such as transactions for expense reports that have not yet been processed in the Accounts Payable system.
-
Assign a hold status to a transaction with a release date to prevent a transaction from being included on an invoice until that date.
-
Split a transaction into two new transactions. You can then revise the billing status for the new transactions.
You can also move a transaction from the active workfile to the workfile history table so that it is not included on an invoice, and you can print a report that lists the transactions in the workfile.
Revising the workfile consists of the following tasks:
Adding text to a workfile transaction
-
Adding existing G/L transactions
-
Changing the markup
-
Entering ad hoc transactions
-
Assigning a hold status
-
Splitting a workfile transaction
-
Moving a workfile transaction to history
-
Printing workfile transactions
19.1.1 Workfile Revisions and Sequence Numbers
When you revise workfile transactions, the system assigns the transactions and each new revision a series of sequence numbers.
You can use these numbers to track the progression of revisions to original workfile transactions. The system assigns each workfile transaction the following sequence numbers:
| Topic | Description |
|---|---|
| Billing Control ID (BCI) | The BCI number is assigned at the time the workfile transaction is first created in the Billing Workfile. The system uses Next Numbers, system 48 index 2 (Billing Control) to derive the number. The BCI number of a workfile transaction never changes, regardless of the revisions made to the workfile transaction. If you split a workfile transaction, the resulting workfile transactions will share the same BCI. |
| Sequence Number (SBSQ) | The sequence number of the original workfile transaction is always 1. The sequence number changes only when you split the workfile transaction. The system assigns the next available sequence number within that BCI series to the resulting workfile transactions. For example, the first time a workfile transaction is split, the sequence numbers assigned to the resulting workfile transactions are 2 and 3. If you split one of those workfile transactions, the sequence numbers assigned to the resulting workfile transactions are 4 and 5. |
| Parent Sequence Number (PRSQ) | The parent sequence number of the original workfile transaction is always 0. The parent sequence number changes only when you split the workfile transaction. The system assigns a parent sequence number to workfile transactions that result from a split. The parent sequence number is always the sequence number of the workfile transaction that you split. For example, if you split a workfile transaction with a sequence number of 1 and a parent sequence number of 0, the system assigns the resulting workfile transactions a parent sequence number of 1. |
| Secondary Sequence Number (SCSQ) | The secondary sequence number of the original workfile transaction is always 1. The secondary sequence number tracks the number of revisions you make to a workfile transaction. You can use this number to track the progression of revisions to original workfile transactions. For example, you might revise a workfile transaction three times. The secondary sequence number of the workfile transaction you revise is 1. After the revision, the secondary sequence number for the workfile transaction is 2. When you change the transaction again, the secondary sequence number is 3. When you split a workfile transaction, the secondary sequence numbers will be 1 on the resulting workfile transactions. |
| Component Link Number (CLNK) | The component link number of the workfile transaction links the parent workfile transaction to the child component transactions. If this number is 0, no components exist for this workfile transaction. The component link number changes when you split a workfile transaction with components. The system assigns a new component link number to each resulting parent workfile transaction. This new component link number is then assigned to the respective component workfile transactions. |
19.1.2 What You Should Know About
| Topic | Description |
|---|---|
| Cost transactions in the G/L | Any changes you make to a workfile transaction affect only the information in the workfile. The changes do not affect the cost (source) transactions in the Account Ledger table (F0911). |
| Revised transactions | Revised transactions remain in the workfile. The system retains a copy of the transaction prior to any changes in the Billing Workfile - History table (F4812H) for audit purposes. |
| Adding transactions directly to the workfile | Caution: If you add transactions directly to the workfile and then process the original transaction through the normal accounting and billing cycles, the customer might be billed twice for the same costs.
See Section 19.5, "Entering Ad Hoc Workfile Transactions" for more information. |
19.2 Adding Text to a Workfile Transaction
From Contract Billing Processing (G52), choose Workfile Generation
From Workfile Generation (G4822), choose Revisions (P4812)
You can enter text to associate additional information with a workfile transaction. For example, the text might be a further description of the services for which you bill customers. You can enter text for a transaction at any point in the billing process. You can also print this text on an invoice. The system uses the billing control ID (BCI) number to attach text, which is stored in the Service Billing Invoice/Batch Extended Text File (F4813) to transactions in the Billing Workfile (F4812).
To add text to a workfile transaction
On Revisions
-
Complete the steps for reviewing workfile transactions.
-
Choose Text (Option 1) for a specific transaction.
Figure 19-2 Invoice/Batch Extended Text screen
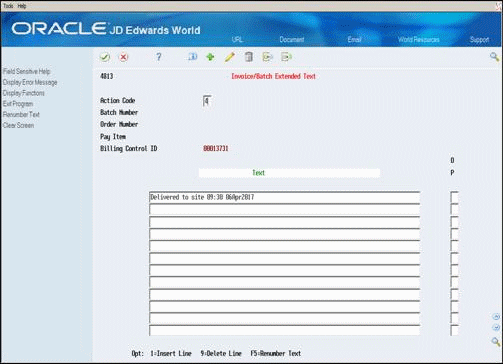
Description of ''Figure 19-2 Invoice/Batch Extended Text screen''
-
On Invoice/Batch Extended Text, enter free-form text.
If you need to enter more text, you can scroll to display additional lines. After you enter text, the system highlights the Option field on the Revisions form to indicate that the text exists for the transaction.
19.2.1 What You Should Know About
| Topic | Description |
|---|---|
| Formatting text | The system prints any text you enter for a workfile transaction exactly as it appears on the Invoice/Batch Extended Text form. |
| Inserting a blank line | You can insert a blank line between two existing lines of text to enter new information. The system inserts a line directly below the line on which you choose Insert Line (Option 1). |
| Deleting text | You can use two methods to delete text you have entered for a transaction:
|
| Renumbering lines of text | The system automatically assigns a sequence number to each line of text. The sequence number is not displayed on the form. If the system prevents you from inserting a blank line, choose Renumber Text (F5). The system updates the numbers to prepare the text for additional lines. |
19.3 Adding Existing G/L Transactions
From Contract Billing Processing (G52), choose Workfile Generation
From Workfile Generation (G4822), choose Revisions (P4812)
You can add transactions from the Account Ledger table (F0911) to the Billing Workfile (F4812) without running the Workfile Generation program (P48120). For example, you can include costs for workfile processing that you did not include in the workfile generation. You can also include costs in the workfile for processing that were entered in the General Accounting system after you ran Workfile Generation.
You can add transactions to the workfile using one of the following amounts:
-
The cost without markup
-
The cost plus markup, based on the markup rules you define or the default markup percentage you specify in the system constants
When you add a source transaction to the workfile, the system runs Workfile Generation interactively for the selected accounting entries. The system marks the transaction as billed in the Account Ledger (F0911) table. If the billable accounting entry originated from the payroll system, the system updates the Payroll Transaction History (F0618) or Employee Transactions Detail (F06116) tables. The system also applies any markup, tax, and G/L offset information retrieved from the Contract Billing tables.
To add existing G/L transactions
On Revisions
-
Complete the steps for reviewing workfile transactions.
-
Choose G/L Selection (F10).
Figure 19-3 G/L Transaction Selection screen

Description of ''Figure 19-3 G/L Transaction Selection screen''
-
On G/L Transaction Selection, complete the following field to display the existing source transactions:
-
Business Unit
-
-
To limit the list of transactions, complete one or more of the following fields:
-
Date From
-
Date Thru
-
Object
-
Subsidiary
-
Subledger
-
Subledger Type
The system automatically supplies the information for these fields if you completed them on the Revisions form.
-
-
Choose one of the following for a specific transaction:
-
Select at Cost (Option 1)
-
Select with Markup (Option 2)
-
19.4 Changing the Transaction Markup
From Contract Billing Processing (G52), choose Workfile Generation
From Workfile Generation (G4822), choose Revisions (P4812)
The markup for a transaction is the increase in costs to account for overhead and profit. You define markup rules in the Cost Plus Markup Table (P48096) when you set up your system. You can also change markup information after you accumulate costs.
After you make changes to the markup, you can apply the revised markup information to the transaction, or you can reapply the markup rules you originally defined for your system on the Cost Plus Markup Table.
In addition to changing the markup through Workfile Revisions, you can also make changes to the Amount Basis and Adjustment Reason Code options by choosing Re-extension (P481202) from the Workfile Generation menu.
On Revisions
-
Complete the steps for reviewing workfile transactions.
-
Choose Detailed Transaction Window (Option 4) for a specific transaction.
Figure 19-4 Detailed Transaction Window screen
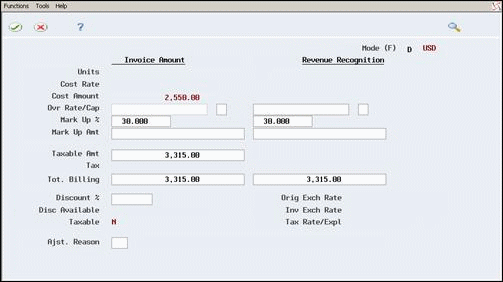
Description of ''Figure 19-4 Detailed Transaction Window screen''
-
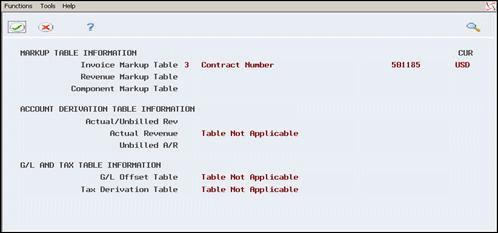
To review the origin of the markup for the transaction, choose Table Information (F15). In the following example, Table Not Applicable indicates that no markup table was found and the markup was derived from the system constants.
-
On Table Information, choose Amounts/Units Information (F11) to return to the Amounts/Units Information form.
-
On Amounts/Units Information, complete any combination of the following applicable fields:
-
Override Rate
-
Cap or Rate
-
Mark Up Percent
-
Mark Up Amount
-
-
Choose Update (F5).
The system calculates the markup and displays the changes.
-
Choose Exit Program (F3).
The system displays Transaction Re-Extension.
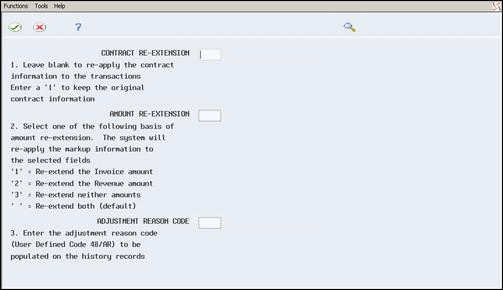
Figure 19-6 Transaction Re-Extension screen
Description of ''Figure 19-6 Transaction Re-Extension screen''
-
On Transaction Re-Extension, complete the following applicable fields:
-
Contract Re-Extension
-
Amount Re-Extension
-
Adjustment Reason Code
For Amount Re-Extension, the revenue option does not apply if the transaction is not eligible for the revenue recognition process. If you choose 2 for the Amount Re-Extension, the system does not re-extend the invoice information.
-
-
Choose Process (F6).
The system retains the information you entered on the form and displays it the next time you access the Transaction Re-Extension form.
| Field | Explanation |
|---|---|
| Ovr Rate/Cap (BRTI, BRT) | The rate the system uses to mark up the invoice or revenue amount reflected in the billing of professional services such as draftsmen, engineers, or consultants fees. This rate does not affect the employee's paycheck.
You can use this markup rate as an override rate or as a maximum rate. The Override Rate Calculation for the Total Invoice Markup is:
|
| Cap or Override Rate (CAPI, CAP) | This flag indicates whether the associated amount is the override rate or the cap of the rate.
Valid codes are: blank – Override Rate. 1 – Cap of the Rate. If the cost rate is less than the cap rate, the cost rate will be used; if the cost rate is greater than the cap rate, the Cap Rate will be used. |
| Mark Up % (PCIM, PERT) | The percentage the system uses to mark up the invoice or revenue amount reflected in the processing of professional services, such as draftsmen, engineers, or consultants fees. Enter the percentage as a whole number. For example, 50.275 percent would be entered as 50.275- This percentage rate does not affect the employee's paycheck. |
| Mark Up Amt (ADCI, ADCR) | An amount the system uses to mark up the invoice or revenue amount. This amount will not affect the employee's paycheck. |
| Option - Contract Re-Extension | You can choose to update the workfile transaction with the revised contract information after you make changes to the contract master. |
| Option - Amount Re-extension | You re-extend a transaction when you want to change or reapply the markup for the transaction based on your specific overrides or on the information that you have defined in the markup tables. The valid values are:
1 – Reapply the established invoice markup rates from the Cost Plus Markup Table. The revenue amount is not changed. 2 – Reapply the established revenue markup rates from the Cost Plus Markup Table. The invoice amount is not changed. 3 – Use the rates or amounts entered in the Amounts/Units Information window or on the Revisions form. Do not apply the established invoice or revenue markup rates from the Cost Plus Markup Table. blank – Reapply both the invoice and revenue markup rates using the established rates from the Cost Plus Markup Tables. Note: You cannot use options 1 or 2 when the Independent Invoice flag in the system constants specifies that the invoice and revenue amounts must be the same. |
| Adjustment Reason Code | A user defined code (UDC 48/AR) that you use to specify the reason for a revision to a single or a group of billing detail transactions in the Billing Workfile (F4812). The system updates the historical billing detail transaction with this reason for audit purposes. |
19.4.1 What You Should Know About
| Topic | Description |
|---|---|
| Multi-currency | To change the amounts for workfile transactions in a multi-currency environment, you must enter the amounts in the currency of the contract. For example, if the contract was entered in the foreign currency, you must make all revisions in the foreign currency. The system prevents you from entering both foreign and domestic currency amounts on a multi-currency contract. |
| Updating a workfile transaction | You can update individual workfile transactions to reflect the most current rules you have set up to calculate discounts, taxes, and markups. Choose Transaction Re-Extension (Option 8) on the Revisions form for the transaction you want to update. |
| Updating workfile transactions globally | You can update multiple workfile transactions to reflect the most current rules you have set up to calculate discounts, taxes, and markups. Choose Re-Extension (P481202) from the Workfile Generation menu (G4822) to access the DREAM Writer. The processing options are identical to the Transaction Re-Extension form. |
| Identifying taxable transactions | The system determines whether a workfile transaction is taxable by the tax information for the related billing line. You cannot change the tax information for a workfile transaction in the following fields:
You can change the tax information in the contract master on the billing line. |
| Changing amounts for a workfile transaction | To change the amounts for a workfile transaction, you can change the markup information or complete one of the following fields on Amounts/Units Information:
If you change an amount for a transaction, the system automatically recalculates and updates all the related amounts, including the Markup % field, when you choose the Update function (F5). |
| Changing the discount | You can change the discount percent only if the payment terms you define for the transaction allow for a discount. To change the discount for a workfile transaction, complete the Discount Percent field (DCP) on Amounts/Units Information. |
See Also:
-
Chapter 33, "Define Markup Rules" for more information about setting up markup rules on the Cost Plus Markup Table.
19.5 Entering Ad Hoc Workfile Transactions
From Contract Billing Processing (G52), choose Workfile Generation
From Workfile Generation (G4822), choose Revisions (P4812)
If you do not enter cost information during an accounting cycle, the transactions are not available when you accumulate costs. You can manually add transactions to the workfile on an as-needed basis for costs that are not processed during the accounting cycle. Transactions you enter into the workfile manually are referred to as ad hoc transactions.
For example, an accounting department processes expense reports on the 15th of each month. The supervisor's expenses contain a billable cost that must be in the Billing Workfile by the 5th of the month. In this case, you enter the cost as an ad hoc transaction to the workfile. The ad hoc transaction is created to represent cost information that is not in the Account Ledger table and is independent of the regular accounting cycle. After you enter the ad hoc transaction into the workfile, you can mark up the cost, enter a remark, and complete the billing process.
When you enter an ad hoc transaction into the workfile:
-
You can record a reason why the transaction was created by adding text to the workfile transaction
-
No source document exists to backup the transaction
-
The detail information for the costs in the general ledger and the workfile is inconsistent
Caution:
If you enter an ad hoc transaction and then process the related source transaction through the normal accounting and billing cycles, you can overbill your customer. To prevent this, you must manually change the eligibility code for the second workfile transaction to nonbillable and remove it from the workfile.If you do not remove the second transaction from the workfile, the system continues to display the transaction on the Revisions form. You might bill for the transaction in error if the eligibility code for the transaction is changed.
On Revisions
-
Complete the steps for reviewing workfile transactions.
-
Complete the following fields on a blank line of the Revisions form:
-
G/L Date
-
Business Unit
-
Object
-
Subsidiary
To create ad hoc transactions for costs that are based on time and materials, you must use an account that you have included in the cross-references for the T&M contract billing line. If you do not use an account that is cross-referenced, the system does not update the ad hoc transaction with the contract information.
See Section 12.2.1, "Cross-References for Time and Material (T&M)."
-
-
Complete the following optional fields for the new transaction:
-
Employee/Supplier
-
Amount
-
Eligibility Code
-
-
Choose More Details (F4).
-
Complete the following optional fields:
-
Subledger
-
Subledger Type
-
-
Choose the Add action.
The system displays Transaction Re-Extension.
-
On Transaction Re-Extension, complete the following applicable fields:
-
Contract Re-Extension
-
Amount Re-Extension
-
Adjustment Reason Code
-
-
Choose Process (F6).
See Also:
-
Section 19.9, "Moving a Workfile Transaction to History" for more information about changing the status of a transaction to nonbillable.
19.6 Assigning a Hold Status
From Contract Billing Processing (G52), choose Workfile Generation
From Workfile Generation (G4822), choose Revisions (P4812)
If you are not ready to process a workfile transaction, you can put the transaction on hold. You can hold a transaction indefinitely, or you can specify a release date. When you put a workfile transaction on hold, the transaction remains in the Billing Workfile, but the system does not process it until the release date. The system stores the release date as part of the audit trail for the transaction.
On Revisions
-
Complete the steps for reviewing workfile transactions.
-
Choose Detailed Transaction (Option 4) for a specific transaction.
-
On Amounts/Units Information, choose Accounting/Internal Control Information (F14).
Figure 19-7 Account/Internal Control Information screen
Description of ''Figure 19-7 Account/Internal Control Information screen''
-
On Internal Control Information, complete the following field:
-
Hold Code
Revenue Hold does not apply if the workfile transaction is eligible only for revenue processing. If you choose R or 4 for the Hold Code, the system does not hold the workfile transaction.
-
-
On Internal Control Information, complete the following optional field:
-
Released Date
If you leave the Released Date field blank, the system holds the transaction indefinitely.
-
-
Choose Update (F5).
-
Choose Exit Program (F3).
The system displays Transaction Re-Extension.
-
On Transaction Re-Extension, complete the following applicable fields:
-
Contract Re-Extension
-
Amount Re-Extension
-
Adjustment Reason Code
-
-
Choose Process (F6).
| Field | Explanation |
|---|---|
| Hold Code (HLD) | This code identifies the type of "hold" status applied to a Billing Workfile transaction.
Valid alpha values are: blank – Not on hold. A – On hold for invoicing, revenue recognition, and cost transfers. B– On hold for invoicing and revenue recognition. Cost transfers are allowed. I – On hold for invoicing only. Revenue recognition and cost transfers are allowed. R – On hold for revenue recognition. This value applies only when the Journal Generation Control flag in the system constants is set to process revenue only. Valid numeric values are: blank – Not on hold. 1 – On hold for invoicing, revenue recognition, and cost transfers. 2 – On hold for invoicing and revenue recognition. Cost transfers are allowed. 3 – On hold for invoicing only. Revenue recognition and cost transfers are allowed. 4 – On hold for revenue recognition. This value applies only when the Journal Generation Control flag in the system constants is set to process revenue only. |
| Date - Released (Julian) (RDJ) | The release date. This Billing Workfile transaction is not eligible for processing until this date is greater than or equal to the cut-off date specified in Revenue Journal Generation (R48132) or the Bill Thru date specified in the Invoice Generation (P52800) processing option. |
19.7 Overriding a Bill-When-Paid Requirement for Billing
From Contract Billing Processing (G52), choose Workfile Generation
From Workfile Generation (G4822), choose Revisions (P4812)
In a contract, your company might have agreed to not bill the customer for costs related to T&M billing lines until the supplier has first been paid. You can define this requirement as bill-when-paid either for the entire contract or for a specific billing line within the contract.
With bill-when-paid, the related workfile transactions are not available for billing until your company has paid the supplier's voucher. However, you can override a bill-when-paid requirement for a specific workfile transaction so that it is available for billing before the supplier is paid. In this case, the system includes the transaction the next time you create invoices automatically or manually.
To override a bill-when-paid requirement
On Revisions
-
Complete the steps for reviewing workfile transactions.
-
Choose Detailed Transaction (Option 4) for a specific transaction.
-
On Amounts/Units Information, choose Accounting/Internal Control Information (F14).
-
On Accounting/Internal Control Information, complete the following field:
-
Reverse Bill When Paid
You specify N (No) in the field to override a bill-when-paid requirement.
-
-
Choose Update (F5).
-
Choose Exit Program (F3).
The system displays Transaction Re-Extension.
-
On Transaction Re-Extension, complete the following applicable fields:
-
Contract Re-Extension
-
Amount Re-Extension
-
Adjustment Reason Code
-
-
Choose Process (F6).
| Field | Explanation |
|---|---|
| Reverse Bill When Paid (AREX) | A code that lets you override the bill-when-paid rule for the Billing Workfile transaction. You can specify the bill-when-paid rule for a contract, a change order, or a contract billing line. |
19.8 Splitting a Workfile Transaction
From Contract Billing Processing (G52), choose Workfile Generation
From Workfile Generation (G4822), choose Revisions (P4812)
After you accumulate costs, you can split a workfile transaction into two new transactions. You can split a transaction by a specific currency amount, unit amount, or a percent.
You might want to split a transaction so that you can process one of the new transactions, but not the other. For example, an employee works overtime and is paid at twice the regular hourly rate. If you need to bill the employee's time at the regular rate, you can split the workfile transaction into two equal portions. One portion can be billable and the other non-billable.
You can split only payroll transactions that do not include associated burden. You cannot split burden transactions.
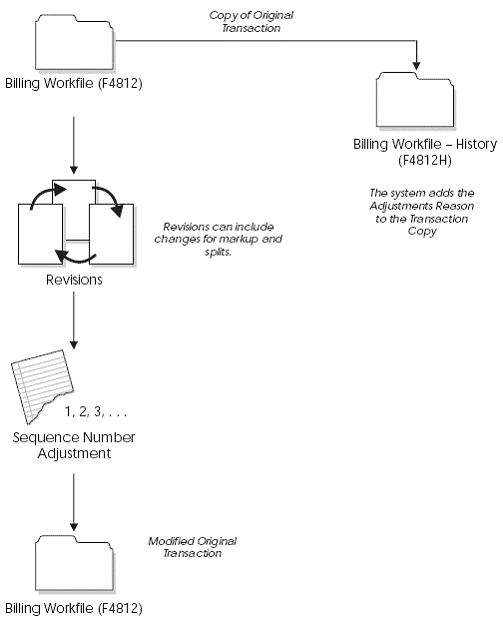
When you split a workfile transaction, the system:
-
Displays two new transactions. The amounts and units for the new transactions equal that of the transaction prior to the modification.
-
Moves a copy of the workfile transaction prior to the modification to the Billing Workfile - History (F4812H).
-
Assigns sequence numbers to all the related transactions. The Billing Control ID (BCI) remains the same for the workfile transactions. You can review the sequence numbers and Billing Control ID in the accounting and internal control information.
-
Splits associated component transactions.
The following graphic illustrates how the system processes and assigns sequence numbers to transactions when you split a workfile transaction.
Figure 19-8 Splitting a Workfile Process
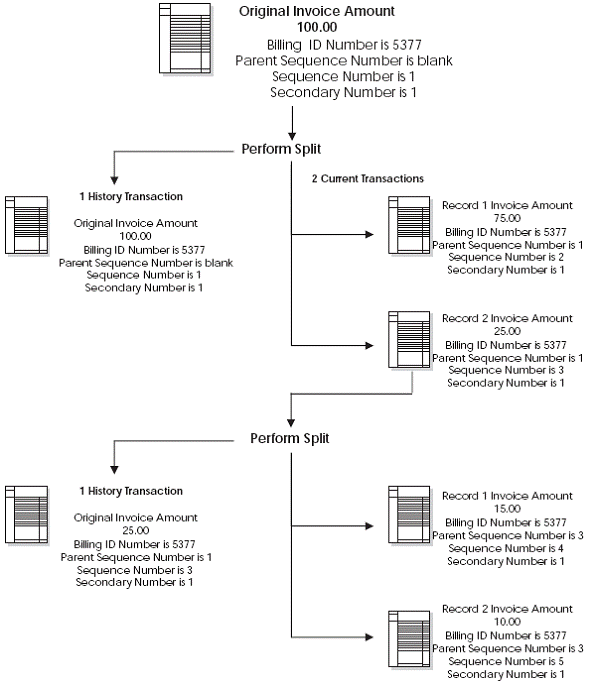
Description of ''Figure 19-8 Splitting a Workfile Process''
To split a workfile transaction
On Revisions
-
Complete the steps for reviewing workfile transactions.
-
Choose Split (Option 2) for a specific transaction.
Figure 19-9 Workfile Transaction Split screen
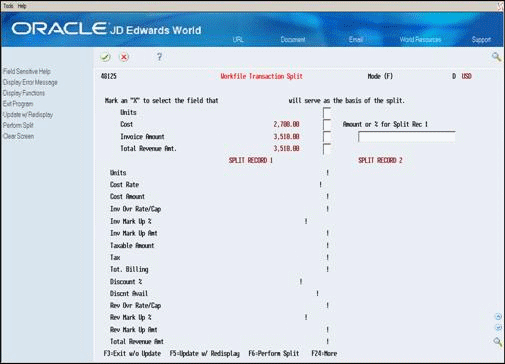
Description of ''Figure 19-9 Workfile Transaction Split screen''
-
On G/L Transaction Split Window, complete one of the following fields:
-
Units
-
Cost
-
Invoice Amount
-
-
Complete the following field:
-
Amount or % for Split Record 1
-
-
Choose Update with Redisplay (F5) to update the displayed information.
-
Verify that the information is correct.
-
Choose Perform Split (F6) to update the workfile transactions.
| Field | Explanation |
|---|---|
| Units (U) | The quantity of something that is identified by a unit of measure. For example, it can be the number of barrels, boxes, cubic yards, gallons, hours, and so on.
Form-specific information If you enter X in this field, the system performs the split based on the units of the workfile transaction. |
| Cost (AA) | The cost (source) amount for a workfile transaction.
Form-specific information If you enter X in this field, the system performs the split based on the cost (source) amount of the transaction. |
| Invoice Amount (ITXA) | The portion of the invoice amount that is subject to tax.
Form-specific information If you enter X in this field, the system performs the split based on the taxable portion of the invoice amount of the transaction. |
| Split Amount/Percent (#SPT) | The split amount or percent. You can split the taxable amount, the revenue total, the cost, or the units.
If you enter an amount, it must be less than the amount of the field you are using as the basis of the split. If you enter a percentage (for example, 25% or %25,), the percentage must be less than 100%. The system automatically calculates the amount or percentage for the second split record. |
19.8.1 What You Should Know About
| Topic | Description |
|---|---|
| Splitting a transaction with a hold code | When you split a transaction with a hold code, the system assigns the hold code and released date information to the resulting new transactions.
See Section 19.6, "Assigning a Hold Status" for more information about hold codes. |
19.9 Moving a Workfile Transaction to History
From Contract Billing Processing (G52), choose Workfile Generation
From Workfile Generation (G4822), choose Revisions (P4812)
You can move a transaction out of the active Billing Workfile if the transaction does not belong in the workfile. Before you can move a transaction out of the workfile, the status for the transaction must be nonbillable. For example, if you do not want to bill for a portion of a split transaction, you would move the nonbillable portion to history.
Moving a transaction to history consists of the following:
-
Moving a transaction without burden to history
-
Moving a transaction with burden to history
If burden is associated with the transaction, you first change the eligibility code for the burden to nonbillable. Then, change the eligibility code for the workfile transaction to nonbillable.
When you move a transaction to history, the system:
-
Copies the transaction to the Billing Workfile - History (F4812H) for audit purposes
-
Removes the transaction from the active Billing Workfile (F4812)
Transactions that you move to history do not appear on the Revisions form. You must use Detail History (P4812H) on the Workfile Generation menu (G4822) to view transactions in the Billing Workfile - History. You also use Detail History to reactivate the workfile transactions that you moved to history.
The system does not remove the original transaction from the Account Ledger table.
To move a transaction without burden to history
On Revisions
-
Complete the steps for reviewing workfile transactions.
-
Complete the following field for a specific transaction to make it non-billable:
-
Eligibility Code
-
-
Use the Change action.
The system displays Transaction Re-Extension.
-
On Transaction Re-Extension, complete the following applicable fields:
-
Contract Re-Extension
-
Amount Re-Extension
-
Adjustment Reason Code
-
-
Choose Process (F6).
The system displays Revisions.
-
On Revisions, choose Delete (Option 9) for the workfile transaction.
-
Use the Change action.
To move a transaction with burden to history
On Revisions
-
Complete the steps for reviewing burden transactions for a specific workfile transaction.
-
On Burden Information, complete the following field for all burden transactions to make them non-billable:
-
Eligibility Code
You must make all the burden transactions related to the workfile transaction non-billable. If you do not, the system prevents you from moving the workfile transaction to history.
-
-
Use the Change action.
-
Choose Exit Program (F3).
-
On Revisions, complete the following field for the workfile transaction to make it non-billable:
-
Eligibility Code
-
-
Use the Change action.
The system displays Transaction Re-Extension.
-
On Transaction Re-Extension, complete the following applicable fields:
-
Contract Re-Extension
-
Amount Re-Extension
-
Adjustment Reason Code
-
-
Choose Process (F6).
The system displays Revisions.
-
On Revisions, choose Delete (Option 9) for the workfile transaction.
-
Use the Change action.
19.9.1 What You Should Know About
| Topic | Description |
|---|---|
| Changing the status of burden transactions | You can make burden transactions non-billable without moving the related workfile transaction to history. You can do this if you need to change the billing status of a burden transaction without changing the billing status of the related workfile transaction.
For example, you might want to do this if a burden account in the chart of accounts has been incorrectly designated as billable. You can change the resulting burden transactions for that account to non-billable without changing the billing status of the related workfile transaction. |
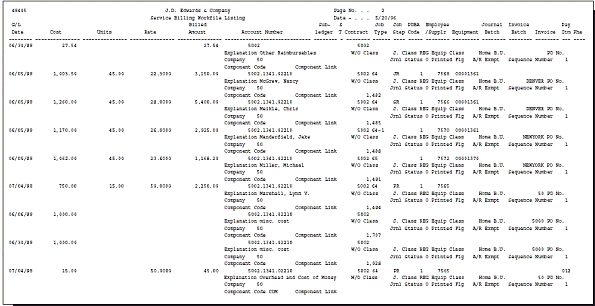
19.10 Printing Workfile Transactions
From Contract Billing Processing (G52), choose Workfile Generation
From Workfile Generation (G4822), choose Print Workfile (P48405)
You can review workfile transactions online. You can also generate a report that prints a list of selected transactions. You might want to use this report for a number of reasons, including:
-
As an exception report, for example, to print all of the transactions that are on hold
-
As a comparison with the detail in the general ledger
To compare the workfile transactions to the detail in the general ledger, you can review the general ledger online using Account Ledger Inquiry (P09200), or you can print the G/L by Object Account (P09421) report.
If you find a discrepancy, you should make the necessary revisions before you continue with the billing process.
19.10.1 Billing Workfile Listing
See Also:
-
JD Edwards World Technical Foundation Guide for information about running, copying, and changing a DREAM Writer version.