9 Set Up Options
This chapter contains these topics:
You set up and maintain options at the subdivision level. You can set up an option for an entire subdivision, a specific plan and all elevations of the plan, or a specific plan and elevation combination. Following are examples of options and the table illustrates how the options can be set up. An asterisk (*) represents all.
-
Subdivision. A mailbox might be common to all plans and elevations in the subdivision.
-
Specific plan and all elevations of that plan. An outdoor entry light may be specific to a particular plan, but common to all elevations of that plan.
-
Specific plan and specific elevation. An entry door can be specific to a particular elevation of a plan.
| Option | Subdivision | Plan | Elevation |
|---|---|---|---|
| Mailbox | 33330000 | * | * |
| Outdoor Entry Light | 33330000 | 3001 | * |
| Entry Door | 33330000 | 3002 | A |
You can use options with Takeoffs. See Section 23.1, "Defining Takeoff Lists" for more information.
9.1 Setting Up Options
You use the Option Master screen to set up and maintain a list of the available options for a subdivision. The Option Master screen also provides the capability for you to include textual information for an option.
From Homebuilder Management (G44H), choose Options/Bid Subcontracts
From Options/Bid Subcontracts (G44H11), choose Option Master
-
On Option Master, complete the following fields:
-
Complete the following optional fields:
-
Estimated Cost
-
Sales Price
-
Previous Sales Price
-
Deposit Percentage
-
Option Type
-
Contingent Option
-
-
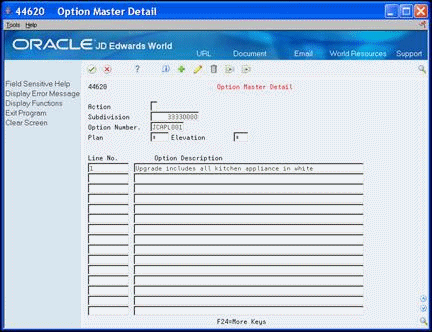
Choose Text Entry (F6) to access the Option Master Detail screen.
The system enters values for the Subdivision, Option Number, Plan, and Elevation fields.
-
Complete the following field.
-
Option Description
-
-
Click Add.
-
Exit (F3) to the Option Master screen.

9.2 Setting Up Contingent Options
On the Option Master screen, you can identify the point in time where an option is no longer available because the construction is beyond the point of installing that option. This is known as a contingent option. You must set up the contingent option field before you can use a contingent option. You can associate a contingent option with a sequence code or to a cost code. The Option Selections program uses the contingent option information to identify to the sales people whether an option is still available.
From Homebuilder Management (G44H), choose Options/Bid Subcontracts
From Options/Bid Subcontracts (G44H11), choose Option Master
-
On Option Master, complete the following fields:
-
Subdivision
-
Option Number
-
Plan
-
Elevation
-
-
In the Contingent Option field choose Field Sensitive Help (F1).
The User Defined Codes Window displays the current contingent options for the Contingent Option (Category Code 8) field.
Figure 9-3 User Defined Codes Window (Contingent Option) screen
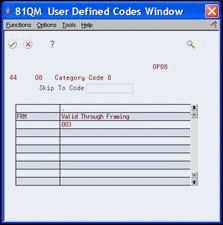
Description of "Figure 9-3 User Defined Codes Window (Contingent Option) screen"
-
From the Functions menu, choose Exit to User Defined Codes Maintenance (F10).
Figure 9-4 User Defined Code Revisions screen
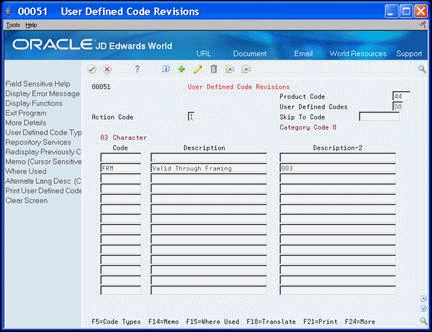
Description of "Figure 9-4 User Defined Code Revisions screen"
-
On User Defined Codes Revisions, choose More Details (F4).
Figure 9-5 User Defined Code Revisions (Detail) screen
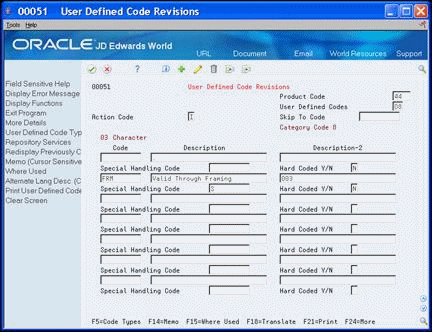
Description of "Figure 9-5 User Defined Code Revisions (Detail) screen"
-
Complete the following fields and click Add:
-
Code
-
Description
-
Description 2
-
Special Handling Code
-
Hard Coded Y/N
-
-
Exit (F3) to the User Defined Codes window.
-
Exit (F3) to the Option Master screen.
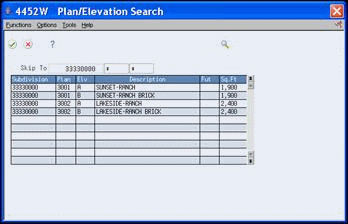
9.3 Adding an Existing Plan or Elevation
You can search for an existing plan or elevation and include this information to your option master.
From Homebuilder Management (G44H), choose Options/Bid Subcontracts
From Options/Bid Subcontracts Setup (G44H11), choose Option Master
To add an existing plan or elevation
-
On Option Master, complete the following field:
-
Subdivision
-
-
Complete either of the following fields:
-
Plan
-
Elevation
-
-
Choose Field Sensitive Help (F1).
The Plan/Elevation Search window displays with valid plan and elevation combinations.
-
Choose the plan or elevation detail line.
The Option Master screen redisplays with the Plan/Elevation information.
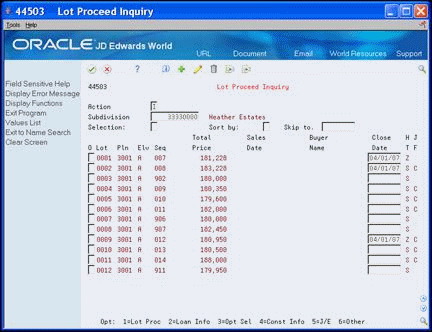
9.4 Selecting Options for a Lot
You can use the Option Selections screen to select specific options for a lot. You can also add an option that is specifically for a lot.
You use the DREAM Writer Version Selection processing option for the Lot Proceed Inquiry program (P44503) to control the version of the Option Selections screen.
From Homebuilder Management (G44H), choose Closing/Revenue Processing
From Homebuilder Accounting Entries (G44H16), choose Lot Proceed Inquiry r
-
On Lot Proceed Inquiry, complete the following field and click Inquire.
-
Subdivision
-
-
Enter 1 in the following field next to a lot to access the Lot Proceed Entry screen:
-
Option
-
-
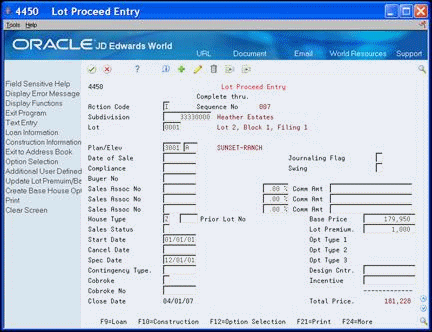
On Lot Proceed Entry, complete the following fields:
-
Plan/Elevation
-
House Type
-
Start Date
-
-
Choose Option Selection (F12) to access Option Selections.
-
On Option Selections, perform one of the following:
-
Choose Option Master (F6) to access the Option Master Entry screen and add an option for that lot.
-
Complete the Quantity field to select the options for the specific project and lot and click Enter.
-

9.5 Understanding Option and Price Availability
The Start Date, End Date, and Price Effective dates you enter on the Option Master screen are significant. Depending on whether you set the Suppress the Display of Inactive Options processing option prior to accessing the Option Selections program, this program determines whether to display the Sales Price date for an option based on the date in the End Date and Price Effective Date fields. Either a P for previous sales price or C for current sales price displays in the PC field on the Option Master screen. The system stores both prices in the Option Master file (F4461).
When you access the Option Selections screen:
-
Within the start and end date range and the date in the Price Effective Date field is the same as or later than the date in the End Date field, the option displays without a price and a P displays in the PC field. The P indicates the option is within the end date availability but not within the price effective date and therefore no price is available.
-
Prior to the date in the End Date field and the date in the Price Effective Date field is the same as or later than the date in the Start Date field, the option displays with a sales price and a C displays in the PC field.
-
Within the start and end date range, and there is not a date in the Price Effective Date field, the option displays with no price and the PC field is blank.
9.5.1 Example of Option and Price Availability
-
On Option Master, add an option and in the Price Effective Date field, perform one of the following:
-
Enter a date that is the same as the date in the End Date field.
-
Enter a date that is between the dates in the Start Date and End Date fields.
-
-
From the Homebuilder Management menu (G44H), choose Closing/Revenue Processing.
-
From the Homebuilder Accounting Entries menu (G44H16), choose Lot Proceed Inquiry.
-
Access the Lot Proceed Entry screen.
-
On Lot Proceed Entry, choose Option Selection (F12).
The Option Selection screens displays with the option in the detail area as follows:
-
Without a sales price and a P in the PC field when you enter a date in the Price Effective Date field that is the same as the end date.
-
With a sales price and a C in the PC field when you enter a date in the Price Effective Date field that is between the start and end dates.
-
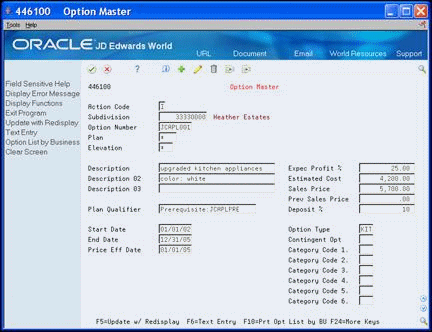
Figure 9-11 Option Selections (Detail) screen
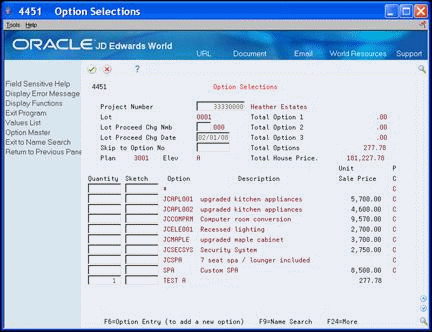
Description of "Figure 9-11 Option Selections (Detail) screen"
9.6 Reviewing the Option List
You use the Option Master List to review all of your available options. You can review the options for the subdivision or for a particular plan. You cannot change option information using this screen. You can select an option and access the Option Master Entry screen, where you can make changes. You can also select an option and access the Option Cost Detail screen, where you can view change supplier and cost information.
From Homebuilder Management (G44H), choose Options/Bid Subcontracts
From Options/Bid Subcontracts Setup (G44H11), choose Option Master List
-
On Option Master List, complete the following fields and click Inquire.
-
Project No
-
-
To narrow your search, complete the following fields:
-
Plan
-
Skip to Option
The Option Master List displays your subdivision or plan options.
-
-
Access the detail area (F4).
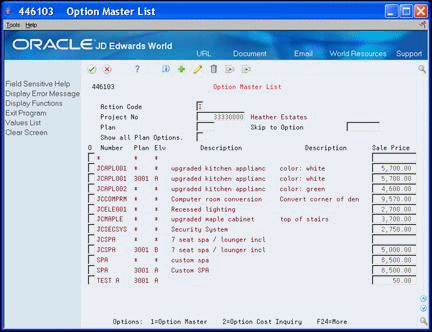
Figure 9-13 Option Master List (Detail) screen

Description of "Figure 9-13 Option Master List (Detail) screen"
| Field | Explanation |
|---|---|
| Project Number | The compressed description contains the alpha name without spaces, slashes, dashes, commas, and other special characters. The compressed description is the field used in the Name Search.
Screen-specific information This is a required field and is your subdivision business unit number. If you use only this field, all the options for your subdivision display. |
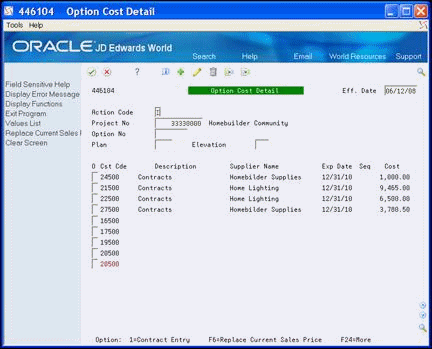
9.7 Reviewing Option Details
The system creates the option detail information after you run the Lot Proceed Proof/Post program. You use the Option Cost Detail screen to review supplier and cost information for an option. You can review the option information by subdivision, by subdivision and plan, by subdivision and option, or by subdivision, option, and plan. If you choose to review the option information using subdivision, option, plan, and elevation, the Option Cost Detail screen displays the previous sale and current sales price.
From Homebuilder Management (G44H), choose Options/Bid Subcontracts
From Options/Bid Subcontracts Setup (G44H11), choose Option Cost Detail
Alternatively, you can access Option Cost Detail from the Option Master List screen by entering 2 in the Option field for a specific option.
-
On Option Cost Detail, complete the following fields and click Inquire.
-
Project No
-
Option No
-
Plan
-
Elevation
The Option Cost Detail screen displays option supplier and cost information.
-
-
Figure 9-15 Option Cost Detail (Details Shown) screen
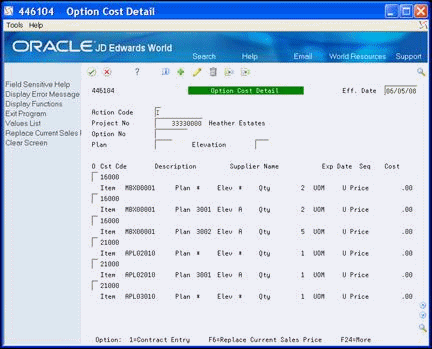
Description of "Figure 9-15 Option Cost Detail (Details Shown) screen"
9.8 Changing the Sales Price
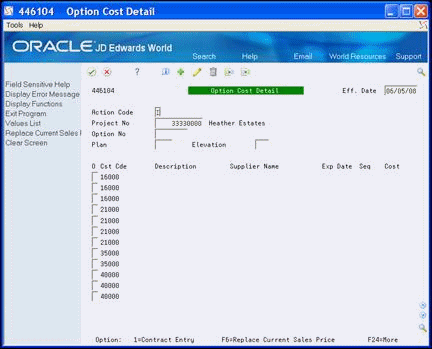
You can change the current sales price on the Option Cost Detail screen. The system uses the current option sales price and the effective date from the Option Master (F4461) table to update the current sales price. Other than the current sales price, you cannot change option information using the Option Cost Detail screen.
9.8.1 Before You Begin
For the system to accept a change in the sales price, the header fields on the Option Cost Detail screen must match the data in the Option Master (F4461) table. All of the header fields on the Option Cost Detail screen are required fields when you change a sales price.
From Homebuilder Management (G44H), choose Options/Bid Subcontracts
From Options/Bid Subcontracts Setup (G44H11), choose Option Cost Detail
-
On Option Cost Detail, complete the following fields and click Inquire.
-
Project No
-
Option No
-
Plan
-
Elevation
The Option Cost Detail screen displays supplier and cost information for an option. Previous and current sales price fields also display.
Figure 9-16 Option Cost Detail (Change Sales Price) screen
Description of "Figure 9-16 Option Cost Detail (Change Sales Price) screen"
-
-
Choose Replace Current Sales Price (F6).
The Option Cost Detail screen redisplays with the current sales price. The system updates this field based on the effective date and the current sales price from the Option Master Entry program (P446100). The date in the Effective Date field should fall between the dates in the Start and End Date fields. There must also be a subcontract with dates in the Effect Date and Complete Date fields for this information to display on the screen.
-
Choose More Detail (F4) to access the detail area.
9.9 Using Copy Option Utility
You use the Copy Option Utility program to copy options to subdivisions. You can copy an option at the city or company level to one or more subdivisions or you can copy an option from one subdivision to another subdivision or range of subdivisions. You can copy a single option or a range of options. To use this copy utility, you must ensure that you copy from and to the same business unit types. For example, copy from a company business unit with a business unit type of residential to a subdivision business unit with a business unit type of residential.
You can use the Data Selection to choose specific options or a range of options. Ensure you enter the effective date in the Copy Option processing option or leave blank to use today's date as the effective date.
From Homebuilder Management (G44H), choose Options/Bid Subcontracts
From Options/Bid Subcontracts Setup (G44H11), choose Copy Option Utility
9.10 Using Global Option Master Update
You use Global Option Master Update to copy or change options or option fields from one city, company, or subdivision business unit to another business unit. To use this program, you must ensure that you are copying from and to the same business unit types. For example, copy from a company business unit with a business unit type of residential to a subdivision business unit with a business unit type of residential. This program generates the Global Option Master Update report (R445094).
You can run a DEMO version or copy a version and change it to suit your needs from the DREAM Writer version list. You can also run this program in proof mode and final mode.
From Homebuilder Management (G44H), choose Hidden Selection 27
From Homebuilder Management Technical Operations (G44H31), choose Global Option Master Update
9.10.1 Before You Begin
If you use this program, the appropriate information must exist in the Type Business Unit field of the Job Master Revisions screen.
9.10.4 Global Option Master Update Report
Figure 9-17 Global Option Master Update report
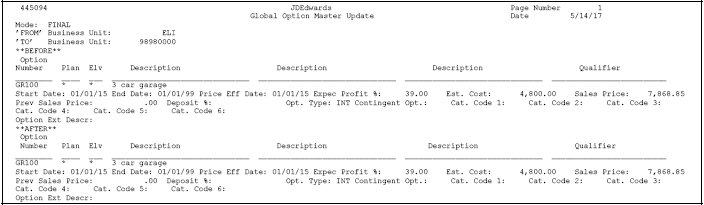
Description of "Figure 9-17 Global Option Master Update report"