58 Work with Menu Security
This chapter contains these topics:
-
Section 58.3, "What are the Types of Comparisons in Menu Masking?"
-
Section 58.5, "Using Group Profile or *PUBLIC with Menu Masking,"
58.1 Understanding Advanced Menu Security
The advanced menu security utility is available as an alternative to classic menu masking security, to control user access to menus and menu selections. You can activate the advanced menu security utility by user. It is controlled by a flag in the JD Edwards User Profile file (F0092).
Advanced menu security feature allows easy entry and maintenance of advanced menu security records. To use advanced menu security, complete the following steps:
-
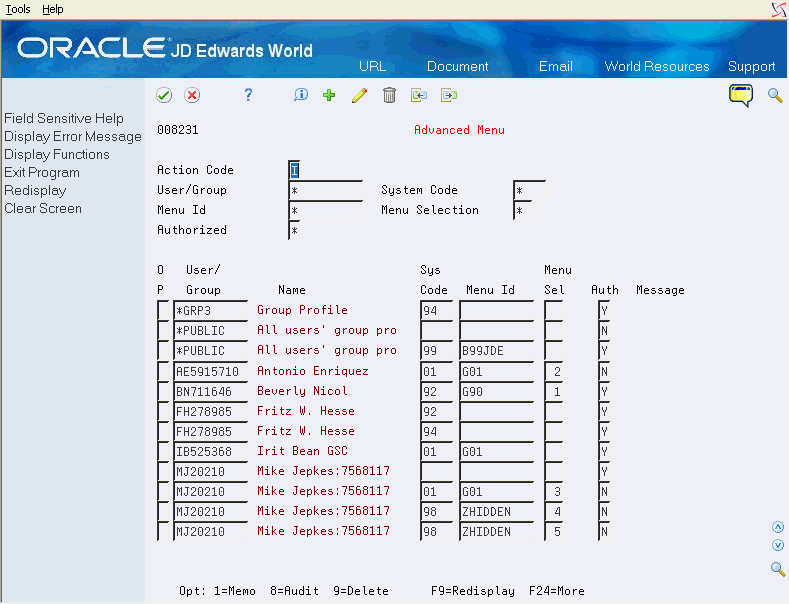
Set up records in the Advanced Menu Security file (F00823).
-
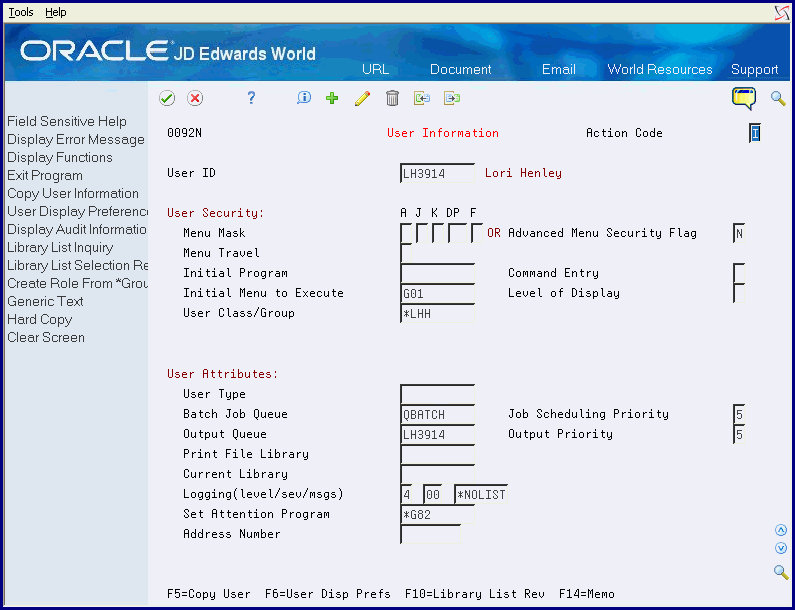
Activate advanced menu security at the user level on the User Information screen (V0092N)
58.1.1 Set Up Advanced Security Records
From Master Directory (G), choose Hidden Selection 27
From Advanced & Technical Operations (G9), choose Security & System Admin
From Security & System Administration (G94), choose Security Officer
From Security Officer (G9401), choose Advanced Menu.
| Field | Explanation |
|---|---|
| User/Group | Use this field to enter Advanced Menu Security records for a particular user, group, or *PUBLIC. This is the only required field. A record entered without a System Code or Menu ID/Selection will apply to all menus in the system.
You may press F1 on the User/Group field to bring up the V0092US - User Search Window. NOTE: Records will appear hierarchically unless the wildcard search is used (see Section 58.1.5, "Wildcard Search" below for specific information). |
| System Code | Use this field to enter the system code the security record applies to. This field is optional.
If left blank and a menu ID is specified, the system will default the menu's system code. If system code and menu ID are entered, the menu's system code must match the system code entered. If a menu ID/selection is not specified, this record will apply to all menus in this system code. If a blank is entered for system code, the Menu ID and Menu Selection fields must also be blank. You may press F1 on the System Code field to bring up the V0081Q - User Defined Codes Window. A security record at the system code level will override a security record with blank system code for a user/group. NOTE: Records will appear hierarchically unless the wildcard search is used (see Section 58.1.5, "Wildcard Search" below for specific information). |
| Menu ID | Use this field to enter the menu ID the record applies to. This field is optional. A security record at the menu level will override one at the system code level.
If a blank is entered for menu ID, the Menu Selection field must also be blank. You may press F1 on the Menu ID field to bring up the V0090Q - Index of Menus Window. |
| Menu Selection | Use this field to enter the menu selection the record applies to. This field is optional. A security record at the menu selection level will override one at the menu level.
You may press F1 on the Menu Selection field to bring up the V0090QS Menu Selections Window. |
| Authorized | Use this field to tell the system if the user, group, or *PUBLIC has access to the system code, menu or menu selection. This data field allows the values of blank, Y or N. Blank: User has access Y: User has access N: User does NOT have access You may limit the subfile display by entering Y or N in the Authorized filtering field. When the Menu level record in the detail is displayed, and there are menu selection level records which override the authorization at the menu level, the message "Mixed" will appear. |
Use the fields in the header portion of the screen to search for existing records in the Advanced Menu Security file (F00823). The header fields can be used to filter the subfile inquiry or position the subfile to a specific point. These fields are enabled for use with wildcard search characters. See Section 58.1.5, "Wildcard Search" for further instructions on how to select with these fields.
The system checks the Advanced Menu Security file for a record with the Authorized field set to Y. If a record is found, the user or group or role they are a part of may be authorized for a system code, a menu, or a menu selection. The more detailed records override the more general records.
Advanced menu security accommodates role-based security. In addition to user and group level security, users may be assigned to a security role. When users sign on with a security role, all the groups tied to that security role will be considered when determining authorization to menus.
Note that the default is "No Access," so if a record is not found, authorization is not granted.
The following options are available on the screen:
-
Option 1 - Memo: Use this option to enter free-form text with any notes, comments or explanations about the security record. If a memo exists for a record, the selection option field will display in reverse image.
-
Option 8 - Audit Information Window: Use this option to retrieve audit information for a security record.
-
Option 9 - Delete Line: Use this option to delete a security record.
If you specify a 'D' in the Action Code field to delete all records currently displayed in a subfile, the program will display the V00DWW - Delete Warning Window. When you press F6, the selected records will be deleted.
You may press F9 to display an inquiry again after an update
58.1.2 Activate Advanced Menu Security at the User Level
From Master Directory (G), choose Hidden Selection 27
From Advanced & Technical Operations (G9), choose Security & System Admin
From Security & System Administration (G94), choose Security Officer
From Security Officer (G9401), choose User Information
| Field | Explanation |
|---|---|
| Advanced Menu Security Flag | The Advanced Menu Security flag is used to specify whether the user is using the Advanced Menu Security feature.
This data field allows the values of Y or N but not blank. The default value is Y. Blank: User is NOT using Advanced Menu Security Y: User is using Advanced Menu Security N: User is NOT using Advanced Menu Security |
Activating advanced menu security for a user overrides any menu masking that was previously set up for the user.
58.1.3 Advanced Menu Security - Functional Details
This section discusses how advanced menu security works in the context of different security setup scenarios:
-
No role or group set up: The system checks the Advanced Menu Security file using a hierarchical approach. If the user logs on without selecting a role and is not in a group, the system checks the Menu file in the following order. The system stops checking security records once it finds a record which applies to a specific menu selection, menu or system code, or a record which grants or denies authority to all menus/selections. Authorization is granted or denied to the menu/selection based on the Allow Usage field:
-
Current User, Menu System Code, Menu ID, Menu Selection
-
Current User, Menu System Code, Menu ID
-
Current User, Menu System Code
-
Current User
-
*PUBLIC, Menu System Code, Menu ID, Menu Selection
-
*PUBLIC, Menu System Code, Menu ID
-
*PUBLIC, Menu System Code
-
*PUBLIC
-
-
No role but user belongs to a group:If the user logs on without selecting a role but belongs to a group (specified on the JD Edwards User Profile record in F0092), the system checks the menu file in the following order. The system stops checking once it finds an applicable record and grants access to the Menu ID/Selection based on the Allow Usage field:
-
Current User, Menu System Code, Menu ID, Menu Selection
-
Current User, Menu System Code, Menu ID
-
Current User, Menu System Code
-
Current User
-
Group, Menu System Code, Menu ID, Menu Selection
-
Group, Menu System Code, Menu ID
-
Group, Menu System Code
-
Group
-
*PUBLIC, Menu System Code, Menu ID, Menu Selection
-
*PUBLIC, Menu System Code, Menu ID
-
*PUBLIC, Menu System Code
-
*PUBLIC
-
-
the User signs on with a security role: If the user logs on by selecting a role, the system checks the Menu file as described in the previous section. However, if the role selected has multiple groups attached, the system looks in all groups for a record with the Allow Usage flag set to 'Y'. In other words, if a group is found with the Allow Usage flag set to 'N', the system continues looking in the remaining groups for a record with Allow Usage flag set to 'Y'.
58.1.4 Advanced Menu Security - Examples
The following table (example 1) illustrates the sequence in which the system checks advanced menu security:
| User/ Group | System Code | Menu ID | Menu Selection | Allow Usage |
|---|---|---|---|---|
| ACN001122 | 00 | Advanced Menu Security Flag | Y | |
| ACN001122 | 00 | G00A | N | |
| ACN001122 | 00 | G00A | 2 | Y |
| ACN001122 | 00 | G00A | 3 | Y |
| ACN001122 | 00 | G00A | 4 | Y |
| *GROUP1 | 00 | N | ||
| *GROUP1 | 00 | G00A | Y | |
| *GROUP1 | 43 | Y | ||
| *PUBLIC | N |
In this example user ACN001122 is in group *GROUP1. The system starts by checking for records at the user (ACN001122) level, group level, then *PUBLIC. Records at the user level supersede records at the group level. Records at the group level supersede records at the *PUBLIC level. User ACN001122 Menu access can be described as follows:
-
Access allowed to all menus in system code 00 except for Menu G00A
-
Access denied to menu G00A except for menu Selections 2, 3, and 4
-
Access allowed to all menus in system code 43
-
Access denied to remaining menus
The following table (example21) illustrates the sequence in which the system checks advanced menu security:
| User/ Group | System Code | Menu ID | Menu Selection | Allow Usage |
|---|---|---|---|---|
| ACN001122 | 00 | Y | ||
| ACN001122 | 00 | G00A | N | |
| ACN001122 | 00 | G00A | 2 | Y |
| *GROUP1 | 00 | N | ||
| *GROUP1 | 00 | G00A | Y | |
| *GROUP1 | 43 | Y | ||
| *GROUP2 | 00 | N | ||
| *GROUP2 | 01 | G01 | N | |
| *GROUP2 | 42 | Y | ||
| *GROUP3 | 00 | N | ||
| *GROUP3 | 01 | G01 | Y | |
| *GROUP3 | 43 | Y | ||
| *PUBLIC | N |
In this example, user ACN001122 logs on selecting a role containing groups *GROUP2 and *GROUP3. The system reads through all group records searching for a record allowing access to the menu. For example, *GROUP2 restricts access to menu G01, but *GROUP3 allows access to menu G01. The record that allows access supersedes the record that denies access. Thus ACN001122 is granted access to G01. User ACN001122 menu access can be describes as follows:
-
Access allowed to all menus in system code 00 except for menu G00A
-
Access denied to menu G00A except for menu selection 2
-
Access allowed to menu G01
-
Access allowed system code 42 and 43
-
Access denied to remaining menus
58.1.5 Wildcard Search
Wildcard search characters can substitute for one or more characters when searching for data in the subfile. Use Configuration Master Setup (P00CFG) on menu G944 option 19 to set up wildcard characters.
For more information, see Chapter 68, "Work with Configuration Master Records" in this guide.
Using wildcards in a search tells the system to search for characters relative to their position in the field. Using wildcard characters will result in an exclusive search as opposed to a subfile reposition.
Wildcard search options include:
-
* = Default wildcard search character for zero or many characters
-
_ = Default wildcard search character for one and only one character
-
| = Default escape wildcard search character. Use the escape wildcard search character to override the wildcard search character to the literal character value.
58.1.5.1 Wildcard Search Examples
These examples illustrate wildcard search options and the records they return:
-
User/Group = A*: This entry will return all users beginning with A.
-
Using 'AN' in the User/Group field repositions the User/Group subfile in alphabetical order starting with AN.
-
Using 'AN*' in the User/Group field returns only the User/Group subfile values with A in the first position, N in the second position, then any number of characters after that.
-
User/Group = *8: This entry returns all users ending with 8.
-
User/Group = *88: This entry returns all users ending with 88.
-
User/Group = *8*: This entry returns all user records containing an 8 anywhere in the user ID.
-
User/Group = T__1: This entry returns all users beginning with T, then any two characters, then 1 (and no characters after that).
-
User/Group = I__253*: This entry returns all users beginning with I, then any two characters, then 253, then any number of characters.
-
User/Group = _N*: This entry will return all users beginning with any single character, then N, then any number of characters.
-
User/Group = |*AN: This entry repositions the subfile to all users greater than *AN.
-
User/Group = PO|_ENTRY: This entry repositions the subfile to all users beginning with or greater than PO_ENTRY.
58.2 Menu Masking Security
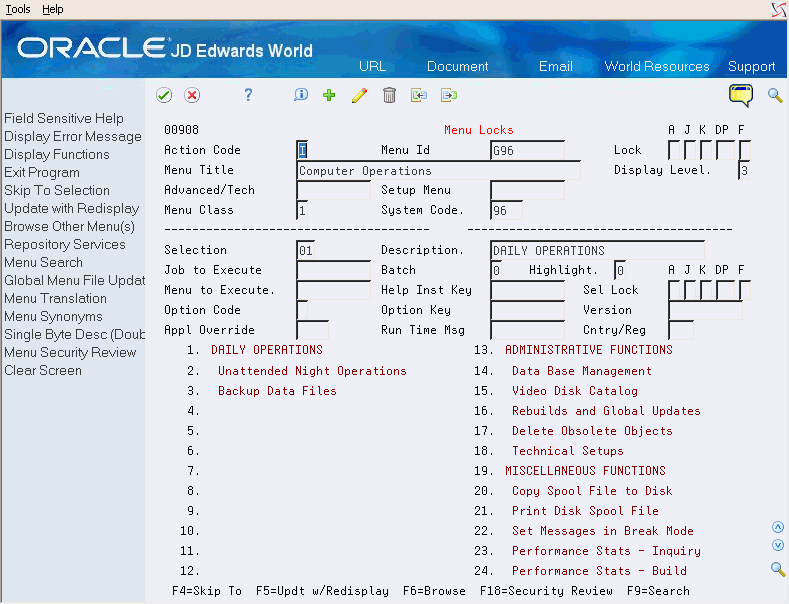
Menu masking is a method of securing entire menus or individual menu selections on a menu by user, group, or *PUBLIC. Menu masking is also used to secure hidden selections. Menu security is determined by the combination of user keys and menu locks based on the following fields:
-
A (Authority)
-
J (Job)
-
K (Knowledge)
-
DP (Department)
-
F (Future use)
All five fields are active.
Note:
Classic Menu Masking Security does not support role-based securityThe Lock fields secure the entire menu.
The Sel Lock fields secure a specific menu selection.
58.3 What are the Types of Comparisons in Menu Masking?
There are two types of comparison in menu masking, they are:
| Comparisons | Description |
|---|---|
| Direct comparison | This requires an exact match between the J, DP, or F fields both on the menu and in the user profile. |
| Hierarchical comparison | This applies to the A and K fields. The comparison between the menu and user profile is based on the hierarchy of Blank, A-Z, and 0-9. The system evaluates the Blank being greater than A, which is greater than Z, which is greater than 0, which is greater than 9. 9 has the least authority.
|
The system compares each menu lock and user key field beginning with A, then J, K, DP, and F. The comparison must pass all five fields to allow access. If the system finds an instance that disallows access, the system stops the search and locks out the user.
When using fast path, the system checks both the menu and the menu selection for authority.
58.4 An Example of Menu Masking
| User/Menu Selection | A | J | K | DP | F |
|---|---|---|---|---|---|
| Student (user) | B | AR | |||
| Menu Selection #1 | B | AR | (Allowed) | ||
| Menu Selection #2 | B | A | (Allowed) | ||
| Menu Selection #3 | C | C | (Allowed) | ||
| Menu Selection #4 | A | (Disallow) | |||
| Menu Selection #5 | B | AP | (Disallow) | ||
| Menu Selection #6 | D | AP | (Disallow) |
58.5 Using Group Profile or *PUBLIC with Menu Masking
To use group profile or *PUBLIC with menu masking
-
Add a *PUBLIC profile to the User Information file. Enter user keys for the profile.
-
Place user keys in the appropriate group profile record.
-
Place any user keys in each individual user profile.
When using individual keys, group profile, or *PUBLIC, the system creates a composite key. This key is a summary of all three user keys. When creating a composite key, the system checks the user keys first, then group, then *PUBLIC for A. Then the system checks all three for J, and so on. As it reads vertically through each key, the first character it reaches becomes the entry for the composite key. In the user, group, *PUBIC scenario, blanks are irrelevant. The system compares the composite key with the menu locks to determine if it will allow access.
| Profile | A | J | K | DP | F |
|---|---|---|---|---|---|
| User | B | ||||
| *JDEGROUP | AR | ||||
| *PUBLIC | R | A | |||
| Key Created | B | R | A | AR |
An entry in the User field overrides an entry in the group profile and *PUBLIC. An entry in the group field overrides an entry in the *PUBLIC record.
| Profile | A | J | K | DP | F |
|---|---|---|---|---|---|
| User | B | PR | |||
| *JDEGROUP | P | AR | |||
| *PUBLIC | R | A | |||
| Key Created | B | P | A | PR |
To maintain blanks as the most authority, use an asterisk in the "key" field. Since the system finds the asterisks first, the asterisks are accepted into the composite key, maintaining the blank. Use an asterisk (*) to override what is in the group profile or in *PUBLIC. Since the DP field is a two-character field, you must use two asterisks (**).
Note:
This type of setup can become complicated. If you use this method, create a written plan before implementation.-
Use the *PUBLIC entry as the base.
-
Place additional securities needed in group profiles.
-
If the user has additional security needs, place entries in the user record.
58.6 Verifying Menu Security Setup
Use any of the following to verify menu security:
-
Use the Menu Locks program (P00908) on the Security Advanced and Technical Ops menu (G9431) to determine if the menu contains any locks in the header.
-
Use the Menu Locks program (P00908) on the Security Advanced and Technical Ops menu (G9431) to determine if a menu option contains any locks.
-
Use the User Information program (P0092) on the Security Officer menu (G9401) to determine if the user profile contains any user keys.
-
Use the User Information program (P0092) on the Security Officer menu (G9401) to determine if the user profile contains a group profile. Locate the group profile to determine if it contains any user keys.
-
Use the User Information program (P0092) on the Security Officer menu (G9401) to determine if the *PUBLIC profile contains user keys.
-
Determine if there is there more than one menu file (F0082).
-
In a particular environment, determine if there is there more than one user profile file (F0092).
-
Use the User Information program (P0092) on the Security Officer menu (G9401) to determine if the Allow Menu Traveling field is set to Y.
58.7 Securing Hidden Selections
Hidden selections are secured in the same way as menu selections. The Hidden Selection menus are ZHIDDEN, ZHIDDEN002, and ZHIDDEN003.
Hidden selections 27 and 29 allow you to access the Advanced & Technical and Setup Operations menus.
The Hidden Selection Masks screen does not display selections that the user cannot access. You cannot secure the ZHIDDEN menus in their entirety, only the selections.
58.7.1 Securing Hidden Selection 60 (HS60)
HS 60 allows a user to send a message that displays in the Send Window Message on the recipient's screen, to which they either reply or press F3 to exit. HS 60 is also referred to as a break message. HS 60 uses the IBM command SNDMSG.
Following are two different methods to restrict the use of HS 60 and the IBM command SNDMSG. You can:
-
Set up the authority you require for the IBM SNDMSG command using GRTOBJAUT.
-
Use menu security on ZHIDDEN003 to prevent the use of this selection by those without the correct menu privileges. Alternatively, you can delete the menu entry for HS 60.
58.7.2 Preventing Users from Receiving a Send Window Message
From Master Directory (G), choose Hidden Selection 27
From Advanced & Technical Operations (G9), choose Security & System Admin
From Security & System Administration (G94), choose System Administration
From System Administration (G944), choose Pre-open Files Setup
You can set up the system to prevent users from receiving a Send Window Message. Users continue to receive messages, but must access their message queue using HS 34 or the IBM command DSPMSG
Determine whether the user is part of a specific user type by accessing the User Information Revisions program (P0092N) on the Security Officer menu (G9401).
To prevent a user from receiving a Send Window Message
-
On Pre-open Files Setup, if the user is part of a specific User Type, locate that User Type.
-
If the User Type contains the J96SMSGQ or J96SETMSGQ files, delete those files.
-
Locate the *SYS User Type.
-
If the User Type contains the J96SMSGQ or J96SETMSGQ files, delete those files.
58.7.3 Securing Hidden Selection 33 (HS33)
From Master Directory (G), choose Hidden Selection 27
From Advanced & Technical Operations (G9), choose run Time Setup
FromRun Time Setup (G90), choose Menus Officer
From Menus (G901), choose Revisions
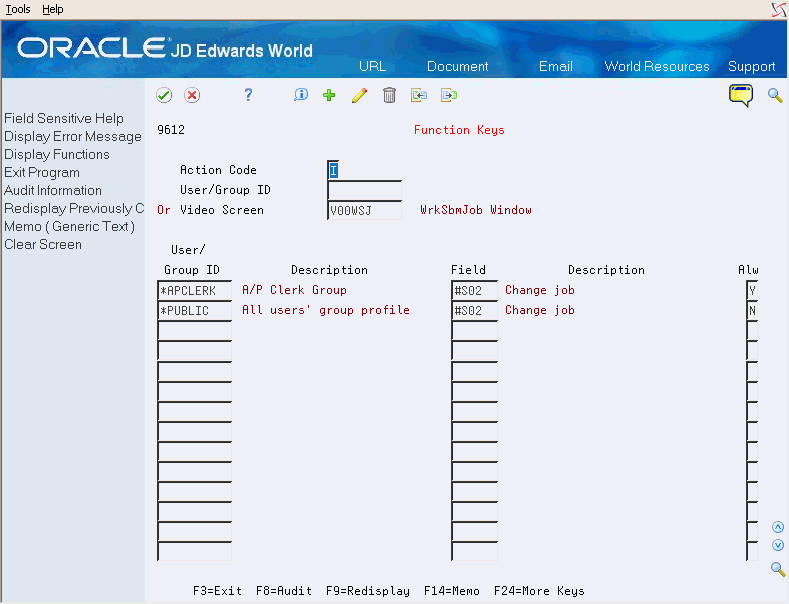
Hidden selection 33 allows a user to access the Work with Submitted Jobs screen and uses the IBM command WRKSBMJOB. On the Work with Submitted Jobs screen, a user can enter the CHGJOB command to move jobs to a different queue or change priorities. You can have the WrkSbmJob Window (V00WSJ) screen display instead of the WRKSBMJOB screen when you use the HS33 command. This allows you to enable Function Keys/Options security.
Ensure objects J00WSJ, P00WSJ, V00WSJ, and X00WSJ are in your JD Edwards World object library.
-
On Revisions, locate the ZHIDDEN menu ID with SELECT 33 (-Sel 33).
-
Enter J00WSJ in the following field:
-
Option Key
-
-
Sign out of the environment and sign in.
HS33 presents the WRKSBMJOB information on V00WSJ.
-
From the Security Officer menu (G9401), choose Function Keys.
-
On Function Keys, locate screen WrkSbmJob Window (V00WSJ) and set up security for the screen per your company requirements.
In the following example, no users can change jobs except Joe User.
58.8 Considerations for Menu Masking
-
Use menu illustrations as a worksheet.
-
Use F8 word search or F18 security review to see menus that have a particular job or menu as a selection.
-
Start with one or two fields.
-
For users that have very limited access, create your own menu, make your menu the "Initial Menu to Execute" and set Allow Menu Traveling and Allow Fast Path fields to N in User Information.
-
Restrict access to User Information, Menu Information and Command Entry.
-
Allow one user to have access: JD Edwards World Security Officer.
-
Where possible, create group profiles for users with similar job requirements.
-
-
Avoid mixing both letters and numbers, particularly in hierarchical fields. Select either letters or numbers until it becomes necessary to use both. Mixing letters and numbers is very confusing.


