4 WebLogic Application Server Setup
This chapter contains these topics:
4.1 Create a Domain
You create a Domain in the WebLogic Application Server for the Transaction Server.
Note:
Another domain only needs to be created if you want a separate domain for the Transaction Server to run in. If not, continue on to the Create a Machine section, following this section.To create a domain in the WebLogic Application Server
-
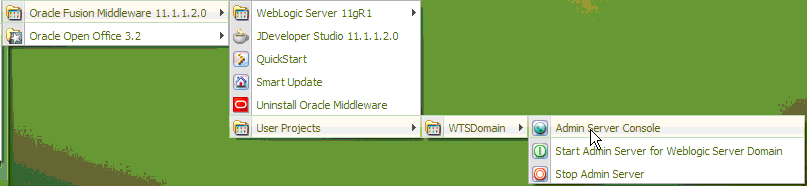
On the Windows Start Menu, access All Programs and locate your Oracle Fusion Middleware menu.
Select the WebLogic Server > Tools > Configuration Wizard.
-
On the Configuration Wizard Welcome screen, Select Create a new WebLogic Domain and then click Next.
Figure 4-2 Configuration Wizard Welcome screen
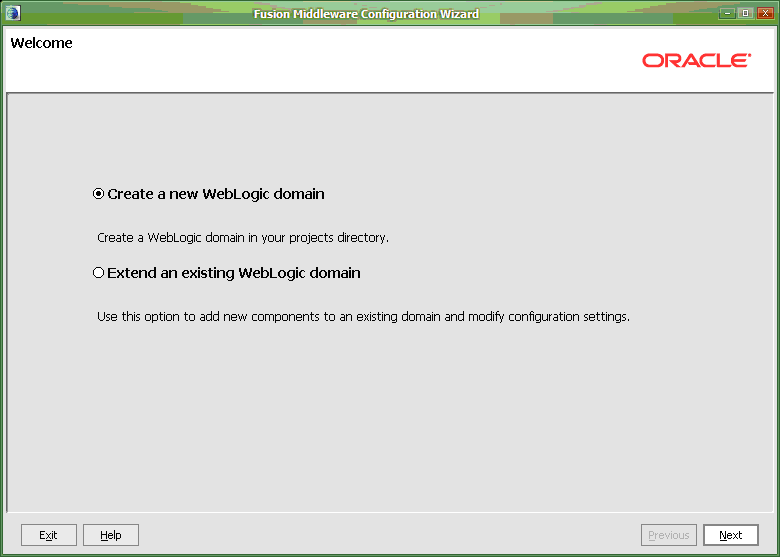
Description of "Figure 4-2 Configuration Wizard Welcome screen"
-
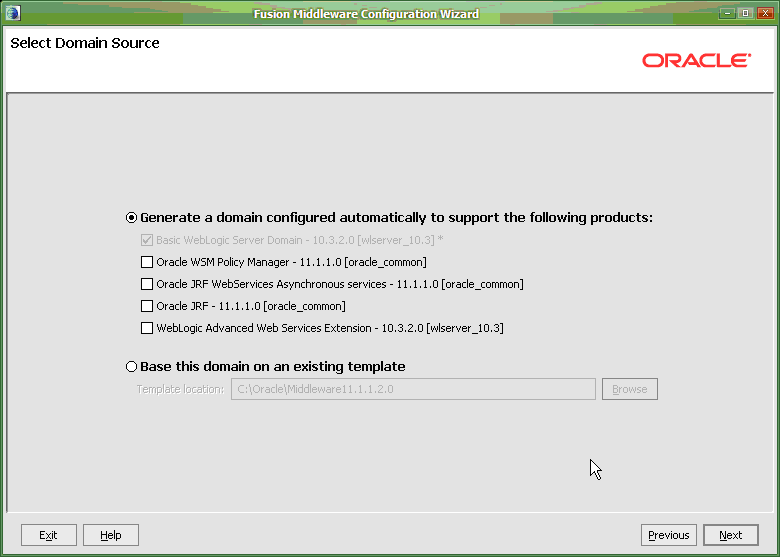
On the Select Domain Source screen, leave the default selection and then click Next.
-
On the Specify Domain Name and Location screen, enter an appropriate Domain name and then click Next.
Figure 4-4 Specify Domain Name and Location screen
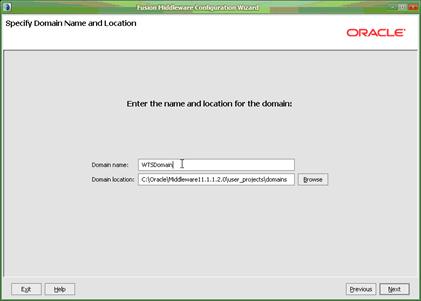
Description of "Figure 4-4 Specify Domain Name and Location screen"
-
On the Configure Administrator User Name and Password screen, enter values for the User name, User password, and Confirm user. Be sure to make a note of the User Name and User Password for later use.
Figure 4-5 Configure Administrator User Name and Password screen
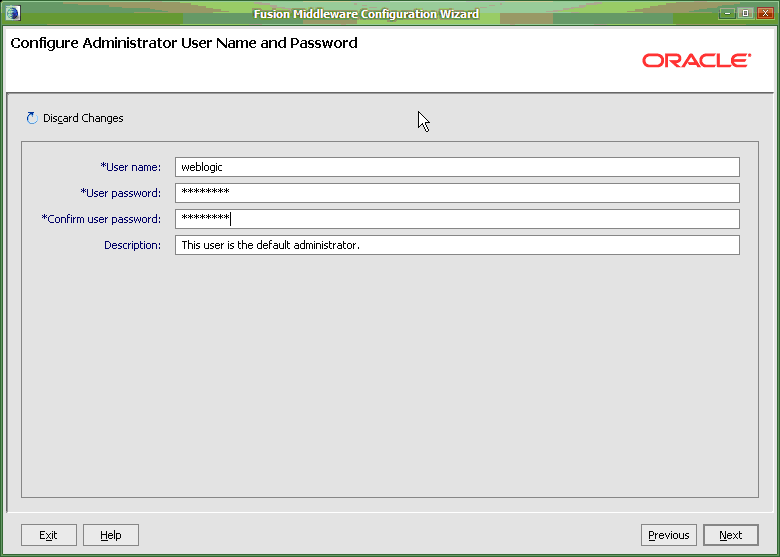
Description of "Figure 4-5 Configure Administrator User Name and Password screen"
-
On the Configure Server Start Mode and JDK screen, select the appropriate WebLogic Domain Startup Mode and JDK Selection. For production use of the Transaction Server, select Production Mode. If you have multiple JDKs available, select the one most appropriate for your use. Click Next.
Figure 4-6 Configure Server Start Mode and JDK screen
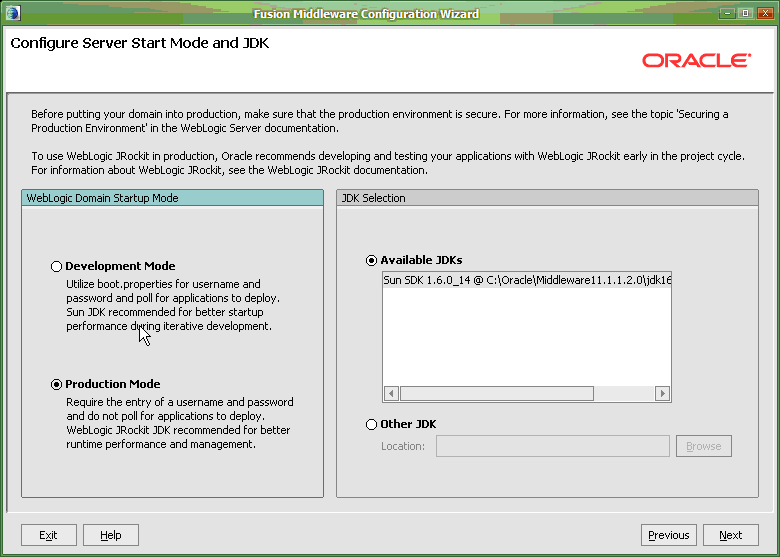
Description of "Figure 4-6 Configure Server Start Mode and JDK screen"
-
On the Select Optional Configuration screen, select the Administration Server checkbox and then click Next.
Figure 4-7 Select Optional Configuration screen
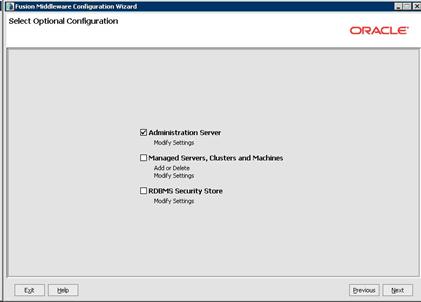
Description of "Figure 4-7 Select Optional Configuration screen"
-
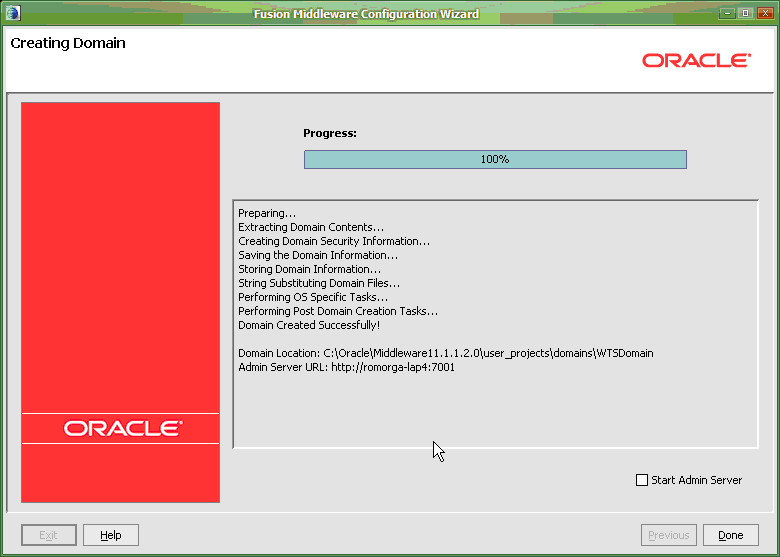
On the Configuration Summary screen, review the configuration settings and then click Create.
-
After you create the domain, select the Start Admin Server checkbox and then click Done.


4.2 Create a Machine
You create a machine within the domain that is setup for the Transaction Server.
To create a machine within the domain
-
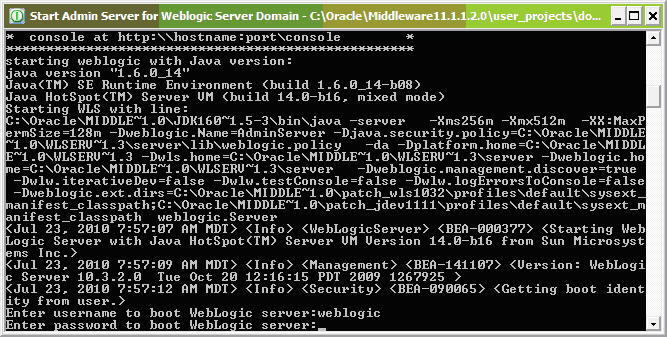
Start the WebLogic Application Server for the domain, if it is not already started.
Figure 4-10 WebLogic Application Server screen
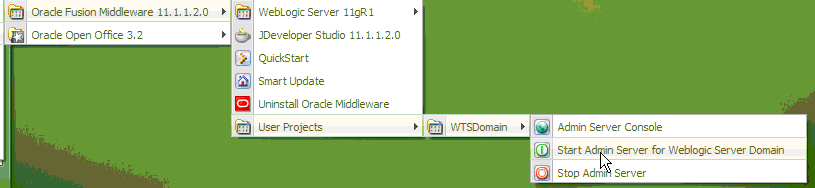
Description of "Figure 4-10 WebLogic Application Server screen"
Depending on your domain configuration, you might need to enter your domain User and Password to get the Admin Server started.
-
On the Admin Server Console Login screen, enter the User and Password and select Log In.
Figure 4-14 Admin Server Console Logic screen

Description of "Figure 4-14 Admin Server Console Logic screen"
-
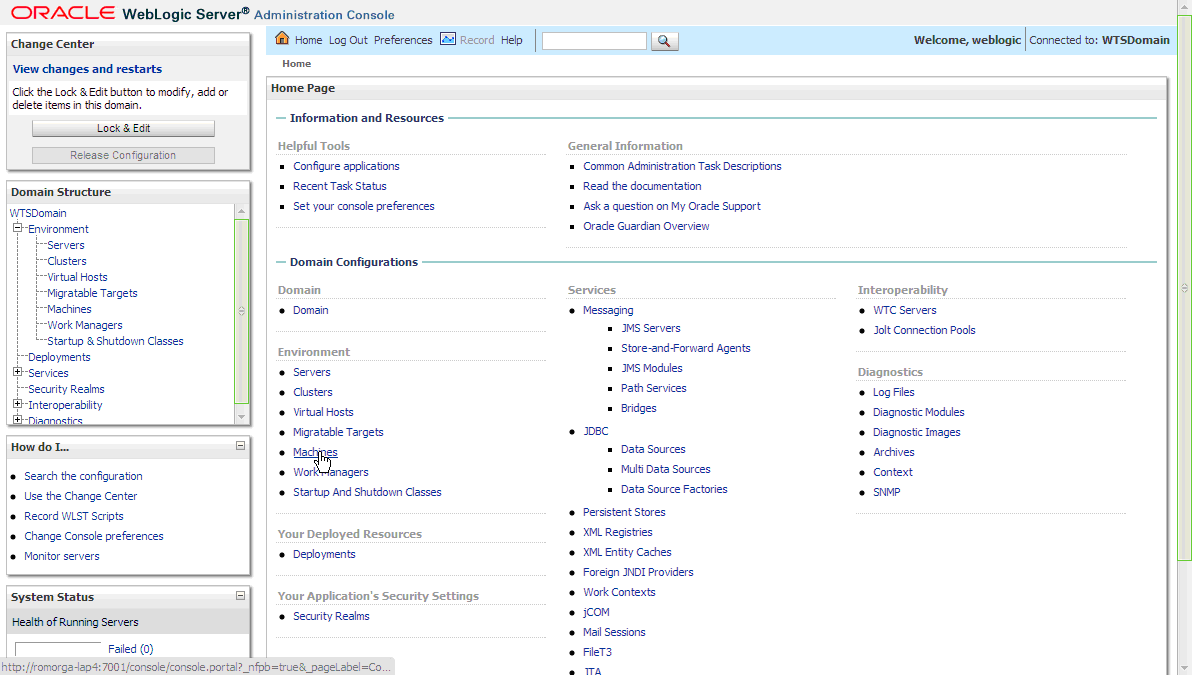
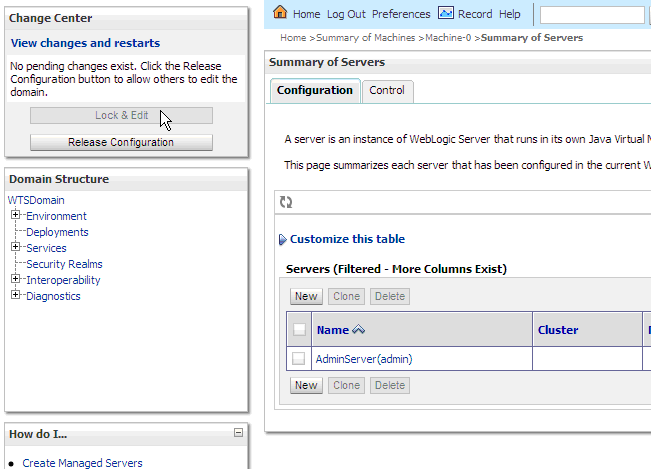
On the Admin Server main console window, select Machines under Environment heading.
-
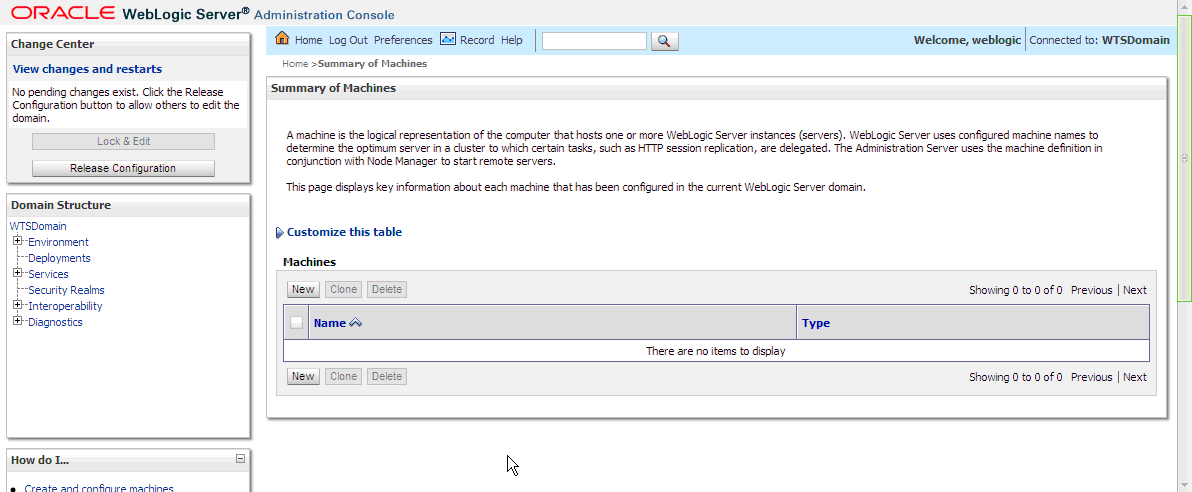
On the Summary of Machines screen, click Lock and Edit. Then select New to create a new Machine.
-
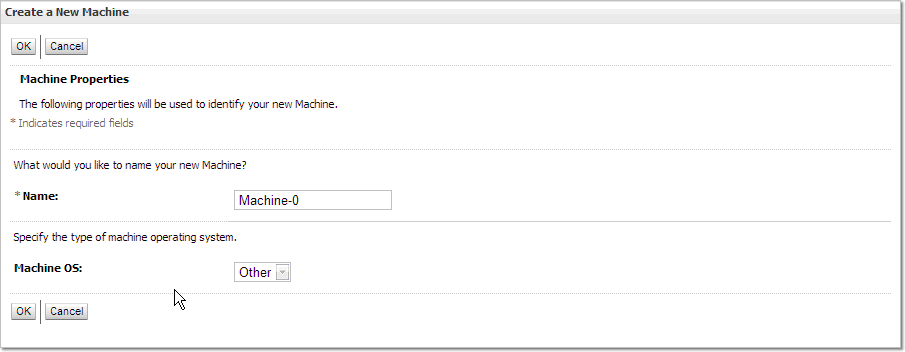
On the Create a New Machine screen, enter a name for the machine and click OK.
-
On the Summary of Machines screen, click Activate Changes.
Figure 4-18 Summary of Machines (Activate Changes) screen
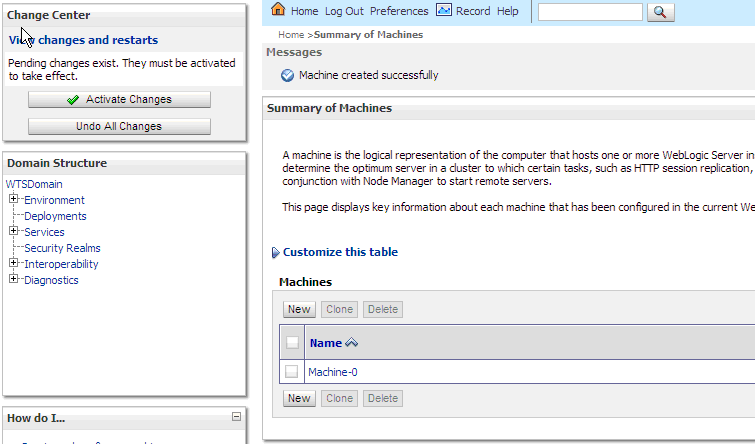
Description of "Figure 4-18 Summary of Machines (Activate Changes) screen"

4.3 Create a Server
You create a server within the domain set up for the Transaction Server.
To create a server within the domain
-
From the Admin Console Home page, select the Servers link.
Figure 4-19 Admin Console Home (Servers) screen
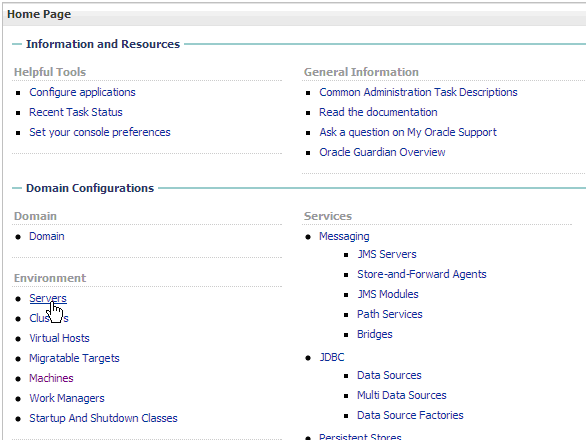
Description of "Figure 4-19 Admin Console Home (Servers) screen"
-
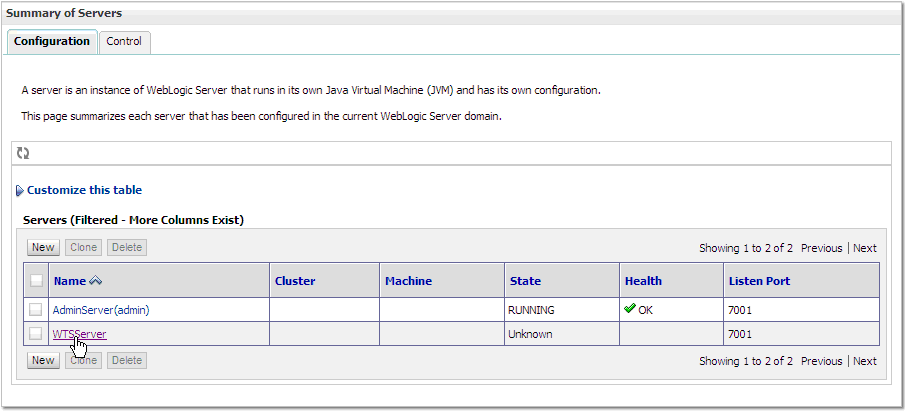
On the Summary of Servers screen, click the Lock and Edit. Then click New.
-
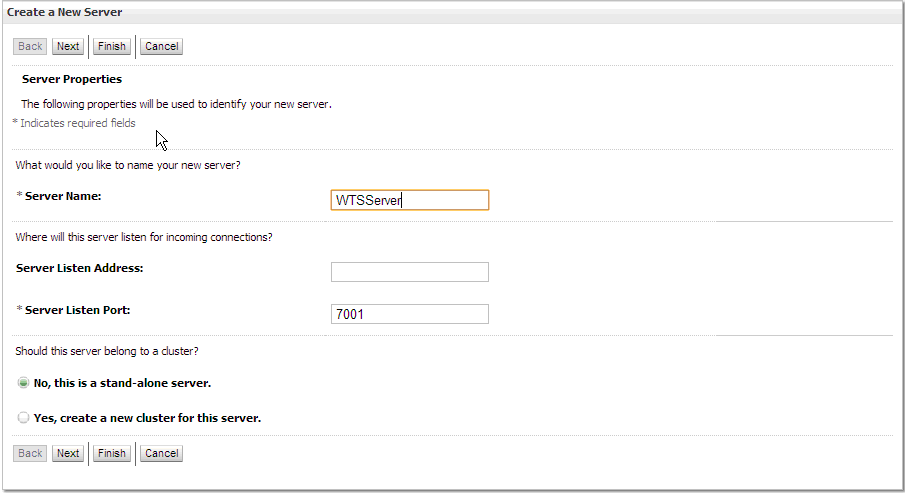
On the Create a New Server screen, enter a Server Name and then click Finish.
-
On the Summary of Servers page, click Activate Changes.
Figure 4-22 Summary of Servers (Activate Changes) screen

Description of "Figure 4-22 Summary of Servers (Activate Changes) screen"
-
On the Summary of Servers screen, select the link for the newly created server.
Figure 4-23 Summary of Servers (New Server) screen
Description of "Figure 4-23 Summary of Servers (New Server) screen"
-
On Settings page for the server, click Lock and Edit. For Machine, select the machine that was created above. Make sure to select the Listen Port Enabled checkbox. Click Save. Click Activate Changes.
Figure 4-24 Settings for WTSServer screen
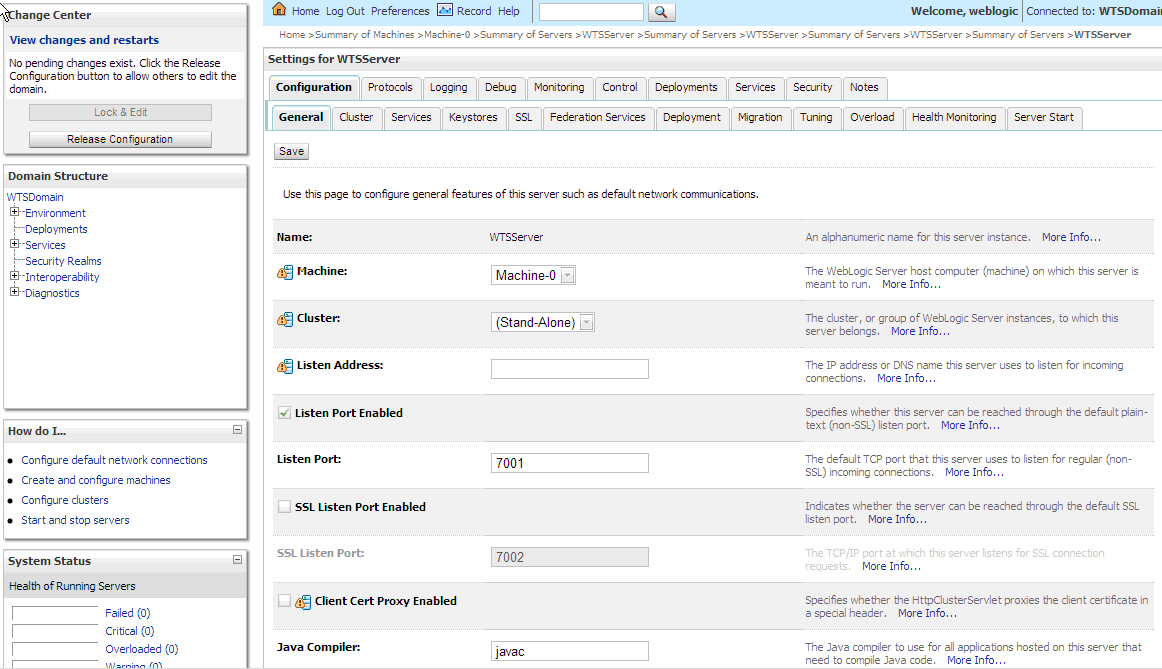
Description of "Figure 4-24 Settings for WTSServer screen"
-
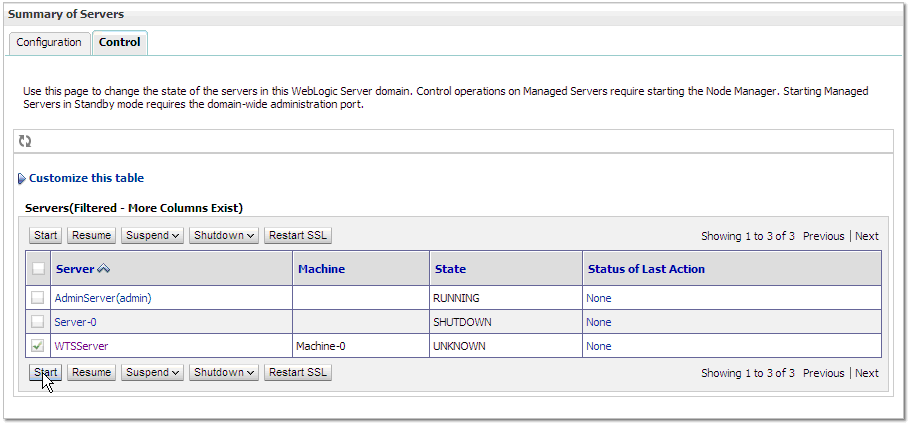
On the Summary of Servers screen, select the Control tab. Select the checkbox next to the server that was just created. Click Start.
Figure 4-25 Summary of Servers (Control) screen
Description of "Figure 4-25 Summary of Servers (Control) screen"
-
On the Server Life Cycle Assistant, click Yes to start the server.
Figure 4-26 Server Life Cycle Assistant screen
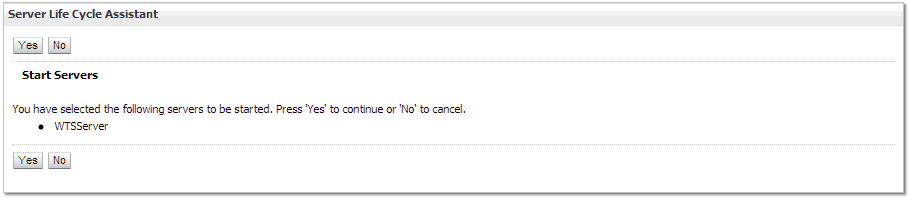
Description of "Figure 4-26 Server Life Cycle Assistant screen"
4.4 Create a JMS Server
You create a JMS Server within the domain set up for the Transaction Server.
To create a JMS Server within the domain
-
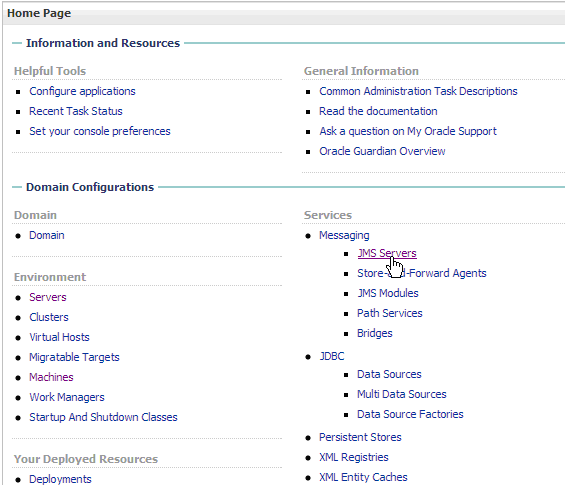
From the Admin Console Home page, select the JMS Servers link under the Services -> Messaging heading.
Figure 4-27 Admin Console Home (JMS Servers) screen
Description of "Figure 4-27 Admin Console Home (JMS Servers) screen"
-
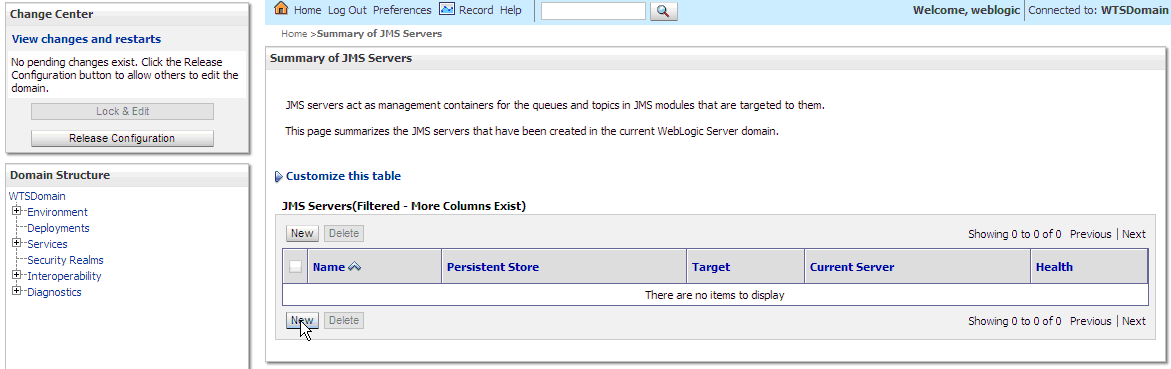
On the Summary of JMS Servers screen, click Lock and Edit, then click New.
Figure 4-28 Summary of JMS Servers screen
Description of "Figure 4-28 Summary of JMS Servers screen"
-
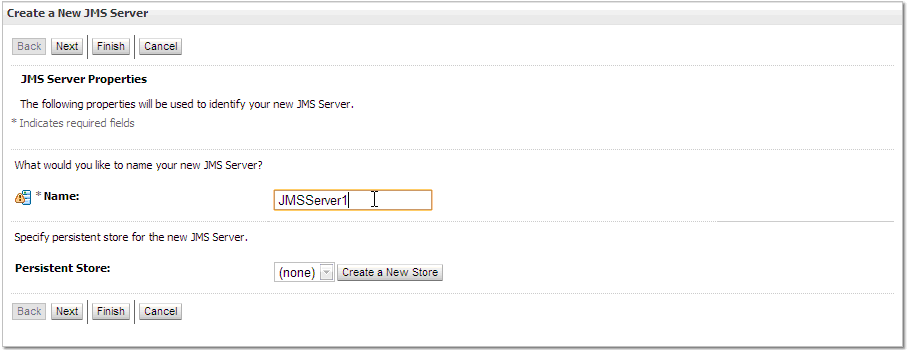
On the Create a New JMS Server screen, enter a name for the JMS Server and then click Next.
Figure 4-29 Create a New JMS Server screen
Description of "Figure 4-29 Create a New JMS Server screen"
-
On the second Create a New JMS Server page, select the Server just created for the Target server. Click Finish.
Figure 4-30 Create a New JMS Server (Target) screen
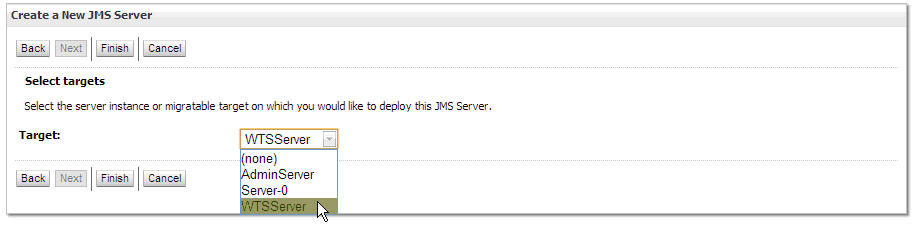
Description of "Figure 4-30 Create a New JMS Server (Target) screen"
-
On the Summary of JMS Servers window, click Activate Changes.
Figure 4-31 Summary of JMS Servers (Activate Changes) screen
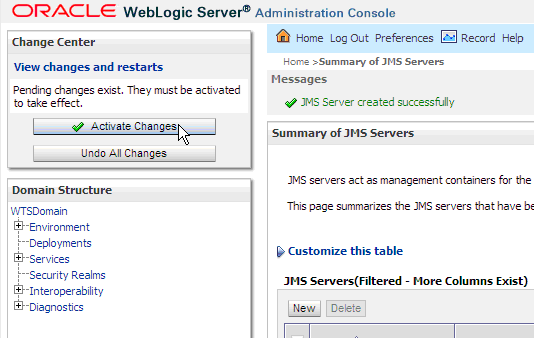
Description of "Figure 4-31 Summary of JMS Servers (Activate Changes) screen"
4.5 Create a JMS Module
You create a JMS Module within the domain set up for the Transaction Server.
To create a JMS Module within the domain
-
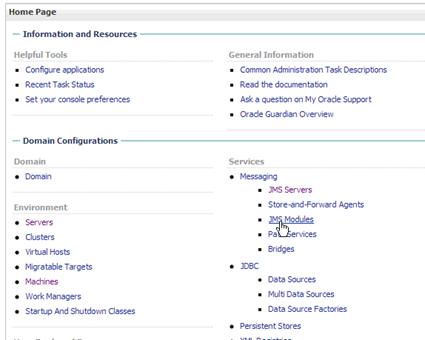
From the Admin Console Home page, select the JMS Modules link under the Services -> Messaging heading.
Figure 4-32 Admin Console Home (JMS Modules) screen

Description of "Figure 4-32 Admin Console Home (JMS Modules) screen"
-
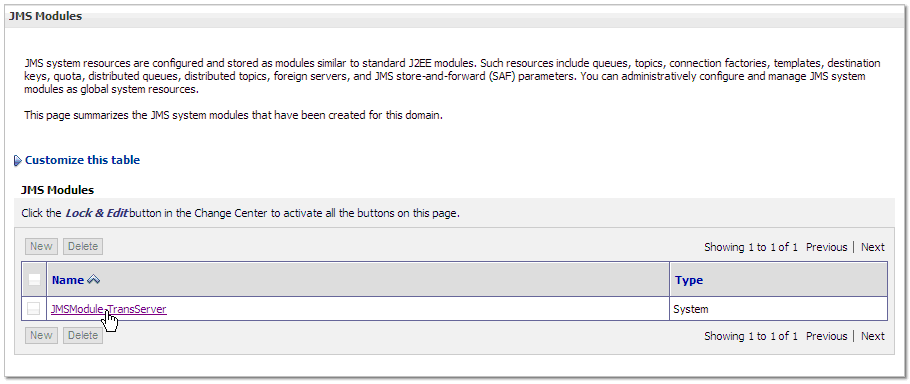
On the JMS Modules screen, click Lock and Edit, then click New.
-
On the Create JMS System Module screen, enter a name for the JMS Module and then click Next.
Figure 4-34 Create JMS System Module screen
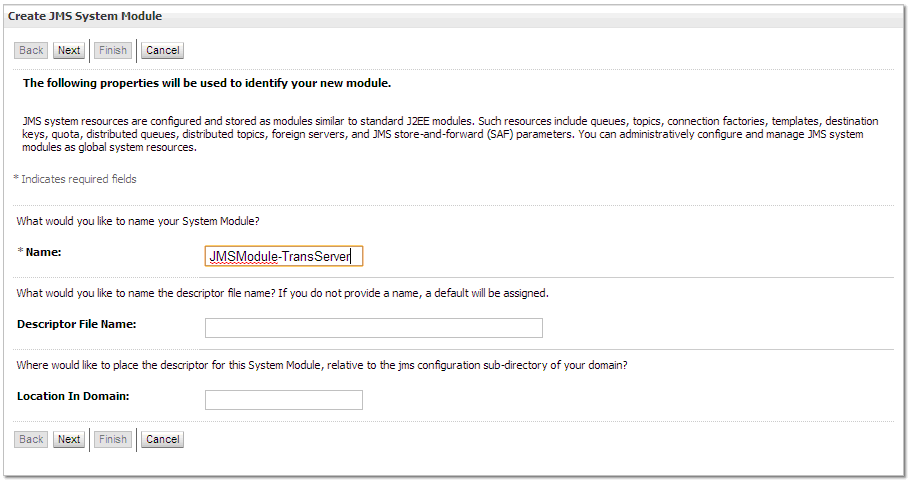
Description of "Figure 4-34 Create JMS System Module screen"
-
On the second Create JMS Module page, select the checkbox for the Server just created as the Target server. Click Next.
Figure 4-35 Create JMS System Module (Target) screen
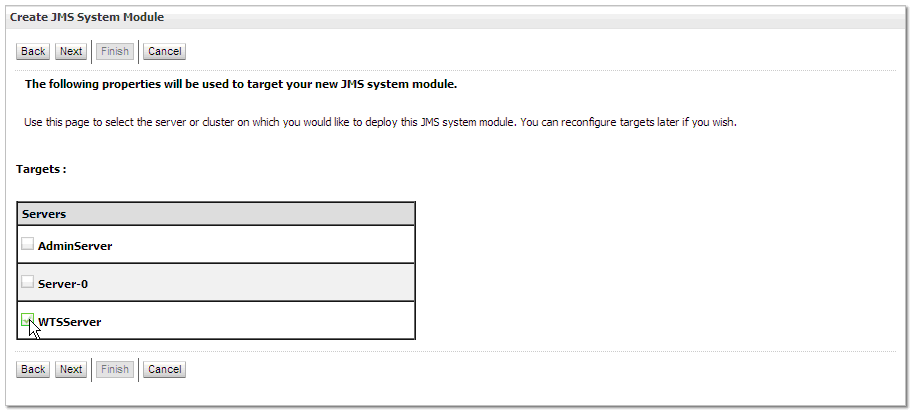
Description of "Figure 4-35 Create JMS System Module (Target) screen"
On the third Create JMS Module page, click Finish.
Figure 4-36 Create JMS System Module (Finish) screen
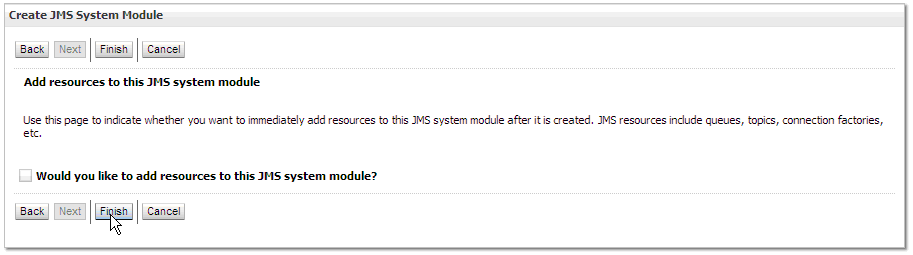
Description of "Figure 4-36 Create JMS System Module (Finish) screen"
-
On the JMS Modules screen, click Activate Changes.
-
Figure 4-37 JMS Modules (Activate Changes) screen
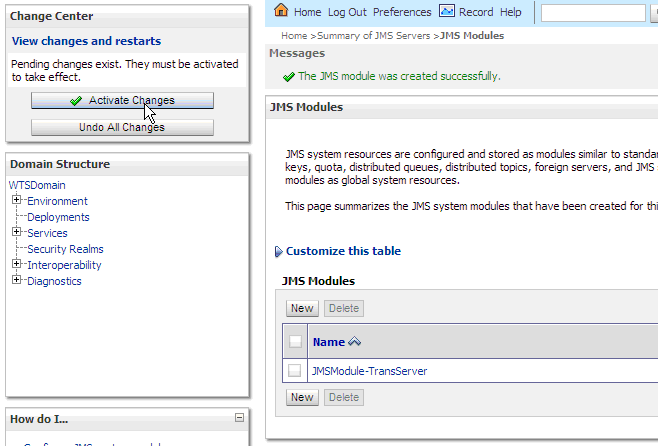
Description of "Figure 4-37 JMS Modules (Activate Changes) screen"

4.6 Create JMS Resources
You create several JMS resources; create connection factories, queues, and topics, within the JMS Module that was just created.
-
From the Admin Console Home page, select the JMS Modules link under the Services -> Messaging heading.
Figure 4-38 Admin Console Home (JMS Resources) screen
Description of "Figure 4-38 Admin Console Home (JMS Resources) screen"
-
On the JMS Modules screen, select the JMS Module that was created in the previous step.
4.6.1 Connection Factories
Use the following steps to create the Connection Factories:
-
Data Reload Topic Connection Factory
Name: DataReloadTopicConnectionFactory
JNDI Name: jms/com/peoplesoft/pt/e1/server/enterprise/events/DataReloadTopicConnectionFactory
-
Event Queue Connection Factory
Name: EventQueueConnectionFactory
JNDI Name: jms/com/peoplesoft/pt/e1/server/enterprise/events/QueueConnectionFactory
-
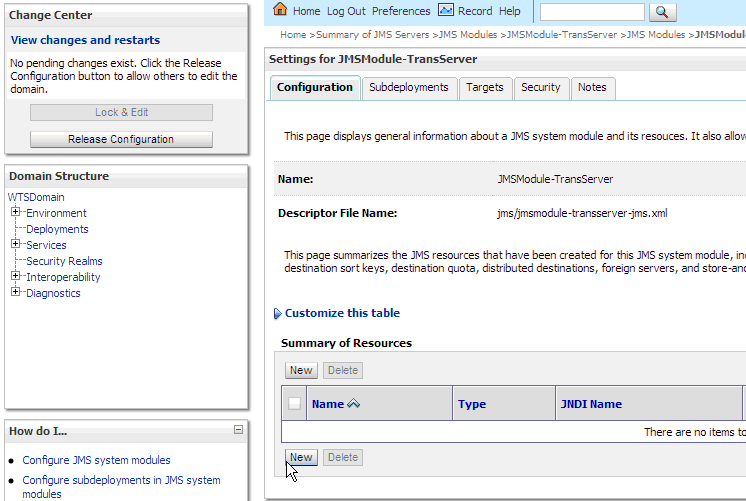
On the Settings for JMS Module screen, click Lock and Edit and then click New.
Figure 4-40 Settings for JMS Module - TransServer screen
Description of "Figure 4-40 Settings for JMS Module - TransServer screen"
-
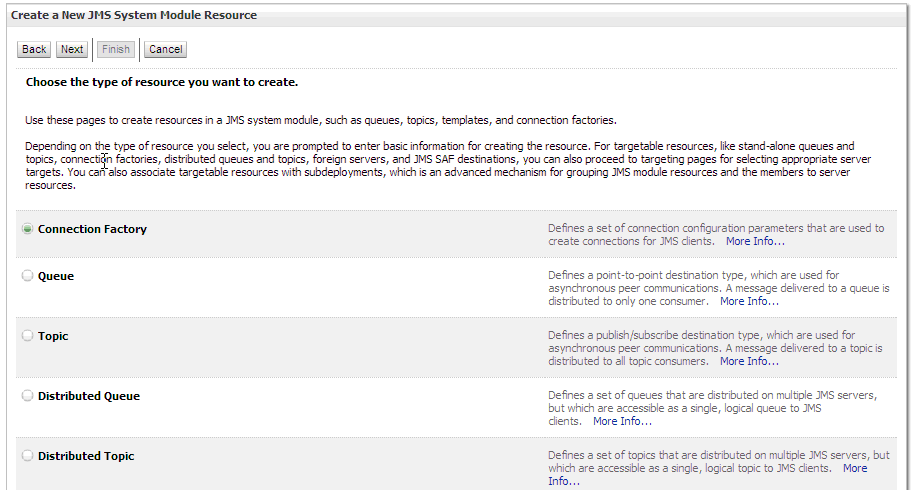
On the Create a New JMS System Module Resource screen, select the Connection Factory radio button. Click Next.
Figure 4-41 Create a New JMS System Module Resource (Connection Factory) screen
Description of "Figure 4-41 Create a New JMS System Module Resource (Connection Factory) screen"
-
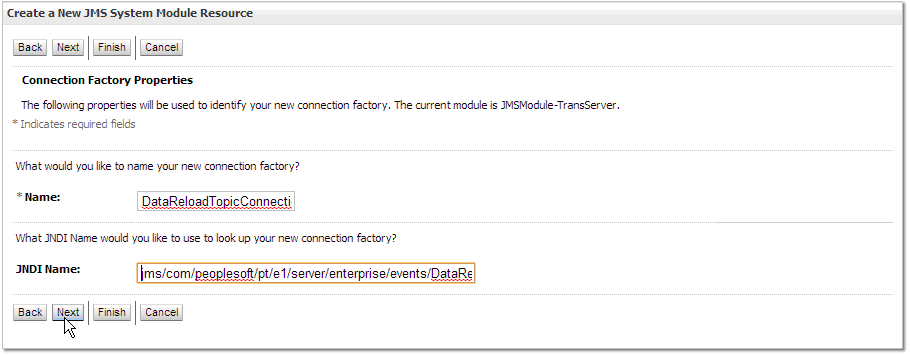
On the Connection Factory screen, enter the connection factory name and JNDI name exactly as it is above.
Figure 4-42 Connection Factory Properties screen
Description of "Figure 4-42 Connection Factory Properties screen"
-
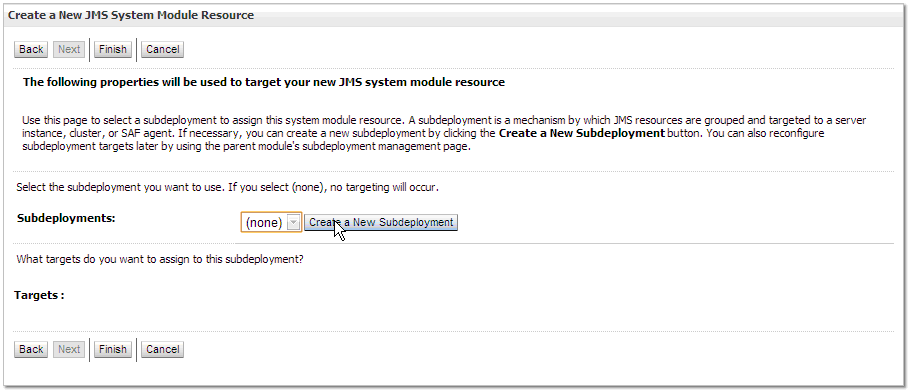
On the Create a New JMS System Module Resource Targeting screen, click Advanced Targeting.
Figure 4-43 Create a New JMS System Module Resource (Targeting) screen

Description of "Figure 4-43 Create a New JMS System Module Resource (Targeting) screen"
-
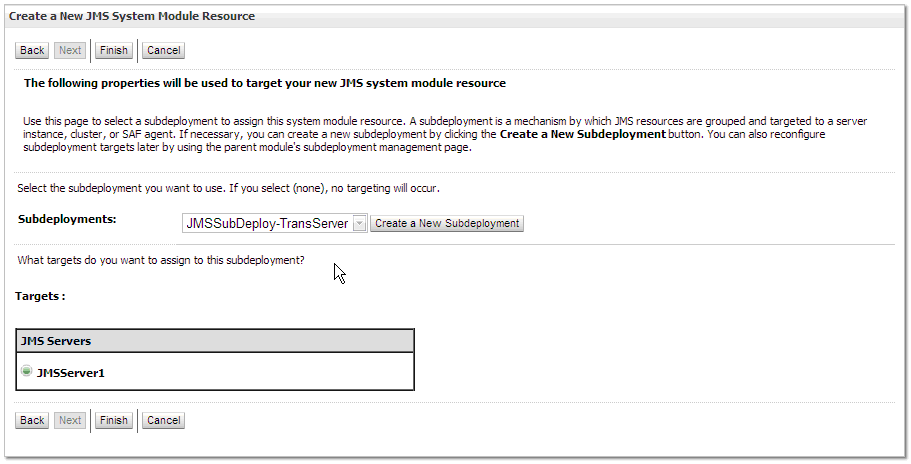
On the Create a New JMS System Module Resource Advanced Targeting screen, either click Create a New Subdeployment, if a subdeployment is not already created or select the subdeployment from the drop down list if the subdeployment is already created.
Figure 4-44 Create a New JMS System Module Resource (Advanced Targeting) screen
Description of "Figure 4-44 Create a New JMS System Module Resource (Advanced Targeting) screen"
-
If creating a new subdeployment, enter a name for the subdeployment (for example, JMSSubdeploy-TransServer). Click OK.
Figure 4-45 Create a New Subdeployment screen
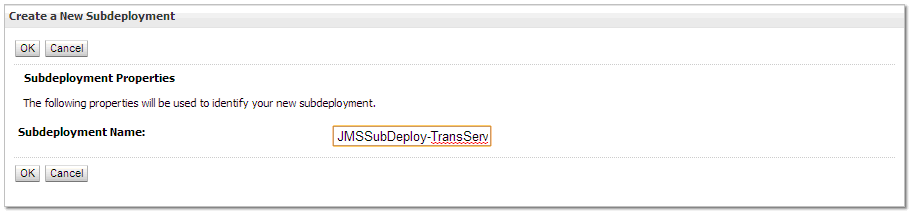
Description of "Figure 4-45 Create a New Subdeployment screen"
-
Once the subdeployment is selected, select the JMS Server as the target and then click Finish.
Figure 4-46 Create a New JMS System Module Resource (JMS Server) screen
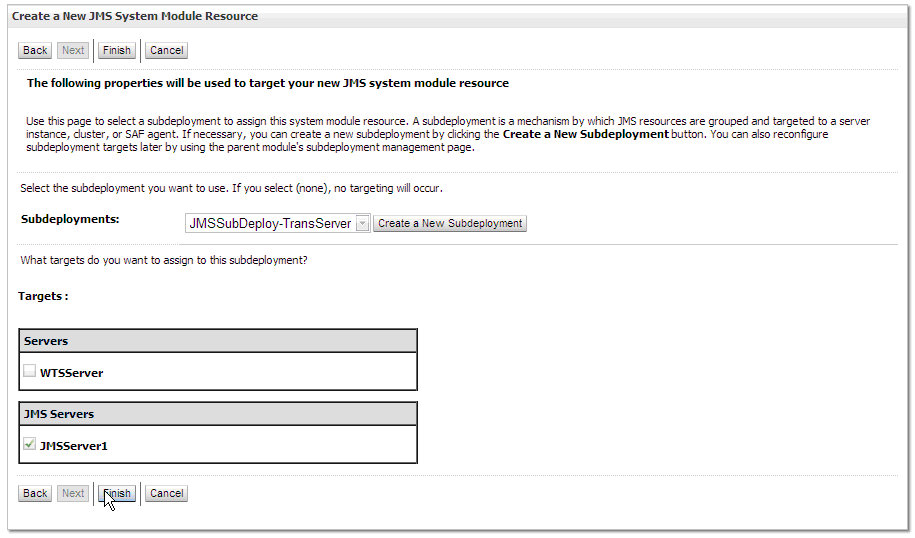
Description of "Figure 4-46 Create a New JMS System Module Resource (JMS Server) screen"
-
On the Settings for JMS Module screen, select the link for the newly created Connection Factory.
Figure 4-47 Settings for JMS Module (Connection Factory) screen
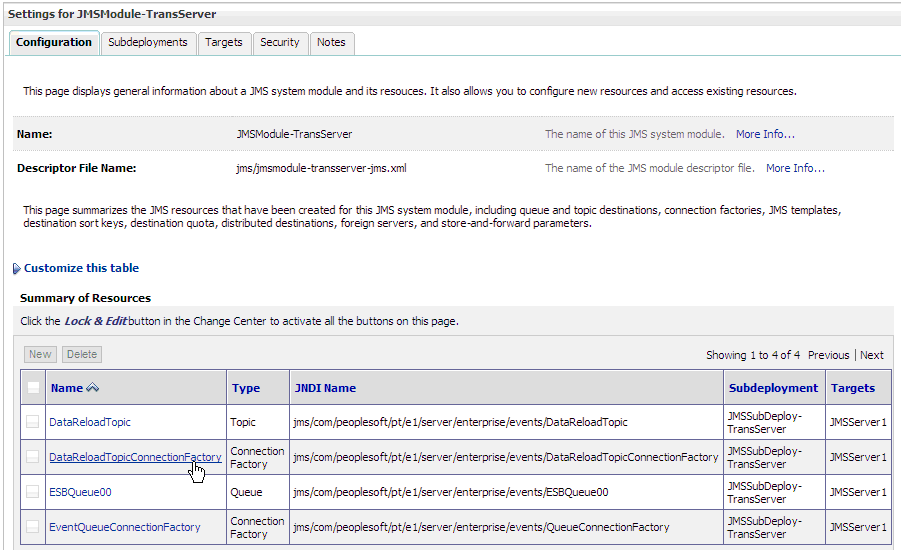
Description of "Figure 4-47 Settings for JMS Module (Connection Factory) screen"
-
On the Setting for Connection Factory screen, select the General tab. Ensure that the Default Targeting Enabled checkbox is unchecked. Click Save.
Figure 4-48 Settings for Connection Factory screen
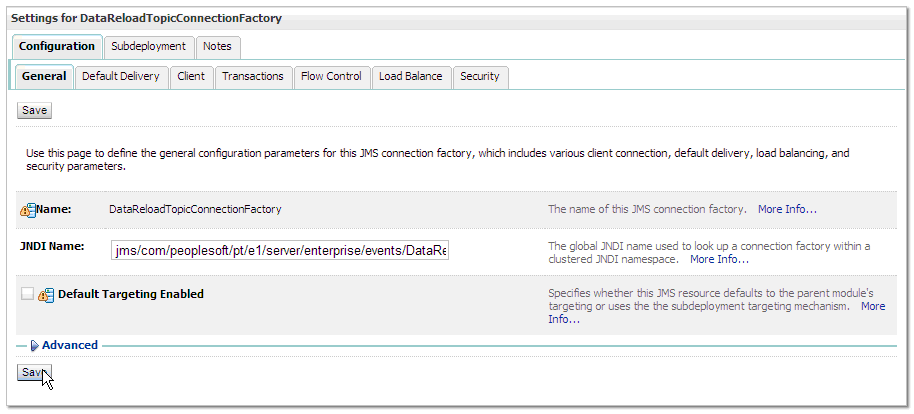
Description of "Figure 4-48 Settings for Connection Factory screen"
-
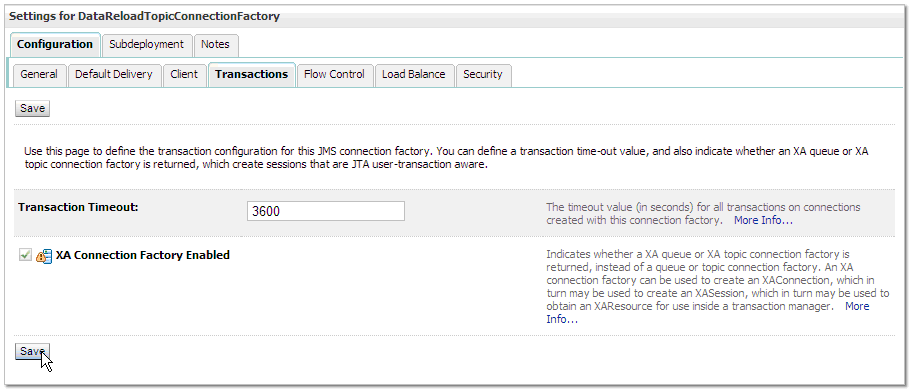
On the Setting for Connection Factory screen, select the Transactions tab. Ensure that the XA Connection Factory Enabled checkbox is checked. Click Save.
Figure 4-49 Settings for Connection Factory (Transactions) screen
Description of "Figure 4-49 Settings for Connection Factory (Transactions) screen"
-
Repeat the steps to create each of the connection factories listed above.
-
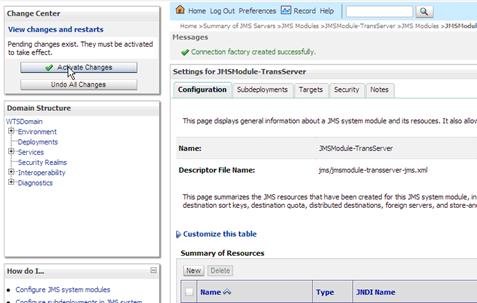
Once all the connection factories are created, click Activate Changes in the Change Center screen.
Figure 4-50 Change Center (Connection Factory, Activate) screen
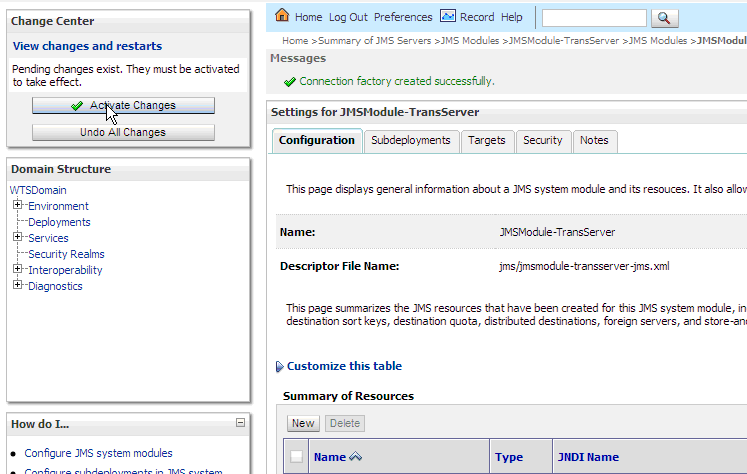
Description of "Figure 4-50 Change Center (Connection Factory, Activate) screen"
4.6.2 JMS Queues
Use the following steps to create the following JMS Queues.
-
ESBQueue00
Name: ESBQueue00
JNDI Name: jms/com/peoplesoft/pt/e1/server/enterprise/events/ESBQueue00
-
EventQueue00
Name: EventQueue00
JNDI Name: jms/com/peoplesoft/pt/e1/server/enterprise/events/EventQueue00
-
EventQueue01
Name: EventQueue01
JNDI Name: jms/com/peoplesoft/pt/e1/server/enterprise/events/EventQueue01
-
EventQueue02
Name: EventQueue02
JNDI Name: jms/com/peoplesoft/pt/e1/server/enterprise/events/EventQueue02
-
EventQueue03
Name: EventQueue03
JNDI Name: jms/com/peoplesoft/pt/e1/server/enterprise/events/EventQueue03
-
SourceRouteQueue
Name: SourceRouteQueue
JNDI Name: jms/com/peoplesoft/pt/e1/server/enterprise/events/SourceRouteQueue
-
SubQueue00
Name: SubQueue00
JNDI Name: jms/com/peoplesoft/pt/e1/server/enterprise/events/SubQueue00
-
SubQueue01
Name: SubQueue01
JNDI Name: jms/com/peoplesoft/pt/e1/server/enterprise/events/SubQueue01
-
SubQueue02
Name: SubQueue02
JNDI Name: jms/com/peoplesoft/pt/e1/server/enterprise/events/SubQueue02
-
SubQueue03
Name: SubQueue03
JNDI Name: jms/com/peoplesoft/pt/e1/server/enterprise/events/SubQueue03
-
SubQueue04
Name: SubQueue04
JNDI Name: jms/com/peoplesoft/pt/e1/server/enterprise/events/SubQueue04
-
SubQueue05
Name: SubQueue05
JNDI Name: jms/com/peoplesoft/pt/e1/server/enterprise/events/SubQueue05
-
SubQueue06
Name: SubQueue06
JNDI Name: jms/com/peoplesoft/pt/e1/server/enterprise/events/SubQueue06
-
SubQueue07
Name: SubQueue07
JNDI Name: jms/com/peoplesoft/pt/e1/server/enterprise/events/SubQueue07
-
SubQueue08
Name: SubQueue08
JNDI Name: jms/com/peoplesoft/pt/e1/server/enterprise/events/SubQueue08
-
SubQueue09
Name: SubQueue09
JNDI Name: jms/com/peoplesoft/pt/e1/server/enterprise/events/SubQueue09
-
SubQueue10
Name: SubQueue10
JNDI Name: jms/com/peoplesoft/pt/e1/server/enterprise/events/SubQueue10
-
SubQueue11
Name: SubQueue11
JNDI Name: jms/com/peoplesoft/pt/e1/server/enterprise/events/SubQueue11
-
SubQueue12
Name: SubQueue12
JNDI Name: jms/com/peoplesoft/pt/e1/server/enterprise/events/SubQueue12
-
SubQueue13
Name: SubQueue13
JNDI Name: jms/com/peoplesoft/pt/e1/server/enterprise/events/SubQueue13
-
SubQueue014
Name: SubQueue14
JNDI Name: jms/com/peoplesoft/pt/e1/server/enterprise/events/SubQueue14
-
SubQueue15
Name: SubQueue15
JNDI Name: jms/com/peoplesoft/pt/e1/server/enterprise/events/SubQueue15
-
TriggerQueue
Name: TriggerQueue
JNDI Name: jms/com/peoplesoft/pt/e1/server/enterprise/events/TriggerQueue
-
On the Settings for JMS Module screen, click Lock and Edit and then click New.
Figure 4-51 Settings for JMS Module (JMS Queues) screen
Description of "Figure 4-51 Settings for JMS Module (JMS Queues) screen"
-
On the Create a New JMS System Module Resource screen, select the Queue radio button. Click Next.
Figure 4-52 Create a New JMS System Module Resource (JMS Queue) screen
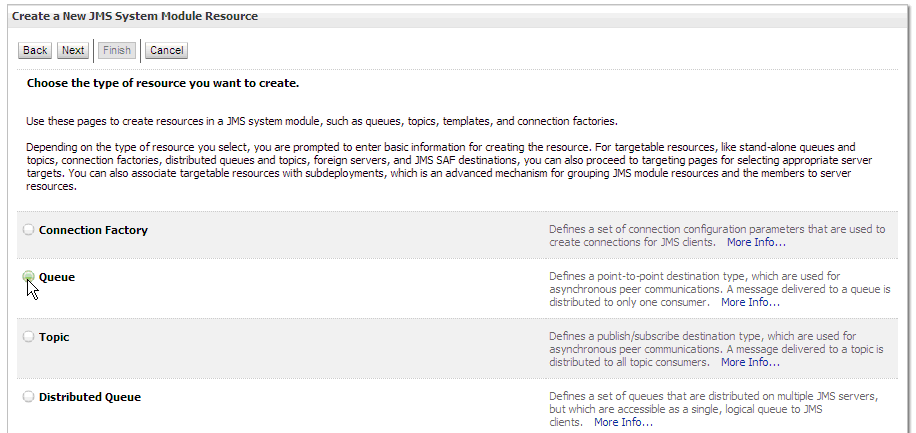
Description of "Figure 4-52 Create a New JMS System Module Resource (JMS Queue) screen"
-
On the JMS Destination Properties screen, enter the queue name and JNDI name exactly as it is above.
Figure 4-53 JMS Destination Properties screen
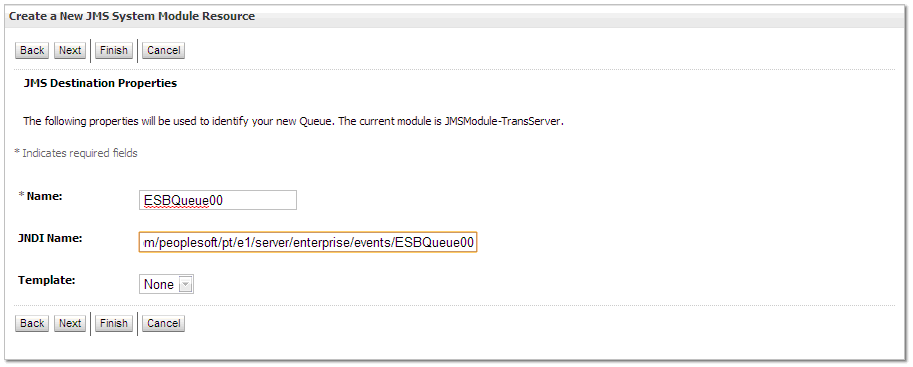
Description of "Figure 4-53 JMS Destination Properties screen"
-
On the JMS Queue Targeting screen, select the same subdeployment used for the connection factories from the drop down list. Make sure the JMS Server created earlier is selected as the Target. Click Finish.
-
Repeat the steps to create each of the JMS Queues listed above.
-
Once all the JMS Queues are created, click Activate Changes in the Change Center screen.
Figure 4-55 Change Center (JMS Queues) screen
Description of "Figure 4-55 Change Center (JMS Queues) screen"
4.6.3 JMS Topics
Use the following steps to create the JMS Topics:
-
DataReloadTopic
Name: DataReloadTopic
JNDI Name: jms/com/peoplesoft/pt/e1/server/enterprise/events/DataReloadTopic
-
On the Settings for JMS Module screen, click Lock and Edit and then click New.
Figure 4-56 Settings for JMS Module (JMS Topics) screen
Description of "Figure 4-56 Settings for JMS Module (JMS Topics) screen"
-
On the Create a New JMS System Module Resource screen, select the Topic radio button. Click Next.
Figure 4-57 Create a New JMS System Module Resource (Topic) screen
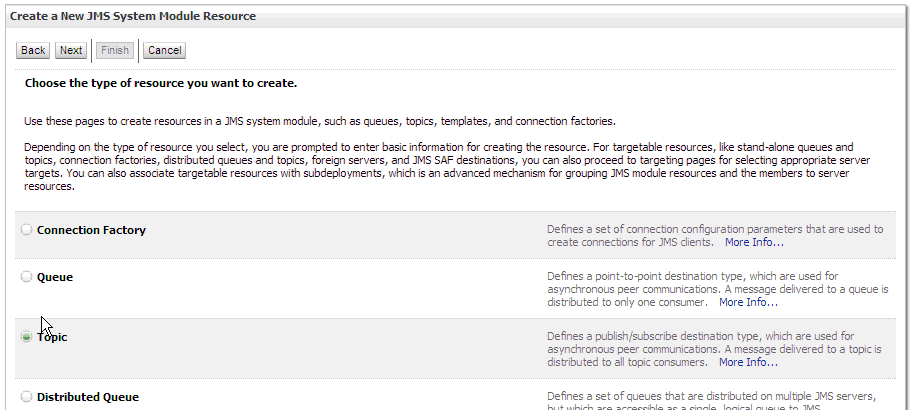
Description of "Figure 4-57 Create a New JMS System Module Resource (Topic) screen"
-
On the JMS Destination Properties screen, enter the topic name and JNDI name exactly as it is above.
Figure 4-58 JMS Destination Properties screen
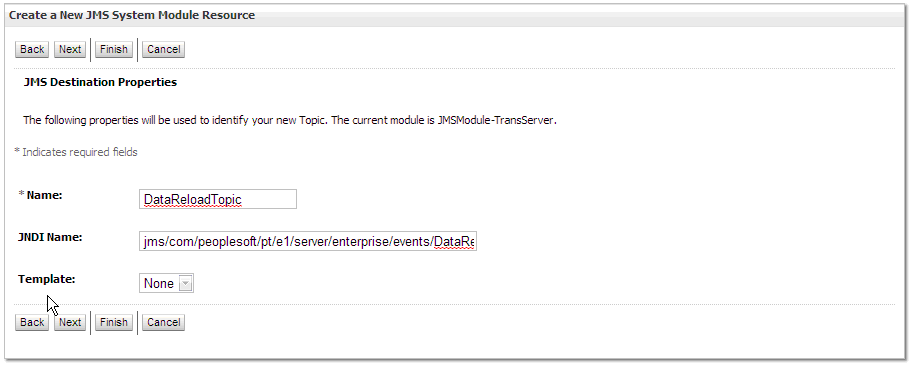
Description of "Figure 4-58 JMS Destination Properties screen"
-
On the JMS Topic Targeting screen, select the same subdeployment used for the connection factories from the drop down list. Make sure the JMS Server created earlier is selected as the Target. Click Finish.
-
Repeat the steps to create each of the JMS Topic listed above.
-
Once all the JMS Topics are created, click Activate Changes in the Change Center screen.
Figure 4-60 Change Center (JMS Topics, Activate Changes) screen
Description of "Figure 4-60 Change Center (JMS Topics, Activate Changes) screen"