49 Work with Payment Terms
This chapter contains these topics:
49.1 Overview
You use payment terms to ensure that both the seller and the buyer agree on when a payment is due for goods or services rendered. Payment terms can range from simple to complex, depending on the policy of your organization. For example, you might set up a simple payment term, such as 1/10, net 30, to encourage early payment. You might also set up a more complex payment term to allow an invoice or a voucher to be split into multiple payments with a different discount percentage for each payment.
Payment terms provide you with the flexibility to define how the system calculates due dates and discount percentages for your invoices and vouchers. A due date can either be a net due date or a discount due date. Because of the complex and diverse ways of calculating due dates, you can set up due date rules using various components to calculate a due date. For example, you can specify that the system add 10 days to the based-on date, which might be the G/L date, when calculating the discount due date of an invoice.
After you set up due date rules for both the net due date and the discount due date, you set up the payment term code. You can specify a due date rule as either a discount due date or a net due date. This enables you to link the rules together with a discount percent to define the:
-
Default payment term code for a customer or supplier
-
Payment term code of a specific invoice or voucher
The system stores payment term information in the following tables:
49.2 Setting Up Due Date Rules
From Accounts Receivable (G03), enter 29
From Accounts Receivable Setup (G0341), choose Payment Terms Revisions
From Payment Terms Revisions (G00141), choose Due Date Rule Revisions
Before you set up specific payment terms, you must define the rules that the system uses to calculate due dates for invoices and vouchers. You can set up as many due date rules as necessary.
A due date rule can consist of any of the following components:
By using a combination of these components, you can set up a variety of payment terms. For example, you might set up date rules as follows:
-
Use the invoice date as the based-on date and add one month. For example, if the date of the invoice is June 25th, the due date is July 25th.
-
Use the G/L date as the based-on date, and add one month and five days. For example, if the G/L date is June 12th, the due date is July 17th.
-
Use the G/L date as the based-on date, set up a day range, specify a number of days to add to the day range and a month to add. For example, if the G/L date is June 2nd, the month to add is 1, and the date ranges are:
-
The 1st through the 10th, add 5 days
-
The 11th through the 31st, use the 31st as the fixed date
Since the based-on date is within the first date range, the system adds five days and one month to the last day in the day range. Therefore, the due date for the payment is July 15th.
-
On Due Date Rule Revisions
Figure 49-1 Due Date Rules Revision screen
Description of "Figure 49-1 Due Date Rules Revision screen"
-
Complete the following fields:
-
Date Rule
-
Description
-
-
To define how the system calculates the due date, complete any of the following fields:
-
Based on Date
-
Months to Add
-
Days to Add
-
Fix Days to Use
-
-
To specify information about a workday calendar, complete the following fields:
-
Calendar
-
Work Day Rule
-
-
To set up a date range as part of your due date rule, choose the Date Range option next to the rule.
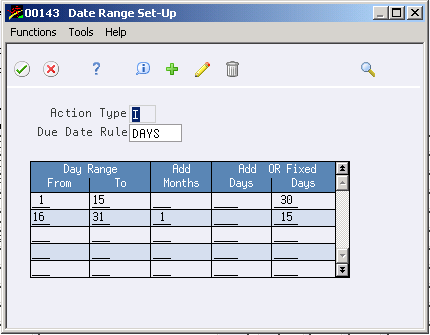
On Date Range Setup, complete the following fields:
-
From Day Range
-
To Day Range
Complete the following optional fields and press Enter:
-
Add Months
-
Add Days
-
Fixed Days
Choose the Update function to update and redisplay the due date rule.
| Field | Explanation |
|---|---|
| Date Rule | The due date rule that the system uses to determine the installment due date of an invoice. You define due date rules on the Due Date Rule Revisions screen. |
| Description | A user defined name or remark. |
| Based on Date | The initial date from which the net due date and discount due date is calculated.
NOTE: The based on date attached to the net due date rule and the discount due date rule is applicable for the first installment only for installment payment terms. Each subsequent installment will use the previously calculated net due date as the basis for calculating the next due date. |
| Months to Add | This field indicates the number of months to add to the based on date to determine the net due date or the discount due date. |
| Days to Add | This field indicates the number of days to add to the based on date to determine the discount or net due date. |
| Fixed Days | This indicates the fixed day which will be used during the date calculation. |
| Calendar | The calendar name to be used in work day calculations. It will be validated against the Work Day table (F0007). |
| Work Day Rule | A code that controls how the system determines the due date when the due date falls on a non-working day. The work day rule operates in conjunction with the fixed days, add days, and date range.
Valid values: blank When calculating the due date, use actual days. Ignore day classifications, such as working day, weekend, and holiday. 1 When calculating the due date, omit non-working days. If the due date falls on a non-working day, move the due date forward to the next working day. 2 When calculating the due date, use actual days. If the due date falls on a non-working day, move the due date forward to the next working day. 3 When calculating the due date, do not omit non-working days. If the due date falls on a non-working day, move the due date back to the last working day. |
| From Day | This field indicates the lower value of a day range. The allowable values are 1 to 31. This must be lower than the To Day value. |
| To Day | This field indicates the upper value of a day range. The allowable values are 1 to 31. This must be greater than the From Day value. |
49.2.1 Date Ranges
If you specify a date range in your due date rule, the system uses the last day in the range in conjunction with the months to add, days to add, or a fixed date. If you do not specify a month to add, days to add, or a fixed date, the system assigns the due date as the last day of the range.
For example, if you set up a date range from the 10th to the 25th of June and you do not specify a fixed date or months/days to add, the due date of the payment is June 25th.
The ranges must not overlap, and they must include a full month (days 1 through the 31st).
Additionally, when you set up a date range, you cannot specify both the number of days to add and a fixed days number. However, you can specify the number of months to add with the number of days to add or the fixed days.
The system adds the days to add, months to add, and fixed days to the last day in the range on the Due Date Rule Revision screen. To determine the date range, the system adds the days to add, months to add, and fixed days to the based-on date.
49.3 Setting Up Workday Calendars
From Accounts Receivable (G03), enter 29
From Accounts Receivable Setup (G0341), choose Payment Terms Revisions
From Payment Terms Revisions (G00141), choose Work Day Calendar
When setting up due date rules for your payment terms, you can set up workday calendars. These calendars enable you to specify the actual workdays, weekends, holidays, and so on, of your organization. You can set up multiple calendars and reference the name of one in the due date rule.
After you set up a workday calendar, you specify which action to take if the system calculates the due date on a non-workday. You do this on the Due Date Rule Revisions screen. For example, you can instruct the system to:
-
Ignore non-workdays when counting the days to calculate the due date and not allow the due date to occur on a non-workday.
-
Use the workday after the calculated due date as the due date. For example, if the calculated due date occurs on the weekend, the system moves it to the following Monday.
-
Use the workday before the calculated due date as the due date. For example, if the calculated due date occurs on the weekend, the system moves it to the previous Friday.
If you specify a workday rule, you can adjust the payment's due date to correspond with your working days. For example, you can prevent unintended "grace periods" that might occur if the due date falls on a Saturday and your business is closed. In addition, you can specify that the payment is due in 30 working days instead of 30 calendar days.
-
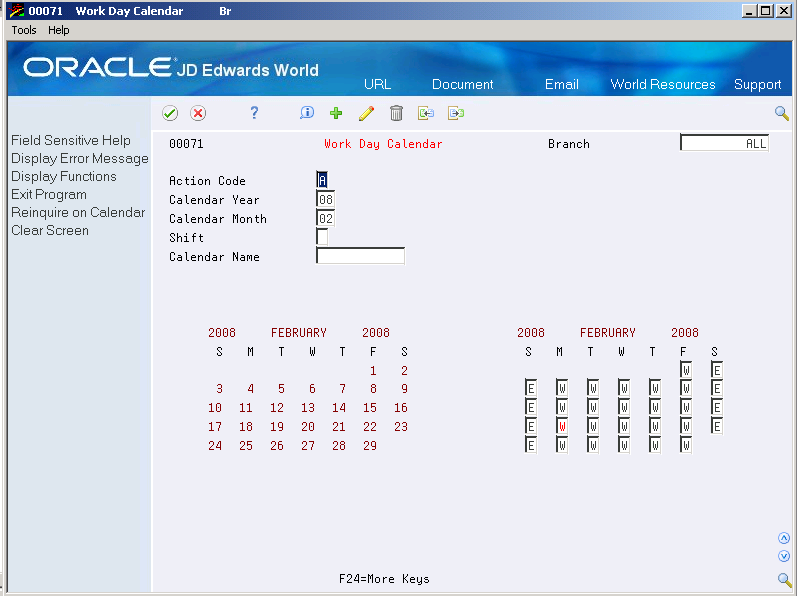
Complete the following fields:
-
Branch
-
Calendar Year
-
Calendar Month
The calendar for the month and year displays twice. The left portion of the screen shows the numerical days, and the right portion of the screen shows the workdays and non-workdays.
-
In the right portion of the screen, change the default values as necessary for each day of the week.
-
49.3.1 Calendars and Type of Day
This list provides examples of the type of day that you can specify:
-
W (workday)
-
E (weekend)
-
H (holiday)
-
S (shut-down)
The Work Day Calendar program is a Manufacturing program. On the Work Day Calendar screen, the Branch field refers to a Branch/Plan (business unit). You can only set up a workday calendar for a valid business unit. After you add a workday calendar, you can specify the calendar on the Due Date Revisions screen.
Only valid business units from the Business Unit table (F0006) can be added to the Work Day Calendar table (F0007).
49.4 Setting Up Payment Term Codes
From Accounts Receivable (G03), enter 29
From Accounts Receivable Setup (G0341), choose Payment Terms Revisions
From Payment Terms Revisions (G00141), choose Advanced Payment Terms
You can set up codes for various payment terms, which determines the net due dates, discounts, and discount due dates for your invoices and vouchers. This makes entering invoices and vouchers more efficient.
When you enter a customer or supplier record, you specify the payment term code that the customer or supplier uses most frequently. Then, when you enter the invoice or voucher, you can either:
-
Accept the default payment term code
-
Designate a different payment term code
49.4.1 Payment Term Codes
When you set up a payment term code, you can use a one-, two- or three-character combination of the following:
-
Alphabetic (A - Z)
-
Numeric (1 - 999)
-
Special characters (including blank)
You should set up a blank code for the most commonly used payment terms. If you do this, you must also set up a non-blank code for the same payment terms in case you need to change a supplier's payment terms later.
For example, you have a supplier with a payment terms code of D (due upon receipt). The supplier changes the terms to net 30 days, which is set up as a blank code. Because you cannot replace the existing code of D with a blank, you must use a non-blank code, such as N for net 30 days.
Set up the necessary due date rules that the system uses to calculate net due dates and discount due dates. This enables the system to link the rule to a specific payment term. See Section 49.2, "Setting Up Due Date Rules".
Figure 49-4 Advanced Payment Terms screen
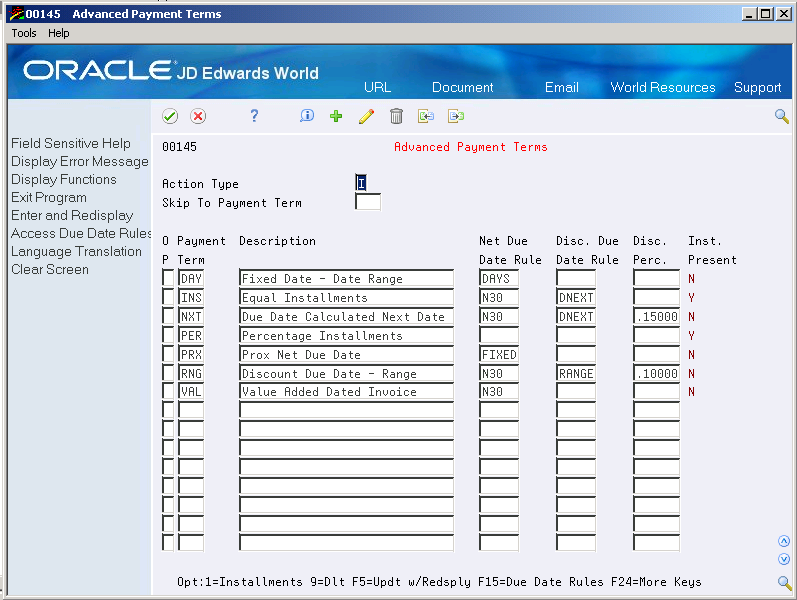
Description of "Figure 49-4 Advanced Payment Terms screen"
-
Complete the following fields:
-
Payment Term
-
Description (optional)
-
-
To attach a due date rule to the payment term, complete the following fields:
-
Net Due Date Rule
-
Discount Due Date Rule
-
-
To specify a discount percentage for the invoice, complete the following field:
-
Discount Percentage
-
| Field | Explanation |
|---|---|
| Payment Term | A code that specifies the terms of payment, including the percentage of discount available if the invoice is paid within a certain amount of time. A blank code usually indicates the most frequently used payment term. You define the specifications for each type of payment term on the Payment Terms Revisions screen. For example:
blank Net 15 1 1/10 net 30 2 2/10 net 30 N Net 30 P Fixed day of 25th Z Net 90 This code prints on customer invoices. |
| Description | The text that describes the payment terms code. You can print this text on the invoice, for example, 2/10, net 30, fixed day 25. |
| Net Due Date Rule | The due date rule that the system uses to calculate the net due date of an invoice installment. You define net due date rules on the Due Date Rules Revisions screen. |
| Disc. Due Date Rule | The due date rule that the system uses to calculate the discount due date of an invoice. This is similar to a discount due date payment term. You define the discount due date rule on the Due Date Rules Revisions screen. |
| Disc Perc | The percent of the total invoice that you will discount if the invoice is paid within the discount period. You enter the discount percent as a decimal, for example, a 2% discount is .02. |
49.4.2 Simple Payment Terms
You define simple payment terms using the Payment Term Revision screen. If you want to set up an advanced payment term, you must use the Advanced Payment Term screen.
The system displays both simple and advanced payment terms on the Payment Term Revision screen, but the Advanced Payment Term screen displays only advanced payment terms. (Advanced payment terms are payment terms that include a net due date and discount due date information.)
49.5 Setting Up Installment Payments
From Accounts Receivable (G03), enter 29
From Accounts Receivable Setup (G0341), choose Payment Terms Revisions
From Payment Terms Revisions (G00141), choose Installment Payment Revisions
Instead of a customer or you paying all of an invoice or voucher at one time, you can arrange installment payments. You can set up installment payment terms to pay an invoice or voucher with multiple payments over a specified period of time.
When you set up installment payment terms, you can set up equal payments or unequal payments with different percentages. You can also specify a different discount percent for each installment. The system calculates the due date of each installment based on the due date rule you assign to it.
The following list describes two examples of installment payment terms:
-
Equal payments with a discount due date
You might set up five equal payments. Each payment includes a 10 percent discount if paid within the discount period that you defined in the discount due date rule.
The actual due date of the payment depends on the net due date rule that you set up.
-
Unequal payments with a discount due date
You might set up 6 payments. Five of the payments might be 15 percent of the invoice amount, and the sixth payment is 25 percent. Each payment might also include a 5 percent discount if paid within the discount period that you defined in the discount due date rule.
The actual due date of the payment depends on the net due date rule that you set up.
To set up installment payments
On Installment Payment Revisions
Figure 49-5 Installment Payment Revisions screen
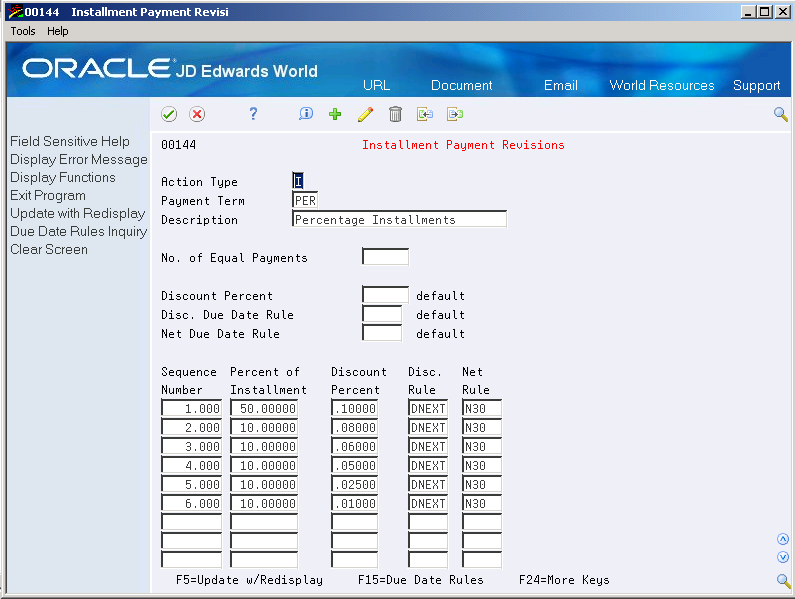
Description of "Figure 49-5 Installment Payment Revisions screen"
-
Complete the following fields:
-
Payment Terms
-
Description (optional)
-
-
To set up equal installment payments with the same due date rules, complete the following fields in the header area:
-
No. of Equal Payments
-
Discount Percent
-
Disc. Due Date Rule
-
Net Due Date Rule
-
-
To set up unequal installment payments or to apply different due date rules, complete the following fields for each installment in the detail area:
-
Sequence Number
-
Percent of Installment
-
Discount Percent
-
Disc Rule
-
Net Rule
-
| Field | Explanation |
|---|---|
| No. of Equal Payments | This field indicates the number of equal installments to be initially generated by the system. Using default values, the system uses this fast path method to create equal installments. |
| Discount Percent | The default value for the percent of the total invoice that will be discounted if the invoice is paid within the discount period. This is entered as a decimal, for example, a 2% discount is .02.
Note: This field is only available the first time that installments are entered for a payment term. It is the value which will initially be replicated for the generated installments. |
| Disc. Due Date Rule | The default value of the discount due date rule that the system uses when generating equal installments.
Note: This field is only available for use when first generating new equal installments for a payment term. |
| Net Due Date Rule | The default value for the Net Due Date rule when generating equal installments.
Note: This field is only available for use when first generating new equal installments for a payment term. |
| Sequence Number | A number used to organize the table into a logical group for online viewing and reporting. |
| Percent of Installment | The percentage of the invoice that is going to be split to generate one installment. The total of all installments must add up to 100.00% of the invoice total amount. This is different than the split payment concept where the split is a fixed percent. Here you create installments using variable percentages. If the percent of the installment is 20%, you enter it as 20. |
| Discount Percent | The percent of the total invoice that you will discount if the invoice is paid within the discount period. You enter the discount percent as a decimal, for example, a 2% discount is .02. |