5 Automatic Payment Process Setup
This chapter contains these topics:
-
Section 5.2, "Setting Up User-Defined Codes for Payment Processing,"
-
Section 5.4, "Setting Up Bank Accounts for Payment Order Processing,"
-
Section 5.7, "Setting Processing Options for Payment Order Supplemental Data - Russia (P74R0452),"
5.1 About Automatic Payment Process Setup
The following setup steps must be completed before you can successfully run the Automatic Payment process for Russia. Use menu G74R04, Accounts Payable - RUSSIA, to set up user defined codes and bank account information for accounts payable processing.
This chapter provides an overview of the setup required for accounts payable processing, lists prerequisites, and discusses how to:
-
Set up user-defined codes for payment processing
-
Set up developer's workbench (G9362)
-
Set up bank accounts for automatic payment processing
Note:
There is a menu G74R04 for defining set up for payment order processing, options 15 through 22. You can define user defined code values and bank account information that will be used later for the payment order printing.5.2 Setting Up User-Defined Codes for Payment Processing
You set up UDCs to specify values the system uses when you run the accounts payable programs. In addition to the UDCs that are used by all countries, you must set up UDCs that are specific to Russia. The UDCs specific to Russia begin with74R or 74.
This section provides an overview of the user-defined code setup required for accounts payable processing, lists prerequisites, and discusses how to:
-
Set Payment Reason code (74R/PR)
-
Set Payment Status code (74R/PS)
-
Set Code Budget Organization code (74R/BO)
-
Set Payment Priority code (74R/PP)
-
Set Payment Terms Type code (74R/PT)
-
Set Transit Number Bank (74R/TN)
5.2.1 Payment Reason (74R/PR)
Set up the Payment Reason UDC to identify the reason for the payment included on the payment order. The system uses the values from this UDC when you run the Payment Order Supplemental Date - RU (P74R0452). For example you might set up these values:
| Codes | Description |
|---|---|
| DIDPY | Differed Debs Payment |
| PYCUY | Payment of Current Yea r |
| REEDB | Restructured Debs |
5.2.2 Payment Status (74R/PS)
Set up this Payment Status UDC to identify the type of payment included on a payment order. The system uses the values from this UDC when you run the Automatic Payment Order program and the Payment Order Supplemental Date - RU (P74R0452). For example, you might set up these values:
| Codes | Description |
|---|---|
| 01 | In process |
| 02 | Suspend |
| 15 | Canceled |
5.2.3 Set Code Budget Organization (74R/BO)
Set up this UDC to specify the budget code that appears on payment orders. The system uses the values from this UDC when you run the Automatic Payment Order program and the Payment Order Supplemental Date - RU (P74R0452). For example, you might set up these values:
| Codes | Description 1 | Description 2 |
|---|---|---|
| 01 | Code Budget KBKBudget | Code KBK0001 |
| 02 | Code Budget CKCBudget | Code CKC0001 |
| 03 | Code Budget PPPBudget | Code PPP0001 |
| 04 | Code Budget JKJBudget | Code JKJ0001 |
| 05 | Code Budget PTTBudget | Code PTT0001 |
5.2.4 Set Payment Priority (74R/PP)
Set up this UDC to specify the priority for processing payment orders. For example, you might set up these values:
| Codes | Description |
|---|---|
| C | Urgent |
| Z | Last one |
| 8 | Priority |
| 9 | At Time |
5.2.5 Set Payment Terms Type (74R/PT)
Set up this UDC to specify the payment terms type for processing payment orders. Press F14 to add a memo for each code. The memo text is printed on the payment order as the default explanation text if no text is entered in the Payment Order Transitory - Russia window.
For example, you might set up these values:
| Codes | Description |
|---|---|
| DAILY | Daily |
| MONTHLY | Monthly |
| WEEKLY | Weekly |
5.2.6 Set Transit Number - Bank (74R/TN)
Set up this UDC to specify the transit bank numbers for processing payment orders. This UDC establishes a link from the transit number (Russian BIK) to the bank information. For example, you might set up these values:
| Codes | Description 1 | Description 2 |
|---|---|---|
| 123456789 | Transit Bank Moscu | 00125000 |
| 223344556 | Transit Bank London | 00126000 |
| 445566778 | Transit Bank Moscu | 00127000 |
You can have different codes (branches) with the same BIK number.
5.3 Setting Up Generic Text Definitions
The generic text definitions entered through the memo function
Figure 5-1 Generic Text Definitions screen
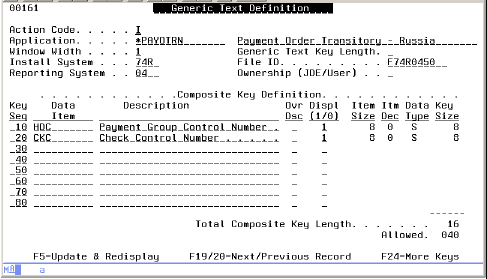
Description of "Figure 5-1 Generic Text Definitions screen"
To verify generic text setup for Payment Order Transitory - Russia
From Developer's Workbench (G9362), choose option 9 (Generic Text Definitions)
-
Select action code I (Inquiry).
-
Enter Application *PAYOTRN and press Enter.
-
Verify that the system displays the information shown in the screen example above.
5.4 Setting Up Bank Accounts for Payment Order Processing
The vendor, vendor's bank, and company bank must be set up in Address Book. The bank's long address and long mailing name print on the payment order.
Verify that both the company and vendor bank accounts have been set up correctly for payment order processing, as described in this section.
Figure 5-2 Bank Account Information screen
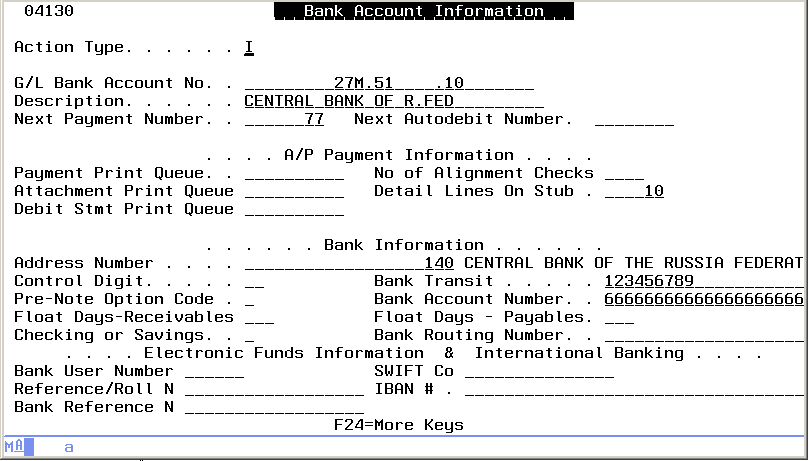
Description of "Figure 5-2 Bank Account Information screen"
To set up company bank account
From Automatic Payment Setup (G04411) or From (G74R04), choose option 21 (if the menu is available in your system)
-
Select menu option 2 - Bank Account Information.
-
Select action code A (Add).
-
Complete the following:
-
G/L Bank Account No - Enter the bank account code that appears in the general ledger.
-
Description - Enter the description of the bank account.
-
Detail Lines on Stub - Enter the number of detail lines that can appear on an A/P payment stub.
-
Address Number - Enter the Address Book number of the bank. The Address Book number identifies the bank in the system and links to the mailing address information for the bank.
-
Bank Transit - Enter the routing and transit (Russian BIK) number that identifies the bank and links to the bank's correspondent account that prints on the payment order.
-
Bank Account Number - Enter the number assigned to your account at the bank.
-
-
Complete additional fields, as needed.
-
Press Enter to save the company bank account information.
Note:
The bank information fields specified in the setup steps are used for Russian Payment Orders. Other fields on Bank Account Information may be used for other types of banking transactions. You can press F1 in any field to display a description of the field or a list of allowed values.5.4.1 Vendor Bank Account Information
You must set up bank account cross-references for suppliers who receive payment orders. These cross-references supply bank account information for your suppliers. You can also add this information on Supplier Master Information.
Bank account cross-references link supplier addresses in the Address Book Master file (F0101) to their bank account information in the Bank Transit Number Master file (F0030).
Figure 5-3 Bank Account Cross Reference screen
Description of "Figure 5-3 Bank Account Cross Reference screen"
From Automatic Payment Setup (G04411), choose option 7 (Bank Account Cross-Reference)
-
Select action code A (Add).
-
Complete the following:
-
Address Number - Enter the vendor Address Book number. The Address Book number identifies the vendor in the system and links to the mailing address information for the vendor.
-
Routing/Transit - Enter the routing and transit (Russian BIK) number that identifies the bank and links to the bank's correspondent account that prints on the payment order.
-
Account No. - Enter the vendor's bank account number.
-
Description - Enter a short description to identify the vendor's bank.
-
-
Press F8-B Type Codes to display the Bank Account Addresses screen. This screen links the Bank Transit (BIK) number and the bank's name and address through the Address Book number.
-
Select action code A (Add).
-
Complete the following:
-
Bank Transit - Enter the routing and transit (Russian BIK) number that identifies the bank and links to the bank's correspondent account that prints on the payment order.
-
Address Number - Enter the Address Book number of the vendor's bank. The Address Book number identifies the bank in the system and links to the mailing address information for the bank.
-
-
Press Enter to accept the information and return to the Bank Account Cross-Reference screen.
-
Press Enter to save the information and clear the screen.
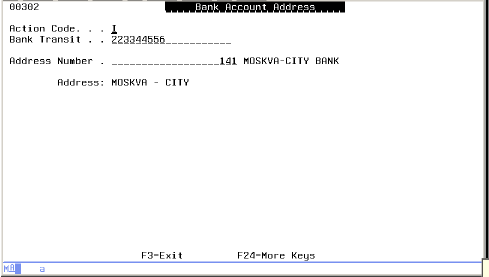
Note:
You can also access the Bank Account Addresses screen by accessing the Supplier Master Information program (P01054), inquiring on a supplier address book number, and pressing F8.You can also use menu G74R04, Option 22 to set up Bank Account Addresses, if the menu is available in your system.
5.5 Automatic Payment Process
Processing automatic payments involves the following tasks:
-
Add a voucher. (Domestic currency is rubles for Russia.)
-
Create a payment control group.
-
In the application Work with Payment Groups or in the application Review Payments, execute the selection option 3 (Write). The new window Payment Order Supplemental Data - RUS - 04 appears.
-
Fill in all additional information needed for each of the payments created.
-
Press F6 to confirm and print the Payment Order for Russian Federation.
5.6 Adding Additional Information to Payments
This section provides an overview of the payment process for Russia, lists prerequisites, and discusses how to:
-
Add additional payment information.
-
Set processing options for Review Payments Additional Information (P74R0452).
5.6.1 Entering Payment Order Supplemental Data - Russia
On Work with Payment Groups (or on Review Payments), select option 3 (Write).
The new window, Payment Order Localization appears.
Note:
If you select option 1 (Pmts) on Work with Payment Groups, the Review Payment Group - Write screen displays. When you select option 3 (Write), from Review Payment Group - Write, the Payment Order Localization screen that appears also shows the check control number, payee address number, G/L date, and company. The information entered applies only to that particular payment. When using option 3 from the more generic Work with Payment Groups, the information entered applies to all payments in that group.Figure 5-5 Payment Order Localization screen
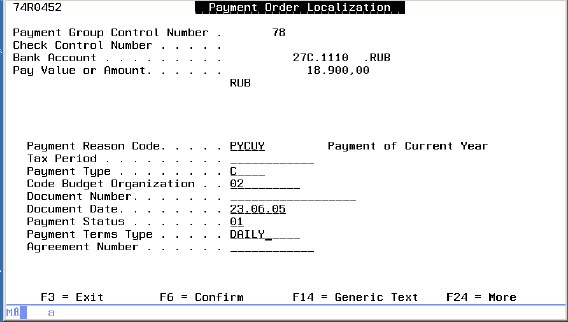
Description of "Figure 5-5 Payment Order Localization screen"
Note:
Most of these fields are only used when making payments to the Tax authorities so will normally be left blank.To enter payment order supplemental data for Russia
-
On Payment Order Localization, complete the following fields:
-
Payment Reason Code - Enter a code or press F1 to select a code from the Payment Reason Code list.
-
Payment Type - Enter the code to specify the payment type.
-
Code Budget Organization - Enter a code or F1 to select a code from the Code Budget Organization list.
-
Payment Status - Enter a code or press F1 to select a code from the Payment Status list.
-
Payment Terms Type - Enter a code or press F1 to select a code from the Payment Terms Type list.
-
Tax Period - Enter the tax period for the payment.
-
Document Number - Enter the document number of the payment.
-
Document Date - Enter the document date.
-
Agreement Number - Enter the agreement number that applies to the payment.
-
-
To add a text comment to the Payment Order, complete the following optional steps. Otherwise, skip to step 3. The text you enter in the Additional Payment Detail window will be printed on the Payment Order.
-
Press F14 (Generic Text) to display the Payment Order Transitory - Russia window (similar to the layout example, below).
-
Enter the additional text you want to print on the payment order and press Enter to save the text and return to the Payment Order Localization window.
Figure 5-6 Additional Payment Detail screen
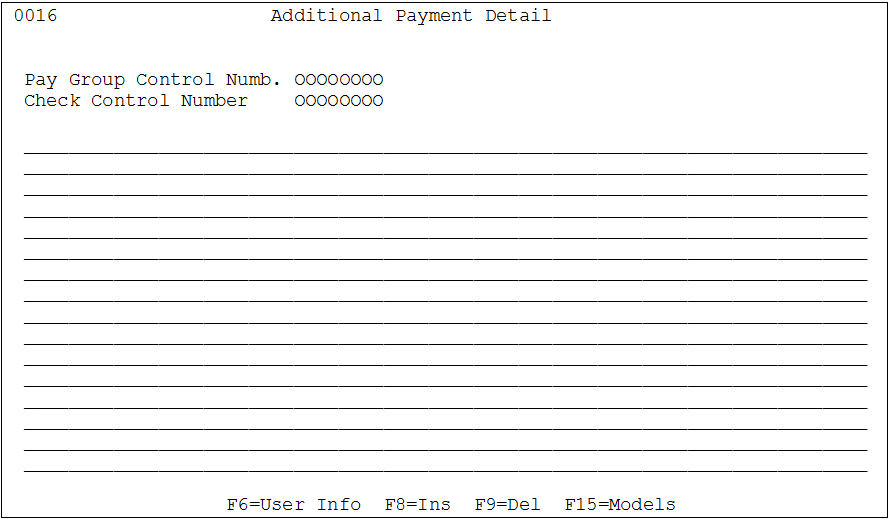
Description of "Figure 5-6 Additional Payment Detail screen"
Note:
Additional text entry is optional. There is no limit for the length of text you can enter. All text entered is printed. If no text is entered here, the memo text description from the UDC code used for Payment Terms Type is printed on the payment order. The memo text for payment terms types can be entered as described under Set Payment Terms Type (74R/PT) in the Setting Up User-Defined Codes for Payment Processing section of this document. -
-
Press F6 - Confirm to continue.
The system displays the Write Payments window.
-
Enter the Payment Order Date and press Enter to submit the payments to processing.
-
If the F3 (Cancel) key is pressed instead of confirming with F6, then the payment order will not be printed.

5.7 Setting Processing Options for Payment Order Supplemental Data - Russia (P74R0452)
Figure 5-8 Processing Options Revisions screen
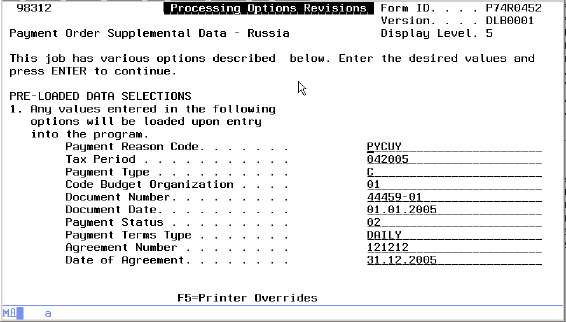
Description of "Figure 5-8 Processing Options Revisions screen"
Note:
The DREAM Writer version you configure for pre-loaded data selections must be the same version that is called by the Work with Payment Groups (P04257) version from which you print the payments. If the pre-loaded data selections are blank, or if another version of P74R0452 is used to print the payments, these fields will appear blank on the Payment Order Localization window (74R0452).5.7.1 Preloaded Data Selections Processing Options
Any values entered in the following options will be loaded upon entry into the program.
| Processing Option | Explanation |
|---|---|
| Payment Reason Code | Use this processing option to enter a payment reason code. The value that you enter must exist in the Payment Reason Code (74R/PR) UDC table. |
| Tax Period | Use this processing option to enter the tax period for the payment. |
| Payment Type | Use this processing option to enter a payment type code. |
| Code Budget Organization | Use this processing option to enter a budget organization code. The value that you enter must exist in the Code Budget Organization (74R/BO) UDC table. |
| Document Number | Use this processing option to enter the document number of the payment. |
| Document Date | Use this processing option to enter the document date. |
| Payment Status | Use this processing option to enter a payment status code. The value that you enter must exist in the Payment Status (74R/PS) UDC table. |
| Payment Terms Type | Use this processing option to enter a payment terms type code. The value that you enter must exist in the Payment Terms Type (74R/PT) UDC table. |
| Agreement Number | Use this processing option to enter the agreement number. |
| Date of Agreement | Use this processing option to enter the date of the agreement. |
Caution:
If you reset a payment after it has been written, the next status reverts from UPD to WRT and the payment can be written again. When you write the payment again, the default data from P74R0452 processing options is not loaded, the previous manually entered information from the first time it was printed is shown instead, and can be updated.5.8 Printing Payment Orders
This section provides an overview of payment orders, lists prerequisites, and discusses how to:
-
Print a payment order automatically.
-
Set processing options for Automatic Payment Order (P74R0453).
5.8.1 Understanding Payment Orders
You print a payment order for all domestic payments. You deliver copies of the payment orders to the bank that processes your payments. You can print the payment order when you work with automatic payments.
When you print a payment order, the system prints a document that contains:
-
Date of the order, in the correct format
-
Supplemental data from the F74R0450 table
-
Amount in rubles
-
Company information
-
Payee information
-
Bank information
-
Payment detail
-
Amount in words
-
Detail for agreement or voucher information
-
Verify that your User Display Preference is set to RU (Russia).
-
Payment instrument (C) must have the payment order printing program (P74R0453) defined in the "Attachment Program" field. To define payment instruments for automatic payments go to menu G04411 (Automatic Payment Setup) and select option 4. Display the fold area as illustrated in the following example.
Figure 5-9 Payment Instrument Defaults screen
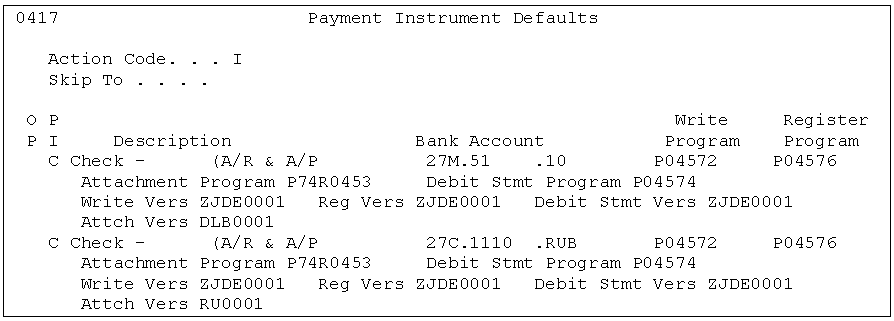
Description of "Figure 5-9 Payment Instrument Defaults screen"
-
Set up bank account information and relationships for suppliers and company. See Section 5.4, "Setting Up Bank Accounts for Payment Order Processing" for more information.
-
Complete the following program and version information for payment orders:
-
Write Program - Enter program that is used to write the payments (P04572).
-
Write Vers (Write Version) - Enter the DREAM Writer version that is used for P04572.
-
Attachment Program - Enter the program that is used to print payment order attachments (P74R0453).
-
-
Attach Vers (Attachment Version) - Enter the DREAM Writer version that is used for P74R0453.
5.8.2 Printing the Payment Order Automatically
To automatically print the payment order
-
Write payments from the Work with Payment Groups (P04257) program.
-
Enter 3 (Write) in the Option field next to each payment to write, or press F10 to write all payments in the pay group.
The system displays the Payment Order Supplemental Data RUS 04 screen.
-
Enter the required supplemental data for each payment in the group by selecting each payment, then entering the supplemental data.
When you press F6 to confirm, the system saves the data that you enter to the Payment Order Supplemental Data (F74R0450) file, runs the Automatic Payment Order (P74R0453) program and prints the Payment Order document.
5.9 Changing the Payment G/L Date
This section provides an overview of the payment GL date and discusses how to:
-
Individually update the payment G/L date.
-
Globally update the payment G/L date.
5.9.1 Understanding the Payment G/L Date for Russia
In Russia, the bank statement is the only document used to confirm general ledger bank account transactions. The payment order G/L date must be equal to the bank statement date even when the payment order is issued with a different payment date.
Oracle JD Edwards World provides a program that lets you modify the payment G/L date after payments are written. A typical scenario for changing the G/L date might be:
-
On June 1, write payments using the Work with Payment Groups program (P04571).
-
On June 2, send payment orders to the bank.
-
On June 6, receive executed payment orders and bank statements that show the actual payment date of June 5.
-
Locate payment records for the transactions in the bank statement and change the G/L date for the transactions from June 1 to June 5 to show the date the payment actually occurred.
Note:
You can update the G/L date only for payments that are at an Update status. In the localization for Russia, the final Update process of the automatic payment processing procedure has been modified to allow users to globally revise the payment date for payments in a payment group or to overwrite the payment date for individual payments.5.9.1.1 Programs Used to Update Payment G/L Dates
| Program Name | Navigation | Usage |
|---|---|---|
| Work with Payment Groups | Automatic Payment Processing (G0413), Work with Payment Groups (P04257). | Choose a record, or process multiple records. |
| Work with Payment Groups - Update Status | Select a record on the Work with Payment Groups screen. Execute selection option 4 (Update). | Choose a record. |
| Update G/L Date | Access the A/P Payments - Update G/L Date program (P74R0451). | Update the G/L date. |
5.9.2 Individually Updating Payment GL Dates
The localization program P74R0451 is accessed through 'Work with Payment Groups' (P04257) when the 'Update' function is selected. It is a requirement for all payment orders to update the payment G/L date to match the payment date information provided by the bank.
Figure 5-10 A/P Payment - Update G/L Date screen
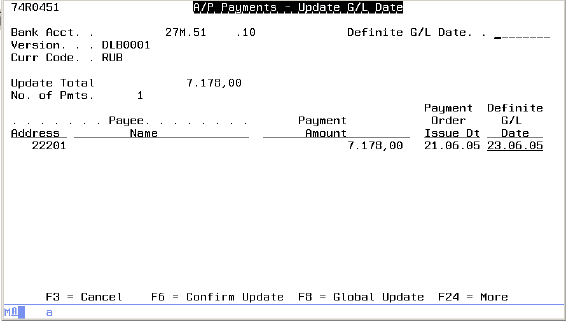
Description of "Figure 5-10 A/P Payment - Update G/L Date screen"
To individually update payment G/L dates
From Automatic Payment Processing (G0413), choose Work with Payment Groups
-
Enter the date provided by the bank statement in the Definite G/L Date field to update the G/L date for the selected payment(s). The date must be greater than or equal to the Payment Order Issue Date.
-
Press F6 to confirm update.
5.9.3 Globally Updating Payment G/L Dates
The global update allows you to update all the payments within the group to the same date. After you have updated the whole group it is possible to amend individual payments if required. The revised date must be greater than or equal to any of the individual payment order dates inside the group.
To globally update payment G/L dates
Access the A/P Payments - Update G/L Date program (P74R0451).
From Working with Payment Groups, choose Option 4 (Update) for the payments that you want to change
-
Press Enter.
-
On A/P Payments - Update G/L Date, enter the date provided by the bank statement in the upper Definite G/L Date field (header section).
-
Press F8 (Global Update).
-
Press F6 to confirm the update.