3 Set Up for VAT Reporting for Belgium
This chapter contains these topics:
3.1 Setting Up for Belgium Reporting
Legal authorities in Belgium requires each company to present the following VAT reports:
-
625 Monthly VAT Report
-
Intracommunity Statement n° 723 Report
-
Yearly Clients List N° 725 Report
3.2 Setting Up User-Defined Codes for Belgium VAT Reporting
Set up the following user-defined codes to meet Belgium VAT requirements:
-
Identification Type (74B/IT)
-
File Type (74B/FT)
-
VAT Report Code (74B/TA)
-
Legal Report Identification (74/RI)
You can access these user-defined codes from any user-defined codes file.
3.2.1 Identification Type (74B/IT)
From Belgium Localizations (G74B), choose Generic VAT Reports
From Generic VAT Reports (G74B00), choose Identification Type
Set up user-defined codes to define the document used to identify the representative of the reporting company. The system validates this data in the processing options of the Belgium VAT Report (P700001BE) program.
See Processing Options for VAT Report XML Generation - Belgium (P700001BE)
Figure 3-1 Identification Type User Defined Codes screen
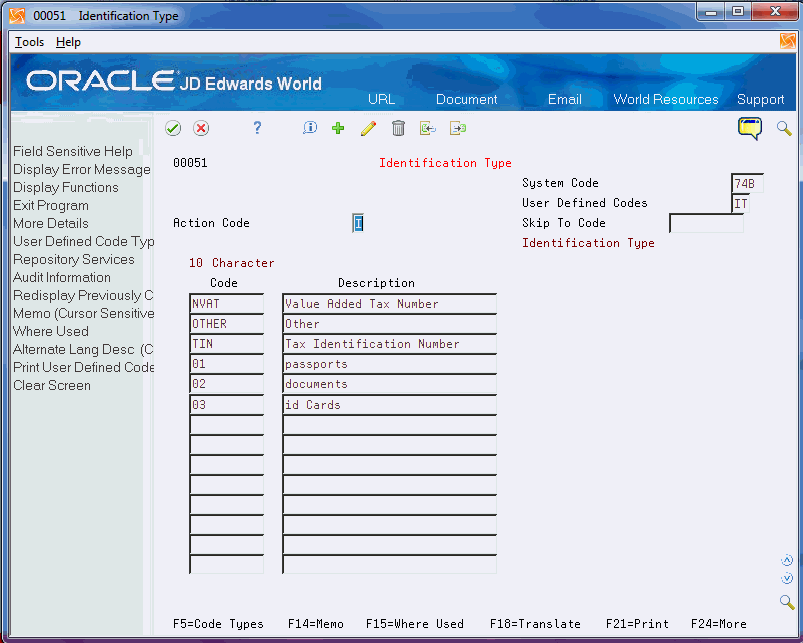
Description of "Figure 3-1 Identification Type User Defined Codes screen"
3.2.2 File Type (74B/FT)
From Belgium Localizations (G74B), choose Generic VAT Reports
From Generic VAT Reports (G74B00), choose File Type
Set up each of the file type load values. The system validates this data in the processing options of the Belgium VAT Report (P700001BE) program.
See Processing Options for VAT Report XML Generation - Belgium (P700001BE)
Figure 3-2 File Type User Defined Codes screen
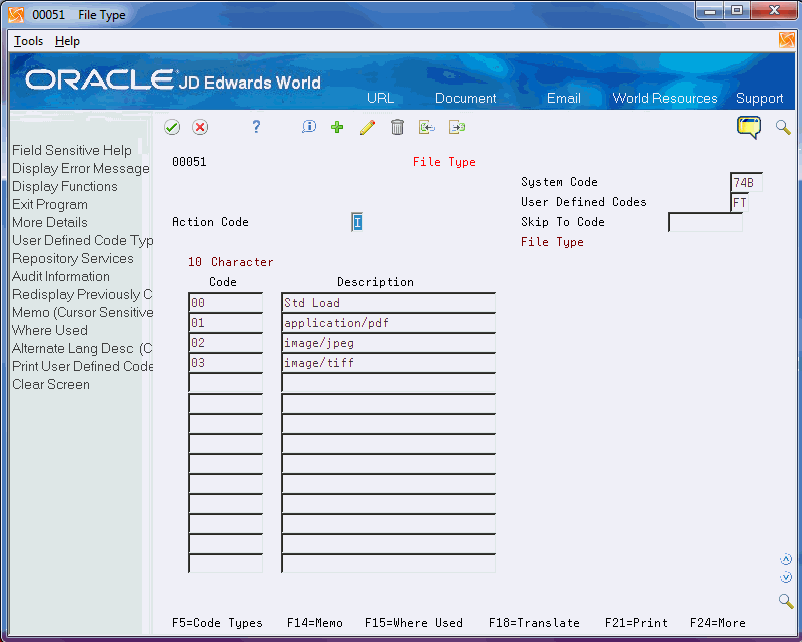
Description of "Figure 3-2 File Type User Defined Codes screen"
3.2.3 VAT Report Code (74B/TA)
Before you generate the 625 VAT report for Belgium, set up UDC 74B/TA to with codes for the tax rates for that you report. Enter AP in the Description 2 field for rates used for accounts payable transactions, and enter AR in the Description 2 fields for rates used for accounts receivable transactions.
3.2.4 Legal Report Identification (74/RI)
From Belgium Localizations (G74B), choose Generic VAT Reports
From Generic VAT Reports (G74B00), choose Generic Report
From Generic Report (G740001), choose Legal Report Identification
Use this UDC to set up values to identify the legal reports.
The first two positions of the code are used to identify the country (BE for Belgium). The system validates this data when you enter a report ID in the processing options of the Generic VAT Extractor (P700001) program.
See "Generic VAT Reports (P700001)" in the JD Edwards World Tax Reference Guide.
For Belgium, the system provides the following hard-coded values:
-
BE_RPT625: Belgium Monthly 625 VAT Report
-
BE_RPT723: Belgium Quarterly 723 VAT Report
-
BE_RPT725: Belgium Yearly 725 VAT Report
Figure 3-3 Legal Report Identification User Defined Codes screen

Description of "Figure 3-3 Legal Report Identification User Defined Codes screen"
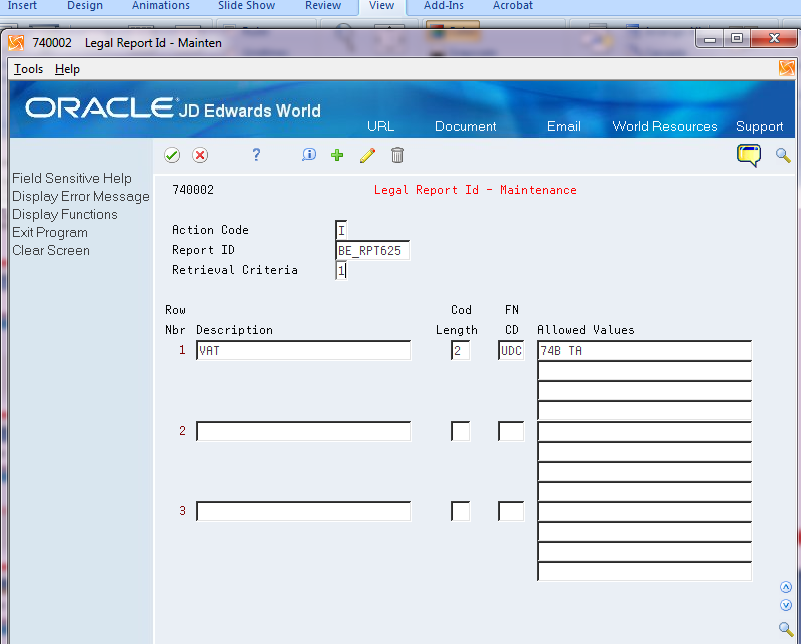
3.3 Associating Reports with Tax Codes
From Belgium Localizations (G74B), choose Generic VAT Reports
From Generic VAT Reports (G74B00), choose Generic Report
From Generic Report (G740001), choose Legal Report ID Maintenance
The BE_RPT625 code for the Belgium Monthly 625 VAT Report exists in the 74B/TA UDC. You must associate the BE_RPT625 codes with the tax rate areas and document types that you must report. You use the Legal Report ID Maintenance program to associate the report code with the tax rate area and document types.
You also associate the Intracommunity Statement n° 723 Report with UDC 74/VT.
The following image illustrates the setup for the Belgium Monthly 625 VAT Report.
Figure 3-4 Legal Report ID Maintenance: Report 625
Description of "Figure 3-4 Legal Report ID Maintenance: Report 625"
The following image illustrates the setup for the Intracommunity Statement n° 723 Report.
Figure 3-5 Legal Report ID - Maintenance: Report 723
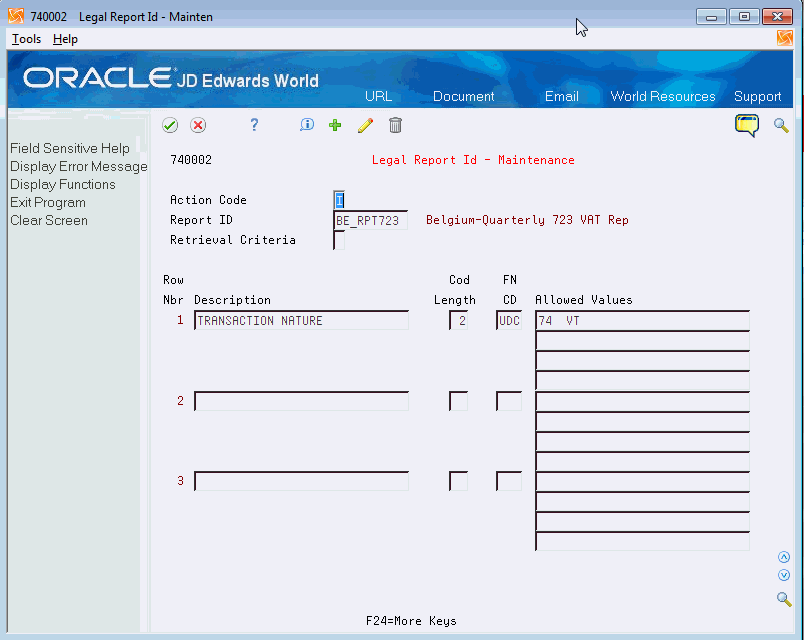
Description of "Figure 3-5 Legal Report ID - Maintenance: Report 723"
3.4 Associating Reports with Tax Rate Areas
From Belgium Localizations (G74B), choose Generic VAT Reports
From Generic VAT Reports (G74B00), choose Generic Report
From Generic Report (G740001), choose Tax Rate Legal Report Maint
Use the Tax Rate Legal Report Mant program (P740003) to associate tax rate areas and document types to these Belgian reports:
-
Belgium Monthly 625 VAT Report
-
Intracommunity Statement n° 723 Report
Figure 3-6 Tax Area Legal Report - Maint Screen
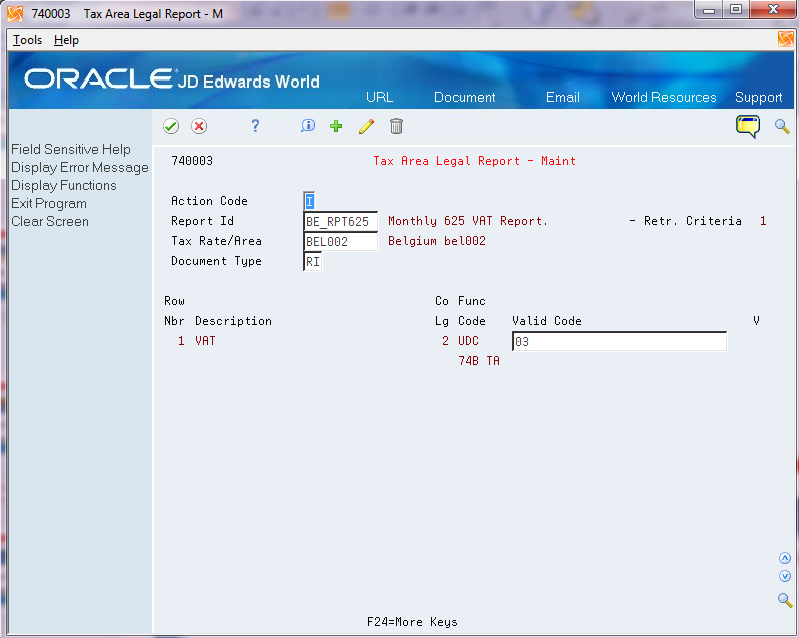
Description of "Figure 3-6 Tax Area Legal Report - Maint Screen"
3.5 Setting Up Report Versions
You must set up a version of the Generic VAT Report XML Generation program (P700001) with the correct parameters for each VAT report that you need to generate. Set up report versions and parameters for:
-
625 Monthly VAT Report
-
Intracommunity Statement n° 723 Report
-
Yearly Clients List N° 725 Report
You must also set up versions of the VAT Report XML Generation - Belgium program (P700001BE) for each of the versions of the P700001 that you set up. The version names in P700001BE must be the same as the names that you use for the P700001 versions. When you run the P700001 program, the system also runs the version of the P700001BE program that has the same name.
After you complete the setup for distribution lists and templates, you will set up the batch export file parameters for the P700001 versions.
3.6 Setting Up Distribution Lists
Before you generate the Belgian VAT reports, you must set up the users who will work with the reports The setup includes these tasks:
-
Set up the email information for the address book record of the user who will access the files.
-
Create the distribution profile for the email address.
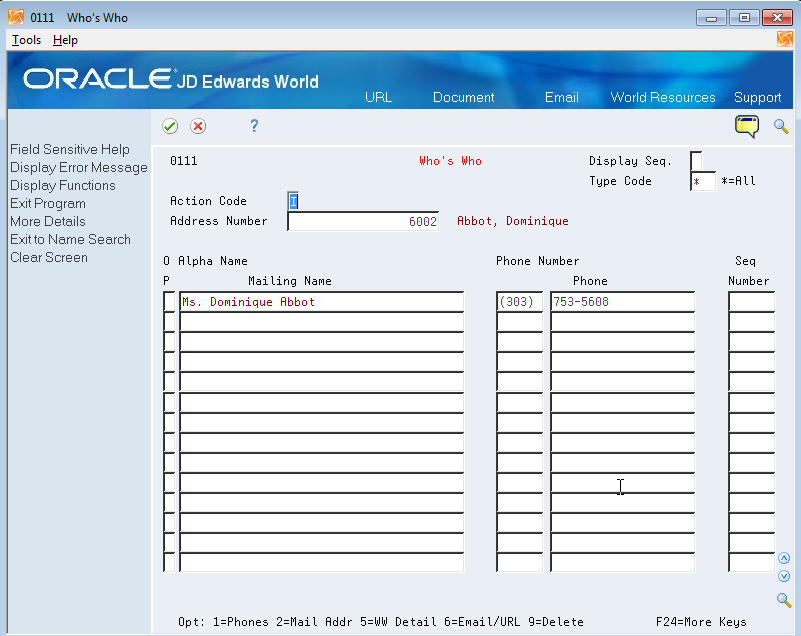
3.6.1 Setting Up Address Book Records
In the address book record of the users who will work with the Belgian reports, complete this setup:
-
In the Who's Who record, enter the Mailing Name of the user.
You access the Who's Who record using option 5 (Who) on the Address Book Revision screen.
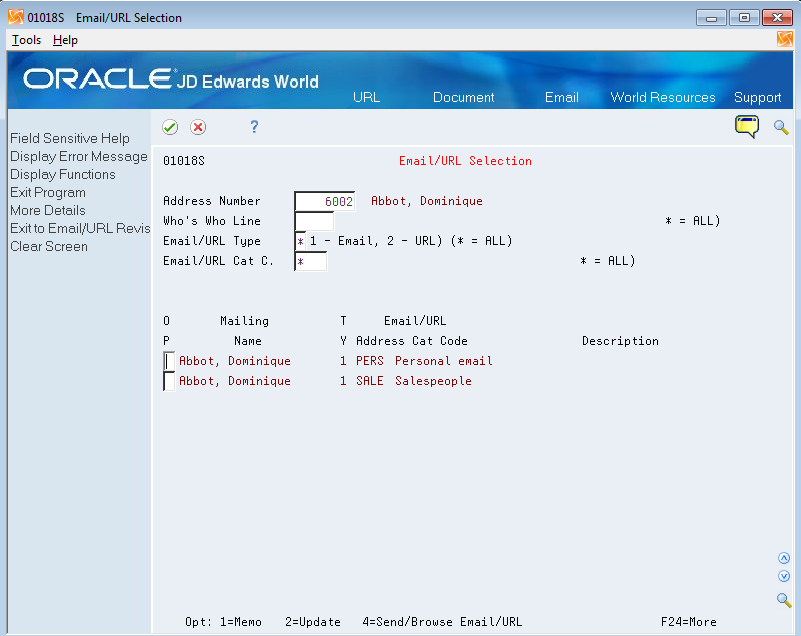
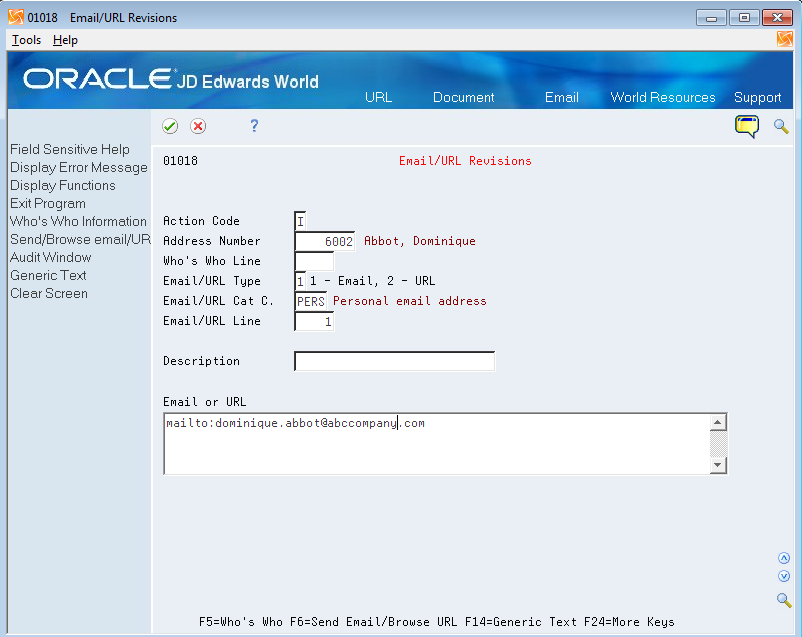
-
Set up the Email/URL record for the Who's Who record.
You access the Email/URL record using option 6 (Email/URL) on the Who's Who screen.
-
On the Email/URL Selection screen, use option 2 (Update) for the selection that you want to update, then enter the email or URL for the employee and click OK.
3.6.2 Creating Distribution Profiles
To create the distribution profile:
-
From the Electronic Document Delivery menu (G00E), choose option 3 (Distribution Profiles).
-
On the Distribution Profiles screen, enter 2 to update a selection, or enter 3 to copy an existing profile to create a new distribution list. If you are creating a new list, enter the new distribution profile name.
Figure 3-10 Distribution Profile Copy screen
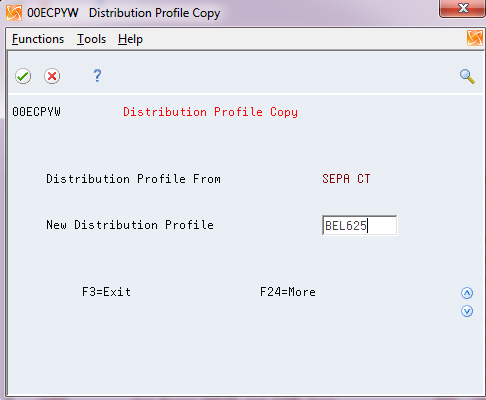
Description of "Figure 3-10 Distribution Profile Copy screen"
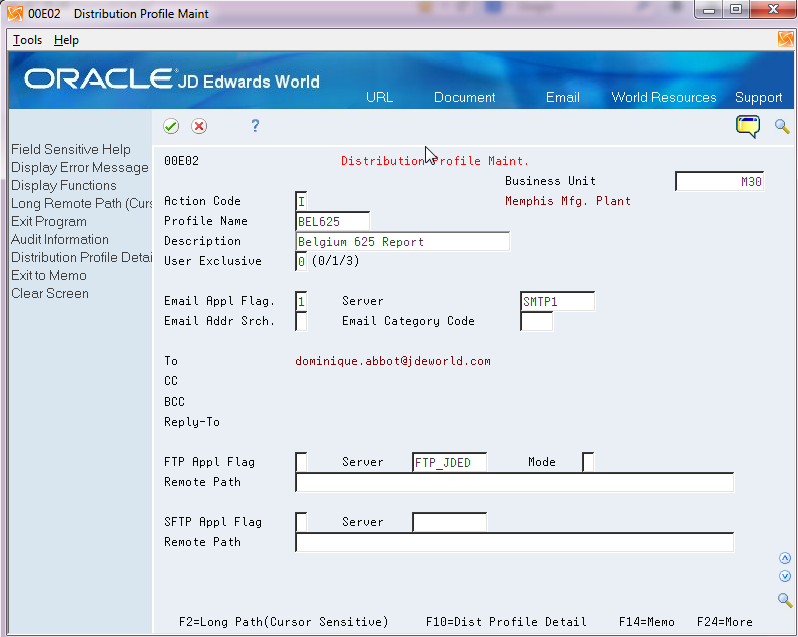
-
On the Distribution Profile screen, enter 2 (Update) for the distribution profile you want to work with.
-
On the Distribution Profile Maint. screen, enter the description of the profile, complete fields as necessary, and save your changes.
Figure 3-11 Distribution Profile Maint. screen
Description of "Figure 3-11 Distribution Profile Maint. screen"
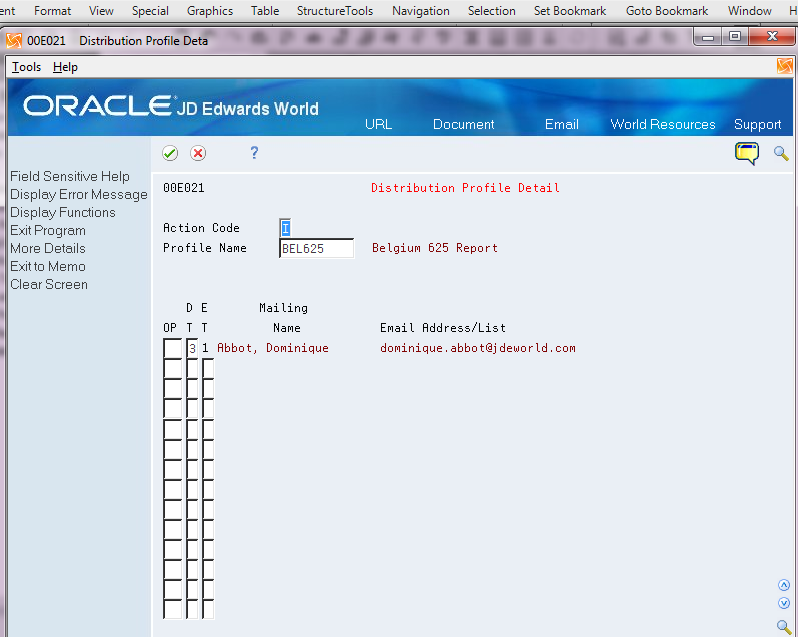
-
On the Distribution Profile Maint. screen, press F10 (Dist. Profile Detail) to access the Distribution Profile Detail screen.
-
On the Distribution Profile Detail screen, add the users to the distribution list and save your changes.
Figure 3-12 Distribution Detail Profile screen
Description of "Figure 3-12 Distribution Detail Profile screen"
3.7 Setting Up Transformation Templates
To work with the Belgium VAT reports, you must set up transformation templates. You set up one type 1 and one type 2 template for each of these reports:
-
625 Monthly VAT Report
-
Intracommunity Statement n° 723 Report
-
Yearly Clients List N° 725 Report
The following table describes the templates that you must set up for each of the Belgian VAT reports. Note that the values in the last column are the required values for the Template File field. Before you set up the transformation templates, verify that the files listed in the Required Values for the Template File Field column of the table were downloaded and exist in the IFS directory of each user who will generate the Belgium VAT reports.
| Report Type | Template Type | Example of Template Names | Required Values for the Template File Field |
|---|---|---|---|
| 625 Summary | Type 1 | BEL625SUM | Generic_VATBIP.xsl |
| 625 Summary | Type 2 | BEL625SUM | Report_625_S.rtf |
| Intracommunity Statement n° 723 Report | Type 1 | BE723 | Generic VAT.xsl |
| Intracommunity Statement n° 723 Report | Type 2 | BE723 | Report723.xsl |
| Yearly Clients List N° 725 Report | Type 1 | BE725 | Generic VAT.xsl |
| Yearly Clients List N° 725 Report | Type 2 | BE725 | Report725.xsl |
To set up the transformation templates:
-
From the Electronic Document Delivery menu (G00E), choose 5. Transformation Templates.
-
On the Transformation Templates screen, enter 2 for a selection to update an existing template, or enter 3 to copy from an existing template to create a new template.
Figure 3-13 Transformation Template Maint. screen
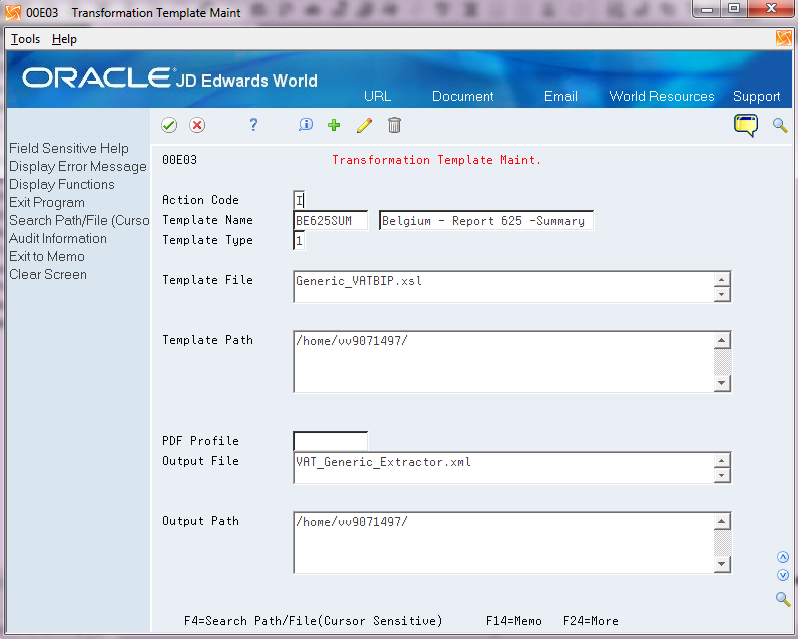
Description of "Figure 3-13 Transformation Template Maint. screen "
-
On the Transformation Template Maint screen:
-
Enter 1 or 2 for the Template Type.
-
In the Template File field, enter the name of the XSL or RTF template that you use to transform the original XML output file.
-
Enter values for the Template Path and the Output Path fields.
-
In the Output File field, enter the name that you want to assign to the formatted XML file. For the 723 and 725 VAT reports, you must assign a file name with the extension of .xml. For the 625 VAT report, enter the file name with the correct extension for the file type that you generate. For example, to generate a PDF file, enter the file name with the .pdf extension.
-
Save your record.
-
3.8 Setting Up Spooled File Export Parameters
Before you generate the Belgian VAT reports, you must set up the file export parameters for the versions of the P700001 program that you use for Belgian reports. Generally, you perform this setup once, unless you want to change the location of the file.
By defining the Batch Export Parameters, you engage the Distribution Profile and the Transformation Template that you set up for the reports to obtain the automatic .xml generation. You must set up the parameters for each version of the report. For example, you set up versions of the P700001 program for the 625 report, the 723 report and the 725 report, you would set up the parameters for each of those versions.
To set up the spooled file export parameters:
-
From Versions List (VL), enter P700001 in the Form field and press Enter to locate the version for the program.
-
Enter 1 (run), 2 (change), or 3 (add) in the Option field to access the version to work with.
-
Access the Additional Parameters screen.
-
Press F6 on the Additional Parameters screen to access the Spooled File Export Parms screen.
Figure 3-14 Spooled File Export Parms screen
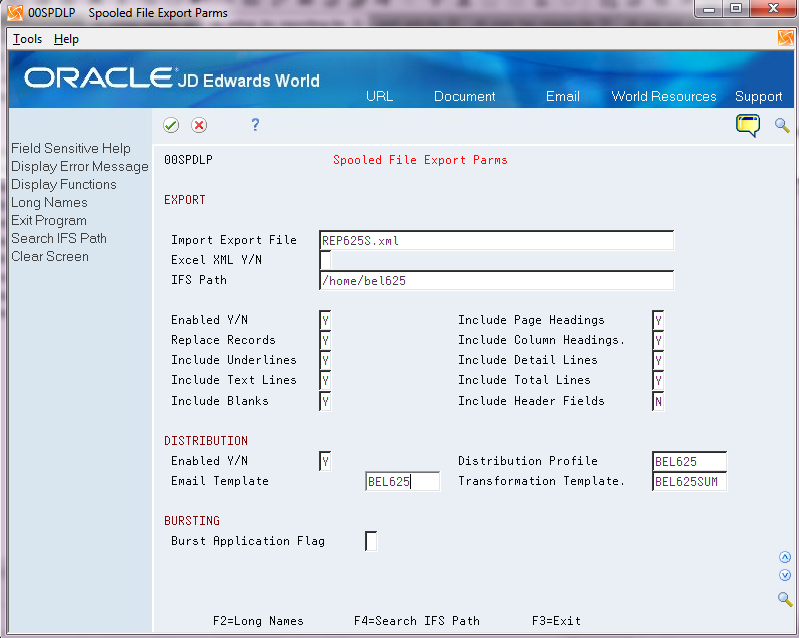
Description of "Figure 3-14 Spooled File Export Parms screen"
-
On Spooled File Export Parms, complete the following fields in the Export section:
-
Import Export File
-
IFS Path
-
Enabled Y/N
You must enter Y in this field.
-
-
Complete the following fields in the Distribution section:
-
Enabled Y/N
You must enter Y in this field.
-
Distribution Profile
Enter the name of the distribution profile that you set up for the report.
-
Transformation Template
Enter the name of the transformation template for the report.
-
-
Complete other fields as desired and save your changes.