4 Year-End Setup
Before you print year-end government forms, verify that information in your system is set up correctly, and that you assign it to the correct employees and companies. If you have not done so, you can set up the information and assign it to the appropriate employee or company.
This chapter contains the following topics:
4.1 Verifying Employee Information
You verify employee information to ensure accuracy when you process employee names, addresses, and other reportable employee information for year end.
Before you build the year-end workfile, you need to verify that employee names and addresses in the Address Book system are set up properly for W-2, 1099, 499R-2 forms, and for electronic filing.
In box 13 on the W-2 form, you can report miscellaneous information that the government requires. An example of miscellaneous information is whether an employee is an active participant in a retirement plan.
When you set up employee information, you might need to set up your system to report year-end information for employees who work in multiple states, and for contract or pension employees.
Verifying employee information includes the following tasks:
-
Verifying employee names and addresses
-
Setting up information for box 13
-
Setting up a statutory employee
-
Setting up an employee who is an active participant in a retirement plan
-
Setting up employees who work in multiple states
-
Setting up employees who work in Puerto Rico
-
Setting up contract and pension employees
-
Verifying employee social security numbers
4.1.1 Verifying Employee Names and Addresses
When you build the year-end workfile, the system uses employee names and addresses from the Address Book system. Therefore, before you build the year-end workfile, you should verify that employee names and addresses in the Address Book system are set up properly for W-2, 1099, 499R-2 forms, and for electronic filing.
Although JD Edwards World does not provide a report to verify employee information for year-end reporting, you can run the Employee Roster to print employee names and addresses.
The employee name that displays on the W-2 form and in the W-2 electronic file is a concatenation of the following three fields from the Address Book - Who's Who table (F0111):
-
Given Name (GVNM)
-
Middle Name (MDNM)
-
Surname (SRNM)
When you update the Alpha Name field (ALPHA) in the Address Book Master table (F0101), the system updates the F0111 table.
The employee name that displays on the 1099 electronic file, 1099 forms, and 499R-2 forms is from either the Alpha Name field or the Mailing Name field, depending on which field you specify in the workfile build program.
Note:
Employee names must comply with the format that government taxing authorities require. If you do not format the names of your employees correctly, government agencies do not accept your year-end information. To ensure that employee names meet government formatting requirements, you can use a conversion utility. To access this utility, choose F0111 File Conversion - EFW2 from menu G97U23 in release A9.2. This conversion utility updates the Given Name (GNNM), Middle Name (MDNM), and Surname (SRNM) fields in the Address Book - Who's Who table (F0111) with the information in the Alpha Name field (ALPHA) in the Address Book Master table (F0101).Contact Global Support Services for help with this procedure.
For the employee address, the system prints the first two address lines for electronic reporting and the last three nonblank lines for printed forms, plus the city, state, and postal code fields. The system can print a maximum of 30 characters per line on the printed forms and can include a maximum of 22 characters per line on electronic file. The information prints on these lines is as follows:
-
Name
-
Address
-
For electronic file, the first two address lines (up to 22 characters each)
-
For forms, the last three nonblank address lines (up to 30 characters each)
-
-
City, state, and postal code
Therefore, in order to ensure that all necessary address information is in both the electronic file and on printed forms, JD Edwards World suggests that you enter the employee's address information using a maximum of 22 characters on each of the first two address lines.
If you enter the street address, along with the apartment information on one line, the system does not include the complete address in the electronic file.
The following example illustrates which line you should use to enter each piece of address information:
Bob Smith
1055 East Main Street (enter this information on address line 1)
Apartment 2A (enter this information on address line 2)
Denver, CO 80218
Note:
To ensure that address information is complete on both printed and electronic file year-end information, JD Edwards World recommends that you enter all of the necessary address information using the format in the previous example. If you are not processing electronic filing, you can use up to three lines to enter an employee's address. However, if in the future you plan to process the information using electronic files, you might need to edit your address book records to avoid reporting incomplete information in the electronic files.4.1.2 Setting up Information for Box 13
On the W-2 form, box 13 contains miscellaneous categories that the government defines for reporting information. To enter information in box 13, you must set up values in various parts of the Payroll system.
Box 13 contains the following categories:
-
Statutory employee
-
Retirement plan
-
Third-party sick pay
4.1.3 Setting up a Statutory Employee
Miscellaneous information that the government requires on the W-2 form includes the category for employees that are a statutory employee. A statutory employee is not subject to federal income tax withholding, but is subject to Social Security and Medicare tax.
To set up a statutory employee
From Employee Information (G0711), choose Tax Withholding/Overrides
-
On Tax Withholding/Overrides, locate the employee.
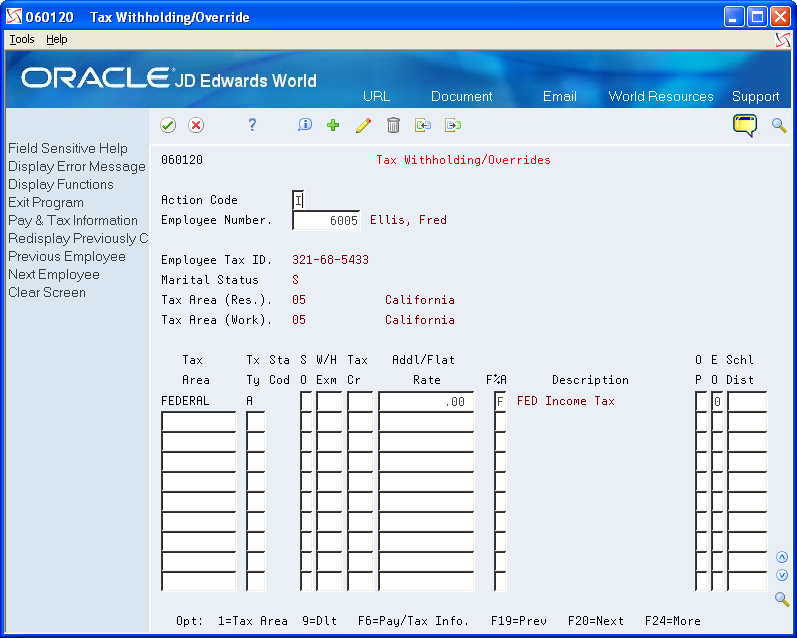
Description of the illustration ''tax_witholding_overide.gif''
-
Enter 0 (zero) in the following field:
-
Addl/Flat Rate (Additional Withholding)
-
-
Enter F in the following field and Click OK:
-
F%A
-
| Field | Explanation |
|---|---|
| Additional Withholding | An additional amount to be withheld over and above the calculated withholding. This could also represent a flat withholding amount in situations in which the employee elects to completely bypass the calculated amount. The authority to which each element relates is determined by the tier code of the tax authority. Whether the amount is to be an additional amount or a flat withholding is specified in the employee's master file record. |
| F%A | Based on the value of this field, the corresponding additional/flat amount field has one of the following functions:
% – A percentage to replace the tax rate from the table. A – An amount to be added to the tax computed from the table. F – An amount to replace the tax computed from the table. X – An additional amount added to the standard exemption amount, deducted (exempt) from the annualized gross to determine taxable pay. Y – An amount to override the standard exemption amount to be subtracted from the annualized gross prior to the tax calculations. |
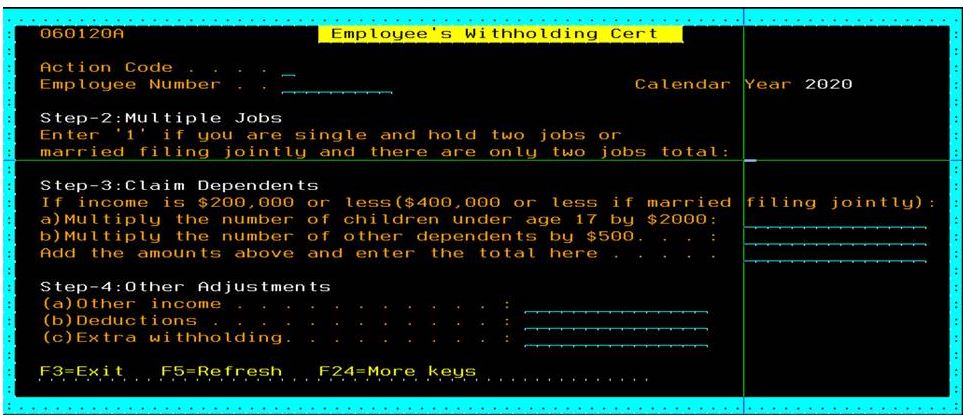
4.1.4 Setting up an Employee W-4 Form (for the year 2020 and later)
The IRS Form W-4, Employee's Withholding Allowance (060120A) is the program that employees use to enter information needed for the IRS W-4 Form.
Employees can enter information in W-4 forms, and review and edit the information if required. The IRS Form W-4 provides a tab each for Name and Address, and also provides the IRS Withholding Calculator. The system saves the values that an employee enters in the W-4 Form.
4.1.5 Updating Employee Details in the W-4 Form
In the Processing Options Revisions page, if the calendar year option for the W-4 form is 2020 or any later year, the system displays the new W-4 (Tax Withholding/Overrides) window.
To update the employee details in the W-4 Form:
-
On the Tax Withholding/Overrides page, enter a value in the Employee Number field. The system then displays the employee details (Employee Tax ID, Marital Status, Tax Area, and so on).
-
Enter the Tax rates if required.
-
Select F5.
-
The system displays the Employee Withholding Certificate with the following options:
-
Action Code: I Displays employee information.
-
Employee Number: Displays the employee number whose withholding is displayed
-
Calendar Year: Displays the calendar year for the withholding certificate.
-
Multiple Job or Spouse Works:
Enter a value in this field if the employee holds more than one job or if the employee's spouse files jointly with the employee.
-
Claim Dependents:
If you have dependents, complete the fields in the Claim Dependents section in the IRS Form W-4.
a) Multiply the no. of children under age 17 by $2,000: Enter the amount generated by multiplying the number of children under the age of 17 by $2,000.
b) Multiply the Number of other dependents by $5,000: Enter the amount generated by multiplying the number of other dependents who are not qualifying children under the age of 17 by $5,000.
c) Add the amounts and end the total here: Enter the sum of the above two amounts.
-
Other Adjustments:
a) Other Income: Enter the income for the year in which withholding is not expected on income.
b) Deductions: Enter the deductions other than the standard deduction that will not have withholding.
c) Extra Withholding: Enter the amount to be withheld in addition to the calculated withholding. This value could also be a flat withholding amount if the employee completely bypasses the calculated amount. The authority assigned to each element is determined by the tier code of the tax authority. Whether the amount is to be an additional amount or a flat withholding is specified in the employee's master file record.
-
4.1.6 Setting up an Employee Who Is an Active Participant in a Retirement Plan
Miscellaneous information that the government requires on the W-2 form also includes the category for the employee that is an active participant in a retirement plan.
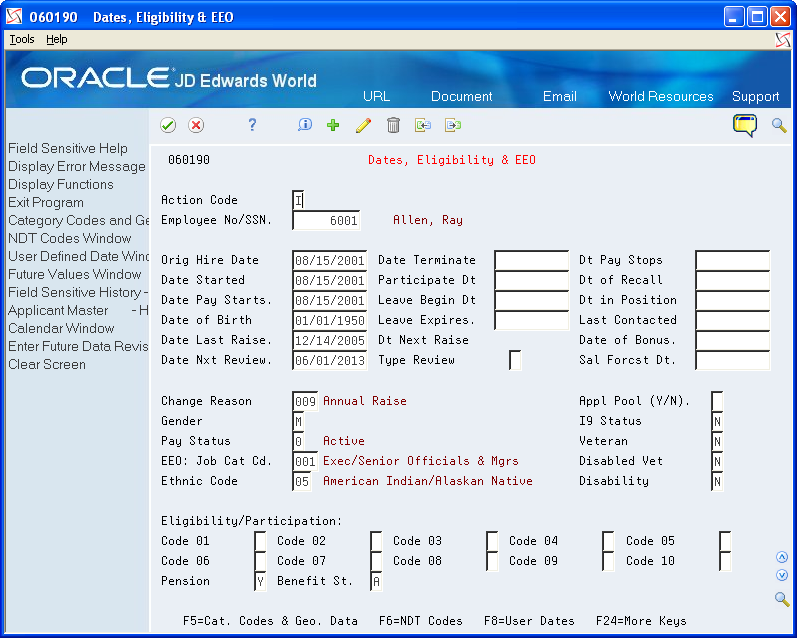
To set up an employee who is an active participant in a retirement plan
From Additional Employee Data & Reports (G07111), choose Dates, Eligibility & EEO
-
On Dates, Eligibility and EEO, locate the employee.
-
Enter Y in the following field:
-
Pension
-
| Field | Explanation |
|---|---|
| Pension | A code that specifies whether the employee is eligible to participate in the company's retirement plan. When you process W-2 information for employees, the code that you enter in this field determines whether the system places an X, indicating employee eligibility, in the Retirement plan box of the employee's W-2 form. |
4.1.7 Setting up Employees Who Work in Multiple States
When an employee works in more than one state, you can print one or two states per W-2 form. When you select one state per form, the employee receives a W-2 for each state. If you choose to print federal information on only one of the W-2 forms, you must specify the W-2 on which you want this information to print. The system uses the employee's base state to determine the W-2 on which to print federal information.
When you create the year-end workfile, the system determines the employee's base state by using values that are set up in various parts of the Payroll system.
Setting up employees who work in multiple states includes the following tasks:
-
Set up the resident state as the base state
-
Set up a state other than the resident state as the base state
Setting up the Resident State as the Base State
You set up the resident state as the base state when you want to print federal tax information on the W-2 that identifies the employee's resident tax area as the base state.
The system uses the resident tax area code that is in the Employee Master table (F060116) as the employee's resident tax area.
Note:
If the employee has no wages or tax for his or her resident tax area, the system uses the last state record in the W-2 workfile as the base state. This is the record with the highest-numbered GeoCode in the Payroll Tax Calculation System.To set up the resident state as the base state
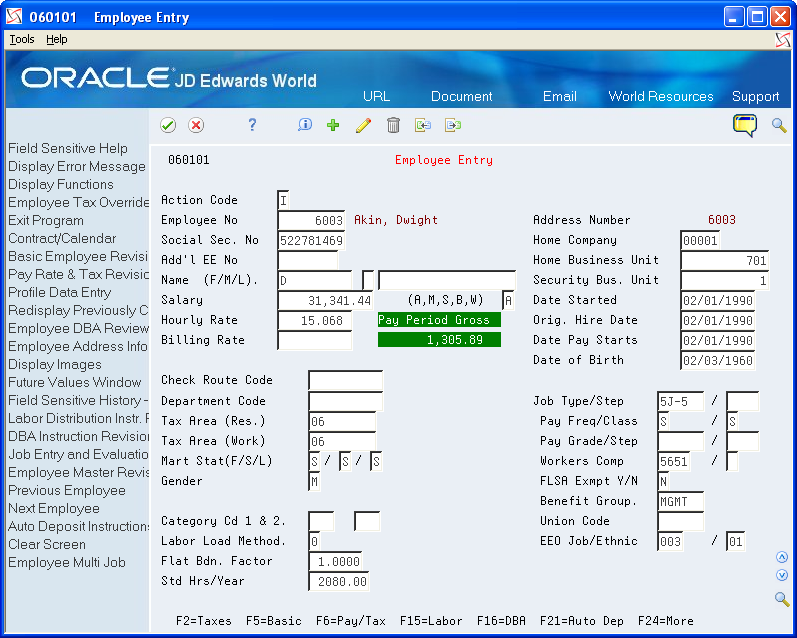
From Employee Information (G0711), choose Employee Entry
-
On Employee Entry, locate the employee.
Description of the illustration ''emp_entry.gif''
-
Enter the code for the employee's resident state in the following field:
-
Tax Area (Res.)
-
| Field | Explanation |
|---|---|
| Tax Area (Res.) | A code that identifies a geographical location and the tax authorities for the employee's residence. Authorities include both employee and employer statutory requirements. In Payroll Tax Calculation System payroll-number tax terminology, this code is synonymous with GeoCode. Refer to Payroll Tax Calculation System's Master GeoCode List for valid codes for your locations.
Screen-specific information You can use either the two-digit state code or the nine-digit locality code. It is recommended that you use the two-digit state code if no state or city code is required. |
Setting up a State Other Than the Resident State as the Base State
You need to set up a state other than the employee's resident state as the base state when tax laws require you to print federal information on a year-end form for a state other than the employee's resident state.
For example, suppose that an employee works for company 707 in Ohio and New Jersey in 2019, but the employee moves to New York in January of 2019 and continues to work for company 707. You update the employee's master record to show New York as the resident state.
When you process year-end information, you must override the employee's current resident state information because all work for 2019 was in states other than the resident state.
Add the tax areas to the UDC table for the appropriate states. The tax area code must be the two-digit Postal Code. For example, to specify the tax area for New Jersey, you enter tax area 31 to UDC 07/SC.
Note:
Because you must enter the numeric Postal Code for any state that you enter in the Home State field, you might have more than one entry per state in UDC 07/SC. You do not need to complete the second description of UDC 07/SC for any codes that you use to set up a state other than the resident state as the base state.To set up a state other than the resident state as the base state
From Additional Employee Data & Reports (G07111), choose Category Codes & Geo. Data
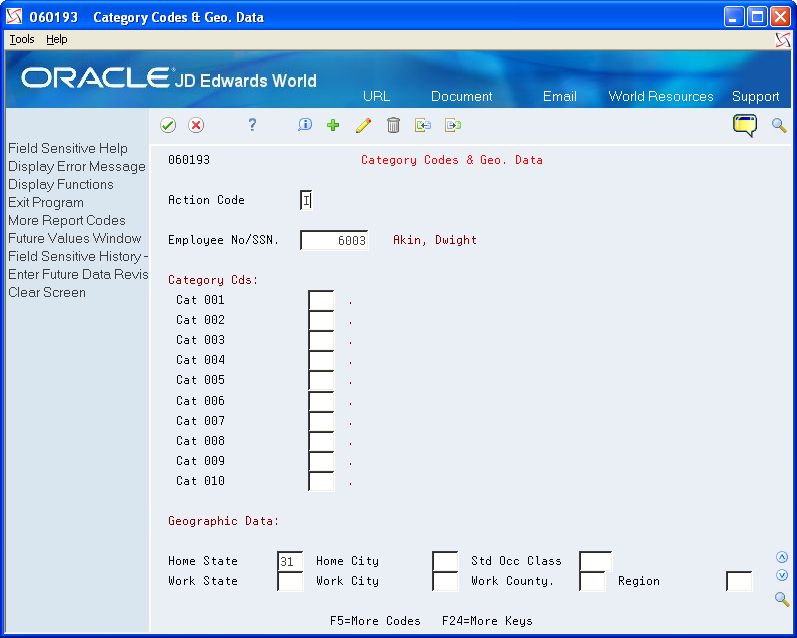
| Field | Explanation |
|---|---|
| Home State | The employee's home state for tax reporting purposes. This code designates the state in which the employee resides.
Note: For W-2 reporting, use the numeric value that is equivalent to the designated state. For example: 06 - Colorado, 05 - California. Otherwise, the system produces undesirable report results. If you leave this field blank, the system uses the value in the Tax Area (Resident) field on Pay and Tax Information as the employee's resident (base) state. |
4.1.8 Setting up Employees Who Work in Puerto Rico
If your organization has employees who work in Puerto Rico during the year, you must create 499R-2 forms for tax reporting purposes when you process year-end information. To set up employees who work in Puerto Rico correctly, you must set them up as statutory employees. Additionally, you must assign the proper tax area and tax method. By assigning the correct tax method, the history records the system creates during the payroll process include the appropriate tax history type. The payroll system generates 499R-2 forms for Puerto Rican employees, using the tax history type.
See Also:
-
Creating the Year-End Workfile for processing Puerto Rico employees
To set up employees who work in Puerto Rico
From Additional Employee Data & Reports (G07111), choose Pay & Tax Revisions
-
On Pay & Tax Revisions, locate the employee.
-
Enter R in the following field:
-
Tax Method
-
-
Enter 72 in the following fields:
-
Tax Area (Res.)
-
Tax Area (Work)
-
-
Click OK.
4.1.9 Setting up Contract and Pension Employees
To generate the appropriate 1099 forms at year end, you must set up tax method information for pension and contract employees before you process pay information from the entire year. By assigning the correct tax method to an employee, the history records the system creates during the payroll process include the appropriate tax history type. The Payroll system generates 1099-R forms for pension employees and 1099-MISC forms for contract employees, using the tax history type.
To set up contract and pension employees
From Additional Employee Data & Reports (G07111), choose Pay & Tax Revisions
-
For pension employees, enter P in the following field:
-
Tax Method
-
-
For contract employees, enter C in the following field:
-
Tax Method
-
-
Click OK.
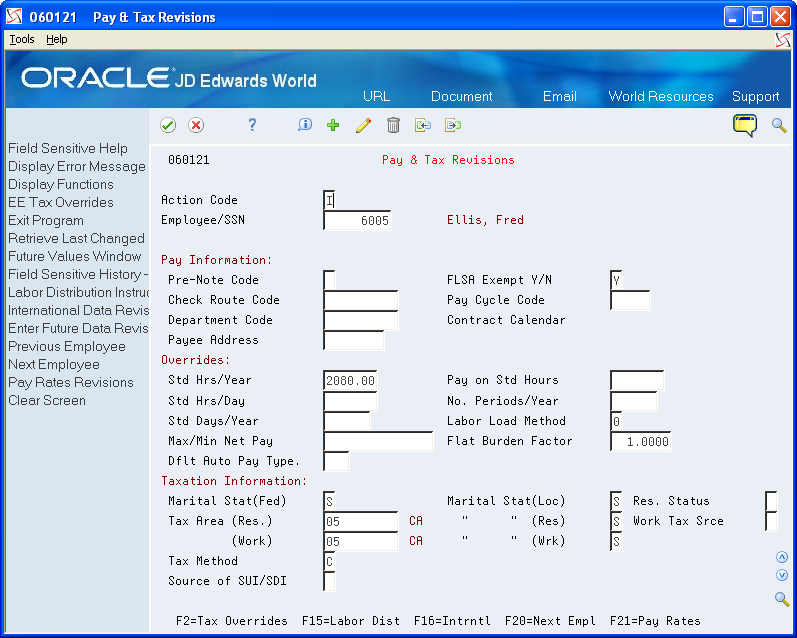
| Field | Explanation |
|---|---|
| Tax Method | A code that indicates to the Payroll Tax Calculation System how to calculate certain taxes. The codes are contained in user defined code table 07/TM. |
4.1.10 Verifying Employee Social Security Numbers
For you to legally employ individuals in the United States, they must provide the employer with a valid Social Security Number. The Social Security Administration (SSA) offers several methods for you to verify that the Social Security Numbers your employees provide to you are valid. You can provide the SSA with a list of employees and their Social Security Numbers via phone, fax, or electronic file.
You can use the Employee Verification Service (EVS) program (P06780) to create a file that includes all of the information that the SSA needs in order to validate employee Social Security Numbers.
After you send your electronic file to the SSA, they verify the information and return the file to you. If the SSA determines that any of the employee Social Security Numbers are invalid, those records indicate that they are invalid. You must then follow up with the employee and the SSA to rectify the situation.
Note:
You do not have to complete this process for year-end processing. However, the SSA does not accept year-end information for employees who do not have a valid Social Security Number. Therefore, we recommend that you run this process regularly to ensure that all employees have valid Social Security Numbers before you report year-end information. Contact your Employer Service Liaison Officer at the SSA for additional information about verifying employee Social Security Numbers.From W-2/1099 Setup menu (G072472), choose Build EVS File for SSA
4.2 Verifying Company Information
You verify company information to ensure accuracy when you process company names, addresses, and tax information for governmental reporting purposes.
If your organization contains several companies that are under one parent company, and all of the child companies have the same corporate tax ID, you can update the W-2 information for the parent company and report information for all child companies under the parent company.
You verify that tax area information is set up for any tax that your company or employees have paid over the year. If tax area information is not accurate, you might not be reporting information correctly on year-end forms.
Setting up next numbers for W-2 forms instructs the system to assign control numbers, which creates an audit trail for your W-2 forms.
Verifying company information includes the following tasks:
-
Verifying company names and addresses
-
Setting up employer information (UDC 07/CT)
-
Verifying railroad tax information
-
Updating year-end information to a parent company
-
Verifying tax area information
-
Setting up next numbers for W-2 forms
-
Setting up kind of employer (UDC 07/KE)
4.2.1 Verifying Company Names and Addresses
To compile the information that you report to state and federal government agencies, the system uses company names and addresses from the Address Book record. Before you build the W-2/1099 workfile, verify that company names and addresses are set up properly for year-end reporting.
The system prints the company name, the first two address lines (for electronic filing) or the last three nonblank address lines (for printed forms), and the city, state, and postal code fields. The system can print a maximum of 30 characters per line on the printed forms and includes a maximum of 22 characters per line in the electronic file. The information that prints on these lines is as follows:
-
Name
-
Address
-
For electronic filing, the first two address lines (up to 22 characters per line)
-
For forms, the last three nonblank address lines (up to 30 characters per line)
-
-
City, state, and postal code
Note:
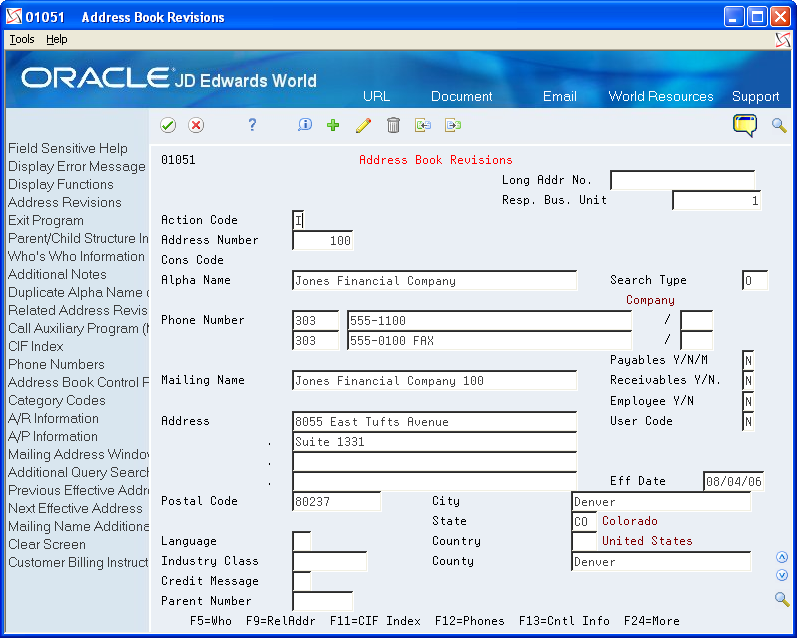
The company address that prints on year-end forms includes the last three nonblank lines of the company's address. The address that the system generates for electronic filing includes the first two lines of a company's address. To ensure that address information is complete on both the printed forms and electronic filing year-end information, JD Edwards World recommends that you enter all of the necessary address information using the format above. If you are not processing electronic filing, you can use up to three lines to enter a street address. However, if you plan to file electronically in the future, you might need to change the address to avoid reporting incomplete information in the electronic file.From Address Book (G01), choose Address Book Revisions
The following illustrates the company address information for year-end purposes:
4.2.2 Setting Up Employer Information
Ensure that you set up the following five fields for employer contact information for the EFW2 and EFW2C:
Employer Contact Name
Employer Contact Phone Number
Employer Contact Phone Extension
Employer Contact Fax Number
Employer Contact E-Mail/Internet
You use UDC 07/CT to set up this information. The Code field must contain the 5-digit company number and the Description field must contain the full 8-digit Address Book Number, including leading zeros, if applicable.
In order for the system to add all of the Employer Contact information to the RE record on the EFW2 and EFW2C workfile, you must add a Company Number record for all Employer Home Company numbers within these work files.
4.2.3 Verifying Railroad Tax Information
For companies that are subject to railroad taxation, verify that the setup of railroad tax information meets tax regulations.
An X in category code 10 on the Mailing Name Addition Window designates companies that are subject to railroad taxation (tier I and tier II). The X displays on the employer record of the electronic file and identifies special taxation requirements to the IRS.
4.2.4 Before You Begin
Add X to UDC 01/WT, if necessary.
To verify railroad tax information
From Address Book (G01), choose Address Book Revisions
-
On Address Book Revisions, locate the company.
-
Choose Who's Who Information (F5).
-
On Who's Who, enter 5 in the following field next to the company name:
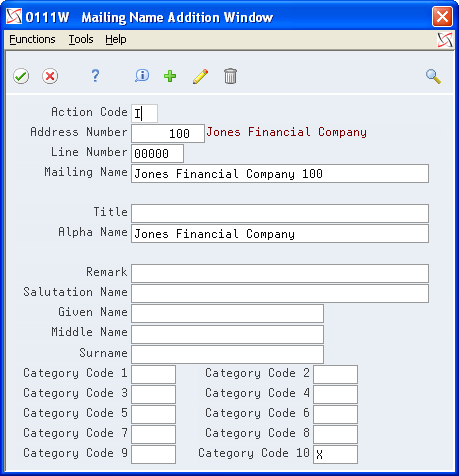
Description of the illustration ''mailng_name_addt_windw.gif''
-
On Mailing Name Addition Window, complete the following field and click Change:
-
Category Code 10
The X must be in the first position of this field.
-
4.2.5 Updating Year-End Information to a Parent Company
If your organization contains several companies that are under one parent company, and all of the child companies have the same corporate tax ID, you can update W-2 information and report it under the parent company. When you update multiple companies under a parent company, an employee who worked in more than one child company receives only one W-2.
You must summarize by the parent company. For example, suppose that the parent company is 00001 and the child company is 00050. You must summarize year-end information for both companies to company 00001. The W-2 forms for employees who work for either company display the name and tax ID of company 00001.
For W-2 reporting purposes, the Federal A corporate tax ID number cannot contain punctuation or spaces. If dashes exist in the Federal A corporate tax ID, remove them. Then correct employee history records that have the erroneous Corporate Tax ID information by following the steps to update payroll history integrity.
See Also:
-
Working with PDBA History Integrity about updating employee history information
To update year-end information to a parent company
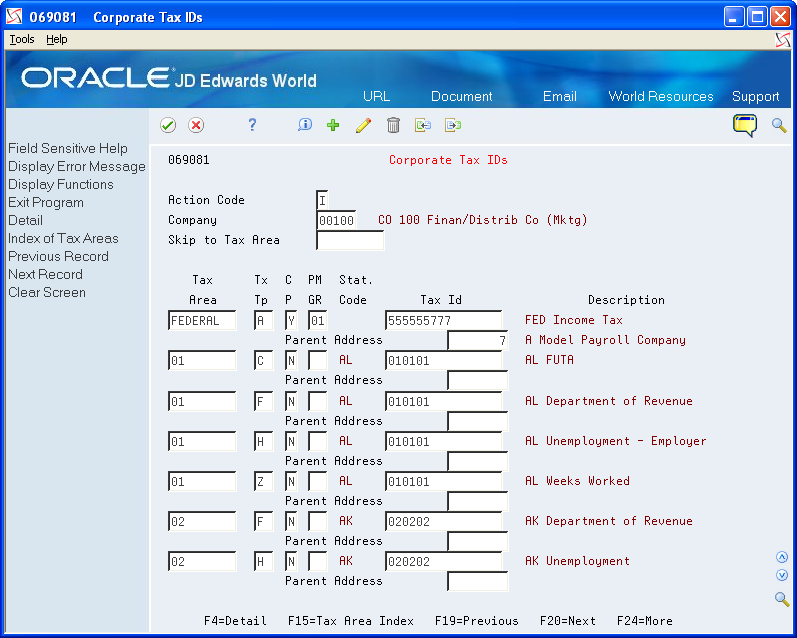
From Taxes & Insurance (G0744), choose Corporate Tax IDs
-
On Corporate Tax IDs, for the Federal A tax area record of the parent company and all child companies, enter the address number for the parent company in the following field in the detail area:
-
Parent Address
-
-
Click Change.
| Field | Explanation |
|---|---|
| Parent Address | The Address Book number of the parent company. The system uses this number to associate a particular address with a parent company or location. For example:
Subsidiaries to parent companies Branches to a home office Job sites to a general contractor If you leave this field blank on an entry screen, the system supplies the primary address from the Address Number field. This address must exist in the Address Book Master table (F0101) for validation purposes. Screen-specific information For payroll year-end reporting, to report multiple companies with the same tax ID under one parent company, enter the address number for the parent (reporting) company for all child companies as well as for the parent company. |
4.2.6 Verifying Tax Area Information
Before you build the workfile, verify that the statutory codes and descriptions for the state and local tax areas are accurate. The system uses this information and prints it in two boxes on the W-2:
-
State (box 15) displays the statutory code that you assign to the state F tax area. These codes are in UDC 07/SC.
-
Locality name (box 20) displays the local tax area description. Eight characters appear for standard and two-part laser forms. Fifteen characters appear for four-part laser forms.
Verifying tax area information includes the following tasks:
-
Verify tax area information for Box 15
-
Verify tax area information for Box 20
To verify tax area information for Box 15
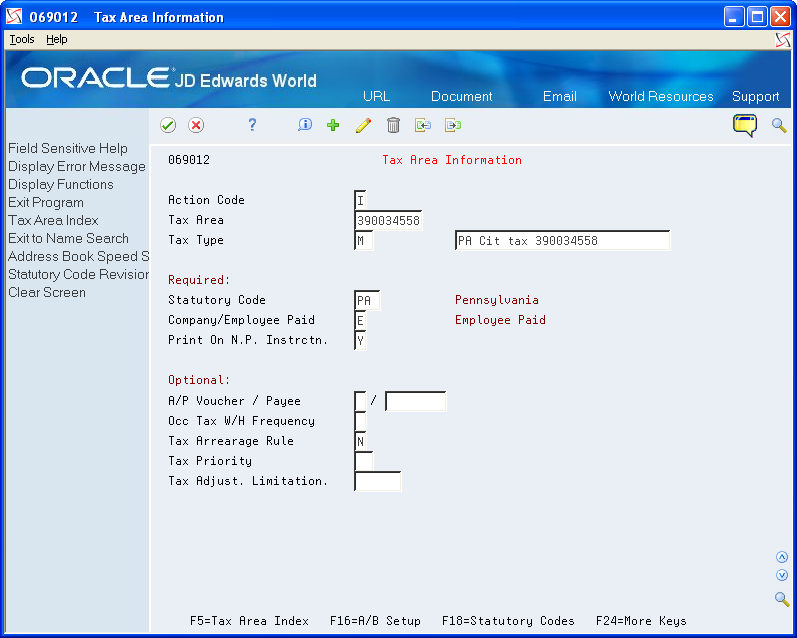
From Taxes & Insurance (G0744), choose Tax Area Information
-
Review the value in the following field:
-
Statutory Code
-
To verify tax area information for Box 20
From Taxes & Insurance (G0744), choose Tax Area Information
-
Review the value in the following field, which is next to the Tax Type field, but does not contain a label:
-
Description
-
| Field | Explanation |
|---|---|
| Tax Area | A code that identifies a geographical location and the tax authorities for the employee's worksite. Authorities include both employee and employer statutory requirements. In Payroll Tax Calculation System payroll-number tax terminology, this code is synonymous with GeoCode. Refer to Payroll Tax Calculation System's Master GeoCode List for valid codes for your locations. |
| Tax Type | A user defined code (07/TX) that identifies the type of payroll tax being processed.
Refer to the associated user defined code records for the current descriptions of these codes. The values and meanings associated with this user defined code are preset by JD Edwards World. You should not alter the values or their meanings. Screen-specific information For Canadian provincial tax types: Set up tax type CF for every tax area even if there is no provincial tax because wage history is maintained by province. For U.S. state tax types: Set up tax type C, Federal Unemployment Insurance (FUI) for each state because the FUI rate might vary from state to state. Use the 2 character statutory code for the state. You must have the tax type Z, weeks worked, whenever you have tax type H, state unemployment. Some states require weeks worked to be reported with state unemployment. For U.S. local tax areas: Local tax areas use all 9 digits of the GeoCode tax area. You should define a 3 character statutory code. For U.S. Earned Income Credit (EIC) For Tax Type B, the EIC prints on the check, advice, or payslip. The system subtracts this tax amount from the total deductions at the bottom of the paystub. |
| Statutory Code | This code specifies the two-character or three-character state or locality code that prints on statutory reports such as W-2 and 941.
For example, on W-2 and 941 forms, instead of printing 06, which might be the taxing authority for the state of Colorado, the system prints the statutory code CO. Enter an alpha code from UDC table 07/SC. Screen-specific information If you leave this field blank, the system uses the default value Federal. The statutory code field is left blank for all federal taxes. The second description is not a GeoCode. JD Edwards World recommends not changing this description because it is used for W-2 and T-4 reporting. |
4.2.7 Setting Up School District Codes (UDC 07/SS)
School District Codes UDC is used to populate the value in the W-2 form for the School District Number (SCDC) in Box-20 when reporting school district withholding. The system displays the first six characters of the school district name followed by the four-digit school district code in the W-2 form. If the school district code is not set up in 07/SS UDC, then the system prints only the school district code in Box-20.
4.2.8 Setting up Next Numbers for W-2 Forms
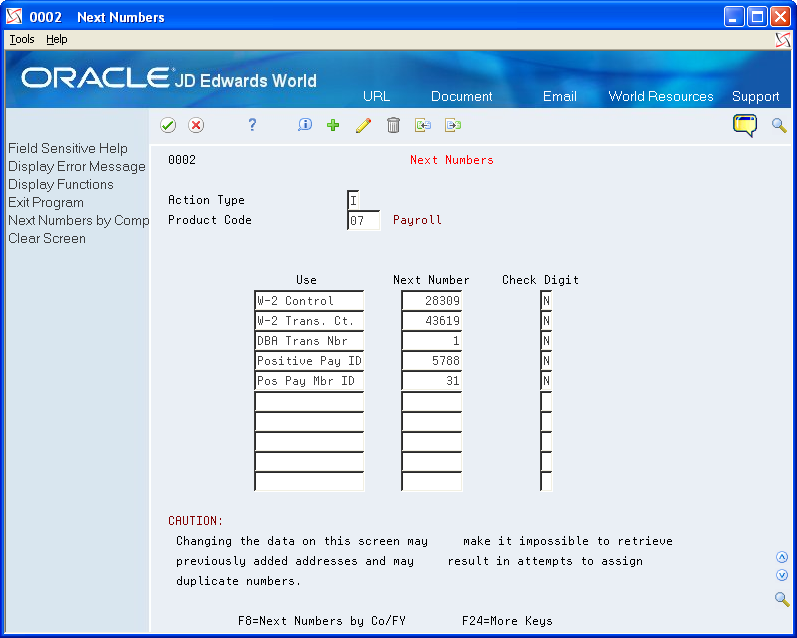
Setting up next numbers for W-2 forms instructs the system to assign individual control numbers to each W-2. This action creates an audit trail for your W-2 forms. Before you begin year-end processing, verify that next numbers exist for system 07 for the following fields:
-
W-2 Control
-
W-2 Transaction Count
To set up next numbers for W-2 forms
From General Systems (G00), choose Next Numbers
-
On Next Numbers, to locate next numbers for a system, complete the following field.
-
System Code
-
-
Review the values in the following fields:
-
Use
-
Next Number
-
Check Digit
-
| Field | Explanation |
|---|---|
| Use | A description that explains how the next number is used. |
| Next Number | The number that the system uses next when assigning numbers. Next numbers can be used for voucher numbers, invoice numbers, journal entry numbers, employee numbers, address numbers, contract numbers, and sequential W-2 forms. You must use the next number types already established, unless custom programming has been provided. |
| Check Digit | A code that specifies whether the system adds a number to the end of each next number assigned. For example, if you are using check digits and the next number is 2, the system will add a check digit such as 7, making the last two numbers 27. Check digits provide a method of randomly incrementing numbers to prevent the assignment of transposed numbers. In this example, the system would never assign next number 72 while check digits are activated.
Valid codes are: Y – Yes, add a check digit to this next number N – No, do not add a check digit |
4.2.9 Setting Up Kind of Employer (UDC 07/KE)
You need to set up UDC 07/KE to determine the Kind of Employer for each company that you are running through year-end processing. This is necessary information for the W-3 form. If none of these apply, do not set up the company in this UDC. The program will correctly check the box None Apply on the form.
| Code | Description | Description 2 |
|---|---|---|
| 00001 | F | Federal Government |
| 00007 | S | State or Local Government Employer |
| 00050 | T | State or Local Tax Exempt Employer |
| 00100 | Y | Tax Exempt Employer |
4.3 Setting Up DBAs for Year-End Processing
When you set up DBAs for year-end processing, you ensure the accuracy of DBA-related earnings and descriptions that you report on year-end forms.
Note:
You cannot attach one DBA number to more than one box on the W-2 form. For example, if you track health care in box 14 with one DBA code, you cannot use that same DBA code in box 12. You must have health information in box 12. If you also want to provide that information in box 14, you can use the Copy PDBA History to New PDBA program, a DREAM Writer, to copy the information in the Payroll Month PDBA Summary History file (F06146) from one DBA code to another. See Section 4.3.1, "Copying PDBA History to a New PDBA" for more information.Additionally, for Release A9.2 and subsequent releases, you can use Transaction History Revisions Z File (P069951Z), a batch import program, to create the Payroll Month PDBA Summary History. Choose PDBAs by Payroll Month on the Payroll Z File Processes menu (G0731Z). See Import Mass Data into Payroll in the U.S. Payroll Volume II Guide for more information.
Setting up DBAs for year-end processing includes the following tasks:
-
Copying PDBA History to a New PDBA (Optional)
-
Entering W-2 IRS defined codes for amounts reported in box 12
-
Entering descriptions for amounts reported in box 14
-
Setting up a tax as a deduction
-
Setting up state wage adjustments for specific states
-
Reposting DBAs to the tax area transaction summary history table (F06148)
4.3.1 Copying PDBA History to a New PDBA
You cannot specify the same DBA code information in more than one box on the W-2 form. If you need to report the same information in more than one box, you can copy current DBA code records and replace the DBA code with a new DBA code. You use Copy PDBA History to New PDBA (P06146D), a DREAM Writer, to do so.
You set the Enter New DBA processing option and use the data selection to locate records. The program copies records in the Payroll Month PDBA Summary History file (F06146LE) and replaces the current DBA code with the new DBA code.
You can run this program in proof or final mode. JD Edwards World strongly recommends that you run the program in proof mode as many times as necessary to ensure the records are correct.
-
In proof mode, the system generates a report, but does not update or create records.
-
In final mode, the system generates a report and creates new records in the Payroll Month PDBA Summary History file (F06146LE).
In either mode, if any errors exist, the program does not create the F06146LE records and lists the errors on the report.
The report is sequenced by employee number and includes totals for DBAs the system copies and new DBAs. It also includes:
-
Address Number
-
Name
-
Current DBA Code
-
New DBA Code
-
Date
-
Company
-
Total Gross Pay
When you enter multiple DBA codes in the data selection, the system copies all of information for these DBA records into the new DBA. The system also accumulates all of the DBA amounts into the new DBA.
After the program completes, you can use PDBAs by Payroll Month on the Data Integrity & Global Updates menu (G0731), to verify the new DBA code information in the Employee's history.
Exception Report Common Error Messages
Following are common error messages from the exception report and the possible reason.
-
F060116 Employee Record Does Not Exist
The program examines the Employee Master file (F060116A) to determine if the employee address number exists in the selected Payroll Month PDBA Summary History file (F06146LE) record. If the employee address number does not exist, the program does not add or update the F06146LE record.
-
F069116 Current DBA Code Does Not Exist
The program examines the Transaction Parameters File (F069116) to determine if the DBA code exists in the Payroll Month PDBA Summary History file (F06146LE) record. If the DBA code does not exist, the program does not add or update the F06146LE record.
-
F069116 Copied DBA Code Does Not Exist
The program examines the Transaction Parameters File (F069116) to determine if the new DBA code that you enter in the Enter New DBA processing option exists. If the DBA code does not exist, the program does not add or update the F06146LE record.
Set up a new DBA code using the DBA Setup program on the Pay/Deductions/Benefits Setup menu (G0742). See Set Up Deductions, Benefits, and Accruals in the U.S. Payroll II Guide for more information.
From Pay/Deductions/Benefits Setup (G072472), choose Copy PDBA History to New PDBA
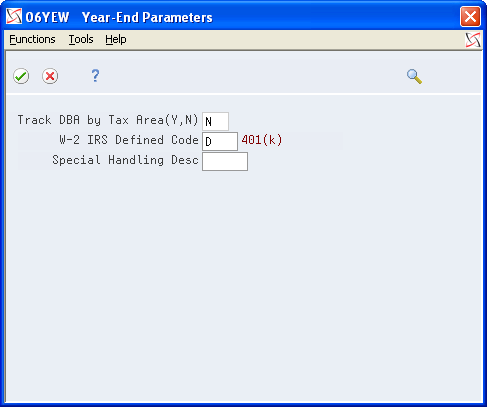
4.3.2 Entering W-2 IRS Defined Codes for Amounts Reported in Box 12
You attach W-2 IRS defined codes to the DBAs that you define for IRS codes A through Z, excluding codes I, O, U and X. Codes AA, BB, CC, DD, EE, FF, GG, and HH are also valid codes. When you attach the appropriate IRS code to DBAs, the system prints the amounts for the DBAs in box 12 on the W-2 form.
Note:
Do not enter the codes A, B, M, or N for a DBA because they apply to FICA and Medicare taxes in arrears that the system tracks in the Taxation Summary History table (F06136). These codes automatically print in box 12 for those employees who have FICA or Medicare taxes in arrears.To enter W-2 IRS defined codes for amounts reported in box 12
From Pay/Deductions/Benefits Setup (G0742), choose DBA Setup
-
Choose Year-End Parameters (F20).
Description of the illustration ''yr_en_parmtrs.gif''
-
On Year-End Parameters, complete the following field and click Enter:
-
W-2 IRS Defined Code
-

| Field | Explanation |
|---|---|
| W-2 IRS Defined Code | The codes that can be entered in this field are IRS defined (A-Z, AA, BB, DD and EE) and supplied by JD Edwards World in UDC 07/S2. This code is used to group similar DBAs in Box 12 of the W-2. For example, to group all 401(k) deductions on a W-2, enter D in this field for all 401(k) DBAs. You must also enter all the deductions into the Special Handling Table that you have set up for Box 12. When W-2s are created, all the DBAs that have D for this code are totaled and appear as one item in Box 12 with D to the left of the item. |
4.3.3 Entering Descriptions for Amounts Reported in Box 14
The information that you report in box 14 is not mandatory; it is miscellaneous information that the IRS allows you to report. The system uses the first three characters that appear in the Special Handling Description field on the DBA in box 14 of the W-2 form.
To enter descriptions for amounts reported in box 14
From Pay/Deductions/Benefits Setup (G0742), choose DBA Setup
-
On DBA Setup, locate a DBA that prints information in box 14.
-
Choose Year-End Parameters (F20).
-
On Year-End Parameters, complete the following field with a three-character description for the DBA and click Enter:
-
Special Handling Desc
-
| Field | Explanation |
|---|---|
| Special Handling Desc | This field has several purposes in the W-2 system. Valid codes are:
1 – The system prints the first three characters of this field as the amount description for Special Handling items placed in Box 14. 2 – The Payroll Tax Calculation system does not calculate all school district taxes. Some clients have created special deductions to withhold these taxes. You must add a specific description on the school district tax deduction. This description is printed with the tax amount on the W-2. For school districts, use all four characters of the description. If the school district is in Ohio, enter the four-digit code of the school district here. 3 – The first position of the W-2 Special Handling Description field represents the IRS Distribution Code that prints in Box 7 on the 1099-R form. Enter Code EPP in this field to print excess golden parachute amounts on form 1099-MISC. |
4.3.4 Setting up a Tax as a Deduction
You set up a tax as a deduction to calculate and withhold those taxes that the Vertex Payroll Tax Calculation system does not calculate. For example, the Vertex Payroll Tax Calculation system currently does not calculate all school district taxes or the tax for Indiana Advanced Earned Income Credit (AEIC).
When you add year-end parameter information, the system prints that information on W-2 forms. For employees who receive multiple W-2 forms, you must attach the correct state code to each special deduction so that you can report taxes correctly.
You must add the DBA code that is set up for calculating school district taxes (box 19) to the special handling codes table for box 19. You must also add any additional DBAs that you use to calculate tax information to the special handling code table for the appropriate box on the year-end forms.
Note:
If you set up a DBA to calculate Indiana AEIC, you must enter AEIC in the Special Handling Desc field and leave the W-2 IRS Defined Code field blank when setting up the DBA. You must then add this DBA code to the special handling table for the box that is for local taxes.4.3.5 Before You Begin
-
Add any necessary GeoCodes to UDC 07/S2.
-
Add the DBA code that is set up for calculating school district taxes (box 19) to the special handling codes table for box 19. See Assigning Special Handling Code Tables for more information.
To set up a tax as a deduction
From Pay/Deductions/Benefits Setup (G0742), choose DBA Setup
-
On DBA Setup, locate the deduction that you are using to calculate the tax.
-
Choose Year-End Parameters (F20).
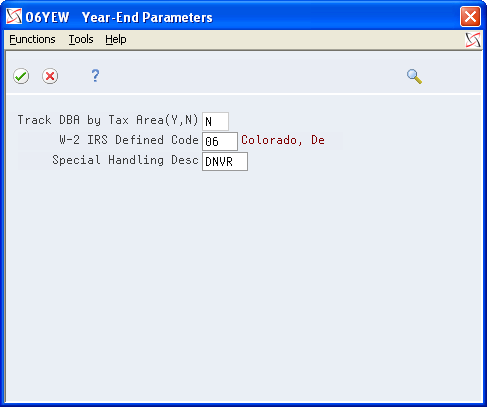
Description of the illustration ''yr_end_parmtrs_1.gif''
-
On Year-End Parameters, complete the following field:
-
W-2 IRS Defined Code
Complete this field with the two-digit GeoCode for the state that assesses the tax.
-
-
Complete the following field with the four-digit code for the tax and click Enter:
-
Special Handling Desc
The system prints the special handling description in box 20.
-
4.3.6 Setting Up State Wage Adjustments for Specific States
You might have set up some DBAs to exempt them from state taxes. The system stores the exempt amounts in history as excludable wages. When calculating the taxable wage, the system subtracts the excludable wage and any wage in excess of limits from the total gross wage.
For W-2 reporting, you might need to add those exempt DBA amounts back to the taxable wage for specific states.
For regular payroll processing, you can use two tax types, F and *F, to exempt a DBA from state taxes; but you must use tax type F if you want to add amounts back to an employee's W-2.
Note:
To add two DBAs together that have the same W-2 IRS defined code, the values (Y or N) in the Track DBA by Tax Area field on the Year-End Parameters screen must also be the same.Example: Adjusting State Wages for a Specific State
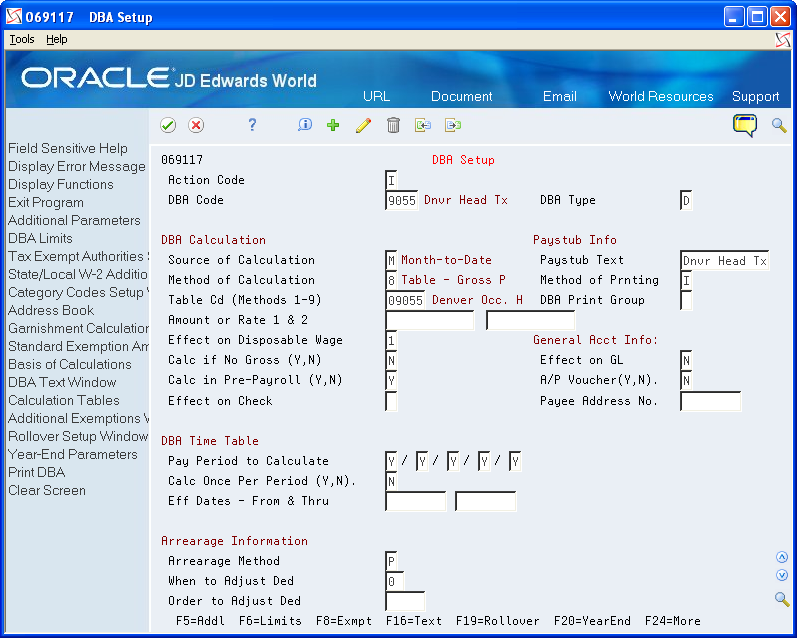
An employee who lived and worked in Colorado moves to Georgia. The new employer reimburses both deductible and nondeductible moving expenses. They have been set up as:
-
Benefit 2020 - Nondeductible (taxable) moving expenses
-
Benefit 2021 - Deductible (nontaxable) moving expenses
On Year-End Parameters, use P in the W-2 IRS Defined Code field for benefit 2021.
You withhold FICA and Medicare taxes from the taxable benefit (2020), but do not withhold federal or state taxes.
Description of the illustration ''dba_setup_6.gif''
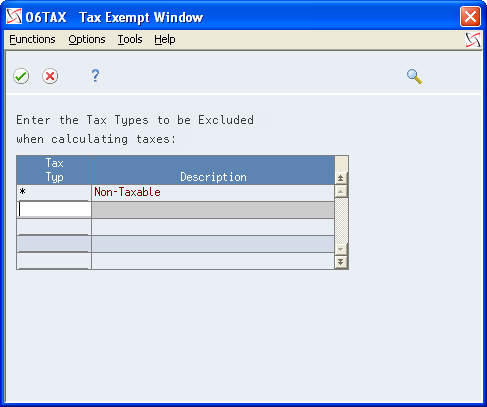
You process the benefit with tax exemption values of A (federal) and F (state) as they appear on the Tax Exempt Window.
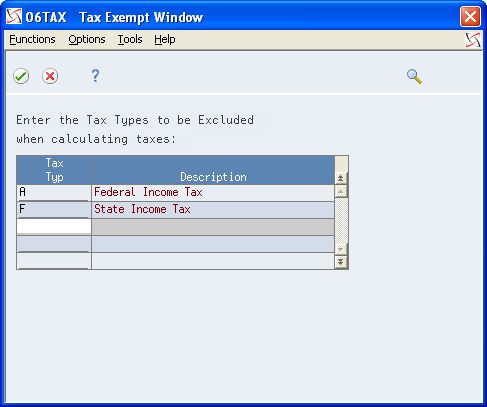
Description of the illustration ''tax_exmpt_wndw.gif''
For federal reporting purposes, you need to add the nondeductible amount (DBA 2020) to reportable wages. The system uses special handling from the workfile build.
In this example, you must also add the nondeductible amount back to Georgia wages, but do not add it to Colorado wages. You specify this amount on State/Local W-2 Additions.
Choose State/Local W-2 Additions (F2).
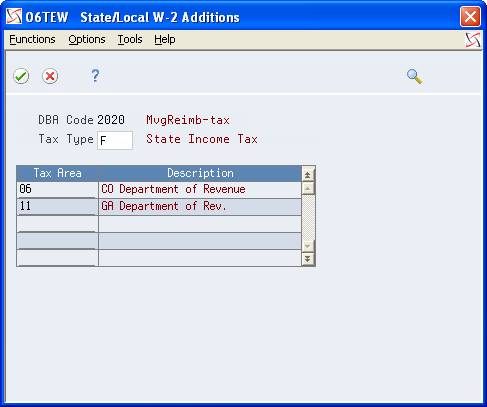
Description of the illustration ''state_locl_w2_addtns.gif''
The year-end workfile build processes these tax areas and their corresponding amounts as follows:
-
If the Track DBA by Tax Area field is Y, the workfile build program checks the Tax Area Transaction Summary History table (F06148) for tax area-specific history. If amounts exist, the system adds them to state wages, based on the work state that is in the table.
-
If the Track DBA by Tax Area field is N, the workfile build program uses the amount from the Payroll Month PDBA Summary History table (F06146) and adds it to all state wages for the employee.
To set up state wage adjustments for specific states
From Pay/Deductions/Benefits Setup (G0742), choose DBA Setup
-
On DBA Setup, locate a DBA that is tax exempt for tax type F.
-
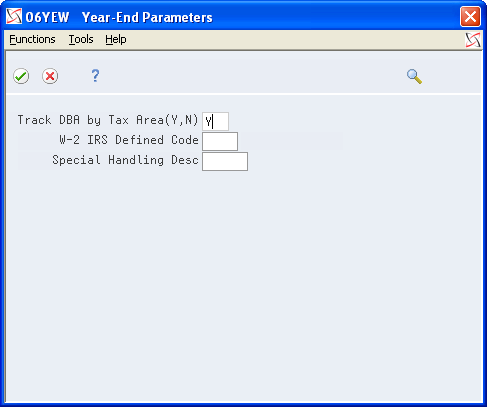
Choose Year-End Parameters (F20).
-
On Year-End Parameters, enter Y in the following field and click Enter:
-
Track DBA by Tax Area (Y, N)
-
| Field | Explanation |
|---|---|
| Track DBA by Tax Area (Y, N) | This field is used for Year-End purposes only.
A code that indicates whether the deduction, benefit, or accrual is to be tracked historically by the work state tax area. If Y (Yes), a record is created in the Tax Area Transaction Summary History table (F06148) during final update for each tax area that the employee works in a calendar year. If you set this flag to Y (Yes) during the middle of a calendar year, the F06148 table will only contain partial year information. To create a full year of history in the F06148 table, the Tax Area History Repost program (P06148) would need to be run. This flag would need to be set to Y (Yes) if you need to add this DBA back to state reportable wages for specific states only. You would typically need to set this flag to Y (Yes) for taxable benefits from which you did not withhold tax. |
4.3.7 Reposting DBAs to the Tax Area Transaction Summary History Table (F06148)
From Data Integrity & Global Updates (G0731), choose DBAs to Tax Area Summary F06148
Repost DBAs to the F06148 table if you did not track the DBA by tax area for any part of the year in which you should have been tracked the DBA. You must set the Track DBA by Tax Area field on the Year-End Parameters screen to Y and then repost the information. This program updates information in the F06148 table with information from the DBA Detail History table (F0619).
Caution:
Run this repost only if the value in the Track DBA by Tax Area field on Year-End Parameters is N for all or part of the year. Before you run the Repost DBAs to Tax Area Summary F06148 program, JD Edwards World strongly recommends that you back up the F06148 table.4.4 Setting up Pay Types for 1099 Processing
You set up pay types for 1099 processing to accurately allocate earnings, other than wages, for contract or pension employees.
You must set up these pay types before you can enter the employee's pay in time entry and process it through a payroll cycle.
Setting up pay types for 1099 processing includes the following tasks:
-
Setting up pay types for contract employees
-
Setting up pay types for pension employees
4.4.1 Setting up Pay Types for Contract Employees
You set up pay types for 1099 processing to accurately allocate earnings, other than wages, for contract employees. You use special handling tables to attach pay types to the year-end workfile build.
The Payroll system supports the following IRS-approved pay types for 1099-MISC forms:
-
Rents
-
Royalty payments
-
Prizes and awards
-
Other income
-
Medical and health care services
-
Nonemployee compensation
-
Substitute payments
-
Excess golden parachute payments
Contract employee information generally falls under the category of nonemployee compensation. To transfer contract employee information to the workfile build process, the system requires the following information for the pay type:
-
Pay type code
-
Paystub text
-
Tax exempt status
After you set up this pay type, you enter the employee's pay in time entry and process it through the payroll cycle. The system prints checks and loads the pay amounts to history. To correctly process 1099 forms, we strongly recommend that you use this process to load history amounts.
You then run integrity reports to verify that dollar amounts are correct and that any necessary tax calculations exist. Make corrections, if needed, to the history tables before running the workfile build.
To set up pay types for contract employees
From Pay/Deductions/Benefits Setup (G0742), choose Pay Type Setup
-
On Pay Type Setup, complete the following fields:
-
Pay Type
-
Paystub Text
-
Source of Pay
-
Auto Pay Methods
-
Pay Type Multiplier
-
Method of Printing
-
Effect on GL
-
-
Choose Tax Exempt Authorities Window (F8).
Description of the illustration ''tax_exmpt_wndw_1.gif''
-
On Tax Exempt Window, enter *in the following field and click Enter:
-
Tax Type
-
-
On Pay Type Setup, click Add.

| Field | Explanation |
|---|---|
| Source of Pay | A user defined code (07/PB) that defines the value upon which the system bases the employee's pay. H, hours worked, is the default value. Other valid values exist for tip and piecework processing. Use E, estimated pay, for an advance pay interim check. The Interim Check program (Format 2) automatically deletes this type of timecard so that you can enter the actual time when it is known. |
| Auto Pay Methods | A code that specifies how the system treats this pay type when computing automatically generated pay (typically for salaried employees). It also identifies supplemental pay. Valid values are:
Y – The dollars with this pay type are part of the employee's base pay, for example, regular, holiday, sick, and vacation pay. N – The dollars with this pay type are in addition to the employee's base pay, for example, overtime pay and time off without pay. S – The hours with this pay type are subtracted from the employee's base pay at standard rate and added back at the entered pay rate. B – The dollars with this pay type are in addition to the employee's base pay and are treated as supplemental pay for taxation purposes, for example, bonuses, commissions and payoffs. C – The hours/dollars entered using this pay type override all autopay instructions. If multiple jobs are used, a Y in this field might cause the pay type to be paid in addition to the regular pay. If you have overridden the job code/job step, home business unit, or position at time entry; multiple active jobs exist for this employee; and the overridden information does not match an existing active job record, the system processes this as additional pay. JD Edwards World recommends that you always use a pay type with N in this field when paying someone for work in addition to their regular pay. This ensures that the system processes the pay type the same in multiple-job or single-job situations. If your company docks employees' pay when they take leave in excess of what has been earned, you should have pay type 997 set up as the pay type to dock pay. Enter N as the autopay method for this pay type. If your company attaches contract calendars to employees to accumulate wages, you should have pay type 996 set up as the pay type to accumulate wages. Enter C as the autopay method for this pay type. |
| Multiplier - Pay Type Multiplier | A factor by which the base hourly rate is multiplied to obtain the actual payment hourly rate. For example, you could use 1.5 to designate time-and-one-half for overtime pay. 0 (zero) is not a valid multiplier. |
| Method of Printing | Identifies whether the item is to be printed on the paystub and whether the item is to be printed on a separate check from other payroll items. Valid codes are:
Pay Types/Payroll Taxes: Y – Print on paystub (default) S – Print separate check (one item per check) C – Print separate check (C types combined) N – Do not print on paystub Deduction/Benefit/Accrual Types: Y – Print as total deductions (default) S – Print separate check (one item per check) C – Print separate check (include detail) N – Do not print on paystub I – Print individual transactions T – Print by DBA Print Group The separate check feature is not available for any payroll taxes being withheld from the employee's paycheck. |
| Effect on GL | A code that specifies whether you want journal entries passed from payroll to the general ledger and the method that you want to use. Valid codes are:
Y – Pass dollars only to the general ledger. N – Pass dollars and hours to the general ledger. M – Do not pass dollars or hours to the general ledger and do not calculate workers' compensation and general liability. H – Pass hours only to the general ledger. This code is valid for Generate Timecard Journals. It should not be used when journals are generated through the pay cycle. W – Do not pass dollars or hours to the general ledger, but calculate workers' compensation and general liability. Workers' compensation and general liability amounts will be passed to the general ledger. |
| Tax Type | You can specify up to 15 tax types for which the respective payroll tax is not to be computed for a pay, deduction, or benefit code.
If you enter * as the first element of this list, no taxes are computed. Screen-specific information For U.S. state and local tax types, you can use two methods of coding: Single-character tax types: F (state income tax), L (county tax), M (city tax), and N (school tax) *F, *L, *M, or *N During payroll processing, both methods of coding result in the DBA being exempt from taxes of the specified type. For example, with either F or *F, the system exempts the DBA amount from income taxation in all states. W-2 processing differs depending on the presence or absence of an asterisk. If you need to add back wages to specific states at year-end, you need to enter F in this field when setting up DBA or Pay types. For single-character state and local tax types that are to be added back during W-2 processing, specify the tax areas on the State/Local W-2 additions window. |
4.4.2 Setting up Pay Types for Pension Employees
You set up pay types for 1099 processing to accurately allocate earnings, other than wages, for pension employees.
The Payroll system supports the following IRS-approved types of pay for 1099-R forms. The IRS-defined special handling code for each type of pay displays in parentheses. These distribution types are in box 7 of the 1099-R form. On the Pay Type Setup screen, you enter the appropriate code type in the first position of the W-2 Special Handling Description field.
-
Early distribution, no exception - in most cases, under age 59¾ (1)
-
Early distribution, exception applies - under age 59¾ (2)
-
Disability (3)
-
Death (4)
-
Prohibited transaction (5)
-
Section 1035 exchange - a tax-free exchange of life insurance, annuity, qualified long-term care insurance, or endowment contract (6)
-
Normal distribution (7)
-
Excess contributions plus earnings/excess deferrals (and /or earnings) taxable in 2019 (8)
-
Cost of current life insurance protection - premiums paid by a trustee or custodian for current insurance protection (9)
-
May be eligible for 10-year tax option (A)
-
Designated Roth account distribution (B)
-
Reportable death benefits under section 6050Y (C)
-
Distribution under Employee Plans Compliance Resolution System (EPCRS) (E)
-
Charitable gift annuity (F)
-
Direct rollover and rollover contribution (G)
-
Direct rollover of distribution from a designated Roth account to a Roth IRA (H)
-
Early distribution from a Roth IRA - this code may be used with Code 8 or P (J)
-
Loans treated as deemed distributions under section 72(p) (L)
-
Qualified plan loan offset (M)
-
Recharacterized IRA contribution made for 2017 (N)
-
Excess contributions plus earnings/excess deferrals taxable in 2010 (P)
-
Qualified distribution from a Roth IRA - distribution from a Roth IRA when the 5-year holding period has been met, and the recipient has reached 59¾, has died, or is disabled (Q)
-
Early distribution from a SIMPLE IRA in the first 2 years, no known exception (S)
-
Roth IRA distribution, exception applies because participant has reached 59¾, died or is disabled, but it is unknown if the 5-year period has been met (T)
-
Distribution from ESOP under Section 404(k) (U)
-
Charges or payments for purchasing qualified long-term care insurance contracts under combined arrangements (W)
To transfer pension employee information to the workfile build program, the system requires the following information for the pay type:
-
Pay type code
-
Special handling description
-
Tax exempt status
After you set up pay types for pension employees, you enter the employee's pay in time entry and process it through the payroll cycle. The system prints checks and loads the pay amounts to history. To correctly process 1099 forms, we recommend that you use this process to load history amounts.
You then run integrity reports to verify that dollar amounts are correct and that tax calculations, if necessary, exist. Before running the workfile build, make corrections, if necessary, to the history tables.
See Also:
-
Government tax publications General Instructions for Forms 1099, 1098, 5498, and W-2c for more information about the Box 7 changes for the 1099-R.
To set up pay types for pension employees
From Pay/Deductions/Benefits Setup (G0742), choose Pay Type Setup
-
On Pay Type Setup, complete the following fields:
-
Pay Type
-
Paystub Text
-
Source of Pay
-
Auto Pay Methods
-
Pay Type Multiplier
-
Method of Printing
-
Effect on GL
-
W-2 Spec Handling Desc
-
-
Choose Tax Exempt Authorities Window (F8).
-
On Tax Exempt Window, complete the following field with * and click Enter:
-
Tax Type
-
-
On Pay Type Setup, click Add.

| Field | Explanation |
|---|---|
| W-2 Spec Handling Desc | This field has several purposes in the W-2 system. Valid values are:
1 – The system prints the first three characters of this field as the amount description for Special Handling items placed in box 14. 2 – The Payroll Tax Calculation system does not calculate all school district taxes. Some clients have created special deductions to withhold these taxes. You must add a specific description on the school district tax deduction. This description is printed with the tax amount on the W-2. For school districts, use all four characters of the description. If the school district is in Ohio, enter the four-digit code of the school district here. 3 – The first position of the W-2 Special Handling Description field represents the IRS Distribution Code that prints in box 7 on the 1099-R form. Enter Code EPP in this field to print excess golden parachute amounts on form 1099-MISC Screen-specific information If the distribution form is from an IRA or SEP, the second character of this description line must contain a I to mark the IRA/SEP box on the 1099-R. |
4.5 Entering Additional Year-End Form Information
You enter additional year-end form information to add PDBA amounts to the wage and tax information that automatically prints in various boxes on the W-2 form. The wage and tax information comes from the Taxation Summary History table (F06136) while the additional PDBA amounts come from the Payroll Month PDBA Summary History table (F06146).
You create special handling code tables to group PDBA codes that you must report for your employees in a specific box on the W-2 form.
You can add special handling codes to an existing table if you need to include additional PDBAs.
The Payroll system reserves the following special handling codes for year-end purposes for W-2 tables.
-
Amounts added to box 1 (01B)
-
Amounts added to box 3 (03B)
-
Amounts added to box 5 (05B)
-
Amounts added to box 10 (10B)
-
Amounts added to box 11 (11B)
-
Amounts added to box 12 (12B)
-
Amounts added to box 14 (14B)
-
Amounts added to box 16 (16B)
-
Amounts added to box 18 (18B)
-
Allocated tips (ALC)
-
Amounts added to box 18, County Wages (COU)
-
Amounts added to box 18, City Wages (LOC)
-
School district taxes (SCH)
-
School district wages (SCW)
-
New Jersey Family Leave (FLI)
For W-3/electronic filing, the Payroll system reserves the following:
-
Fringe benefit (FRB) (TIB-4 only)
-
Nonqualified plan amounts (NQP)
-
Deferred compensation (DFC) (TIB-4 only)
-
Nonqualified non-457 (NQ4)
-
Dependent care (DEP)
-
Group term life (GTL)
For 499R-2 tables, the Payroll system reserves the following:
-
Wages (WAG)
-
CODA plans (COD)
-
Commissions (COM)
-
Concessions (CON)
-
Reimbursed expense (REM)
-
Retirement (RET)
-
Employer Health Coverage (EHC)
-
Charitable Contributions (CCS)
For 1099 forms, the Payroll system reserves the following:
-
Employee contributions for the 1099-R (ECT)
-
Gross distributions for the 1099-R (GRD)
-
Medical and health care for the 1099-MISC (MHC)
-
Nonemployee compensation for the 1099-MISC (NEC)
-
Pension pay for the 1099-R (PNS)
-
Other income for the 1099-MISC (OTH)
-
Rents for the 1099-MISC (RTS)
-
Royalty payments for the 1099-MISC (RYT)
-
Substitute payments for the 1099-MISC (SPY)
-
Excess golden parachute payments for the 1099-MISC (EPP)
Entering additional year-end form information includes the following tasks:
-
Creating special handling code tables
-
Adding special handling codes to an existing table
4.5.1 Creating Special Handling Code Tables
You create special handling code tables to group balances from PDBA codes that you must add to a specific box on the W-2 form.
When you create special handling code tables for boxes 1, 3, 5, 16, and 18, do not include pay types. The system automatically adds wages to those boxes when it processes the workfile build. If you include pay types in the special handling codes tables for those boxes, double gross wages print on the W-2.
For processing 1099 forms, you must enter all of the pay types in the special handling table for gross distributions. You must enter these to generate a form for 1099-R forms and electronic filing purposes for 1099-MISC forms.
Note:
On the 1099-R form, you report any amount that is a federal wage in the Federal A record of the Taxation Summary History table (F06136) in box 2a as long as the gross distribution is taxable. If no federal wages exist, you report the amount of gross distribution, as set up in special handling from box 1, in box 2a if the gross distribution is an IRA. The system also derives the federal tax withheld amount from the F06136 table.To create special handling code tables
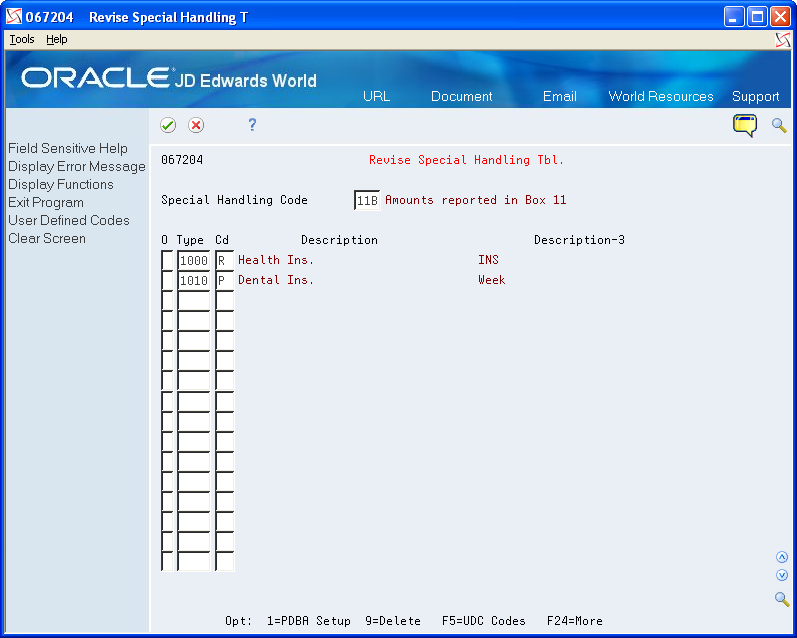
From W-2/1099 Setup (G072472), choose Revise Special Handling Tbl
-
On Revise Special Handling Tbl, complete the following field:
-
Special Handling Code
Description of the illustration ''revis_spl_hndlng_tbl.gif''
-
-
Complete the following field with a pay type, deduction, or benefit number:
-
Type (PDBA code)
-
-
Repeat step 2 until you finish entering PDBAs for this special handling code table.
| Field | Explanation |
|---|---|
| Type | The number and description of the PDBA that you want the system to use to calculate the corresponding PDBA. This number is the ending number in the range that is the basis of the calculation.
Screen-specific information Enter the number and description of the PDBA that you want the system to calculate for the specified special handling code table. |
4.5.2 Adding Special Handling Codes to an Existing Table
You can add special handling codes to an existing table if you need to include additional PDBAs.
To add special handling codes to an existing table
From W-2/1099 Setup (G072472), choose Revise Special Handling Tbl
-
On Revise Special Handling Tbl., choose User Defined Codes (F5).
User Defined Code Revisions displays with UDC 07/IP (Basis Table Codes).
-
On User Defined Code Revisions, add the necessary codes to the table.
4.6 Entering Third-Party Sick Pay Information
You enter third-party sick pay when an employee receives pay from an outside source that requires a separate W-2. For example, suppose that an employee's medical condition requires a short-term disability leave of two months. The disability insurance enables the employee to receive a partial salary for the leave period. You report the amount that the employee receives from the insurance company as third-party sick pay.
You must also enter third-party sick pay to meet the requirements of the SSA and the Internal Revenue Service (IRS). Both agencies require employers to report any federal income tax withheld by a third-party payer. Entering third-party sick pay information includes the following tasks:
-
Entering third-party sick pay records
-
Entering third-party sick pay for regular W-2 forms
-
Entering third-party sick pay for electronic filing reporting
4.6.1 Entering Third-Party Sick Pay Records
When you enter third-party sick pay information, you update or create tax history records to print this information on a separate W-2 form. When you enter this information, the system directly updates the Taxation Summary History table (F06136) for history type 1 (Third Party Sick Pay).
On the Third Party Sick Entry screen, enter the amounts by employee and by tax type and tax area. The SSA requires employers to report federal income tax withheld by a third-party payer. The system automatically reports Federal A tax amounts that you enter through the Third Party Sick Entry program on electronic filing.
Caution:
The Third-Party Sick Entry program does not create journal entries. It updates history directly. You must enter any journal entries through the General Accounting system.To enter third-party sick pay records
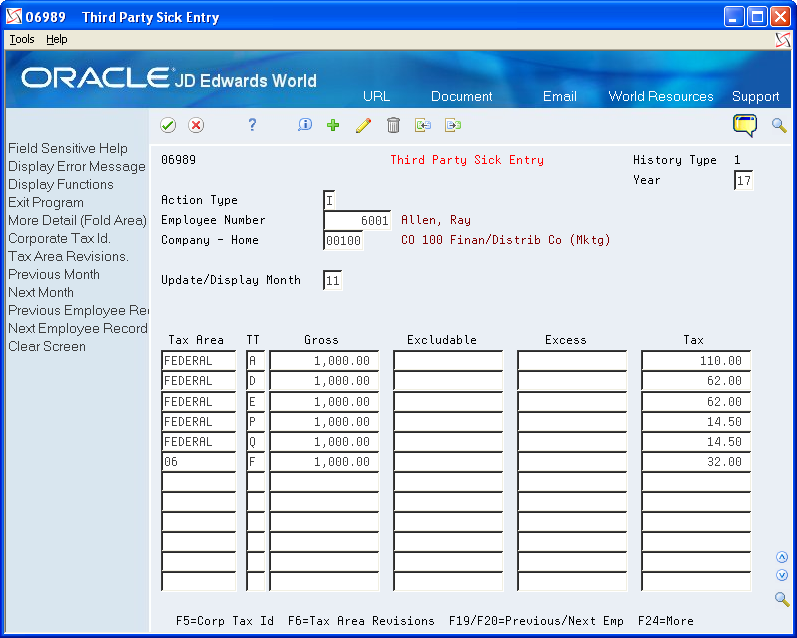
From Integrity, Rollover & Repost (G072471), choose Third Party Sick Entry
On Third Party Sick Entry, complete the following fields:
-
Year
-
Employee Number
-
Company - Home
-
Update/Display Month
-
Tax Area
-
TT
-
Gross
-
Excludable
-
Excess
-
Tax
Description of the illustration ''thrd_prty_sick_etry.gif''
| Field | Explanation |
|---|---|
| Update/Display Month | The number of the month in which the history files were updated. |
| Tax Area | A code that identifies a geographical location and the tax authorities for the employee's worksite. Authorities include both employee and employer statutory requirements. In the Payroll Tax Calculation system payroll-number tax terminology, this code is synonymous with GeoCode. Refer to Payroll Tax Calculation System's Master GeoCode List for valid codes for your locations. |
| TT | A user defined code (07/TT) that identifies the type of payroll tax being processed.
Refer to the associated user defined code records for the current descriptions of these codes. The values and meanings associated with this user defined code are predefined by JD Edwards World. You should not alter the values and meanings. Screen-specific information Refer to the user defined codes in table 07/TX. |
| Gross | This field represents the Gross Amount of the transaction. Depending on the type of transaction, the specific meaning will be as follows:
A – Pay Types - The total amount of earnings related to the type of pay. B – D/B/A Types - The total amount of the deduction, benefit, or accrual. C – Payroll Taxes - The total amount of gross wages, before exclusions or paid-in-excess. The amount in this field represents the first month of the payroll year or calendar year, depending on the inquiry screen being used. |
| Excludable | For months 01 - 12, this is the amount of gross pay excluded from the tax calculation. This would include 401(k) deductions and so on. |
| Excess | The amount of wages earned, but in excess of the annual limit, for tax calculation. |
| Tax | For months 01 - 12, this is the amount of tax calculated. |
4.6.2 Entering Third-Party Sick Pay for Regular W-2 Forms
To include third-party sick pay in regular wages and have it print on the employee's regular W-2, you process the sick pay through interim checks. You can create a separate pay type for this sick pay for tracking purposes; however, a separate pay type is not necessary for W-2 reporting purposes.
You might not want to calculate the employer-paid portion of the taxes from these sick pay entries if your third-party administrator has already withheld these taxes. To prevent the system from calculating these taxes, enter tax overrides on the interim check for the employer-paid taxes withheld by your third-party administrator.
You must report the taxes withheld by your third party administrator separately to the SSA via electronic file. You must perform additional setup prior to entering third-party sick pay using interim checks in order to report this information correctly via the electronic file.
If you process sick pay through interim checks and then choose to report third-party sick pay on a separate W-2, you must void the interim checks for third-party sick pay before entering information in the Third Party Sick Entry screen.
Note:
If your third-party administrator provides only taxable wage amounts, you can enter the actual taxable wage amount in the Gross field on the Third Party Sick Entry screen. If you use a taxable wage, leave the Excludable and Excess fields blank because the system subtracts these amounts from the gross wage to determine the taxable wage for W-2 reporting.See Also:
-
Entering Third-Party Sick Pay for Electronic Filing Reporting for additional information
4.6.3 Entering Third-Party Sick Pay for Electronic Filing Reporting
You must report third-party sick pay taxes separately to the SSA via electronic file. When you enter third-party sick pay using the Third Party Sick Pay Entry screen, the system automatically reports this information correctly on EFW2 without the need for you to perform any additional setup.
If you process interim checks to report third-party sick pay, you must perform special setup so that those third-party sick pay amounts are correct in electronic file. To meet SSA electronic filing reporting requirements for third-party sick pay that you enter using interim checks, set up a model PDBA for reporting purposes only. Then create a model record in the Payroll Month PDBA Summary History table (F06146). Next, for an employee who is already in your year-end workfile, enter the total tax for the third-party sick pay in one of the months of the F06146 table. You will receive these amounts from your third-party provider.
Entering third-party sick pay for electronic filing reporting includes the following tasks:
-
Set up a model PDBA for reporting purposes
-
Enter the federal income tax total for the company
-
Create special handling code tables that are specific to third-party sick pay
-
Attach the total to a special handling code table
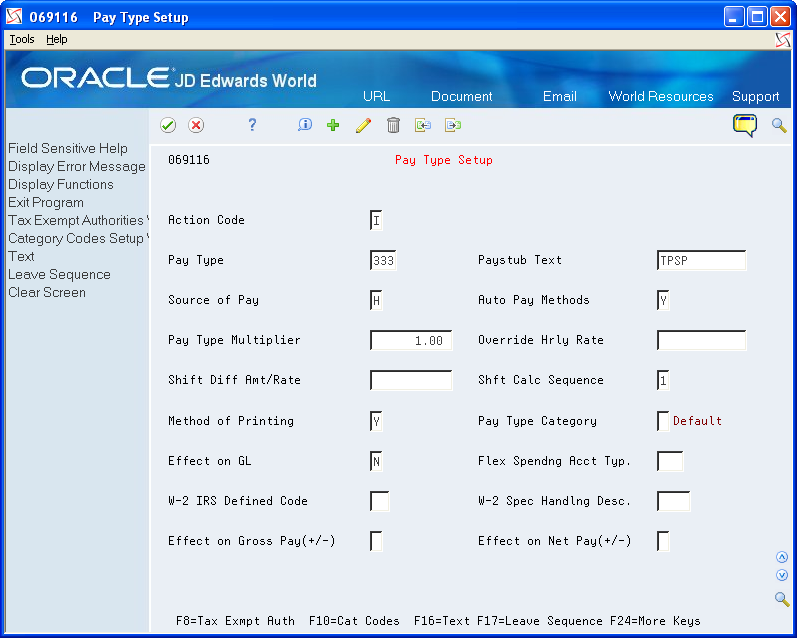
To set up a model PDBA for reporting purposes
From Pay/Deductions/Benefits Setup (G0742), choose Pay Type Setup
On Pay Type Setup, complete only the following fields and click Add:
-
Pay Type
-
Paystub Text
-
Pay Type Multiplier
Description of the illustration ''pay_type_stup_2.gif''
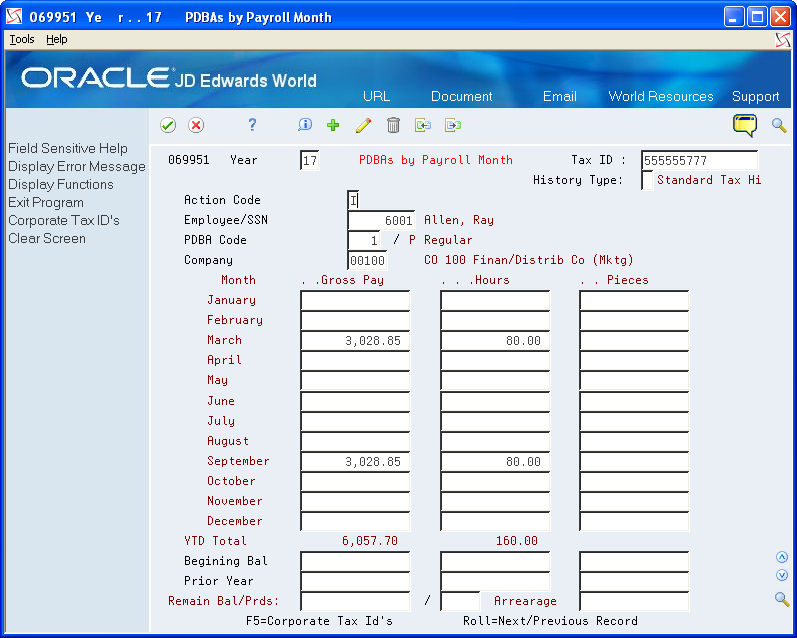
To enter the federal income tax total for the company
From Data Integrity & Global Updates (G0731), choose PDBAs by Payroll Month
-
On PDBAs by Payroll Month, complete the following fields to add the federal income tax amount to an employee record for the year-end workfile:
-
Year
-
Tax ID
-
Employee/SSN
-
Company
-
-
Complete the following field with the model PDBA code to report the third-party sick pay:
-
PDBA Code
-
-
Complete the following field with the company total amount of federal income tax and click Add.
-
Gross Pay
-
To create special handling code tables that are specific to third-party sick pay
From W-2/1099 Setup (G072472), choose Revise Special Handling Tbl
On Revise Special Handling Tbl., complete the following fields:
-
Special Handling Code
-
Type
Description of the illustration ''revis_spl_hndlng_tbl.gif''
To attach the total to a special handling code table
From W-2/1099 Setup (G072472), choose Assign Special Handling Code Tbl
-
On the first Assign Spec Hndlng Code Table screen, complete the following field and click Enter:
-
W-2/1099 ID
-
-
Click Enter to continue.
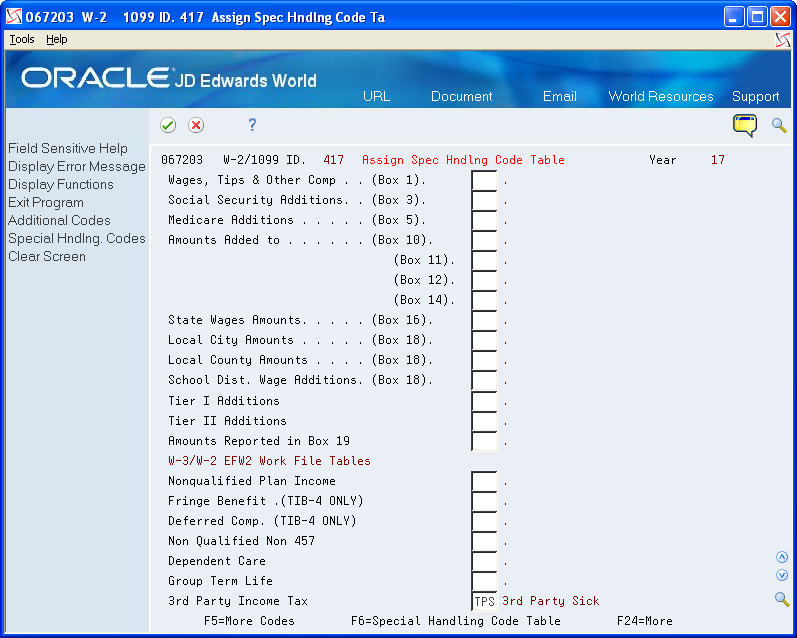
Description of the illustration ''assng_spl_hndlng_code_tbl.gif''
-
On the third Assign Spec Hndlng Code Table screen, complete the following field and click Enter:
-
3rd Party Income Tax
-
| Field | Explanation |
|---|---|
| 3rd Party Income Tax | A code that identifies a table of pay, deduction, and benefit types that are used in reporting 3rd Party Sick Income Tax Paid on the W-3 Summary Form. |
4.7 Reviewing W-2 IRS-Defined Codes
Before you begin year-end processing, verify that the information that you want to print on year-end forms is set up correctly. To verify this information, review the W-2 IRS-defined codes and make any necessary changes or additions.
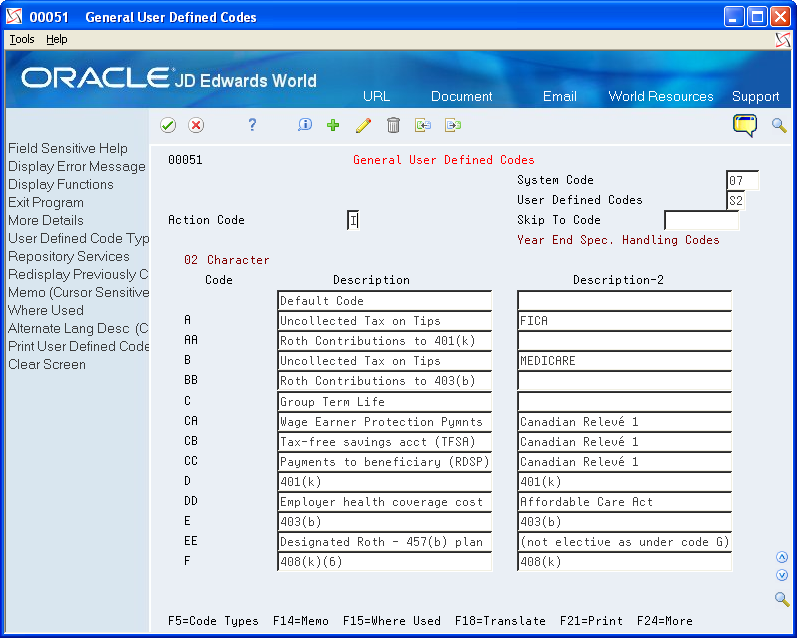
Use the Year-End Special Handling Codes table (07/S2) to maintain W-2 IRS-defined codes.
Use codes A through Z (excluding codes I, O, Q, and U), in box 12 of the W-2 form. The IRS defines these codes. You should not change them.
To review W-2 IRS defined codes
From W-2/1099 Setup (G072472), choose General User Defined Codes
-
On General User Defined Codes, enter 07 the following field:
-
System Code
-
-
Enter S2 in the following field and click Inquire:
-
User Defined Codes
-
-
Review the following fields:
-
Code
-
Description
-
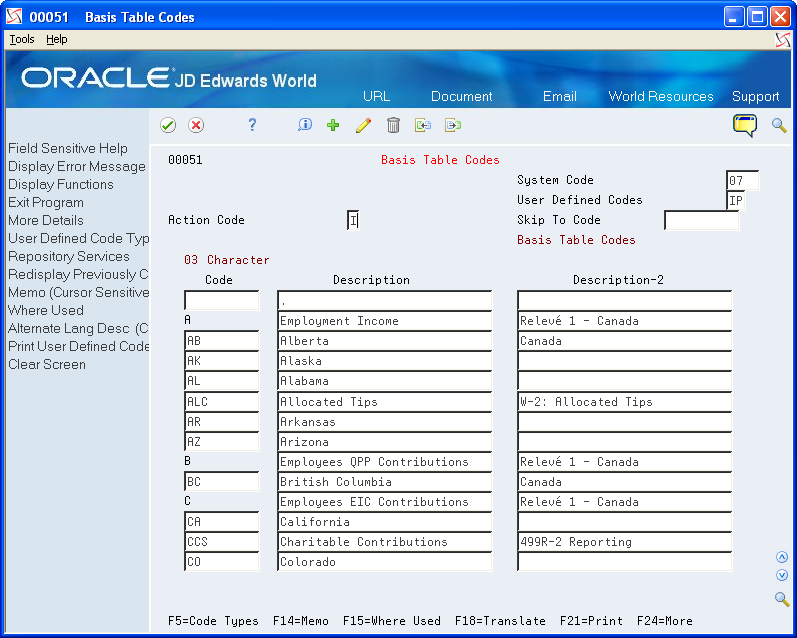
4.8 Reviewing Basis Table Codes
The software includes basis table codes (07/IP) so that you can incorporate the codes that JD Edwards World reserve for the W-2, 499R-2, and 1099 processing into year-end processing. You might need to add some of these codes.
From W-2/1099 Setup (G072472), choose Basis Table Codes
On Basis Table Codes, review the following fields:
-
Code
-
Description