Administering Custom Integration Interfaces and Services
Overview
Oracle E-Business Suite Integrated SOA Gateway supports custom integration interfaces and allows them to be published along with Oracle seeded ones through the Oracle Integration Repository where they can be exposed to all users.
Custom interface definitions can be created for various interface types, including custom interface definitions for XML Gateway Map, Business Event, PL/SQL, Concurrent Program, Business Service Object, Java APIs, Java Bean Services, Application Module Services, and Composite Service for BPEL type. Depending on your business needs, integration developers can create and annotate custom interface definitions based on Integration Repository Annotation Standards. The annotated definitions can then be validated and uploaded to Oracle Integration Repository.
Note: Custom interface types of EDI, Open Interface Tables, Open Interface Views, and Java APIs for Forms interfaces are not supported in this release.
Oracle Integration Repository currently does not support the creation of custom Product Family and custom Business Entity.
After the upload, these custom integration interfaces are displayed in the Integration Repository based on the interface types they belong to. To easily distinguish them from Oracle integration interfaces, Interface Source "Custom" is used to categorize those custom integration interfaces in contrast to Interface Source "Oracle" for Oracle seeded interfaces in Oracle E-Business Suite. Custom integration interfaces can now seamlessly leverage the Oracle E-Business Suite Integrated SOA Gateway capabilities. Custom integration interfaces of service enabled interface types can be exposed as web services. Integration administrators perform the same administrative tasks for custom integration interfaces as they do for native integration interfaces. These tasks include creating security grants, as well as generating and managing services throughout the deployment life cycle.
Usage Guidelines for Custom Web Services
While creating or developing custom services for your business needs, consider the following conditions:
| Requirement | Use |
|---|---|
| To enable existing or new Oracle E-Business Suite customizations built on native Oracle E-Business Suite technologies (such as PL/SQL, Business Service Objects, and other supported custom integration interface types described earlier) as web services | Oracle E-Business Suite Integrated SOA Gateway |
| To integrate Oracle E-Business Suite with SOA application that requires rich service infrastructure and integration capabilities such as Business Rules, Business Activity Monitoring (BAM), web service development and orchestration | Oracle SOA Suite in conjunction with Oracle E-Business Suite Integrated SOA Gateway |
| To develop custom services that are not associated with Oracle E-Business Suite | Oracle WebLogic web service stack |
Enabling Custom Integration Interface Process Flow
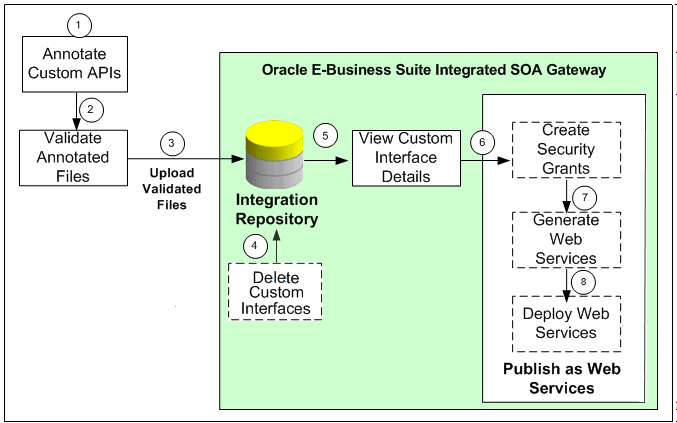
The following diagram illustrates the entire process flow of enabling custom integration interfaces:
Custom Integration Interfaces Development Process Flow
-
Users with the Integration Developer role annotate custom integration interface definition based on the Integration Repository annotation standards for the supported interface types.
See: Integration Repository Annotation Standards, Oracle E-Business Suite Integrated SOA Gateway Developer's Guide.
Note: For custom PL/SQL APIs (simple data types only) that are created with a custom schema, you can publish such custom APIs in Oracle Integration Repository. Additionally, perform the following tasks for such APIs with a custom schema:
-
Grant access to APPS schema.
-
Connect to a custom schema as
EBS_SYSTEMif your instance is on AD and TXK Delta 13 release update packs (RUPs) or later, or asSYSTEMif your instance is on an earlier AD and TXK RUP:sqlplus '/ as EBS_SYSTEM'Note: The R12.AD.C.Delta.13 and R12.TXK.C.Delta.13 RUPs introduce the
EBS_SYSTEMschema. If you are running Release Update Packs for AD and TXK Delta 13 or later, database privileges are granted to the Oracle E-Business Suite administration account,EBS_SYSTEM. Only the minimally required database privileges required to run Oracle E-Business Suite are granted to APPS byEBS_SYSTEM. For more information, refer to:-
Document 2755875.1, Oracle E-Business Suite Release 12.2 System Schema Migration
-
Document 2758993.1, Managing Database Privileges in Oracle E-Business Suite Release 12.2 (Running adgrants.sql)
-
-
Use the following command to grant access:
GRANT EXECUTE on <custom_schema>.<custom_package> TO APPS;
-
-
Create a synonym for the custom stored procedure.
-
Connect to APPS schema using the following command:
sqlplus <APPS Username>
Enter password: password
-
Use the following command to create a synonym:
CREATE SYNONYM <custom_package> FOR <custom_schema>.<custom_package>;
-
-
-
Users who have the Integration Administrator role validate the annotated custom interface definitions against the annotation standards. This validation is performed by running the Integration Repository Parser (IREP Parser), a design time tool, to read the annotated files and then generate an Integration Repository loader file (iLDT ) if no error occurred. For more information, see:
-
Users who have the Integration Administrator role upload the generated iLDT file to Oracle Integration Repository.
-
(Optional) Users who have the Integration Administrator role can delete the custom integration interfaces if needed.
Before starting to use a custom integration interface from the Integration Repository, users who have the Integration Administrator role can delete the custom interface if it is not yet generated or deployed as a web service. The administrators can first locate the custom interface from the Integration Repository user interface, and then click Delete Interface in the Overview tab of the custom interface details page.
If a custom interface has been generated or deployed, it must be reset or undeployed to its initial state before it can be deleted. See: Deleting Custom Integration Interfaces.
-
All users can view the uploaded custom interfaces from the Integration Repository user interface.
-
(Optional) Users who have the Integration Administrator role then create necessary security grants for the custom integration interfaces if needed.
This is achieved by first locating the custom interface from the Integration Repository, and then selecting methods contained in the selected custom interface before clicking Create Grant. The Create Grants page is displayed where the administrators can grant the selected method access permissions to a user, user group, or all users.
-
(Optional) Users who have the Integration Administrator role can generate SOAP services if the custom interfaces can be service enabled.
This is achieved by first locating the custom interface, and then specifying the interaction pattern either at the interface level or the method level before clicking Generate in the selected custom interface details page. See: Generating Custom SOAP Web Services.
-
(Optional) Users who have the Integration Administrator role deploy the services from Oracle Integration Repository to the application server.
To deploy generated SOAP services, the administrators must first select one authentication type (Username Token or SAML Token) for each selected service and then click Deploy in the selected interface details page. This deploys the generated service with 'Active' state to Oracle SOA Suite where Oracle E-Business Suite services can be exposed as standard services for service invocation at runtime. See: Deploying and Undeploying SOAP Custom Web Services.
If the custom interfaces can be exposed as REST services, the administrators must enter a unique service alias for each selected custom interface, and specify the desired service operations before deploying the service. Additionally, the administrators need to specify HTTP methods for the service operations contained in the selected interface if it is an interface type of PL/SQL, Java Bean Services, Application Module Services, or Business Service Object.
Note: Although open interface tables and views can be exposed as REST services, custom open interface tables and custom open interface views are not supported in this release.
REST services are deployed to an Oracle E-Business Suite environment. For more information on how to deploy custom REST services, see Deploying Custom REST Web Services.
To better understand how to use Integration Repository Parser to validate and upload annotated custom interface definitions to Integration Repository, as well as perform administrative tasks on these uploaded custom integration interfaces, the following topics are discussed in this chapter:
For information on how to create and annotate custom integration interfaces, see Creating and Annotating Custom Integration Interfaces, Oracle E-Business Suite Integrated SOA Gateway Developer's Guide.
Setting Up and Using the Integration Repository Parser
Setup Tasks
Integration Repository Parser is a standalone design-time tool used by the integration administrator to validate annotated custom interface definitions against the annotation standards and generate an Integration Repository loader file (iLDT). The generated iLDT files are uploaded to the Integration Repository using the FNDLOAD command so that the custom interfaces can be searched, generated, and deployed from the Integration Repository user interface.
Note: Integration Repository Parser does not support the integration interfaces registered under custom applications.
Before running the Integration Repository Parser, you need to install Perl modules with the following steps:
Note: It is required to obtain a native C compiler for the platform and operating system version that you are running on to build the Perl modules. The following are the minimum versions of compilers certified for Oracle E-Business Suite platforms:
-
Linux x86-64: Intel C/C++ Compiler (icc) version 7.1.032
-
Linux x86-64: GNU Compiler Collection (GCC) version 4.1.2
-
Oracle Solaris on SPARC (64-bit): Oracle Studio 12
-
HP-UX Itanium: HP ANSI C B3910B A.0.06.05
-
IBM AIX on Power Systems (64-bit): XL C Enterprise 8.0
Microsoft Windows platform is currently not supported in this release.
Installing Perl Modules on Linux
Perform the following steps to install Perl modules on Linux:
-
Establish the Oracle E-Business Suite application environment.
From the Oracle E-Business Suite APPS_BASE, establish the run file system APPL_TOP environment by running the EBSapps.env script.
-
Download Patch 13602850 (p13602850_R12_GENERIC.zip) into a temporary directory.
-
Run the following command:
perl $FND_TOP/patch/115/bin/IREPParserSetup.pl -
When prompted, provide the temporary directory path where patch p13602850_R12_GENERIC.zip is located.
Enter patch 13602850 location (<patch location>/p13602850_R12_GENERIC.zip file should exist and the default location is default location is <current directory>):The
IREPParserSetup.plscript will display the status of each step on the terminal. At the end, you may see messages like:[Final Status] Integration Repository parser setup completed successfully[Info] For more information check <current directory>/IREPParserSetup.log
Installing Perl Modules on Oracle Solaris, AIX, and HP-UX Itanium
Perform the following steps to install Perl modules on Oracle Solaris, AIX, and HP-UX Itanium:
-
Establish an Oracle E-Business Suite application environment.
From Oracle E-Business Suite APPS_BASE, establish the run file system
APPL_TOPenvironment by running theEBSapps.envscript. -
On both the run and patch file systems, locate the
Perlconfiguration files that need to be modified and back up these files.For example, on Oracle Solaris, the
Config.pmis located in the following directory:$FMW_HOME/webtier/perl/lib/5.10.0/sun4-solaris-thread-multi-64 -
On both the run and patch file systems, modify the
Perlconfiguration fileConfig.pmto point to thePerldirectory in$FMW_HOME/webtier.For example, on Oracle Solaris, these are the statements that need to be modified with the absolute path of
$FMW_HOME/webtier/perl:Note:
<FMW_HOME>is the value of$FMW_HOME.-
archlibexp =>relocate_inc('<FMW_HOME>/webtier/perl/lib/5.10.0/sun4-solaris-thread-multi-64') -
privlibexp =>relocate_inc('<FMW_HOME>/webtier/perl/lib/5.10.0') -
sitearchexp =>relocate_inc('<FMW_HOME>/webtier/perl/lib/site_perl/5.10.0/sun4-solaris-thread-multi-64') -
sitelibexp =>relocate_inc('<FMW_HOME>/webtier/perl/lib/site_perl/5.10.0')
-
-
If your system is on Oracle Solaris, modify the
Config.pmandConfig_heavy.plfiles to point to the C compiler installed as a requirement of the Integration Repository Parser. For example:Config.pm
cc =>'/opt/SunProd/studio12u3/solarisstudio12.3/bin/cc',libpth =>'/opt/SunProd/studio12u3/solarisstudio12.3/lib /opt/SUNWspro/WS6U1/lib/v9 /usr/lib/sparcv9 /usr/ccs/lib/sparcv9 /usr/local/lib/usr/lib /usr/ccs/lib,Config_heavy.pl
cc='/opt/SunProd/studio12u3/solarisstudio12.3/bin/cc'ld='/opt/SunProd/studio12u3/solarisstudio12.3/bin/cc' -
Create a directory '
perl' in$APPL_TOP_NEwhere the newPerlmodules will be installed. For example:mkdir $APPL_TOP_NE/perlchmod 755 $APPL_TOP_NE/perl -
On the run file system, set the following environment variables in the
APPL_TOPenvironment:-
Prepend
PATHwith the path to the C compiler installed as a requirement of the Integration Repository Parser. -
Prepend
PERL5LIBwith$FND_TOP/perland$APPL_TOP_NE/perlin that order.For example, export
PERL5LIB=$FND_TOP/perl:$APPL_TOP_NE/perl:$PERL5LIB. -
Add
$FMW_HOME/webtier/libtoLIBPATHif it is not present.For example, export
LIBPATH=$LIBPATH:$FMW_HOME/webtier/lib. -
Set
$FMW_HOME/webtierasORACLE_HOME.For example, export
ORACLE_HOME=$FMW_HOME/webtier. -
Prepend
LD_LIBRARY_PATHwith$ORACLE_HOME/lib32and$ORACLE_HOME/lib.For example, export
LD_LIBRARY_PATH=$ORACLE_HOME/lib32:$ORACLE_HOME/lib:$LD_LIBRARY_PATH. -
Set
JAVA_HOMEto the JDK top directory.Obtain the path returned by 'which java' and set
JAVA_HOMEto the current JDK top directory.For example, on Oracle Solaris:
which java
                 /prod/EBS122/fs1/FMW_Home/jdk/jre/bin/java
export JAVA_HOME=/prod/EBS122/fs1/FMW_Home/jdk
-
-
Download and unzip Patch 13602850 (
p13602850_R12_GENERIC.zip) to a temporary area.Patch 13602850 contains the following
Perlmodules:-
Compress-Raw-Zlib-2.009 -
Compress-Zlib-2.009 -
Class-MethodMaker-1.12
Install these modules in the order shown above using the following commands:
Note: If
Perlcommand is not found, invokePerlin$FMW_HOME/webtier/perl/bin/perl.After installing the
Compress-Raw-Zlib-2.009Perl module but before installingCompress-Zlib-2.009, prependPERL5LIBwith$APPL_TOP_NE/perl/lib/5.10.0/<platform thread-multi directory>.For example, on Oracle Solaris:
export
PERL5LIB=$APPL_TOP_NE/perl/lib/5.10.0/sun4-solaris-thread-multi-64:$PERL5LIB.-
cd $APPL_TOP_NE/perl -
Copy the module to be installed into
$APPL_TOP_NE/perl.For example:
cp -r /temp/Compress-Raw-Zlib-2.009 -
cd <Perl module name>For example:
cd Compress-Raw-Zlib-2.009 -
perl Makefile.PLNote: On HP-UX Itanium, the option
CC=ccmay be needed when installingCompress-Raw-Zlib-2.009. For example,perl Makefile.PL CC=cc.If errors occur, verify your setup and remove the Perl module being installed from
$APPL_TOP_NE/perlbefore copying it into$APPL_TOP_NE/perlto try again. -
makeNote: If the 'cc' compiler is not found, verify the LD parameter in the
Makefilethat contains the correct path to the C compiler executable file.If the following warning appears on Oracle Solaris, replace
-xarch=v9with-m64throughout theMakefile, and runmakeagain.cc: Warning: -xarch=v9 is deprecated, use -m64 to create 64-bit programs -
make install
-
Using the Integration Repository Parser
Once the Integration Repository Parser has been installed and set up properly, you can run the parser to generate iLDT files and then upload the files to the Integration Repository if no error occurs.
Note: For an object (or class) which is present in the Integration Repository, the Integration Repository Loader program reloads the new definition of that object ONLY if the new version is a later version than the current version present in the Integration Repository. If the new file version is the same or earlier than the current one in the repository, then the new file will not be uploaded.
Therefore, before running the parser, you need to increment the Header version of the target source file so that the modifications to the object defined in the source file can take effect in the Integration Repository.
The following sections explain the use of Integration Repository Parser and FNDLOAD utilities in greater detail.
Generating ILDT Files
Prerequisites - Setting Up Environment Variables
Before running the Integration Repository Parser to generate iLDT files, set the following environment variables which may affect parser operation:
-
From the Oracle E-Business Suite APPS_BASE, establish the run file system
APPL_TOPenvironment by running theEBSapps.envscript. -
The following environment variables affect parser operation:
-
LIBPATH: Add the$FMW_HOME/webtier/libtoLIBPATHvariable if it is not present. For example,export
LIBPATH=$LIBPATH:$FMW_HOME/webtier/lib -
CLASSPATH: It is used when parsing Java files. This is required to be properly set up (as if for a compile) when performing-generatewith such files.If parser is not able to find a particular class, check for its availability in
CLASSPATH.On a Linux machine,
CLASSPATHcan be set likesetenv CLASSPATH classpath1:classpath2.For others, refer to your platform documentation on how to set
classpathvariable. -
JAVA_HOME: It is used to find the Java runtime.If
JAVA_HOMEis not set, obtain the path returned by 'which java' from theAPPL_TOPenvironment, and setJAVA_TOPto the JDK top directory. For example,-
On AIX:
export
JAVA_HOME=$COMMON_TOP/util/jdk32 -
On Oracle Solaris:
export
JAVA_HOME=$COMMON_TOP/util/jdk
-
-
export
PERL5LIB=$APPL_TOP_NE/perl/lib/5.10.0:$APPL_TOP_NE/perl/lib/site_perl/5.10.0:$FND_TOP/perl:$PERL5LIB -
For HP-UX Itanium Only
Prepend
LD_LIBRARY_PATHwith$FMW_HOME/webtier/libas follows:export
LD_LIBRARY_PATH=$FMW_HOME/webtier/lib:$LD_LIBRARY_PATH
-
Running the Integration Repository Parser
To generate an iLDT (*.ildt) file, run the Integration Repository Parser using the following syntax:
$IAS_ORACLE_HOME/perl/bin/perl $FND_TOP/bin/irep_parser.pl -g -v -username=<a fnd username> <product>:<relative path from product top>:<fileName>:<version>=<Complete File Path, if not in correct directory>
Examples of generating iLDT files for custom PL/SQL APIs and custom composites of BPEL type:
-
$IAS_ORACLE_HOME/perl/bin/perl $FND_TOP/bin/irep_parser.pl -g -v -username=sysadmin fnd:patch/115/sql:SOATest1S.pls:12.0=SOATest1S.pls -
$IAS_ORACLE_HOME/perl/bin/perl $FND_TOP/bin/irep_parser.pl -g -v -username=sysadmin fnd:<path>:ONT_POI_R121XB7A.bpel:12.0=<Path>/ONT_POI_R121XB7A.bpel
Note: If an error message "Java runtime not found" appears while running the Integration Repository Parser, then set the JRE location to variable OA_JRE_TOP. JRE location could be located at $JAVA_HOME/jre, If JAVA_HOME is not set, source $FMW_HOME/wlserver_10.3/server/bin/setWLSEnv.sh file.
While running the parser, you need to pay attention to any error messages on the console. These errors would be due to incorrect annotation or some syntax errors in the annotated file. Ensure that the annotations are correct and the file has proper syntax.
If no error occurs in the annotated interface file, an iLDT (*.ildt) file would be generated. This generated iLDT file needs to be uploaded to the Integration Repository.
See: Uploading ILDT Files to Integration Repository.
Integration Repository Parser (irep_parser.pl) Usage Details
The usage for the Integration Repository Parser can be seen from the command prompt using the -manual option:
$IAS_ORACLE_HOME/perl/bin/perl $FND_TOP/bin/irep_parser.pl -manual
Name irep_parser.pl Interface Repository Annotation Processor
Synopsis irep_parser.pl [-verbose] [-logfile=file ? -append-logfile=file] [-generate] [-force] [-outdir=directory] [-java-source=version] [-cache-java=oper] [-cache-file=file] [-imports=file] [-username=username] <filespec>...
Description The irep_parser reads interface annotation documentation in program source files and validates it according to its file type.
If the -generate flag is supplied (and other conditions met), then it will generate iLDT files. For more information, see -generate option.
Any validation errors will be reported, usually along with file name and line number, like the result of grep -n.
File Types
The irep_parser can handle almost all types of application source files. While validating the annotated files against the annotation standards of the supported interface types, files that do not match will be ignored.
Here is the list of supported file types:
Note: Integration Repository Parser supports custom interface definitions for XML Gateway Map, Business Event, PL/SQL, Concurrent Program, Business Service Object, Java APIs, Java Bean Services, Application Module Services, and Composite Service for BPEL type.
Custom interface types of EDI, Open Interface Tables, Interface Views, and Java APIs for Forms interfaces are not supported in this release.
-
.java: All Java files are completely parsed. -
.p(kh/ls): PL/SQL package specifications are processed.If and when a package body is detected, the parser aborts processing and the file is ignored.
-
.ldt: It processes the LDT file for annotated concurrent programs. Most LDT files will fail and be ignored right away because they are not concurrent program loader files (i.e. not created withafcpprog.lct). -
.xgm: It processes the XML Gateway map file, looking for an annotated map. -
.xml: It processes the XML file, scanning for signature contents indicating various kinds of Business Service Object data since the filename pattern is generic. -
.wfx: It processes the Business Event file, looking for annotated events.
Files Specifications
Argument filespec tokens have the following formats:
-
pathname: A simplepathnameargument directly indicates the file to be processed. Since path information is not included, the output iLDT can not be generated. For example, only validation is supported. See-developmentflag (This is backward compatible with previous validation only usage.) -
product:relative_path[:name[:version]]=pathname: Specify the product and relative path from product top (and optionally file name and version) in addition to the physical location of the file to process.Please note that the source file information on the left-hand side of the "
=" sign is imported verbatim into the output iLDT, and otherwise not examined. Thepathnameon the right-hand side must refer to a real file, which can be located anywhere.The
productandrelative_pathcorrespond to file location onAPPL_TOP.
Options
Options can be abbreviated by the smallest significant number of characters. Often this can be just the first character. Options cannot be combined. Here are the supported options:
-
-generate: It generates iLDT (Interface Repository Seed Data) files. The file is created in either the current directory or the directory designated by-outdir.The generated file name is derived from the file name by replacing all periods with underscores, and then appending the suffix "
.ildt".Note: Use of the
-generateflag requires that the command line filespecs to have (at least) the source product and path. For more information, seeprod:path[:name[:version]]=pathnameand the-developmentflag. -
-force: If the-generateflag is used to request iLDT generation, and if the file is an incorrect file type for annotations or has no significant annotation contents (no annotation at all, or no@rep:scopetag in any primary-level annotation), then an empty file is created anyway. If a file of the same name existed from a previous run, it is forced to be overwritten with a zero-length file.The net effect is that only files that had actual errors (parsing, validation, and incomplete for generation) will not be represented in the creation of (at least) in an empty iLDT file.
-
-development: It is a special flag for developers to quickly verify syntax of annotations in a file. It is equivalent to using both-generateand-verboseflags with sample values of fields, such as 'product', 'relative path from product top' and 'version'. For example,-d TestFileNameis equivalent to-g -v nul:relative/path/unknown:TestFileName:1.0=TestFileName.This allows you to generate test iLDTs using a simple list of filenames.
-
-outdir=directory: It designates an alternate directory (other than the working directory) for generated output to be placed in. -
-username=username: A valid FND user name (other than the default SEED user name) which marks this interface as custom service.If tag
-usernameis missed, it is considered as a seeded interface. A custom interface is identified on the Integration Repository user interface by the label 'Custom' and can be searched by selecting 'Custom' in the Interface Source field after clicking Show More Search Options in the Search page. -
-logfile=file: It writes all verbose tracing and validation error messages in a log file instead of printing to standard output. It is mutually exclusive with-append-logfile. -
-append-logfile=file: It is similar to-logfile, append all verbose tracing and validation error messages in a log file instead of printing to standard output. It is mutually exclusive with-logfile. -
-verbose: It provides chatty information about files processed and other internals, non-fatal warning messages, and so on. This is in addition to any error messages generated.It is useful for querying the parser version, if it's used without any filespec arguments.
-
-java-source=version: It informs the parser what language version (via JDK version number) to support for Java parses. A minor change was introduced in 1.4 (the assert facility), and major changes were introduced in 1.5 (generics, enhanced for loop, autoboxing/unboxing, enums, varargs, static import and annotations). If it is not supplied, then 1.5 is assumed.
Return Value
The parser will return an exit value of 0 if no errors occurred during processing. Otherwise, it will return a count of the number of files that had errors.
Files with incomplete information for generation (class resolution) are considered errors only if the -generate flag is used.
Quick Validation Examples
Use the following statements in validating annotation in PL/SQL specification files during development:
-
$IAS_ORACLE_HOME/perl/bin/perl $FND_TOP/bin/irep_parser.pl *s.pls -
$IAS_ORACLE_HOME/perl/bin/perl $FND_TOP/bin/irep_parser.pl -v -g itg:patch/115/sql:12.0=fndav.pls
Uploading ILDT Files to Integration Repository
After validation is completed and iLDT files are generated, the integration administrator can upload the generated iLDT files to the Integration Repository using the FNDLOAD command. The custom interfaces can be displayed in the repository and exposed to all users.
Manual Steps for Uploading the iLDT File
Perform the following steps to upload the iLDT file to the Integration Repository:
-
Log in to the Oracle E-Business Suite Release 12 instance.
-
Set the Oracle E-Business Suite application environment.
From the Oracle E-Business Suite APPS_BASE, establish the run file system
APPL_TOPenvironment by running theEBSapps.envscript. -
Use the following command to upload the iLDT file:
$FND_TOP/bin/FNDLOAD <APPS username> 0 Y UPLOAD $fnd/patch/115/import/wfirep.lct <ildt file>ORACLE Password:Examples of uploading iLDT files for custom PL/SQL APIs and custom composites of BPEL type:
-
$FND_TOP/bin/FNDLOAD apps @isg122d 0 Y UPLOAD $FND_TOP/patch/115/import/wfirep.lct SOATest1S_pls.ildtORACLE Password: password -
$FND_TOP/bin/FNDLOAD apps @$TWO_TASK 0 Y UPLOAD $FND_TOP/patch/115/import/wfirep.lct ./ONT_POI_R121XB7A_bpel.ildtORACLE Password: password
-
-
Pay attention to any error messages in the generated log file. Error messages mostly would be due to incorrect database connect string or incorrect
lctfile.Look for string "Concurrent request completed successfully" to determine whether the iLDT file was correctly uploaded.
For Business Service Object only - submit a concurrent program called FNDIRLOAD which loads all the iLDT files related to Business Service Object interfaces present on various product tops of the instances.
Note: Ensure that the FNDIRLOAD concurrent program is associated with the user who will run the concurrent request.
For example, if the request will be run by a user who has the system administrator responsibility, FNDIRLOAD should be listed as part of the requests for System Administrator Reports group in the Request Groups window.
Request Groups Window
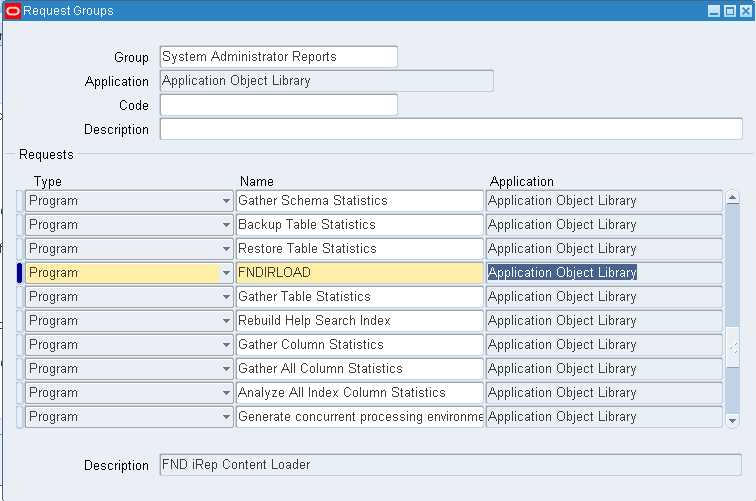
If you cannot find FNDIRLOAD from the name list, use the following steps to register it with the system administrator responsibility.
-
Log in to Oracle E-Business Suite with the System Administrator responsibility. Select System Administrator > Security > Responsibility > Define from the navigation menu.
-
In the Responsibilities window, locate 'System Administrator' as the value in the Responsibility Name field through a search.
Ensure 'System Administrator Reports' is selected as the Request Group Name.
Responsibilities Window with Responsibility Name and Request Group Name Highlighted
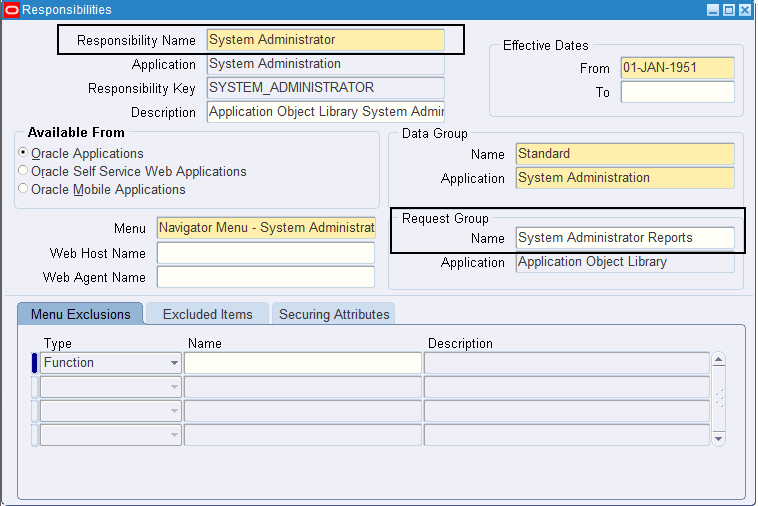
Save the change and close the window.
-
Select System Administrator > Security > Responsibility > Requests from the navigation menu.
In the Request Group window, locate 'System Administrator Reports' as the value in the Group field through a search.
In the Requests region, add FNDIRLOAD program to the list and save your entry.
Request Groups Window
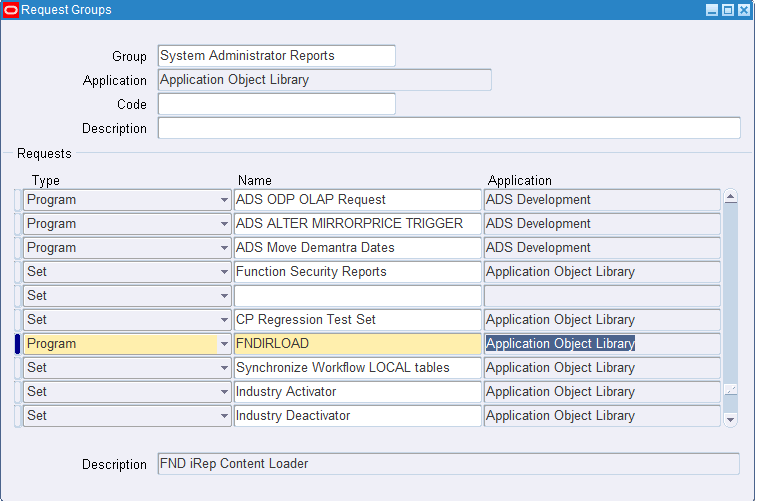
In the Parameters window, enter an appropriate value for APPLTOP_ID.
Submit Request Window with Parameters Pop-up Window
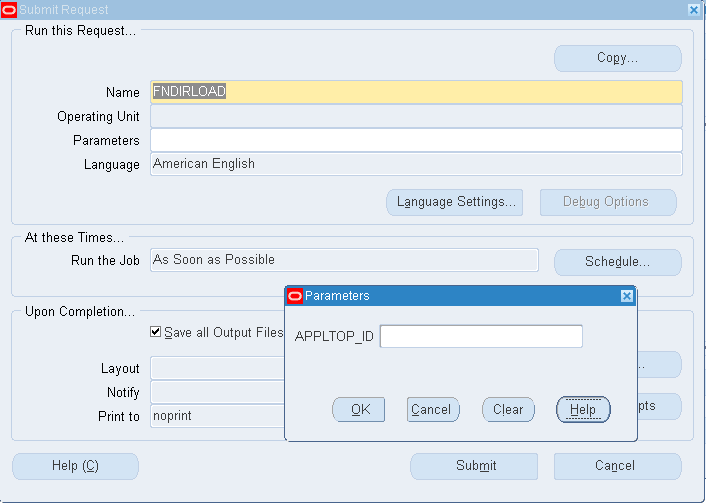
Note: To obtain the APPLTOP_ID parameter value, your system administrator can run the following query:
SELECT max(appl_TOP_id)
FROM ad_appl_tops
WHERE active_flag = 'Y'
Click Submit to process the request.
Examine the request log file to see if any issues occur while running the concurrent request.
-
Once these annotated source files have been successfully uploaded, they will appear in the Integration Repository based on the interface types they belong to. The administrator can perform administrative tasks on these custom integration interfaces.
If the upload is for an updated version of iLDT file, after the upload the administrator needs to perform the following additional tasks to ensure successful invocation of the updated API included in the file:
-
For SOAP services, stop and restart Oracle SOA Suite managed server where data sources are deployed.
-
For REST services, clear existing cache, and stop and restart the
oafmOracle E-Business Suite managed server where data sources are deployed.
Performing Administrative Tasks for Custom Integration Interfaces and Services
Custom integration interfaces are annotated based on Integration Repository annotation standards for the supported interface types. The behavior of these interfaces is the same as Oracle seeded interfaces except they are not native packaged, but custom ones. As a result, an integration administrator uses the same approach of managing native interfaces to manage custom interfaces and services.
Viewing Uploaded Custom Integration Interfaces from the Integration Repository
Before starting to perform any administrative task, the administrator needs to first locate a desired custom interface or service through either of the following ways:
-
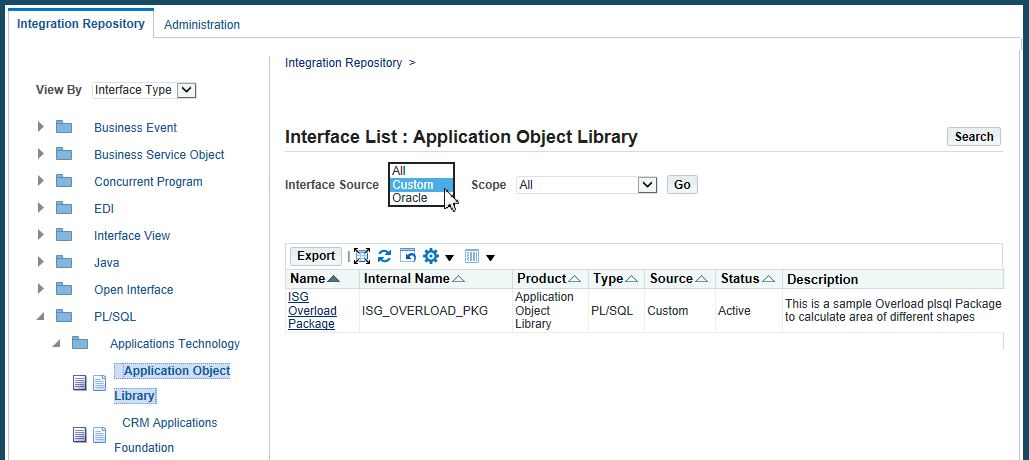
From the Interface List page, select 'Custom' from the Interface Source drop-down list along with a value for the Scope field to restrict the custom integration interface display. The search criteria 'Oracle' in the drop-down list is used for searching seeded interfaces.
Interface List Page with Interface Source "Custom" Selected
-
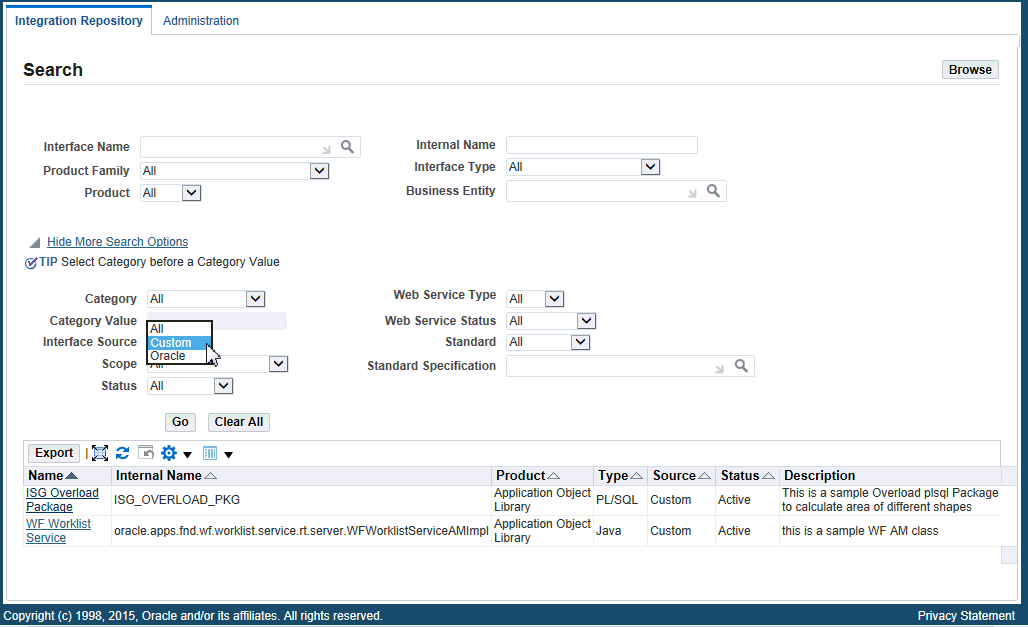
From the Search page, click Show More Search Options and select 'Custom' from the Interface Source drop-down list along with any interface type, product family, or scope if needed as the search criteria.
For example, select 'Custom' as the Interface Source and 'PL/SQL' as the Interface Type to locate the custom interfaces for PL/SQL type.
Search Page with Interface Source "Custom" Selected
For more information on how to search for custom integration interfaces, see the Oracle E-Business Suite Integrated SOA Gateway User's Guide.
After locating a desired custom interface, the administrator can perform the following administrative tasks:
Important: If you update a custom service, you must set theISG_CLEAR_JPUB_CACHE property to reflect the changes in the updated custom service:
-
For a custom SOAP service, set
<SID>.ISG_CLEAR_JPUB_CACHE=YESinisg.properties. -
For a custom REST service, set
<SID>.ISG_CLEAR_JPUB_CACHE=YESinisgagent.properties.
Set this property to Yes only when there are updates in the custom service. Otherwise, set it to No or it should be commented out.
-
Managing Custom Integration Interfaces
-
Managing Custom Web Service Lifecycle Activities
For Custom SOAP Web Services
For Custom REST Web Services
-
Managing Custom Composite Integration Interfaces
Deleting Custom Integration Interfaces
Once a custom integration interface is validated and uploaded to the Integration Repository, integration administrators can delete the custom interface from the repository if the custom interface is not yet generated or deployed and it is no longer used or needed.
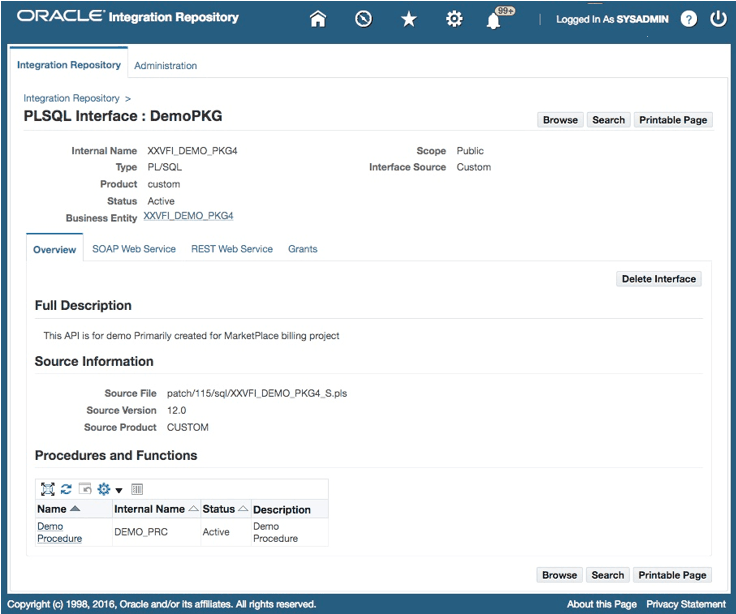
To delete a custom interface, first locate the custom interface from the repository and then click Delete Interface in the Overview tab of the selected custom interface details page. This action removes the selected custom interface from the integration repository.
Overview Tab with the "Delete Interface" Button Shown for a Custom Interface
If a custom interface has been generated or deployed, it must be reset or undeployed to its initial state ('Not Generated' for a SOAP service or 'Not Deployed' for a REST service) before it can be deleted through the Overview tab. Otherwise, a warning message appears indicating that you cannot delete a generated or deployed service.
For information on resetting a SOAP service, see Resetting SOAP Web Services. For information on undeploying a REST service, see Undeploying REST Web Services.
Managing Security Grants for SOAP Services Only
To let appropriate users use these newly uploaded custom integration interfaces, the administrators can select one or more methods contained in a given custom interface and then grant the selected method access permissions to a user, user group, or all users. The administrators can revoke existing grants by removing the privileges from the grantee who can be a specific user, user group, or all users if needed.
For information about managing grants for interfaces with the support for SOAP services only, see Managing Security Grants for SOAP Web Services Only.
Generating Custom SOAP Web Services
Once custom integration interfaces have been uploaded to Oracle Integration Repository, an integration administrator or an integration developer can transform these interface definitions into WSDL descriptions if the interface types they belong to can be service enabled.
To generate a web service, the administrator must first locate a custom interface, and then specify the interaction pattern either at the interface level or the method level before clicking Generate in the interface details page.
If the web service has been successfully generated, a WSDL link appears along with the 'Generated' web service status information displayed in the Web Service region (or the SOAP Web Service tab if the interface can be exposed as both SOAP and REST services). The selected interaction pattern information ('Synchronous', 'Asynchronous', or both Synchronous and Asynchronous) for the selected custom service is also displayed.
For detailed information on how to generate SOAP services on native integration interfaces, see Generating SOAP Web Services.
Deploying and Undeploying Custom SOAP Web Services
Once a web service has been successfully generated for a custom interface, like native packaged interfaces, the administrator will perform the same deployment activity to deploy the generated service to an Oracle SOA Suite WebLogic environment with Active state. Before deploying the custom service, the administrator must select one authentication type to authenticate the web service.
The administrator can undeploy the service if needed.
Note: Similar to the native Oracle E-Business Suite services, the deployed WSDL URL for the custom service shows the physical location of service endpoint where the service is hosted in soa-infra in this release. If your system is upgraded from a previous Oracle E-Business Suite release, after the upgrade to Release 12.2, the deployed WSDL URL information for the custom service has already been changed. Therefore, you may need to replace it with the new WSDL URL and service location or address accordingly in web service clients while invoking the deployed custom service.
For detailed information on how to deploy or undeploy SOAP web services, see Deploying and Undeploying SOAP Web Services.
Resetting Custom SOAP Web Services
Once a custom service has been successfully generated or deployed, Reset appears in the Web Service region (or the SOAP Web Service tab if the interface can be exposed as both SOAP and REST services) allowing you to reset the 'Generated' or 'Deployed' web service status to its initial state - 'Not Generated' if needed. This feature clears up the custom service artifact for a given service regardless of its current state.
For more information, see Resetting SOAP Web Services.
Retiring Custom SOAP Web Services
When a custom service has been successfully deployed to Oracle SOA Suite with active state, this deployed custom service is ready to accept new requests.
The administrator can change the active state of a deployed custom service by clicking Retire in the Web Service region (or the SOAP Web Service tab if the interface can be exposed as both SOAP and REST services). This retires a deployed custom service and it will no longer accept new requests.
For a retired custom service, the administrator can activate the retired service so that it can become active again.
For more information on retiring SOAP web services, see Retiring SOAP Web Services.
Activating Custom SOAP Web Services
For a custom service that has been retired, you can activate it by clicking Activate in the interface details page. This action allows a retired custom service to become active again.
For more information on activating web services, see Activating SOAP Web Services.
Subscribing to Custom Business Events
Similar to the native business events, the administrator can subscribe to a custom business event by clicking Subscribe from the business event interface details page. Internally, an event subscription is created for that selected event with WF_BPEL_QAGENT Out Agent.
Once an event subscription for that custom event has been successfully created, Unsubscribe appears instead. Clicking Unsubscribe removes the event subscription from the WF_BPEL_Q queue.
For more information on subscribing to business events, see Subscribing to Business Events.
Enabling Log Configurations and Viewing Log Messages for SOAP Services
In addition to managing design-time lifecycle activities through the Integration Repository user interface, the administrator can access the Configuration tab to perform additional administrative tasks:
-
Enable design-time and runtime logs for SOAP service of an interface through the Log & Audit Setup Details page
-
Monitor and view design-time and runtime logs recorded for SOAP messages if the design-time log and runtime log are enabled for the SOAP service of a specified interface respectively
Managing Security Grants for Custom REST Services
Similar to managing grants for the interfaces with the support for SOAP services only, the administrators can create grants by selecting one or more methods contained in a given custom interface and then grant the selected method access permissions to a user, user group, or all users.
Once an access permission to a procedure is authorized to a grantee, it grants the permission to access the associated SOAP and REST service operations simultaneously. For more information about managing grants for interfaces with the support for SOAP and REST services, see Managing Security Grants for SOAP and REST Web Services.
Deploying Custom REST Web Services
After custom interfaces that can be exposed as REST services are uploaded to the Integration Repository, the administrator can deploy the custom REST services.
Before deploying a custom interface as a REST service, the administrator must specify service alias for the selected interface, select one or more methods from the Service Operations table, and ensure that at least one authentication type is selected in the REST Service Security region. Additionally, if the selected interface type is PL/SQL, Business Service Object, Java Bean Services, or Application Module Services, the administrator needs to specify HTTP verbs for desired methods contained in the selected interface before deployment.
If the service has been successfully deployed, the REST Service Status field is updated to 'Deployed' from 'Not Deployed' indicating that the deployed REST service is ready to accept new service requests.
For more information on deploying REST services, see Deploying REST Web Services.
Undeploying Custom REST Web Services
If a custom REST service has been successfully deployed to an Oracle E-Business Suite managed server, Undeploy appears in the REST Web Service tab. Undeploying a REST service not only brings the deployed REST service back to the Integration Repository, but also resets its status to its initial state - 'Not Deployed'.
For more information on undeploying REST services, see Undeploying REST Web Services.
Enabling Log Configurations and Viewing Log Messages for REST Services
Similar to managing SOAP services, the administrator can perform the following additional tasks through the Configuration tab to enable and view log messages for REST services:
-
Enable design-time and runtime logs for REST service of an interface through the Log & Audit Setup Details page
-
Monitor and view design-time and runtime logs recorded for REST messages if the design-time log and runtime log are enabled for the REST service of a specified interface respectively
Viewing and Downloading Custom Composite Services
Viewing Custom Composite Services
To view a custom composite service, from the Search page select 'Composite' from the Interface Type field. Click Show More Search Options and select 'Custom' from the Interface Source drop-down list along with any product family or scope as the search criteria.
click a custom composite service from the search result to display the composite service details.
Downloading Custom Composite Services
The administrators can click Download Service in the interface details page to download the relevant custom composite files aggregated in a .JAR file to your local directory.
For more information on how to view and download a composite service, see: