Using Business Events Through Subscription Model
Overview
The Oracle Workflow Business Event System (BES) is an application service that leverages the Oracle Advanced Queuing (AQ) infrastructure to communicate business events between systems. The Business Event System consists of the Event Manager and workflow process event activities.
The Event Manager lets you register subscriptions to significant events; event activities representing business events within workflow processes let you model complex business flows or logics within workflow processes.
Events can be raised locally or received from an external system or the local system through AQ. When a local event occurs, the subscribing code is processed in the same transaction as the code that raised the event, unless the subscriptions are deferred.
Oracle E-Business Suite Integrated SOA Gateway supports business events through event subscription. An integration administrator can subscribe to a business event from the business event interface details page. The subscription to that event can be enqueued as an out agent. An integration developer can create a SOA composite application with BPEL process in Oracle JDeveloper to include the subscribed event at design time and update application data if needed at runtime.
To better understand how the subscription model works for business events, detailed tasks at design time and runtime are included in this chapter. For the example described in the following sections, Oracle JDeveloper 11g (11.1.1.6.0) is used as a design-time tool to create a SOA composite application with BPEL process, and Oracle SOA Suite 11g (11.1.1.6.0) is used for the process deployment.
Note: While using Oracle JDeveloper with other Oracle Fusion Middleware components (such as Oracle SOA Suite), to enable SOA technologies, you need to manually download Oracle SOA Suite Composite Editor, an Oracle JDeveloper extension for SOA technologies. For more information on installing additional Oracle Fusion Middleware design-time components, see the Oracle Fusion Middleware Installation Guide for Oracle JDeveloper.
Using a Business Event in Creating a SOA Composite Application with BPEL Process at Design Time
SOA Composite Application with BPEL Process Scenario
Take a PO XML Raise business event as an example to explain the SOA composite application with BPEL process creation.
When a purchase order is created and approved, a Purchase Order Approved business event oracle.apps.po.event.xmlpo is raised. Since the subscription to this event is created through the interface details page (internally, an event subscription is automatically created for the selected event with WF_BPEL_QAGENT as Out Agent), and enqueued in WF_EVENT_T structure to Advanced Queue WF_BPEL_Q, we will create a BPEL process to first dequeue the subscription from the WF_BPEL_Q queue to get the event details. The event details will be passed through BPEL process activities and then written in XML file as an output file.
When the BPEL process has been successfully processed after deployment, the same purchase order information should be obtained from the output file once a purchase order is approved.
Prerequisites to Create a SOA Composite Application with BPEL Process Using a Business Event
An integration administrator must first subscribe to a business event from the Oracle Integration Repository user interface. Internally, an event subscription is automatically created for that event with WF_BPEL_QAGENT as Out Agent.
For example, a business event oracle.apps.po.event.xmlpo needs to be subscribed. A confirmation message appears if the event subscription has been successfully created.
To subscribe to a business event, the administrator will first locate an event from the Oracle Integration Repository, and then click Subscribe in the interface detail page to create the subscription.
For information on how to subscribe to business events, see Subscribing to Business Events, Oracle E-Business Suite Integrated SOA Gateway Implementation Guide.
Note: If a BPEL process is created with the business event that you have subscribed to it, in order for the subscribed business event to be successfully enqueued to WF_BPEL_Q queue, you need to make sure:
-
The consumer name must be unique.
-
The BPEL process is deployed before raising the business event.
Once the subscription is created and enqueued, an integration developer can then orchestrate the subscribed event into a meaningful business process in Oracle JDeveloper using BPEL language at design time.
SOA Composite Application with BPEL Process Creation Flow
Based on the PO XML Raise business event scenario, the following design-time tasks are discussed in this chapter:
-
Create a new SOA Composite Application with BPEL Process
Use this step to create a new SOA composite application with BPEL process called
GetPurchaseOrder.bpel. -
Create a Partner Link for AQ Adapter
Use this step to dequeue the event details from the
WF_BPEL_Qqueue. -
Use the Receive activity to take event details as an input to the Assign activity.
-
Create a Partner Link for File Adapter
This is to write event details in an XML file as an output file.
-
This is to write business event information to an XML file through invoking the partner link for File Adapter.
-
Use the Assign activity to take the output from the Receive activity and to provide input to the Invoke activity.
For general information and how to create SOA composite applications using BPEL process service component, see the Oracle Fusion Middleware Developer's Guide for Oracle SOA Suite for details.
Creating a New SOA Composite Application with BPEL Process
Use this step to create a new SOA composite application with BPEL process that will contain various BPEL process activities.
To create a new SOA composite application with BPEL process:
-
Open Oracle JDeveloper.
-
Click New Application in the Application Navigator.
The "Create SOA Application - Name your application" page is displayed.
-
Enter an appropriate name for the application in the Application Name field and select SOA Application from the Application Template list.
Click Next. The "Create SOA Application - Name your project" page is displayed.
-
Enter an appropriate name for the project in the Project Name field, for example,
GetPOProject. -
In the Project Technologies tab, select 'Web Services' and ensure that SOA is selected from the Available technology list to the Selected technology list.
Click Next. The "Create SOA Application - Configure SOA settings" page is displayed.
-
Select Composite With BPEL Process from the Composite Template list, and then click Finish. You have created a new application, and a SOA project. This automatically creates a SOA composite.
The Create BPEL Process page is displayed.
-
Leave the default BPEL 1.1 Specification selection unchanged. This creates a BPEL project that supports the BPEL 1.1 specification.
Enter an appropriate name, for example
GetPurchaseOrder, for the BPEL process in the Name field.Select Define Service Later in the Template field. Click OK.
An empty BPEL process is created. The required source files including bpel and wsdl, using the name you specified (for example,
GetPurchaseOrder.bpelandGetPurchaseOrder.wsdl) andcomposite.xmlare also generated. -
Click Finish.
-
Navigate to SOA Content > Business Rules and double click
composite.xmlto view the composite diagram.Composite Diagram
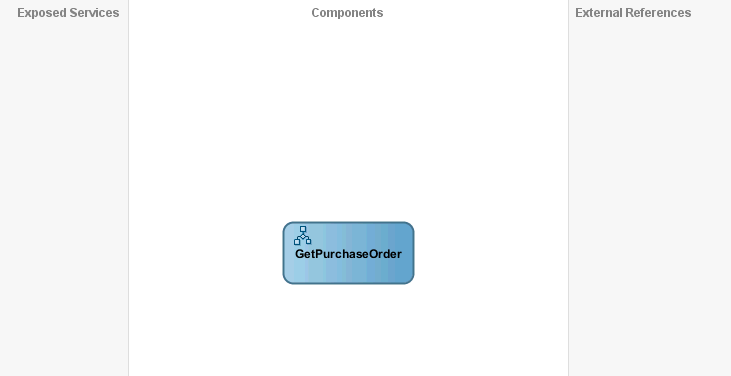
Double click on the
GetPurchaseOrdercomponent to open the BPEL process.
Creating a Partner Link for AQ Adapter
Use this step to create a Partner Link called GetPurchaseOrder for AQ Adapter to dequeue the subscription to oracle.apps.po.event.xmlpo event.
To create a partner link for AQ Adapter to dequeue the event subscription:
-
In Oracle JDeveloper, drag and drop the AQ Adapter service from the BPEL Services list into the right Partner Link swim lane of the process diagram. The Adapter Configuration wizard welcome page appears.
-
Click Next. The Service Name dialog box appears.
-
Enter a service name in the Service Name dialog box, for example
GetPO. -
Click Next. The Service Connection dialog box appears.
-
You can use an existing database connection by selecting a database connection from the Connection list or define a new database connection by clicking New to open the Create Database Connection Wizard.
Note: You need to connect to the database where Oracle E-Business Suite is running.
To create a new database connection:
-
Click New to open the Create Database Connection Wizard. Click Next and enter an unique connection name and then select a connection type for the database connection. Click Next.
-
Enter appropriate user name and password information to authenticate the database connection in the Authentication dialog box. Click Next
-
Specify the following information in the Connection dialog box:
-
Driver: Thin
-
Host Name: Enter the host name for the database connection. For example,
myhost01.example.com. -
JDBC Port: Enter JDBC port number (such as
1521) for the database connection. -
SID: Specify an unique SID value (such as
sid01) for the database connection.
-
-
Click Next to test your database connection.
The status message
"Success!"indicates a valid connection. -
Click Next to return to the Service Connection dialog box providing a summary of the database connection.
-
-
The JNDI (Java Naming and Directory Interface) name corresponding to the database connection you specified appears automatically in the JNDI Name field of the Service Connection dialog box. Alternatively, you can enter a different JNDI name.
-
Click Next to open Adapter Interface dialog box.
Select the Define from operation and schema (specified later) radio button and click Next. The Operation dialog box appears.
-
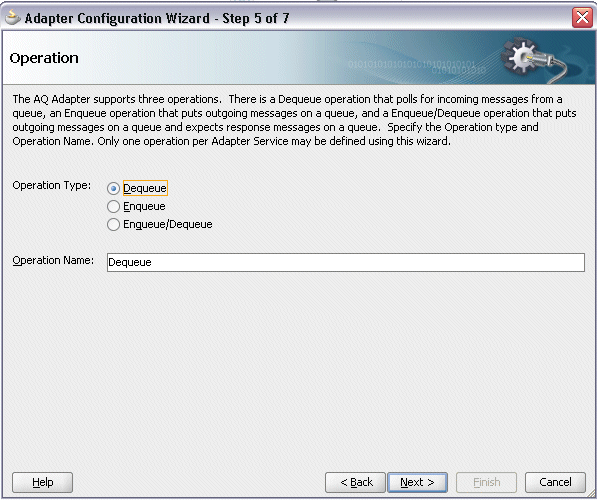
Select the Dequeue radio button in the Operation Type field. 'Dequeue' is also populated in the Operation Name field.
Operation Dialog
-
Click Next to open the Queue Name dialog box.
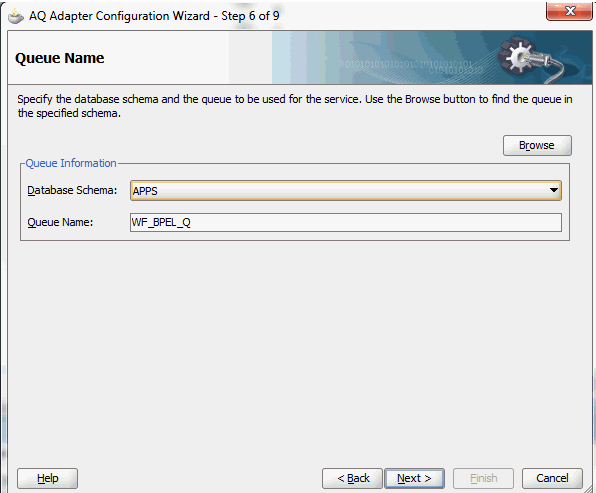
Select 'APPS' in the Database Schema field. Enter 'WF_BPEL_Q' in the Queue Name field.
Queue Name Dialog
-
Click Next to open the Queue Parameters dialog box.
Queue Parameters Dialog
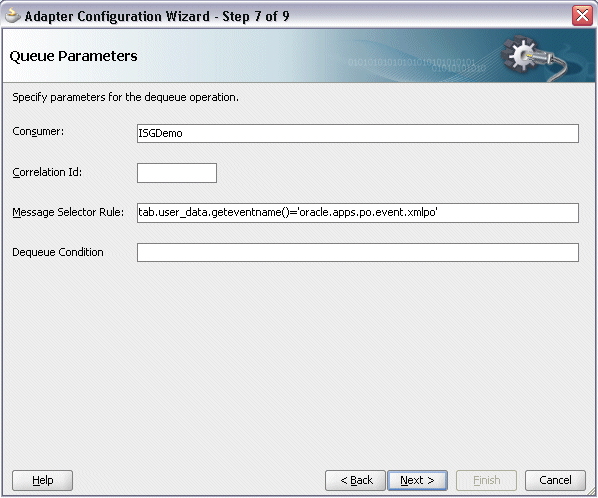
Enter the following information:
-
Enter a unique consumer name.
Important: In order for the subscribed business event to be successfully enqueued to
WF_BPEL_Qqueue, the consumer name must be unique. -
Enter message selector rule information (such as
tab.user_data.geteventname()='oracle.apps.po.event.xmlpo').
-
-
Click Next. The Messages dialog box opens where you can define the message that will be contained in the Business Event System payload for the APPS.WF_BPEL_Q queue.
Click Browse for schema file to open the Type Chooser window.
Click Import Schema Files on the top right corner of the Type Chooser window. This opens the Import Schema File pop-up window.
Click the Browse Resources.. icon to display the SOA Resource Browser window. Select the xsd folder as the location and APPS_NE_WF_EVENT_T file from the folder.
SOA Resource Browser Window
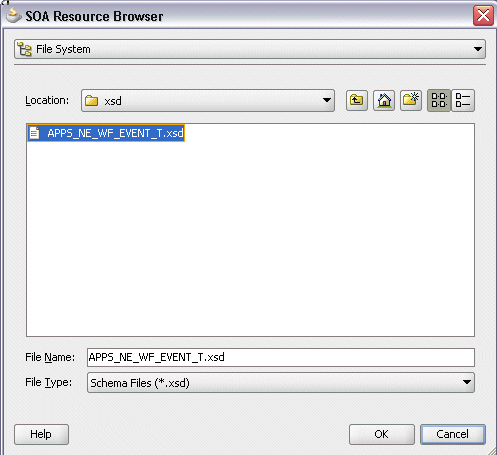
Click OK twice.
In the Type Chooser window, expand the Project Schema Files and select
WF_EVENT_Tschema from theAPPS_NE_WF_EVENT_T.xsd. Click OK.The selected
APPS_NE_WF_EVENT_T.xsdis displayed as URL and theWF_EVENT_Telement is selected as Schema Element.Messages Dialog with Selected Schema
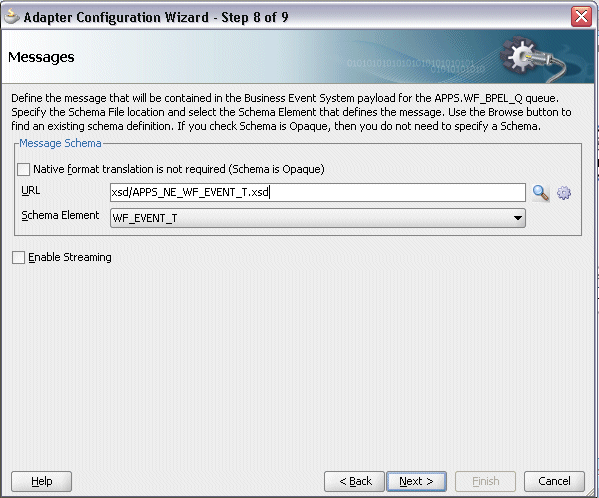
-
Click Next to proceed to the Finish dialog box to confirm that you have finished defining the AQ Adapter for the
GetPOservice. -
Click Finish. The wizard generates the WSDL file corresponding to the
GetPOservice.Click Apply and then OK to complete the partner link configuration. The partner link is created with the required WSDL settings, and is represented in the BPEL project by a new icon in the border area of the process diagram.
Adding a Receive Activity
This step is to configure a Receive activity to receive XML data from the partner link GetPO that you configured for the AQ adapter service for the business event.
The XML data received from the Receive activity is used as an input variable to the Assign activity that will be created in the next step.
To add a Receive activity to obtain Purchase Order XML data:
-
In Oracle JDeveloper, expand the BPEL Constructs from the Component Palette. Drag and drop the Receive activity into the center swim lane of the process diagram.
-
Link the Receive activity to the
GetPOpartner link. The Receive activity will take event data from the partner link. The Edit Receive dialog box appears. -
Enter a name for the Receive activity such as 'Receive_PO' and then click the Create icon next to the Variable field to create a new variable. The Create Variable dialog box appears.
-
Select Global Variable and then enter a name for the variable. You can accept the default name. Click OK to return to the Edit Receive dialog box.
-
Click Apply and then OK to finish configuring the Receive activity.
Edit Receive Dialog
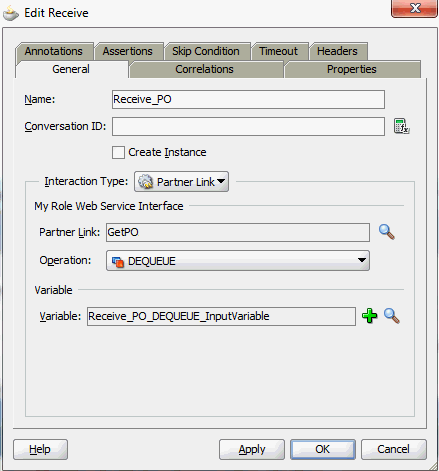
The Receive activity appears in the BPEL process diagram.
Adding a Partner Link for File Adapter
Use this step to configure a business event by writing the event data to an XML file.
To add a Partner Link for File Adapter:
-
In Oracle JDeveloper, drag and drop the File Adapter service from the BPEL Services list into the right Partner Link swim lane of the process diagram. The Adapter Configuration wizard appears.
-
Click Next. The Service Name dialog box appears.
-
Enter a name for the file adapter service, such as
WritePurchaseOrder. -
Click Next. The Adapter Interface dialog box appears.
-
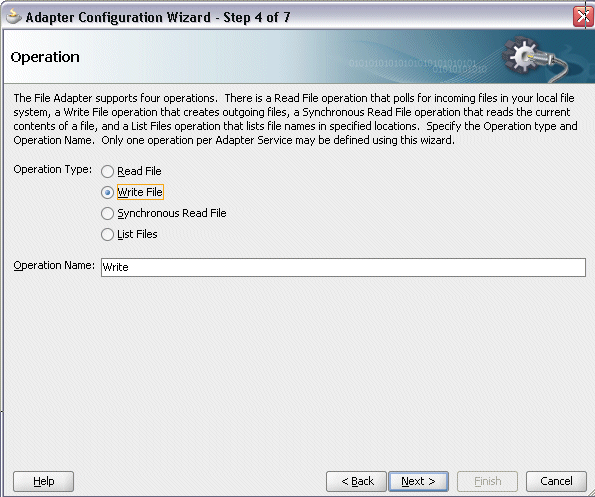
Select the Define from operation and schema (specified later) radio button and click Next. The Operation dialog box appears.
Operation Dialog
-
Specify the operation type, for example Write File. This automatically populates the Operation Name field.
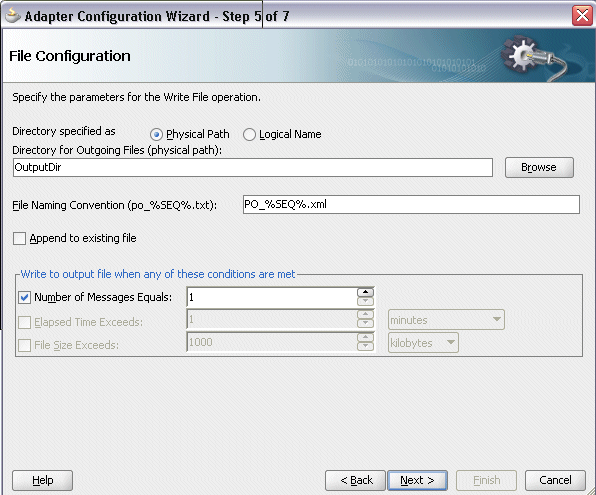
Click Next to access the File Configuration dialog box.
File Configuration Dialog
-
For the Directory specified as field, select Physical Path. Enter directory path in the Directory for Outgoing Files field, and specify a naming convention for the output file such as
PO_%SEQ%.xml. -
Confirm the default write condition: Number of Messages Equals 1. Click Next. The Messages dialog box appears.
-
Select Browse for schema file in front of the URL field.
The Type Chooser dialog is displayed.
Type Chooser Dialog
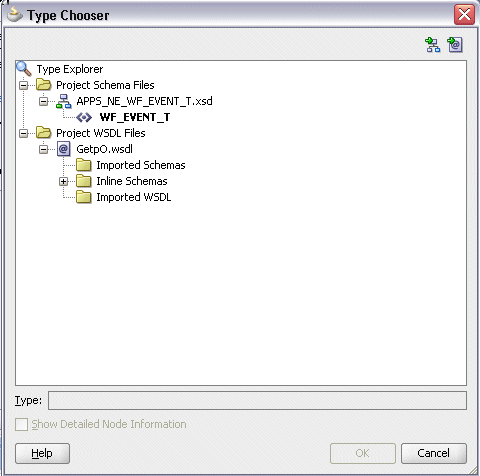
Expand the Project Schema Files and select
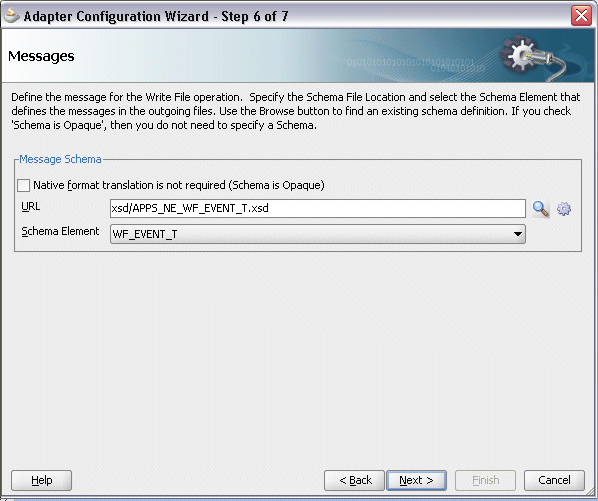
WF_EVENT_Tschema from theAPPS_NE_WF_EVENT_T.xsd. Click OK.The selected
APPS_NE_WF_EVENT_T.xsdis displayed as URL and theWF_EVENT_Telement is selected as Schema Element.Messages Dialog with Selected Schema
-
Click Next and then Finish. The wizard generates the WSDL file corresponding to the partner link. The main Create Partner Link dialog box appears, specifying the new WSDL file
WritePurchaseOrder.wsdl.Edit Partner Link Dialog
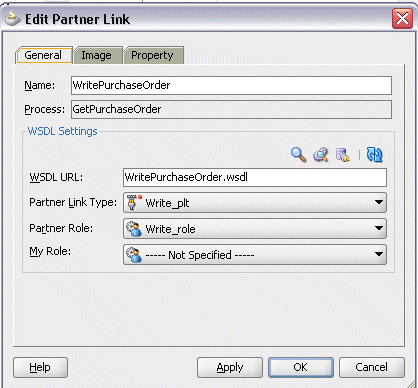
Click Apply and then OK to complete the configuration and create the partner link with the required WSDL settings for the File Adapter Service.
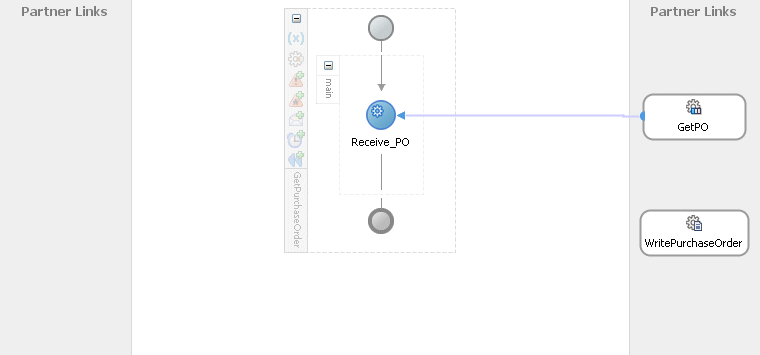
The
WritePurchaseOrderPartner Link appears in the BPEL process diagram.BPEL Process Diagram with Partner Link Added for File Adapter
Adding an Invoke Activity
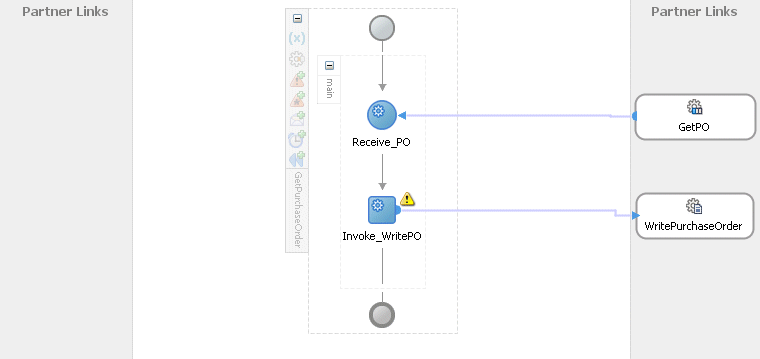
This step is to configure an Invoke activity to write the purchase order approved event details that is received from the Receive activity to the WritePurchaseOrder partner link in an XML file.
To add an Invoke activity:
-
In Oracle JDeveloper, expand the BPEL Constructs from the Component Palette. Drag and drop the Invoke activity from the Component Palette into the center swim lane of the process diagram, after the Receive activity.
-
Link the Invoke activity to the
WritePurchaseOrderservice. The Invoke activity will send event data to the partner link. The Edit Invoke dialog box appears. -
Enter a name for the Invoke activity, and then click the Create icon next to the Input Variable field to create a new variable. The Create Variable dialog box appears.
-
Select Global Variable and then enter a name for the variable. You can also accept the default name. Click OK to close the Create Variable dialog box.
Click Apply and then OK in the Edit Invoke dialog box to finish configuring the Invoke activity.
The Invoke activity appears in the process diagram.
BPEL Process Diagram with Invoke Activity Added
Adding an Assign Activity
Use this step to pass the purchase order approved event details from the Receive activity to the Invoke activity.
To add an Assign activity:
-
In Oracle JDeveloper, expand the BPEL Constructs from the Component Palette. Drag and drop the Assign activity from the Component Palette into the center swim lane of the process diagram, between the Receive activity and the Invoke activities.
-
Double-click the Assign activity to access the Edit Assign dialog box.
-
Select the Copy Rules tab and expand the source and target trees:
-
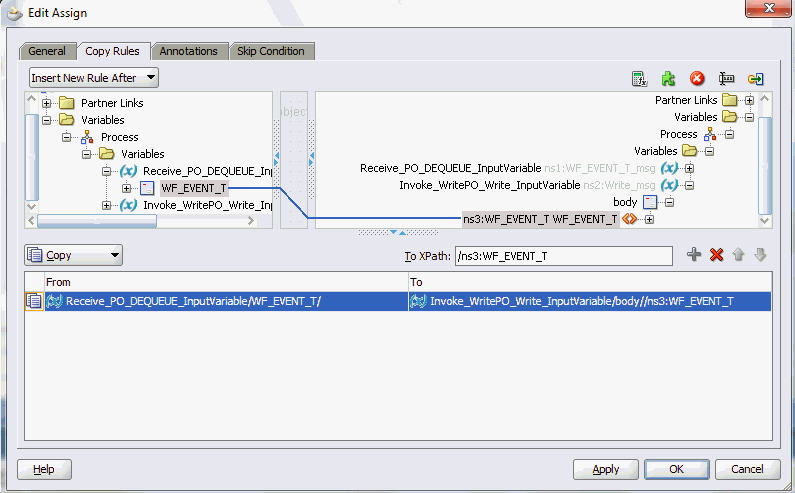
In the From navigation tree, navigate to Variable > Process > Variables > Receive_PO_Dequeue_InputVariable and select WF_EVENT_T element.
-
In the To navigation tree, navigate to Variable > Process > Variables > Invoke_WritePO_Write_InputVariable and select body.
Drag the source node (WF_EVENT_T) to connect to the target node (body) that you just identified. This creates a line that connects the source and target nodes. The copy rule is displayed in the From and To sections at the bottom of the Edit Assign dialog box.
Edit Assign Dialog
-
-
Click Apply and then OK in the Edit Assign dialog box to complete the configuration of the Assign activity.
Click the composite.xml to display the Oracle JDeveloper composite diagram.
Deploying and Testing the SOA Composite Application with BPEL Process at Runtime
After creating a SOA composite application with the subscribed event in BPEL process, you need to deploy it to the Oracle WebLogic managed server. This can be achieved using Oracle JDeveloper. Once the composite is deployed, it can be tested from the Oracle Enterprise Manager Fusion Middleware Control Console.
Prerequisites
Before deploying the SOA composite with BPEL process using Oracle JDeveloper, you must have established the connectivity between the design-time environment and the runtime server. For information on how to configure the necessary server connection, see Configuring Server Connection.
Note: If a local instance of the Oracle WebLogic Server is used, start the WebLogic Server by selecting Run > Start Server Instance from Oracle JDeveloper. Once the WebLogic Admin Server "DefaultServer" instance is successfully started, the <Server started in Running mode> and DefaultServer started message in the Running:DefaultServer and Messages logs should appear.
Perform the following runtime tasks:
Deploying the SOA Composite Application with BPEL Process
Before manually testing the BPEL process, you need to deploy it first.
To deploy the SOA composite application with BPEL process:
-
In the Applications Navigator of JDeveloper, select the GetPOProject project.
-
Right-click the project and select Deploy > [project name] > [serverConnection] from the menu.
For example, you can select Deploy > GetPOProject > SOAServer to deploy the process if you have the connection appropriately.
Note: If this is the first time to set up the server connection, then the Deployment Action dialog appears. Select 'Deploy to Application Server' and click Next.
In the Deploy Configuration dialog, ensure the following information is selected before clicking Next to add a new application server:
-
New Revision ID: 1.0
-
Mark composite revision as default: Select this checkbox.
-
Overwrite any existing composites with the same revision ID: Select this checkbox.
The steps to create a new Oracle WebLogic Server connection from Oracle JDeveloper are covered in Configuring Server Connection.
-
-
In the Select Server dialog, select 'soa-server1' that you have established the server connection earlier.
Click Next.
-
In the SOA Servers dialog, accept the default target SOA Server ('soa-server1') selection.
Click Next and Finish.
-
If you are deploying the composite for the first time from your Oracle JDeveloper session, the Authorization Request window appears. Enter username and password information specified during Oracle SOA Suite installation. Click OK.
-
Deployment processing starts. Monitor deployment process and check for successful compilation in the SOA - Log window.
Verify that the deployment is successful in the Deployment - Log window.
Testing the SOA Composite Application with BPEL Process
Once the BPEL process contained in the SOA composite application has been successfully deployed, you can manage and monitor the process from Oracle Enterprise Manager Fusion Middleware Control Console. You can also test the process and the integration interface by manually initiating the process.
Log in to Oracle E-Business Suite to manually initiate the purchase order approval and acknowledgement processes and to confirm that the relevant event is raised and the updated purchased order details is also written in the XML file.
To manually test the BPEL process contained in the SOA composite application:
-
Navigate to Oracle Enterprise Manager Fusion Middleware Control Console (
http://<hostname>:<port>/em). The login page appears. -
Enter the username and password information specified during the Oracle SOA Suite installation. Click Login to log in to a farm. The composite (GetPurchaseOrder) you deployed is displayed in the Applications Navigation tree.
You may need to select an appropriate target instance farm if there are multiple target Oracle Enterprise Manager Fusion Middleware Control Console farms.
For more information about Oracle SOA Suite, see the Oracle Fusion Middleware Administrator's Guide for Oracle SOA Suite.
-
From the Farm navigation pane, expand the
SOA > soa-infranode in the tree to navigate through the SOA Infrastructure home page and menu to access your deployed SOA composite applications running onsoa-inframanaged server.Ensure that GetPurchaseOrder has been deployed.
-
Log in to Oracle E-Business Suite as a user who has the XML Gateway responsibility.
This is to ensure that the XML Gateway trading partner is set up correctly so that a purchase order can have a valid supplier that has been defined.
-
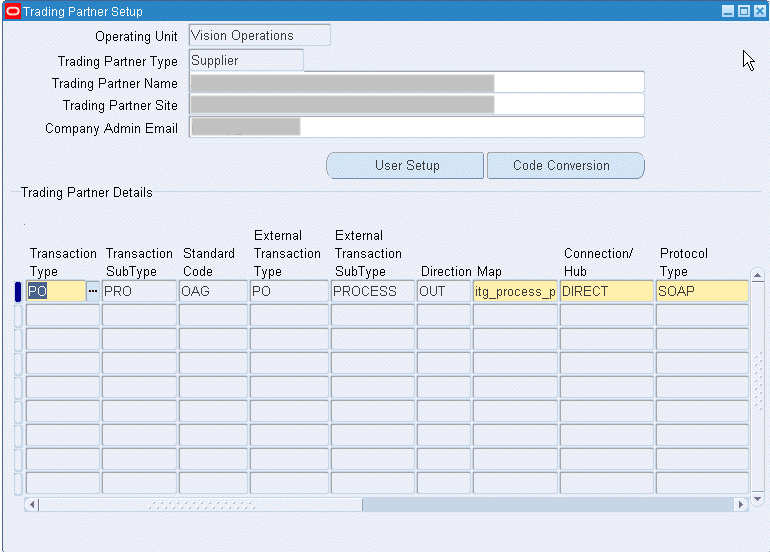
Select Define Trading Partner from the navigation menu to access the Trading Partner Setup window.
-
Enter the header values on the Trading Partner Setup form as follows:
-
Trading Partner Type: Supplier
-
Trading Partner Name: Enter a trading partner name, such as Example Inc.
-
Trading Partner Site: Enter a trading partner site information.
-
Company Admin Email: Enter a valid email address.
-
-
Enter the following trading partner details:
-
Transaction Type: PO
-
Transaction SubType: PRO
-
Standard Code: OAG
-
External Transaction Type: PO
-
External Transaction SubType: Process
-
Direction: Out
-
Map: itg_process_po_007_out
-
Connection / Hub: DIRECT
-
Protocol Type: SOAP
Trading Partner Setup Form
-
-
Save the trading partner details. Switch responsibility back to Purchasing, Vision Operations (USA) and select Purchase Order from the navigation menu.
-
Create a purchase order with the header values reflecting the trading partner you previously defined in the Purchase Orders form:
-
Supplier: Enter a supplier information.
-
Site: Select a site information.
-
-
On the Lines tab, enter a data row with the following values:
-
Type: Goods
-
Item: CM13139
-
Quantity: 1
-
Description: Hard Drive - 8GB
-
Promised: Enter any future date in the format of dd-mmm-yyyy (such as 23-JUN-2008).
-
-
Save your purchase order. The status of the purchase order is 'Incomplete'.
Note: Because the trading partner is set up and valid, the transmission method is automatically set to XML.
-
Click Approve to approve the purchase order.
Purchase Orders Form
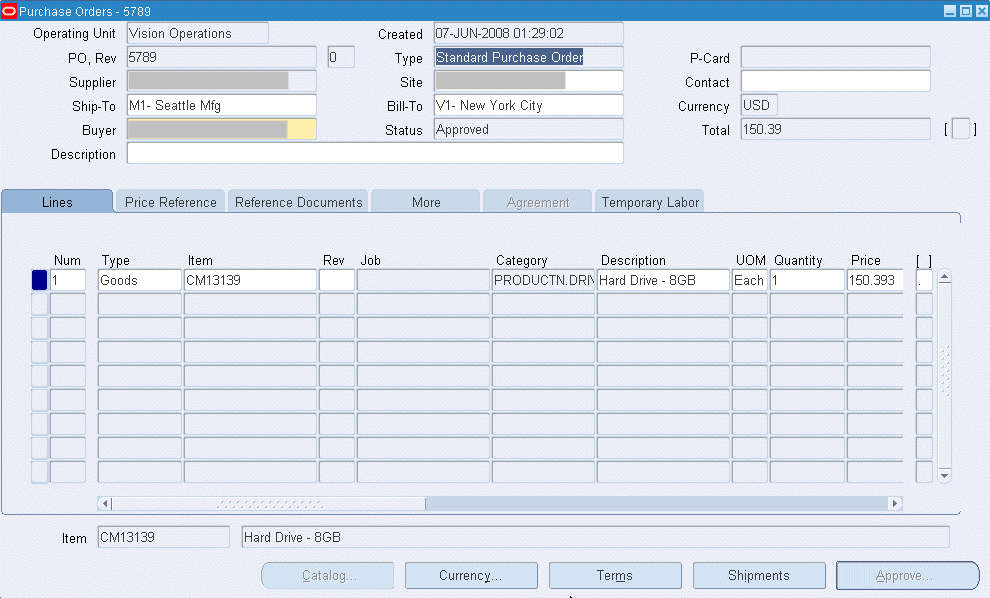
The status of the purchase order is now changed to 'Approved'. For future reference, record the value of the PO, Rev field (for example, the PO number 5789).
Once the purchase order is approved, the business event
oracle.apps.po.event.xmlpois raised. -
Log in to Oracle Enterprise Manager Fusion Middleware Control Console to confirm that the
GetPurchaseOrderBPEL process has been completed.To verify, click the Instances tab. The SOA composite application instance ID, name, conversation ID, most recent known state of each instance since the last data refresh of the page are displayed.
-
Click your BPEL service component instance link (such as GetPurchaseOrder) to display the Instances page where you can view the process details of the BPEL activities in the Audit Trail tab. Click the Flow tab to check the BPEL process flow diagram.
-
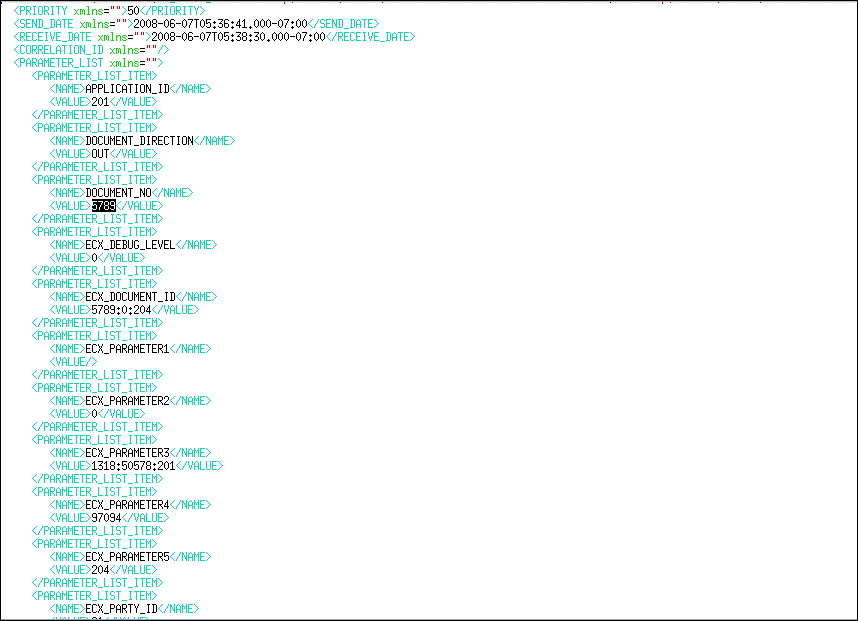
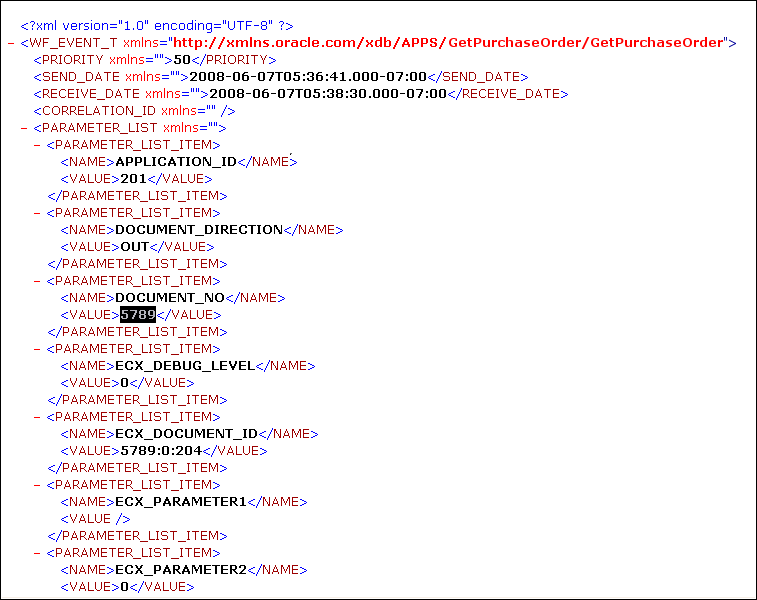
Double-click on the Receive activity in the BPEL process diagram and click the View XML document link to open the XML file. Note that the purchase order (number 5789) has been received.
Verification of the Receive Event Name
-
Examine the Assign and Invoke activities as well for the event raised and document number.
-
Go to the directory you specified for the write operation, for example
outputDir(typicallyc:\temp). Open the output file (for examplePO_1.xml), and confirm that the order number is the same as that of the approved purchase order.Confirmation of the Output Order Number
