Oracle Application Object Library Security
Overview of Oracle E-Business Suite Security
As System Administrator, you define Oracle E-Business Suite users, and assign one or more responsibilities to each user.
Note: Some screenshots used in this chapter were captured on an earlier release. Although the colors and interface elements of these images consequently have a different appearance, the functionality they illustrate also applies to the current release.
Defining Application Users
You allow a new user to sign-on to Oracle E-Business Suite by defining an application user. An application user has a user name and a password. You define an initial password, then the first time the application user signs on, they must enter a new (secret) password.
When you define an application user, you assign to the user one or more responsibilities.
Responsibilities Define a User's Context
A responsibility provides a context in which a user operates. This context can include profile option values, navigation menus, available concurrent programs, and so on.
For example, a responsibility can allow access to:
-
A restricted list of windows that a user can navigate to; for example, a responsibility may allow certain Oracle Planning users to enter forecast items, but not enter master demand schedule items.
-
A restricted list of functions a user can perform. For example, two responsibilities may have access to the same window, but one responsibility's window may have additional function buttons that the other responsibility's window does not have.
-
Reports in a specific application; as system administrator, you can assign groups of reports to one or more responsibilities, so the responsibility a user chooses determines the reports that can be submitted.
Each user has at least one or more responsibilities, and multiple users can share the same responsibility. A system administrator can assign users any of the standard responsibilities provided with Oracle E-Business Suite, or create new custom responsibilities if required.
HRMS Security
The Human Resources Management Systems (HRMS) products have an additional feature using Security Groups. For more information, see: Customizing, Reporting, and System Administration in Oracle HRMS.
Related Topics
Enterprise Command Center Security
Oracle Enterprise Command Center Framework provides an additional script to set up responsibilities and grants for product-specific Enterprise Command Centers. You run this script as part of your initial installation of Oracle Enterprise Command Center Framework. If you later change your RBAC setup, such as by creating new custom responsibilities, then you should rerun the script to update the Enterprise Command Center setup. See My Oracle Support article KA980, Installing Oracle Enterprise Command Center Framework, Release 12.2.
Oracle E-Business Suite User Passwords
The following are features related to passwords for end users of Oracle E-Business Suite.
Passwords can be defined in the Users Window; see: Users Window for more information on setting user passwords.
Note: Oracle E-Business Suite local password management is not designed to provide advanced password-management capabilities. For comprehensive password management, customers should integrate Oracle E-Business Suite with an Oracle identity solution such as Oracle Access Manager with Oracle Internet Directory (OID) or Oracle Unified Directory (OUD), or Oracle Identity Cloud Service (IDCS). For more information, see Single Sign-On Integration.
Hashed Passwords for Oracle E-Business Suite Users
For the enhanced security of passwords, if you have not already done so you should migrate local Oracle E-Business Suite user passwords from their current encryption schemes to a non-reversible hashed password scheme as soon as possible.
Note: This configuration is checked by the Secure Configuration Console based upon recommended security guidelines. For more information, see the details for the check "Application Users Passwords Have Been Migrated to Hashed Passwords". For an overview of all security feature configurations that are checked by the console, see Checked Security Guidelines.
Introduced in Oracle E-Business Suite Release 12.2.15 or R12.ATG_PF.C.Delta.14, the Password Security Administration page provides a dashboard making the migration process to a hashed password scheme easier to manage.
In Oracle E-Business Suite Release 12.2.3 and later, the AFPASSWD or FNDCPASS utilities on the command line are still available for the migration of Oracle E-Business Suite user passwords to a non-reversible hashed password scheme.
For information on migrating to non-reversible hashed passwords using the Password Security Administration user interface and the command line utilities (AFPASSWD and FNDCPASS), see "Oracle E-Business Suite Password Management", Oracle E-Business Suite Maintenance Guide.
Case Sensitivity in Oracle E-Business Suite User Passwords
Oracle E-Business Suite user passwords can optionally be treated as case sensitive, depending on the setting you choose for the site-level profile option Signon Password Case.
The two available settings are:
-
Sensitive - Passwords are stored and compared as they are, with the password case preserved. During comparison, if the entered password does not match the decrypted version, then an error message is displayed. With Release 12, this option is the default behavior. All newly created or changed passwords are treated as case sensitive.
Note: Users who have not changed their passwords since the installation of Release 12 are not affected until they do change their passwords.
A password expiration utility is available if the System Administrator requires that all users convert to case sensitive passwords upon the next login. This utility expires all passwords in FND_USER, including that of
SYSADMINand default Vision accounts and can be run as a SQL script ($FND_TOP/sql/AFCPEXPIRE.sql) or as a concurrent program (FNDCPEXPIRE_SQLPLUS). -
Insensitive (or not set) - Passwords are treated as case insensitive. In Insensitive mode, passwords are stored and compared in uppercase, similar to that in earlier releases. The entered password and the decrypted password are converted to uppercase prior to comparison.
If you want to preserve case insensitivity in passwords, such as retain the behavior from previous releases, ensure that Signon Password Case value is either set to "Insensitive" or not set at all.
There are no upgrade or data migration issues with this new feature. The profile option affects only how new passwords are stored. Existing passwords are tested using the policy in effect when they were created.
Restriction on the GUEST User Password
The GUEST user password cannot include the special character "#."
Super User Feature for Password Profile Override
The Super User Feature for Password Profile Override feature provides the ability to have a "Super User" whose password profile values, if set, override the site-level profile values when the Super User creates new users or updates passwords for existing users.
For this feature, the Super User is defined as one whose password profile values, if set, overrides the Site values and other password profile values when the Super User creates passwords for new users. This feature will override the following password profiles when creating a new user and/or changing an existing user password:
-
Signon Password Case (SIGNON_PASSWORD_CASE)
-
Signon Password Length (SIGNON_PASSWORD_LENGTH)
-
Signon Password Hard to Guess (SIGNON_PASSWORD_HARD_TO_GUESS)
-
Signon Password Custom (SIGNON_PASSWORD_CUSTOM) (This profile option specifies the full name of the class containing custom password validation logic.)
The profile SIGNON_PASSWORD_NO_REUSE will be overridden only when changing the password value of an existing user.
Here is an example of a business case for this feature: Say you have set the SIGNON_PASSWORD_HARD_TO_GUESS profile to 'Yes' at the Site level. Also say you have a requirement to create users whose initial passwords match their Insurance Policy Numbers. However, an insurance policy number can have repetitive digits (for example, '33'), and the repetitive numbers violate the rule specified by the profile SIGNON_PASSWORD_HARD_TO_GUESS. To overcome this conflict, this "Super User" feature can be enabled to create a Super User and the profile value for SIGNON_PASSWORD_HARD_TO_GUESS can be set to 'No' at the User level for this Super User. Now the Super User can create a new user having the password as "Insurance Policy Number" because the Super User's profile value overrides the site-level value. Note that whenever a new user gets created, the profile value is retrieved from the "Site" as the call is to fnd_profile.value_specific() API.
Note that the values which are used from the Super User setup are only temporary. Upon initial logon, each user must change the password as expected. When users sign on for the first time and change their passwords, the system enforces the password policies set at the Site- or User- level and not those of the Super User.
To enable this feature, you make a user a Super User by granting the permission 'OVERRIDE_PASSWORD_POLICY_PERM' must be granted to this user. This permission should only be granted by a system administrator who has a "Functional Administrator" responsibility.
-
Navigate to the Functional Administrator responsibility, then Permission Sets.
-
Create a permission set having the permission 'OVERRIDE_PASSWORD_POLICY_PERM'.
-
Create a grant on this permission set and assign this grant to the user.
Now, the Super User feature is activated. To deactivate this feature, end-date the grant or delete the grant.
Important: This feature should only be activated if there is an appropriate business need and if the issue can be resolved only by this feature, because the impact of this implementation can be enormous.
Guest User Account
Credentials (user name and password) for the Guest user are stored in a secure repository that was specifically designed to store sensitive data such as credentials, certificates and keys. Oracle E-Business Suite products can read Guest user information from this repository using standard APIs.
Note: Prior to Release 12.1, such items were stored in a FND profile option, GUEST_USER_PWD. This profile option did not offer the advanced security features now employed, and is no longer supported.
The only way to change the Guest user password is to update the context variable s_guest_pass and run AutoConfig, which runs the AdminAppServer utility. See: Using AutoConfig Tools for System Configuration, Oracle E-Business Suite Setup Guide and AdminAppServer Utility, Oracle E-Business Suite Setup Guide.
User Session Limits
Using the following profile options you can specify limits on user sessions.
ICX: Session Timeout
Use this profile option to enforce an inactivity time-out. If a user performs no Oracle E-Business Suite operation for a time period longer than the time-out value (specified in minutes), the user's session is disabled. The user is provided an opportunity to re-authenticate and re-enable a timed-out session. If re-authentication is successful, the session is re-enabled and no work is lost. Otherwise, Oracle E-Business Suite exits without saving pending work.
If this profile option is set to 0 or NULL, then user sessions will never time out due to inactivity.
ICX: Limit time
Use this profile option to specify the absolute maximum length of time (in hours) of any user session, active or inactive.
Defining a Responsibility
When you define a responsibility, you assign to it some or all of the components described below.
Menu (Required)
A menu is a hierarchical arrangement of application functions (forms). In the definition of a responsibility, the specified menu defines what is displayed in the navigator. The specified menu does not necessarily define the functions that can be accessed by the responsibility, which are granted. See: Overview of Function Security.
Data Group (Required)
A data group defines the mapping between Oracle E-Business Suite products and ORACLE database IDs. A data group determines which Oracle database accounts a responsibility's forms, concurrent programs, and reports connect to. See: Defining Data Groups, Oracle E-Business Suite Setup Guide.
Important: Oracle Application Framework functionality does not support data groups. You should not define any custom data groups.
For almost all cases, you should accept the default value in defining a responsibility.
Function and Menu Exclusions (Optional)
A responsibility may optionally have function and menu exclusion rules associated with it to restrict the application functionality enabled for that responsibility. See: Overview of Function Security.
Additional Notes About Responsibilities
Predefined Responsibilities
All Oracle E-Business Suite products are installed with predefined responsibilities. Consult the reference guide for your Oracle E-Business Suite product for the names of those predefined responsibilities.
Additionally, instances of the major components that help define a responsibility (data groups, request security groups, menus, and functions) are predefined for Oracle E-Business Suite. You should not define any custom data groups.
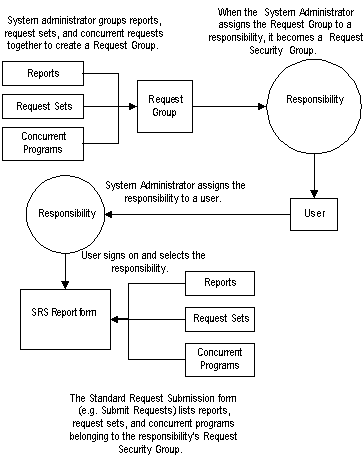
Responsibilities and Request Security Groups
Note: The Request Security Groups feature is for backward compatibility only.
When a request group is assigned to a responsibility, it becomes a request security group.
From a standard submission form, such as the Submit Requests form, the choice of concurrent programs and request sets to run are those in the user's responsibility's request security group.
If you do not include the Submit Requests form on the menu for a responsibility, then you do not need to assign a request security group to the responsibility.
Responsibilities and Function Security
Oracle E-Business Suite architecture may aggregate several related business functions into a single form. Parts of an application's functionality may be identified as individual Oracle E-Business Suite functions, which can then be secured (that is, included or excluded from a responsibility).
See: Overview of Function Security
Defining Request Security
You can control user access to requests and request sets using request security groups or Role-Based Access Control (RBAC). Beyond this short introduction, request groups and request security groups are discussed in greater detail, as part of a broader range of topics not necessarily limited to application security, in Oracle E-Business Suite Setup Guide.
Using Request Security Groups
You can use request security groups to specify the reports, request sets, and concurrent programs that your users can run from a standard submission form, such as the Submit Requests form.
Define a request group using the Request Groups form. Using the Responsibilities form, you assign the request group to a responsibility. The request group is then referred to as a request security group. See: Request Security Groups, Oracle E-Business Suite Setup Guide.
You can define a request group to contain single requests, request sets, or all the requests and request sets in an application.
If you choose to include all the requests and requests sets in an application, the user has automatic access to any new requests and request sets (without owners) in the future.
A request security group can contain requests and request sets from different applications. If you want to define request security groups that own requests from different applications, refer to the discussion on Data Groups. See: Defining Data Groups, Oracle E-Business Suite Setup Guide.
Note: A request security group or request group is not the same as a security group.
Individual Requests and Request Sets
Reports or concurrent programs which are not included in a request security group on an individual basis, but do belong to a request set included in a request security group, have the following privileges:
-
Users can, however, run request sets that contain requests that are not in their request security group, if the request set is in their request security group.
If you assign a request set, but not the requests in the set, to a request security group, the user:
-
Can edit the request set by deleting requests from it or adding other requests to it, only if the user is the assigned owner of the request set.
-
Cannot edit request information in the request set definition.
-
Cannot stop specific requests in the set from running.
The Request Security Groups figure below illustrates the relationship between a request security group, application user, and a responsibility.
Responsibilities, Request Groups, and Request Security Groups
Request Security Using RBAC
By using RBAC, administrators have more granular control in granting submission privileges to users. In short, administrators can assign individual programs/sets, all programs/sets in a request group, programs/sets belonging to one or more applications, and so on, either to the user directly or to a role that can then be assigned to one or more users.
If applications are included in the request groups, all programs/requests sets that are created in these applications will also be automatically included. Note that request submission applies to both programs and request sets.
See: Controlling Access to Concurrent Programs using Role-Based Access Control (RBAC), Oracle E-Business Suite Setup Guide.
Related Topics
Overview of Oracle E-Business Suite Security
Request Sets and Owners, Oracle E-Business Suite Setup Guide
Oracle Applications Manager Security Tests
You can manage Oracle E-Business Suite Diagnostics tests across environments from the Oracle Applications Manager Dashboard.
The two key tests accessible from the OAM Security tab are:
-
Best Practices: Database Security Tests
-
Best Practices: Oracle E-Business Suite Security Tests
Overview of Security Groups in Oracle HRMS
Security groups, used exclusively by Oracle HRMS, allow data to be partitioned in a single installation. A single installation can use a particular set of configuration data, but store data for multiple clients, where the data is partitioned by security groups. A user with a responsibility assignment of one security group can only access data within that security group.
A security group represents a distinct client or business entity. Data that must be distinct for each client in an installation is partitioned by security group. All other data is shared across all security groups.
For Oracle Application Object Library, the data items that are "striped" by security groups are responsibility assignments, lookups, and concurrent programs.
Security is maintained at the level of responsibility/security group pairs. That is, users are assigned specific responsibilities within each security group. When signing on to Oracle E-Business Suite, a user, if assigned more than one responsibility, will be asked to choose a responsibility and security group pair. Partitioned data accessed through security group sensitive views will show only data assigned to the current security group.
Use the Enable Security Groups profile option to enable this feature.
Defining Security Groups
Every installation will have a single "Standard" security group seeded in. If no other security groups are created, this single group will be hidden from users when they sign on.
In the Users form, you assign a security group when you assign a responsibility.
For more information, see: Configuring, Reporting and System Administration in Oracle HRMS.
Overview of Function Security
Function security is the mechanism by which user access to applications functionality is controlled.
Function security can be considered as "global data security," in that it grants access to a function regardless of the current row of data.
Oracle E-Business Suite architecture aggregates several related business functions into a single form. Because all users should not have access to every business function in a form, Oracle E-Business Suite provides the ability to identify pieces of applications logic as functions. When part of an application's functionality is identified as a function, it can be secured (that is, included or excluded from a responsibility).
Application developers register functions when they develop forms. A system administrator administers function security by creating responsibilities that include or exclude particular functions.
Terms
Function
A function is a part of an application's functionality that is registered under a unique name for the purpose of assigning it to, or excluding it from, a responsibility.
There are two types of function: executable functions (originally called form functions), and non-executable functions (originally called subfunctions).
Executable Function
Executable functions have the unique property that you may navigate to them using the Navigate window.
Non-Executable Function
A non-executable function is a securable subset of a form's functionality: in other words, a function executed from within a form.
A developer can write a form to test the availability of a particular non-executable function, and then take some action based on whether the non-executable function is available in the current responsibility.
Non-executable functions are frequently associated with buttons or other graphical elements on forms. For example, when a non-executable function is enabled, the corresponding button is enabled.
However, a non-executable function may be tested and executed at any time during a form's operation, and it need not have an explicit user interface impact. For example, if a non-executable function corresponds to a form procedure not associated with a graphical element, its availability is not obvious to the form's user.
Menu
A menu is a hierarchical arrangement of functions and menus of functions. Each responsibility has a menu assigned to it. Menus can map to permission sets.
Menu Entry
A menu entry is a menu component that identifies a function or a menu of functions. In some cases, both a function and a menu of functions correspond to the same menu entry. For example, both a form and its menu of subfunctions can occupy the same menu entry.
Responsibility
A responsibility defines an application user's current privileges while working with Oracle E-Business Suite. When an application user signs on, they select a responsibility that grants certain privileges, specifically:
-
The functions that the user may access. Functions are determined by the menu assigned to the responsibility.
-
The concurrent programs, such as reports, that the user may run.
-
The application database accounts that forms, concurrent programs, and reports connect to.
Related Topics
Functions, Menus, and the Navigate Window
Overview of Oracle E-Business Suite Security
Implementing Function Security
Executable Functions vs. Non-executable Functions
An executable function, as a whole, including all of its program logic, is always designated as a function. Subsets of a form's program logic can optionally be designated as subfunctions if there is a need to secure those subsets.
For example, suppose that an executable function such as a form contains three windows. The entire form is designated as a function that can be secured (included or excluded from a responsibility). Each of the form's three windows can be also be designated as non-executable functions, which means they can be individually secured. Thus, while different responsibilities may include this form, certain of the form's windows may not be accessible from each of those responsibilities, depending on how function security rules are applied.
Related Topics
Functions, Menus, and the Navigate Window
Functions, Menus, and the Navigate Window
Executable functions are selected using the Navigate window. The arrangement of form names in the Navigate window is defined by the menu structure assigned to the current responsibility.
The following types of menu entries are not displayed by the Navigate window:
-
Non-executable functions
-
Menus without Entries
-
Menu Entries without a Prompt
If none of the entries on a menu are displayed by the Navigate window, the menu itself is not displayed.
Menu Entries with a Submenu and Functions
If a menu entry has both a submenu and a function defined on the same line, then the behavior depends on whether or not the function is executable. If it is executable, then the submenu on the same line is treated as content to be rendered by the function. The submenu will not appear on a navigation tree, but will be available in function security tests (FND_FUNCTION.TEST calls). If the function is not executable, then it is treated as a "tag" for enforcing exclusion rules, and the submenu on the same line is displayed in the navigation tree.
A function is considered executable if it can be run directly from the current running user interface. For example, an Oracle E-Business Suite form using Oracle Forms is an executable function from within Oracle Forms, but not within the Self Service applications.
How Function Security Works
Registering Functions
-
Developers can require parts of their Oracle Forms code to look up a unique function name, and then take some action based on whether the function is available in the current responsibility. Function names are unique.
-
Developers can register functions. They can also register parameters that pass values to a function. For example, a form may support data entry only when a function parameter is passed to it.
Warning: In general, you should not modify names, parameters, or other material features of predefined functions for Oracle E-Business Suite products. The few exceptions are documented in the relevant manuals or product notes.
Excluding Functions
Each Oracle E-Business Suite product is delivered with one or more predefined menu hierarchies. System Administrators can assign a predefined menu hierarchy to a responsibility. To tailor a responsibility, System Administrators exclude functions or menus of functions from that responsibility using exclusion rules.
Note: The ability to exclude functions is to be used for backward compatibility only. Menu exclusions do not apply to grants.
Read-Only Forms for a Responsibility or User
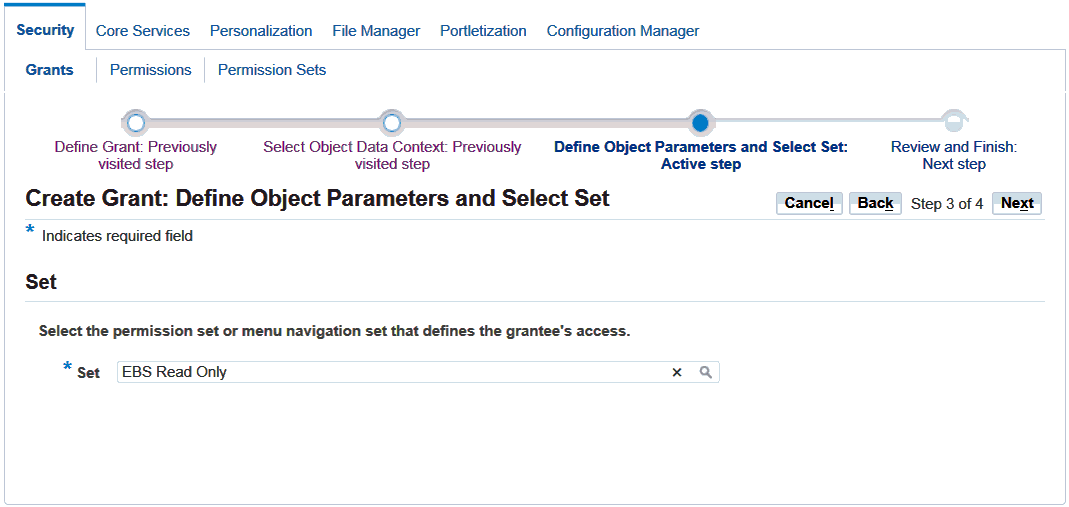
An application developer can define a form to be opened in query-only, or read-only, mode by using the QUERY_ONLY=YES string as a parameter for the function calling the form. Beginning with Release 12.2.6, an administrator can create a grant to set a form as read-only on the responsibility level, user level, or for an organization or a group of users. This can be done by granting the 'EBS Read Only' permission set to grantees.
Using the Functional Administrator responsibility, navigate to the Grants > Create Grant page.
-
On the Define Grant page, select the desired grantee type and grantee.
-
On the Define Object Parameters and Select Set page, select the permission set 'EBS Read Only' and assign it to your grantee(s).
Create Grant: Defined Object Parameters and Select Set Screen
-
Save your grant.
For more information on query-only forms, see Using Form Functions, Oracle E-Business Suite Developer's Guide.
Available Functions for a User
Functions are available to a user through responsibilities (as well as grants).
When a user first selects or changes their responsibility, a list of functions obtained from the responsibility's menu structure is cached in memory.
Functions a System Administrator has excluded from the current responsibility are marked as unavailable.
Executable functions in the function hierarchy (such as the menu hierarchy) are displayed in the Navigate window. Available non-executable functions are accessed by working with the application's forms.
Related Topics
Overview of Oracle E-Business Suite Security
Implementing Function Security
Securing Functions Using New Menus
Use the Menus form to define menus pointing to functions that you want to make available to a user.
-
Use forms and their associated menus of non-executable functions to define new menus.
The new menu can be then granted to a user.
Defining a New Menu Structure
When defining a new menu structure:
-
Create a logical, hierarchical listing of functions. This allows for easy exclusion of functions when customizing the menu structure for different responsibilities.
-
Create a logical, hierarchical menu that guides users to their application forms and pages.
Tasks for Defining a Custom Menu Structure
-
Determine the application functionality required for different job responsibilities.
-
Identify predefined menus, forms, and form subfunctions to use as entries when defining a new menu. Understand predefined menus by printing Menu Reports using the Submit Requests window.
Tip: To simplify your work, use predefined menus for your menu entries. You can exclude individual functions after a menu structure is assigned to a responsibility.
-
Plan your menu structure. Sketch out your menu designs.
-
Define the lowest-level menus first. A menu must be defined before it can be selected as an entry on another menu.
-
Assign menus and functions to higher-level menus.
-
Assign menus and functions to a top-level menu (root menu).
-
Document your menu structure by printing a Menu Report.
Warning: Always start with a blank Menus form (blank screen). See Notes About Defining Menus, below.
Notes About Defining Menus
Define Menus for Fast and Easy Keyboard Use
-
Design menu prompts with unique first letters, so typing the first letter automatically selects the form or menu.
-
Design the sequence of menu prompts with the most frequently used functions first (such as lower sequence numbers).
Menu Compilation
The Compile Security (FNDSCMPI) concurrent program is used to compile menus so that the system can more quickly check if a particular function is available to a particular responsibility/menu.
You should compile your menus after you make changes to your menu data. A request for this concurrent program is automatically submitted after you make changes using the Menus form.
Related Topics
Compile Security Concurrent Program
Preserving Custom Menus Across Upgrades
Preserve custom menus during upgrades of Oracle E-Business Suite by using unique names for your custom menus. For example, you can start the menu's name with the application short name of a custom application. Define a custom application named Custom General Ledger, whose application short name is XXCGL. Define your custom menu names to start with XXCGL, for example, XXCGL_MY_MENU.
Remember that the Oracle E-Business Suite standard menus may be overwritten with upgrade versions. Therefore, if you attached your custom menu as a submenu to one of the preseeded Oracle E-Business Suite menus, recreate the attachment to it following an upgrade. An alternative is to attach a standard Oracle E-Business Suite menu as a submenu to your custom menu; the link from your custom menu to the standard menu should survive the upgrade.
Related Topics
Overview of Oracle E-Business Suite Security
Implementing Function Security
Overview of Data Security
Data Security allows administrators to control user access to specific data, as well as what functions users can apply to that data.
Function security can be considered "global" data security, in that access to a function is granted regardless of the data.
Concepts and Definitions
Objects
Data Security uses the concept of an Object to define the data records that are secured.
Object
Data security permissions are managed on objects. Business entities such as Projects and Users are examples of objects. Only a securable business-level concept should be registered as an object.
An object definition includes the business name of the object and identifies the main table and primary key columns used to access the object.
Object Instance
An object instance is a specific example of an object, such as Project Number 123 or User JDOE. An object instance generally corresponds to a row in the database. An instance is identified by a set of one or more primary key values as defined by the object.
In addition, "All Rows" for an object indicates all data rows of the object.
Object Instance Set
An object instance set is a group of related object instances within an object. A set is specified as a predicate on the keys or attributes of an object, expressed as a SQL "WHERE clause." All instances that satisfy the predicate are considered members of the object instance set. For example:
STATUS = 'ACTIVE'
could determine a set of object instances with the "Active" status.
The specific instances in the set can vary over time as object instance attributes change, or as new object instances are created.
An example is:
OWNER = FND_GLOBAL.USER_ID
The predicate can also be parameterized, so that the logic can define instance sets as a function of one or more input parameters. An example is:
COLOR = :PARAM1
Object instance sets are also called "data instance sets."
Users and Groups
Users and groups are both roles that you can use in Role-Based Access Control. User and role information is stored in the Oracle Workflow directory service. For more information, see: Setting Up an Oracle Workflow Directory Service, Oracle Workflow Administrator's Guide.
Privileges given to users and groups determine their access to secured objects.
The data security system allows you to assign privileges to groups of users instead of assigning privileges to each user individually.
Users
Users are individuals who have access to software applications at a particular enterprise.
A user must have a unique name and should map one-to-one with an individual human or system. "Group" accounts are not correct uses of the user entity.
Groups
Users can belong to Groups. The grouping can come from position or organization relationships modeled in applications such as Oracle Human Resources. Alternatively, ad-hoc groups can be created explicitly for security purposes. A group is sometimes referred to as a role.
Functions and Permissions
A function or a permission is the smallest unit of securable product functionality. You can register function definitions with the security system to represent actions that can be performed on an object or on the system in general. Granting a function to a set of users gives them permission to perform that function, and so a function may also be referred to as a permission.
There are two broad categories of functions and permissions:
-
An executable function/permission can be invoked from a generic navigator user interface. An executable function definition must contain all information necessary to launch the function; often this includes the form name or URL plus parameters.
-
An abstract function/permission does not refer to a specific piece of code, but represents permission to perform a higher-level business action. The code that implements an abstract function calls the function security system to test whether the abstract function is granted. The system only allows the action if the abstract function is granted.
Examples of these are a particular JSP page (executable) and View Person (abstract).
Functions and permissions can either be at the system level or be sensitive to a data context.
Navigation Menus and Permission Sets
Functions and permissions are grouped into related sets so that administration of these functions can be performed in higher-level business terms.
Functions and permissions are bundled into named sets, which can be defined for two purposes: as navigation menus and/or permission sets. Each set can also contain other sets.
Menus are defined for navigation purposes and group UI pages into functional areas. Users access menus by selecting responsibilities. Each menu item maps to a permission which optionally may be granted to the user as part of the menu/responsibility assignment. Menu items that are not granted as part of the menu/responsibility assignment will not be rendered unless the user is granted the permission separately.
Permission sets are granted to users or roles independently of menus/responsibilities. Permission sets are granted to users in order to enable menu items and other operations (functions) that should not be available to all users assigned a given menu/responsibility. Permission sets are granted to users or roles through permission assignments (grants).
Grants
A grant authorizes a particular role to perform a specified action or actions (set of functions) on a specified object instance (or object instance set).
Note that where you are creating a data security policy for an object by creating a grant, you need to include that object in your grant definition. Other than in this specific type of case, you do not need to specify an object in your definition.
Security Context
Security context refers to the context of the data in which the user is working. For example, data context could be the organization or responsibility with which the user is logged in.
Implementation of Data Security
Implement data security by granting access to a set of functions (either a navigation menu or a permission set) to a user or group of users.
Data security policies can reflect access to:
-
A specific instance (row) identified by a primary key value
-
All instances (rows) of an object
-
An instance set defined by a SQL predicate (WHERE clause)
Responsibilities Window
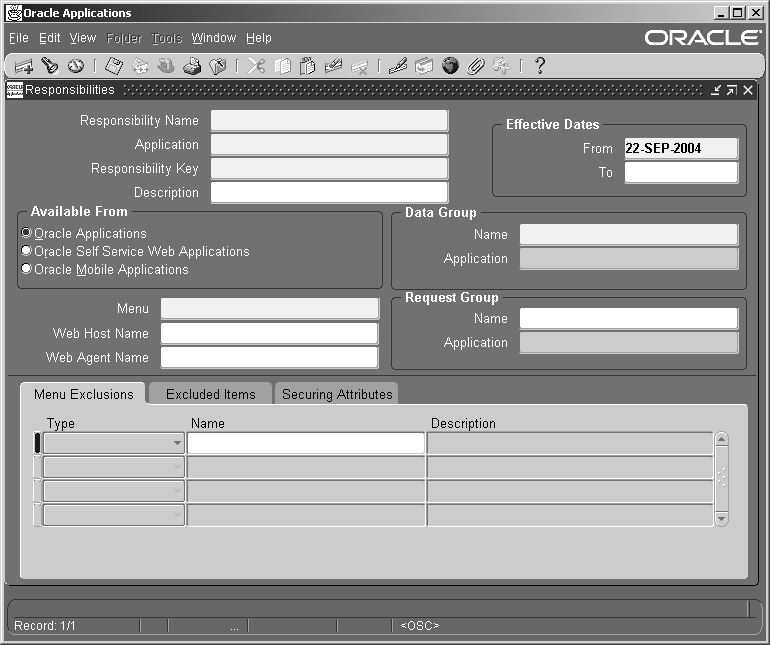
Use this window to define a responsibility. Each application user is assigned at least one responsibility.
Note: The information in this section can also be used to define a responsibility in the HTML-based Create Responsibility page.
A responsibility determines whether the user accesses Oracle E-Business Suite or Oracle Mobile Applications; which applications functions a user can use; which reports and concurrent programs the user can run; and which data those reports and concurrent programs can access.
Responsibilities cannot be deleted. To prevent a responsibility from being used, set the Effective Date's To field to a past date and restart Oracle E-Business Suite.
See: Overview of Function Security
Before defining your responsibility, do the following:
-
Use the Data Groups window to list the ORACLE user name your responsibility's concurrent programs reference on an application-by-application basis.
-
Use the Request Groups window to define the Request Group you wish to make available with this responsibility.
-
Use the Menus window to view the predefined Menu you can assign to this responsibility.
Responsibilities Block
An application name and a responsibility name uniquely identify a responsibility.
Responsibility Name
If you have multiple responsibilities, a pop-up window includes this name after you sign on.
Application
The owning application for the responsibility.
This application name does not prevent the user of this responsibility from accessing other applications' forms and functions if you define the menu to access other applications.
Responsibility Key
This is the internal key for the responsibility that is used by loader programs, (concurrent programs that load messages, user profiles, user profile values, and other information into Oracle E-Business Suite tables). The responsibility key is unique per application.
Do not use non-ASCII characters in the responsibility key.
Also, avoid using the following characters in the responsibility key: !, ", ;, [, ], (, ), {, }, %, |, <, >.
Effective Dates (From/To)
Enter the start/end dates on which the responsibility becomes active/inactive. The default value for the start date is the current date. If you do not enter an end date, the responsibility is valid indefinitely.
You cannot delete a responsibility, because its information helps to provide an audit trail. You can deactivate a responsibility at any time by setting the end date to the current date. If you wish to reactivate the responsibility later, either change the end date to a date after the current date, or clear the end date.
Available From
This is the navigator from which the responsibility will be available (Oracle E-Business Suite forms navigator, mobile navigator).
A responsibility may be associated with only one Oracle E-Business Suite system.
Data Group
Note: Data groups are used for backward compatibility only. Oracle Application Framework does not support the data groups feature. You should not define any custom data groups.
Name/Application
The data group defines the pairing of application and ORACLE user name.
Select the application whose ORACLE user name forms connect to when you choose this responsibility. The ORACLE user name determines the database tables and table privileges accessible by your responsibility. Transaction managers can only process requests from responsibilities assigned the same data group as the transaction manager.
Menu
The menu whose name you enter must already be defined with Oracle E-Business Suite. See: Menus.
Request Group - Name/Application
Specify a request security group to associate the responsibility to a set of requests, request sets, or concurrent programs that users logged in with this responsibility can run from the Submit Requests window. Note that such users can also access requests from a Submit Requests window you customize with a request group code through menu parameters
Note: The Request Security Groups feature is provided for backward compatibility.
New responsibilities should be created in accordance with Role-Based Access Control and should not have a default request security group.
See:
Overview of Oracle E-Business Suite Security
Customizing the Submit Requests Window Using Codes, Oracle E-Business Suite Setup Guide
Request Groups, Oracle E-Business Suite Setup Guide
Menu Exclusions Block
Note: Menu exclusions should be used for backward compatibility only.
Define function and menu exclusion rules to restrict the application functionality accessible to a responsibility.
Type
Select either Function or Menu as the type of exclusion rule to apply against this responsibility.
-
When you exclude a function from a responsibility, all occurrences of that function throughout the responsibility's menu structure are excluded.
-
When you exclude a menu, all of its menu entries, that is, all the functions and menus of functions that it selects, are excluded.
Name
Select the name of the function or menu you wish to exclude from this responsibility. The function or menu you specify must already be defined in Oracle E-Business Suite.
HTML-Based Applications Security
Oracle HTML-based applications use columns, rows and values in database tables to define what information users can access. Table columns represent attributes that can be assigned to a responsibility as Securing Attributes or Excluded Attributes. These attributes are defined in the Web Application Dictionary.
Excluded Items
Use the List of Values to select valid attributes. You can assign any number of Excluded Attributes to a responsibility.
Securing Attributes
Use the List of Values to select valid attributes. You can assign any number of securing attributes to the responsibility.
Security Groups Window
This form is for HRMS security only.
For more information on setting up system administration for the HRMS products, see: Customizing, Reporting, and System Administration in Oracle HRMS.
Users Window
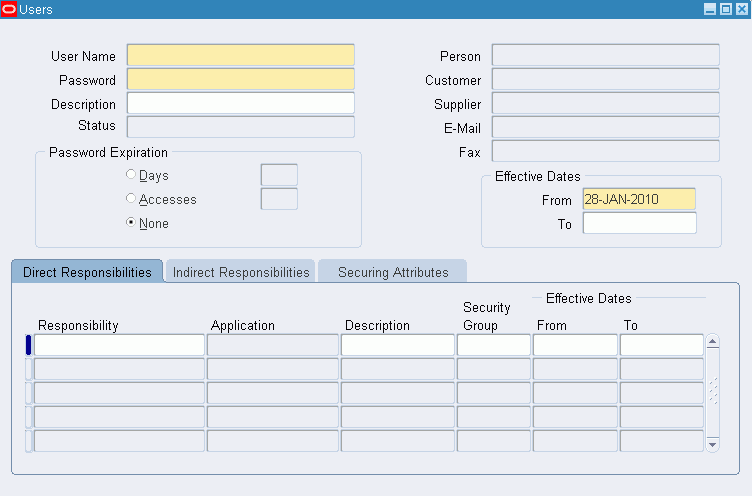
Use this window to define an Oracle E-Business Suite user. This user is an authorized user of Oracle E-Business Suite, and is uniquely identified by a user name.
Once defined, a new Oracle E-Business Suite user can sign on to Oracle E-Business Suite and access data through Oracle E-Business Suite windows.
Note: If you have upgraded from a previous release of Oracle E-Business Suite, ensure that you have run the Party Merge concurrent program to update your user data. If you have no run this program, you may receive errors in querying your user data.
For more information, see the Oracle Trading Community Architecture documentation.
Users Block
Enter these fields for the user.
User Name
An application user enters this user name to sign on to Oracle E-Business Suite.
The user name should only contain characters allowed by Oracle Single Sign-On.
Tip: We recommend that you define meaningful user names, such as the employee's first initial followed by their last name. Or, for a group account, you can define the application user name so as to indicate the purpose or nature of the group account.
Password
Enter the initial password of an application user. An application user enters this password along with his user name to sign on to Oracle E-Business Suite.
-
A password must be at least five (5) characters and can be up to thirty (30) characters.
-
All characters are allowed except control characters, which are non-printable. Oracle encourages the use of non-alphanumeric characters because they add complexity, making passwords harder to guess.
This window does not display the password you enter. After you enter a password, you must re-enter it to ensure you did not make a typing error.
If the application user already exists and the two entries do not match, the original password is not changed and an error message is displayed.
If you are defining a new application user and the two entries do not match, you are required to enter the password again. For a new user, you cannot navigate to the next field until the two entries match.
The first time an application user signs on, he must change his password. If a user forgets his password, you can reassign a new password in this field.
As System Administrator, you can set an initial password or change an existing password, but you cannot access the user's chosen password.
You can set the minimum length of Oracle E-Business Suite user passwords using the profile option Signon Password Length. If this profile option is left unset, the minimum length defaults to 5.
You can set the minimum number of days that a user must wait before being allowed to reuse a password with the Signon Password No Reuse profile option.
You can use the profile option Signon Password Hard to Guess to set rules for choosing passwords to ensure that they will be "hard to guess." A password is considered hard-to-guess if it follows these rules:
-
The password contains at least one letter and at least one number.
-
The password does not contain the user name.
-
The password does not contain repeating characters.
The Signon Password Failure Limit profile option determines the maximum number of login attempts before the user's account is disabled.
For information on case sensitivity in passwords, see: Case Sensitivity in Oracle E-Business Suite User Passwords.
Status
The Status field indicates the status of the user account. This field is display-only and values are generated by the system. This field is similar to Status in Oracle User Management for managing user accounts.
Possible statuses of a user account are:
-
Unassigned - This status is used for the moment of creating a new user in the form, before committing the transaction. Since a user ID hasn't been assigned yet at that moment, the record status is Unassigned.
-
Pending - This user account exists but cannot be used yet. For example, a user account with "Effective Dates" that are in the future would have a Pending status.
-
Locked - This user account is locked. For example, if a user has unsuccessfully tried to log in over the maximum number of tries allowed (per the profile option "Signon Password FailureLimit"), then the user account becomes locked.
-
Active - The status for a user account is Active if both of the following conditions are true:
-
The start date is not NULL and is before or equal to the current date
-
The end date is NULL or is after the current date
-
-
Inactive - This user has an inactive account. For example, a user account with "Effective Dates" that are in the past would have an Inactive status.
Person, Customer, and Supplier
Use these fields to enter the name of an employee (person), customer, or supplier contact. Enter the last name and first name, separated by a comma, of the employee, customer, or supplier who is using this application user name and password. Use the List of Values to select a valid name.
For more information on using these fields, see the Oracle Trading Community Architecture documentation.
Enter the email address for this user.
Fax
Enter the fax number for this user.
Password Expiration
-
Days - Enter the maximum number of days between password changes. A pop-up window prompts an application user to change his password after the maximum number of days you specify has elapsed.
-
Accesses - Enter the maximum allowed number of sign-ons to Oracle E-Business Suite allowed between password changes. A pop-up window prompts an application user to change their password after the maximum number of accesses you specify has elapsed.
Tip: We recommend that you require all application users to make regular password changes. This reduces the likelihood of unauthorized access to Oracle E-Business Suite.
Effective Dates (From/To)
The user cannot sign on to Oracle E-Business Suite before the start date or after the end date. The default for the start date is the current date. If you do not enter an end date, the user name is valid indefinitely.
You cannot delete an application user from Oracle E-Business Suite because this information helps to provide an audit trail. You can deactivate an Oracle E-Business Suite user at any time by setting the End Date to the current date.
If you wish to reactivate a user, change the End Date to a date after the current date, or clear the End Date field.
Direct Responsibilities
Direct responsibilities are responsibilities assigned to the user directly.
Responsibility
Select the name of a responsibility you wish to assign to this application user. A responsibility is uniquely identified by application name and responsibility name.
Security Group
This field is for HRMS security only. See: Customizing, Reporting, and System Administration in Oracle HRMS.
This field is enabled only if the profile Enable Security Groups is enabled.
From/To
You cannot delete a responsibility because this information helps to provide an audit trail. You can deactivate a user's responsibility at any time by setting the End Date to the current date.
If you wish to reactivate the responsibility for the user, change the End Date to a date after the current date, or clear the End Date.
Indirect Responsibilities
Indirect responsibilities are used with Oracle User Management only. A user may "inherit" an indirect responsibility through membership of a group to which the responsibility has been assigned.
This block is read-only.
Securing Attributes
Securing attributes are used by some Oracle HTML-based applications to allow rows (records) of data to be visible to specified users or responsibilities based on the specific data (attribute values) contained in the row.
You may assign one or more values for any of the securing attributes assigned to the user. If a securing attribute is assigned to both a responsibility and to a user, but the user does not have a value for that securing attribute, no information is returned for that attribute.
For example, to allow a user in the ADMIN responsibility to see rows containing a CUSTOMER_ID value of 1000, assign the securing attribute of CUSTOMER_ID to the ADMIN responsibility. Then give the user a security attribute CUSTOMER_ID value of 1000.
When the user logs into the Admin responsibility, the only customer data they have access to has a CUSTOMER_ID value of 1000.
Attribute
Select an attribute you want used to determine which records this user can access. You can select from any of the attributes assigned to the user's responsibility.
Value
Enter the value for the attribute you want used to determine which records this user can access.
Related Topics
Form Functions Window
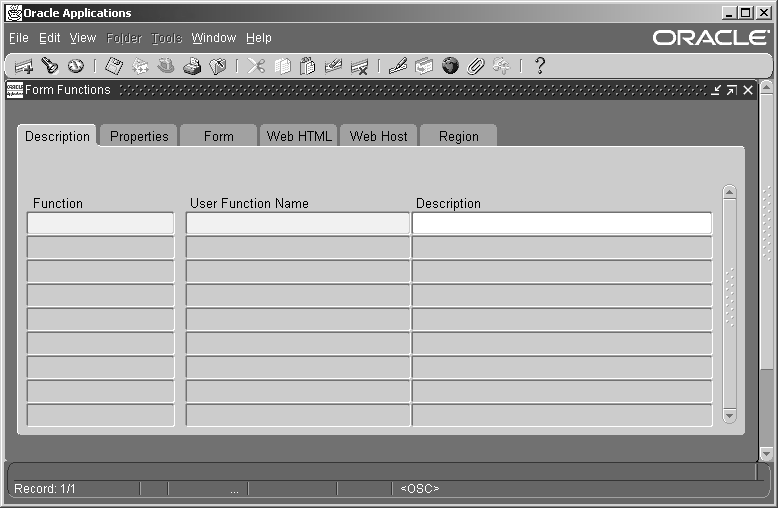
Used to define new functions. A function is a part of an application's functionality that is registered under a unique name for the purpose of assigning it to, or excluding it from, a responsibility.
Description
Fields include:
Function
Users do not see this unique function name. However, you may use this name when calling your function programmatically. You should follow the naming conventions for functions.
User Function Name
Enter a unique name that describes your function. You see this name when assigning functions to menus. This name appears in the Top Ten List of the Navigator window.
Properties
Fields include:
Type
A function's type describes its use. A function's type is passed back when a developer tests the availability of a function. The developer can write code that takes an action based on the function's type.
Standard function types include the following:
| Variable | Description |
|---|---|
| ADFX | External ADF Application. Used for linking an external Application Developer Framework (ADF) 11g application deployed on an Oracle Application Server 11g container from the Oracle E-Business Suite home page. |
| DBPORTLET | Database provider portlet. |
| FORM | Oracle E-Business Suite form functions are registered with a type of FORM. |
| JSP | Functions used for some products in the Oracle Self-Service Web Applications. These are typically JSP functions. |
| REST | REST service. |
| SERVLET | Servlet functions used for some products in the Oracle Self-Service Web Applications. |
| SUBFUNCTION | Subfunctions are added to menus (without prompts) to provide security functionality for forms or other functions. |
| WEBPORTLET | Web provider portlet. |
| WWK | Functions used for some products in the Oracle Self-Service Web Applications. These are typically PL/SQL functions that open a new window. |
| WWR or WWL | Functions used for some products in the Oracle Self-Service Web Applications. |
| WWJ | OA Framework JSP portlet. |
| WWW | Functions used for some products in the Oracle Self-Service Web Applications. These are typically PL/SQL functions. |
For information on functions used by Oracle Application Framework, see My Oracle Support article KB852704, Oracle Application Framework Developer's Guide: Index.
Maintenance Mode Support
This field should not be used. Maintenance Mode is disabled in an online patching-enabled environment.
Context Dependence
In general, the context dependence determines the required context for the function to work properly. The context dependence controls whether the user must choose a specified context (if not already in that context) before executing the function.
For example, some functions are controlled by profile options that affect what the user can perform within the current context. Types of context dependence are:
-
Responsibility - The function is controlled by the user's responsibility (RESP_ID/RESP_APPL_ID (includes ORG_ID)).
-
Organization - The function is controlled by the user's organization (ORG_ID).
-
Security Group - The function is controlled by the user's security group (service bureau mode).
-
None - There is no dependence on the user's session context.
Form
Fields include the following:
Form/Application
If you are defining a form function, select the name and application of your form.
Parameters
Enter the parameters you wish to pass to your function. Separate parameters with a space.
For an executable (form) function:
-
If you specify the parameter QUERY_ONLY=YES, the form opens in query-only mode. Oracle Application Object Library removes this parameter from the list of form parameters before opening the form in query-only mode.
-
You can also specify a different form name to use when searching for help for a form in the appropriate help file. The syntax to use is:
HELP_TARGET = "alternative_form_name"
Your form name overrides the name of the form. See: Help Targets in Oracle E-Business Suite, Oracle E-Business Suite Setup Guide.
For a concurrent program submitted through the Standard Request Submission form, the following syntax may be used:
TITLE="appl_short_name:message_name"
where appl_shortname:message_name is the name of a Message Dictionary message. See: Customizing the Submit Requests Window using Codes, Oracle E-Business Suite Setup Guide.
Warning: In general, system administrators should not modify parameters passed to predefined functions for Oracle E-Business Suite products. The few exceptions are documented in the relevant manuals or product notes.
Web HTML
The fields in the Web HTML and Web Host are only required if your function will be accessed from Oracle Application Framework. You do not need to enter any of these fields for functions based on Oracle Developer forms.
HTML Call
The last section of your function URL is the HTML Call. The HTML Call is used to activate your function. The function may be either a static web page or a procedure.
The syntax for this field depends on the function type.
For functions used with Mobile Application Server, enter the full name of your Java class file, including <package name>.<class name>. The class name and package name are case sensitive. Mobile Application Server will try to load this class from the classpath as it is. For example, 'oracle.apps.mwa.demo.hello.HelloWorld'.
Web Host
The fields in the Web HTML and Web Host are optional and only enabled for some types of functions. These fields apply only to Oracle Application Framework functions.
Host Name
The URL (universal resource locator) or address required for your function consists of three sections: the Host Name, Agent Name, and the HTML Call. The Host name is the IP address or alias of the machine where the Web server is running.
Agent Name
The second section of your function URL is the Oracle Web Agent. The Oracle Web Agent determines which database is used when running your function. Defaults to the last agent used.
Icon
Enter the name of the icon used for this function. If the function will be in the "Level 1" menu, provide the name of a seeded icon to assign to the function. The icon file must reside in the $OA_MEDIA directory. This icon displays when the profile FND: Top-Level Menu Display Mode is set to display the "Level 1" menu as icons and links, when the function appears in the global header, or when the function is a favorite on the simplified home page.
Secured
Secured is only required when your function is accessed by Oracle Workflow. Checking Secured enables recipients of a workflow email notification to respond using email.
Encrypt Parameters
Checking Encrypt Parameters adds a layer of security to your function to ensure that a user cannot access your function by altering the URL in their browser window. You must define Encrypt Parameters when you define your function to take advantage of this feature.
Region
The fields on this page are for future use.
Menus Window
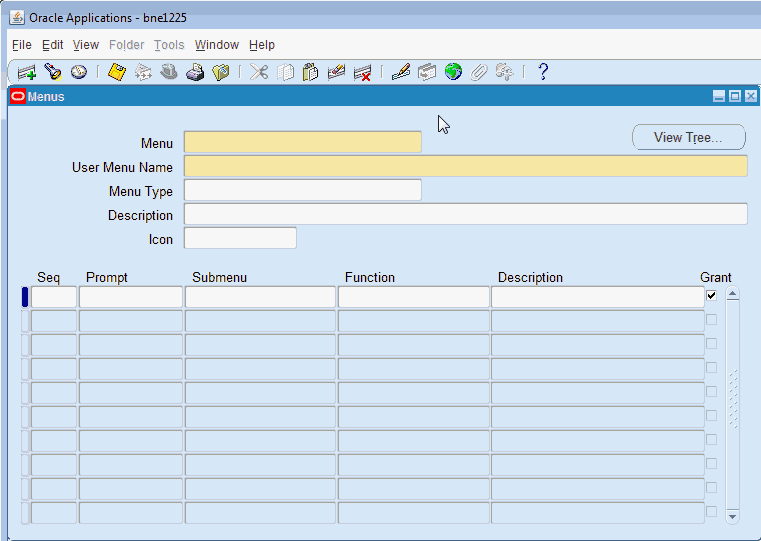
Used to define a new menu or modify an existing menu.
A menu is a hierarchical arrangement of functions and menus of functions. Each responsibility has a menu assigned to it.
You can build a custom menu for that responsibility using predefined forms. However, we recommend that you do not disassociate a form from its developer-defined menus.
After you save your changes in this form, a request is submitted to compile the menu data.
See:
Implementing Function Security
Before you define your menu, perform the following:
-
Register your application using adsplice. See: AD Splicer, Oracle E-Business Suite Setup Guide and My Oracle Support article KB858105, Creating a Custom Application in Oracle E-Business Suite Release 12.1.3 and Above.
-
Register any forms you wish to access from your menu with Oracle Application Object Library using the Forms window.
-
Define any functions you intend to call from your menu.
-
Define any menus that you intend to call from your menu. Define the lowest-level submenus first. A submenu must be defined before it can be called by another menu.
Tip: By calling submenus from your menu, you can group related windows together under a single heading on your menu. You can reuse your menu on other menus.
Menus Block
Menu entries detail the options available from your menu.
Menu
Choose a name that describes the purpose of the menu. Users do not see this menu name.
Note: Once the menu is saved, this menu name cannot be updated.
View Tree...
Once you have defined a menu, you can see its hierarchical structure using the "View Tree..." button. See: Menu Viewer.
User Menu Name
You use the user menu name when a responsibility calls a menu or when one menu calls another.
Menu Type
Specify a menu type to describe the purpose of your menu. Options include:
-
Standard - for menus that would be used in the Navigator form
-
Tab - for menus used in self service applications tabs
-
Security - for menus that are used to aggregate functions for data security or specific function security purposes, but would not be used in the Navigator form
In addition, see the section on Oracle Application Framework menu types.
Icon
If this menu will be an item on a "Level 1" menu, provide the name of a seeded icon to assign to the menu. This icon displays when the profile FND: Top-Level Menu Display Mode is set to display the "Level 1" menu as icons and links.
Menu Entries Block
Fields include the following:
Sequence
Enter a sequence number to specify where a menu entry appears relative to other menu entries in a menu. The default value for this field is the next whole sequence number.
Important: You can only use integers as sequence numbers.
A menu entry with a lower sequence number appears before a menu entry with a higher sequence number.
You cannot replace a menu entry sequence number with another sequence number that already exists. If you want to add menu entries to a menu entry sequence, carefully renumber your menu entries to a sequence range well outside the sequence range you want, ensuring that you do not use existing sequence numbers. If you want to renumber an entry, then delete the entire row and save your work; and then insert a new row with the desired sequence number and same prompt and submenu/function as the previous one.
Navigator Prompt
Enter a user-friendly, intuitive prompt your menu displays for this menu entry. You see this menu prompt in the hierarchy list of the Navigator window.
Tip: Enter menu prompts that have unique first letters so that power users can type the first letter of the menu prompt to choose a menu entry.
Submenu
Call another menu and allow your user to select menu entries from that menu.
Function
Call a function you wish to include in the menu. A form function (form) appears in the Navigate window and allows access to that form. Other non-form functions (subfunctions) allow access to a particular subset of form functionality from this menu.
Description
Descriptions appear in a field at the top of the Navigate window when a menu entry is highlighted.
Grant
The Grant checkbox should usually be checked. Checking this box indicates that this menu entry is automatically enabled for the user. If this is not checked then the menu entry must be enabled using additional data security rules.
For more information on grants, see: Overview of Data Security and Grants.
Menu Viewer
The Menu Viewer is a read-only window that provides a hierarchical view of the submenus and functions of a menu, and also lists properties of the menus and functions.
You can launch the viewer from the Menus form by clicking on the "View Tree..." button. The viewer will appear for the menu specified in the Menus form.
Note: When you are creating or editing a new menu, your changes must be committed to the database before you will be able to see them in the Menu Viewer.
Functionality
The Menu Viewer consists of two panes, one showing the menu tree and the other the node properties.
Menu Tree
To view the menu tree, click on the plus (+) sign next to the menu. You will see a hierarchical tree with a number of nodes. Each node represents a function or submenu of your main menu.
Note: The menu tree displays the user menu name for the main menu, and displays the prompts from the Menus form for submenus and functions. If no prompt has been specified, then no label will appear for the node.
To print a menu tree, choose Print from the File menu.
Node Properties
To view properties of a particular menu or function, highlight the node in the menu tree. The node properties will appear in the Properties pane. You can create a separate Properties page for a node by clicking the "push pin" button at the top of the Properties pane.
The entry's sequence number, prompt, and description are shown.
View Options
The View menu provides options on how the viewer displays your menu.
You can specify whether the Node Properties pane, the toolbar, or the status bar are displayed. You can also choose the display style in which you view your menu tree.
Display Styles
There are three styles for viewing your menu tree. You can select one from the View menu or from the buttons on the toolbar.
| Variable | Description |
|---|---|
| Vertical | Menu entries are displayed vertically, similar to how they appear in the Navigator window when you log on to Oracle E-Business Suite. |
| Interleaved | Menu entries are displayed horizontally and vertically. |
| Org-Chart | Menu entries are displayed horizontally as in an organizational chart. |
Edit Menu
From the Edit menu you can bring up a Properties window for the node you have highlighted in the menu tree.
Note: You can view the properties for your menu or function here, but you cannot edit them.
You can view and edit your Preferences for the Menu Viewer. You can choose colors for your menu tree pane as well as the text font and size.
Objects
Use these pages to find, create, and edit data objects. You define objects to be secured in the Data Security system.
Objects can be tables or views. An object must be queryable in SQL, and the combination of primary key columns specified must be a unique key.
In these pages, objects are described with the following
-
The Name is the name that appears in the Object Instance Set and Grants pages. This name should be user-friendly.
-
The Code is the internal name of the object.
-
The Application Name is the owning application.
-
The Database Object Name is the name of the underlying database object.
Related Topics
Find Objects
Use this page to find an existing object.
Simple Search
Name
The display name of the object.
Code
The object name.
Application Name
The object's owning application.
Database Object Name
The database object name.
Advanced Search
Use the Advanced Search screen to find data that meet a set of criteria. With the Advanced Search screen, you can enter in special conditions based on the given fields, and the search results will consist of all data that match the conditions.
For example, for a specified application, you can search for all objects whose name begins with a letter before "P." (Note: all uppercase letters precede all lowercase letters for this type of search).
Search Results
The search results are shown in a table with the following columns:
-
Name - click on the object name to view details on the object.
-
Code
-
Application Name
-
Database Object
-
Description
-
Last Update
To update an object, click on the icon under the Update column.
Update Object
Use this page to update the fields listed below for an object. You cannot change the internal Object Name of an existing object.
Display Name
Enter a user-friendly name for the object.
Application Name
The owning application for the object. This application owns the database table on which the object is based.
Database Object Name
Typically this is a table in the database.
Description
Enter a description for the object.
Create Object
Use this page to create a new object. Enter the following information:
Name
Enter a user-friendly name for the object.
Code
Enter a code that will be used as an internal name for the object. This name cannot include spaces and can include underscores and hyphens. You cannot update the object name after the object is created and saved.
Application Name
The owning application for the object. This application owns the database table on which the object is based.
Database Object
Typically this is a table in the database.
Description
Enter a description for the object.
Object Column Details
Enter in information on the primary key for the object (n below indicates an integer between 1 and 5). The primary key is used to identify rows (object instances) for inclusion in object instance sets.
PKn Column Name
The primary key column name.
PKn Column Type
The datatype for the column.
Object Detail
This page provides the following information for an object:
-
Object Name
-
Display Name
-
Application
-
Database Object Name
-
Description
Columns
You can also view details on columns that comprise the primary key (n below indicates an integer between 1 and 5):
-
PKn Column Name
-
PKn Column Type
Instances of an object can be grouped together into an object instance set. For example, you may want to create a group of projects or a group of items. To create and manage objects instance sets, click Manage Object Instance Sets.
Click on the "Return to Object Search" link to go back to the main Objects page.
Delete Object
Confirm the deletion of an object from this page. Review the information shown, and click Delete.
Related Topics
Object Instance Sets
After you create an object you can create a set of instances of the object. For example, you could define the object "User" corresponding to the User table. Each row in the User table becomes an instance of the User object. Users in the sales organization could then be grouped into an Object Instance Set named "Sales Organization."
Object Instance Sets are described by the following:
-
The Object Instance Set Name is its internal name. This name must not contain any spaces and can include underscores.
-
The Display Name is a user-friendly name for the object that appears in the Grants pages.
-
The Predicate is the WHERE clause used to define the object instances in the set. It must be a valid SQL predicate for the database object.
Manage Object Instance Set
Use this page to manage existing object instance sets or create new ones.
The following object information is displayed:
-
Object Name
-
Display Name
-
Application
-
Database Object Name
-
Description
Existing Object Instance Sets
-
Instance Set Name - click on the Instance Set Name to view details
-
Display Name
-
Description
To update an object, click on the icon under the Details column to open up the Update Object page.
To delete a row, click on the icon under the Delete icon, or select the object and click Delete.
To return to the main Objects page, click on the "Return to Object Search" link.
Related Topics
Create Object Instance Set
The containing object's Name, Display Name, Application ID, Database Object Name, and Description are shown.
Enter the following for the Object Instance Set:
Code
Enter a name that will be used internally for the object instance set. This name cannot include spaces and can include underscores and hyphens. The Object Instance Set Name cannot be updated once the object instance set has been created and saved.
Name
Enter a user-friendly, descriptive name to appear in the Grants pages.
Description
Enter a description for the object instance set.
Predicate
This predicate determines which object instances are included in the set. Do not include "WHERE" in your entry, but only the body of the WHERE clause.
Update Object Instance Set
The containing object's Name, Display Name, Application ID, Database Object Name, and Description are shown.
Note: The Object Instance Set Name cannot be updated after the object instance set has been created and saved.
Display Name
Enter a user-friendly, descriptive name to appear in the Grants pages.
Description
Enter a description for the object instance set.
Predicate
This predicate determines which object instances are included in the set. Do not include "WHERE" in your entry, but only the body of the WHERE clause.
Delete Object Instance Set
Confirm the deletion of an object from this page. Review the information shown, and click Delete.
Related Topics
Object Instance Set Details
Details of an object instance set are shown on this page.
The containing object's Name, Display Name, Application ID, Database Object Name, and Description are shown.
The following is shown for the object instance set:
-
Code
-
Name
-
Description
-
Predicate
Use the "Return to Manage Object Instance Sets" to return to the main page.
Related Topics
Grants
The HTML-based pages for maintaining Grants can be accessed from the Functional Administrator responsibility. For more information on this responsibility, see: Overview of Functional Administrator and Functional Developer Responsibilities, Oracle E-Business Suite Maintenance Guide.
Search Grants
Use this page to search for grants.
You can search using the following criteria:
-
Name
-
Grantee Type - Select from one of the following:
-
All Users - The grant applies to all users.
-
Group of Users - The grant applies to a group of users.
-
Specific User - The grant applies to a single user.
If you select Group of Users or Specific User, you will be prompted to specify the group or the user.
-
-
Set - The Navigation Menu or Permission Set included in the grant.
-
Object Type - A grant can apply to either all objects or only a specific object. Under Object Type, specify if your search should include only grants that apply to all objects ("All Objects"), only grants that apply to a specific object ("Specific Object"), or both ("Any").
If you select Specific Object, you will be prompted to specify the object.
-
Effective Dates.
Create Grant
Use these pages to create a grant. Grants are used to manage user access to product functionality. In these pages you give access to functions to specified users.
Related Topics
Define Grant
In this page you specify basic information for the grant.
To define a grant:
-
Enter a name and description for your grant.
-
Enter effective dates for your grant.
-
Enter the security context information.
The security context defines the circumstances in which the grant is active.
For Grantee, you can select a single user, a role, or global (all users and roles).
-
For Operating Unit, specify an operating unit if you want your grant to apply to a specific one.
-
For Responsibility, specify a responsibility if you want your grant to apply to a specific one.
-
Enter the Data Security information if you are creating a data security policy for an object. The grant applies to the object you specify.
If you are not creating a data security policy, you will skip the next step.
Note: You cannot change a data security policy once it has been saved. You can delete it or provide an end date to a data security policy.
Select Object Data Context
If you specified that your grant applies to a single object, you add context for that object in this page.
Choose one of the following:
-
Global (All Rows) - Indicates that the set of functions is being granted for all rows of the object (for a function security grant).
-
Instance - Indicates that the set of functions are being granted for a single row, specified by value(s) for the primary key.
-
Instance Set - Indicates that the set of functions are being granted for a set of rows which is specified by an instance set predicate.
Define Object Parameters and Select Set
If you selected either an object instance or an instance set earlier, you can further customize the resulting set by additional information for the data context.
Additionally, you can select either a permission set or a navigation menu that can additionally specify how the grant will be applied in the security context.
For an instance set:
-
In the Predicate region, the predicate that defines the instance set is shown. In the Instance Set Details region, specify the values for the parameters to be used in the predicate above.
-
Select the permission set or navigation menu set that defines the grantee's access.
For an instance:
-
In the Instance Details region, specify information identifying the instance.
-
Select the permission set or navigation menu set that defines the grantee's access.
Review and Finish
Use this page to review the definition of your grant. Click Finish to save your work.
Update Grant
Use this page to update the definition of your grant.
Define a Grant
The following procedure summarizes the steps for defining a grant.
-
Log in to the Functional Administrator responsibility. The Grants page appears.
-
Click Create Grant.
-
In the Grant: Define Grant page, enter a grant name, description, and effective dates.
-
Select the grantee type, either All Users, Group of Users with a role or responsibility as the grantee, or Specific User with a user as the grantee. You can also specify a responsibility or operating unit context. For example:
-
If you use a custom responsibility, then select Group of Users in the Grantee Type field and select the applicable responsibility in the Grantee field.
-
If you provide access through a user account, then select Specific User in the Grantee Type field and the name of the user in the Grantee field.
-
If you provide access through an operating unit, then select All Users in the Grantee Type field and select the operating unit.
-
-
If the grant applies for a specific object, select the object in the Data Security region.
-
Click Next. If you specified an object for a data security policy, then the Grant: Select Object Data Context page appears. If you did not specify an object, skip to step 11.
-
Specify the rows of the object for which the set of functions is being granted by selecting Global (All Rows), Instance (a single row), or Instance Set (a set of rows). If you selected Instance Set, specify the instance set you want to use.
-
Click Next. The Define Object Parameters and Select Set page appears.
-
For an instance, specify the primary key value that identifies the row.
-
For an instance set, enter the parameters for the predicate that defines the rows in the instance set.
-
For all grants, in the Set region, select the permission set or menu navigation set that defines the grantee's access.
-
Click Next.
-
In the Grant: Review and Finish page, review the grant details and click Finish.
View Grant
Use this page to view details for a grant, including:
-
Security Context
-
Object information, if applicable
-
Set information
You can update or delete a grant from this page.
Functions
Use these pages to define new functions. A function is a part of an application's functionality that is registered under a unique name for the purpose of assigning it to, or excluding it from, a responsibility.
You can search for functions from the main page.
Function Types
When you define a function, you assign it one of the following types:
-
External ADF Application - Used for linking an external Application Developer Framework (ADF) 11g application deployed on an Oracle Application Server 11g container from the Oracle E-Business Suite home page.
-
Database Provider Portlet
-
APEX - Used for defining the link to an Oracle APEX application extension. This type can only be added using the HTML user interface available within the Functional Administrator responsibility. To do so, navigate to the Core Services tab, select Functions, and then click Create Function.
Note: For more information on the usage of the APEX function type, see My Oracle Support article KB290245, Extending Oracle E-Business Suite Release 12.2 Using Oracle APEX.
-
Form - An Oracle Forms form function.
-
JSP Interoperable with OA
-
SSWA JSP function
-
Mobile Application - A function used in an Oracle mobile application.
-
Process
-
REST service - Used for REST services. For more information on REST services and other Oracle Application Framework functions, see the Oracle Application Framework Developer's Guide, available from My Oracle Support article KB852704, Oracle Application Framework Developer's Guide: Index.
-
SSWA servlet function
-
Web Provider portlet
-
SSWA PL/SQL function that opens a new window (kiosk mode)
-
Plug
-
Generic Plug
-
SSWA PL/SQL function
Related Topics
Search
Using Simple Search, You can search for functions using the following criteria:
-
Name
-
Code
-
Type
Advanced Search
Using Advanced Search, you can be more flexible with your criteria, as well as search on the description field.
Create Function
Use these pages to create a function.
-
Specify a name for the function.
-
Specify a code for the function. The code is the internal name for the function. Once the function has been saved, the code cannot be updated.
-
Specify a type for the function.
-
For context dependence, specify 'None' or Responsibility.
-
If you are defining a form function, select the name and application of your form. If the function applies to a specific object, select the object name and specify parameters.
-
If you are using type "JSP Interoperable with OA," enter the values for the following properties in the Create Function: Details page.
-
HTML Call - provides the mapping to the associated page. At runtime, whenever this function is invoked, the OA Framework knows to display the page identified in this property.
-
Icon - if the function will be in the "Level 1" menu, provide the name of a seeded icon to assign to the function. The icon file must reside in the $OA_MEDIA directory. This icon displays when the profile FND: Top-Level Menu Display Mode is set to display the "Level 1" menu as icons and links.
If the function applies to a specific object, select the object name and specify parameters. For more details, see: Oracle Applications Framework Developer's Guide.
-
Note: The Maintenance Mode Support field is not used. Maintenance Mode is disabled in an online patching-enabled environment.
Update Function
Use this page to update an existing function. Note that you cannot update the code for an existing function.
To update a function:
-
Specify a name for the function.
-
If this function applies to a specific object, specify the object.
-
Specify a type for the function.
-
For context dependence, specify 'None' or Responsibility.
Note: The Maintenance Mode Support field is not used. Maintenance Mode is disabled in an online patching-enabled environment.
To update function details:
-
If this is a form function, select the name and application of your form.
-
If the function applies to a specific object, you can update the object name and specify parameters.
In updating menus,
-
You can remove the function from menus containing it using the Menus subtab.
-
You can also update menu prompts and descriptions for the function here.
Duplicate Function
Use this page to duplicate an existing function.
Note that you must enter a unique code for the new function you are creating.
To duplicate a function:
-
Specify a name for the function.
-
Specify a code for the function. The code is the internal name for the function. Once the function has been saved, the code cannot be updated.
-
Specify a type for the function.
-
For context dependence, specify 'None' or Responsibility.
-
If you are defining a form function, select the name and application of your form. If the function applies to a specific object, select the object name and specify parameters.
Note: The Maintenance Mode Support field is not used. Maintenance Mode is disabled in an online patching-enabled environment.
View Function
Use this page to view details on an existing function.
You can update and duplicate a function from this page. If the function is not on a menu, you can also delete the function.
Delete Function
Use this page to delete a function.
Navigation Menus
Define a new menu or modify an existing menu.
A menu is a hierarchical arrangement of functions and menus of functions. Each responsibility has a menu assigned to it.
You can build a custom menu for that responsibility using predefined forms. However, we recommend that you do not disassociate a form from its developer-defined menus.
Before creating a menu, perform the following:
-
Register your application using adsplice. See: AD Splicer, Oracle E-Business Suite Setup Guide and My Oracle Support article KB858105, Creating a Custom Application in Oracle E-Business Suite Release 12.1.3 and Above.
-
Define any menus that you intend to call from your menu. Define the lowest-level submenus first. A submenu must be defined before it can be called by another menu.
Tip: By calling submenus from your menu, you can group related windows together under a single heading on your menu. You can reuse your menu on other menus.
Terms
Terms used in defining menus include:
-
Name - The display name for the menu
-
Code - The internal name for the menu
Type - The purpose of the menu
-
Permission Set - For menus that are used to aggregate functions for data security or specific function security purposes, but would not be used in the Navigator form.
-
Standard - For menus used in the Navigator form
-
App Pref Menu Container - For preferences
-
Global Menu - For providing access to tasks and content that are applicable to the entire application
-
HTML Side Navigator Menu
-
HTML SideBar
-
HTML SideList
-
HTML Sub Tab - A tab-like control for switching content or action views in the page's content area. Sub tabs can be used with a horizontal navigation element, with a tab and horizontal navigation elements, or with a side navigation
-
HTML Tab
-
Homepage
-
If you are creating a menu to be used with Oracle Application Framework, see My Oracle Support article KB852704, Oracle Application Framework Developer's Guide: Index.
Search for Menus
Enter any of the following criteria for the menu:
-
Name
-
Code
-
Type
Create Navigation Menu
Use this page to create a navigation menu.
-
Choose a user-friendly name that describes the purpose of the menu.
-
Enter a code for the menu. Choose an internal name that indicates the purpose of the menu. Users do not see this menu code.
-
Optionally specify a menu type and description to describe the purpose of your menu.
-
If this menu will be an item on a "Level 1" menu, provide the name of a seeded icon to assign to the menu. This icon displays when the profile FND: Top-Level Menu Display Mode is set to display the "Level 1" menu as icons and links.
Add your information for your menu entries using the Menu Builder.
-
Enter a prompt for your menu entry.
Enter a user-friendly, intuitive prompt your menu displays for this menu entry. You see this menu prompt in the hierarchy list of the Forms Navigator window.
Tip: Enter menu prompts that have unique first letters so that power users can type the first letter of the menu prompt to choose a menu entry.
-
If this menu entry is a menu itself (a submenu), enter in the menu name.
You can call another menu and allow your user to select menu entries from that menu.
-
If this menu entry is a function, enter in the function name.
Call a function you wish to include in the menu.
-
Specify the function type.
-
Apply your changes.
If you want to reorder the menu entries, click Reorder .
Menu Manager
Once you have your menu defined, you can update its list of entries in the Menu Manager tab.
Hierarchy of Children
The Hierarchy of Children subtab provides information on the child nodes within the menu structure. Child nodes are either functions or menus (submenus). Child nodes are displayed in a hierarchy with the following information, as applicable: display name, internal menu name, function name, type, and description.
Direct Parents
The Direct Parents subtab allows the user to see the direct parent(s), if any, of the navigation menu. A direct parent is a menu that contains this menu directly as a submenu. This feature is useful in identifying the direct impact of any changes that may be made to this menu.
For each parent, the prompt and internal menu name is shown.
Grants
The Grants subtab displays the associated grants that secure the navigation menu.
For each associated grant the following is shown: name, grantee type, grantee, valid dates, data context type, object, and instance set.
Update Menu
Use this page to update an existing navigation menu.
All fields can be updated except for the menu code.
The direct parents of a menu can be deleted in the Direct Parents tab.
You cannot update a parent menu from this tab. You must navigate to the parent menu record itself to update it.
Note: You cannot replace an existing parent menu with another menu, as the parent menu is used as the primary key of the hierarchy mapping. Instead, you have to delete this existing (child) menu and add a new menu. Also, the sequence number cannot be updated since it is the primary key. You can update the prompt and description.
Duplicate Menu
Use this page to duplicate a menu and copy its hierarchy of children. You must give the duplicate menu and new code (internal name).
View Menu
Use this page to view details of a menu.
Delete Menu
Use this page to delete a menu.
Note that you cannot delete a referenced menu. A menu can be referenced by any of the following:
-
Children (menu or function)
-
Menu parents
-
Grants
Permissions
A permission is the smallest unit of securable action that can be performed on the system. A permission can either be abstract permissions or executable functions (menu). It can either be a system level permission or be sensitive to a data context. For example, a particular JSP page may be an executable permission and "View Person" may be an abstract permission.
The Permissions pages can be accessed from the Functional Administrator and Functional Developer responsibilities. For more information on these, see: Overview of Functional Administrator and Functional Developer Responsibilities, Oracle E-Business Suite Maintenance Guide.
You can search for permissions from the main page. You can update, duplicate, or remove a permission found in your search results. You can also create a new permission from this page.
Search for permissions using the following criteria:
-
Name
-
Code
-
Object Name
Create Permission
Use these pages to create a permission.
-
Specify a name for the permission.
-
Specify a code for the permission. The code is the internal name for the permission. Once the permission has been saved, the code cannot be updated.
-
If this permission applies to a specific object, specify the object.
-
If you want to add this permission to a permission set now, select a permission set.
Update Permission
Use this page to update an existing permission.
Note that you cannot update the code (internal name) for the permission.
-
You can specify a new name for the permission.
-
You can specify a new object if the permission applies to a specific object.
You can update the permission set information as well:
-
To add this permission to a permission set, select a permission set from the list of values for "Add this to a Permission Set."
-
To delete this permission from a permission set, select the permission set in the table and click Remove.
Select Apply to save your changes.
Duplicate Permission
Use this page to duplicate an existing permission.
Note that you must enter a unique code for the new permission you are creating.
-
Specify a name for the permission.
-
Specify a code for the permission. The code is the internal name for the permission. Once the permission has been saved, the code cannot be updated.
-
If this permission applies to a specific object, specify the object.
-
If you want to add this permission to a permission set now, select a permission set.
View Permission
Use this page to view details on an existing permission.
You can update or duplicate a permission from this page. You can delete a permission from this page if it does not belong to a permission set.
Delete Permission
Use this page to delete a permission.
Permission Sets
Permission sets provide a way to group related permissions together. You can create a new permission set from this page.
The Permission Sets HTML-based pages can be accessed from the Functional Administrator and Functional Developer responsibilities. For more information on these, see: Overview of Functional Administrator and Functional Developer Responsibilities, Oracle E-Business Suite Maintenance Guide.
You can search for permission sets using the following criteria:
-
Name
-
Code
You can update, duplicate, or delete permission sets found in your search.
Create Permission Set
Use this page to create a permission set.
-
Specify a name for the permission set.
-
Specify a code for the permission set. The code is the internal name for the permission set. Once the permission set has been saved, the code cannot be updated.
Use the Permission Set Builder to add permissions to your new permission set. You can also add existing permission sets to the new permission set.
Update Permission Set
Use this page to update an existing permission set.
You can specify a new name for the permission set. Note that you cannot update the code (internal name) for the permission set.
If you want to update which permissions and permission sets belong to this permission set, use the Permission Set Builder to do so.
Permission Set Manager
Once you have your permission set defined, you can update the contents of the permission set in the Permission Set Manager tab.
Hierarchy of Children
The Hierarchy of Children subtab provides information on the child nodes in the permission set structure. A child node is either a permission or permission set. Child nodes are displayed in a hierarchy with the following information: display name, permission set name (if applicable), permission name (if applicable), and description.
Direct Parents
The Direct Parents subtab allows you to see the permission sets, if any, that include the current permission set. This feature is useful in identifying the direct impact of any changes that may be made to this permission set.
Grants
The Grants subtab displays the associated grants that secure the navigation menu.
For each associated grant, the name, grantee type, grantee, valid dates, data context type, object name, and instance set name is displayed.
Duplicate Permission Set
Use this page to duplicate an existing permission set.
Note that you must enter a unique code for the new permission set you are creating.
-
Specify a name for the permission set.
-
Specify a code for the permission set. The code is the internal name for the permission set. Once the permission set has been saved, the code cannot be updated.
If you want to update which permissions and permission sets belong to this permission set, use the Permission Set Builder to do so.
View Permission Set
Use this page to view details on an existing permission set.
Click Update to update the permission set.
Delete Permission Set
Use this page to delete a permission set. If a permission set is a child of another permission set, it cannot be deleted without first being removed from its parent permission set.
Compile Security Concurrent Program
Use this concurrent program to compile your menu data. Compiling your menu data allows for the system to determine more quickly whether a function is available to a particular responsibility/menu.
A request to run this program is automatically submitted when you make changes using the Menus form.
Parameter
Everything
This parameter takes the value Yes or No. "No" is used to recompile only those entities that are marked as needing recompilation. "Yes" is used to recompile all entities, and can take a long time. "No" is the default value.
Function Security Reports
Use the function security reports to document the structure of your menus. You can use these reports as hardcopy to document your customized menu structures before upgrading your Oracle E-Business Suite software.
The function security reports consist of the Function Security Functions Report, the Function Security Menu Report, and the Function Security Navigator Report.
These reports are available through the Function Security Menu Reports request set. For each report, specify the responsibility whose function security you want to review.
Note: If a function and a menu are associated with the same menu entry and the function is excluded then the submenu and its children are also excluded.
If the submenu is also included on another branch of the menu (same level or higher) than the submenu and functions will be included and should be on the reports assuming all other function security conditions are met.
Function Security Function Report
Specify a responsibility when submitting the report. The report output lists the functions accessible by the specified responsibility.
The report does not include items excluded by function security rules.
Function Security Menu Report
Specify a responsibility when submitting the report. The report output lists the complete menu of the responsibility, including all submenus and functions.
The report indicates any excluded menu items with the rule that excluded it.
Function Security Navigator Report
Specify a responsibility when submitting the report. The report output lists the menu as it appears in the navigator for the responsibility specified.
This report does not include items excluded by function security rules, or non-form functions that do not appear in the navigator.
Users of a Responsibility Report
This report documents who is using a given responsibility. Use this report when defining or editing application users.
Report Parameters
Application Name
Choose the name of the application to which the responsibility you want in your report belongs.
Responsibility Name
Choose the name of the responsibility you want in your report.
Report Heading
The report heading indicates the application name and responsibility for which you requested a report.
Column Headings
User Name
The name of the user who is assigned to the responsibility.
Start Date
The date the responsibility became active for the user.
End Date
The date the responsibility either becomes inactive or became inactive for the user. If no end date appears for a user, then this responsibility is always enabled for the user.
Description
The description of the user who is assigned to the responsibility.
Related Topics
Overview of Oracle E-Business Suite Security
Active Responsibilities Report
This report shows all the responsibilities that are currently active, the users who can currently access each responsibility, and the start and end dates when they can access the responsibility.
Report Parameters
None.
Report Heading
This displays the name of the report, the date and time the report was run, and the page number.
Column Headings
Application Name
The name of the application associated with the responsibility.
Responsibility Name
The name of the currently active responsibility.
User Name
The name of the user who can currently access the responsibility.
Start Date
The date when the user can begin accessing the responsibility.
End Date
The date when the user can no longer access the responsibility. See: Overview of Oracle E-Business Suite Security.
Related Topics
Overview of Oracle E-Business Suite Security
Active Users Report
This report shows all the user names that are both currently active and have at least one active responsibility. It also displays all the responsibilities that users can access, and the start and end dates when they can access each responsibility.
Report Parameters
None.
Report Heading
The report heading displays the name of the report, the date that the report was run, and the page number.
Column Headings
User Name
The Oracle E-Business Suite name of the currently active user. The start and end dates that you specify in the Users window determine whether a user name is currently active.
Application Name
The name of the application associated with the responsibility.
Responsibility Name
The name of the currently active responsibility.
Start Date
The date when the user can begin accessing the responsibility. You can specify a start date when you assign the responsibility to the user in the Responsibilities block of the Users window.
End Date
The date when the user can no longer access the responsibility. You specify an end date when you assign the responsibility to the user in Responsibilities block of the Users window.
Disable and Enable Inactive FND Users Based on Security User Type
The Disable Inactive FND Users and Enable Inactive FND Users concurrent programs are enhanced in Oracle E-Business Suite Release 12.2.13 to consider the security user type in determining the user accounts they run against. These concurrent programs checks the value of a new profile option in Oracle E-Business Suite Release 12.2.13 called FND: Security User Type.
The profile option FND: Security User Type (FND_SEC_USER_TYPE) is valid for site and user levels and can be set to one of the following values:
-
NAMED - Site level default or if the value is null.
-
SYSTEM - System and internal account, exempt from inactive user locking policy.
-
PUBLIC - Public account (GUEST), exempt from inactive user locking policy.
The Disable Inactive FND Users concurrent program checks the value of FND: Security User Type to determine which user accounts should be inactivated if they have not logged in within a specified amount of time and inactivates them.
Conversely, the Enable Inactive FND Users concurrent program allows for the re-activation of user accounts that were initially inactivated by the Disable Inactive FND Users concurrent program.
Reports and Sets by Responsibility Report
This report identifies which reports (and other concurrent programs) and report sets are included in the request security groups available to any given responsibility. Use this report when defining or editing responsibilities.
Report Parameters
If you enter no parameters, the report documents all reports and report sets accessible from each responsibility.
Application Short Name
Choose the application name associated with the responsibility whose available reports and report sets you wish to report on.
If you do not choose an application name, the report documents all reports and report sets accessible from each responsibility.
Responsibility Name
Choose the name of a responsibility whose available reports and report sets you wish to report on. You must enter a value for Application Short Name before entering a value for Responsibility Name.
Report Headings
The report headings list the report parameters you specify, and provide you with general information about the contents of the report.
Related Topics
Overview of Oracle E-Business Suite Security
Oracle Application Object Library REST Security Services
Oracle E-Business Suite Release 12.2 introduces Oracle Application Object Library REpresentational State Transfer (REST) security services as a new integration option, providing more versatility than previously possible. In particular, the REST security services facilitate the development of customizable support for mobile applications.
How these services are used is detailed under the descriptions of the four main APIs that are associated with them:
-
Login Service
-
Session Management Service
-
Authorization Service
-
Logout Service
Login Service
Every web service request made to Oracle E-Business Suite must be authenticated: that is to say, have the caller's credentials validated. The authentication process is often more informally referred to as logging in.
The REST Login Service validates the Oracle E-Business suite user credentials, and returns an access token. This access token can then be used with every subsequent service request that requires authentication, without the need for the user name and password to be sent every time.
The Login Service is based on the HTTP basic authentication scheme.
URL:
  http(s)://<EBSHost>:<EBSPort>/OA_HTML/RF.jsp?function_id=mLogin

HTTP Methods
  GET or POST

Content Type:
  JSON, XML

HTTP Headers:
  Authorization header as per HTTP BASIC authentication scheme
  Accept-Language header for client language in RFC 5646 format.
  Input Parameters:
    No input payload
        Output Parameters:
     accessToken - Token to be passed with every service request requiring authentication
          accessTokenName - Name of the access token
          ebsVersion - Oracle E-Business Suite release version
          userName      - Authenticated Oracle E-business Suite user name

Sample Request:

  GET /OA_HTML/RF.jsp?function_id=mLogin HTTP/1.1
  Authorization: Basic c3lzYWRtaW46c3lzYWRtaW4=
  Accept-Language: en-GB,en-US;q=0.8,en;q=0.6
  Content-Type: application/xml

Sample possible responses:

  200 (On Success):

  <response>
    <data>
      <accessToken>xxxxxxxxxxxxxxxxxxxxxxxxxx</accessToken>
      <accessTokenName>example</accessTokenName>
      <ebsVersion>12.2.0</ebsVersion>
      <userName>SYSADMIN</userName>
    </data>
  </response>

  401 (On Failure)

  <response>
    <status>
      <code>401</code>
      <description>Invalid username/password</description>
    </status>
    <data>
      <accessToken>-1</accessToken>
      <accessTokenName></accessTokenName>
      <ebsVersion></ebsVersion>
      <userName></userName>
    </data>
  </response>
Session Management Service
Any operation or service processing Oracle E-Business Suite data (to read, insert, update, or delete) is sensitive to the Oracle E-Business Suite security context (responsibility, application, security group, and operating unit). This means that the same operation will have different results if performed with a different security context. It is therefore critical to maintain a meaningful security context for the relevant requests, and to reset this security context when required.
The Session Management REST service allows the client to initialize and re-initialize the Oracle E-Business Suite session's security context at any time. This service upgrades the access token with the security context information, so that all the requests holding the access token implicitly carry the security context information to the service provider.
The Session Management REST service also retrieves the current session security context information when required.
URL:
  http(s)://<EBSHost>:<EBSPort>/OA_HTML/RF.jsp?function_id=mInit

Content Type:
  JSON, XML

HTTP Headers:
  Cookie header with accessTokenName and accessToken from mLogin Service

Operation 1:
  To retrieve current session context information

HTTP Method:
  GET

Input Parameters:
  No input payload

Output Parameters:
    "resp" - responsibility information in the following structure
     id - responsibility ID
     applId     - responsibility application id
     key         - responsibility internal name
     applKey - responsibility application short name
    "securityGroup" - Security group information in the following structure
     id - Security group ID
     key - security group internal name
    "org"       - Operating Unit information in the following structure
     id - Operating Unit id
     key        - Operating unit internal name
    "userId"    - authenticated Oracle E-Business Suite user ID
    "username"  -       authenticated Oracle E-Business Suite user name
    "accessToken"       -       current access token
    "accessTokenName" - current access token name
    "language"  - Current session language

Sample Request:

  GET /OA_HTML/RF.jsp?function_id=mInit HTTP/1.1
  Cookie: <accessTokenName>=<accessToken>
  Content-Type: application/xml

Sample Possible Responses:

  200 (On Success):

  <response>
    <data>
      <resp>
        <id>20872</id>
        <key>SYSTEM_ADMINISTRATION</key>
        <applId>178</applId>
        <applKey>ICX</applKey>
      </resp>
      <securityGroup>
        <id>0</id>
        <key>STANDARD</key>
      </securityGroup>
      <org>
        <id>1733</id>
        <key>Vision Communications (USA)</key>
      </org>
      <userId>0</userId>
      <userName>SYSADMIN</userName>
      <accessToken>xxxxxxxxxxxxxxxxxxxxxxxxxx</accessToken>
      <accessTokenName>example</accessTokenName>
           <language>US</language>
    </data>
  </response>

'On Failure' returns the following HTTP error status codes along with error description based on different error
conditions. Besides this information in response body the service also returns the corresponding HTTP error status
code:

400 - for any invalid input payload
500 - for any unexpected exceptional conditions, which should be a code bug
401 - for unauthorized access

Sample failure response:

  <response>
    <status>
      <code>error status code</code>
      <description>error description</description>
    </status>
    <data></data>
  </response>


Operation 2:

To initialize or re-initialize the Oracle E-Business Suite session's security context

HTTP Method:
  POST

Input Parameters:
  "resp" - responsibility information in the following structure:
      id        - responsibility ID
      applId    - responsibility application ID
      key - responsibility internal name
      applKey - responsibility application short name
        o Supports both IDs and keys (internal names).
        o Uses either id attributes or key (internal name) attributes for passing responsibility information.
        o A combination of id attribute for one entity and key attribute for another entity is not supported. For example,
          id (responsibility id), applKey is NOT supported. Similarly, appId (responsibility application ID), key
          (responsibility internal name) is not supported.
      "securityGroup"  - Security group information in the following structure. Supports both IDs and keys (internal names). Use
       either id attribute or internal key attribute for passing security group information.
       o        id      -  Security group ID
       o        key - Security group internal name
      "org"     - Operating Unit information in the following structure. It supports both the ID and key (internal name). Use either ID
      attributes or internal key attribute for passing operating unit information.
       o        id      - Operating Unit ID
       o        key - Operating unit internal name

The parameters "resp", "securityGroup", and "org" are all optional.
The  request must send at least one of the parameters (rest, securityGroup, org)
All the input parameters are case sensitive

Output Parameters:

Status Response

Sample Request:

  POST /OA_HTML/RF.jsp?function_id=mInit HTTP/1.1
  Cookie: <accessTokenName>=<accessToken>
  Content-Type:application/xml

    <data>
      <resp>
        <key>SYSTEM_ADMINISTRATION</key>
        <applKey>ICX</applKey>
      </resp>
      <securityGroup>
        <key>STANDARD</key>
      </securityGroup>
      <org>
        <key>Vision Communications (USA)</key>
      </org>
    </data>

Sample Response:

200 (On Success):

  <response>
    <status>
      <code>200</code>
      <description>success</description>
    </status>
    <data></data>
  </response>

'On Failure' returns the following HTTP error status codes along with error description based on different error
conditions. Besides this information in response body, the service also returns the corresponding HTTP error status
code:

400 - for any invalid input payload
500 - for any unexpected exceptional conditions, which should be a code bug
401 - for unauthorized access

Sample failure response:

<response>
  <status>
    <code>error status code</code>
    <description>error description</description>
  </status>
  <data></data>
</response>
Authorization Service
This Oracle Applications Object Library REST security service allows client applications to retrieve the list of the assigned responsibilities, roles, and privileges for all logged-in users, filtered by specified criteria. The authorization security data returned by the service works with both with traditional function security and the RBAC model.
URL:
  http(s)://<EBSHost>:<EBSPort>/OA_HTML/RF.jsp?function_id=mACS

HTTP Method:
  POST

Content Type:
  JSON

HTTP Headers:

  Cookie header with accessTokenName and accessToken from mLogin Service

Operation 1

  Returns logged-in user's roles and responsibilities filtered by input filter criteria.

  Input Parameters:

  "mode" - Honors values {"role", "resp", "roleresp", "parent"}. When the value is:
        "role":  The service returns all the logged-in user's roles matching the filter criteria.
      "resp": The service returns all the logged-in user's responsibilities matching the filter criteria
      "roleresp": The service returns the logged-in user's both the roles and responsibilities matching the
       filter criteria
        "parent": For all the roles/responsibilities matching the filter criteria, this service returns the
       assigning role (wf_user_role_assignments.assigning_role). The assigning role may be different than the
       immediate parent in the role hierarchy.
   "appName" - Application Short Name. To filter the authorization data based on application short name.
   "roleCode" - Internal name of role/responsibility (WF_LOCAL_ROLES.NAME). To filter the authorization data based
    on internal name of role/responsibility

Output Parameters:

  "data"        - The array of roles/responsibilities in the following structure.
      "NAME" - Internal name of role/responsibility
        "DISPLAY_NAME"  - Display name of role/responsibility in session language
        "RESPONSIBILITY_ID"     - WF Orig_System_Id for a role and responsibility ID for a responsibility
        "RESPONSIBILITY_APPLICATION_ID" - owning application ID of a role/responsibility
        "APPL_SHRT_NAME"        - Owning application short name of a role/responsibility
        "SECURITY_GROUP_KEY" - Security group internal name for a responsibility.

Sample Request:

  POST /OA_HTML/RF.jsp?function_id=mACS HTTP/1.1
  Cookie: <accessTokenName>=<accessToken>
  Content-type:application/json

          {
            mode:"role",
            appName:"FND",
            roleCode:"UMX|FND_SYSTEM%"
          }

Sample Response:


  "data":[{
  "NAME":"UMX|FND_SYSTEM_INTEGRATION_DEVELOPER",
  "DISPLAY_NAME":"System Integration Developer",
  "RESPONSIBILITY_ID":"0",
  "RESPONSIBILITY_APPLICATION_ID":"0",
  "APPL_SHRT_NAME":"FND",
  "SECURITY_GROUP_KEY":"NONE"
},{
  "NAME":"UMX|FND_SYSTEM_INTEGRATION_ANALYST",
  "DISPLAY_NAME":"System Integration Analyst",
  "RESPONSIBILITY_ID":"0",
  "RESPONSIBILITY_APPLICATION_ID":"0",
  "APPL_SHRT_NAME":"FND",
  "SECURITY_GROUP_KEY":"NONE"
}]

On Failure returns the following HTTP error status codes, along with error description based on different error
conditions. Besides this information in response body, the service also returns the corresponding HTTP error
status code:

400 - for any invalid input payload
500 - for any unexpected exceptional conditions, which should be a code bug
401 - for unauthorized access

Sample failure response:

  {
    "status":{
    "code":"401",
    "description":"This is a bad request"
  }

Operation 2

Returns logged-in user's privileges (EBS executable functions and non-executable permissions), filtered by input
filter criteria.

Input Parameters:

  "mode" - Honors only value {"function"}. When the value is:
        "function":  the service returns all the logged-in user's privileges matching the filter criteria.
  "resp" - array of responsibilities (with the below structure of attributes) for which accessible privileges is
retrieved
    "resp_id" - responsibility Id
    "appl_id" - responsibility_application_id
    "secgrp_id" - security_group_id
    "filter" - An optional filter criteria at "resp" record level to filter the list of accessible privileges from
     this responsibility.
      o "functionName" - Function internal code based on which list of accessible privileges from this responsibility are
       filtered.
      o "webCall" - EBS Function FND_FORM_FUNCTIONS.WEB_HTML_CALL based on which list of accessible privileges from this
       responsibility are filtered
    "filter"    - Global filter criteria applied on all the accessible privileges retrieved from the list of all
     input responsibilities. Global filter criteria is being over-ridden by the resp specific filter criteria (if
     provided) for it's accessible privileges.
      o "functionName" - Function internal code based on which list of accessible privileges from the entire
          responsibility list are filtered
      o "webCall" - EBS Function FND_FORM_FUNCTIONS.WEB_HTML_CALL based on which list of accessible privileges from
         the entire responsibility list are filtered.

Output Parameters:

  "data"        - The array of responsibilities along with the corresponding privileges list in the following structure.
        "resp_id" : Responsibility Id
      "appl_id" : Responsibility Application Id
      "secgrp_id"        : Security Group Id
        "responsibility_name"   : Responsibility Display Name
      "funcDetail"      : Array of privileges accessible from this responsibility. The privilege has the following structure:
       "RESPONSIBILITY_NAME"    : Responsibility display name
       "FUNCTION_ID" : Function Id
       "FUNCTION_NAME"  : Internal Function Name
       "USER_FUNCTION_NAME" : Function display name
       "WEB_HTML_CALL" : For executable functions, the function URL

Sample Request:

  POST /OA_HTML/RF.jsp?function_id=mACS HTTP/1.1
  Cookie: <accessTokenName>=<accessToken>
  Content-type:application/json

    {
      mode:"function",
      resp:[
            { resp_id:20420, appl_id:1, secgrp_id:0,
              filter: {functionName:"%HELP%"}
            },
                   { resp_id:23175, appl_id:861, secgrp_id:0
            }
           ],
      filter: {
        functionName:"%HELP%",
        webCall:"%"
            }
    }

Sample Response:

  {
  data:
    {
     resp_id: "20420"
     appl_id: "1"
     secgrp_id: "0"
     responsibility_name: "System Administrator"
     funcDetails:
      {
       function_id: "1002781"
       function_name: "FND_HELP_BUILDER"
       user_function_name: "Help Builder"
       web_html_call: "jsp/fnd/fndhelpbuilder.jsp?custom_level=10"
      }
      {
       function_id: "1035387"
       function_name: "FND_HELP_REPORTS_PAGE"
       user_function_name: "Fnd Help Reports Page"
       web_html_call: "OA.jsp?page=/oracle/apps/fnd/gfm/webui/FndHelpReportsPG"
      }
    }
    {
     resp_id: "23175"
     appl_id: "861"
     secgrp_id: "0"
     responsibility_name: "iMeeting System Monitor responsibility"
     funcDetails:
      {
       function_id: "1005377"
       function_name: "ICX_HELP"
       user_function_name: "Self Service Help"
       web_html_call: "fndgfm/fnd_help.get/US/FND/@ICXPHP"
      }
      {
       function_id: "1032936"
       function_name: "UMX_LOGIN_HELP"
       user_function_name: "Login Help UI"
       web_html_call: "OA.jsp?page=/oracle/apps/fnd/umx/password/webui/LoginHelpPG&akRegionApplicationId=0"
      }
    }
  }

On Failure returns the following HTTP error status codes, along with error description based on different error
conditions. Besides this information in response body, the service also returns the corresponding HTTP error status
code:

400 - for any invalid input payload
500 - for any unexpected exceptional conditions, which should be a code bug
401 - for unauthorized access

Sample failure response:

  {
  "status":{
  "code":"401",
  "description":"This is a bad request"
  }

Operation 3  - Oracle E-Business suite implementation for ADFmf ACS interface)
Provides an Oracle E-Business Suite implementation for ADFmf pre-defined interface for ACS REST service.

Input Parameters:
  "userId"      : Logged-in EBS username. If this differs from logged-in user, it reports an error.
  "filterMask" : Array honoring values {role, privilege}. When the value is :
     "role" : Filters the data based on roles passed through roleFilter
     "privilege"        : Filters the data based on privileges passed through privilegeFilter
  "roleFilter" : List of role and responsibility internal codes (WF_LOCAL_ROLES.NAME) on which data is filtered.
  "privilegeFilter"": List of functions and internal codes (FND_FORM_FUNCTIONS.FUNCTION_NAME) on which data is filtered.

Output Parameters:
  "userId"                      : logged-in Oracle E-Business Suite user name.
  "roles"                       : List of logged-in user roles and responsibilities in internal codes
  "privileges"     : List of logged-in user functions in internal codes

Sample Request:

  POST /OA_HTML/RF.jsp?function_id=mACS HTTP/1.1
  Cookie: <accessTokenName>=<accessToken>
  Content-type:application/json

    {
    "userId": "johnsmith",
    "filterMask": ["role", "privilege"],
    "roleFilter": [ "role1", "role2" ],
    "privilegeFilter": ["priv1", "priv2", "priv3"]
          }

Sample Response:

  {
    "userId": "johnsmith",
    "roles": [ "role1" ],
    "privileges": ["priv1", "priv3"]
  }
Logout Service
Logout Service invalidates the access token as an authentication mechanism, and thereby also invalidates any associated authenticated sessions.
URL:
        /OA_HTML/RF.jsp?function_id=mLogout

HTTP Methods:
  GET

Content-Type:
  XML or JSON

HTTP Headers:
  Cookie header with accessTokenName and accessToken from mLogin Service

Input Parameters:
        No input parameters

Output parameters :
  "accessToken" : Invalidated access token

Sample Request:

  GET /OA_HTML/RF.jsp?function_id=mLogout HTTP/1.1
  Cookie: <accessTokenName>=<accessToken>
  Content-type:application/xml

Sample Response:

  <response>
    <data>
      <accessToken>-1</accessToken>
      <accessTokenName>example</accessTokenName>
      <ebsVersion />
    </data>
  </response>

'On Failure' returns the following HTTP status codes along with error description based on different error conditions:

500 - for any unexpected exceptional conditions

  <response>
    <status>
  <code>500</code>
  <description>Detailed error description</description>
    </status>
    <data></data>
  </response>
Cookie Domain Scoping
A cookie is a mechanism of storing state information across requests to a website. When a site is accessed, a user's browser uses the cookie to store information such as a session identifier. When the site is accessed on a future occasion, the information in the cookie can be reused.
If a domain is not specified, the browser does not send the cookie beyond the originating host. Explicitly setting the cookie domain scope tells the browser where the cookie can be sent.
Note: This configuration is checked by the Secure Configuration Console based upon recommended security guidelines. For more information, see the details for the check "Cookie Domain Scoping is Configured". For an overview of all security feature configurations that are checked by the console, see Checked Security Guidelines.
Features of Cookie Domain Scoping include:
-
Reduces the attack surface of Oracle E-Business Suite
-
Provides additional protection for communication between the browser and the Oracle E-Business Suite web tier
-
Provides the ability to define the scope for cookie sharing to avoid unnecessary exposure
-
Allows for a custom scope to be defined
Cookie domain scoping configuration is set using the profile option "Oracle Applications Session Cookie Domain" (ICX_SESSION_COOKIE_DOMAIN).
By default, Oracle E-Business Suite will set the cookie domain attribute to the domain name of your site in order to ease integration of "external" integrations such as Discoverer, Kanban, and Single Sign-On. If you do not require the session cookie domain to be set because of "external" integrations such as Discoverer, you can set the ICX session cookie to be sent back on to the Oracle E-Business Suite web entry point.
Additional Information: Concerning Oracle Discoverer, see My Oracle Support article KB263327, Oracle E-Business Suite Support Implications for Discoverer 11gR1.
The ICX_SESSION_COOKIE_DOMAIN profile option can take the following values:
-
Host: (Recommended value) The domain attribute of the cookie will not be set. The cookie is scoped (restricted) to the originating server, and not sent to any other machines. This setting offers the minimum possible attack surface, and therefore the maximum level of protection. It should always be the setting used in a DMZ environment.
Example:
host=myebsserver.us.example.com
ICX_SESSION_COOKIE_DOMAIN=HOST
Set-Cookie: <no domain attribute>
-
Domain: The domain attribute of the cookie will be set. The cookie is shared with all hosts in first level domain, with the domain value being derived from the APPS_WEB_AGENT profile option. This setting is the default, and is similar to pre-12.2 behavior.
Example:
host=myebsserver.us.example.com
ICX_SESSION_COOKIE_DOMAIN=DOMAIN
Set-Cookie: ...; domain=.us.example.com
-
Custom: The domain value is user-defined. A broader scope for the cookie may be specified. This setting is not generally recommended.
Example:
host=myebsserver.us.example.com
ICX_SESSION_COOKIE_DOMAIN=.example.com (CUSTOM)
Set-Cookie: ...; domain=.example.com
Implementing Cookie Domain Scoping
When setting up this feature, you should take into account the following:
-
Identify any integrations that use an Oracle E-Business Suite cookie and determine what domains these cover.
-
Scope cookies to narrowest domain consistent with business or other operational requirements.
-
Always scope DMZ cookies to Host setting.
-
Aim to use narrow cookie scoping when planning new configurations.
Troubleshooting Cookie Domain Scoping
Problem: Authenticated Oracle E-Business Suite users cannot navigate to external integrations such as Oracle E-Business Suite Information Discovery.
Check the following:
-
The value of the ICX_SESSION_COOKIE_DOMAIN profile at site and server levels.
-
Domains of the Oracle E-Business Suite and external integrations with which browser is communicating.
-
Response headers containing
Set-Cookie. The easiest method to do so is to use your browser's developer tools. Alternatives are intercepting proxy (more difficult with TLS enabled) and Apache logging.
Problem: When setting the domain, browser is not sending cookie back to host.
Check the following:
-
Ensure that the APPS_WEB_AGENT profile option matches the web entry point with which the browser is communicating.
Problem: With a custom setting, browser is not sending cookie back to host.
Check the following:
-
Custom value must be a strict subset of host name. For example, the browser will not send a cookie with a domain of
domain.example.comtootherdomain.example.com.
Problem: With a custom setting, browser is not sending cookie to a host in another registerable domain.
Check the following:
-
Check that the custom value corresponds to a registerable domain such as
example.comand not a non-registerable domain such as.com. Browsers do not allow cookies to be shared or scoped across different registrable domains. For example, it is not possible to share cookies betweenexample.comtoexample.net.
References
For more information, see My Oracle Support article KA1036, Oracle E-Business Suite Release 12.2 Configuration in a DMZ.
Allowed Resources
Introduction
The Allowed Resources feature is a security control that uses an allowlist to restrict access to only those resources explicitly authorized within your Oracle E-Business Suite environment. Rather than permitting access to every installed resource, it helps reduce the attack surface by blocking access to unused, unnecessary, or unauthorized pages and services.
A resource is an executable file that can be accessed using a URL located under the /OA_HTML/ path. The most common examples of a resource are JavaServer Pages (JSPs) and servlets. All Oracle E-Business Suite resources are predefined for you in the Allowed Resources feature. The feature also allows custom resources to be defined in the list of allowed resources.
Only resources that have been explicitly added to the allowlist are accessible. Any resource not included on the allowlist is automatically denied and blocked. By enforcing this principle of least privilege, the Allowed Resources feature helps protect the environment from both known and unknown vulnerabilities, reducing the risk of unauthorized access and exploitation.
Tip: The concepts behind Allowed Resources are broadly similar to those used in DMZs, which use a URL firewall as an allowlist mechanism to control access to approved resources. For more information, see My Oracle Support article KA1036, Oracle E-Business Suite Release 12.2 Configuration in a DMZ.
The Allowed Resources feature offers multiple levels of protection. From the Allowed Resources user interface (UI), you can deny Oracle E-Business Suite resources using the options to manage by product family, products or resources. You can also allow custom resources to be defined in the allowlist. Using the feature with the shipped configuration provides some level of protection for minimal effort.
Note: This configuration is checked by the Secure Configuration Console based upon recommended security guidelines. For more information, see the details for the check "Allowed Resources". For an overview of all security features that are checked by the console, see Checked Security Guidelines.
How to Use the Allowed Resources Feature
The following outlines the strategy for using the Allowed Resources feature.
-
Prepare your environment
As described in Prepare Your Environment for Allowed Resources, to prepare your environment to use the Allowed Resources feature add your custom resources. A custom resource is an executable file that you created for your environment that can be accessed using a URL located under the /OA_HTML/ path. Common examples of custom resources include JSPs and servlets.
If you have an inventory of custom resources, use Option 1 or Option 2 to add your custom resources:
-
Option 1 - Using your inventory, create a
custom.conffile for your custom resources and bulk load them using the WLDataMigration utility. Details are found in Option 1 - Bulk Load a Known Inventory of Custom Resources. -
Option 2 - In the Allowed Resources user interface, use the All Resources tile found on the Management by Resource page to individually add custom resources. Details are found in Option 2 - Manually Add a Custom Resource Using the UI.
If you do not have an inventory of custom resources, use Option 3 to add your custom resources:
-
Option 3 - Perform the following steps to collect your usage data and create a
custom.outfile to bulk load.-
Collect your OHS access_log files
-
Create a
custom.outfile with validated custom resources using webusage.awk, then bulk load your custom resources using WLDataMigration.
Details are found in Option 3 - Create and Bulk Load an Inventory of Custom Resources
-
-
-
Enable the Allowed Resources feature
Set or validate the "Security: Allowed Resources" profile to ensure the Allowed Resources feature is enabled. See Enable the Allowed Resources Feature to verify or set the profile to the recommended values.
Note: Allowed Resources is delivered and enabled by default (or "turned on") with Oracle E-Business Suite Release 12.2.7, R12.ATG_PF.C.Delta.7, or the October 2020 Critical Patch Update (CPU).
-
Configure the Allowed Resources feature
To configure the Allowed Resources feature, perform the following tasks:
-
Identify and deny access to resources for Oracle E-Business Suite products that are not used in your environment.
Each Oracle E-Business Suite installation includes all products by default. An effective and easy way to reduce your attack surface using the Allowed Resources feature is to deny access to resources for all Oracle E-Business Suite products that are not in use in your environment. To deny access to resources for an Oracle E-Business Suite product is simple and only requires knowledge of the product families used by your company.
To deny access to the resources for an Oracle E-Business Suite Product, use the Management by Product Hierarchy page to review the filtered data and deny resources at the product or product family level that you know are not used (see Management by Product Hierarchy).
-
Identify and deny access to specific resources based upon usage.
Once a sufficient amount of access usage data is collected for the system, use the Management by Resource page to deny access to resources which have never been used or are no longer in use (See Allowed – But Never Accessed Tile, Allowed – Sorted by Last Access Date Tile, Allowed – Sorted by Access Count Tile.). The start date of data collection is listed on the upper left of the Management by Resource page.
-
-
Continue to improve the list of allowed or denied resources
Using the previously described steps, schedule regular maintenance to review and modify the allowlist for your environment. Periodically review the usage data and modify the configuration as needed. When deploying new features or products or as products or features are no longer used update the configuration. Add custom resources upon deployment in your environment and deny custom resources that are no longer used.
Access the Allowed Resources Feature
Allowed Resources is delivered and enabled by default (or "turned on") with Oracle E-Business Suite Release 12.2.7 or R12.ATG_PF.C.Delta.7.
The feature is also delivered through the October 2020 Critical Patch Update (CPU) for Oracle E-Business Suite Release 12.2.6 and earlier releases. After applying the CPU patch, you must manually enable the Allowed Resources feature. For more information about the latest CPU, see My Oracle Support article KA923, Identifying the Latest Monthly or Quarterly Critical Patch Update for Oracle E-Business Suite Release 12.2.
Prepare Your Environment for Allowed Resources
To prepare your Oracle E-Business Suite environment to utilize the Allowed Resources feature, you must have an inventory of resources bulk load custom resources or add each custom resources to the allowlist with the Allowed Resources user interface (UI).
Adding Custom Resources to the Configuration
Custom resources may be added one-by-one through the user interface or bulk loaded to the configuration. How you add the custom resource depends upon whether you have an inventory of your custom resources or not.
If you have an inventory of your custom resources, use with Option 1 or Option 2 to add your custom resources to the configuration:
If you do not have an inventory of your custom resources, use Option 3 to add your custom resources to the configuration:
Option 1 - Bulk Load a Known Inventory of Custom Resources
Use this option to bulk load a known inventory of custom resources. Bulk loading is beneficial if you have a large number of custom resources to add to the configuration.
To do this, create a custom.conf file. Alternatively, if you have an existing custom.conf file as input from a prior configuration of the Allowed Resources (or Allowed JSPs) feature, you can use that already existing file to bulk load your custom resources.
To create the custom.conf file, perform the steps in Create custom.conf File for Bulk Loading.
After you have created the custom.conf file, bulk load it using the WLDataMigration command as follows:
$ java oracle.apps.fnd.security.resource.WLDataMigration MODE=custom INPUT_FILE=custom.conf DBC=$FND_SECURE/<SID>.dbc
Option 2 - Manually Add a Custom Resource Using the UI
Use this option to manually load a custom resource to the configuration using the Allowed Resources user interface (UI). Manually loading is a good option if you have a limited number of custom resources to add to the configuration.
Individual custom resources can be added through the All Resources tile of the Management by Resource page. The All Resources tile provides the ability to add or update a new or existing custom resource. You can also make changes to custom resources or change associated resources for a particular product or product family, such as changing the usage. For details, see All Resources Tile.
Option 3 - Create and Bulk Load an Inventory of Custom Resources
Use this option to create an inventory of custom resources in a custom.out file and bulk load it. Bulk loading is beneficial if you have a large number of custom resources to add to the configuration.
To load your custom resources in bulk, you can utilize the webusage.awk script to mine the information in the OHS access_log file.
Due to the activity and size of the file, the OHS access_log file is typically archived on a rotating basis. It is recommended for auditing and logging purposes that you retain a year’s worth or more of OHS access_log files (see OHS Access Log for more information). Given this recommendation, sufficient OHS access_log file logging information is most likely already available for you to generate an inventory of your custom resources.
The volume of logging information collected in the access_log file required to configure Allowed Resources is dependent upon your functional usage. For some environments, a few months log data is sufficient. These files can then be used to create your custom.out file and bulk load with the WLDataMigration command. For details, see Create a custom.out File for Bulk Loading.
After you have collected a sufficient volume of logging information in your OHS access_log file data, usage data has been collected perform the steps documented in Adding Custom Resources to generate the custom.out file.
Use the custom.out file, to bulk load existing custom resources discovered by the webusage.awk. To invoke the WLDataMigration utility, use the following command:
$ java oracle.apps.fnd.security.resource.WLDataMigration MODE=custom INPUT_FILE=custom.out DBC=$FND_SECURE/<SID>.dbc
Note: When using the custom.out file, review each entry to ensure that they are legitimate custom resources. For example, invalid results may have been caused by typos when editing the URL in the address bar or hits from a web scanner/penetration test (attempting to access non-existing resources).
Processes and Tools for Bulk Loading Custom Resources
Create a custom.conf File for Bulk Loading
Per Option 1 - Bulk Load a Known Inventory of Custom Resources, use your inventory of custom resources to create a custom.conf file with the syntax in the following sections.
Loader File Syntax for JSPs
The following syntax is used in the loader files for JSPs:
-
The full resource path must be specified for the underlying file associated with the allowed resource.
Example:
/OA_HTML/example.jsp -
Comments are denoted by a leading "#."
Example:
# This is a comment
Loader File Syntax for Servlets
The following syntax is used in the loader files to add custom servlet entries.
-
If the servlet's URI mapping in the
web.xmlfile has no trailing patterns, such as:/*--- web.xml ---*/ <servlet-mapping> <servlet-name>AppsLogin</servlet-name> <url-pattern>AppsLogin</url-pattern> </servlet-mapping>List the servlet's URI pattern directly starting with
/OA_HTML.For example:
/*--- custom_servlets.conf ---*/
# Sample entry for a servlet
/OA_HTML/AppsLogin
-
If the servlet's URI mapping in
web.xmlhas a trailing wildcard (*) pattern, such as:For example:
/*--- web.xml ---*/
<servlet-mapping>
        <servlet-name>weboam</servlet-name>
        <url-pattern>/weboam/*</url-pattern>
</servlet-mapping>
List the servlet's resource pattern starting with
/OA_HTMLwithout the trailing wildcards with a "servlet" directive.For example:
/*--- custom.conf ---*/
# Sample entry with URL mapping that ends with *
servlet /OA_HTML/weboam
Note: Starting with Oracle E-Business Suite Release 12.2.7, the pattern tag has been deprecated.
Create custom.out File for Bulk Loading
-
Download the
webusage.awkscript to summarize web usage activities from Apache access logs. -
Run the
webusage.awkscript against your Apache access logs.A simple case where all relevant access_log files exist in one directory would be:
$ cat access_log* | tr '?' ' ' | awk -f webusage.awk > webusage.out
The
webusage.outmay look something like this:=============== WEB USAGE: 324512 lines, 1358 counted hits 2016-09-11 - 2016-12-09 First hit seen Most recent hit #Hits URL ================ ================ ======== ============================== 2016-11-08_19:38 2016-11-08_20:36 3 /OA_HTML/amsActMetricsHistLOV.jsp 2016-11-08_19:42 2016-11-08_19:42 1 /OA_HTML/amsApprFuncLOV.jsp ... 2016-09-29_00:36 2016-12-08_18:06 308 /OA_HTMLAppsLocalLogin.jsp 2016-11-04_20:27 2016-11-04_21:02 6 /OA_HTML/AppsLocalLogin.jsp/%2e./jtffmeqq.jsp ... 2016-11-04_19:29 2016-11-04_19:31 5 /OA_HTML/cabo/jsps/a.jsp 2016-10-27_21:03 2016-11-08_00:08 195 /OA_HTML/cabo/jsps/frameRedirect.jsp 2016-09-11_11:12 2016-09-11_11:12 1 /OA_HTML/fake.jsp
To gather information about resources that have been used at your site, generate the
webusage.outfile as using the following command:$ cd <location of the OHS access_log files> $ cat access_log* | tr '?' ' ' | awk -f webusage.awk > webusage.out
Prior to running the above command, ensure all relevant access_log files are present in the location provided. Relevant access_log files will be those from the previous year or two.
For environments with multiple application tier nodes, copy the access_log.NNNNNNNNN files from each node to a central location. If you have a limited log retention period in the runtime system and have archived older logs elsewhere, copy all access_log.NNNNNNNNN files to a central location.
If you have log files going back many years, you can limit the report to only include more recent entries by modifying the
access_log*wildcard in the command.Example wildcards are as shown:
access_log.14*       "May 13 16:53:20 UTC 2014"
access_log.14[789]*  "Jul 31 21:20:00 UTC 2016"
access_log.14[89]*   "Nov 24 15:06:40 UTC 2016"
access_log.15*       "Jul 14 02:40:00 UTC 2017"
In this example, to use all access logs after "Nov 24 15:06:40 UTC 2016," replace the wildcard
access_log*withaccess_log.14[89]* access_log.15* access_login the awk command line, as shown in the following command:$ cat access_log.14[89]* access_log.15* access_log | tr '?' ' ' | awk -f webusage.awk > webusage.out
-
Run the
WLDataMigrationutility to populate web usage data and generate theCUSTOM.outfile (for resources that are not in the system). Use the following command:$ java oracle.apps.fnd.security.resource.WLDataMigration MODE=seed INPUT_FILE=webusage.out DBC=$FND_SECURE/<SID>.dbc
For example, the
CUSTOM.outmay look like this:2016-09-11_11:12 2016-09-11_11:12 1 /OA_HTML/fake.jsp 2017-06-04_03:24 2017-06-14_03:27 538 /OA_HTML/CustLogin.jsp
Some of the resources listed in this file may be valid custom resources and some may be invalid requests. You should review and keep the resources that you want to add as custom resources.
Tools for Migrating
The following tools can be used to populate usage data and custom resources.
webusage.awk Script
The webusage.awk script is an awk script which can be used to generate a summary of resources used from any available Apache access logs. This can then be leveraged using the WLDataMigration utility to identify custom resources as well as to populate web usage data.
See My Oracle Support article KB850113, Security Configuration and Auditing Scripts for Oracle E-Business Suite, for the latest zip file containing the script.
WLDataMigration Command Line Utility
The WLDataMigration utility provides the ability to identify and populate custom resources and web usage data from your Apache access logs. It also allows you to populate that information, or migrate existing custom resource configuration files in bulk, into the allowed resources repository.
You can access the WLDataMigration utility by using the following command line. Note that all parameters can, if desired, be entered on the same command line; they are shown here on different lines (using the UNIX "\" continuation character) for clarity.
java oracle.apps.fnd.security.resource.WLDataMigration \
MODE=<seed|custom> \
INPUT_FILE=<conf file/webusage file> \
DBC=<path of dbc> \
[PARSE_MODE=<single|recursive>]
The utility provides several different options:
-
When
MODE=seedandINPUT_FILEis a web usage file:-
This mode allows you to leverage your existing Apache access logs to identify custom resources and associated usage data as well as to populate web usage data for existing allowed resource. It takes the
webusage.outfile as input which is generated using thewebusage.awkscript described in the previous section. This mode also produces aCUSTOM.outfile of potential custom resources along with web usage data.
-
-
When
MODE=customandINPUT_FILEis a web usage file:-
The utility takes the
CUSTOM.outfile as input which was created as an output of theMODE=seedpreviously described. Thecustom.outfile includes web usage data.
-
-
When
MODE=customandINPUT_FILEis a simple configuration file:-
The utility takes the
custom.conffile as input from prior configuration of the Allowed Resources (or Allowed JSPs) feature. Thecustom.conffile does not include web usage data.
-
The PARSE_MODE parameter can also be added to the command. If PARSE_MODE=single, the WLDataMigration utility parses only individual resource entities in the configuration files. If PARSE_MODE=recursive searches for the "include" keyword and parses these included configuration files for resource data as well.
Enable the Allowed Resources Feature
As of Oracle E-Business Suite Release 12.2.11, there are two profile options used to configure the Allowed Resources feature: "Security: Allowed Resources" and "FND: Security Resource Logging". Set or validate the profiles are properly set to enable the feature.
Note: If you are running R12.ATG_PF.C.Delta.6 or earlier, it is highly recommended that you upgrade to the latest ATG product family release as soon as possible.
Profile Options For Allowed Resources
As of Oracle E-Business Suite Release 12.2.11, there are two profile options used to configure the Allowed Resources feature: "Security: Allowed Resources" and "FND: Security Resource Logging".
| Profile Option Name | Code (Internal Name) | Recommended Value |
|---|---|---|
| Security: Allowed Resources | FND_SEC_ALLOWED_RESOURCES | CONFIG |
| FND: Security Resource Logging | FND_SEC_LOG_RESOURCES | UNRECOGNIZED |
Security: Allowed Resources
The Allowed Resources feature is controlled by the profile Security: Allowed Resources (FND_SEC_ALLOWED_RESOURCES). The values for this profile option are as follows:
-
CONFIG: Short for "configured," CONFIG is the profile option's default value in R12.ATG_PF.C.Delta.7 or Oracle E-Business Suite Release 12.2.7 and later. This value enables the Allowed Resources feature.
-
ALL: Setting the profile option to ALL, meaning all resources are allowed, will disable the Allowed Resources feature. In releases prior to R12.ATG_PF.C.Delta.7 or Oracle E-Business Suite Release 12.2.7, where delivered by the CPU, this is the default.
Note: Security: Allowed Resources will override the profile option Allow Unrestricted JSP Access (FND_SEC_ALLOW_JSP_UNRESTRICTED_ACCESS) delivered with R12.ATG_PF.C.Delta.4 and R12.ATG_PF.C.Delta.5, which are included in Oracle E-Business Suite Release 12.2.4 and Release 12.2.5, respectively.
Key characteristics of the Security: Allowed Resources profile option are as follows:
-
It can be set at either the site or server level.
-
A value of ALL turns off the feature and allows unrestricted access to resources. We recommend that you set FND_SEC_ALLOWED_RESOURCES=ALL for diagnostic purposes only. The Allowed Resources feature should not be turned off on your production system.
When the Security: Allowed Resources profile option is set to CONFIG, the profile options FND: Security Resource Logging (FND_SEC_LOG_RESOURCES) can be set to configure logging options for dispatcher type REQUEST.
Note: When enabling or disabling the Allowed Resources feature, you must bounce the WebLogic Server oacore managed server for changes to take effect.
FND: Security Resource Logging
Set the profile option FND: Security Resource Logging (FND_SEC_LOG_RESOURCES) to one the following values to log access to requests of dispatcher type REQUEST: NONE, UNRECOGNIZED, and ALL.
-
NONE: Setting FND: Security Resource Logging to NONE means that no requests of dispatcher type REQUEST are logged.
-
UNRECOGNIZED: This is the default value. When FND: Security Resource Logging is set to UNRECOGNIZED, requests of dispatcher type REQUEST are logged at the UNEXPECTED level where resources are either one of the following:
-
In the Allowed Resources metadata, but overall access is disabled; or
-
Not in the metadata and would be rejected if the Allowed Resources feature is enabled.
-
-
ALL: Setting FND: Security Resource Logging to ALL logs all requests of dispatcher type REQUEST.
Note: The values for the FND: Security Resource Logging profile option have been updated for Oracle E-Business Suite Release 12.2.11 and later. For reference, see FND: Security Resource Logging Profile Option Values for Earlier Releases in "Appendix H: Security Features for Earlier Oracle E-Business Suite Releases" for profile option values prior to Release 12.2.11.
When requests are REJECTED and logged, logs are produced in the detailed log format, described in Log Formats.
Requests that are ACCEPTED are logged as follows:
-
If the profile option FND: Debug Log Level (AFLOG_LEVEL) is set to STATEMENT, logs are produced in the detailed format, as described in Log Formats.
-
All others are logged in the simple log format, as described in Log Formats.
Log Formats
Logs that are produced as a result of the FND: Security Resource Logging profile option are either in a simple log format or detailed log format.
Simple Log Format
The simple log format is as follows:
Id [Type] [Action] [Method] [Source --> Destination] [Referer]
For example, a simple log entry could look like this:
1864 [REQUEST] [REJECTED] [GET] ["" --> "/OA_HTML/index.jsp"] ["https://host.example.com:4443/OA_HTML/OA.jsppage=/oracle/apps/icx/icatalog/shopping/webui/ShoppingHomePG&_ti=xxxxxxxxxx&oapc=4&OAMC=xxxxxxx_xxx_0&menu=Y&oaMenuLevel=1&oas=xxxxxxxxxxxxxxxxxxxxxx.."]
Detailed Log Format
The detailed log format is as follows:
Id [Type][Action][Method][Source --> Destination][Referer][Remote Address][XSID][Username][SessionId][Stack]
For example, a detailed log entry could look like this:
43 [REQUEST][REJECTED] [GET] ["" --> "/OA_HTML/testRejected.jsp"] [""] [10.76.52.228] [xxxxxxxxxxxxxxxxxxxxxxxxxx] ["SYSADMIN"] ["xxxxxxxxxx"] [Stack: "[]"]
Configure the Allowed Resources Feature
Configure the Allowed Resources feature by using the user interface (UI) to:
-
Identify and deny access to resources for Oracle E-Business Suite products that are not used in your environment. See Management by Product Hierarchy.
-
Identify and deny access to specific resources based upon usage. See Allowed – But Never Accessed Tile, Allowed – Sorted by Last Access Date Tile, Allowed – Sorted by Access Count Tile.
Allowed Resources User Interface
The Allowed Resources user interface (UI) makes it easier for administrators (specifically, Applications administrators) to configure the Allowed Resources feature by analyzing data usage and allowing or denying access to specific resources, configuring at a product family, product, or resource level. The Allowed Resources feature was introduced in Oracle E-Business Suite Release 12.2.7 and the UI has since been enhanced.
To access the Allowed Resources home page, select the Functional Administrator responsibility in the Navigator pane on the Oracle E-Business Suite home page. Then, on the Functional Administrator page, select the Allowed Resources tab.
Once within the Allowed Resources tab, there are two subtabs: Management by Product Hierarchy and Management by Resource.
Allowed Resources Tabs

An alternative method for accessing these two subtabs is through the OAM Security Dashboard. To do this, from the Navigator pane on the Oracle E-Business Suite home page, select the System Administrator responsibility, click on Oracle Applications Manager, and then click OAM Security Dashboard. On the dashboard are two links to the previously mentioned subtab pages.
Management by Product Hierarchy
Management by Product Hierarchy allows you to configure your allowed resources on the product family level. It is recommended that when you first begin to use the Allowed Resources feature, review this page keeping in mind the products that you use so that you can turn off (disable) the unused products at the family level.
Note: You must wait until the cached data is refreshed before any changes go into effect.
-
For R12.ATG_PF.C.Delta.7 or Oracle E-Business Suite Release 12.2.7 and later, the check frequency is automatically set to 60 seconds. This check rate value cannot be changed.
-
For prior versions of the ATG product family and Oracle E-Business Suite Release 12.2.6 and earlier, the UPDATE_CHECK_INTERVAL value is used to determine the refresh timing. The default value of UPDATE_CHECK_INTERVAL is 60 seconds.
On the Management by Product Hierarchy page, start by selecting a family name from the left menu to view the Product Family Configuration page for the selected product family.
From here, the Product Family Configuration page is divided into two main sections: Details and Product and Common Resource Details.
Product Family Configuration Page
The Details section displays basic information about the product family, such as the name and short code. The Enabled checkbox indicates whether or not the product family resources are allowed. Once the product family is enabled, you can add or remove individual products from the Allowed Resources allowlist. Select/deselect the checkbox and click Apply to implement changes.
Use the Product and Common Resource Details section of the page to configure products. This section is where you should focus your configuration efforts.
In the Product Details tab of this section, displayed is a table of products within the selected product family and important information about each product.
-
Code: The product short code.
-
Licensed: A green check mark or a red "X" indicates whether or not the product is licensed in License Manager.
-
Web Activity: This is at the product-level and indicates whether or not there has been any activity associated with the resources or by the resources within the product. For example, every time the resource is requested, it is being tracked. Over time, this will continue to provide more information about what resources are in active use.
-
Transaction Data: Queries are run in the database to see if any transactions are detected for the particular product, generally within the last year.
-
Recommendation: Oracle's recommendation, based upon the previous 3 columns: Licensed, Web Activity, and Transaction Data.
-
Access: Use the drop-down list to allow or deny access to this product's resources. After making a selection, click Apply at the top of the table.
Product and Common Resource Details Section - Product Details Tab
Click on a product name in the table found on the Product Details tab. The Resource Details are displayed. Here you can also select or deselect the Enabled checkbox in order to deny or allow access to the product.
Configuring resources at the details level is a task you may want to perform when you have collected sufficient activity data to be sure of the specific resources that are used in your configuration.
Resource Details - Used Tab
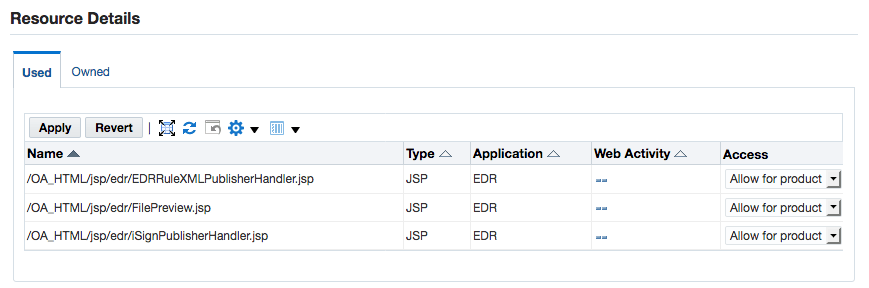
When in the Product Configuration page, generally speaking, you will be working mostly within the Used tab of the Resource Details section. The resources listed in this tab are those that are exposed for the selected product. Change access to the resource by selecting either "Allow for product" or "Deny for product" in the drop-down list found in the Access column. This is another method for allowing/denying access to a product, in addition to enabling access in the Details section of the Product Family Configuration page.
The Owned tab in the Resource Details provides you with a listing of resources owned by this product and if any product is currently exposing that resource.
Resource Details Section - Owned Tab
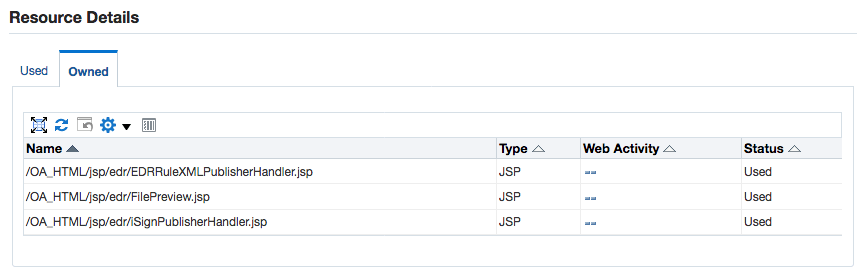
Going back to the Product and Common Resource Details section of the Product Family Configuration page, beside the Product Details tab is the Common Resources tab.
On the Common Resources tab, listed are the common resources for all products for a product family. You can view and control these resources by selecting "Allow for product" or "Deny for product" in the drop-down list in the Access column.
Product and Common Resource Details Section - Common Resources Tab
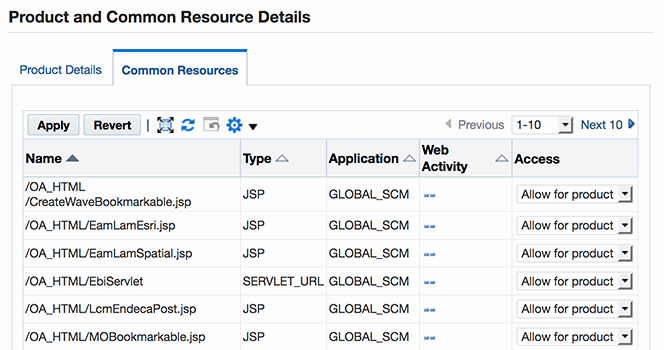
When it comes to allowing and denying access to resources on the Management by Product Hierarchy page, three levels of granularity exist:
-
At the Product Family Level
To allow and deny resources at the product family level, navigate to the Product Family Configuration page - Details section. Selecting the Enabled checkbox allows access to all product family resources; deselecting the Enabled checkbox denies the access.
-
At the Product Level
To allow and deny access at the product level, deny access to the appropriate product level on the Product Details tab in the Product and Common Resources section.
-
At the Resource Level
To view individual resources, you can drill down to the Resource Details in Common Resources tab. The Management by Resource page, discussed in the next section, provides a tailored interface for managing individual resources across the products that use the resource.
Note: In the event of problems, you should be prepared to revert modifications to family, product, or individual resources.
Management by Resource
Starting with Oracle E-Business Suite Release 12.2.9 or after applying R12.ATG_PF.C.Delta.8, the Management by Resource tab, allows you to evaluate your data usage.
At the top of the Management by Resource page is a statement indicating whether the Allowed Resources feature is enabled and the date in which the feature started collecting access usage data. Remember that for a more accurate evaluation of the resources you should allow, it is ideal to collect at least one year's worth of continuous access usage data. If you have access usage data from a previous environment, you can leverage the existing access logs by following the instructions in Adding Custom Resources to the Configuration. To purge Allowed Resources audit data that is older than a certain date, click the Purge button.
Six predefined filter criteria are displayed as tiles (previous versions utilize a combination of subtabs and saved searches). Prior to Oracle E-Business Suite Release 12.2.9 or R12.ATG_PF.C.Delta.8, the Management by Resource tab is delivered through the October 2020 CPU (see My Oracle Support article KA923, Identifying the Latest Monthly or Quarterly Critical Patch Update for Oracle E-Business Suite Release 12.2, for more information).
The predefined filter criteria tiles are as follows:
Click on each tile to view the filtered content in the table displayed. At the top of each table are buttons to allow or deny resources, as appropriate, or to perform further actions such as to show or hide columns. Note that not all columns are displayed by default.
You can further refine each tile's filters by utilizing the Filters section on the left. The Filter section allows you to add additional filter criteria and to save your search for later use. Saved searches are bound to a tile, therefore, each tile can have its own saved searches.
Note: You must wait until the cached data is refreshed before the changes go into effect. The check frequency is automatically set to 60 seconds. This check rate value cannot be changed.
Management by Resource Page
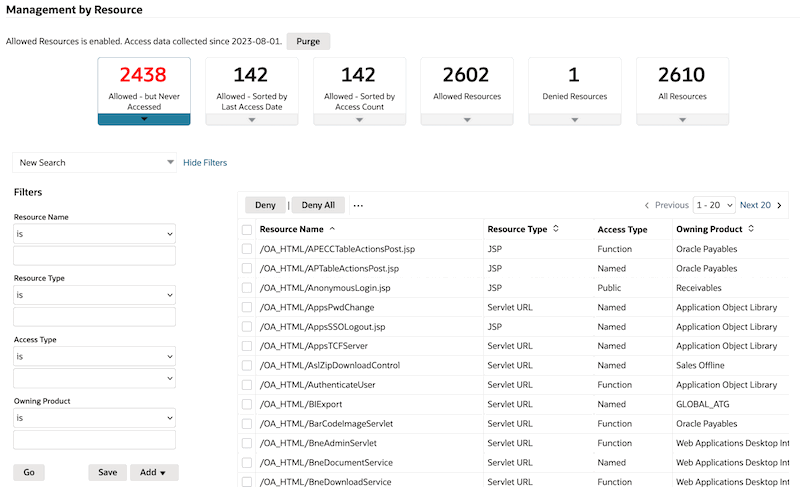
Allowed – But Never Accessed Tile
Select the Allowed – But Never Accessed tile to view a listing of resources that are allowed but have not been accessed so that you can determine whether or not to deny access to these resources. Review this listing once sufficient access usage data has been collected.
-
This listing can be filtered by Resource Name, Resource Type, and Owning Product.
-
Click Deny All in order to deny all resources which have never been accessed. This will impact all resources in the query, and not just the resources currently displayed on the page. This can be reverted in the Denied Resources tile described later in this section. Before the action is complete, there will be a warning dialog box which tells how many resources will be denied.
Note: It is recommended that you do not deny all resources in this listing until a sufficient amount of usage data has been procured. Oracle recommends this is done after 13 months of data has been collected.
Allowed – Sorted by Last Access Date Tile
Select the Allowed – Sorted by Last Access Date tile to view the resources that are currently allowed and accessed, listed by the most recent date of access. The purpose of this tiles is to allow review of resources which have not been used in a long time, since they may no longer require access.
-
This listing can be filtered by Resource Name, Resource Type, Owning Product, and by First or Last Access Date.
-
Resources that have not been used in a long time can be evaluated to determine if access is required any longer. If no access is required, select the resource or resources, and click Deny.
Allowed – Sorted by Access Count Tile
Select the Allowed – Sorted by Access Count to view the resources that are currently allowed and accessed, listed by the number of times that the resource has been accessed. The purpose of this tile is to allow review of resources which have been used infrequently, since they may no longer require access.
-
This listing can be filtered by Resource Name, Resource Type, Owning Product, and by Access Count.
-
Resources used infrequently can be evaluated to determine if access is required any longer. If no access is required, select the resource or resources, and click Deny.
Allowed Resources Tile
Select the Allowed Resources tile to view all resources that are currently allowed.
-
This listing can be filtered by Resource Name, Resource Type, Owning Product, Access Count, Creation Date, First Access Date, and Last Access Date.
-
If a resource should not require access, but is found in this listing of allowed resources, select the resource or resources, and click Deny.
Denied Resources Tile
Select the Denied Resources tile to view resources that are currently denied.
-
This listing can be filtered by Resource Name, Resource Type, Owning Product, Family Level Status, Product Level Status, Resource Level Status, First Access Date, Last Access Date, Access Count, and Denied Date.
-
Denied resources from the other five tiles will shift to this listing.
-
If you identify a resource in this listing that should require access, select the resource or resources, and click Allow. If all resources in the listing require access, click Allow All.
-
If you wish to revert the resources that were denied on a specific date, filter the resources on "Denied Date" and use the Allow All function to allow those resources.
All Resources Tile
Select the All Resources tile to view all resources - This includes allowed, denied, accessed, and never accessed resources, as well as resources that are not associated with a specific product and therefore do not populate in any of the listings for the previous five tiles. The All Resources tile provides the ability to add or update a new or existing resource. You can also make changes to custom resources or change associated resources for a particular product or product family, such as changing the usage.
-
This listing can be filtered by Resource Name, Resource Type, Owning Product, Creation Date, First Access Date, Last Access Date, or Access Count.
-
The All Resources tile includes the resource type "Extension." The other tiles in Management by Resource UI do not include the extension resource type. Each tile also has specific default filters and search criteria. As a result of this, tile counts may not sum to the expected result. For example, the total count for "Allowed Resources" plus the total count of "Denied Resources" may not equal the total count for "All Resources."
-
At the top of the table, click Add to add a custom resource. This opens the Add a Resource page. Provide a Resource Name and select a Resource Type from the provided drop-down list: extension, JSP, servlet pattern, servlet URL, or executable. Also, select an Owning Product from the drop-down list.
Note: If you are adding an extension resource, enter the extension as the Resource Name. For example, "spq" or "xsd."
After providing the resource details, grant the appropriate access to the resource at the product level or the product family level. Click Apply to submit the custom resource to the allowed resources repository.
If you wish to leverage your existing Apache access logs to identify custom resources and bulk upload them into the allowed resources repository, see Migration of Access Usage Data and Custom Resources.
-
From within the table, you can click the pencil icon to update a specific resource, allowing or denying the resource access to certain products and product families.
Update Resource Page
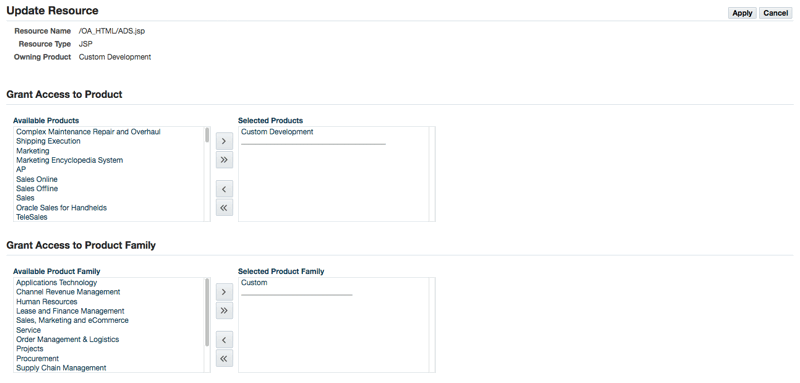
Logging and Troubleshooting
When this feature is enabled, you may find that access to required resources has been blocked. In this case, you would get an HTTP 403 (Forbidden) response and the following message: "Requested resource or page is not allowed in this site".
Seeing this message is the expected behavior (it is not an error) if it is seen on an attempt to access a resource that is intentionally restricted. On the other hand, it is an error (in that it should not be displayed) if it is seen on an attempt to access a resource that is unrestricted.
Logging can be used to investigate issues such as this. By default, it is disabled (turned off). When enabled, logging will write messages to the designated log file as follows:
-
Whether or not the filter is enabled.
-
Whether or not access is allowed to a resource on which an access attempt is being made.
Enabling Logging
Logging is enabled by setting the profile FND: Debug Log Enabled (AFLOG_ENABLED) to Yes and the log level to the appropriate level depending on the amount of information needed - Exception, Procedure, or Statement.
Common Issues
-
Symptom: Error message denying access is displayed upon trying to access resource that should not be restricted.
Probable Causes: (1) Resource is denied or not defined in the allowed resources repository. (2) Browser caching issue.
Resolution: (1) Allow access to the resource or add the resources using the utility mentioned above. If you are on Oracle E-Business Suite Release 12.2.6 or earlier, uncomment the resource in configuration file or add the resource to configuration file. (2) Clear browser cache and restart browser.
-
Symptom: Error message denying access is displayed upon trying to access resource that is on the list of allowed resources.
Probable Causes: (1) URL does not match exactly. May be caused by double slashes in URLs, or different location. (2) Browser caching issue.
Resolution: (1) Ensure the resource and location match exactly. (2) Clear browser cache and restart browser.
Allowed Resources Authorizations
Introduction
Beginning with Oracle E-Business Suite Release 12.2.15 or R12.ATG_PF.C.Delta.14, the Allowed Resources Authorizations feature extends the existing Allowed Resources feature by providing more defense in-depth protection through an additional permission check on web resource access at the beginning of each access request. To do so, Allowed Resources Authorizations adds an access type attribute to the Allowed Resources metadata. Access types control whether the resource that is allowed can be accessed by guest sessions, only authenticated users, or only users with specific function permissions. All seeded Oracle E-Business Suite resources have been assigned the access type with the least privilege required to function properly.
This feature is disabled by default with Oracle E-Business Suite Release 12.2.15 or R12.ATG_PF.C.Delta.14, although it is recommended that you enable Allowed Resources Authorizations to enforce an additional layer of security.
Key characteristics of this feature:
-
Provides defense in-depth protection for:
-
Shared resources, such as LOVs and common pages, that are publicly accessible today but cannot explicitly check functions because they may be called from a variety of pages.
-
Pages which are accessible through a menu function, but do not do properly perform their own function checks.
-
-
Provides defense in-depth protection as a mechanism for Denial of Service (DOS) - these are often through anonymous users and sometimes caused by the function check.
-
Makes explicit which resources are available to anonymous users. There are few cases which require public access to pages.
Profile Option for Allowed Resources Authorizations
To enable the Allowed Resources Authorizations feature, you must first enable Allowed Resources and then set the following profile option:
| Profile Option Name | Code (Internal Name) | Recommended Value |
|---|---|---|
| Security: Allowed Resource Authorizations | FND_SEC_ALLOWED_AUTHORIZATION | CONFIG |
Security: Allowed Resource Authorizations
The profile option Security: Allowed Resource Authorizations (FND_SEC_ALLOWED_AUTHORIZATION) can be set to either ALL or CONFIG to disable or enable the feature.
-
ALL: This is the default value. When FND_SEC_ALLOWED_AUTHORIZATION is set to ALL, this means that the Allowed Resources Authorizations feature is disabled.
-
CONFIG: When FND_SEC_ALLOWED_AUTHORIZATION is set to CONFIG at the site level, the Allowed Resources Authorizations feature is enabled.
As stated previously, when the feature is enabled (FND_SEC_ALLOWED_AUTHORIZATION is set to CONFIG), Allowed Resources Authorizations adds an access type attribute to the Allowed Resources metadata. The access type attribute (access_type) can be set to one of the following values:
-
PUBLIC: The allowed resource is available without a valid session or is available to the
GUESTuser. -
NAMED: This is the default value. For access of the allowed resource, the user must be an authenticated user (not
GUEST). An example of this type are pages for common LOVs. The system administrator can update the default access type for custom resources as needed. -
FUNCTION: The user must have access to a function in the function list. Any of the functions listed in the function list can allow access.
-
DELEGATED: Delegated to the associated framework with no explicit checks done for this resource. Note that product teams should not mark any of their resources as DELEGATED. Only
RF.jsp(and its variants) andOA.jsp(and its variants) are in this category. If a product team claims that the resource handles authentication and authorization on its own in a non-standard manner, then can set to this type after code review.Note: Changes such as adding new resources to the allowed resources list or denying resources from being accessed will take effect in 60 second intervals. No restart of oacore is required for these changes to take effect.
In the event of a resource authorization failure, the following message will be displayed in a dialog box to the user: "Requested resource or page is not authorized for this session".
Allowed Redirects
Introduction
The Allowed Redirects security feature in Oracle E-Business Suite provides defense in-depth protection against phishing redirect attacks by enabling the configuration of allowed redirects to avoid unnecessary exposure.
Similar to the Allowed Resources feature, Allowed Redirects restrict redirects by utilizing an allowlist mechanism, defining hosts with authorized access to a resource and denying access to those that are not in the allowed listing.
Note: An allowlist is a list of items that are explicitly granted access to a resource.
Note: This configuration is checked by the Secure Configuration Console based upon recommended security guidelines. For more information, see the details for the check "Allowed Redirects is Enabled". For an overview of all security feature configurations that are checked by the console, see Checked Security Guidelines.
Allowed Redirects is delivered with Oracle E-Business Suite Release 12.2.4 and later or R12.ATG_PF.C.Delta.4.
It is enabled by default (or "turned on") with Oracle E-Business Suite Release 12.2.6 later or with R12.ATG_PF.C.Delta.6 and later.
The feature is also delivered through the October 2020 Critical Patch Update (CPU) for Oracle E-Business Suite Release 12.2.5 and earlier releases. After applying the CPU patch, you must manually enable the Allowed Redirects feature. For more information about the latest CPU, see My Oracle Support article KA923, Identifying the Latest Monthly or Quarterly Critical Patch Update for Oracle E-Business Suite Release 12.2.
It is important to note that this feature is specific to HTTP 302 redirects. It does not protect against other types of unrestricted redirects, such as a Java servlet forward or meta-refresh tags.
Getting Started
The basic strategy for deploying the Allowed Redirects feature is as follows.
-
Evaluate product family usage.
-
Cross-check restricted redirects against the access log.
-
Add custom redirects, as required.
-
Ensure the Allowed Redirects feature is enabled.
-
Continue to refine the allowlist. For example, comment out any redirects which do not seem to be used.
The main configuration file is: $FND_TOP/secure/allowed_redirects.conf.
Configuration Files
Note: Apply the latest technology stack release update pack to receive the most current version of the configuration file. See My Oracle Support article KA1054, Applying the Latest AD and TXK Release Update Packs to Oracle E-Business Suite Release 12.2.
Syntax
The following syntax is used with the Allowed Redirects configuration file:
-
Content listed should be hosts, domains, site or server level profiles, and/or additional configuration files.
-
Comments are denoted by a leading '#'.
Example:
# domain example.com -
Include files may be defined.
Example:
include example_file.conf
Creating a Custom Configuration File
The procedure to do this is as follows:
-
Create a new custom configuration file. For example,
allowed_redirectsCUSTOM.conf. -
Add your custom redirect configurations to the custom configuration file. For example, host host1.example.com.
-
Add an entry in the
allowed_redirects.conffile. For example, includeallowed_redirectsCUSTOM.conf.
The allowed_redirects.conf file would then look something like this:
#--------------------------------------------
# Include Additional Config Files
# Add custom config files for custom redirects
#--------------------------------------------
# include <AllowedRedirectsCustom.conf>
include moreConfig.conf                 # in this same directory
include product/moreConfig.conf         # in a relative directory
include /somewhere/else/moreConfig.conf # in an absolute path
The following are configurations delivered in the configuration file:
-
Oracle E-Business Suite built-in use of redirects for functionality
Examples include: Report Launcher, Self-Service Applications, Help System
-
Single sign-on integration with Oracle Access Manager using Oracle E-Business AccessGate and Oracle Directory Services
-
Reporting with Oracle Discoverer Viewer, Oracle Discoverer Server and Oracle Business Intelligence Enterprise Edition
Additional Information: See also My Oracle Support article KB263327, Oracle E-Business Suite Support Implications for Discoverer 11gR1.
-
Integration with Oracle Portal
-
iRecruitment Background Check URL
Configurations which you may need to add to the configuration file based upon your environment:
-
Oracle E-Business Suite iProcurement with Punchout (Add host or domain entry for each Punchout site), only for Releases 12.2 through 12.2.5
Note: Starting with Release 12.2.6, configuration of allowed redirects for Oracle E-Business Suite iProcurement is performed automatically.
-
Oracle E-Business Suite Configurator integration with Agile or Siebel using Oracle Application Integration Architecture (Add host or domain entry for each integration point)
-
Any custom redirects used in your environment
Profile Options for Allowed Redirects
The profile option Allow Unrestricted Redirects (FND_SEC_ALLOW_UNRESTRICTED_REDIRECT) sets unrestricted or restricted access.
Key characteristics are:
-
Can be set at the site or server level.
-
As of Oracle E-Business Suite Release 12.2.6, the default value is No at the site level. This restricts access to the allowed redirects per the redirect allowlist filter.
-
A value of Yes allows unrestricted redirects to occur. We recommend that you set FND_SEC_ALLOW_UNRESTRICTED_REDIRECT=Yes for diagnostic purposes only. This feature should not be turned off on your production system.
-
A value of NULL enables restricted access if the redirect servlet filter is configured.
-
This profile update requires a restart of the application tier services.
Allowing Redirects
There are three mechanisms for adding allowed redirects using the Allowed Redirects feature. Access can be added at the host, domain, and profile levels.
Example Host Configuration
#------------------------------------------------------------------
# Allowed redirects configuration file
# Anything following a '#' is considered a comment
#------------------------------------------------------------------
#----------------
# List of hosts
#----------------
# host target.example.com
...
Example Domain Configuration
...
#------------------------------------------------------------------
# List of domains. This matches both host.internal.<DOMAIN_NAME>
# and host.external.<DOMAIN_NAME>
#------------------------------------------------------------------
# domain example.com
...
Example Profile Configuration
#------------------------------------------------------------------
# Server level profiles (site or server level)
#------------------------------------------------------------------
profile APPS_SERVLET_AGENT              # URL for JSP and Servlets
profile APPS_FRAMEWORK_AGENT            # URL for Self Service Applications entry point
profile APPS_AUTH_AGENT                 # URL for OAM and Access Gate integration
profile APPS_SSO_POSTLOGOUT_HOME_URL    # URL to redirect on logout
profile ICX_DISCOVERER_VIEWER_LAUNCHER  # URL to launch Discoverer Viewer
profile ICX_REPORT_LAUNCHER             # URL for Report Launcher
profile ICX_FORMS_LAUNCHER              # URL for the Forms Launcher
...
Additional Information: See also My Oracle Support article KB263327, Oracle E-Business Suite Support Implications for Discoverer 11gR1.
Testing Allowed Resources and Allowed Redirects
The following example can be used to test and understand the Allowed Redirects feature, as well as the Allowed Resources/JSPs feature. In this example, you will be adding in a custom JSP to the Allowed Resources allowlist, as well as allowing the system to redirect to a custom host.
Creating and Compiling the JSP
Place the following JSP code into a file called redirectTest.jsp:
<html>
<head>
          <title>Testing a redirect</title>
</head>

<body>
          <%
            String redirectURL = "https://example.org/wiki/HTTP_302";
            response.sendRedirect(redirectURL);
          %>
</body>
Now, compile:
[html]$ cp redirectTest.jsp $OA_HTML
[html]$ cd $OA_HTML
[html]$ $FND_TOP/patch/115/bin/ojspCompile.pl --compile -s 'redirectTest.jsp' -log err.log --flush
logfile set: err.log
starting...(compiling all)
using 10i internal ojsp ver: 10.3.6.0
quick compile:
  files to compile...1
translating and compiling:
  translating jsps...1/1 in 25s
  compiling jsps...1/1 in 3s
Finished!
As expected, the JSP redirects in Oracle E-Business Suite Release 12.1.3 and pre-12.2.6 instances where new features have not been turned on.
The JSP is not accessible when the Allowed Resources and servlets filter features have been turned on - these are turned on by default in Oracle E-Business Suite Release 12.2.6 and later. When the Allowed Resources feature is turned on, you will receive an HTTP 403 (Forbidden) response.
Adding a Custom Page to the Allowlist
[html]$ cd $FND_TOP/secure

vi $FND_TOP/secure/redirect_test_CUSTOM.conf
Add the following lines:
#Adding in for testing redirect filtering
/OA_HTML/redirectTest.jsp
Load the redirect_test_CUSTOM.conf into the database with the following command:
$ java oracle.apps.fnd.security.resource.WLDataMigration MODE=custom INPUT_FILE=$FND_TOP/secure/redirect_test_CUSTOM.conf DBC=$FND_SECURE/<SID>.dbc
...
Enter APPS username: APPS
Enter APPS password: ...
This JSP will now be enabled, you can disable it using the CUSTOM Family/Product in the Allowed Resources user interface (UI).
You must wait until the cached data is refreshed before the changes go into effect.
-
For R12.ATG_PF.C.Delta.7 or Oracle E-Business Suite Release 12.2.7 and later, the check frequency is automatically set to 60 seconds. This check rate value cannot be changed.
-
For prior versions of the ATG product family and EBS 12.2.6 and earlier, the UPDATE_CHECK_INTERVAL value is used to determine the refresh timing. The default value of UPDATE_CHECK_INTERVAL is 60 seconds.
Allowing a Host for Redirects
Now, http://ebs.example.com:8000/OA_HTML/redirectTest.jsp gives us an error stating "An invalid redirect has been blocked." This demonstrates the redirect blocking on.
Allow redirects to the specific custom page by using the following command:
$ cd $FND_TOP/secure
$ edit allowed_redirects.conf
Add in the following line in the manual configuration section:
host example.org
This will tell the system that it is allowed to redirect to this host.
Now, going to the page we've added (http://ebs.example.com:8000/OA_HTML/redirectTest.jsp) should redirect us to the custom page.
Headers during and after the redirect look like the following:
http://ebs.example.com:8000/OA_HTML/redirectTest.jsp

GET /OA_HTML/redirectTest.jsp HTTP/1.1
Host: ebs.example.com:8000
User-Agent: Mozilla/5.0 (Windows NT 6.1; WOW64; rv:45.0) Gecko/20100101 Firefox/45.0
Accept: text/html,application/xhtml+xml,application/xml;q=0.9,*/*;q=0.8
Accept-Language: en-US,en;q=0.5
Accept-Encoding: gzip, deflate
Cookie: JSESSIONID=xxxx...; VIS1226_pses=xxxxx...
Connection: keep-alive

HTTP/1.1 302 Moved Temporarily
Date: Thu, 02 Mar 2017 18:10:04 GMT
Set-Cookie: JSESSIONID=xxxxxx...; path=/OA_HTML
Location: https://example.org/wiki/HTTP_302
Keep-Alive: timeout=15
Connection: Keep-Alive
Transfer-Encoding: chunked
...
----------------------------------------------------------
https://example.org/wiki/HTTP_302

GET /wiki/HTTP_302 HTTP/1.1
Host: example.org
User-Agent: Mozilla/5.0 (Windows NT 6.1; WOW64; rv:45.0) Gecko/20100101 Firefox/45.0
Accept: text/html,application/xhtml+xml,application/xml;q=0.9,*/*;q=0.8
Accept-Language: en-US,en;q=0.5
Accept-Encoding: gzip, deflate
Cookie: WMF-Last-Access=02-Mar-2017; WMF-Last-Access-Global=02-Mar-2017; CP=H2; GeoIP=US:CA:Redwood_City:37.49:-122.24:v4; enwikiGeoFeaturesUser2=xxxxxxxxxxxxxxxx; enwikimwuser-sessionId=xxxxxxxxxxxxxxxx
Connection: keep-alive

HTTP/2.0 200 OK
Date: Thu, 02 Mar 2017 18:10:09 GMT
...
Finally, don't forget to turn the redirect filter back on by setting Allow Unrestricted Redirects to No, remove any redirects you added, and disable the JSP in the Allowed Resources UI.
When finished, remove the redirect host directive you added from allowed_redirects.conf and disable the JSP in the Allowed Resources UI.
You may also want to remove the test JSP and the associated Java and class files from the system, from both run and patch file systems:
$ rm $OA_HTML/redirectTest.jsp
$ rm $OA_HTML/WEB-INF/classes/_pages/__redirecttest.*
Troubleshooting Tips
Given the need to run and tweak access to redirects using this feature, you may find unexpected access errors - either access being permitted when you did not expect it would be, or (more commonly) access being denied when you expected it to be permitted.
For example, you may see an error with the text "An invalid redirect has been blocked."
This error is an expected behavior and is not a true error if the URL is accessed and it is not allowed (restricted). If the URL is accessed and it should be allowed (unrestricted), the error displayed is an error itself. Turn off the Allowed Redirects feature to determine where the redirect goes to understand what is being blocked and what may need to be added to the allowed redirects list.
Allowed Forwards
Introduction
The Allowed Forwards feature builds upon the security of the Allowed Resources feature and reduces the attack surface by creating an allowlist of pages that an environment can and cannot forward to. By default, JavaServer Pages (JSPs) and servlets are not permitted to forward between each other in an Oracle E-Business Suite environment.
Allowed Forwards is delivered with Oracle E-Business Suite Release 12.2.14 or by applying R12.ATG_PF.C.DELTA.13 and upgrading to the equivalent product family release update packs for any other product families you may have implemented on your environment.
Forwards are only allowed if a rule exists that explicitly allows it. Oracle E-Business Suite has predefined a set of rules availabile in the Allowed Forwards feature. The implementation strategy also allows custom forward rules to be defined in the list of allowed forwards. When adding custom forward rules, you are not allowed to set the target destination to a wildcard.
How to Use Allowed Forwards
The following outlines the strategy for using the Allowed Forwards feature:
-
Collect usage data.
For a more accurate evaluation of the forwards you should allow, it is ideal to collect at least one year's worth of data of forwards that are not recognized. Data collection begins after R12.ATG_PF.C.DELTA.10 (Patch 31856779) is applied.
-
Add custom forwards.
Review the data that has been collected. Click Add on the Manage Resources Forwards Page to add any identified allowed forward rules that are not already present in the table of Allowed Forwards rules. See Manage Resource Forwards Page.
-
Turn on the Allowed Forwards feature.
Once your customization forwards have been added, turn on the Allowed Forwards feature by setting the profile option Security: Allowed Forwards to CONFIG.
Profile Options For Allowed Forwards
There are two profile options used to configure the Allowed Forwards feature: "Security: Allowed Forwards" and "FND: Security Forwards Logging".
| Profile Option Name | Code (Internal Name) | Recommended Value |
|---|---|---|
| Security: Allowed Forwards | FND_SEC_ALLOWED_FORWARDS | CONFIG |
| FND: Security Forwards Logging | FND_SEC_LOG_FORWARDS | UNRECOGNIZED |
Security: Allowed Forwards
The profile option Security: Allowed Forwards (FND_SEC_ALLOWED_FORWARDS) can be set to either ALL or CONFIG to disable or enable the feature.
-
ALL: This is the default value. When FND_SEC_ALLOWED_FORWARDS is set to ALL, this means that the Allowed Forwards feature is disabled.
-
CONFIG: Setting FND_SEC_ALLOWED_FORWARDS to CONFIG enables the Allowed Forwards feature.
FND: Security Forwards Logging
The profile option FND: Security Forwards Logging (FND_SEC_LOG_FORWARDS) can be set to one of the following values to log access to requests of dispatcher type FORWARDS: NONE, UNRECOGNIZED, and ALL.
-
NONE: Setting FND_SEC_LOG_FORWARDS to NONE means that no requests of dispatcher type FORWARDS are logged.
-
UNRECOGNIZED: This is the default value. When FND_SEC_LOG_FORWARDS is set to UNRECOGNIZED, requests of dispatched type FORWARDS are logged where resources are either:
-
In the Allowed Forwards metadata, but overall access is disabled; or
-
Not in the metadata and would be rejected if the Allowed Forwards feature is enabled.
-
-
ALL: Setting FND_SEC_LOG_FORWARDS to ALL logs all requests of dispatcher type FORWARDS.
When forwards are REJECTED and logged, logs are produced in the detailed log format.
Forwards that are ACCEPTED are logged as follows:
-
If the profile option FND: Debug Log Level (AFLOG_LEVEL) is set to STATEMENT, logs are produced in the detailed format.
-
All others are logged in the simple log format, as described in Log Formats.
For more information on the types of log formats, detailed and simple, see Log Formats.
Log Formats
Logs that are produced as a result of the FND: Security Forwards Logging profile option are either in a simple or detailed log format.
Simple Log Format
The simple log format is as follows:
Id [Type] [Action] [Method] [Source --> Destination] [Referer]
For example, a simple log entry could look like this:
1864 [REQUEST] [REJECTED] [post] ["OA_HTML/testrejected.jsp" --> "/OA_HTML/index.jsp"]
["https://host.example.com:4443/OA_HTML/OA.jsp?jttst0=xxxxxxxxx&jtfm0=xxxxx&oas=xxxxxxxxx..."]
Detailed Log Format
The detailed log format is as follows:
Id [Type][Action][Method][Source --> Destination][Referer][Remote Address][XSID][Username][SessionId][Stack]
For example, a detailed log entry could look like this:
227 [FORWARD] [REJECTED(FORWARD_NOT_ALLOWED)] [POST] ["/OA_HTML/testrejected.jsp" --> "/OA_HTML/forwardrejected.jsp"] [<full url>] [10.76.52.228] [xxxxxxxx] ["sysadmin"] ["xxxxxxx"] [Stack: "[[0]/OA_HTML/testrejected.jsp]"]
Allowed Forwards User Interface
Allowed Forwards Home Page
To access the Allowed Forwards home page user interface (UI), select the Functional Administrator responsibility in the Navigator pane on the Oracle E-Business Suite home page. Then, on the Functional Administrator page, select the Allowed Forwards tab. This takes you to the Manage Resource Forwards page.
Managed Resource Forwards Page
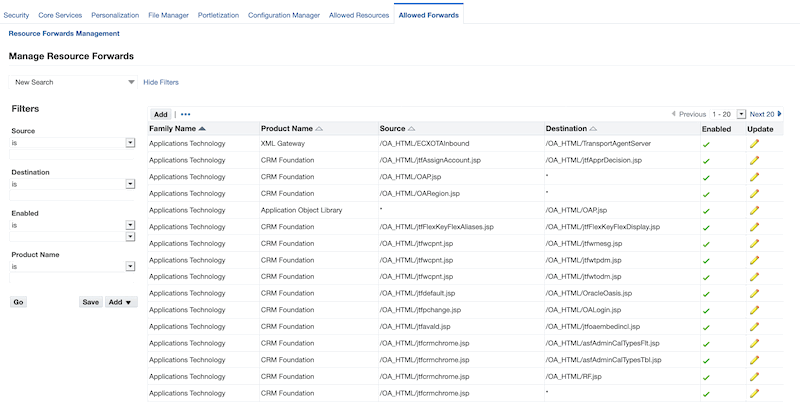
Manage Resource Forwards Page
Table of Allowed Forwards Rules
The main portion of the Manage Resource Forwards page displays a table of the current rules set for Allowed Forwards.
Table of Allowed Forwards Rules
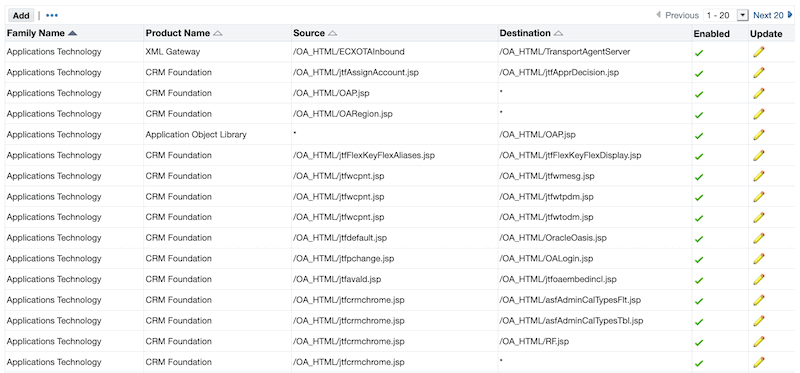
You can sort by one of the following columns:
-
Family Name
-
Product Name
-
Source (the source JSP)
-
Destination (the target JSP)
The Enabled column allows an at-a-glance look at whether the forward rule is currently allowed.
In the Update column, click on the pencil icon to update the rule for that particular allowed forward. A pop-up window is displayed and allowed you to modify the source or destination. In this window, you can also select or deselect the checkbox to enable or disable the rule. Click Submit to apply the changes.
Note: Do not use a wildcard (*) in the Destination field. This will result in an error.
Update Rule Window
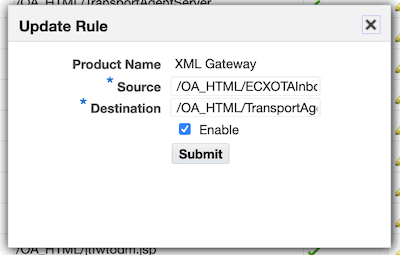
Above the main table, click Add to add another Allowed Forwards rule. This takes you to the Add Forward Rules page.
Filtering Options
Similar to the UI features of Allowed Resources, the left pane allows you to refine the displayed table by utilizing filters for each of the columns. Click Go to see the filtered results, or Save to save your filter criteria.
Allowed Forwards Filtering
Add Forward Rules Page
On the Add Forward Rules page, you can add multiple forward rules for a product family.
-
In the Product Name drop-down list, select the appropriate product in which you would like to add an Allowed Forwards rule. Then, complete the details in the table on the screen.
-
Source - The originating resource that forwards to the destination.
-
Destination - This is the target destination of an allowed forward. Do not use a wildcard (*) in this field. This will result in an error.
-
Enabled - Select this checkbox to enable the rule. Deselect to disable the rule.
-
-
Click Apply to save and apply to your environment.
If any forward rule entered does not have a unique Source or Destination (or rather, is a duplicate of an existing entry), you will receive an error. Select the rule and use the Delete button at the top of the table to remove any conflicting entries.
Add Forward Rules
