Running Diagnostics
Diagnostics in Oracle E-Business Suite
Oracle E-Business Suite delivers various diagnostic tools, including, for example:
In addition, diagnostic features are available from the Help menu in Forms-based applications in Oracle E-Business Suite.
Oracle Diagnostics Framework
Oracle Diagnostics Framework provides the infrastructure to execute diagnostic tests either for troubleshooting or for simply sanity-checking the Oracle E-Business Suite instance periodically or after applying any patch. Oracle E-Business Suite Diagnostics provides application specific troubleshooting tools that can help shorten problem-resolution time.
For more information, see Introduction to Oracle E-Business Suite Diagnostics, Oracle Diagnostics Framework User's Guide.
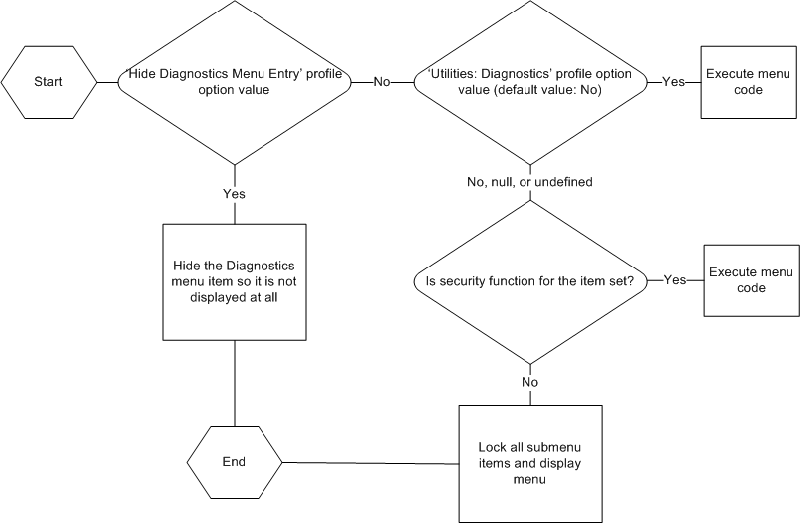
Controlling Access to the Oracle Forms-based Applications Diagnostics Menu
The Diagnostics menu is one of several menus available in Oracle Forms-based applications in Oracle E-Business Suite. These menus allow the user to invoke standard Oracle Forms functions, such as "Clear Record" as well as Oracle E-Business Suite-specific functions. For more information on the Oracle E-Business Suite pulldown menus for Forms-based applications, see: Pulldown Menus and the Toolbar, Oracle E-Business Suite Developer's Guide.
The Diagnostics menu can be found under the Help menu > Diagnostics.
In previous releases, access to the Diagnostics menu and submenu items was controlled by two profile options, Hide Diagnostics Menu Entry and Utilities: Diagnostics:
-
Hide Diagnostics Menu Entry - If this profile is set to Yes, the Diagnostics menu is hidden from the user.
-
Utilities: Diagnostics - Utilities: Diagnostics determines whether a user can automatically use the following Diagnostics submenu items: Examine, Trace, Debug, Properties, and Custom Code. If Utilities:Diagnostics is set to Yes, then users can automatically use these features. If Utilities:Diagnostics is set to No, then users must enter the password for the APPS schema to use these Diagnostics features. When the user no longer needs to use these features, he or she can select the menu entry Disable Secured Diagnostics.
Beginning with Release 12.1.3, access to the above Diagnostics submenu items can be controlled by the profile Utilities:Diagnostics or by security functions using Role-Based Access Control (RBAC). Whether or not a submenu item is available is checked on an as-needed basis by the system when the user selects the submenu item. If the menu item is not available to the user, the message "Function not available to this responsibility. Change responsibilities or contact your System Administrator."
The following flowchart illustrates how the menu items are secured:
Flowchart for Access Control to Diagnostic Menu Entries
Seeded Security Functions and Permission Sets
The following table lists the seeded securing functions and their corresponding Diagnostic menu items.
Note that there are read-only functions for some menu items.
| Securing Function Name | Securing Function User-Friendly Name | Internal Menu Name | Runtime Menu Name |
|---|---|---|---|
| FND_DIAGNOSTICS_EXAMINE | FND Diagnostics Menu Examine | DIAGNOSTICS
|
Diagnostics
|
| FND_DIAGNOSTICS_EXAMINE_RO | FND Diagnostics Menu Examine | DIAGNOSTICS
|
Diagnostics
|
| FND_DIAGNOSTICS_TRACE | FND Diagnostics Trace | TRACE
|
Diagnostics
|
| FND_DIAGNOSTICS_VALUES | FND Diagnostics Values | PROPERTIES_MENU
|
Diagnostics - Properties
|
| FND_DIAGNOSTICS_VALUES_RO | FND Diagnostics Values Read Only | PROPERTIES_MENU
|
Diagnostics - Properties
|
| FND_DIAGNOSTICS_CUSTOM | FND Diagnostics Custom | CUSTOM_CODE_MENU
|
Diagnostics - Custom Code
|
| FND_DIAGNOSTICS_PERSONALIZE | FND Diagnostics Personalize | CUSTOM_CODE_MENU
|
Diagnostics - Custom Code
|
| FND_DIAGNOSTICS_PERSONALIZE_RO | FND Diagnostics Personalize Read Only | CUSTOM_CODE_MENU
|
Diagnostics - Custom Code
|
The following table lists seeded permission sets.
| Permission Set Name | Permission Set Code | Permissions Assigned |
|---|---|---|
| FND Diagnostics Examine Menu | FND_DIAGNOSTICS_EXAMINE_PS | FND Diagnostics Menu Examine |
| FND Diagnostics Examine Read Only | FND_DIAGNOSTICS_EXAMINE_RO_PS | FND Diagnostics Menu Examine Read Only |
| FND Diagnostics Custom Menu | FND_DIAGNOSTICS_CUSTOM_PS | FND Diagnostics Custom |
| FND Diagnostics Personalizations Menu | FND_DIAGNOSTICS_FORMS_PERS_PS | FND Diagnostics Personalize |
| FND Diagnostics Personalizations Menu Read Only | FND_DIAGNOSTICS_FRM_PERS_RO_PS | FND Diagnostics Personalize Read Only |
| FND Diagnostics Properties Menu | FND_DIAGNOSTICS_PROPERTIES_PS | FND Diagnostics Values |
| FND Diagnostics Properties Menu Read Only | FND_DIAGNOSTICS_PROP_RO_PS | FND Diagnostics Values Read Only |
| FND Diagnostics Trace Menu | FND_DIAGNOSTICS_TRACE_PS | FND Diagnostics Trace |
| FND Diagnostics Menu Developer | FND_DIAGNOSTICS_DEVELOPER_PS |
|
| FND Diagnostics Menu Support | FND_DIAGNOSTICS_SUPPORT_PS |
|
To give a user access to a secured menu item using RBAC, grant a permission set containing a permission for that item to a role. Then assign that role to the user.
Example - Granting access to the Examine menu item only
For example, say you want to give a certain user full access to the "Examine..." menu item only. You want to make the other menu items that are controlled by the profile Utilities:Diagnostics inaccessible to that user.
-
Ensure that the profile option Hide Menu Entry is set to No, because that profile controls whether the Diagnostics menu is visible at all.
-
Ensure that the Utilities: Diagnostics profile is set to No, so that the other menu items will be unavailable.
-
Grant the seeded permission set FND Diagnostics Examine Menu to a role.
-
Assign the role to the user.
The user should then be able to access the "Examine..." menu item, but not the other items controlled by the Utilites:Diagnostics profile.
Related Topics
Overview of Access Control with Oracle User Management, Oracle E-Business Suite Security Guide
Java Mission Control and Java Flight Recorder
A new feature in Oracle E-Business Suite Release 12.2.6 allows you to enable Java Mission Control (JMC) and Java Flight Recorder (JFR). When Release 12.2.6 is installed, or the AD.C and TXK.C Delta 8 patches are applied, the feature to enable or disable JFR can be managed via AutoConfig.
By default, the feature is off (disabled). When the feature is enabled via AutoConfig, the startup script will have the following parameters added for the specified managed server or Java process:
-XX:+UnlockCommercialFeatures -XX:+FlightRecorder
The specified managed server or Java process will need to be restarted for the new feature to be available. When the feature is disabled via AutoConfig, the above parameters will be removed and the feature will be unavailable after the next restart of the managed server or Java process.
To Enable or Disable JMC and JFR for Oracle E-Business Suite Managed Servers
To enable or disable JFR, follow these steps:
-
Log in to the Oracle E-Business Suite application tier.
-
Source the Oracle E-Business Suite environment.
-
To enable JFR for the Oracle WebLogic Server managed servers, run the following command:
$ perl $FND_TOP/bin/txkrun.pl -script=FlightRecorder -enable=oacore_server1,forms_server1 -contextfile=$CONTEXT_FILE
-
To disable JFR for the Oracle WebLogic Server managed servers, run the following command::
$ perl $FND_TOP/bin/txkrun.pl -script=FlightRecorder -disable=oacore_server1,forms_server1 -contextfile=$CONTEXT_FILE
-
After running the enable or disable command, restart the managed servers to put the change into effect.
To Enable or Disable JMC and JFR for Oracle E-Business Suite CP, GSM, and AD
To enable or disable JFR, follow these steps:
-
To enable JFR, run the following command:
$ perl $FND_TOP/bin/txkrun.pl -script=FlightRecorder -enable=CP,GSM,AD -contextfile=$CONTEXT_FILE
-
To disable JFR, run the following command:
$ perl $FND_TOP/bin/txkrun.pl -script=FlightRecorder -disable=CP,GSM,AD -contextfile=$CONTEXT_FILE
-
Source the environment file before restarting the CP, GSM, and AD services.
Using JFR Recordings
After the JFR feature is enabled, JFR recordings can be managed by running the jcmd command with a PID and desired action appended, plus any applicable options:
jcmd <PID>.<action> [options]
The jcmd command has to be run from $COMMON_TOP/util/jdk64/bin.
Here are some usage examples, all for a PID of 7000:
To start a recording:
$ jcmd 7000 JFR.start name=MyRecording settings=profile delay=20s duration=2m filename=/EBS12jfr/myrecording.jfr
To check on a recording:
$ jcmd 7000 JFR.check
To dump a recording:
$ jcmd 7000 JFR.dump name=MyRecording filename=/EBS12jfr/dump.jfr
To stop a recording:
$ jcmd 7000 JFR.stop name=MyRec_cp
Optionally, the Java Mission Control console can be used to start the recording. For more information, see the JMS and JFR documentation at https://docs.oracle. com/javacomponents/index.html.