System Setup
This chapter covers the following topics:
- Setting Up - Overview
- Oracle Assets With Multiple Ledgers
- Defining the Asset Category Descriptive Flexfield
- Using the Account Generator in Oracle Assets
- Asset Key Flexfield
- Category Flexfield
- Location Flexfield
- Specifying System Controls
- Defining Locations
- Defining Asset Keys
- Entering QuickCodes
- Creating Fiscal Years
- Specifying Dates for Calendar Periods
- Setting Up Security by Book
- Defining Depreciation Books
- Defining Additional Depreciation Methods
- Defining Formula-Based Depreciation Methods
- Defining Bonus Depreciation Rules
- Depreciation Methods for the Job Creation and Worker Assistance Act of 2002
- Depreciation Methods for the American Jobs Creation Act of 2004
- Defining Depreciable Basis Rules
- Polish Tax Depreciation
- Polish Tax Depreciable Basis Rules
- Adjusting Polish Tax Depreciation Transactions
- Partial Retirements
- Japan Tax Reforms - FY2007
- Setting Up Depreciation Ceilings
- Defining Investment Tax Credit Rates
- Specifying Dates for Prorate Conventions
- Defining Price Indexes
- Setting Up Asset Categories
- Defining Distribution Sets
- Lease Analysis
- Entering Leases
- Exporting Lease Payments to Oracle Payables
- Defining Asset Warranties
- Overview of Asset Insurance
Setting Up - Overview
This section contains a brief overview of each task required to set up Oracle Assets.
Related Topics
Related Product Setup Steps
Perform the following steps to implement Oracle Assets. The steps are discussed in detail in the Setting Up sections of required Oracle product user guides. The following tables list the related product setup steps.
To set up the underlying Oracle Applications technology, complete the following setup steps:
-
Performing system-wide setup tasks such as configuring concurrent managers and printers.
-
Managing data security which includes setting up responsibilities to allow access to a specific set of business data and complete a specific set of transactions, and assigning individual users to one or more of these responsibilities.
-
Setting up Oracle Workflow.
General Ledger Setup Steps
Refer to the Setting Up General Ledger section of Oracle General Ledger Implementation Guide for additional details in how to complete the following setup steps.
| Step |
|---|
| Define a Ledger See: Defining Ledgers., Oracle General Ledger User Guide Note: If you are not implementing Oracle General Ledger, use the Ledgers window in Oracle Assets to define a ledger. |
| Define Additional Journal Entry Sources See: Defining Journal Sources, Oracle General Ledger User Guide Note: If you are not implementing Oracle General Ledger, use the Journal Entry Sources window in Oracle Assets to define journal entry sources. |
| Define Additional Journal Entry Categories See: Defining Journal Categories, Oracle General Ledger User Guide Note: If you are not implementing Oracle General Ledger, use the Journal Entry Categories window in Oracle Assets to define journal entry categories. |
Oracle Inventory Setup Steps
Refer to the Setting Up Oracle Inventory section of Oracle Inventory User Guide for additional details in how to complete the following setup steps.
| Step |
|---|
| Define Unit of Measure Classes See: Defining Units of Measure Classes, Oracle Inventory User Guide Note: If you are not implementing Oracle Inventory, use the Unit of Measure Classes window in Oracle Assets to define unit of measure classes. |
| Define Units of Measure See: Defining Units of Measure, Oracle Inventory User Guide Note: If you are not implementing Oracle Inventory, use the Units of Measure window in Oracle Assets to define units of measure. |
Oracle Human Resources Setup Steps
Refer to the Managing Your Workforce Using Oracle HRMS for additional details in how to complete the following setup steps.
| Step |
|---|
| Define Employees See: Entering a New Person, Managing Your Workforce Using Oracle HRMS Note: If you are not implementing Oracle Human Resources, you can use the Enter Person window in Oracle Assets to define your employees. |
Oracle Payables Setup Steps
Refer to the Setting Up Oracle Payables section of Oracle Payables User Guide for additional details in how to complete the following setup steps.
| Step |
|---|
| Define Supplier and Employee Numbering Schemes See: Defining Financials Options., Oracle Payables User Guide Note: If you are not implementing Oracle Payables, use the Financial Options window in Oracle Assets to define supplier and employee numbering schemes. |
iSupplier Setup Steps
Refer to the iSupplier Portal Implementation Guide for additional details in how in complete the following setup steps.
| Step |
|---|
| Define Suppliers See: Entering Suppliers., iSupplier Portal Implementation Guide Note: If you are not implementing Oracle Payables, use the Suppliers window in Oracle Assets to define suppliers. |
Related Topics
Oracle Applications System Administrator's Guide
Oracle Workflow Guide
Setup Flowchart
The following flowchart outline contains the required and optional setup steps for Oracle Assets. Required steps with Defaults refer to setup functionality that is pre-seeded and contains default values in the database. Review the default values and determine if changes are necessary to suit your business needs. If changes are required, perform the corresponding setup step. Optional steps are only performed if you plan to use the related feature or need to perform the particular business functions.
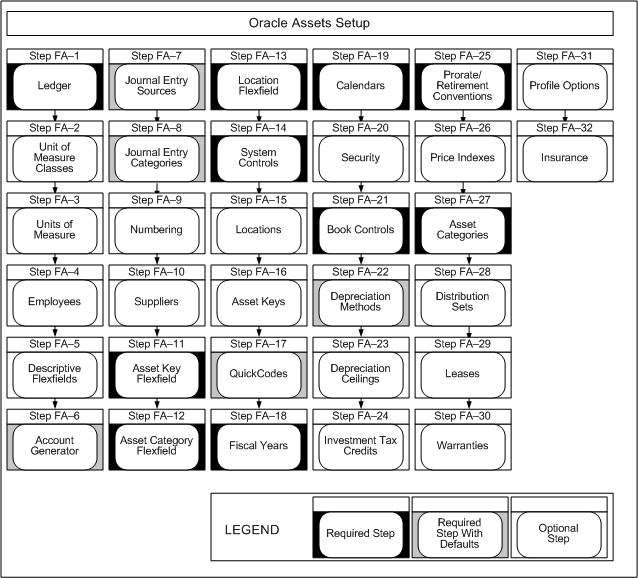
Setup Checklist
The following table lists Oracle Assets setup steps and whether the step is optional or required. After you log on to Oracle Applications, complete these steps to implement Oracle Assets:
Setup Steps
For each step, we include a Context section that indicates whether you need to repeat the step for each set of tasks, ledger, inventory organization, HR organization, or other operating unit under Multiple Organizations.
-
You need to define at least one ledger before you can implement and use Oracle Assets.
A ledger includes an accounting calendar, a ledger currency, and an account structure. The account defines the structure of your general ledger accounts. If you have not defined your account while setting up a ledger, you need to set the account to match your accounting structure and provide valid values for expense, cash, and accounts payable liability accounts.
If you previously defined your ledger while setting up a different Oracle Financials product, proceed to the next step.
You can use Oracle Assets with multiple ledgers within a single installation. See: Oracle Assets with Multiple Ledgers.
Default - This is a required step. If you skip this step, you will not be able to use Oracle Assets.
Context: You need to perform this step only once per installation.
See: Defining Ledgers., Oracle General Ledger Implementation Guide
-
Define Your Unit of Measure Classes (optional)
If you do not install Oracle Inventory or Oracle Purchasing, use the Unit of Measure Classes window in Oracle Assets to define your unit of measure classes. You can define classes for the units you use to measure production for your units of production assets.
If you previously defined your unit of measure classes while setting up a different Oracle Applications product, proceed to the next step.
Important: You must set up an organization before you can define units of measure classes. See: Creating an Organization., Oracle Human Resources Management System User Guide
Important: You must define the profile option HR:User Type before you can set up an organization. See: Setting User Profile Options, Oracle Applications System Administrator's Guide
Default - If you skip this step, Oracle Assets will use the defaults set up in Oracle Inventory or Oracle Purchasing. If neither Oracle Inventory nor Oracle Purchasing are installed, you will not be able to use unit of measure classes.
Context: Perform this step once for each Inventory organization.
See: Defining Units of Measure Classes., Oracle Inventory User Guide
-
Define Your Units of Measure (optional)
If you do not install Oracle Inventory or Oracle Purchasing, use the Units of Measure window in Oracle Assets to define your units of measure. You can define the units you use to measure production for your units of production assets.
Important: You must set up an organization before you can define units of measure. See: Creating an Organization, Oracle Human Resources Management System User Guide
Important: You must define the profile option HR:User Type before you can set up an organization. See: Setting User Profile Options, Oracle Applications System Administrator's Guide.
If you previously defined your units of measure while setting up a different Oracle Applications product, proceed to the next step.
Default - If you skip this step, Oracle Assets will use the defaults set up in Oracle Inventory or Oracle Purchasing. If neither Oracle Inventory nor Oracle Purchasing are installed, you will not be able to use units of measure.
Context: Perform this step once for each Inventory organization.
See: Defining Units of Measure., Oracle Inventory User Guide
-
Define Your Employees (optional)
If you do not install Oracle Personnel, Oracle Payroll, Oracle Purchasing, or Oracle Payables, use the Enter Person window in Oracle Assets to define employees. You must enter an employee before you can assign an asset to the employee. Oracle Assets only uses the employee name, number, and termination date.
If you previously defined your employees while setting up a different Oracle Applications product, proceed to the next step.
Default - If you skip this step, you will not be able to track assets by employee name.
Context: Perform this step once for each business group.
See: Entering a New Person., Managing Your Workforce Using Oracle HRMS
-
Define Your Descriptive Flexfields (optional)
You can set up descriptive flexfields to track additional information. For example, you can set up a descriptive flexfield for each asset category to collect information relevant to your business. For example, you might want to track the license number for cars, but the square footage for buildings. Then, when you assign a new asset to a category, you can enter the additional information.
There are many other descriptive flexfields in Oracle Assets. For example, you can set up a descriptive flexfield to store additional information about your transactions.
Note: To set up the Leases GUI descriptive flexfield or the Retirements GUI descriptive flexfield, see: Defining Descriptive Flexfield Structures, Oracle Applications Flexfields Guide.
Default - If you skip this step, you will not be able to enter additional descriptive information to track assets.
Context: You need to perform this step only once per installation.
-
Set Up Oracle Subledger Accounting (conditionally required)
Note: This step is required if the FA: Use Workflow Account Generation profile option is set to No.
Oracle Assets uses Oracle Subledger Accounting to create journal entries.
Default - If you skip this step, Oracle Assets will use the default value of No for the FA Use Workflow Account Generation and will use Subledger Accounting to create journal entries.
Context: Perform this step once for each ledger.
See: Subledger Accounting Options Setup Overview, Oracle Subledger Accounting Implementation Guide
-
Decide How to Use the Account Generator (conditionally required)
Oracle Assets uses the Account Generator to generate accounting flexfield combinations for journal entries. You must review the default process that Oracle Assets uses to see if it meets your accounting requirements. You can optionally customize the Account Generator for each ledger that you have defined. Note that you must set up Oracle Workflow in order to use the Account Generator.
Default - If you skip this step, Oracle Assets will use the default Account Generator settings to build accounting flexfield code combinations.
Context: Perform this step once for each (entity) i.e. organization operating unit, business group, or legal entity.
-
Define Additional Journal Entry Sources (required with defaults)
If you do not install Oracle General Ledger, use the Journal Entry Sources window in Oracle Assets to define additional journal entry sources. Journal entry sources are used to identify the origin of your journal entry transactions.
If you previously defined your journal entry sources while setting up Oracle General Ledger, proceed to the next step.
Default - If you skip this step, Oracle Assets will use the journal entry sources set up in Oracle General Ledger.
Context: Perform this step once for each operating unit.
See: Defining Journal Sources., Oracle General Ledger User Guide
-
Define Additional Journal Entry Categories (required with defaults)
If you do not install Oracle General Ledger, use the Journal Entry Categories window in Oracle Assets to define additional journal entry categories. Journal entry categories describe the purpose or type of your journal entries.
If you previously defined your journal entry categories while setting up Oracle General Ledger, proceed to the next step.
Default - If you skip this step, Oracle Assets will use the journal entry categories set up in Oracle General Ledger.
Context: Perform this step once for each operating unit.
See: Defining Journal Categories., Oracle General Ledger User Guide
-
Define Your Supplier and Employee Numbering Schemes (optional)
If you do not install Oracle Purchasing or Oracle Payables, use the Financials Options window in Oracle Assets to define your supplier and employee numbering schemes. You need to specify how to number your suppliers and employees before you can enter suppliers or employees.
If you previously defined your supplier and employee numbering schemes while setting up a different Oracle Applications product, proceed to the next step.
Default - If you skip this step, you will not be able to track asset assignments against employees and assignments.
Context: Perform this step once for each operating unit.
See: Defining Financials Options., Oracle Payables User Guide
-
Define Your Suppliers (optional)
If you do not install Oracle iSupplier, use Setup > Assets System > Financials > Suppliers in Oracle Assets to define your suppliers. You must enter a supplier before you can enter assets or bring over mass additions purchased from that supplier. Oracle Assets only uses the supplier name, number, and inactive date.
If you previously defined your suppliers while setting up a different Oracle Applications product, proceed to the next step.
Default - If you skip this step, you will not be able to track assets assigned to specific suppliers.
Context: Perform this step once for each operating unit.
See: Entering Suppliers., iSupplier Portal Implementation Guide
-
Define Your Asset Key Flexfield
The asset key flexfield allows you to define asset keys that let you name and group your assets so you do not need an asset number to find them. The asset key is similar to the asset category in that it allows you to group assets. However, the asset key has no financial impact.
This flexfield lets you assign the same name to many assets so you can find similar assets. You can provide additional descriptive data to group assets by project or other functional group. You can use this flexfield to track your CIP assets. You use the same setup windows to create your asset key flexfield as you do for your other key flexfields.
Default - This is a required step. If you skip this step, you will not be able to use Oracle Assets.
Context: You need to perform this step only once per installation.
See: Asset Key Flexfield.
-
Define Your Asset Category Flexfield
The asset category flexfield allows you to define asset categories and subcategories. For example, you can create an asset category for your computer equipment. You can then create subcategories for personal computers, terminals, printers, and software. You must assign the major category segment qualifier to one segment of your category flexfield. The major category segment facilitates capital budgeting. You must assign the minor category segment qualifier to one segment of your category flexfield. This is needed as some variable format report use it as a parameter. All other segments are optional. You use the same setup windows to create your asset category flexfield as you do for your other key flexfields.
Default - This is a required step. If you skip this step, you will not be able to use Oracle Assets.
Context: You need to perform this step only once per installation.
See: Category Flexfield
-
Define Your Location Flexfield
The location flexfield allows you to specify and track the exact location of your assets. You must assign the state segment qualifier to one segment of your location flexfield. The state segment facilitates property tax reporting. All other segments are optional. You use the same setup windows to create your location flexfield as you do for your other key flexfields.
Default - This is a required step. If you skip this step, you will not be able to use Oracle Assets.
Context: You need to perform this step only once per installation.
See: Location Flexfield
-
Set up your system controls. You specify your enterprise name, asset numbering scheme, and key flexfield structures in the System Controls window. You also specify the oldest date placed in service of your assets.
Default - This is a required step. If you skip this step, you will not be able to use Oracle Assets.
Context: You need to perform this step only once per installation.
-
Define Your Locations (optional)
Define valid locations. Your location flexfield combinations tell Oracle Assets what locations are valid for your company. Oracle Assets uses location for tracking assets and for property tax reporting.
If your location flexfield has dynamic insertion turned off, this is the only place you can define valid combinations. If dynamic insertion is turned on, Oracle Assets automatically updates the Locations window with the values you enter in the Assignments window.
Default - This is a required step. If you skip this step, you will not be able to use Oracle Assets.
Context: Perform this step once per ledger.
See: Defining Locations.
-
Define Your Asset Keys (optional)
Define valid asset keys. You can use the list of values to choose these combinations for your assets when you enter them.
If dynamic insertion is disabled for your asset key flexfield, Asset Keys is the only window where you can define valid combinations. If dynamic insertion is enabled, Oracle Assets automatically updates the Define Asset Keys window with the values you enter when you add assets.
Default - This is a required step. If you skip this step, you will not be able to use Oracle Assets.
Context: Perform this step once per ledger.
See: Defining Asset Keys.
-
Define Your Standard Asset Descriptions and Other QuickCode Values (required with defaults)
QuickCode values are values that you can choose from a list of values when you enter and maintain assets. You can define the QuickCode values that you want for the following items:
-
Standard Asset Descriptions
-
Journal Entries
-
Mass Additions Queue Names
-
Property Type
-
Retirement
-
Asset Category
-
Asset Subcategory
Default - If you skip this step, the list of values you receive for maintaining assets will be the seeded defaults.
Context: Perform this step once per ledger.
See: Entering QuickCodes.
-
-
Use the Fiscal Years window to define the beginning and end of each fiscal year since the start of your company.
Your fiscal year groups your accounting periods. You must define the start and end date of each fiscal year since the oldest date placed in service. If you are using a 4-4-5 calendar, your start and end dates change every year. Create fiscal years from the oldest date placed in service through at least one fiscal year beyond the current fiscal year. Depreciation will fail if the current fiscal year is the last fiscal year.
Default - This is a required step. If you skip this step, you will not be able to use Oracle Assets.
Context: Perform this step once per ledger.
-
Use the Calendars window to set up as many depreciation and prorate calendars as you need. Calendars break down your fiscal year into accounting periods. Define your calendars with as many periods as you need.
Define a prorate calendar and a depreciation calendar for each depreciation book. Depreciation books can share a calendar, and you can use the same calendar for your depreciation calendar and prorate calendar if appropriate.
-
Depreciation Calendar: Determines, with the divide depreciation flag, what fraction of the annual depreciation amount to take each period.
-
Prorate Calendar: Determines, with the date placed in service, which depreciation rate to select from the rate table.
You can set up different calendars for each depreciation book. For example, you might set up a monthly calendar for financial reporting and a quarterly calendar for tax reporting.
Default - This is a required step. If you skip this step, you will not be able to use Oracle Assets.
Context: Perform this step once per ledger.
-
-
Set Up Security by Book (optional)
If you have multiple depreciation books, you may need to set up security for each book. For example, you may have operations in the U.S., Europe, and Asia, and may have ledgers and associated depreciation books set up for each country, according to that country's currency and tax laws. For a variety of reasons, you may prefer that the staff at the different sites are unable to view depreciation information for another site.
Oracle Assets allows you to limit access to each book so that only certain individuals can view the information. You do this by creating asset organizations and organization hierarchies that determine which organizations have access to a specific depreciation book.
Default - If you skip this step, all asset depreciation books will be accessible to all users.
Context: Perform this step once per ledger.
-
Use the Book Controls window to set up your depreciation books. You can set up an unlimited number of independent depreciation books. Each book has its own set of accounting rules and accounts so you can organize and implement your fixed assets accounting policies.
When you define a tax book, you must specify an associated corporate book. You can mass copy assets and transactions from the source book into your tax book. You specify the current open period, and Initial Mass Copy copies each asset into the tax book from the corporate book as of the end of that fiscal year in the corporate book.
Default - This is a required step. If you skip this step, you will not be able to use Oracle Assets.
Context: Perform this step once per ledger.
To set up security for your ledgers, you need to complete the following steps:
-
Define organizations. See: Asset Organizations Overview
-
Define organizations hierarchies. See: Organization Hierarchies in Oracle Assets
-
Define security profiles. See: Security Profiles
-
Run the Security List Maintenance process. See: Security List Maintenance Process
-
Define responsibilities. See: Defining Responsibilities. See: Defining Responsibilities
-
Assign responsibilities to users. See: Assigning Responsibilities to Users
-
Set up the FA: Security Profile profile option. See: Setting Up FA: Security Profile
-
-
Define Additional Depreciation Methods and Rates (required with defaults)
Depreciation methods specify how to spread the asset cost. Oracle Assets includes many standard depreciation methods, and you can define additional methods in the Methods window, if necessary.
-
Life_Based Depreciation Method: Oracle Assets includes standard life-based depreciation methods and rates. However, you can define additional life-based methods.
-
Flat-Rate Depreciation Method: You can define additional flat-rate methods, such as Diminishing Value. You can define your methods to calculate depreciation using either the net book value or the cost of the asset.
-
Bonus Depreciation Rules: Use the Bonus Depreciation Rules window to enter bonus rates for your flat-rate depreciation methods. Bonus rules allow you to take additional depreciation in the early years of an asset's life.
-
Units of Production: You can define a units of production method so you can calculate depreciation for an asset based on actual production or use for the period.
-
Formula-Based Depreciation: You can define specific formulas to derive annual depreciation rates for your assets. You can use these user-defined depreciation formulas in lieu of table-based, flat rate, calculated, or units of measure depreciation methods.
Default - If you skip this step, you will be able to use only the standard depreciation methods included in Oracle Assets.
Context: Perform this step once per ledger.
See: Defining Additional Depreciation Methods, Defining Formula-Based Depreciation Methods and Defining Bonus Depreciation Rules.
-
-
Define Your Depreciation Ceilings (optional)
Depreciation ceilings limit the depreciation expense you can take for an asset. Set up depreciation expense ceilings to limit the annual amount of depreciation expense you can take on an asset. Or set up depreciation cost ceilings to limit the recoverable cost of an asset.
-
Depreciation Expense Ceilings: Use the Ceilings window to define your depreciation expense ceilings. If you are subject to United States tax law, you must set up depreciation ceilings for luxury automobiles.
-
Depreciation Cost Ceilings: If you do business in a country which requires cost ceilings, such as Australia, you can limit the cost Oracle Assets uses to calculate depreciation. When you use a cost ceiling, Oracle Assets bases depreciation expense on the lesser of the cost ceiling and the asset cost.
Default - If you skip this step, depreciation expense will not be limited by depreciation ceilings.
Context: Perform this step once per ledger.
-
-
Define Your Investment Tax Credits (optional)
Set up your Investment Tax Credit (ITC) rates, recapture rates, and ceilings. Investment tax credits (ITC) allow you to reduce the recoverable cost of an asset.
-
ITC Rates: Oracle Assets allows you to set up ITC rates for assets that are eligible for Investment Tax Credit. ITC rates determine the amount of ITC for an asset.
-
ITC Recapture Rates: Oracle Assets allows you to set up ITC recapture rates for assets with Investment Tax Credits. ITC recapture rates determine the portion of the investment tax credit that must be recaptured if you retire the asset prematurely.
-
ITC Ceilings: Oracle Assets allows you to define Investment Tax Credit (ITC) ceilings. ITC ceilings limit the amount of ITC for an asset. If you are subject to United States tax law, you must set up ITC ceilings for luxury automobiles.
Default - If you skip this step, you will not be able to use investment tax credits.
Context: Perform this step once per ledger.
-
-
Define Your Prorate and Retirement Conventions
Use the Prorate Conventions window to set up your prorate and retirement conventions. Prorate and retirement conventions determine how much depreciation expense to take in the first and last year of life, based on when you place the asset in service. Oracle Assets lets you set up as many prorate and retirement conventions as you need.
-
Prorate Conventions: Determines how much depreciation expense to take in the first year of life.
-
Retirement Conventions: If you do business in a country that requires you to use a different prorate convention for retirements than for additions, set up retirement conventions to determine how much depreciation to take in the last year of life, based on the retirement date.
You must set up your prorate conventions for the entire year. When you run the depreciation program for the last period in your fiscal year, Oracle Assets automatically generates the dates for your next fiscal year.
Default - This is a required step. If you skip this step, you will not be able to use Oracle Assets.
Context: Perform this step once per ledger.
-
-
Define Your Price Indexes (optional)
A price index lets you calculate gains and losses for retirements using current value rather than historical cost. If you do business in a country that requires you to base gains and losses on current value rather than historical cost, Oracle Assets lets you set up price indexes to calculate the gains and losses for your asset upon retirement. When you retire an asset assigned to a category and book for which you have defined a price index, you can run the Revalued Asset Retirements Report which uses the revalued asset cost in calculating gains and losses.
You can use a different index for each asset category or the same index for all categories. You associate an index with an asset category by entering the name of the price index in the Price Index field on the Asset Categories window.
Default - If you skip this step, you will not be able to use price indexes with features such as retirements and insurance.
Context: Perform this step once per ledger.
-
Asset categories let you define information that is common to all assets in a category, such as depreciation method and prorate convention. Oracle Assets uses this information to provide default values to help speed asset entry.
Default - This is a required step. If you skip this step, you will not be able to use Oracle Assets.
Context: Perform this step once per ledger.
-
Define Distribution Sets (optional)
Distribution sets let you automatically assign distributions to a new asset or mass addition quickly and accurately by using a predefined distribution set. Default distribution sets appear in the Distribution Set poplist in the Assignments window.
Default - If you skip this step, you will not be able to use distribution sets to automatically assign distributions to new asset additions.
Context: Perform this step once per ledger.
-
Define leases in the Lease Details window. You can assign leases to one or more assets in the Asset Details window. You can also test your leases in accordance with generally accepted accounting principles in the Lease Details window, and you can analyze alternate leasing strategies using the Lease Payments window.
Default - If you skip this step, you will not be able to assign a lease to an asset.
Context: Perform this step once per ledger.
See: Entering Leases and Lease Analysis.
-
Define and track descriptive information on manufacturer and vendor warranties. You define the warranty information in the Asset Warranties window. You can then assign assets to these previously defined warranties in the Asset Details window. You can assign any number of assets to the same warranty.
Default - If you skip this step, you will not be able to track descriptive information on manufacturer and vendor warranties.
Context: Perform this step once per ledger.
-
Set Profile Options (optional)
Profile options specify how Oracle Assets controls access to and processes data. In general, profile options can be set at one or more of the following levels: site, application, responsibility, and user.
Oracle Assets users use the Personal Profile Values window to set profile options only at the user level. System administrators use the Update System Profile Options window to set profile options at the site, application, responsibility, and user levels.
You can set or view the following profile options in Oracle Assets. The table also includes profile options from other applications that are used by Oracle Assets.
Default - If you skip this step, you will not be able to control access to and process data optimally in Oracle Assets.
Context: Perform this step once per ledger.
See: Overview of User Profiles, Oracle Applications System Administrator's Guide and Setting User Profile Options, Oracle Applications System Administrator's Guide.
-
Define Asset Insurance (optional)
You can use the Fixed Asset Insurance window to define insurance information for your assets, such as insurance policy information and calculation methods. You can enter multiple insurance policies for an asset for different categories of insurance. Oracle Assets uses the insurance information that you enter here to calculate the current insurance value of the asset.
Default - If you skip this step, you will not be able to track insurance information for assets.
Context: Perform this step once per ledger.
Oracle Assets With Multiple Ledgers
You can use Oracle Assets with multiple ledgers, within a single Oracle Assets installation.
You can handle multiple companies in two different ways. You can have multiple companies within one ledger, or you can have multiple companies each with its own ledger. Regardless of the way you choose, you create at least one depreciation book for each ledger that you want to use.
Example: Global Computers is a parent company with three subsidiaries. They are:
| Global Computers | G/L ledger 1 |
| Real Estate | G/L ledger 2 |
| Research & Development | G/L ledger 3 |
| Distribution | G/L ledger 3 |
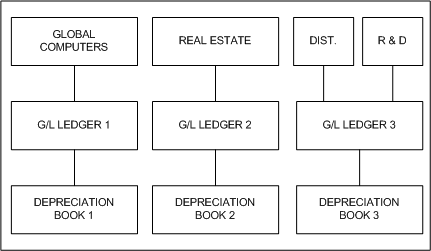
Since Global Computers and the Real Estate subsidiary are in different ledgers, they must be in different depreciation books. The Research & Development and Distribution subsidiaries are in the same ledger so you can either set up one depreciation book for both, or a separate depreciation book for each.
Implementation
You need only one copy of Oracle Assets to implement multiple ledgers. Use AutoInstall to install the single copy.
Once you install Oracle Assets, use the Book Controls window to set up as many depreciation books as you need. For each depreciation book, you choose to create journal entries to the appropriate ledger.
Remember that before you use the Book Controls window to set up your depreciation books, you must:
-
Set up the Account structure (chart of accounts) associated with each ledger
-
Use Oracle General Ledger to set up the ledger you need. If you do not have Oracle General Ledger, you can set up your ledgers using the Ledgers window in Oracle Assets
Limitations
Implementing multiple ledgers in Oracle Assets has the following limitations:
-
If you want to transfer assets that are in different corporate depreciation books, you must retire the asset from one depreciation book and add it to the other.
-
You can run depreciation projections for several books at once if all books have the same Account flexfield structure. If they have different structures, you must project them separately.
Related Topics
Defining Ledgers, Oracle General Ledger Implementation Guide
Defining the Asset Category Descriptive Flexfield
You can set up the Asset Category descriptive flexfield to store additional information based on the asset category. The Asset Category descriptive flexfield appears in both the Additions and Quick Additions forms.
Enter ATTRIBUTE_CATEGORY_CODE as the reference field to base the descriptive flexfield structure on the value of your Category Flexfield (key flexfield). See: Category Flexfield.
You define your context field values (structure names) to exactly match your concatenated Category Flexfield combinations. For example, if you have a Major Category value of BUILDING, and a Minor Category of OFFICE, your Category Flexfield combination is BUILDING.OFFICE, so you would define BUILDING.OFFICE as your context value (structure name). Similarly, you could define another context value as VEHICLE.DELIVERY. Note that the segment separator, spelling and case must exactly match your Category Flexfield combination.
You need not define a descriptive flexfield structure for each combination of your Category Flexfield; define structures only for those categories where you want to capture additional information (such as license number, insurance policy number, and so on).
Note that you may want to "share" segment names (not necessarily the same as your segment prompts) among different structures of context-sensitive segments if you plan to use flexfield views for reporting.
Related Topics
Overview of Flexfield Views, Oracle Applications Flexfield Guide
Segment Naming Conventions, Oracle Applications Flexfield Guide
Descriptive Flexfield View Example, Oracle Applications Flexfield Guide
Using the Account Generator in Oracle Assets
This essay describes how to use and customize the default Account Generator process in Oracle Assets.
The Account Generator in Oracle Assets utilizes Oracle Workflow. You can view and customize Account Generator processes through the Oracle Workflow Builder. See: Predefined Workflows Embedded in Oracle E-Business Suite, Oracle Workflow Developer User Guide and Overview of the Account Generator, Oracle Applications Flexfield Guide.
Oracle Assets uses the Account Generator to generate accounting flexfield combinations for journal entries. The Account Generator allows you to designate a specific source for each segment in the account for which Oracle Assets creates a journal entry. The Account Generator gives you the flexibility to create journal entries according to your requirements. You can specify to what detail to create journal entries, and you can specify the detail level for each book and account type.
For example, when creating journal entries for asset cost, you can specify that the cost center segment comes from the depreciation expense account of the distribution line you entered for the asset in the Assignments window. Or, you can specify that the cost center comes from the default value you defined for the depreciation book.
Oracle Assets sets up the Account Generator to create journal entries using default assignments when you set up a depreciation book.
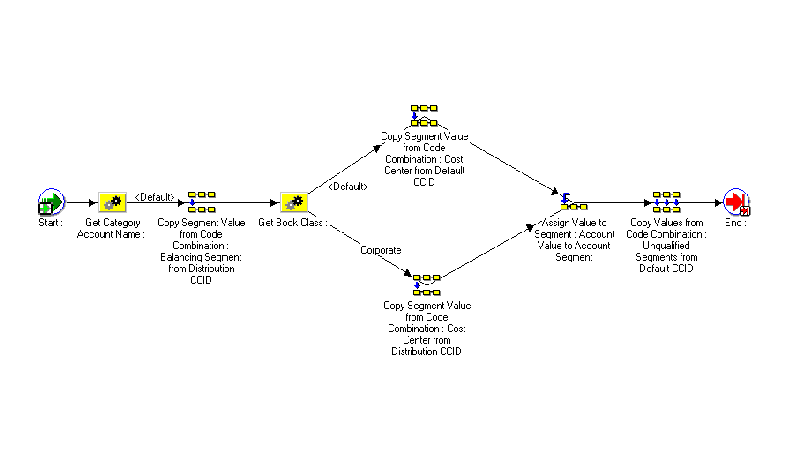
Oracle Assets provides two seeded Account Generator processes.
-
Generate Default Account process
-
Generate Distribution Detail Account process
The Generate Default Account process creates journal entries without cost center level detail, except for depreciation expense. Using the default assignments, it creates journal entries using the balancing segment from the distribution line in the Assignments window and the natural account segment from the asset category or book, depending on the account type. The Account Generator gets the other segments from the default segment values you entered for the book. You can modify the default Account Generator processes so that Oracle Assets creates journal entries to a different detail level.
The Generate Distribution Detail Account process creates journal entries with cost center level detail. It creates journal entries using the distribution expense account for all segment values, except the natural account segment. The natural account segment is created from the asset category or book, depending on the account type. You can modify the default Account Generator processes so that Oracle Assets creates journal entries to a different detail level.
Tip: You only need to read this essay and modify the default process if you want to use the Account Generator to post to a different level of detail.
Important: Notice that the default process is different for the depreciation expense account and the bonus depreciation expense account. Using the default process, Oracle Assets creates full detail journal entries for depreciation expense. Oracle Assets creates journal entries for depreciation expense using all the segments from the distribution line you enter for the asset in the Assignments window. For bonus depreciation expense, Oracle Assets creates journal entries using the account segment from the asset category and the other segments from the distribution line.
Related Topics
Overview of the Account Generator, Oracle Applications Flexfield Guide.
Decide How to Use the Account Generator
In Release 10, several Oracle Applications products used FlexBuilder to derive account code combinations for certain account transactions. In Release 11, FlexBuilder is replaced by the Account Generator to provide implementation teams with even greater flexibility and a better user interface with Oracle Workflow.
If you are upgrading from Release 10 and used FlexBuilder, then you should perform the equivalent of this setup step as part of your upgrade. See the FlexBuilder chapter of the Oracle Applications Upgrade Preparation Manual.
If you are implementing Oracle Assets for the first time, then you need to review how Assets uses the Account Generator to build Accounting Flexfield code combinations. Consider whether the default Account Generator process is appropriate for each ledger that uses a unique Accounting Flexfield structure. For each structure and ledger, you can choose one of the following:
-
Use the Generate Default Account process
-
Use the Generate Distribution Detail Account process
-
Customize the default Account Generator processes
This decision determines which setup steps your implementation team needs to perform.
Note: You cannot create a new Account Generator process. However, you can customize the default Account Generator processes, as stated above.
Before Using the Account Generator
Before using the Account Generator on a production database in Oracle Assets to generate accounting flexfield combinations, you must:
-
Define your Accounting Flexfield structure for each ledger.
-
Define flexfield segment values and validation rules.
-
Set up Oracle Workflow, Oracle Workflow Guide
-
Choose whether you want to use the default Account Generator process, or if you need to customize it to meet your accounting needs.
-
Do one of the following for each ledger:
-
Choose to use the default Account Generator process.
-
Customize the default Account Generator process, test your customizations, and choose the process for a flexfield structure, if necessary.
-
Related Topics
The Default Account Generator Processes for Oracle Assets
Customizing the Account Generator for Oracle Assets
The Default Account Generator Processes for Oracle Assets
Evaluate whether the default Account Generator processes meet your accounting requirements. No setup steps are required to use the default processes. The default processes can also be updated later as your needs change. You can make minor changes to the default processes without changing the name.
Note: If you used FlexBuilder in Release 10 but did not customize the default configuration, you can use the default Account Generator process in Release 11, which gives you the same result as the default assignments in FlexBuilder.
Each Account Generator workflow is called an item type. Oracle Assets comes with the following Account Generator item type:
-
FA Account Generator
The FA Account Generator contains the following workflow processes:
-
Generate Default Account
-
Generate Distribution Detail Account
-
Generate Account Using FlexBuilder Rules
Generate Default Account Process
Use the Generate Default Account process to generate asset-level, book-level, and category-level accounts. You can use the default settings or customize it as required.

Start Generating Code Combination (Node 1)
This is a standard activity that marks the start of the process.
Get Account Group (Node 2)
This function returns the group to which the account belongs, either book level, category level, or asset level.
Generate Book Level Account (Node 3)
This activity generates the code combination ID (CCID) for a book-level account. The FA Account Generator finds the name of the account for which it is generating code combinations. Possible account names are:
-
Cost of Removal Clearing
-
Cost of Removal Gain
-
Cost of Removal Loss
-
Deferred Depreciation Expense
-
Deferred Depreciation Reserve
-
Depreciation Adjustment
-
Intercompany Accounts Payable
-
Intercompany Accounts Receivable
-
Net Book Value Retired Gain
-
Net Book Value Retired Loss
-
Proceeds of Sale Clearing
-
Proceeds of Sale Gain
-
Proceeds of Sale Loss
-
Revaluation Reserve Retired Gain
-
Revaluation Reserve Retired Loss
Generate Category Level Account (Node 4)
This activity generates the code combination ID (CCID) for a category-level account. The FA Account Generator finds the name of the account for which it is generating code combinations. Possible account names are:
-
Asset Clearing
-
Asset Cost
-
Bonus Expense
-
Bonus Reserve
-
Construction-In-Process Clearing
-
Construction-In-Process Cost
-
Depreciation Reserve
-
Revaluation Amortization
-
Revaluation Reserve
Generate Asset Level Account (Node 5)
This activity generates the code combination ID (CCID) for an asset-level account. The FA Account Generator finds the name of the account for which it is generating code combinations. Possible account names are:
-
Depreciation Expense
Validate Code Combination (Node 6)
The FA Account Generator validates the generated code combination.
End Generating Code Combination (Node 7)
It is always the End function for an Account Generator process.
Generate Distribution Detail Account Process
Use the Generate Distribution Detail Account process to generate asset-level, book-level, and category-level accounts. You can use the default settings or customize it as required.

Start Generating Code Combination (Node 1)
This is a standard activity that marks the start of the process.
Get Account Group (Node 2)
This function returns the group to which the account belongs, either book level, category level, or asset level.
Generate Book Level For Distribution Detail (Node 3)
This activity generates the code combination ID (CCID) for a book-level account. The FA Account Generator finds the name of the account for which it is generating code combinations. Possible account names are:
-
Cost of Removal Clearing
-
Cost of Removal Gain
-
Cost of Removal Loss
-
Deferred Depreciation Expense
-
Deferred Depreciation Reserve
-
Depreciation Adjustment
-
Intercompany Accounts Payable
-
Intercompany Accounts Receivable
-
Net Book Value Retired Gain
-
Net Book Value Retired Loss
-
Proceeds of Sale Clearing
-
Proceeds of Sale Gain
-
Proceeds of Sale Loss
-
Revaluation Reserve Retired Gain
-
Revaluation Reserve Retired Loss
Generate Category Level for Distribution Detail (Node 4)
This activity generates the code combination ID (CCID) for a category-level account. The FA Account Generator finds the name of the account for which it is generating code combinations. Possible account names are:
-
Asset Clearing
-
Asset Cost
-
Bonus Expense
-
Bonus Reserve
-
Construction-In-Process Clearing
-
Construction-In-Process Cost
-
Depreciation Reserve
-
Revaluation Amortization
-
Revaluation Reserve
Generate Asset Level Account (Node 5)
This activity generates the code combination ID (CCID) for an asset-level account. The FA Account Generator finds the name of the account for which it is generating code combinations. Possible account names are:
-
Depreciation Expense
Validate Code Combination (Node 6)
The FA Account Generator validates the generated code combination.
End Generating Code Combination (Node 7)
It is always the End function for an Account Generator process.
Generate Account Using FlexBuilder Rules Process
If you used FlexBuilder in a previous release to generate account combinations, you can use the Generate Account Using FlexBuilder Rules process to replicate your FlexBuilder setup automatically, without changing any of your predefined FlexBuilder Rules, and without customizing the Account Generator. The Generate Account Using FlexBuilder Rules process includes a function generated during your upgrade from Release 10 to Release 11.
If you are upgrading from Release 10, follow the guidelines in the FlexBuilder chapter of the Oracle Applications Upgrade Preparation Manual.
Exceptions
In a few special cases, Oracle Assets does not use the Account Generator to determine for which account to create journal entries. These special cases are for the clearing account for an asset added using mass additions, and for the depreciation expense account after a reclassification.
When you add an asset using mass additions, Oracle Assets clears the asset clearing or CIP clearing account to which your payables system charged the asset in your corporate book, without using the Account Generator.
When you reclassify an asset, Oracle Assets changes the depreciation expense account segment for all books to that of the new asset category, without using the Account Generator, or the account segment from the distribution you specified for the asset in the Assignments window.
When Generate Accounts is run, all required accounts are generated and stored in fa_distribution_accounts if they pass account validation.
If the account combination already exists in fa_distribution_accounts, Generate Accounts will use the account combination without revalidation.
Related Topics
Customizing the Account Generator for Oracle Assets
Oracle Assets provides two default Account Generator processes for you to use. If the default processes do not satisfy your accounting requirements, you can use the Oracle Workflow Builder to customize the default process or create a new one.
If you want to create a new process to meet your company's needs, use the Oracle Workflow Builder to create a new process, or copy the existing default and change the name before making extensive changes to it.
Customization Guidelines
You can define to what level of detail Oracle Assets creates journal entries by specifying how the Account Generator generates the account combination. You can indicate the source in Oracle Assets for the value of each segment in the account combination.
Important: If you create journal entries to the detail level for segments without qualifiers, the Journal Entry Reserve Ledger Report does not directly reconcile with the general ledger. Most Oracle Assets reports do not report to unqualified segment detail.
Oracle Assets standard reports show the balancing segment from the distribution line, and the cost center and natural account from the asset category or book. They show these values even if you modify the Account Generator process to create journal entries using different segment values.
Functions
In addition to the functions used in the default processes, the FA Account Generator contains several unique functions, which you can use along with the Standard and Standard Flexfield Workflow functions to customize the FA Account Generator.
Note: You cannot delete or modify any of the functions listed in this section.
Get Book Account Name. This function returns only one of the book level accounts.
Get Book Class. This function determines the book class of the book, either corporate, tax, or budget.
Get Book Type Code. This function returns the book type code to be used in the workflow process. To use this function in a process, you must do the following:
-
Define a new lookup type called Books.
-
Add the lookup codes you have defined to the lookup type Books. The lookup codes should be valid book type codes you defined in the Book Controls window, for example, MYCORP or MYTAX.
-
In the Get Book Type Code properties, enter Books in the Result Type field.
Oracle Assets Default Account Generator Assignments
The following table illustrates default segment sources for each segment:
Account Structure
| Segment Name | Default Segment Sources |
|---|---|
| Company | Distribution CCID |
| Cost Center | Default CCID |
| Account | Account Segment Value |
| Product | Default CCID |
| Sub-Account | Default CCID |
Customization Example
The Account Generator uses several sources to fill in the account combination for which to create a journal entry.
Example 1: Cost Center Detail
To create journal entries to the cost center level for all your category-level accounts in your Corporate book, you specify that the Account Generator uses the cost center segment value in the distribution line attribute.
Using these attributes, Oracle Assets creates journal entries using the balancing and cost center segments from the distribution line. The account segment still comes from the asset category, and the other segments still come from the defaults you entered for the book.
Testing a Customized Account Generator Process
You must test any modified Account Generator process before using it on a production database.
You can test the supplier invoice account generation process by running the SQL script faxagtst.sql. At the system prompt, type:
$FA_TOP/admin/sql/faxagtst.sql
The script prompts you to enter a value for the following parameters:
-
account_type (for example, asset_cost or asset_cost_clearing)
-
book
-
distribution_ccid
-
account_segment
-
default_ccid
-
account_ccid
Implementing a Customized Account Generator Process
If you have customized your Account Generator process for the FA Account Generator item type and assigned a new name to it, use the Account Generator Processes window to associate the new process name with the appropriate Accounting Flexfield structure and item type.
If you made customizations to the default process, but did not change the name of it, you do not need to perform this step.
Choosing the Process for a Flexfield Structure
-
Navigate to the Account Generator Processes window.
In the System Administrator responsibility, this window is under the navigation path Application > Flexfield > Key > Accounts. In your Oracle Assets responsibility, it is under Setup > Flexfields > Key > Accounts.
-
Select the structure to which you want to assign a process. You can choose the application, flexfield title, structure, and description from the row list of values.
-
Specify the FA Account Generator item type.
-
Specify the process you want to use to generate the accounts.
The Generate Default Account process will default in. If you want to use a different process, such as the Generate Distribution Detail Account process, enter the name of the process you want to use.
Related Topics
Customizing the Account Generator, Oracle Applications Flexfields Guide
Asset Key Flexfield
Oracle Assets uses the asset key flexfield to group your assets by non-financial information. You design your asset key flexfield to record the information you want. Then you group your assets by asset key so you can find them without an asset number.
Warning: Plan your flexfield carefully. Once you have started entering assets using the flexfield, you cannot change it.
Asset Key Flexfield
| Owner | Oracle Assets |
|---|---|
| Flexfield Code | KEY# |
| Table Name | FA_ASSET_KEYWORDS |
| Number of Columns | 10 |
| Width of Columns | 30 |
| Dynamic Inserts Possible | Yes |
| Unique ID Column | CODE_COMBINATION_ID |
| Structure Column | None |
Group Assets According To Your Needs
Use the asset key flexfield to group your assets. Group your assets according to non-financial information. You can assign the same asset key to many assets to easily find similar assets. All Oracle Assets transaction forms allow you to query using the asset key, and help you find your assets without an asset number.
Asset Key Flexfield Structure
You define your asset key flexfield structure to fit the specific needs of your organization. You choose the number of segments, the length of each segment, and the name and order of each segment in your asset key flexfield. You can define up to ten asset key segments. This key flexfield supports only one structure.
Not Using The Asset Key Flexfield
If you choose not to track assets using the asset key, you must define at least one segment asset key flexfield without validation.
Determine Your Needs
Asset Key Structure
Consider the way you group and query your assets. You need to decide how many levels (segments) your asset key structure needs.
Value Sets
Each segment of your asset key structure needs a value set. The terms you used to group your assets are the values you enter for these value sets.
Tip: The asset key name (all segments concatenated) appears on forms and reports which display only a limited number of characters. You may want to abbreviate some asset key segment values.
Define Your Asset Key Flexfield
Create A Value Set For Each Segment
Create a value set for each segment using the Value Set windows. If you want to set up a segment which is dependent on another segment, create an independent value set for the segment which the user enters first, and a dependent value set for the segment which depends on the value entered. See: Value Set Windows, Oracle Applications Flexfields Guide.
Alternatively you can set up cascading dependencies for your category flexfield value sets.
Alternatively you can set up cascading dependencies for your category flexfield value sets. See: Example of $FLEX$ Syntax, Oracle Applications Flexfields Guide.
Enable Each Segment For Your Asset Asset Key Flexfield
Define new asset key segments using the Define Key Segments form. Remember, you must log into Oracle Assets again before you add assets after you recompile your key flexfield.
If you want to define all valid combinations and prevent users from creating additional combinations while entering assets, uncheck Allow Dynamic Inserts. If you do not need to limit valid combinations, check Allow Dynamic Inserts. You can define valid combinations in the Define Asset Key Flexfield Combinations form. See: Key Flexfield Segments, Oracle Applications Flexfield Guide.
Define Values For Each Segment
Create a list of valid values for each segment using the Segment Values Window. Since Oracle Assets only displays a limited number of characters of the asset key flexfield on forms and reports, you may want to keep the values short. See: Segment Values Window, Oracle Applications Flexfields Guide.
Create Asset Key Flexfield Combinations
Use the Define Asset Key Flexfield Combinations form to enter the combination using the segments you defined. You do not need to use this form to define combinations if you checked Allow Dynamic Inserts.
See: Defining Asset Keys
Example
You decide to use a two segment asset key flexfield. A typical asset key combination might be JET 10.ENGINE. To set up your asset key flexfield you must set up value sets, enable your segments, and enter valid segment values.
First, use the Value Set windows to set up a value set for each segment. For example, you create the value sets Project and Component.
Then use the Key Flexfield Segments window to enable your segments. Enter each segment and the value set for validation in the Segments window.
Now use the Segment Values windows to enter the valid values for each asset key segment. For example, you enter JET 10 as a valid value for the Project segment.
Now, when you enter an asset, you can specify JET 10.ENGINE as the asset key. Since you checked Allow Dynamic Inserts, Oracle Assets creates the combination for you if it doesn't already exist. Or you can create the combination explicitly in the Define Asset Key Flexfield Combinations form.
Related Topics
Key Flexfields by Flexfield Name, Oracle Applications Flexfields Guide
Key Flexfields by Owning Application, Oracle Applications Flexfields Guide
Category Flexfield
Oracle Assets uses the category flexfield to group your assets by financial information. You design your category flexfield to record the information you want. Then you group your assets by category and provide default information that is usually the same for assets in that category.
Warning: Plan your flexfield carefully. Once you have started entering assets using the flexfield, you cannot change it.
Category Flexfield
| Owner | Oracle Assets |
|---|---|
| Flexfield Code | CAT# |
| Table Name | FA_CATEGORIES |
| Number of Columns | 7 |
| Width of Columns | 30 |
| Dynamic Inserts Possible | No |
| Unique ID Column | CATEGORY_ID |
| Structure Column | None |
Group Assets According To Your Needs
Define the category flexfield to fit the way you group your assets. Use the category flexfield to group your assets. Group your assets according to depreciation rules. By standardizing category names, you can more easily track your assets.
Category Flexfield Structure
You define your category flexfield structure to fit the specific needs of your organization. You must define a major category segment and you can also define up to six subcategory segments. This key flexfield supports only one structure.
Warning: The combination of segment values plus segment value separators must be 30 characters or less, since the combination is used as a context field value for the Asset Category descriptive flexfield. An example of a valid combination is VEHICLE.DELIVERY, which contains 16 characters including the segment separator.
Category Hierarchy
You can set up your category flexfield so that the valid values for the subcategory segment are dependent on the major category value entered. Then, if you have a dependent segment, only the valid values appear in the list of values for that segment.
Category Default Depreciation Rules
You can default asset financial information for new assets based on the asset category. You can enter default depreciation rules for each category flexfield combination for each book. When you add an asset to a book, Oracle Assets defaults the depreciation rules from the asset category. If necessary, you can specify different depreciation rule defaults for different date placed in service ranges.
Category Budget
You can track actual spending versus budgeted amounts for each category. Enter budgeting information based on asset category. Enter budget amounts for each category for each period and then run depreciation projections for your budgeted additions. You can also run reports that compare budgeted and actual spending or show asset additions to categories for which you did not enter budget amounts.
Descriptive Flexfield Based on the Asset Category
You can set up a descriptive flexfield that stores additional information based on the asset category. Enter the asset category flexfield as the reference field, and the concatenated category segments as the context field value for that descriptive flexfield structure.
Determine Your Needs
Category Structure
Consider the way you group your assets. Determine which assets share depreciation information such as prorate convention and depreciation method. You also need to decide how many levels (segments) your category structure needs. Decide which is the top level (major category segment).
You may want to set up your categories to match your chart of accounts. Each chart account defines a major category. You can define at least one subcategory segment to allow for distinctions within a major category.
Tip: You can define up to seven segments for your asset category flexfield. Since Oracle Assets only displays a limited number of characters on its forms and reports, you may wish to use only two or three segments so they can be displayed. Also, since you must define depreciation rules for each category flexfield combination, more segments require more setup and maintenance effort.
Value Sets
Each segment of your category structure needs a value set. The terms you used to group your assets are the values you enter for these value sets.
Tip: The category name (all segments concatenated) appears on forms and reports which only display a limited number of characters. You may want to abbreviate some category segment values.
Dependent Segments
To set up a subcategory segment for which the valid values are dependent on the value of a previously entered segment, create a dependent value set. Create an independent value set for the first segment using the Value Set windows. Then create a dependent value set for the dependent segment. Enter the name of the independent value set, and specify the value which must be entered for the dependent value set to be valid.
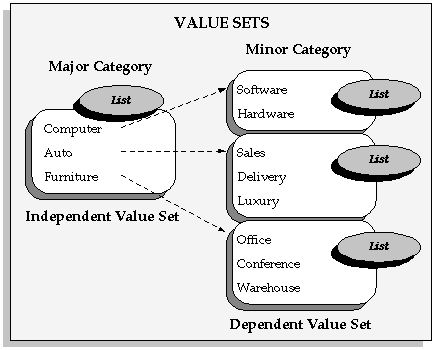
The valid values for the minor category segment are dependent on the value of the major category segment.
Alternatively you can set up cascading dependencies for your category flexfield value sets. See: Example of $FLEX$ Syntax, Oracle Applications Flexfields Guide.
Major Category Qualifier
You must define exactly one Major Category segment when setting up your category flexfield. Specify which segment is your major category segment by entering Yes for the Major Category qualifier in the Define Key Segments form. You can enter capital budgeting information for your major categories.
Define Your Category Flexfield
Create A Value Set For Each Segment
Create a value set for each segment using the Value Set windows. If you want to set up a segment which is dependent on another segment, create an independent value set for the segment which the user enters first, and a dependent value set for the segment which depends on the value entered. See: Value Set Windows, Oracle Applications Flexfields Guide.
Enable Each Segment For Your Asset Category Flexfield
Define new asset category segments using the Define Key Segments form. For your major category segment, check Enabled for the Major Category qualifier. Remember, you must log into Oracle Assets again to add assets after you recompile your key flexfield.
Because you must enter dependent values for each asset category and assign the category to at least one book, Oracle Assets does not allow dynamic insertion when you use the Category flexfield. Make sure the Allow Dynamic Inserts check box on the Key Flexfield Segments window is unchecked and the flexfield registration (Key Flexfields window) is not modified to alter the availability of dynamic insertion. See: Key Flexfield Segments, Oracle Applications Flexfields Guide.
Define Values For Each Segment
Create a list of valid values for each segment using the Segment Values Window. Since Oracle Assets only displays a limited number of characters of the asset category flexfield on forms and reports, you may want to keep the values short. See: Segment Values Window, Oracle Applications Flexfields Guide.
Tip: If you are setting up the descriptive flexfield on forms where you add assets to reference the asset category, you may want to enter all values in uppercase. Then, when you enter the concatenated category flexfield segments value for which the descriptive flexfield structure applies, you can just enter the segment values in all uppercase separated by your segment separator.
Create Asset Categories
Use the Asset Categories form to enter the asset category name using the segments you defined. Also enter the asset category default information. You must define your category for a book using the Asset Categories form before you can enter assets in that category and book.
See: Setting Up Asset Categories
Example
You decide to use a two segment category flexfield with a dependent segment. A typical category combination might be COMPUTER.HARDWARE, where HARDWARE is a valid value for the second segment only if the value of the first segment is COMPUTER. To set up your category flexfield you must set up value sets, enable your segments, enter valid segment values, and set up the category.
First, use the Value Set windows to set up a value set for each segment. For example, you create the value sets Major, and Minor Computer. Since you want the Minor Computer value set to be dependent on the Major value set, create an independent value set for Major and a dependent value set for Minor Computer. The Independent Value Set on which Minor Computer depends is Major, and the Dependent Default Value is COMPUTER.
Then use the Key Flexfield Segments windows to enable your segments. Enter each segment and the value set for validation in the Segments window. For the major category segment, check Enabled for the Major Category qualifier.
Now use the Segment Values windows to enter the valid values for each subcategory segment. For example, you enter HARDWARE as a valid value for the Minor segment.
Finally, use the Asset Categories window to enter the asset category name and information.
Flexfield Qualifiers
Major Category
You must have exactly one Major Category segment in your Category Flexfield. Oracle Assets uses the Major Category segment for capital budgeting.
Related Topics
Asset Category Descriptive Flexfield in Oracle Assets
Key Flexfields by Flexfield Name, Oracle Applications Flexfields Guide
Key Flexfields by Owning Application, Oracle Applications Flexfields Guide
Descriptive Flexfield Segments, Oracle Applications Flexfields Guide
Location Flexfield
Oracle Assets uses the location flexfield to group your assets by physical location. You design your location flexfield to record the information you want. Then you can report on your assets by location. You can also transfer assets that share location information as a group, such as when you move an office to a new location.
Warning: Plan your flexfield carefully. Once you have started entering assets using the flexfield, you cannot change it.
Location Flexfield
| Owner | Oracle Assets |
|---|---|
| Flexfield Code | LOC# |
| Table Name | FA_LOCATIONS |
| Number of Columns | 7 |
| Width of Columns | 30 |
| Dynamic Inserts Possible | Yes |
| Unique ID Column | LOCATION_ID |
| Structure Column | None |
Track Asset Location According To Your Needs
Define the location flexfield to fit the way you track your asset locations. Use the location flexfield to track the physical location of your assets. For example, if you do business internationally (or plan to do so in the future), you may want to track the country an asset is in. Other segments you may want include are state, city, and site. If you track asset location to more detail, such as for barcoding, you can also add segments for building and room number.
Location Flexfield Structure
You define your location flexfield structure to fit the specific needs of your organization. You choose the number of segments, the length of each segment, and the name and order of each segment in your location flexfield. You must define a state segment and you can also define up to six other location segments.
Property Tax Reporting
You can run the Property Tax Report for your states. The Property Tax Report sorts your assets by the location segment with the state qualifier set to Yes.
See: Property Tax Report
Mass Transfer By Location
You can transfer assets that share location information as a group. Or you can use the location as a criterion to select assets to transfer between employees or general ledger expense accounts.
See: Transferring Assets
Determine Your Needs
Location Structure
Consider the way you track asset location. You need to decide how many levels (segments) your location structure needs. Also decide which is the state segment.
Value Sets
Each segment of your location structure needs a value set. The terms you used to describe your asset locations are the values you enter for these value sets.
Tip: The location name (all segments concatenated) appears on forms and reports which only display a limited number of characters. You may want to abbreviate some location segment values.
State Qualifier
You must define exactly one State segment when setting up your location flexfield. Specify which segment is your state segment by checking Enabled for the State qualifier in the Segments window. You can run the Property Tax Report for your states.
Define Your Location Flexfield
Create A Value Set For Each Segment
Create a value set for each segment using the Value Set windows. If you want to set up a segment which is dependent on another segment, create an independent value set for the segment which the user enters first, and a dependent value set for the segment which depends on the value entered. See: Value Set Windows, Oracle Applications Flexfields Guide.
Alternatively you can set up cascading dependencies for your category flexfield value sets. See: Example of $FLEX$ Syntax, Oracle Applications Flexfields Guide.
Enable Each Segment For Your Location Flexfield
Define new location segments using the Define Key Segments form. For your state segment, check Enabled for the State qualifier. Remember, you must log into Oracle Assets again to add assets after you recompile your key flexfield.
If you want to define all valid locations and prevent users from creating additional location flexfield combinations while entering assets, uncheck Allow Dynamic Inserts. If you do not need to limit valid locations, check Allow Dynamic Inserts. You can define valid location flexfield combinations in the Locations form.
If you want to define shorthand aliases for your location flexfield, check Enable Shorthand Flexfield Entry. You can then set up aliases to represent your locations in the Shorthand Aliases window. See: Key Flexfield Segments, Oracle Applications Flexfields Guide. See: Shorthand Aliases, Oracle Applications Flexfields Guide.
Define Values For Each Segment
Create a list of valid values for each segment using the Segment Values form. Since Oracle Assets only displays a limited number of characters of the location flexfield on forms and reports, you may want to keep the values short. See: Segment Values Window, Oracle Applications Flexfields Guide.
Create Locations
Use the Locations form to enter the location name using the segments you defined. You do not need to use this form to define locations if you checked Allow Dynamic Inserts.
See: Defining Locations
You decide to use a three segment location flexfield. A typical location combination might be UK.OXFORDSHIRE.BDG3. To set up your location flexfield you must set up value sets, enable your segments, enter valid segment values, and set up the location.
First, use the Value Set windows to set up a value set for each segment. For example, you create the value sets Country, District Council, and Site.
Then use the Key Flexfield Segments windows to enable your segments. Enter each segment and the value set for validation in the Segments window. For the District Council segment, enable the State qualifier.
Now use the Segment Values windows to enter the valid values for each segment. For example, you enter UK as a valid value for the Country segment.
Finally, use the Locations window to enter the location flexfield combination UK.OXFORDSHIRE.BDG3.
Flexfield Qualifiers
State
You must have exactly one State segment in your Location Flexfield. Oracle Assets uses the State segment for property tax reporting.
Related Topics
Key Flexfields by Flexfield Name, Oracle Applications Flexfields Guide
Key Flexfields by Owning Application, Oracle Applications Flexfields Guide
Specifying System Controls
Use this form to specify your company name, asset numbering scheme, and key flexfield structures.
Prerequisites
-
Set up your Category, Location, and Asset Key Flexfields. See: Setting Up the Asset Category Flexfield, Setting Up the Asset Key Flexfield, and Setting Up the Location Flexfield.
To specify system controls:
-
Open the System Controls window.
-
Enter the enterprise name as you want it to appear on reports.
-
Enter the Oldest Date Placed In Service, which controls what dates are valid to place assets in service and on what date to begin your calendars.
If you change this field, you do not affect the assets already in the system. However, you cannot place new assets in service before the new date.
Note: You can only update the Oldest Date Placed in Service before you assign any calendars to depreciation books.
-
Enter the Starting Number at which you want Oracle Assets to begin automatically numbering your assets. Note that some asset numbers may be skipped.
Tip: If you are converting from another system, enter a starting number greater than the number of assets you want to convert so converted assets keep the same number from the previous system. For example, if you are converting 75,000 assets, you may want to enter 100,000 as the Starting Number to reserve the numbers 1 to 100,000 for manual asset numbering. Note that adding the 75,000 assets will increment the automatic numbering sequence by 75,000 (automatically numbered assets will begin at 175,001).
Note that asset numbers with a letter in them are not reserved for automatic asset numbering, since the automatic numbers are a numerical sequence.
If you are using automatic numbering, then manual numbering must be less than the starting asset number that you have in the System Controls window. Oracle Assets does not support asset numbers that exceed 2,000,000,000.
-
Enter the Location, Category, and Asset Key Flexfield structures you want to use.
-
Save your work.
Related Topics
Defining Locations
If you chose to Allow Dynamic Inserts in the Define Key Segments form, you do not need to define valid locations, since you automatically create locations when you assign assets to assignment.
Prerequisite
-
Specify the location flexfield structure you want to use. See: Specifying System Controls.
To define location flexfield combinations:
-
Open the Locations window.
-
Enter valid location flexfield combinations.
-
Choose whether to Enable the combination.
-
Save your work.
Related Topics
Setting Up the Location Flexfield
Defining Asset Keys
If you chose to Allow Dynamic Inserts in the Define Key Segments form, you do not need to define valid asset keys.
Prerequisite
-
Specify the asset key flexfield structure you want to use. See: Specifying System Controls.
To define location flexfield combinations:
-
Open the Asset Keys window.
-
Enter valid asset key flexfield combinations.
-
Choose whether to Enable the combination.
-
Save your work.
Related Topics
Setting Up the Asset Key Flexfield
Entering QuickCodes
Use this window to enter QuickCode values in addition to those provided. These values appear in Lists of Values throughout Oracle Assets.
To enter QuickCode values:
-
Open the QuickCodes window.
-
Query the QuickCode Name for which you want to define values.
-
Enter a Value for the QuickCode type.
QuickCode Types and their values are listed in the table below:
QuickCode Type QuickCode Values Asset Description Enter values such as PERSONAL COMPUTER and DELIVERY VEHICLE to standardize asset descriptions. Journal Entries You cannot enter new Journal Entry values, but you can change the descriptions. Queue Name Enter values such as ACCOUNT HOLD, or LOCATION HOLD to describe your hold queues for Mass Additions. You cannot change values DELETE, ON HOLD, and POST. Property Type Enter values such as PERSONAL, REAL, or RESIDENTIAL to describe your property. Retirement Enter values such as EXTRAORDINARY and SALE to describe your retirements. Asset Category Enter values such as AUTO and COMPUTER to describe your major asset categories. You enter major category values in the QuickCodes window if you are using table-based validation for your asset categories. Asset Subcategory Enter values such as SALES and DELIVERY to describe your asset subcategories. For example, you can use these values to create AUTO.SALES and AUTO.DELIVERY asset categories. You enter minor category values in the QuickCodes window if you are using table-based validation for your asset categories. Unplanned Depreciation Type You can enter values in addition to UNPLANNED DEPRN to describe different types of unplanned depreciation adjustments. Lease Frequency The possible values for Lease Compounding Frequency are: Monthly, Quarterly, Semi-Annually, and Annually. You cannot alter existing or enter new Lease Frequency values, but you can change the existing descriptions. Lease Payment Type You can enter lease payment types in addition to Annuity, Balloon Payment, Bargain Purchase Option, and Bargain Renewal Option. Tip: If you want to create hierarchical asset category flexfield segment values, use the Define Value Set, Define Key Segment, and Define Key Segment Value windows to define your asset category flexfield. Then, to set up the value of the minor segment to be dependent on the value of the major segment, define the Value Set for the minor segment to be dependent on the value of the major segment.
If you create hierarchical asset category values, you do not need to enter category and subcategory QuickCode values.
Tip: The values you enter appear in List of Values windows which allow no more than 12 spaces. You may want to limit your values to 12 characters.
-
Enter a description of your QuickCode value.
-
Optionally enter a Disable Date after which this value no longer appears in Lists of Values.
-
Save your work.
Related Topics
Setting Up the Asset Category Flexfield
Creating Fiscal Years
Specify the start and end dates of each fiscal year for a fiscal year name. Create fiscal years from the oldest date placed in service through at least one fiscal year beyond the current fiscal year. Depreciation will fail if the current fiscal year is the last fiscal year.
You can set up multiple fiscal years in this window. You can assign different fiscal years to your different corporate books. The calendar for a tax book must use the same fiscal year name as the calendar for the associated tax book.
Prerequisite
-
Specify the Oldest Date Placed in Service. See: Specifying System Controls.
To create a fiscal year:
-
Open the Asset Fiscal Years window.
-
Enter a Fiscal Year Name and Description. You can set up multiple fiscal years with different names.
Tip: The name you enter appears in List of Values windows which allow no more than 30 spaces. You may want to limit your name to 30 characters.
-
Enter the start and end date of each fiscal year.
-
Enter the Fiscal Year you are defining.
-
Save your work.
Related Topics
Specifying Dates for Calendar Periods
You can set up as many calendars as you need. Each book you set up requires a depreciation calendar and a prorate calendar. The depreciation calendar determines the number of accounting periods in a fiscal year, and the prorate calendar determines the number of prorate periods in your fiscal year. You can use one calendar for multiple depreciation books, and as both the depreciation and prorate calendar for a book.
Your corporate books can share the same calendar. A tax book can have a different calendar than its associated corporate book. The calendar for a tax book must use the same fiscal year name as the calendar for the associated tax book.
The depreciation program uses the prorate calendar to determine the prorate period which is used to choose the depreciation rate. The depreciation program uses the depreciation calendar and divide depreciation flag to determine what fraction of the annual depreciation expense to take each period. For example, if you have a quarterly depreciation calendar, Oracle Assets calculates one-fourth of the annual depreciation each time you run depreciation.
You must initially set up all calendar periods from the period corresponding to the oldest date placed in service to the current period. You must set up at least one period before the current period. At the end of each fiscal year, Oracle Assets automatically sets up the periods for the next fiscal year.
You can define your calendar however you want. For example, to define a 4-4-5 calendar, set up your fiscal years, depreciation calendar, and prorate calendar with different start and end dates, and fill in the uneven periods. To divide annual depreciation proportionately according to the number of days in each period, enter By Days in the Divide Depreciation field in the Book Controls window.
Prerequisites
-
Set up your Oldest Date Placed in Service. See: Specifying System Controls.
-
Set up your fiscal years. See: Creating Fiscal Years.
To specify dates for calendar periods:
-
Open the Asset Calendars window.
-
Enter the name of your Calendar.
Tip: The name you enter appears in List of Values windows which allow no more than 15 spaces. You may want to limit your name to 15 characters.
-
Choose Fiscal or Calendar to append either the fiscal or calendar year to get the accounting period name. If you do not want the fiscal or calendar year automatically appended, choose None.
For example, if your fiscal year runs from June 1 to May 31, and the current date is July 15, 1995, you are in calendar 1995 and fiscal 1996. If you specify FISCAL, your period name is JUL-96. If you specify CALENDAR, your period name is JUL-95.
-
Enter the Fiscal Year Name you want to use for this calendar.
-
Enter the number of periods in the fiscal year for this calendar.
Note: You cannot enter more than 365 periods per year.
-
Enter the Name of this period.
If your periods include the year, such as JAN-1995, and you are using the hyphen (-) as the suffix delimiter, you must use either a two or four-digit year suffix. Oracle Assets automatically adds a four-digit year to the end of the period name if you do not enter a year. Otherwise, you can enter a two-digit year suffix.
-
Enter the start and end dates of this period.
-
Save your work.
To change period names for future periods:
Note: Use this procedure if you have already created periods, but need to change them to correspond with GL periods. You can only change the names of future period names.
-
Open the Asset Calendars window.
-
Query the calendar for which you want to change period names and scroll to the last period.
-
From the Main menu, select Edit/Delete Record. Delete all of the periods you plan to rename.
-
Reenter the deleted periods with the correct name.
Related Topics
Defining Calendars (in Oracle General Ledger), Oracle General Ledger User Guide
Setting Up Security by Book
Oracle Assets shares organization and hierarchy information with Oracle Human Resources. If your business does not currently use Oracle Human Resources, you define this data using the Oracle Human Resources windows provided with Oracle Assets.
If you have already implemented Oracle Human Resources, you can skip many of the steps included in this section. Ensure that the organizations and hierarchies you defined in Oracle Human Resources corresponds to the data you want to use with Oracle Assets.
Asset Organization Overview
Organizations are departments, sections, divisions, companies, or other organizational units in your business.
The illustration below depicts ABC Corporation's organization structure. There are three levels of organizations. ABC Corporation, the top-level organization, has three child organizations Americas, Europe, and Asia/Pacific. Each of these organizations also has several child organizations. For example, the Americas organization has the following child organizations: US, Canada, and Brazil.
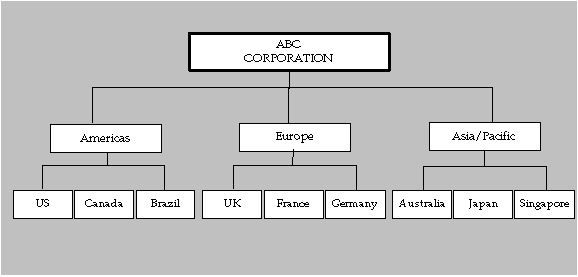
ABC Corporation uses the following information to define its default reporting organization hierarchy:
| Name | Oracle Assets |
| Version | 1 |
| Organization Name | ABC Corporation |
Business Groups
A business group is the highest level of organization and the largest grouping of employees across which you may report.
Oracle Human Resources includes a predefined organization named Setup Business Group. We recommend that you modify the definition of this predefined business group rather than defining a new one. If you define a new business group instead of modifying the predefined Setup Business Group, you need to set the HR: Security Profile profile option to point to the security profile for the new business group. Oracle Human Resources automatically creates a security profile with the business group name when you define a new business group. Oracle Human Resources incorporates all other organizations you specify into the business group you define. See: Security., Oracle Human Resources Documentation Set
You use the Organization window to retrieve the predefined Setup Business Group. Then, you can create your own business group by changing the name of the Setup Business Group. The business group you define here appears in the list of values when you set up the HR: Security Profile profile option.
Note: If you already use Oracle Human Resources, we recommend that you continue using the same business group you defined in Human Resources. If you are using a shared installation of Human Resources, we recommend you use the pre-defined Setup Business Group.
A business group is a special classification of an organization, so you also need to specify its organization type, location, and whether it is an internal or external organization. It is also essential to select the correct legislation code for a business group for correct functioning of Oracle Human Resources. You cannot change the legislation code after entering employees in a business group. See also: Entering Business Group Information., Oracle Human Resources Documentation Set
Important: Employees, organizations, and other entities are partitioned by business group. If you set up more than one business group, your data will be partitioned accordingly. In addition, classifying an organization as a business group is not reversible. Be sure to plan your business group setup carefully. For more information, refer to the Oracle Human Resources Documentation Set.
Organization Window
You use the Organization window in Oracle Assets or Oracle Human Resources to specify all the organizations within your company. By choosing the Others button on this window, you can then set up the corporate and tax book information for that particular organization.
Organization Classifications
Oracle Human Resources uses organization classifications to determine the type of organizations being set up. To flag an organization for use in Oracle Assets, you enable the Asset Organization classification.
An asset organization is an organization that allows you to perform asset-related activities for specific Oracle Assets corporate depreciation books. Oracle Assets uses only organizations designated as asset organizations.
If you require other types of organization classifications, see the Oracle Human Resources Documentation Set.
Related Topics
Creating an Organization, Oracle Human Resources Documentation Set
Organization Hierarchies in Oracle Assets
Organization hierarchies show reporting lines and other hierarchical relationships among the organizations in your business.
You use the Organization Hierarchy window to specify your organization hierarchy.
You need to define the top organization in the hierarchy and at least one organization subordinate to it.
Related Topics
Organization Hierarchies, Oracle Human Resources Documentation Set
Security Profiles
A security profile allows you to control access to Oracle Assets through responsibilities that you create and assign to users of the system. Users can sign on to Oracle Assets only through the responsibilities that you give them. Their responsibilities control what they can see and do in the system.
A responsibility always includes a security profile, which you associate with a work structure such as an organization hierarchy.
See: Security Profiles, Oracle Human Resources Documentation Set
Security List Maintenance Process
This process maintains the lists of organizations, positions, employees, and applicants that security profile holders can access. You should schedule it to run every night to take account of changes made during the day. If a disruption, such as a power outage, occurs while the process is running, you can manually restart it from the Submit Requests window.
See: Security Processes, Oracle Human Resources Documentation Set
Defining Responsibilities
A responsibility is a level of authority in Oracle Applications that allows users to access only those Oracle Applications functions and data appropriate to their roles in an organization. Each responsibility allows access to specific applications, ledgers, windows, functions, and reports.
Related Topics
Defining a Responsibility, Oracle Applications System Administrator Guide
Overview of Oracle Applications Security, Oracle Applications System Administrator Guide
Assigning Responsibilities to Users
When defining Applications users, you need to assign each user to a responsibility. You do this by navigating to the the Users Window in the System Administration responsibility.
See: User's Window, Oracle Applications System Administrator Guide
Setting Up FA: Security Profile
The FA: Security Profile profile option restricts access to the organizations defined in the security profile. The options available for the FA: Security Profile are the previously defined security profile values.
For example, you may want to set up the security profiles for the ABC Corporation. Since there is a one to one correspondence between an organization and a security profile, a logical naming standard for the security profile value would include the organization name and the organization identification number. In this case, the organization ABC Corporation might have a security profile value of ABC_Corporation_100, the organization Americas might have a profile value of Americas_200, and so forth.
Related Topics
Profile Options and Profile Options Categories Overview
Setting User Profile Options, Oracle Applications System Administrator Guide
Defining Depreciation Books
You can define corporate, tax, and budget depreciation books. You must set up your depreciation books before you can add assets to them. You can set up multiple corporate books that create journal entries for different ledger, or to the same ledger. In either case, you must both run depreciation and create journal entries for each depreciation book. For each corporate book, you can set up multiple tax and budget books that are associated with it.
Prerequisites
-
Specify system controls. See: Specifying System Controls.
-
Define your calendars. See: Specifying Dates for Calendar Periods.
-
Set up your Account segment values and combinations. See: Defining Accounts., Oracle General Ledger User Guide
-
Set up your journal entry formats. See: Defining Journal Sources, Oracle General Ledger User Guide and Defining Journal Categories., Oracle General Ledger User Guide
To define a depreciation book:
-
Open the Book Controls window.
-
Enter the name of the book you want to define.
The book name cannot contain any special characters.
Tip: The name you enter appears in List of Values windows which allow no more than 15 spaces. You may want to limit the book name to 15 characters.
-
Enter a brief, unique description of the book.
-
Choose a Corporate, Tax, or Budget book class.
-
Save your work.
Related Topics
Entering Calendar Information for a Book
-
In the Book Controls window, choose the Calendar tabbed region.
-
Optionally enter a disable date for the depreciation book.
Note: Once a book has been disabled, you cannot re-enable it.
-
Choose whether to Allow Purge for the book.
-
Enter the ledger for which you want to create journal entries. Allow GL Posting if you want to create journal entries for this book. You cannot allow general ledger posting for your budget books.
You can enter a different ledger for your tax book than the ledger of the associated corporate book. The different ledger must be a secondary ledger of the ledger assigned to the corporate book and the following conditions must be satisfied:
-
Oracle Subledger Accounting should be enabled and Use Primary Ledger Amounts should be set to No in the Accounting options of the secondary ledger setup.
-
Oracle Assets must be enabled for Oracle Subledger Accounting for the secondary ledger.
Note: When setting up a Tax book that is linked to a Secondary ledger, the chart of accounts and currency must be the same as the Primary ledger which is linked to the Corporate book.
-
-
Enter the name of the Depreciation Calendar you want to use for this book.
-
Enter the name of the Prorate Calendar that you want to use for this book.
Use the prorate calendar with the smallest period size or resolution you need for determining your depreciation rate. For example, you may want to use a monthly prorate calendar in a tax book that uses a quarterly depreciation calendar to allow finer control of the annual depreciation amount for some monthly prorate/method combinations.
-
Enter the current open period name for this book.
Note: You must set up the depreciation calendar for at least one period before the current period. See: Specifying Dates for Calendar Periods.
-
Enter the method for dividing the annual depreciation amount over the periods in your fiscal year for this book.
-
Choose Evenly to divide depreciation evenly to each period
-
Choose By Days to divide it proportionally based on the number of days in each period
-
-
Choose whether to depreciate assets in this book that are retired in their first year of life.
-
Enter the date on which you last calculated depreciation for this book. Oracle Assets updates this date when you run depreciation.
Related Topics
Defining Ledgers., Oracle General Ledger User Guide
Specifying Dates for Calendar Periods.
Entering Accounting Rules for a Book
-
In the Book Controls window, choose the Accounting tabbed region.
-
To allow amortized changes in this book, check the Allow Amortized Changes check box.
-
Choose Allow Mass Changes to allow mass changes in this book.
-
Enter the minimum time you must hold an asset for Oracle Assets to report it as a capital gain when you retire it. If you want Oracle Assets to report a capital gain for all assets when you retire them, enter zero for the threshold.
If you hold the asset for less than the threshold, Oracle Assets reports it as ordinary income.
-
If you choose to Allow Revaluation, specify revaluation rules:
Revalue Accumulated Depreciation If you do not revalue accumulated depreciation, Oracle Assets transfers the accumulated depreciation to the revaluation reserve account upon revaluation.
Revalue YTD Depreciation Check this check box to revalue year-to-date depreciation.
Retire Revaluation Reserve Check this check box to retire revaluation reserve.
Amortize Revaluation Reserve Check this check box to allow revaluation reserve to be amortized in this book. See: Asset Management in a Highly Inflationary Economy (Revaluation).
Revalue Fully Reserved Assets Check this check box to revalue fully reserved assets.
Maximum Revaluations Enter the maximum number of times an asset in this book can be revalued as fully reserved. If you leave this field blank, Oracle Assets does not limit the number of times you can revalue an asset as fully reserved.
Life Extension Factor Enter the life extension factor for fully reserved assets in this book. Oracle Assets multiplies the life extension factor by the asset original life to determine the asset's new, extended life.
Life Extension Ceiling The life extension ceiling limits the depreciation adjustment when revaluing fully reserved assets.
-
Choose Allow Group Depreciation to allow group assets to be added in this book. If you choose to allow group depreciation, specify these group depreciation rules:
Allow CIP Depreciation in Group Assets Check this check box to allow depreciation of member CIP asset cost.
Allow Intercompany Member Asset Assignments Check this check box to allow the group asset and its member assets to have a different balancing segment value. If the check box is not checked, the group asset and each of its member assets must have the same balancing segment value.
-
Prevent Previous Periods Amortized Changes check this check box to prevent backdated transactions on amortized assets. Transactions include additions, adjustments, retirements, and transfers. Value in this field does not impact assets without amortization.
Entering Natural Accounts for a Book
-
In the Book Controls window, choose the Natural Accounts tabbed region.
-
Enter Retirement Accounts.
You can set up your gain and loss accounts so that Oracle Assets creates individual journal entries for each component of the gain/loss amount to separate accounts, or to a single account for the net gain or loss.
-
Enter Deferred Depreciation Reserve and Deferred Depreciation Expense accounts.
-
Enter the general ledger account that you want to use as an offset account for the entry against accumulated depreciation when you perform reserve adjustments.
-
Enter the Account Generator default segment values for this book's journal entries.
By default, Oracle Assets creates journal entries without cost center level detail for all accounts except the depreciation expense account. Using the default assignments, it creates journal entries using the balancing segment from the expense account in the Assignments window and the account segment from the asset category or book, depending on the account type. Oracle Assets uses the other segments from the default segment values you enter for the book in this field.
Related Topics
Journal Entries for Additions and Capitalizations
Journal Entries for Depreciation
Journal Entries for Retirements and Reinstatements
Journal Entries for Revaluations
Journal Entries for Tax Accumulated Depreciation Adjustments
Entering Tax Rules for a Book
The Tax Rules tabbed region is only available for tax books. This tabbed region will not appear if you did not select Tax in the Class field in the Book Controls window.
-
In the Book Controls window, choose the Tax Rules tabbed region.
Check Allow Reserve Adjustments if you want to allow changes to the accumulated depreciation in your tax book.
You can Allow Cost/Expense Ceilings in a depreciation book; however, you cannot apply a cost ceiling and an expense ceiling to the same asset in a depreciation book.
-
Check Allow CIP Assets if you want to be able to automatically add CIP assets to your tax book when you add them to your corporate book.
-
If you choose to Allow Mass Copy into this tax book, choose whether to copy additions, adjustments, retirements, and/or salvage value.
-
In the Group Asset Additions field, choose Copy if you wish to allow mass copy of group assets into this tax book. The default value is Do Not Copy.
Note: Mass Copy does not copy group reclassification transactions that are performed when changing member assets' group assignment. Mass Copy does not copy an type of group adjustment, including group reserve transfer, group retirement adjustments, and group unplanned depreciation.
-
In the Member Asset Assignments field, choose Copy if you wish to allow mass copy of the member asset group asset assignments into this tax book. The default value is Do Not Copy.
Related Topics
Entering Default Depreciation Rules for a Category.
Determine Adjusted Accumulated Depreciation
Defining Additional Depreciation Methods
Once a depreciation method is in use, it cannot be modified. Therefore, any modification to existing rates within a method will require a new depreciation method to be defined.
To define a calculated depreciation method:
-
Navigate to the Depreciation Methods window.
Navigation: Setup: Depreciation > Methods
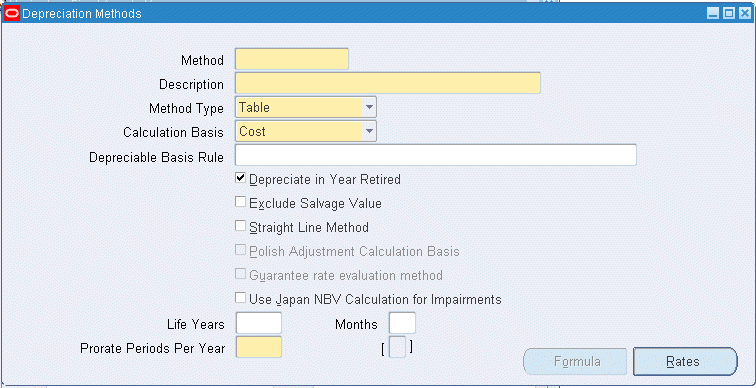
-
Enter a depreciation Method name and Description.
-
Select Calculated from the Method Type poplist.
-
The calculation basis automatically defaults to Cost (NBV is not valid for calculated methods).
-
Choose whether the depreciation method allows asset depreciation in the year it is retired.
-
Choose the Exclude Salvage Value check box if the method is to exclude the salvage value from the depreciable basis.
-
Enter the number of Years and Months of asset life.
-
Save your work.
To define a table-based depreciation method:
-
Navigate to the Depreciation Methods window.
-
Enter a depreciation Method name and Description.
-
Select Table from the Method Type poplist.
-
Choose whether to use Cost or NBV as the basis for calculating depreciation from the Calculation Basis poplist.
-
Choose whether this depreciation method allows asset depreciate in the year it is retired.
-
Choose the Exclude Salvage Value check box if the method is to exclude the salvage value from the depreciable basis.
-
Choose whether this method is a straight-line method.
-
Enter the number of Years and Months of asset life.
-
Enter the number of Prorate Periods Per Year the method uses.
-
Choose the Rates button to enter rates in the Depreciation Rates window.
-
Enter annual depreciation rates.
Rates entered must fully depreciate an asset over its life. When specifying a calculation basis rule of Cost, the sum of all the years' rates for each period must be one. When specifying a calculation basis rule of NBV, the rate for the last year of life for each period must be one and all the other rates must be between zero and one.
Important: For table methods, the annual rate entered for each prorated period must reflect the fraction of the fiscal year the asset was in service. The rate must be prorated based on the number of periods in the year and on the prorate convention.
-
Save your work.
To define units of production depreciation method:
-
Navigate to the Depreciation Methods window.
-
Enter a depreciation Method name and Description.
-
Select Production from the Method Type poplist.
-
The calculation basis automatically defaults to Cost (NBV is not valid for units of production methods).
-
Choose the Exclude Salvage Value check box if the method is to exclude the salvage value from the depreciable basis.
-
Save your work.
To define a flat-rate depreciation method:
-
Navigate to the Depreciation Methods window.
-
Enter a depreciation Method name and Description.
-
Select Flat from the Method Type poplist.
-
Choose whether to use Cost or NBV as the basis for calculating depreciation from the Calculation Basis poplist.
-
Choose whether this depreciation method allows asset depreciation in the year it is retired.
-
In the Depreciable Basis Rule field, select a depreciable basis rule from the poplist.
-
Choose the Exclude Salvage Value check box if the method is to exclude the salvage value from the depreciable basis. Salvage value can only be excluded if the flat-rate method uses NBV as the calculation basis.
-
Check the Polish Adjustment Calculation Basis check box, if applicable. This check box affects the calculation when creating negative cost adjustments to assets depreciating under Polish tax depreciation. See: Adjusting Polish Tax Depreciation Transactions.
Note: This check box is available only if you have selected one of the Polish tax depreciable basis rules as your depreciable basis rule.
-
Choose the Rates button to enter rates in the Depreciation Rates window.
-
Enter basic rates.
-
Enter the adjusting rate, or loading factor.
-
Save your work.
Note: If using the Japan Tax Reforms features, when navigating to the Depreciation Methods window, the Use Japan NBV Calculation for Impairments check box will be available. Select this check box if the Japan NBV Calculation for Impairments formula is to be used with this depreciation method.
For seeded JP-STL Depreciation Methods, an additional rate line was added to the Depreciation rates as a result of changes to the Japan Tax Reforms and the Use Japan NBV Calculation for Impairments has been enabled. For more information, see Japan Tax Reforms features.
Related Topics
Basic Depreciation Calculation
Depreciation Calculation for Flat-Rate Methods
Depreciation Calculation for Table and Calculated Methods
Depreciation Calculation for the Units of Production Method
Asset Depreciating Under Units of Production
Defining Formula-Based Depreciation Methods
Oracle Assets allows you to define depreciation formulas to calculate annual depreciation rates.
The Depreciation Formula window is used to define depreciation formulas. When finished defining your formula, it is recommended that the formula be tested using the Test Formula tabbed region.
Note: Defining depreciation formulas requires some knowledge of SQL. See: Oracle 8i SQL Reference.
Note: To meet the requirements for the Japan 250% Declining Balance depreciation method, the Guarantee Rate Evaluation check box was added to the Depreciation Method window in addition to the Use Japan NBV Calculation for Impairments. The check boxes are only displayed when the FA: Japan 2007 Tax Reforms Features profile option is set to Yes. For more information, see Japan Tax Reforms features.
To define a depreciation formula:
-
Navigate to the Depreciation Methods window.
Navigation: Setup: Depreciation > Methods
-
Enter a depreciation Method name and Description.
-
Select Formula from the Method Type poplist.
-
Choose whether to use Cost or NBV as the basis for calculating depreciation from the Calculation Basis poplist.
-
Optionally select one of the following depreciable basis rules, if NBV is selected as the basis for calculating depreciation:
-
Beginning Period Balance
-
Period End Average
-
-
Choose whether the depreciation method allows asset depreciation in the year it is retired.
-
Choose the Exclude Salvage Value check box if the method is to exclude the salvage value from the depreciable basis. Salvage value can only be excluded if the flat-rate method uses NBV as the calculation basis.
-
Choose whether the method is a straight-line method.
-
Enter the life in years and months.
-
Choose the Formula button to define depreciation formulas in the Depreciation Formula window.
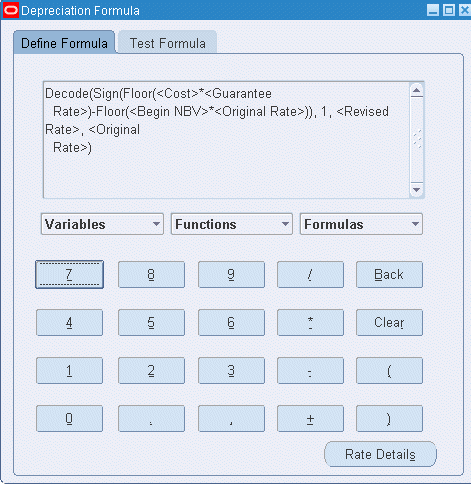
-
While in the Define Formula tabbed region, enter a formula by clicking buttons to insert elements into the formula.
-
Optionally test the formula by choosing the Test Formula tab.
-
Save the formula.
Note: To meet the requirements for the Japan 250% Declining Balance depreciation method, the Rate Details button was added to the Depreciation Formula window. The Rate Details button is displayed only when one of the seeded Japan depreciation methods is used. For more information, see Japan Tax Reforms features.
To test a depreciation formula:
-
In the Depreciation Formula window, go to the Test Formula tabbed region.
-
Optionally enter parameters, such as Life in Years or Salvage Value.
Note: To meet the requirements for the Japan Tax Reforms, the Cost and NBV at Beginning of Year parameters were added to the Test Formula tabbed region. The system displays these parameters only when the FA: Japan 2007 Tax Reforms Features profile option is set to Yes. For more information, see Japan Tax Reforms features.
-
Review the test results confirming the results depreciated the asset correctly.
-
Save the formula.
Using the Calculator to Define a Formula
The Depreciation Formula window contains a calculator that is used to insert elements into formulas.
Important: Click on the different buttons on the calculator to enter in the formula in to the display field. Formulas cannot be entered directly into the display field. In addition to the standard calculator keys used to insert constants and operators directly into the display, the Depreciation Formula: Method Name window contains the following special keys: Variables, Functions, and Formulas.
In addition to the standard calculator keys, which insert constants and operators directly into the display, the Depreciation Formula: Method Name window contains the following special keys: Variables, Functions, and Formulas.
Variables
Oracle Assets provides a poplist of variables. When a variable is selected, Oracle Assets inserts the value for the asset it is depreciating. For example, if you enter 1/<Salvage Value>, when depreciation is executed for the asset using the formula, Oracle Assets retrieves the salvage value of the asset when calculating depreciation.
See: How Oracle Assets Calculates Depreciation in a Short Tax Year.
Functions
Displays previously defined formulas in the Formulas poplist. Use the Formulas poplist to insert existing user-defined formulas into the display field.
Formulas
Any formulas you defined previously appear in the Formulas poplist. Use the Formulas poplist to insert existing user-defined formulas into the display field.
Changing the Depreciation Rate at a Specified Point in Time
For some companies, it may be advantageous to depreciate an asset at a certain rate, or at a specific point in time, or to begin depreciating the asset at a different rate. Oracle Assets allows you to define depreciation formulas in which the depreciation rate changes at a specified point in time. In order to define specify a formula the change a depreciation rate at a specified time; define the formula using a combination of the SQL DECODE and SIGN functions.
For more information on SQL, see: Oracle 8i SQL Reference.
Example 1
You have an asset with a life of 15 years. The asset's depreciates at a rate of 0.05 while the asset's remaining life is greater than 10 years. See: How Oracle Assets Calculates Depreciation in a Short Tax Year.
When the asset has a remaining life of 10 years, the asset's depreciates at a rate of 0.07. When the remaining life of the asset is less than 10 years, the asset's depreciates at a rate of 0.08. To accomplish this, enter in the following formula in the Depreciation Formula window:
DECODE (SIGN (<Remaining Life2> - 10), 1, 0.05, 0, 0.07, -1, 0.08)
Example 2
Switch from one depreciation method to another, depending on the rate:
GREATEST (1 / <Life> * 2, 1 / <Remaining Life1>)
The following table provides examples of how to use the available functions:
| Function | Example | Result |
|---|---|---|
| Decode | Decode(Remaining Life 1, 3, 0.3, 2, 0.2, 0.1) | If Remaining Life 1 is 3, Oracle Assets returns the value 0.3; if Remaining Life 1 is 2, Oracle Assets returns the value 0.2; otherwise, Oracle Assets returns the value 0.1 |
| Greatest | Greatest(2/Life, 0.5) | Oracle Assets returns the greater of 2 divided by the life or 0.5. |
| Least | Least(2/Life, 0.5) | Oracle Assets returns the smaller of 2 divided by the life or 0.5. |
| Power | Power(0.5, 3) | Oracle Assets returns 0.5 to the power of 3 (0.125). |
| Round | Round(2.33333, 4) | Oracle Assets rounds to the fourth position and returns a value of 2.3333. |
| Sign | Sign(Life - 5) | If Life minus 5 is a positive number, Oracle Assets returns a value of 1; if Life minus 5 is zero, Oracle Assets returns a value of zero. Otherwise, Oracle Assets returns a value of -1. |
| Sqrt | Sqrt(25) | Oracle Assets returns the square root of 25 (5). |
Guidelines for Defining Depreciation Formulas
When you use formula-based depreciation, you have the flexibility to create custom depreciation methods to meet your specific needs. However, it is essential that you plan and thoroughly test your custom depreciation formulas to ensure that your assets will depreciate correctly. Poorly thought out depreciation formulas can cause unexpected and incorrect depreciation rates.
Note: Oracle Assets does not validate custom depreciation formulas.
The following is an example of a poorly thought out depreciation formula:
100 / <Salvage Value> + 0.01
If the salvage value of an asset is greater than 100, the asset depreciates at an expected rate (between 0 and 100). However, if the salvage value of the asset is less than 100, the asset actually appreciates over time.
Also, if the salvage value for an asset is zero, Oracle Assets automatically sets any amount you divide by the salvage value to zero (100 / 0 = 0). In this case, the rate when you use the above depreciation formula would always equal 0.01.
Finally, if the salvage value is set to null for an asset, the value is automatically set to 0. Again, the rate when you use the above depreciation formula would always equal 0.01.
Related Topics
Adding Assets in Short Tax Years
Defining Bonus Depreciation Rules
A bonus rule can have a different bonus rate for each year of the asset's life. You can modify the rate at any time for current and future fiscal years.
You can use bonus rules with corporate books as well as tax books. Bonus rates let you increase the annual depreciation expense for assets using flat-rate, straight-line, table-based, and formula-based depreciation methods. Oracle Assets also allows you to set up negative bonus rates to amortize bonus reserve.
For reporting purposes, you can set the bonus year and rate to 0. Oracle Assets does not calculate any bonus expense.
You can use the One-Time Depreciation check box to limit bonus rules to one fiscal year.
Note: After assigning a bonus rule to an asset, it cannot be removed. The solution is to set up a bonus rule with 0 rate and assign it to the asset or the category default.
To define your bonus rules:
-
Open the Bonus Depreciation Rules window.
-
Enter a Bonus Rule name and description.
-
Check the One-Time Depreciation check box, if applicable.
-
Enter the fiscal year range of the asset life to which the bonus rate applies.
-
Enter the bonus rate for each fiscal year range.
-
If you are setting up a bonus rule for use with Polish tax depreciation, enter a depreciation factor and an alternate depreciation factor. When you enter either a depreciation factor or an alternate depreciation factor, the value in the Rate % field is automatically set to 0%.
Note: You need to ensure the depreciation factor and alternate depreciation factor are set up appropriately. Oracle Assets does not validate that the factor is between a predetermined range.
-
Save your work.
Related Topics
Depreciation Calculation for Flat-Rate Methods
Bonus Depreciation Rule Listing
Depreciation Methods for the Job Creation and Worker Assistance Act of 2002
Oracle Assets provides special depreciation methods to help you take advantage of the additional first-year depreciation deduction provided by the Job Creation and Worker Assistance Act of 2002.
The Job Creation and Worker Assistance Act of 2002 provides an additional depreciation deduction for both regular tax and alternative minimum tax purposes in the United States. It provides an additional first-year depreciation deduction that is equal to 30 percent of the qualified asset's depreciable basis. The depreciable basis of the asset and the depreciation deduction in the year of purchase and in later years would be adjusted to reflect the additional first-year depreciation deduction. Refer to the Job Creation and Worker Assistance Act of 2002 for compliance.
Table-Based Depreciation Methods for the Job Creation and Worker Assistance Act of 2002
The following table shows the table-based depreciation methods Oracle Assets provides to help you take advantage of the additional first-year depreciation deduction allowed by the Job Creation and Worker Assistance Act of 2002.
| Method | Life | Method Description | Derived From Method |
|---|---|---|---|
| MACRS 30B HY | 3, 5, 7, 10, 15, 20 years | MACRS: Half-Year Convention - 30% Bonus | MACRS HY |
| MACRS 30B MQ | 3, 5, 7, 10, 15, 20 years | MACRS: Mid-Quarter Convention - 30% Bonus | MACRS MQ |
| MACRS STL30B | 27.5, 39 years | MACRS: Straight-line Mid-Month Convention - 30% Bonus | MACRS STL MM |
| AMT 30B HY | 2.5 - 20 years | Alternative Minimum Tax: Half-Year Convention - 30% Bonus | AMT HY |
| AMT 30B MQ | 2.5 - 20 years | Alternative Minimum Tax: Mid-Quarter Convention - 30% Bonus | AMT MQ |
| STL 30B | 3 years | Straight-Line - 30% Bonus (Applies to Mid-Month Convention) | N/A |
Important: The table-based methods referred to above represent modified versions of methods previously included with Oracle Assets. The methods from which they where derived are listed in the Derived From Method column. If you currently use customized rate tables for tax depreciation methods, you will need to modify the rate tables accordingly.
Example
On June 1, 2002, a corporation acquires and places in service qualified property that costs $1 million. The corporation is allowed an additional first-year depreciation deduction of $300,000. The depreciation calculation is computed as shown in the following table:
| Field | Value |
| Asset Cost: | $1 million |
| Date placed in service: | June 1, 2002 |
| Prorate date: | January 1, 2002 |
| Life: | 5 years |
| Period: | Yearly calendar ending December 31 |
| Depreciation method: | MACRS 30B HY |
| Prorate convention: | Half Year |
The following table shows the yearly depreciation:
| Period | Cost | Depreciation | Accumulated Depreciation | Depreciation Rates for MACRS 30B HY - 5 Years | Depreciation Rates for MACRS HY - 5 Years |
|---|---|---|---|---|---|
| FY 2002 | 1,000,000 | 440,000 | 440,000 | 44% | 20% |
| FY 2003 | 1,000,000 | 224,000 | 664,000 | 22.4% | 32% |
| FY 2004 | 1,000,000 | 134,400 | 798,000 | 13.44% | 19.2% |
| FY 2005 | 1,000,000 | 80,640 | 879,040 | 8.064% | 11.52% |
| FY 2006 | 1,000,000 | 80,640 | 959,680 | 8.064% | 11.52% |
| FY 2007 | 1,000,000 | 40,320 | 1,000,000 | 4.032% | 5.76% |
Depreciation is calculated as follows:
FY 2002 = 44% * 1,000,000 = 440,000
FY 2003 = 22.4% * 1,000,000 = 224,000
FY 2004 = 13.44% * 1,000,000 = 134,400
FY 2005 = 8.064% * 1,000,000 = 80,640
FY 2006 = 8.064% * 1,000,000 = 80,640
FY 2007 = 4.032% * 1,000,000 = 40,320
Depreciation rates of MACRS 30B HY - 5 years are modified from MACRS HY - 5 years table rates, listed as follows:
FY 2002 = 30% + 20% * (1 - 30%) = 44%
FY 2003 = 32% * (1 - 30%) = 22.4%
FY 2004 = 19.2% * (1 - 30%) = 13.44%
FY 2005 = 11.52% * (1 - 30%) = 8.064%
FY 2006 = 11.52% * (1 - 30%) = 8.064%
FY 2007 = 5.76% * (1 - 30%) = 4.032%
Changing the Depreciation Method
You can change the depreciation method of existing assets to take the additional first-year depreciation deduction. You can perform a prior period depreciation method change and execute the depreciation method change as an expensed adjustment. The catch-up expense will be taken in the current period of change.
You can change the depreciation method of an asset via the Asset Workbench. For a range of affected assets, use Mass Change to perform the depreciation method change. See: Changing Financial and Depreciation Information.
You cannot perform an expensed adjustment if you have previously performed an amortized adjustment for the asset.
Note: If you need to adjust prior fiscal year accumulated depreciation, you should perform the reserve adjustment on your assets prior to any depreciation method change.
Adjusting Accumulated Depreciation for the Prior Fiscal Year
Because the additional first-year depreciation deduction retroactively applies to assets placed in service after September 10, 2001, many users may have closed their previous fiscal year before the additional first-year depreciation deduction was available.
If you need to file amended prior year tax returns, you can use Reserve Adjustment to adjust the depreciation for one or more assets for the previous fiscal year in your tax book.
See: Adjusted Tax Book Accumulated Depreciation.
Depreciation Methods for the American Jobs Creation Act of 2004
Oracle Assets provides special depreciation methods for qualified leasehold and restaurant improvements to help you take advantage of the additional first-year depreciation deduction provided by the American Jobs Creation Act of 2004.
The American Jobs Creation Act of 2004 provides that qualified leasehold and restaurant improvements placed in service between October 22, 2004 and Dec. 31, 2005 will be depreciated over 15 years using the straight-line method. These improvements can still qualify for the 50 percent bonus depreciation if they were placed in service before Dec. 31, 2004.
The 50 percent bonus depreciation provides an additional first-year depreciation deduction that is equal to 50 percent of the qualified asset's depreciable basis. The depreciable basis of the asset and the depreciation deduction in the year of purchase and in later years will be adjusted to reflect the additional first-year depreciation deduction.
The qualified asset is depreciated using the same depreciation method, useful life, and convention that apply to the qualified asset for both regular tax and alternative minimum tax (AMT) purposes in the United States.
Table-Based Depreciation Methods for the American Jobs Creation Act of 2004
The following table shows the table-based depreciation methods Oracle Assets provides to help you take advantage of the additional first-year depreciation deduction allowed by the American Jobs Creation Act of 2004. The same depreciation method, life, and prorate convention apply to both regular tax and AMT purposes on the qualified asset.
| Method | Life | Method Description | Derived From Method |
|---|---|---|---|
| STL 50B HY | 15 years | Straight-Line Half-Year Convention with 50% Bonus Depreciation | MACRS STL HY |
| STL 50B MQ | 15 years | Straight-line Mid-Quarter Convention with 50% Bonus Depreciation | MACRS STL MQ |
Important: The table-based methods referred to above represent modified versions of methods previously included with Oracle Assets. The methods from which they were derived are listed in the Derived From Method column. If you currently use customized rate tables for tax depreciation methods, you will need to modify the rate tables accordingly.
Example
On December 1, 2004, a corporation acquires and places in service a qualified asset that costs $1 million. The corporation is allowed an additional first-year depreciation deduction of $500,000. The depreciation calculation is computed as shown in the following table:
| Field | Value |
|---|---|
| Asset Cost | $1 million |
| Date Placed in Service | December 1, 2004 |
| Prorate Date | July 1, 2004 |
| Life | 15 years |
| Period | Yearly calendar ending December 31 |
| Depreciation Method | STL 50B HY |
| Prorate Convention | Half Year |
The above depreciation method, life and prorate convention are used for both regular tax and AMT purposes on the qualified asset.
The following table shows the yearly depreciation:
| Period | Cost | Depreciation | Accumulated Depreciation | Depreciation Rates for STL 50B HY - 15 Years | Depreciation Rates for MACRS STL HY - 15 Years |
|---|---|---|---|---|---|
| FY 2004 | 1,000,000 | 516,665 | 516,665 | 51.6665% | 3.333% |
| FY 2005 | 1,000,000 | 33,335 | 550000 | 3.3335% | 6.667% |
| FY 2006 | 1,000,000 | 33,335 | 583,335 | 3.3335% | 6.667% |
| FY 2007 | 1,000,000 | 33,330 | 616,665 | 3.333% | 6.666% |
| FY 2008 | 1,000,000 | 33,335 | 650,000 | 3.3335% | 6.667% |
| FY 2009 | 1,000,000 | 33,335 | 683,335 | 3.3335% | 6.667% |
| FY 2010 | 1,000,000 | 33,330 | 716,665 | 3.333% | 6.666% |
| FY 2011 | 1,000,000 | 33,335 | 750,000 | 3.3335% | 6.667% |
| FY 2012 | 1,000,000 | 33,335 | 783,335 | 3.3335% | 6.667% |
| FY 2013 | 1,000,000 | 33,330 | 816,665 | 3.333% | 6.666% |
| FY 2014 | 1,000,000 | 33,335 | 850,000 | 3.3335% | 6.667% |
| FY 2015 | 1,000,000 | 33,335 | 883,335 | 3.3335% | 6.667% |
| FY 2016 | 1,000,000 | 33,330 | 916,665 | 3.333% | 6.666% |
| FY 2017 | 1,000,000 | 33,335 | 950,000 | 3.3335% | 6.667% |
| FY 2018 | 1,000,000 | 33,335 | 983,335 | 3.3335% | 6.667% |
| FY 2019 | 1,000,000 | 16,665 | 1,000,000 | 1.6665% | 3.333% |
Depreciation is calculated as follows:
FY 2004 = 51.6665% * 1,000,000 = 516,665
FY 2005 = 3.3335% * 1,000,000 = 33,335
FY 2006 = 3.3335% * 1,000,000 = 33,335
FY 2007 = 3.333% * 1,000,000 = 33,330
FY 2008 = 3.3335% * 1,000,000 = 33,335
FY 2009 = 3.3335% * 1,000,000 = 33,335
FY 2010 = 3.333% * 1,000,000 = 33,330
FY 2011 = 3.3335% * 1,000,000 = 33,335
FY 2012 = 3.3335% * 1,000,000 = 33,335
FY 2013 = 3.333% * 1,000,000 = 33,330
FY 2014 = 3.3335% * 1,000,000 = 33,335
FY 2015 = 3.3335% * 1,000,000 = 33,335
FY 2016 = 3.333% * 1,000,000 = 33,330
FY 2017 = 3.3335% * 1,000,000 = 33,335
FY 2018 = 3.3335% * 1,000,000 = 33,335
FY 2019 = 1.6665% * 1,000,000 = 16,665
Depreciation rates of STL 50B HY - 15 years are modified from MACRS STL HY - 15 years table rates, listed as follows:
FY 2004 = 50% + 3.333% * (1 - 50%) = 51.6665%
FY 2005 = 6.667% * (1 - 50%) = 3.3335%
FY 2006 = 6.667% * (1 - 50%) = 3.3335%
FY 2007 = 6.666% * (1 - 50%) = 3.333%
FY 2008 = 6.667% * (1 - 50%) = 3.3335%
FY 2009 = 6.667% * (1 - 50%) = 3.3335%
FY 2010 = 6.666% * (1 - 50%) = 3.333%
FY 2011 = 6.667% * (1 - 50%) = 3.3335%
FY 2012 = 6.667% * (1 - 50%) = 3.3335%
FY 2013 = 6.666% * (1 - 50%) = 3.333%
FY 2014 = 6.667% * (1 - 50%) = 3.3335%
FY 2015 = 6.667% * (1 - 50%) = 3.3335%
FY 2016 = 6.666% * (1 - 50%) = 3.333%
FY 2017 = 6.667% * (1 - 50%) = 3.3335%
FY 2018 = 6.667% * (1 - 50%) = 3.3335%
FY 2019 = 3.333% * (1 - 50%) = 1.6665%
Changing the Depreciation Method
You can change the depreciation method of existing assets to take the additional first-year depreciation deduction. You can perform a prior period depreciation method change and execute the depreciation method change as an expensed adjustment. The catch-up expense will be taken in the current period of change.
You can change the depreciation method of an asset via the Asset Workbench. For a range of affected assets, use Mass Change to perform the depreciation method change. See: Changing Financial and Depreciation Information.
You cannot perform an expensed adjustment if you have previously performed an amortized adjustment for the asset.
Note: If you need to adjust prior fiscal year accumulated depreciation, you should perform the reserve adjustment on your assets prior to any depreciation method change.
Defining Depreciable Basis Rules
Depreciable Basis Rules
Oracle Assets provides the Depreciable Basis Rules feature to accommodate depreciation method setup requirements not met by the Cost or NBV calculation basis types. The combination of depreciable basis rule and depreciation method determine how depreciable basis is derived.
Applying Depreciable Basis Rules
Choose the desired depreciable basis rule when you set up the depreciation methods. When you create transactions, the depreciable basis of the asset is calculated based on the depreciable basis rules specified in the Depreciable Basis Rule field.
Note: You can only use depreciable basis rules with flat-rate based methods, with the following exceptions: Beginning Period Balance and Period End Average can also be used with formula-based methods.
-
Use Recoverable Cost
-
Use Transaction Period Basis
-
Use Fiscal Year Beginning Basis
-
Flat Rate Extension
-
Period End Balance
-
Beginning Period Balance
-
Period End Average
-
Year to Date Average Balance
-
Year to Date Average with Half Year Rule
-
Year End Balance
-
Year End Balance with Positive Reduction Amount
-
Year End Balance with Half Year Rule
The following depreciable basis rules are applicable only to Polish tax depreciation. See: Polish Tax Depreciable Basis Rules.
Note: When you use one of the Polish Tax depreciable basis rules, the Method Type must be set to Flat and the Calculation Basis must be set to Cost.
-
Polish 30% with a Switch to Declining Classic and Flat Rate
-
Polish 30% with a Switch to Flat Rate
-
Polish Declining Modified with a Switch to Declining Classic and Flat Rate
-
Polish Declining Modified with a Switch to Flat Rate
-
Polish Standard Declining with a Switch to Flat Rate
The depreciable basis rules provide calculations as described below:
Use Recoverable Cost Rule
When the Use Recoverable Cost rule is used, the depreciable basis is equal to the new recoverable cost or Cost - Salvage Value. This depreciable basis rule is only available for the Flat rate method with Cost basis.
Current Period Depreciation Expense with Use Recoverable Cost = (Cost - Salvage Value) * Annual Depreciation Rate / Periods per Year
Example: Use Recoverable Cost
The following table contains asset setup information used in this example.
Asset A
| Asset Setup Item | Asset Setup Information |
|---|---|
| Depreciation Method: | Flat Rate with Cost Basis Depreciation Basis Rule: Use Recoverable Cost |
| Depreciation Rate: | 30% |
| Salvage Value: | 20% |
| Group DPIS / Prorate Date: | 01-JAN-2000 |
| Depreciation Calendar: | Monthly |
The following table contains asset setup information used in this example.
Asset A - Current Period Cost Adjustment
| Asset Setup Item | Asset Setup Information |
|---|---|
| Cost Adjustment: | 10,000 |
| Period Performed: | Mar-2000 |
| Amortization Start Date: | 01-MAR-2000 |
The table below illustrates asset and calculated amounts for the first four periods of 2000.
| Jan-2000 | Feb-2000 | Mar-2000 | Apr-2000 | |
|---|---|---|---|---|
| Asset A Cost | 30,000 | 30,000 | 40,000 | 40,000 |
| Asset A Depreciable Basis | 24,000 | 24,000 | 32,000 | 32,000 |
| Asset A Depreciation Expense | 600 | 600 | 800* | 800 |
| Asset A Accumulated Depreciation | 600 | 1,200 | 2,000 | 2,800 |
* Depreciation Expense in Mar-2000 = 32,000 * 30% / 12 = 800
Use Transaction Period Basis Rule
This depreciable basis rule is available for Flat rate method with NBV basis only. NBV basis = Cost - Salvage Value - Accumulated Depreciation. The basis will be reset at the end of each fiscal year. If you have performed an amortize adjustment, the NBV basis will be reset at the amortization date.
Use Transaction Period Basis = (Cost - Salvage Value) - Accumulated Depreciation
Use Fiscal Year Beginning Basis Rule
This depreciable basis rule is available for the Flat rate method with NBV basis only. NBV basis = Cost - Salvage Value - Accumulated Depreciation as of the beginning of the fiscal year. The basis will be reset at the end of each fiscal year.
Use Fiscal Year Beginning Basis = (Cost - Salvage Value) - Accumulated Depreciation as of Beginning of the Fiscal Year
If you have performed an adjustment, the NBV basis will be reset as follows:
Use Fiscal Year Beginning Basis = Current Cost - Current Salvage Value - Recalculated Accumulated Depreciation as of the Beginning of the Fiscal Year
Flat Rate Extension Rule
This rule supports depreciation method changes from flat-rate and NBV-based methods, to flat-rate and cost-based methods, which are legally required in Japan.
When you change the depreciation method from flat-rate and NBV-based, to flat-rate and cost-based depreciation, the adjustment is amortized. The depreciable basis becomes the NBV on the date amortization begins.
When this rule is applied to flat-rate and NBV-based depreciation methods, the behavior is the same as when the depreciable basis rule is set to Use Fiscal Year Beginning Basis. You can only apply this rule to flat-rate and cost/NBV-based depreciation methods.
For group assets, when member asset tracking is enabled with the Allocate Group Amount option, the depreciable basis of the fully reserved member assets will be removed from the group level depreciable basis. When member tracking is enabled with the Calculate Member Asset Amounts option, and the depreciation method selected is Cost, the depreciable basis of the fully reserved member assets will be removed from the group level depreciable basis.
The following is an example of flat rate extension.
The following table contains asset setup information used in this example.
Asset Before Adjustment Added in Q1-1998
| Asset Setup Item | Asset Setup Information |
|---|---|
| Method Type | Flat-Rate |
| Calculation Basis | NBV |
| Rate | 20% |
| Exclude Salvage Value | On |
| Depreciable Basis Rule | Use Fiscal Year Beginning Basis |
| Period | Q1-1998 |
| Calculation Basis Rate | NBV, 20% |
| Cost | 1,000,000 |
| Activity | Add new Assets |
The following table contains asset setup information used in this example.
Asset After Adjustment Adjusted in Q1-2000
| Asset Setup Item | Asset Setup Information |
|---|---|
| Method Type | Flat-Rate |
| Calculation Basis | Cost |
| Rate | 25% |
| Salvage Value | 10% |
| Exclude Salvage Value | Off |
| Depreciable Basis Rule | Flat Rate Extension |
| Period | Q1-2000 |
| Calculation Basis Rate | Cost, 25% |
| Cost | 1,000,000 |
| Activity | Amortized Adjustment: Method Change Amortization Start Date: 01-JAN-2000 (Q1-2000) |
The table below illustrates depreciation calculated after the adjustment.
| Period | Cost | Depreciable Basis | Depreciation Expense | Accumulated Depreciation |
|---|---|---|---|---|
| Q4-1998 | 1,000,000 | 1,000,000 | 50,000 | 200,000 |
| Q1-1999 | 1,000,000 | 800,000 | 40,000 | 240,000 |
| Q2-1999 | 1,000,000 | 800,000 | 40,000 | 280,000 |
| Q3-1999 | 1,000,000 | 800,000 | 40,000 | 320,000 |
| Q4-1999 | 1,000,000 | 800,000 | 40,000 | 360,000 |
| Q1-2000 | 1,000,000 | 540,000 | 33,750 | 393,750 |
| Q2-2000 | 1,000,000 | 540,000 | 33,750 | 427,500 |
| Q3-2000 | 1,000,000 | 540,000 | 33,750 | 461,250 |
| Q4-2000 | 1,000,000 | 540,000 | 33,750 | 495,000 |
| Q1-2001 | 1,000,000 | 540,000 | 33,750 | 528,750 |
| Q2-2001 | 1,000,000 | 540,000 | 33,750 | 562,500 |
| Q3-2001 | 1,000,000 | 540,000 | 33,750 | 596,250 |
| Q4-2001 | 1,000,000 | 540,000 | 33,750 | 630,000 |
The following are calculations for the period Q1-2000:
-
[Depreciable Basis] = (1,000,000 - [Salvage Value]) - [Accumulated Depreciation] + [YTD Depreciation]
= (1,000,000 - 1,000,000*10%) - 360,000 - 0 = 540,000
-
[Depreciation Expense] = [Depreciable Basis] * [Rate] * (1/ [Period])
= 540,000 * 0.25 * (1/4) = 33,750
Period End Balance Rule
When the Period End Balance rule is used, current period depreciation is calculated as follows:
Current Period Depreciation Expense for Period End Balance = (Group Asset Balance at Period End * Annual Depreciation Rate) / Periods Per Year
Example: Period End Balance
The following table contains asset setup information used in this example.
| Asset Setup Item | Asset Setup Information |
|---|---|
| Group Asset: | Group A |
| Member Assets: | Asset 1 Asset 2 |
| Depreciation Method: | Flat Rate with Cost Basis Depreciable Basis Rule: Period End Balance |
| Depreciation Rate: | 30% |
| Depreciation Calendar: | Monthly |
| Group Asset DPIS / Prorate Date: | 01-JAN-2000 |
The following table contains asset setup information used in this example.
Asset 1 - Current Period Cost Adjustment
| Asset Setup Item | Asset Setup Information |
|---|---|
| Cost Adjustment: | 10,000 |
| Period Performed: | Mar-2000 |
| Amortization Start Date: | 01-MAR-2000 |
The table below illustrates asset and calculated amounts for the first four periods of 2000.
| Jan-2000 | Feb-2000 | Mar-2000 | Apr-2000 | |
|---|---|---|---|---|
| Asset 1 | 10,000 | 10,000 | 20,000 | 20,000 |
| Asset 2 | 20,000 | 20,000 | 20,000 | 20,000 |
| Group A Cost | 30,000 | 30,000 | 40,000 | 40,000 |
| Group A Depreciable Basis | 30,000 | 30,000 | 40,000 | 40,000 |
| Group A Depreciation | 750 | 750 | 1,000* | 1,000 |
| Group A Accumulated Depreciation | 750 | 1,500 | 2,500 | 3,500 |
* Group Depreciation Expense in Mar-2000 = (Group Asset Depreciable Basis * Annual Depreciation Rate) / Periods Per Year = (40,000 * 30%) / 12 = 1,000
Beginning Period Balance Rule
When the Beginning Period Balance rule is used, current period depreciation is calculated as follows:
Current Period Depreciation Expense for Beginning Period Balance = (Group Asset Balance at Beginning of Period *Annual Depreciation Rate)/ Periods Per Year
Example: Beginning Period Balance
The following table contains asset setup information used in this example.
| Asset Setup Item | Asset Setup Information |
|---|---|
| Group Asset: | Group A |
| Member Assets: | Asset 1 Asset 2 |
| Depreciation Method: | Flat Rate with Cost Basis Depreciation Basis Rule: Beginning Period Balance |
| Depreciation Rate: | 30% |
| Depreciation Calendar: | Monthly |
| Group Asset DPIS / Prorate Date: | 01-JAN-2000 |
The following table contains asset setup information used in this example.
Asset 1 - Current Period Cost Adjustment
| Asset Setup Item | Asset Setup Information |
|---|---|
| Cost Adjustment: | 10,000 |
| Period Performed: | Mar-2000 |
| Amortization Start Date: | 01-MAR-2000 |
The table below illustrates asset and calculated amounts for the first four periods of 2000.
| Jan-2000 | Feb-2000 | Mar-2000 | Apr-2000 | |
|---|---|---|---|---|
| Asset 1 | 10,000 | 10,000 | 20,000 | 20,000 |
| Asset 2 | 20,000 | 20,000 | 20,000 | 20,000 |
| Group A Cost | 30,000 | 30,000 | 40,000 | 40,000 |
| Group A Depreciable Basis | 0 | 30,000 | 30,000 | 40,000 |
| Group A Depreciation | 0 | 750 | 750 | 1,000* |
| Group A Accumulated Depreciation | 0 | 750 | 1,500 | 2,500 |
* Group Depreciation Expense in Apr-2000 = (Group Asset Depreciable Basis) * Annual Depreciation Rate / Periods Per Year = 40,000 * 30% / 12 = 1,000
Period End Average Rule
When the Period Average Balance rule is used, current period depreciation is calculated as follows:
Current Period Depreciation Expense for Period Average Balance = (End of Current Period Balance + End of Previous Period Balance) /2 * Rate / Periods Per Year.
Example: Period End Average
The following table contains asset setup information used in this example.
| Asset Setup Item | Asset Setup Information |
|---|---|
| Group Asset: | Group A |
| Member Assets: | Asset 1 Asset 2 |
| Depreciation Method: | Flat Rate with Cost Basis Depreciation Basis Rule: Period Average Balance |
| Depreciation Rate: | 30% |
| Depreciation Calendar: | Monthly |
| Group DPIS / Prorate Date: | 01-JAN-2000 |
The following table contains asset setup information used in this example.
Asset 1 - Current Period Cost Adjustment
| Asset Setup Item | Asset Setup Information |
|---|---|
| Cost Adjustment: | 10,000 |
| Period Performed: | Mar-2000 |
| Amortization Start Date: | 01-MAR-2000 |
The table below illustrates asset and calculated amounts for the first four periods of 2000.
| Jan-2000 | Feb-2000 | Mar-2000 | Apr-2000 | |
|---|---|---|---|---|
| Asset 1 | 10,000 | 10,000 | 20,000 | 20,000 |
| Asset 2 | 20,000 | 20,000 | 20,000 | 20,000 |
| Group A Cost | 30,000 | 30,000 | 40,000 | 40,000 |
| Group A Depreciable basis | 15,000 | 30,000 | 35,000* | 40,000 |
| Group A Depreciation | 375 | 750 | 875** | 1,000 |
| Group A Accumulated Depreciation | 375 | 1,125 | 2,000 | 3,000 |
* Group Asset Depreciable Basis in Mar-2000 = (End of Current Period Balance + End of Previous Period Balance) / 2 = (40,000 + 30,000) / 2 = 35,000
** Group Asset Depreciation Expense Mar-2000 = Group Asset Depreciable Basis * Annual Depreciation Rate / Periods Per Year = 35,000 * 30% / 12 = 875
Year to Date (YTD) Average Balance Rule
When the Year to Date Average Balance rule is used, current period depreciation is calculated as follows:
Current Period Depreciation Expense for Year to Date Average Balance = (End of Current Period Balance + End of Previous Year Balance) / 2 * Rate / Periods Per Year
Example: Year to Date (YTD) Average Balance
The following table contains asset setup information used in this example.
| Asset Setup Item | Asset Setup Information |
|---|---|
| Group Asset: | Group A |
| Member Assets: | Asset 1 - cost adjusted in Mar-2000 Asset 2 - cost adjusted in Feb-2000 |
| Depreciation Method: | Flat Rate with Cost Basis Depreciation Basis Rule: YTD Average Balance |
| Depreciation Rate: | 30% |
| Depreciation Calendar: | Monthly |
| Group DPIS / Prorate Date: | 01-JAN-2000 |
The following table contains asset setup information used in this example.
Asset 1 - Current Period Cost Adjustment
| Asset Setup Item | Asset Setup Information |
|---|---|
| Cost Adjustment: | 10,000 |
| Period Performed: | Mar-2000 |
| Amortization Start Date: | 01-MAR-2000 |
The following table contains asset setup information used in this example.
Asset 2 - Current Period Cost Adjustment
| Asset Setup Item | Asset Setup Information |
|---|---|
| Cost Adjustment: | 20,000 |
| Period Performed: | Feb-2000 |
| Amortization Start Date: | 01-FEB-2000 |
The table below illustrates asset and calculated amounts for the first four periods of 2000.
| Jan-2000 | Feb-2000 | Mar-2000 | Apr-2000 | |
|---|---|---|---|---|
| Asset 1 | 10,000 | 10,000 | 20,000 | 20,000 |
| Asset 2 | 20,000 | 40,000 | 40,000 | 40,000 |
| Group A Cost | 30,000 | 50,000 | 60,000 | 60,000 |
| Group A Depreciable Basis | 15,000 | 25,000* | 30,000** | 30,000 |
| Group A Depreciation | 375 | 625 | 750*** | 750 |
| Group A Accumulated Depreciation | 375 | 1,000 | 1,750 | 2,500 |
* Group Asset Depreciable Basis in Feb-2000 = (End of Current Period Balance + End of Previous Year Balance) / 2 = (50,000 + 0) / 2 = 25,000
** Group Asset Depreciable Basis in Mar-2000 = (End of Current Period Balance + End of Previous Year Balance) / 2) = (60,000 + 0) / 2 = 30,000
*** Group Asset Depreciation Expense Mar-2000 = (Group Asset Depreciable Basis * Annual Depreciation Rate) / Periods Per Year = (30,000 * 30%) / 12 = 750
Year to Date (YTD) Average with Half Year Rule
This depreciable basis rule is only available for the Flat rate method with Cost basis. When the Year to Date Average with Half Year rule is used, current period depreciation is calculated as follows:
Current Period Depreciation Expense for Year to Date Average with Half Year rule = (((End of Current Period Balance + End of Previous Year Balance) / 2 * Rate) - Year to Date Depreciation ) / Remaining Fiscal Periods
Example: Year to Date (YTD) Average with Half Year Rule
The following table contains asset setup information used in this example.
| Asset Setup Item | Asset Setup Information |
|---|---|
| Group Asset: | Group A |
| Member Assets: | Asset 1 Asset 2 |
| Depreciation Method: | Flat Rate with Cost Basis Depreciation Basis Rule: Year to Date Average with Half Year rule |
| Depreciation Rate: | 30% |
| Depreciation Calendar: | Monthly |
| Group DPIS / Prorate Date: | 01-JAN-2000 |
The following table contains asset setup information used in this example.
Asset 1 - Current Period Cost Adjustment
| Asset Setup Item | Asset Setup Information |
|---|---|
| Cost Adjustment: | 10,000 |
| Period Performed: | Mar-2000 |
| Amortization Start Date: | 01-MAR-2000 |
The following table contains asset setup information used in this example.
Asset 2 - Current Period Cost Adjustment
| Asset Setup Item | Asset Setup Information |
|---|---|
| Cost Adjustment: | 20,000 |
| Period Performed: | Feb-2000 |
| Amortization Start Date: | 01-FEB-2000 |
The table below illustrates asset and calculated amounts for the first four periods of 2000.
| Jan-2000 | Feb-2000 | Mar-2000 | Apr-2000 | |
|---|---|---|---|---|
| Asset 1 | 10,000 | 10,000 | 20,000 | 20,000 |
| Asset 2 | 20,000 | 40,000 | 40,000 | 40,000 |
| Group A Cost | 30,000 | 50,000 | 60,000 | 60,000 |
| Group A Depreciation | 375* | 647.73** | 797.73*** | 797.73 |
| Group A Accumulated Depreciation | 375 | 1,022.73 | 1,820.46 | 2,618.19 |
| Group A Year to Date Depreciation | 375 | 1,022.73 | 1,820.46 | 2,618.19 |
* Group A Depreciation Expense in Jan-2000 = (((End of Current Period Balance + End of Previous Year Balance) / 2) x Annual Depreciation Rate - Year to Date Depreciation ) / Remaining Fiscal Year Periods = ((( 30,000 + 0 ) / 2 ) x 30% - 0 ) / 12 = 375
** Group A Depreciation Expense in Feb-2000 = (((End of Current Period Balance + End of Previous Year Balance) / 2) x Annual Depreciation Rate - Year to Date Depreciation ) / Remaining Fiscal Year Periods = ((( 50,000 + 0 ) / 2 ) x 30% - 375 ) / 11 = 647.73
*** Group A Depreciation Expense in Mar-2000 = (((End of Current Period Balance + End of Previous Year Balance) / 2) x Annual Depreciation Rate - Year to Date Depreciation ) / Remaining Fiscal Year Periods = ((( 60,000 + 0 ) / 2 ) x 30% - 1,022.73 ) / 10 = 797.73
Year End Balance Rule
End of Current Fiscal Year balance. This depreciable basis rule is available for the Flat method with NBV basis only.
Current Period Expense for Year End Balance = Current Period YTD Depreciation - Prior Period Ytd Depreciation
Example: Year End Balance - NBV Basis
The following table contains asset setup information used in this example.
Asset Information
| Asset Setup Item | Asset Setup Information |
|---|---|
| Group Asset: | Group A |
| Member Assets: | Asset 1 Cost adjusted in FY2002 Asset 2 |
The following table contains asset setup information used in this example.
Group Asset A Setup
| Asset Setup Item | Asset Setup Information |
|---|---|
| Depreciation Method: | Flat Rate with NBV Basis Depreciation Basis Rule: Year End Balance |
| Depreciation Rate: | 30% |
| Group DPIS / Prorate Date: | 01-JAN-2000 |
| Depreciation Calendar: | Yearly |
The following table contains asset setup information used in this example.
Asset 1 - Current Period Cost Adjustment
| Asset Setup Item | Asset Setup Information |
|---|---|
| Cost Adjustment: | 10,000 |
| Period Performed: | FY-2002 |
| Amortization Start Date: | 01-JAN-2002 |
The table below illustrates asset and calculated amounts for four years.
| FY 2000 | FY 2001 | FY 2002 | FY 2003 | |
|---|---|---|---|---|
| Asset 1 | 10,000 | 10,000 | 20,000 | 20,000 |
| Asset 2 | 20,000 | 20,000 | 20,000 | 20,000 |
| Group Asset A Cost | 30,000 | 30,000 | 40,000 | 40,000 |
| Group Asset A Depreciable Basis | 30,000 | 21,000 | 24,700* | 17,290 |
| Group A Depreciation Expense | 9,000 | 6,300 | 7,410** | 5,187 |
| Group A Accumulated Depreciation | 9,000 | 15,300 | 22,710 | 27,897 |
* Group Asset A Depreciable Basis in FY-2002 = Cost - Salvage Value - Accumulated Depreciation = 40,000 - 15,300 - 24,700
(Additions + / - Adjustments) - (Proceeds of Sales - Cost of Removal) > 0
** Group Asset Depreciation Expense in FY-2002 = Depreciable Basis * Annual Rate = 24,700 * 30% = 7,410
Year End Balance with Positive Reduction Amount Rule
This rule can be applied to Flat method with Cost or NBV basis. The Reduction Rate field is enabled only for group and member assets, and it is not enabled for standalone assets.
In Canada, if the following calculation is greater than zero in any given period for a group asset, then half of the excess amount must be deducted from the depreciable basis when calculating the group depreciation amount. The calculation is as follows:
(Additions + / - Adjustments) - Proceeds of Sales - Cost of Removal > 0
However, some groups may be exempted from 50% rule. In order to accommodate Canada's 50% rule, you must select the Year End Balance with Positive Reduction Amount depreciable basis rule for the group asset depreciation method, and enter the reduction rate of 50% for the group asset.
You may enter a reduction rate for the group asset if the group asset has this depreciable basis rule setup in the depreciation method.
Note: The Year End Balance with Positive Reduction Amount rule is applicable only to Group Assets (not for standalone assets).
Example: Year End Balance with Positive Reduction Amount
The following table contains asset setup information used in this example.
Asset Information
| Asset Setup Item | Asset Setup Information |
|---|---|
| Group Asset: | Group A |
| Member Assets: | Asset 1 Cost adjusted in FY2002 Asset 2 |
The following table contains asset setup information used in this example.
Group Asset A Setup
| Asset Setup Item | Asset Setup Information |
|---|---|
| Depreciation Method: | Flat Rate with NBV Basis Depreciation Basis Rule: Year End Balance with Positive Adjustment Amount |
| Depreciation Rate: | 30% |
| Reduction Rate: | 50% |
| Group DPIS / Prorate Date: | 01-JAN-2000 |
| Depreciation Calendar: | Yearly |
The following table contains asset setup information used in this example.
Asset 1 - Current Period Cost Adjustment
| Asset Setup Item | Asset Setup Information |
|---|---|
| Cost Adjustment: | 10,000 |
| Period Performed: | FY-2002 |
| Amortization Start Date: | 01-JAN-2002 |
The table below illustrates asset and calculated amounts for four years.
| FY 2000 | FY 2001 | FY 2002 | FY 2003 | |
|---|---|---|---|---|
| Asset 1 | 10,000 | 10,000 | 20,000 | 20,000 |
| Asset 2 | 20,000 | 20,000 | 20,000 | 20,000 |
| Group Asset A Cost | 30,000 | 30,000 | 40,000 | 40,000 |
| Group Asset A Depreciable Basis | 15,000* | 25,500** | 22,850*** | 20,995 |
| Group A Depreciation Expense | 4,500 | 7,650 | 6,855**** | 6,298.50 |
| Group A Accumulated Depreciation | 4,500 | 12,150 | 19,005 | 25,303.50 |
* Group A Depreciable Basis in FY 2000 = Cost - Salvage Value - Accumulated Depreciation - Reduced Amount = 30,000 - (30,000 * 50%) = 15,000
** Group A Depreciable Basis in FY 2001 = 30,000 - 4,500 = 25,500
*** Group A Depreciable Basis in FY 2002 = 40,000 - 12,150 - 10,000 * 50% = 22,850
**** Group A Depreciation Expense in FY 2002 = Depreciable Basis * Annual Rate = 22,850 * 30% = 6,855
Year End Balance with Half Year Rule
The Year End Balance with Half Year Rule basis rule can be applied to the Flat method with NBV basis. The Reduction Rate field is enabled only for group and member assets, and it is not enabled for standalone assets.
In India, if a member asset is added during the second half of the fiscal year, the depreciation rate is reduced by 50% for the member asset. Otherwise, 100% of depreciate rate can be used if the member asset is placed into service during the first half of the fiscal year.
In order to accommodate India's 50% rule, you must select the Year End Balance with Half Year Rule depreciable basis rule for the group asset depreciation method, and enter the reduction rate of 50% for the group asset. You also need to enter the Mid Year Start Date on the Fiscal Year setup window.
-
If the date placed in service is in the first half of the year, use 100% of Group Depreciation Rate.
-
If the date placed in service is in the second half of the year, use 50% of Group Depreciation Rate.
You may enter a reduction rate for the group asset if the group asset has this depreciable basis rule setup in the depreciation method.
Example: Year End Balance with Half Year Rule
The following table contains asset setup information used in this example.
| Asset Setup Item | Asset Setup Information |
|---|---|
| Group Asset: | Group A |
| Member Assets: | Asset 1 DPIS: 01-JAN-2000 Asset 2 DPIS: 01-AUG-2000 |
The following table contains asset setup information used in this example.
Group Asset A Setup
| Asset Setup Item | Asset Setup Information |
|---|---|
| Depreciation Method: | Flat Rate with NBV Basis Depreciation Basis Rule: Year End Balance with Half Year Rule |
| Depreciation Rate: | 30% |
| Reduction Rate: | 50% |
| Group DPIS / Prorate Date: | 01-JAN-2000 |
| Depreciation Calendar: | Yearly |
| Mid Year Start Date: | 01-JUL-2000 |
The table below illustrates asset and calculated amounts for four years.
| FY 2000 | FY 2001 | FY 2002 | FY 2003 | |
|---|---|---|---|---|
| Asset 1 | 10,000 | 10,000 | 10,000 | 10,000 |
| Asset 2 | 20,000 | 20,000 | 20,000 | 20,000 |
| Group Asset A Cost | 30,000 | 30,000 | 30,000 | 30,000 |
| Group Asset A Depreciable Basis | 20,000* | 24,000*** | 16,800 | 11,760 |
| Group A Depreciation Expense | 6,000** | 7,200 | 5,040 | 3,528 |
| Group A Accumulated Depreciation | 6,000 | 13,200 | 18,240 | 21,768 |
* Group A Depreciable Basis in FY 2000 = Cost - Salvage Value - Accumulated Depreciation - Reduced Amount = 30,000 - (20,000 * 50%) = 20,000
** Group A Depreciation Expense in FY 2000 = Depreciable Basis * Annual Rate = 20,000 * 30% = 6,000
***Group A Depreciable Basis in FY 2001 = 30,000 - 6,000 = 24,000
Defining Depreciable Basis Rules
To define depreciable basis rules:
-
Navigate to the Depreciation Methods window.
-
In the Method field, enter a name for your depreciation method.
-
In the Description field, enter a description for your depreciation method.
-
Select Flat from the Method Type poplist.
-
Choose whether to use Cost or NBV as the basis for calculating depreciation from the Calculation Basis Rule poplist.
-
Select the Depreciable Basis Rule.
Note: When you select Flat in the Method Type field, the Depreciable Basis Rule field becomes required. You can update the defaulted value.
-
Check the Depreciate in Year Retired check box if you want depreciation calculated in the year retired.
-
Check the Exclude Salvage Value check box if you want this method to exclude the salvage value from the calculation of Cost - Salvage Value.
-
Choose the Rates button to enter rates in the Depreciation Rates window.
-
Enter the basic rates.
-
Enter the adjusting rate, or loading factor.
-
Save your work.
Polish Tax Depreciation
Oracle Assets provides five seeded depreciable basis rules to support Polish tax depreciation requirements. Each of these five depreciable basis rules is comprised of several Polish tax depreciation methods. These Polish tax depreciation methods are in effect in a predetermined or conditional sequence. For example, if a depreciable basis rule consists of three Polish tax depreciation methods, then the first Polish tax depreciation method may be effective in fiscal year one, the second Polish tax depreciation method may be effective from fiscal year two through fiscal year four, and the third Polish tax depreciation method may be effective for the remaining fiscal years until the asset is fully depreciated.
Polish tax depreciation methods are similar to depreciation methods, except they cannot be set up or used individually to depreciate assets. That is, you cannot assign an asset to depreciate using one of these Polish tax depreciation methods.
Note: If you are using Polish tax depreciation methods, you cannot use Depreciation Projections to determine future depreciation. You can use What-if Depreciation.
The Polish tax depreciation methods are as follows:
-
30% Flat Rate: Assets depreciate at the rate of 30 percent in the period of addition and depreciation is suspended for the rest of the periods in the fiscal year.
-
Declining Classic: Assets depreciate at the defined flat rate multiplied by the depreciation factor. When this Polish tax depreciation method is used in a depreciable basis rule, it always begins in the second fiscal year.
-
Declining Modified: Assets depreciate at the defined flat rate multiplied by the alternate depreciation factor.
-
Standard Declining: Assets depreciate at the defined flat rate multiplied by the depreciation factor.
-
Flat Rate: Assets depreciate at the defined flat rate.
The Polish tax depreciable basis rules are each comprised of two or more of the Polish tax depreciation methods listed above. The depreciable basis rules for Polish tax depreciation are as follows:
-
Polish 30% with a Switch to Declining Classic and Flat Rate
-
Polish 30% with a Switch to Flat Rate
-
Polish Declining Modified with a Switch to Declining Classic and Flat Rate
-
Polish Declining Modified with a Switch to Flat Rate
-
Polish Standard Declining with a Switch to Flat Rate
To set up Polish tax depreciation:
-
Define a new depreciation method in the Depreciation Methods window. See: Defining Additional Depreciation Methods.
-
Choose one of the Polish tax depreciable basis rules from the Depreciable Basis Rule list of values, for example, Polish 30% with a Switch to Flat Rate. See: Polish Tax Depreciable Basis Rules.
-
Navigate to the Depreciation Rates window and enter the flat rate.
-
Save your work.
-
Navigate to the Bonus Depreciation Rules window and define the bonus rule. See: Defining Bonus Depreciation Rules.
-
Enter the depreciation factor and the alternate depreciation factor. See: Defining Bonus Depreciation Rules.
-
Navigate to the Books window and assign the method and bonus rule to the asset. See: Entering Financial Information (Detail Additions Continued).
You can also assign the method to an asset category. See: Entering Default Depreciation Rules for a Category.
Polish Tax Depreciable Basis Rules
Oracle Assets provides five seeded polish tax depreciable basis rules:
Polish 30% with a Switch to Declining Classic and Flat Rate
In the first fiscal year this depreciable basis rule uses the 30% Flat Rate Polish tax depreciation method. The asset is depreciated at a fixed depreciation rate of 30 percent in the period of addition. After that, the depreciation is suspended for the remainder of the periods in the fiscal year. There should be no catchup depreciation even if an adjustment is made in subsequent periods in the first fiscal year after the 30 percent depreciation has been charged.
In the second fiscal year, the depreciation rate is calculated using the Declining Classic Polish tax depreciation method. The formula to be used by the Declining Classic Polish tax depreciation method is calculated by multiplying the flat rate with the depreciation factor defined in the Bonus Depreciation Rules window.
The formula used to calculate the rate of depreciation used by the Declining Classic Polish tax depreciation method is as follows:
Flat Rate * Depreciation Factor
For example, if the flat rate = 20 percent and the depreciation factor is 2, then the resulting depreciation rate for this Polish tax depreciation method is:
20% * 2 = 40%
Depreciation in the second fiscal year is always calculated on the basis of cost. Depreciation in the subsequent fiscal years (where the Declining Classic depreciation Polish tax depreciation method is used) is calculated on the following basis:
Cost - Depreciation Reserve + First Year Reserve
After the end of the second fiscal year, at the beginning of every fiscal year, a test is performed to verify whether the estimated depreciation amount calculated based on the Declining Classic Polish tax depreciation method is equal to or less than the estimated depreciation amount calculated based on the flat rate.
If the estimated depreciation calculation based on the Declining Classic Polish tax depreciation method is equal to or less than the estimated depreciation amount calculated based on the flat rate (the depreciation basis for the Flat Rate method is always cost), then the depreciation method from that fiscal year onward needs to switch to the Flat Rate method. Otherwise, depreciation will continue with the Declining Classic Polish tax depreciation method.
Example - Polish 30% with a Switch to Declining Classic and Flat Rate
| Month | Year 1: 30% (3000.00) | Year 2: 20% * 2 (4000.00) | Year 3: 20% * 2 (2400.00) | Year 4: 20% (600.00) |
|---|---|---|---|---|
| M1 | 3000.00 | 333.33 | 200.00 | 166.67 |
| M2 | 0.00 | 333.33 | 200.00 | 166.67 |
| M3 | 0.00 | 333.33 | 200.00 | 166.67 |
| M4 | 0.00 | 333.33 | 200.00 | 99.99 |
| M5 | 0.00 | 333.33 | 200.00 | -- |
| M6 | 0.00 | 333.33 | 200.00 | -- |
| M7 | 0.00 | 333.33 | 200.00 | -- |
| M8 | 0.00 | 333.33 | 200.00 | -- |
| M9 | 0.00 | 333.33 | 200.00 | -- |
| M10 | 0.00 | 333.33 | 200.00 | -- |
| M11 | 0.00 | 333.33 | 200.00 | -- |
| M12 | 0.00 | 333.37 | 200.00 | -- |
In this example:
-
The asset cost is $10,000.
-
Year 1 uses the 30% Flat Rate Polish tax depreciation method with a depreciation basis of 10,000.
-
Year 2 uses the Declining Classic Polish tax depreciation method with a depreciation basis of 10,000.
-
Year 3 uses the Declining Classic Polish tax depreciation method with a depreciation basis of 6000.
Note: In this case, the basis has changed to Cost - Reserve + First year reserve.
-
Year 4 uses the Flat Rate method with a depreciation basis of 10,000.
The depreciation reserve amounts at the end of each year are as follows:
-
Year 1: 3000.00
-
Year 2: 7000.00
-
Year 3: 9400.00
-
Year 4: 10,000.00
Polish 30% with a Switch to Flat Rate
In the first fiscal year this depreciable basis rule uses the 30% Flat Rate Polish tax depreciation method. The asset is depreciated at a fixed depreciation rate of 30 percent in the period of addition. After that, the depreciation is suspended for the remainder of the periods in the fiscal year.
In the second fiscal year this depreciable basis rule automatically switches from the 30% Flat Rate Polish tax depreciation method to the Flat Rate method.
Example - Polish 30% with a Switch to Flat Rate
| Month | Year 1: 30% (3000.00) | Year 2: 20% (2000.00) | Year 3: 20% (2000.00) | Year 4: 20% (2000.00) | Year 5: 20% (1000.00) |
|---|---|---|---|---|---|
| M1 | 3000.00 | 166.67 | 166.67 | 166.67 | 166.67 |
| M2 | 0.00 | 166.67 | 166.67 | 166.67 | 166.67 |
| M3 | 0.00 | 166.67 | 166.67 | 166.67 | 166.67 |
| M4 | 0.00 | 166.67 | 166.67 | 166.67 | 166.67 |
| M5 | 0.00 | 166.67 | 166.67 | 166.67 | 166.67 |
| M6 | 0.00 | 166.67 | 166.67 | 166.67 | 166.65 |
| M7 | 0.00 | 166.67 | 166.67 | 166.67 | -- |
| M8 | 0.00 | 166.67 | 166.67 | 166.67 | -- |
| M9 | 0.00 | 166.67 | 166.67 | 166.67 | -- |
| M10 | 0.00 | 166.67 | 166.67 | 166.67 | -- |
| M11 | 0.00 | 166.67 | 166.67 | 166.67 | -- |
| M12 | 0.00 | 166.63 | 166.63 | 166.63 | -- |
In this example:
-
The asset cost is $10,000.
-
Year 1 uses the 30% Flat Rate Polish tax depreciation method with a depreciation basis of 10,000.
-
Years 2 through 5 use the Flat Rate method with a depreciation basis of 10,000.
The depreciation reserve amounts at the end of each year are as follows:
-
Year 1: 3000.00
-
Year 2: 5000.00
-
Year 3: 7000.00
-
Year 4: 9000.00
-
Year 5: 10,000.00
Polish Declining Modified with a Switch to Declining Classic and Flat Rate
When you use this depreciable basis rule the depreciation for the first fiscal year is based on the Declining Modified Polish tax depreciation method. The rate of depreciation used by the Declining Modified Polish tax depreciation method is obtained by multiplying the flat rate with the alternate depreciation factor.
The formula used to calculate the rate of depreciation used by the Declining Modified Polish tax depreciation method is as follows:
Flat Rate * Alternate Depreciation Factor
For example if the flat rate is 20 percent and the alternate depreciation factor is 3, then the depreciation rate is:
20% * 3 = 60%
At the beginning of the second fiscal year the Polish tax depreciation method automatically switches from the Declining Modified Polish tax depreciation method to the Declining Classic Polish tax depreciation method. The depreciation rate is calculated using the Declining Classic Polish tax depreciation method.
The formula used to calculate the rate of depreciation used by the Declining Classic Polish tax depreciation method is as follows:
Flat Rate * Depreciation Factor
For example if the flat rate is 20 percent and the depreciation factor is 2, then the resulting depreciation rate for this Polish tax depreciation method is:
20% * 2 = 40%
Depreciation in the second fiscal year is always calculated on the basis of cost. Depreciation in the subsequent fiscal years (where the Declining Classic Polish tax depreciation method is used), is calculated on the following basis:
Cost - Depreciation Reserve + First Year Reserve
After the second fiscal year, at the beginning of every fiscal year, a test is performed to verify whether the estimated depreciation amount calculated based on the Declining Classic Polish tax depreciation method is equal to or less than the estimated depreciation amount calculated based on the flat rate.
If the estimated depreciation calculation based on the Declining Classic Polish tax depreciation method is equal to or less than the estimated depreciation amount calculated based on the flat rate, then from that fiscal year onward, the depreciation method needs to change to the Flat Rate method. Otherwise depreciation will continue with the Declining Classic Polish tax depreciation method.
Example - Polish Declining Modified with a Switch to Declining Classic and Flat Rate
| Month | Year 1: 20% * 2.5 (5000.00) | Year 2: 20% * 2 (4000.00) | Year 3: 20% * 2 (1000.00) |
|---|---|---|---|
| M1 | 416.67 | 333.33 | 200.00 |
| M2 | 416.67 | 333.33 | 200.00 |
| M3 | 416.67 | 333.33 | 200.00 |
| M4 | 416.67 | 333.33 | 200.00 |
| M5 | 416.67 | 333.33 | 200.00 |
| M6 | 416.67 | 333.33 | -- |
| M7 | 416.67 | 333.33 | -- |
| M8 | 416.67 | 333.33 | -- |
| M9 | 416.67 | 333.33 | -- |
| M10 | 416.67 | 333.33 | -- |
| M11 | 416.67 | 333.33 | -- |
| M12 | 416.63 | 333.37 | -- |
In this example:
-
The asset cost is $10,000.
-
Year 1 uses the Declining Modified Polish tax depreciation method with a depreciation basis of 10,000.
-
Year 2 uses the Declining Classic Polish tax depreciation method with a depreciation basis of 10,000.
-
Year 3 uses the Declining Classic Polish tax depreciation method with a depreciation basis of 6000.
Note: In this case, the basis has changed to Cost - Reserve + First year reserve.
The depreciation reserve amounts for each year are as follows:
-
Year 1: 5000.00
-
Year 2: 9000.00
-
Year 3: 10,000.00
Polish Declining Modified with a Switch to Flat Rate
The Polish tax depreciation method used in the first fiscal year is the Declining Modified Polish tax depreciation method. The calculations are similar to the first year calculation in the Polish Declining Modified with a Switch to Declining Classic and Flat Rate depreciable basis rule. See: Polish Declining Modified with a Switch to Declining Classic and Flat Rate.
In the second fiscal year, the depreciation method automatically changes to the Flat Rate method and the asset continues to depreciate using the Flat Rate method until the asset is fully depreciated.
Example - Polish Declining Modified with a Switch to Flat Rate
| Month | Year 1: 20% * 2.5 (5000.00) | Year 2: 20% (2000.00) | Year 3: 20% (2000.00) | Year 4: 20% (1000.00) |
|---|---|---|---|---|
| M1 | 416.67 | 166.67 | 166.67 | 166.67 |
| M2 | 416.67 | 166.67 | 166.67 | 166.67 |
| M3 | 416.67 | 166.67 | 166.67 | 166.67 |
| M4 | 416.67 | 166.67 | 166.67 | 166.67 |
| M5 | 416.67 | 166.67 | 166.67 | 166.67 |
| M6 | 416.67 | 166.67 | 166.67 | 166.65 |
| M7 | 416.67 | 166.67 | 166.67 | -- |
| M8 | 416.67 | 166.67 | 166.67 | -- |
| M9 | 416.67 | 166.67 | 166.67 | -- |
| M10 | 416.67 | 166.67 | 166.67 | -- |
| M11 | 416.67 | 166.67 | 166.67 | -- |
| M12 | 416.63 | 166.63 | 166.63 | -- |
In this example:
-
The asset cost is $10,000.
-
Year 1 uses the Declining Modified Polish tax depreciation method with a depreciation basis of 10,000.
-
Years 2 through 4 use the Flat Rate method with a depreciation basis of 10,000.
The depreciation reserve amounts at the end of each year are as follows:
-
Year 1: 5000.00
-
Year 2: 7000.00
-
Year 3: 9000.00
-
Year 4: 10,000.00
Polish Standard Declining with a Switch to Flat Rate
The Polish tax depreciation method used in the first fiscal year is the Standard Declining Polish tax depreciation method. The rate of depreciation is derived by multiplying the flat rate with the depreciation factor.
The formula used to calculate the rate of depreciation used by the Declining Standard Polish tax depreciation method is as follows:
Flat Rate * Depreciation Factor
For example if the flat rate is 20 percent and the depreciation factor is 3, then the depreciation rate is:
20% * 3 = 60%
After the first fiscal year, at the beginning of every fiscal year a test is performed to verify whether the estimated depreciation amount calculated based on the Standard Declining Polish tax depreciation method is equal to or less than the estimated depreciation amount calculated based on the flat rate.
If the estimated depreciation calculation based on the Standard Declining Polish tax depreciation method is equal to or less than the estimated depreciation amount calculated based on the flat rate, then the depreciation method from that fiscal year onward changes to the Flat Rate method. Otherwise, depreciation should continue with the Standard Declining Polish tax depreciation method. The depreciation basis for the Standard Declining Polish tax depreciation method is always net book value.
Example - Polish Standard Declining with a Switch to Flat Rate
| Month | Year 1: 20% * 2 (4000.00) | Year 2: 20% * 2 (2400.00) | Year 3: 20% (2000.00) | Year 4: 20% (1600.00) |
|---|---|---|---|---|
| M1 | 333.33 | 200.00 | 166.67 | 166.67 |
| M2 | 333.33 | 200.00 | 166.67 | 166.67 |
| M3 | 333.33 | 200.00 | 166.67 | 166.67 |
| M4 | 333.33 | 200.00 | 166.67 | 166.67 |
| M5 | 333.33 | 200.00 | 166.67 | 166.67 |
| M6 | 333.33 | 200.00 | 166.67 | 166.67 |
| M7 | 333.33 | 200.00 | 166.67 | 166.67 |
| M8 | 333.33 | 200.00 | 166.67 | 166.67 |
| M9 | 333.33 | 200.00 | 166.67 | 166.67 |
| M10 | 333.33 | 200.00 | 166.67 | 99.97 |
| M11 | 333.33 | 200.00 | 166.67 | -- |
| M12 | 333.37 | 200.00 | 166.63 | -- |
In this example:
-
The asset cost is $10,000.
-
Year 1 uses the Standard Declining Polish tax depreciation method with a depreciation basis of 10,000.
-
Year 2 uses the Standard Declining Polish tax depreciation method with a depreciation basis of 6000.
-
Years 3 and 4 use the Flat Rate method with a depreciation basis of 10,000.
The depreciation reserve amounts at the end of each year are as follows:
-
Year 1: 4000.00
-
Year 2: 6400.00
-
Year 3: 8400.00
-
Year 4: 10,000.00
Adjusting Polish Tax Depreciation Transactions
You can perform cost adjustments on assets that are depreciating using Polish Tax Depreciation transactions. The cost adjustments can be for either a positive (higher cost) or a negative (lower cost) amount. You can perform a current dated adjustment, which means the adjustment applies to any date in the current period, or you can perform a prior period adjustment.
Related Topics
Negative Cost Adjustments
A negative cost adjustment occurs when the cost of an asset is reduced from the current cost. When you perform negative cost adjustments, depreciation is calculated based on whether you have checked the Polish Adjustment Calculation Basis check box.
Note: The Polish Adjustment Calculation Basis check box applies only to negative cost adjustments.
Polish Adjustment Calculation Basis Checked
If this check box is checked, Oracle Assets uses special rules to calculate the new depreciation basis. The new depreciation basis is calculated using the following formula:
Old Cost - Net Book Value of Adjustment Amount
To calculate the net book value of the adjustment amount, Oracle Assets first calculates the calculated proportion of the reserve. This is calculated using the following formula:
Old Reserve * Adjustment Amount/Old Cost
Oracle Assets then uses the calculated proportion of the reserve to calculate the net book value of the adjusted amount using the following formula:
Adjusted Amount - Calculated Proportion of Reserve
For example, assume the old cost is 20,000, the old reserve is 10,800, and the adjustment amount is 8,000. Oracle Assets first calculates the proportion of the reserve:
10,800 * 8,000/20,000 = 4,320
Oracle Assets then calculates the net book value of the adjustment amount:
8,000 - 4,320 = 3,680
Finally, Oracle Assets calculates the new depreciation basis:
20,000 - 3,680 = 16,320
Polish Adjustment Calculation Basis Unchecked
If this check box is unchecked, Oracle Assets uses the following formula to calculate the new depreciation basis:
Old Basis - Old Basis * Adjustment Amount/Old Cost
For example, if the old cost is 20,000 and the old basis is 12,000, the adjustment amount is 8,000. The new basis is calculated as follows:
12,000 - 12,000 * 8,000/20,000 = 7,200
Example: Current Dated Negative Cost Adjustment: Polish Adjustment Calculation Basis Checked
In the following example:
-
Depreciable basis rule: Polish Standard Declining with a Switch to Flat Rate
-
Flat rate: 20 percent
-
Factor: 2
-
In year 1, no test is performed to determine whether to switch the depreciation method. In all subsequent years, the test is performed.
In this example, the negative cost adjustment occurs in year 2, month 8.
The following table shows depreciation information for year one:
Note: The rounding in this table and subsequent tables is approximate.
| Month | Cost | Depreciation | Reserve | Depreciation Basis |
|---|---|---|---|---|
| 1 | 20,000.00 | 666.67 | 666.67 | 20,000.00 |
| 2 | 20,000.00 | 666.67 | 1,333.33 | 20,000.00 |
| 3 | 20,000.00 | 666.67 | 2,000.00 | 20,000.00 |
| 4 | 20,000.00 | 666.67 | 2,666.67 | 20,000.00 |
| 5 | 20,000.00 | 666.67 | 3,333.33 | 20,000.00 |
| 6 | 20,000.00 | 666.67 | 4,000.00 | 20,000.00 |
| 7 | 20,000.00 | 666.67 | 4,666.67 | 20,000.00 |
| 8 | 20,000.00 | 666.67 | 5,333.33 | 20,000.00 |
| 9 | 20,000.00 | 666.67 | 6,000.00 | 20,000.00 |
| 10 | 20,000.00 | 666.67 | 6,666.67 | 20,000.00 |
| 11 | 20,000.00 | 666.67 | 7,333.33 | 20,000.00 |
| 12 | 20,000.00 | 666.67 | 8,000.00 | 20,000.00 |
The following table shows depreciation information for year two:
| Month | Cost | Depreciation | Reserve | Depreciation Basis |
|---|---|---|---|---|
| 1 | 20,000.00 | 400.00 | 8,400.00 | 12,000.00 |
| 2 | 20,000.00 | 400.00 | 8,800.00 | 12,000.00 |
| 3 | 20,000.00 | 400.00 | 9,200.00 | 12,000.00 |
| 4 | 20,000.00 | 400.00 | 9,600.00 | 12,000.00 |
| 5 | 20,000.00 | 400.00 | 10,000.00 | 12,000.00 |
| 6 | 20,000.00 | 400.00 | 10,400.00 | 12,000.00 |
| 7 | 20,000.00 | 400.00 | 10,800.00 | 12,000.00 |
| 8 | 12,000.00 | 544.00 | 11,344.00 | 16,320.00 |
| 9 | 12,000.00 | 544.00 | 11,888.00 | 16,320.00 |
| 10 | 12,000.00 | 544.00 | 12,432.00 | 16,320.00 |
| 11 | 12,000.00 | 544.00 | 12,976.00 | 16,320.00 |
| 12 | 12,000.00 | 544.00 | 13,520.00 | 16,320.00 |
The following table shows depreciation information for year three:
| Month | Cost | Depreciation | Reserve | Depreciation Basis |
|---|---|---|---|---|
| 1 | 12,000.00 | 272.00 | 13,792.00 | 16,320.00 |
| 2 | 12,000.00 | 272.00 | 14,064.00 | 16,320.00 |
| 3 | 12,000.00 | 272.00 | 14,336.00 | 16,320.00 |
| 4 | 12,000.00 | 272.00 | 14,608.00 | 16,320.00 |
| 5 | 12,000.00 | 272.00 | 14,880.00 | 16,320.00 |
| 6 | 12,000.00 | 272.00 | 15,152.00 | 16,320.00 |
| 7 | 12,000.00 | 272.00 | 15,424.00 | 16,320.00 |
| 8 | 12,000.00 | 272.00 | 15,696.00 | 16,320.00 |
| 9 | 12,000.00 | 272.00 | 15,968.00 | 16,320.00 |
| 10 | 12,000.00 | 272.00 | 16,240.00 | 16,320.00 |
| 11 | 12,000.00 | 80.00 | 16,320.00 | 16,320.00 |
| 12 |
Example: Back Dated Negative Cost Adjustment: Polish Adjustment Calculation Basis Checked
In the following example:
-
Depreciable basis rule: Polish Standard Declining with a Switch to Flat Rate
-
Flat rate: 20 percent
-
Factor: 2
-
In year 1, no test is performed to determine whether to switch the depreciation method. In all subsequent years, the test is performed.
In this example, the negative cost adjustment occurs in year 3, month 7, and is back dated to year 2, month 8. Note that the depreciation amount of 624.00 shown for year 3, month 7 includes the current period depreciation expense of 272.00 plus the catchup depreciation.
The following table shows depreciation information for year one:
| Month | Cost | Depreciation | Reserve | Depreciation Basis |
|---|---|---|---|---|
| 1 | 20,000.00 | 666.67 | 666.67 | 20,000.00 |
| 2 | 20,000.00 | 666.67 | 1,333.33 | 20,000.00 |
| 3 | 20,000.00 | 666.67 | 2,000.00 | 20,000.00 |
| 4 | 20,000.00 | 666.67 | 2,666.67 | 20,000.00 |
| 5 | 20,000.00 | 666.67 | 3,333.33 | 20,000.00 |
| 6 | 20,000.00 | 666.67 | 4,000.00 | 20,000.00 |
| 7 | 20,000.00 | 666.67 | 4,666.67 | 20,000.00 |
| 8 | 20,000.00 | 666.67 | 5,333.33 | 20,000.00 |
| 9 | 20,000.00 | 666.67 | 6,000.00 | 20,000.00 |
| 10 | 20,000.00 | 666.67 | 6,666.67 | 20,000.00 |
| 11 | 20,000.00 | 666.67 | 7,333.33 | 20,000.00 |
| 12 | 20,000.00 | 666.67 | 8,000.00 | 20,000.00 |
The following table shows depreciation information for year two:
| Month | Cost | Depreciation | Reserve | Depreciation Basis |
|---|---|---|---|---|
| 1 | 20,000.00 | 400.00 | 8,400.00 | 12,000.00 |
| 2 | 20,000.00 | 400.00 | 8,800.00 | 12,000.00 |
| 3 | 20,000.00 | 400.00 | 9,200.00 | 12,000.00 |
| 4 | 20,000.00 | 400.00 | 9,600.00 | 12,000.00 |
| 5 | 20,000.00 | 400.00 | 10,000.00 | 12,000.00 |
| 6 | 20,000.00 | 400.00 | 10,400.00 | 12,000.00 |
| 7 | 20,000.00 | 400.00 | 10,800.00 | 12,000.00 |
| 8 | 20,000.00 | 400.00 | 11,200.00 | 12,000.00 |
| 9 | 20,000.00 | 400.00 | 11,600.00 | 12,000.00 |
| 10 | 20,000.00 | 400.00 | 12,000.00 | 12,000.00 |
| 11 | 20,000.00 | 400.00 | 12,400.00 | 12,000.00 |
| 12 | 20,000.00 | 400.00 | 12,800.00 | 12,000.00 |
The following table shows depreciation information for year three:
| Month | Cost | Depreciation | Reserve | Depreciation Basis |
|---|---|---|---|---|
| 1 | 20,000.00 | 333.33 | 13,133.33 | 20,000.00 |
| 2 | 20,000.00 | 333.33 | 13,466.67 | 20,000.00 |
| 3 | 20,000.00 | 333.33 | 13,800.00 | 20,000.00 |
| 4 | 20,000.00 | 333.33 | 14,133.33 | 20,000.00 |
| 5 | 20,000.00 | 333.33 | 14,466.67 | 20,000.00 |
| 6 | 20,000.00 | 333.33 | 14,800.00 | 20,000.00 |
| 7 | 12,000.00 | 624.00 | 15,424.00 | 16,320.00 |
| 8 | 12,000.00 | 272.00 | 15,696.00 | 16,320.00 |
| 9 | 12,000.00 | 272.00 | 15,968.00 | 16,320.00 |
| 10 | 12,000.00 | 272.00 | 16,240.00 | 16,320.00 |
| 11 | 12,000.00 | 80.00 | 16,320.00 | 16,320.00 |
| 12 |
Example: Current Dated Negative Cost Adjustment: Polish Adjustment Calculation Basis Unchecked
In the following example:
-
Depreciable basis rule: Polish Standard Declining with a Switch to Flat Rate
-
Flat rate: 20 percent
-
Factor: 2
-
In year 1, no test is performed to determine whether to switch the depreciation method. In all subsequent years, the test is performed.
In this example, the negative adjustment from 20,000.00 to 12,000.00 occurs in year 2, month 8. The new depreciation basis is 7,200.00.
The following table shows depreciation information for year one:
| Month | Cost | Depreciation | Reserve | Depreciation Basis |
|---|---|---|---|---|
| 1 | 20,000.00 | 666.67 | 666.67 | 20,000.00 |
| 2 | 20,000.00 | 666.67 | 1,333.33 | 20,000.00 |
| 3 | 20,000.00 | 666.67 | 2,000.00 | 20,000.00 |
| 4 | 20,000.00 | 666.67 | 2,666.67 | 20,000.00 |
| 5 | 20,000.00 | 666.67 | 3,333.33 | 20,000.00 |
| 6 | 20,000.00 | 666.67 | 4,000.00 | 20,000.00 |
| 7 | 20,000.00 | 666.67 | 4,666.67 | 20,000.00 |
| 8 | 20,000.00 | 666.67 | 5,333.33 | 20,000.00 |
| 9 | 20,000.00 | 666.67 | 6,000.00 | 20,000.00 |
| 10 | 20,000.00 | 666.67 | 6,666.67 | 20,000.00 |
| 11 | 20,000.00 | 666.67 | 7,333.33 | 20,000.00 |
| 12 | 20,000.00 | 666.67 | 8,000.00 | 20,000.00 |
The following table shows depreciation information for year two:
| Month | Cost | Depreciation | Reserve | Depreciation Basis |
|---|---|---|---|---|
| 1 | 20,000.00 | 400.00 | 8,400.00 | 12,000.00 |
| 2 | 20,000.00 | 400.00 | 8,800.00 | 12,000.00 |
| 3 | 20,000.00 | 400.00 | 9,200.00 | 12,000.00 |
| 4 | 20,000.00 | 400.00 | 9,600.00 | 12,000.00 |
| 5 | 20,000.00 | 400.00 | 10,000.00 | 12,000.00 |
| 6 | 20,000.00 | 400.00 | 10,400.00 | 12,000.00 |
| 7 | 20,000.00 | 400.00 | 10,800.00 | 12,000.00 |
| 8 | 12,000.00 | 240.00 | 11,040.00 | 7,200.00 |
| 9 | 12,000.00 | 240.00 | 11,280.00 | 7,200.00 |
| 10 | 12,000.00 | 240.00 | 11,520.00 | 7,200.00 |
| 11 | 12,000.00 | 240.00 | 11,760.00 | 7,200.00 |
| 12 | 12,000.00 | 240.00 | 12,000.00 | 7,200.00 |
Example: Back Dated Negative Cost Adjustment: Polish Adjustment Calculation Basis Unchecked
In the following example:
-
Depreciable basis rule: Polish Standard Declining with a Switch to Flat Rate
-
Flat rate: 20 percent
-
Factor: 2
-
In year 1, no test is performed to determine whether to switch the depreciation method. In all subsequent years, the test is performed.
In this example, the negative adjustment from 20,000.00 to 12,000.00 occurs in year 3, month 7, but is back dated to year 2, month 8. The negative 2,800.00 shown as the depreciation amount in year 3 month 7 is the amount of excess depreciation expense and reserve that is backed out.
The following table shows depreciation information for year one:
| Month | Cost | Depreciation | Reserve | Depreciation Basis |
|---|---|---|---|---|
| 1 | 20,000.00 | 666.67 | 666.67 | 20,000.00 |
| 2 | 20,000.00 | 666.67 | 1,333.33 | 20,000.00 |
| 3 | 20,000.00 | 666.67 | 2,000.00 | 20,000.00 |
| 4 | 20,000.00 | 666.67 | 2,666.67 | 20,000.00 |
| 5 | 20,000.00 | 666.67 | 3,333.33 | 20,000.00 |
| 6 | 20,000.00 | 666.67 | 4,000.00 | 20,000.00 |
| 7 | 20,000.00 | 666.67 | 4,666.67 | 20,000.00 |
| 8 | 20,000.00 | 666.67 | 5,333.33 | 20,000.00 |
| 9 | 20,000.00 | 666.67 | 6,000.00 | 20,000.00 |
| 10 | 20,000.00 | 666.67 | 6,666.67 | 20,000.00 |
| 11 | 20,000.00 | 666.67 | 7,333.33 | 20,000.00 |
| 12 | 20,000.00 | 666.67 | 8,000.00 | 20,000.00 |
The following table shows depreciation information for year two:
| Month | Cost | Depreciation | Reserve | Depreciation Basis |
|---|---|---|---|---|
| 1 | 20,000.00 | 400.00 | 8,400.00 | 12,000.00 |
| 2 | 20,000.00 | 400.00 | 8,800.00 | 12,000.00 |
| 3 | 20,000.00 | 400.00 | 9,200.00 | 12,000.00 |
| 4 | 20,000.00 | 400.00 | 9,600.00 | 12,000.00 |
| 5 | 20,000.00 | 400.00 | 10,000.00 | 12,000.00 |
| 6 | 20,000.00 | 400.00 | 10,400.00 | 12,000.00 |
| 7 | 20,000.00 | 400.00 | 10,800.00 | 12,000.00 |
| 8 | 20,000.00 | 400.00 | 11,200.00 | 12,000.00 |
| 9 | 20,000.00 | 400.00 | 11,600.00 | 12,000.00 |
| 10 | 20,000.00 | 400.00 | 12,000.00 | 12,000.00 |
| 11 | 20,000.00 | 400.00 | 12,400.00 | 12,000.00 |
| 12 | 20,000.00 | 400.00 | 12,800.00 | 12,000.00 |
The following table shows depreciation information for year three:
| Month | Cost | Depreciation | Reserve | Depreciation Basis |
|---|---|---|---|---|
| 1 | 20,000.00 | 333.33 | 13,133.33 | 20,000.00 |
| 2 | 20,000.00 | 333.33 | 13,466.67 | 20,000.00 |
| 3 | 20,000.00 | 333.33 | 13,800.00 | 20,000.00 |
| 4 | 20,000.00 | 333.33 | 14,133.33 | 20,000.00 |
| 5 | 20,000.00 | 333.33 | 14,466.67 | 20,000.00 |
| 6 | 20,000.00 | 333.33 | 14,800.00 | 20,000.00 |
| 7 | 12,000.00 | (2800.00) | 12,000.00 | 7,200.00 |
Positive Cost Adjustments
A positive cost adjustment occurs when the cost of an asset is increased from the current cost.
Example: Current Dated Positive Cost Adjustment
In the following example:
-
Depreciable basis rule: Polish Standard Declining with a Switch to Flat Rate
-
Flat rate: 20 percent
-
Factor: 2
-
In year 1, no test is performed to determine whether to switch the depreciation method. In all subsequent years, the test is performed.
In this example, the positive cost adjustment from 10,000.00 to 20,000.00 occurs in year 3, month 7.
Note: In this example, although depreciation is shown only through year 3, it should be assumed that depreciation will continue until the asset is fully reserved.
The following table shows depreciation information for year one:
| Month | Cost | Depreciation | Reserve | Depreciation Basis |
|---|---|---|---|---|
| 1 | 10,000.00 | 333.33 | 333.33 | 10,000.00 |
| 2 | 10,000.00 | 333.33 | 666.67 | 10,000.00 |
| 3 | 10,000.00 | 333.33 | 1,000.00 | 10,000.00 |
| 4 | 10,000.00 | 333.33 | 1,333.33 | 10,000.00 |
| 5 | 10,000.00 | 333.33 | 1,666.67 | 10,000.00 |
| 6 | 10,000.00 | 333.33 | 2,000.00 | 10,000.00 |
| 7 | 10,000.00 | 333.33 | 2,333.33 | 10,000.00 |
| 8 | 10,000.00 | 333.33 | 2,666.67 | 10,000.00 |
| 9 | 10,000.00 | 333.33 | 3,000.00 | 10,000.00 |
| 10 | 10,000.00 | 333.33 | 3,333.33 | 10,000.00 |
| 11 | 10,000.00 | 333.33 | 3,666.67 | 10,000.00 |
| 12 | 10,000.00 | 333.33 | 4,000.00 | 10,000.00 |
The following table shows depreciation information for year two:
| Month | Cost | Depreciation | Reserve | Depreciation Basis |
|---|---|---|---|---|
| 1 | 10,000.00 | 200.00 | 4,200.00 | 6,000.00 |
| 2 | 10,000.00 | 200.00 | 4,400.00 | 6,000.00 |
| 3 | 10,000.00 | 200.00 | 4,600.00 | 6,000.00 |
| 4 | 10,000.00 | 200.00 | 4,800.00 | 6,000.00 |
| 5 | 10,000.00 | 200.00 | 5,000.00 | 6,000.00 |
| 6 | 10,000.00 | 200.00 | 5,200.00 | 6,000.00 |
| 7 | 10,000.00 | 200.00 | 5,400.00 | 6,000.00 |
| 8 | 10,000.00 | 200.00 | 5,600.00 | 6,000.00 |
| 9 | 10,000.00 | 200.00 | 5,800.00 | 6,000.00 |
| 10 | 10,000.00 | 200.00 | 6,000.00 | 6,000.00 |
| 11 | 10,000.00 | 200.00 | 6,200.00 | 6,000.00 |
| 12 | 10,000.00 | 200.00 | 6,400.00 | 6,000.00 |
The following table shows depreciation information for year three:
| Month | Cost | Depreciation | Reserve | Depreciation Basis |
|---|---|---|---|---|
| 1 | 10,000.00 | 166.67 | 6,566.67 | 10,000.00 |
| 2 | 10,000.00 | 166.67 | 6,733.33 | 10,000.00 |
| 3 | 10,000.00 | 166.67 | 6,900.00 | 10,000.00 |
| 4 | 10,000.00 | 166.67 | 7,066.67 | 10,000.00 |
| 5 | 10,000.00 | 166.67 | 7,233.33 | 10,000.00 |
| 6 | 10,000.00 | 166.67 | 7,400.00 | 10,000.00 |
| 7 | 20,000.00 | 333.33 | 7,733.33 | 20,000.00 |
| 8 | 20,000.00 | 333.33 | 8,066.67 | 20,000.00 |
| 9 | 20,000.00 | 333.33 | 8,400.00 | 20,000.00 |
| 10 | 20,000.00 | 333.33 | 8,733.33 | 20,000.00 |
| 11 | 20,000.00 | 333.33 | 9,066.67 | 20,000.00 |
| 12 | 20,000.00 | 333.33 | 9,400.00 | 20,000.00 |
Example: Back Dated Positive Cost Adjustment
In the following example:
-
Depreciable basis rule: Polish Standard Declining with a Switch to Flat Rate
-
Flat rate: 20 percent
-
Factor: 2
-
In year 1, no test is performed to determine whether to switch the depreciation method. In all subsequent years, the test is performed.
In this example, the positive cost adjustment from 10,000.00 to 20,000.00 occurs in year 3, month 7, with an effect beginning year 2, month 7. Note that the depreciation amount of 1,333.33 shown for year 3, month 7 includes the current period depreciation expense of 333.33 plus the catchup depreciation. The amount of catchup depreciation between year 2, month 7 and year 3, month 2 is 1,000.00.
Note: In this example, although depreciation is shown only through year 3, it should be assumed that depreciation will continue until the asset is fully reserved.
The following table shows depreciation information for year one:
| Month | Cost | Depreciation | Reserve | Depreciation Basis |
|---|---|---|---|---|
| 1 | 10,000.00 | 333.33 | 333.33 | 10,000.00 |
| 2 | 10,000.00 | 333.33 | 666.67 | 10,000.00 |
| 3 | 10,000.00 | 333.33 | 1,000.00 | 10,000.00 |
| 4 | 10,000.00 | 333.33 | 1,333.33 | 10,000.00 |
| 5 | 10,000.00 | 333.33 | 1,666.67 | 10,000.00 |
| 6 | 10,000.00 | 333.33 | 2,000.00 | 10,000.00 |
| 7 | 10,000.00 | 333.33 | 2,333.33 | 10,000.00 |
| 8 | 10,000.00 | 333.33 | 2,666.67 | 10,000.00 |
| 9 | 10,000.00 | 333.33 | 3,000.00 | 10,000.00 |
| 10 | 10,000.00 | 333.33 | 3,333.33 | 10,000.00 |
| 11 | 10,000.00 | 333.33 | 3,666.67 | 10,000.00 |
| 12 | 10,000.00 | 333.33 | 4,000.00 | 10,000.00 |
The following table shows depreciation information for year two:
| Month | Cost | Depreciation | Reserve | Depreciation Basis |
|---|---|---|---|---|
| 1 | 10,000.00 | 200.00 | 4,200.00 | 6,000.00 |
| 2 | 10,000.00 | 200.00 | 4,400.00 | 6,000.00 |
| 3 | 10,000.00 | 200.00 | 4,600.00 | 6,000.00 |
| 4 | 10,000.00 | 200.00 | 4,800.00 | 6,000.00 |
| 5 | 10,000.00 | 200.00 | 5,000.00 | 6,000.00 |
| 6 | 10,000.00 | 200.00 | 5,200.00 | 6,000.00 |
| 7 | 10,000.00 | 200.00 | 5,400.00 | 6,000.00 |
| 8 | 10,000.00 | 200.00 | 5,600.00 | 6,000.00 |
| 9 | 10,000.00 | 200.00 | 5,800.00 | 6,000.00 |
| 10 | 10,000.00 | 200.00 | 6,000.00 | 6,000.00 |
| 11 | 10,000.00 | 200.00 | 6,200.00 | 6,000.00 |
| 12 | 10,000.00 | 200.00 | 6,400.00 | 6,000.00 |
The following table shows depreciation information for year three:
| Month | Cost | Depreciation | Reserve | Depreciation Basis |
|---|---|---|---|---|
| 1 | 10,000.00 | 166.67 | 6,566.67 | 10,000.00 |
| 2 | 10,000.00 | 166.67 | 6,733.33 | 10,000.00 |
| 3 | 10,000.00 | 166.67 | 6,900.00 | 10,000.00 |
| 4 | 10,000.00 | 166.67 | 7,066.67 | 10,000.00 |
| 5 | 10,000.00 | 166.67 | 7,233.33 | 10,000.00 |
| 6 | 10,000.00 | 166.67 | 7,400.00 | 10,000.00 |
| 7 | 20,000.00 | 1,333.33 | 8,733.33 | 20,000.00 |
| 8 | 20,000.00 | 333.33 | 9,066.67 | 20,000.00 |
| 9 | 20,000.00 | 333.33 | 9,400.00 | 20,000.00 |
| 10 | 20,000.00 | 333.33 | 9,733.33 | 20,000.00 |
| 11 | 20,000.00 | 333.33 | 10,066.67 | 20,000.00 |
| 12 | 20,000.00 | 333.33 | 10,400.00 | 20,000.00 |
Partial Retirements
Oracle Assets does not provide any special treatment for partial retirements on assets using one of the five Polish tax depreciation methods. Oracle Assets calculates the new reserve, depreciation basis and the new cost as it would for any other partial retirement transaction.
The calculation for the new basis is the same as for a negative cost adjustment in which the Polish Adjustment Calculation Basis check box is unchecked, except the adjustment amount is replaced by the partial retirement amount:
Old Basis - Old Basis * Partial Retirement Amount/Old Cost
For example, if the old cost is 20,000 and the old basis is 12,000, and the partial retirement amount is 8,000, the new basis is calculated as follows:
12,000 - 12,000 * 8,000/20,000 = 7,200
Example: Current Dated Partial Retirement
In the following example:
-
Depreciable basis rule: Polish Standard Declining with a Switch to Flat Rate
-
Flat rate: 20 percent
-
Factor: 2
-
In year 1, no test is performed to determine whether to switch the depreciation method. In all subsequent years, the test is performed.
In this example, the partial retirement of 8,000 occurs in year 2, month 8. The new reserve is calculated as follows:
Old Reserve + Current Period Depreciation - Old Reserve * Retirement Amount/Old Cost
The following table shows depreciation information for year one:
| Month | Cost | Depreciation | Reserve | Depreciation Basis | Method |
|---|---|---|---|---|---|
| 1 | 20,000.00 | 666.67 | 666.67 | 20,000.00 | SD |
| 2 | 20,000.00 | 666.67 | 1,333.33 | 20,000.00 | SD |
| 3 | 20,000.00 | 666.67 | 2,000.00 | 20,000.00 | SD |
| 4 | 20,000.00 | 666.67 | 2,666.67 | 20,000.00 | SD |
| 5 | 20,000.00 | 666.67 | 3,333.33 | 20,000.00 | SD |
| 6 | 20,000.00 | 666.67 | 4,000.00 | 20,000.00 | SD |
| 7 | 20,000.00 | 666.67 | 4,666.67 | 20,000.00 | SD |
| 8 | 20,000.00 | 666.67 | 5,333.33 | 20,000.00 | SD |
| 9 | 20,000.00 | 666.67 | 6,000.00 | 20,000.00 | SD |
| 10 | 20,000.00 | 666.67 | 6,666.67 | 20,000.00 | SD |
| 11 | 20,000.00 | 666.67 | 7,333.33 | 20,000.00 | SD |
| 12 | 20,000.00 | 666.67 | 8,000.00 | 20,000.00 | SD |
The following table shows depreciation information for year two:
| Month | Cost | Depreciation | Reserve | Depreciation Basis | Method |
|---|---|---|---|---|---|
| 1 | 20,000.00 | 400.00 | 8,400.00 | 12,000.00 | SD |
| 2 | 20,000.00 | 400.00 | 8,800.00 | 12,000.00 | SD |
| 3 | 20,000.00 | 400.00 | 9,200.00 | 12,000.00 | SD |
| 4 | 20,000.00 | 400.00 | 9,600.00 | 12,000.00 | SD |
| 5 | 20,000.00 | 400.00 | 10,000.00 | 12,000.00 | SD |
| 6 | 20,000.00 | 400.00 | 10,400.00 | 12,000.00 | SD |
| 7 | 20,000.00 | 400.00 | 10,800.00 | 12,000.00 | SD |
| 8 | 12,000.00 | 240.00 | 6,720.00 | 7,200.00 | SD |
| 9 | 12,000.00 | 240.00 | 6,960.00 | 7,200.00 | SD |
| 10 | 12,000.00 | 240.00 | 7,200.00 | 7,200.00 | SD |
| 11 | 12,000.00 | 240.00 | 7,440.00 | 7,200.00 | SD |
| 12 | 12,000.00 | 240.00 | 7,680.00 | 7,200.00 | SD |
The following table shows depreciation information for year three:
| Month | Cost | Depreciation | Reserve | Depreciation Basis | Method |
|---|---|---|---|---|---|
| 1 | 12,000.00 | 200.00 | 7,880.00 | 12,000.00 | FR |
| 2 | 12,000.00 | 200.00 | 8,080.00 | 12,000.00 | FR |
| 3 | 12,000.00 | 200.00 | 8,280.00 | 12,000.00 | FR |
| 4 | 12,000.00 | 200.00 | 8,480.00 | 12,000.00 | FR |
| 5 | 12,000.00 | 200.00 | 8,680.00 | 12,000.00 | FR |
| 6 | 12,000.00 | 200.00 | 8,880.00 | 12,000.00 | FR |
| 7 | 12,000.00 | 200.00 | 9,080.00 | 12,000.00 | FR |
| 8 | 12,000.00 | 200.00 | 9,280.00 | 12,000.00 | FR |
| 9 | 12,000.00 | 200.00 | 9,480.00 | 12,000.00 | FR |
| 10 | 12,000.00 | 200.00 | 9,680.00 | 12,000.00 | FR |
| 11 | 12,000.00 | 200.00 | 9,880.00 | 12,000.00 | FR |
| 12 | 12,000.00 | 200.00 | 10,080.00 | 12,000.00 | FR |
Example: Back Dated Partial Retirement
In the following example:
-
Depreciable basis rule: Polish Standard Declining with a Switch to Flat Rate
-
Flat rate: 20 percent
-
Factor: two
-
In year 1, no test is performed to determine whether to switch the depreciation method. In all subsequent years, the test is performed.
In this example, the partial retirement of 8,000 occurs in year 2, month 12. Note that the depreciation amount of (400.00) shown for year 2, month 12 includes the current period depreciation expense of 240.00 plus the excess depreciation amount of 640.00 from year 2, month 8 through year 2, month 11, that was backed out.
The following table shows depreciation information for year one:
| Month | Cost | Depreciation | Reserve | Depreciation Basis | Method |
|---|---|---|---|---|---|
| 1 | 20,000.00 | 666.67 | 666.67 | 20,000.00 | SD |
| 2 | 20,000.00 | 666.67 | 1,333.33 | 20,000.00 | SD |
| 3 | 20,000.00 | 666.67 | 2,000.00 | 20,000.00 | SD |
| 4 | 20,000.00 | 666.67 | 2,666.67 | 20,000.00 | SD |
| 5 | 20,000.00 | 666.67 | 3,333.33 | 20,000.00 | SD |
| 6 | 20,000.00 | 666.67 | 4,000.00 | 20,000.00 | SD |
| 7 | 20,000.00 | 666.67 | 4,666.67 | 20,000.00 | SD |
| 8 | 20,000.00 | 666.67 | 5,333.33 | 20,000.00 | SD |
| 9 | 20,000.00 | 666.67 | 6,000.00 | 20,000.00 | SD |
| 10 | 20,000.00 | 666.67 | 6,666.67 | 20,000.00 | SD |
| 11 | 20,000.00 | 666.67 | 7,333.33 | 20,000.00 | SD |
| 12 | 20,000.00 | 666.67 | 8,000.00 | 20,000.00 | SD |
The following table shows depreciation information for year two:
| Month | Cost | Depreciation | Reserve | Depreciation Basis | Method |
|---|---|---|---|---|---|
| 1 | 20,000.00 | 400.00 | 8,400.00 | 12,000.00 | SD |
| 2 | 20,000.00 | 400.00 | 8,800.00 | 12,000.00 | SD |
| 3 | 20,000.00 | 400.00 | 9,200.00 | 12,000.00 | SD |
| 4 | 20,000.00 | 400.00 | 9,600.00 | 12,000.00 | SD |
| 5 | 20,000.00 | 400.00 | 10,000.00 | 12,000.00 | SD |
| 6 | 20,000.00 | 400.00 | 10,400.00 | 12,000.00 | SD |
| 7 | 20,000.00 | 400.00 | 10,800.00 | 12,000.00 | SD |
| 8 | 20,000.00 | 400.00 | 11,200.00 | 12,000.00 | SD |
| 9 | 20,000.00 | 400.00 | 11,600.00 | 12,000.00 | SD |
| 10 | 20,000.00 | 400.00 | 12,000.00 | 12,000.00 | SD |
| 11 | 20,000.00 | 400.00 | 12,400.00 | 12,000.00 | SD |
| 12 | 12,000.00 | (400.00) | 7,680.00 | 12,000.00 | SD |
The following table shows depreciation information for year three:
| Month | Cost | Depreciation | Reserve | Depreciation Basis | Method |
|---|---|---|---|---|---|
| 1 | 12,000.00 | 200.00 | 7,880.00 | 12,000.00 | FR |
| 2 | 12,000.00 | 200.00 | 8,080.00 | 12,000.00 | FR |
| 3 | 12,000.00 | 200.00 | 8,280.00 | 12,000.00 | FR |
| 4 | 12,000.00 | 200.00 | 8,480.00 | 12,000.00 | FR |
| 5 | 12,000.00 | 200.00 | 8,680.00 | 12,000.00 | FR |
| 6 | 12,000.00 | 200.00 | 8,880.00 | 12,000.00 | FR |
| 7 | 12,000.00 | 200.00 | 9,080.00 | 12,000.00 | FR |
| 8 | 12,000.00 | 200.00 | 9,280.00 | 12,000.00 | FR |
| 9 | 12,000.00 | 200.00 | 9,480.00 | 12,000.00 | FR |
| 10 | 12,000.00 | 200.00 | 9,680.00 | 12,000.00 | FR |
| 11 | 12,000.00 | 200.00 | 9,880.00 | 12,000.00 | FR |
| 12 | 12,000.00 | 200.00 | 10,080.00 | 12,000.00 | FR |
Japan Tax Reforms - FY2007
On March 30, 2007, the Japan Tax Reform act was published by the Ministry of Finance Japan and was enacted on April 1, 2007. The reform significantly impacted the methods used for depreciation of assets in Japan and provided new guidelines on the calculation and treatment of depreciation of assets. The purpose of the new deprecation rules laid down in the FY2007 Tax Reforms is to increase the Depreciation expenses by abolishing salvage value and increasing the depreciation limit on assets so that the companies can reduce National and Local taxes. Additionally, new depreciation methods were introduced and extended depreciation feature made available for assets acquired before April 1, 2007. In order to address the Japanese depreciation requirements, the following Japan specific depreciation methods have been created and seeded within Oracle Assets.
| Method | Method Type | Calculation Basis | Depreciable Basis Rule |
|---|---|---|---|
| JP-STL XXYR | Flat Rate | Cost | FLAT RATE EXTENSION |
| JP-DB XXYR | Flat Rate | NBV | FLAT RATE EXTENSION |
| JP-250DB XX | Formula | NBV | DUAL RATE EVALUATION (Guarantee Rate Evaluation method) |
| JP-200DB XX | Formula | NBV | DUAL RATE EVALUATION (Guarantee Rate Evaluation method) |
| JP-STL-EXTND | Calculated | Cost | Straight Line Method |
This section covers the following topics:
Japanese Straight Line Depreciation Method
As a result of the reform, new Straight Line depreciation rates were published for assets acquired on or after April 1, 2007. The Straight Line depreciation rate calculation for assets acquired prior to April 1, 2007 used rates rounded downward rather than upward as required by the new reform. As a result, the existing seeded JP-STL XXYR depreciation methods were modified. For depreciation terms where the rate calculation required by the reform impacted the rate, an additional rate line was added to the depreciation method. For depreciation methods where there was not an impact, the method continues to contain a single rate line. For example, in the JP-STL depreciation methods for assets with a life of four or five years the change in the rounding did not impact the rate, therefore, only one rate line is defined. Whereas in JP-STL deprecation methods for asset with lives of three to six, there was an impact on the rate, so an additional rate line was added. The method contains one rate that can be used for assets with a DPIS of prior to April 1, 2007 with another for assets with a DPIS on or after April 1, 2007.
Japanese 250 (or 200%) Declining Balance Depreciation Method
As part of the reform, the Japan government published a new 250 (or 200%) Declining Balance Depreciation Method which can be used on assets acquired on or after April 1, 2007 (200% Declining Balance Depreciation Method after April 1, 2012). For this method, the rate applied for depreciation is an accelerated balance method which is 250 (or 200%) of the rates used under the straight line method or more commonly known as 250DB (or 200DB). The method comes with an added feature of a straight-line switch. As a result, a new Guarantee Rate Evaluation Method check box was introduced to the Depreciation Method window to support the new 250DB (or 200DB)method. This option enables five new variables to be available in defining depreciation formulas within the window.
The rates provided under this method are the basic 250DB (or 200DB) rates, the guarantee rates and revised rates. The 250% (or 200%) DB Depreciation methods, as specified by the Japan government, are seeded as JP-250DB XX (and JP-200DB XX) depreciation methods in Oracle Assets with one depreciation method for each possible asset life year.
The following table describes the JP-250DB (or JP-200DB) depreciation methods:
| Field Name | Value |
|---|---|
| Method | JP-250DB XX or JP-200DB XX |
| Description | Japan 250 or 200 Declining Balance XX years |
| Method Type | Formula |
| Calculation Basis | NBV |
| Depreciable Basis Rule | Dual Rate Evaluation |
| Depreciate in Year Retired | Yes |
| Exclude Salvage Value | Yes |
| Straight Line Method | No |
| Polish Adjustment Calculation Basis | No |
| Guarantee Rate Evaluation Method | Yes |
| Use Japan NBV Calculation for Impairments | Yes |
| Life Years | XX Years |
| Months | 0 |
| Formula | Decode(Sign(Floor(<Cost> * <Guarantee Rate>) – Floor(<NBV at beginning of year> *< Original Rate>)),1,<Revised Rate>, <Original Rate>) |
Dual Rate Evaluation Depreciable Basis Rule
Oracle Assets provides the Depreciable Basis Rules feature to accommodate depreciation method setup requirements not met by the Cost or NBV calculation basis types. The combination of depreciable basis rule and depreciation method determines how depreciable basis is derived.
The Dual Rate Evaluation depreciable basis rule is part of the predefined rules. This depreciable basis rule determines the basis for the calculation of depreciation. The rule checks the rate that is used for calculating depreciation and accordingly determines the depreciable basis. This depreciable basis rule is available only if the FA: Japan 2007 Tax Reforms Features profile option is set to Yes.
The Dual Rate Evaluation depreciable basis rule is available only for depreciation methods that satisfy both of the following conditions:
-
Depreciation method must be a Formula based method.
-
The Guarantee Rate Evaluation Method check box is selected for the depreciation method.
The formula that is specified in the Formula field of the depreciation method determines which rate is used for the calculation of depreciation. When the Original rate is used, the depreciation calculation basis is the net book value at the beginning of the fiscal year for the asset. When the Revised rate is used, the basis of depreciation calculation is the NBV of the asset as at the date of the switch from Original rate to the Revised rate.
The following changes have been made for Formula Based methods to support the Japan Tax Reforms:
Variables for Depreciation Formula
Five additional variables were added to the list of variables on the Depreciation Formula window. These variables are used in the formula for the predefined 250% (or 200%) Declining Balance Depreciation (JP-250DB or JP-200DB) methods and are available only for those formula-based depreciation methods that have the Guarantee Rate Evaluation Method check box selected.
The following table describes the new variables on the Depreciation Formula window for the formula-based methods:
| Variable Name | Purpose |
|---|---|
| Cost | The original cost of the asset. |
| NBV at Beginning of Year | The net book value of the asset at the beginning of the first period of the fiscal year. |
| Original Rate | The original rate of depreciation is specified in the Original Rate field on the Rate Details window. |
| Revised Rate | The revised rate of depreciation is specified in the Revised Rate field on the Rate Details window. |
| Guarantee Rate | The guarantee rate is specified in the Guarantee Rate field on the Rate Details window. |
The Rate Details Window is available for Formula Based depreciation methods. Use the Rate Details window to enter the Original Rate, Revised Rate and Guarantee Rate of depreciation for Formula Based Depreciation methods that have the Guarantee Rate Evaluation Method check box selected.
To accommodate the above variables, the system displays Cost and NBV at Beginning of Year parameters in the Test Formula tabbed region of Depreciation Formula window. In order to have access to these parameters, the FA: Japan 2007 Tax Reforms Features profile option must be set to Yes.
Example for JP-250DB depreciation method
Assumptions:
-
Asset added on: April 1st, 2007
-
Depreciation method = JP250DB 3
-
Life of asset = 3 Years
-
Asset cost = 1000 Yen
-
Original Rate = 0.833
-
Guarantee Rate = 0.02789
-
Revised Rate = 1.00
Year 1
Depreciation Calculation:
Rate to be used =
= Decode (Sign (Floor (<Cost> * <Guarantee Rate>) - Floor (<NBV at beginning of year> * < Original Rate>)),1,<Revised Rate>, <Original Rate>)
= 27 - 833
= -806
Therefore depreciation rate for the first year is the Original rate.
Rate = 0.833
Thus, depreciation for the first year is as follows:
Year 1 = NBV * Original Rate
= 1000 * 0.833
= 833
Year 2
Depreciation Calculation:
= Decode (Sign(Floor(<Cost> * <Guarantee Rate>) - Floor(<NBV at beginning of year> * < Original Rate>)),1,<Revised Rate>, <Original Rate>)
= Decode (sign(1000 * 0.02789)-((1000 - 833)* 0.833)),1,Revised Rate, Original Rate)
= 27 - 139
= -112
Therefore, depreciation method for the second year is the Original rate.
Rate = .833
Thus, depreciation for the second year is as follows:
Year 2 = NBV * Original Rate
= 167 * 0.833
= 139
Year 3
Depreciation Calculation:
Rate to be used =
= Decode (Sign(Floor(<Cost> * <Guarantee Rate>) - Floor(<NBV at beginning of year> * < Original Rate>)),1,<Revised Rate>, <Original Rate>)
= Decode (sign(floor(1000 * 0.02789)-((1000 - 833- 139) * 0.833)),1,Revised Rate, Original Rate)
= 27 - 23
= 4
Therefore, depreciation method for the second year is the Revised rate.
Rate = 1.00
Thus, depreciation for the second year is as follows:
Year 3 = NBV at time of switch * Revised Rate
= 28 * 1.00
= 28
Japanese Straight Line Extended Depreciation
The reform provided an extended depreciation benefit to assets acquired before April 1, 2007 which have already reached the earlier depreciation limit of 95%. Under this benefit, these assets could now be depreciated further to 1 Yen using the Straight Line method over a 60 month period. Through the Find Eligible Assets window, you can search for the eligible assets and then use the Set Extended Depreciation window to record the decision whether or not a particular asset should be avail for extended depreciation. Once the decision is recorded on the asset and then you click on the Submit button of Set Extended Depreciation window, a concurrent process is launched to update the depreciation method to JP-STL-EXTND and depreciation limit is set to 1 Yen.
The new straight line depreciation method (JP-STL-EXTND) has been seeded in Oracle Assets in support of the extended depreciation benefit. This new method is used for all assets for which the extended depreciation decision has been set to Yes.
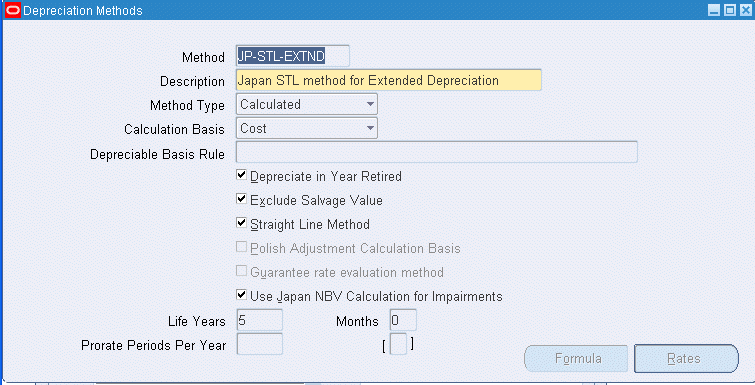
The following table describes the fields related to JP-STL-EXTND depreciation method:
| Field Name | Value |
|---|---|
| Method | JP-STL-EXTND |
| Description | Japan STL Method for Extended Depreciation |
| Method Type | Calculated |
| Calculation Basis | Cost |
| Depreciable Basis Rule | N/A |
| Depreciate in Year Retired | Yes |
| Exclude Salvage Value | Yes |
| Straight Line Method | Yes |
| Polish Adjustment Calculation Basis | No |
| Guarantee Rate Evaluation Method | No |
| Use Japan NBV Calculation for Impairments | Yes |
| Life Years | 5 Years |
| Months | 0 |
| Formula | N/A |
Windows, Window Tabs, and Menu Items Specific to Japan Tax Reforms
The following are available windows, window tabs, and menu items that support Japan Tax Reforms feature:
Rate Details Window
The Rate Details window is accessed through the Depreciation Methods window and is only available when the Guarantee Rate Evaluation Method check box is selected on the Depreciation Methods window. This window was added in support of the new 250DB depreciation methods and is only available for Formula Based depreciation methods. The window is used to capture the Original Rate, Revised Rate and Guarantee Rate of depreciation.
The Guarantee Rate Evaluation Method check box is applicable only for seeded methods and cannot be used for defining new depreciation rules.
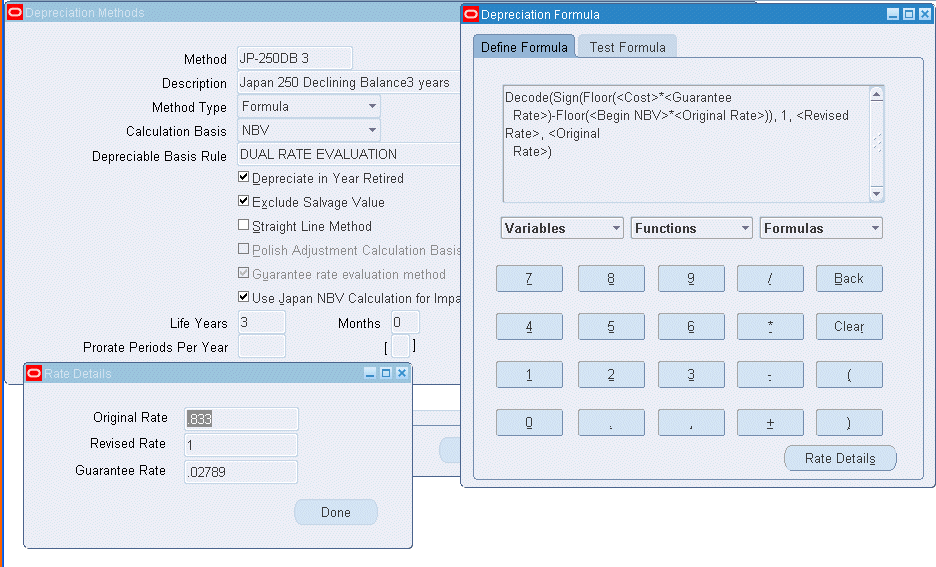
Extended Depreciation Menu Option
The system adds the Extended Depreciation menu option to the Depreciation menu if the FA: Japan 2007 Tax Reforms Features profile option is set to Yes. The Extended Depreciation menu provides access to the following:
Find Eligible Assets Window
In order to be eligible for extended depreciation, an asset should satisfy the following criteria:
-
Acquired on or before 31st March 2007
-
Fully reserved as of the date of inquiry
Use the Search By region of Find Eligible Assets window to search for assets eligible for extended depreciation. Navigate to the Depreciation Menu then to the Extended Depreciation menu option; the Find Eligible window is displayed.
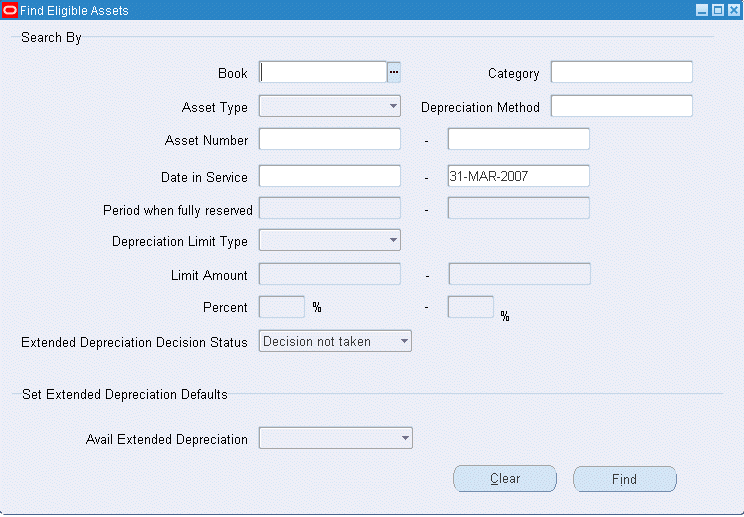
Enter in at least one search criteria for the assets.
The Date in Service is defaulted to a high range of March 31, 2007.
Extended Depreciation Decision Status - Default: Decision not taken.
-
Decision not taken: This option results in query results that show all the eligible assets that are being evaluated for Extended depreciation for the first time.
-
Decision deferred: This option results in the query results that show all assets for which the user has set the Extended Depreciation decision to Deferred.
-
Decision to avail: This option results in the query results that show all assets for which the user has set the Extended Depreciation decision to Yes and excludes those assets which have finished availing extended depreciation.
-
Decision to not avail. This option results in query results that show all assets for which the user has set the Extended depreciation decision to No.
The Set Extended Depreciation Defaults region of Find Eligible Assets window provides access to Avail Extended Depreciation field. Use the Avail Extended Depreciation field to indicate the Extended Depreciation status to default for the assets being retrieved using the query parameters in the Search By region. Using the Set Extended Depreciation Defaults is optional.
-
If the Avail Extended Depreciation field is set to Yes, all assets retrieved in the Set Extended Depreciation window will have a default status of Yes in the Avail Extended Depreciation field. The first eligible period for extended depreciation will be defaulted in the First Period field for each asset.
-
If the Avail Extended Depreciation field is set to No, all assets retrieved in the Set Extended Depreciation window will have a default status of No in the Avail Extended Depreciation field. In this case, the first eligible period will not be defaulted in the First Period field for any asset.
-
If the Avail Extended Depreciation field is set to Defer, all assets retrieved in the Set Extended Depreciation window will have a default status of Defer in the Avail Extended Depreciation field. In this case, the first eligible period will not be defaulted for any asset.
-
If you accept the default value (null) for the Avail Extended Depreciation field, assets retrieved in the Set Extended Depreciation window will not have any default status. In this case, you need to manually choose the value for the Avail Extended Depreciation field in the Set Extended Depreciation window. Additionally, you will need to manually choose the first period from when the extended depreciation is to be availed.
In order to access the Find Eligible Assets window, set the FA: Japan 2007 Tax Reforms Features profile option to Yes.
Set Extended Depreciation Window
The Set Extended Depreciation window displays the results of the query executed using the parameters in the Find Eligible Assets window.
Use this window to record the decision of whether or not a particular asset should be available for extended depreciation
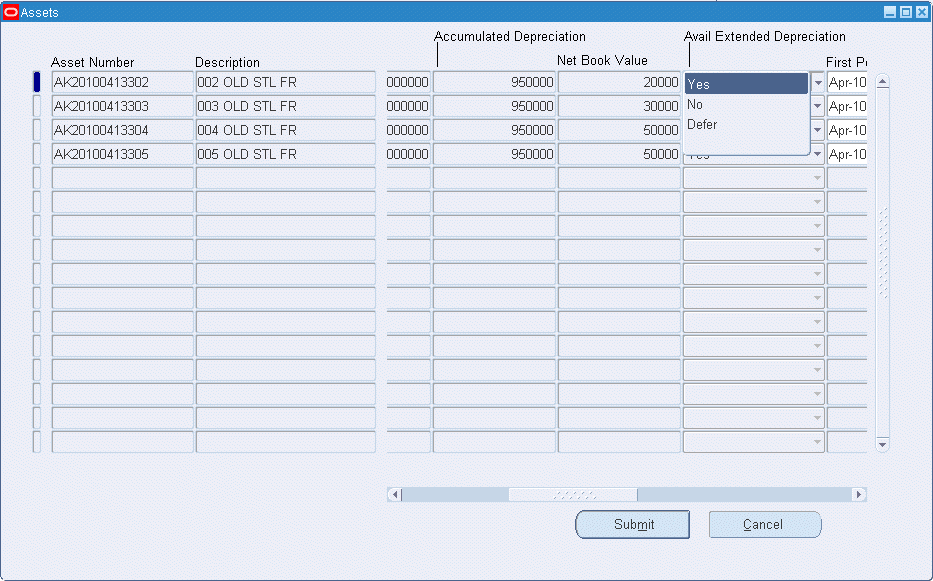
For every asset, set the Avail Extended Depreciation field to:
-
Yes
-
No
-
Defer Decision
For more information about the Avail Extended Depreciation field, see Find Eligible Assets Window.

Once you have indicated the extended depreciation decision for the assets, click the Submit button to launch the process of changing the depreciation method and depreciation limit for those assets.
The concurrent program launched, executes the following processes:
-
For all assets for which the Avail Extended Depreciation is set to Yes:
-
Depreciation method is changed to the JP-STL Extended Depreciation method (JP-STL EXTND).
-
Internal Extended Depreciation flag is set to Yes.
-
Final depreciable limit is set to the value specified by the user in the Set Extended Depreciation window.
-
First period from when the extended depreciation is to be expensed is stored on the asset record.
-
Asset cost to be used as the basis for calculation of depreciation is set as: (Cost - Accumulated Depreciation - Final Depreciable limit).
-
-
Where the first period of depreciation is the first period of the current fiscal year, the catch-up depreciation, if any, is calculated and expensed in the current period.
-
For all assets where the Avail Extended Depreciation is set to No or Defer Decision, the internal Extended Depreciation flag is set accordingly.
-
The normal depreciation program picks up the assets selected for extended depreciation based on the First Period specified for individual assets.
In order to access the Set Extended Depreciation Window, set the FA: Japan 2007 Tax Reforms Features profile option to Yes.
What-If Analysis Window
In accordance with the Japan Tax Reforms 2007, Oracle Assets now supports calculation of What-if Projections Analysis for JP-250DB and JP-STL-EXTND depreciation methods. Also, you can use the What-If analysis for assets that are in Extended Depreciation using the JP-STL EXTND method.
In order to use the What-If Analysis for JP-250DB and JP-STL EXTND depreciation methods, set the FA: Japan 2007 Tax Reforms Features profile option toYes.
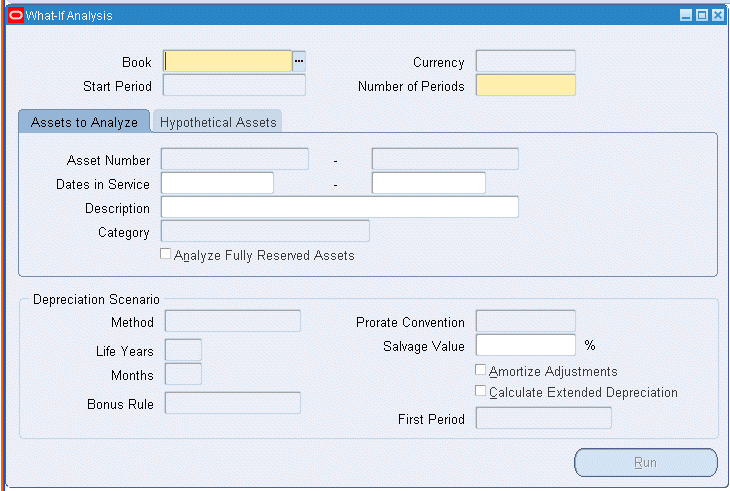
By setting the FA: Japan 2007 Tax Reforms Features profile option to Yes, the system adds the following to the What-If Analysis window:
-
Calculate Extended Depreciation check box: Select the check box to indicate that extended depreciation calculations should be made in the current What-If run.
-
First Period field: Select the first period from which projections of extended depreciation is to be calculated for a single or group of assets. This field is enabled if the Calculate Extended Depreciation box is checked. Periods that are displayed in the First Period are first periods of the fiscal year for which extended depreciation should start for the assets selected.
Books Window - Japan Asset Additional Info Tab
The Japan Asset Additional Info tab enables users to provide additional information when migrating individual assets that are being depreciated with JP-250DB or JP-STL-EXTND depreciation method into Oracle Assets through the Books window.
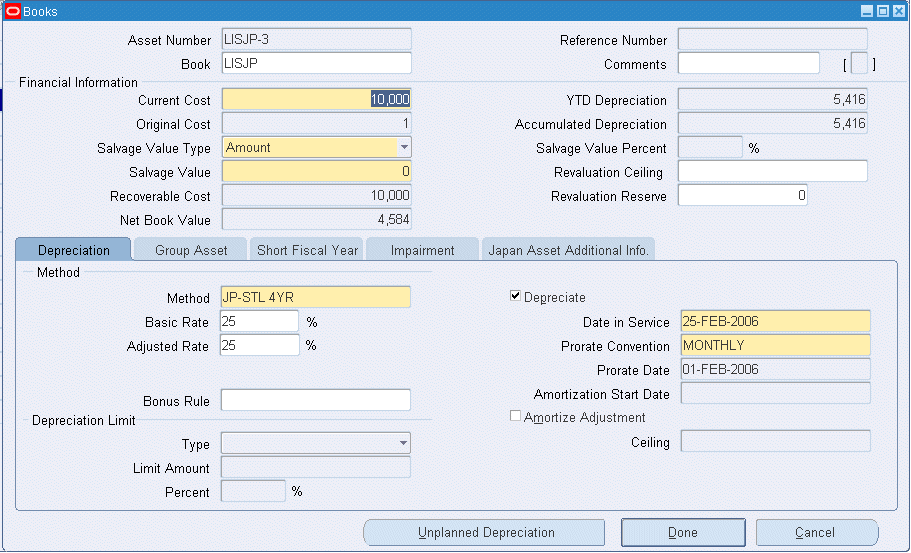
The Japan Asset Additional Info tab includes following fields:
-
NBV at the Time of Switch
-
Period When Fully Reserved
-
Earlier Depreciation Limit
-
Limit Amount
-
Percent
-
First Period of Extended Depreciation
-
Earlier Depreciation Method
-
Life Years
-
Months
Mass Additions Window - Japan Asset Additional Info Tab
The Japan Asset Additional Info tab enables users to provide additional information while migrating an individual asset that is being depreciated with JP-250DB or JP-STL-EXTND depreciation method into Oracle Assets through Mass Additions Window. The Japan Asset Additional Info tab includes following fields:
-
NBV at the Time of Switch
-
Period When Fully Reserved
-
Earlier Depreciation Limit
-
Limit Amount
-
Percent
-
First Period of Extended Depreciation
-
Earlier Depreciation Method
-
Life Years
-
Months
Asset Impairment Changes for Japan
Though Japan is one of the countries that has not fully adopted IFRS, Japan has incorporated various principles of IFRS to increase visibility and transparency of reporting one of which being Asset Impairment. Oracle Assets now addresses the requirements of impairments for Japan depreciation methods in addition to International Accounting Standards (IAS36). The Oracle Assets Impairment functionality addresses the following business requirements for Asset Impairments for Japan:
Asset Impairments
For all Japanese depreciation method assets, users are now able to perform impairments on individual assets or as a group of assets within a Cash Generating Unit. Users can assign assets to a Cash Generating Unit within Asset Workbench or through the WedADI Impairment Worksheet. This includes assets being depreciated using guarantee rate depreciation methods such as JP-250DB or JP-STL-EXTND.
Note: You can reverse any asset impairment posted in a prior period by entering a negative impairment, by manually entering the correct amount.
Non-Depreciating Assets Impairments
Japanese companies are allowed to impair non-depreciating assets such as Land, Construction in Process, and idle assets. Assets using the Japan depreciation methods, which are fully reserved or have the depreciation flag set to No, can now be included in the Impairment process.
Impairment of Assets Beyond Asset's Deprecation Limits
In Japan, depreciation limits are legislated by the tax regulation and are set to 95% of the asset cost for assets with a date place in service (DPIS) before March 31, 2007. Most Japanese companies use the same depreciation limit for accounting purposes and depreciation is calculated up to the depreciation limit. While depreciation is limited to the depreciation limit, assets may be impaired beyond the depreciation limits. For assets using the Japan depreciation methods, are not longer prevented from impairing asset which have reached their depreciation limits.
Japan Depreciation Methods Impairment Loss Calculations
The formula for calculating net book value varies with the Japan depreciation methods.
The calculations are as follows:
Net book Value
For assets acquired prior to March 31, 2007 and are being depreciated using the seeded depreciation methods of JP-STL XXYR, JP-DB XXYR, and JP-STL-EXTND, the net book value for the impairment calculation, the salvage value is not considered in the calculation.
The net book value is calculated as follows when:
-
NBVCurrent = Cost - Cost Adjustment + Revaluations - Accumulated Depreciation (including current period depreciation) - Accumulated Impairment - Retirements
When performing impairments on assets using the Japanese depreciation method of JP-250DB, the salvage value is considered in the net book value calculation and is as follows:
-
The net book value is calculated as follows when deriving the impairment loss account:
NBVCurrent = Cost - Cost Adjustment + Revaluations - Accumulated Depreciation (including current period depreciation) - Accumulated Impairment - Retirements - Salvage Value
Post Impairment Depreciation Calculations
After the impairment has been posted to the asset, the depreciation components are recalculated as detailed below for the various depreciation methods.
Depreciable Basis
Once the impairment has been posted to the asset, the asset's depreciable basis after impairment is calculated:
-
JP-DB, JP-250DB
Depreciable Basis = Net Book Value
-
JP-STL
Depreciable Basis = Net Book Value - Salvage Value
-
JP-STL-EXTND
Depreciable Basis = Net Book Value - Depreciation Limit (Memorandum Price)
Guarantee Rate Recalculation
For the JP-250DB depreciation method only, the guarantee rate will not change or be recalculated after the impairment posting. The rate will be recalculated at the beginning of the fiscal year as if the impairment had not taken place.
Accounting
Impairment losses are accounted for in the organization's general ledger and are reported on the income statement. The journals for recording of impairment loss, additions, depreciation, reclassification, adjustments and retirements for the Japanese depreciation methods is the same as non-Japanese depreciation methods and is addressed using the standard Oracle Assets journal process.
Revaluations
Based on asset impairment requirements in accordance with Japanese Accounting Principles, revaluation or reversal of impairments are currently not allowed or supported for assets using the Japan depreciation methods.
Application Setup
In order to perform impairments on asset's using the Japan depreciation methods, ensure that the FA: Japan 2007 Tax Reforms Features profile option is set to Yes. Then, follow the setup steps as detailed in the Application Setup for Asset Impairments section of Oracle Assets User Guide.
Processing Impairments
For details on how to create, post, and manage asset impairments, see the Asset Maintenance: Asset Impairment Business Process section of Oracle Assets User Guide.
Asset Impairment Examples
Below details the processing events and accounting for impairing asset's depreciated using the various Japan depreciation methods.
Guarantee Rate Evaluation Method (JP-250DB): NBV Basis
Using a Revised Rate (Normal Depreciation < Guarantee Amount) With Switch
On April 1, 2007, an asset was recorded into Oracle Assets with the following details:
| Asset Item | Asset Information |
|---|---|
| Cost | 1,000,000 Yen |
| DPIS | 01-Apr-2007 |
| Salvage Value | 0 |
| Limit | 1 Yen |
| Guarantee Rate/Amount | 0.05111 |
| Guarantee Amount | (1,000,000 * .05111) or 51,110 |
| Original Rate | 31.3% |
| Revised Rate | .334 |
| Depreciation Method Details | JP-250DB 8 |
| Method Type | Formula |
| Depreciation Basis | NBV |
| Depreciation Basis Rule | Dual Rate Evaluation |
| Depreciate in Year Retired | No |
| Excluding Salvage Value | No |
| Straight Line Method | No |
| Guarantee Rate Evaluation | Yes |
| Impairment Loss | 150,000 |
| Impairment Date | 31-Mar-2010 |
| FA: Annual Rounding | Yes |
Fiscal Year: April – March
On March 31, 2010, a professional evaluation was performed on the asset and an impairment loss was recorded on the asset.
The effect of the impairment is illustrated in the following table:
| Period | Cost | Depreciation Expense | Accumulated Depreciation Expense | Asset CNBV (End of Period | Asset NNBV | Depreciable Basis | Impairment Loss | Accumulated Impairment |
|---|---|---|---|---|---|---|---|---|
| 2008FY1 | 1,000,000 | 313,000 | 313,000 | 687,000 | 1,000,000 | |||
| 2009FY | 215,031 | 528,031 | 471,969 | 687,000 | ||||
| 2010FY | 147,726 | 675,757 | 324,243 | 471,969 | ||||
| Impairment | 174,243 | 150,000 | ||||||
| 2011FY | 54,438 | 730,295 | 119,705 | 174,243 | 150,000 | |||
| Switch | ||||||||
| 2012FY | 39,981 | 770,276 | 79,724 | 119,705 | 150,000 | |||
| 2013FY | 39,981 | 810,257 | 39,743 | 119,705 | 150,000 | |||
| 2014FY | 39,742 | 849,999 | 1 | 1 | 150,000 | |||
| 2015FY | 0 | 849,999 | 1 | 1 | 150,000 |
When determining the impairment loss, the current period's (March 2010) is included in the CNBV calculation.
Impairment loss calculations are as follows:
Current Net Book Value (CNBV) = Cost + Cost Adjustment - Current Period Depreciation - Accumulated Depreciation - Accumulated Impairments - Retirements
324,243 = 1,000,000 - 12,305 - 663,452 - 0 - 0
Impairment Loss = 150,000
New Net Book Value = CNBV - Impairment Loss
174,243 = 324,243 - 150,000
Depreciable Basis = New Net Book Value
Depreciable Basis = 174,243
Since this impairment happen at the end of the fiscal year and depreciation for the current period is included in the impairment loss calculation, the depreciation expense is not recalculated until the next period.
Depreciation Expense for next fiscal year:
Depreciation Expense = (Depreciable Basis * Deprecation Rate)
Note: Depreciation Rate Revision: Original Rate or Revised Rate only happens at the beginning of the next fiscal year of the impairment period. The guarantee amount calculation is always based on the formula: Cost * Guarantee Rate. There is no rate change before or after the impairment.
Determine if rate revision:
Depreciable Basis * Original Rate = > Guarantee Amount (51,110)…Use Original Rate (0.313)
174,243 * 0.313 = 54,538 > 51,110 ... 54,538
Accounting Entries:
The following accounting entries are generated to record the impairment loss:
| Account Description | Debit | Credit |
|---|---|---|
| Impairment Expense | 150,000 | |
| Accumulated Impairment | 150,000 |
At the end of the month, the following accounting entry is booked to record the depreciation expense for March 2010:
| Account Description | Debit | Credit |
|---|---|---|
| Depreciation Expense | 12,305 * | |
| Accumulated Depreciation | 12,305 |
* Since the current month depreciation is considered in the CNBV calculation, depreciation is not recalculated until the following month.
Japanese Straight Line (JP-STL)
Salvage Value 10% and Depreciation Limit 95%, DPIS before March 31, 2007
On April 1, 2007, an asset was recorded into Oracle Assets with the following details:
| Asset Item | Asset Information |
|---|---|
| Cost | 1,000,000 Yen |
| DPIS | 01-Apr-2005 |
| Salvage Value | 10%, 100,000 |
| Limit | 95%, 50,000 |
| Months | - |
| Adjusted Rate | 12.5% |
| Guarantee Rate | - |
| Guarantee Amount | - |
| Original Rate | - |
| Revised Rate | - |
| Depreciation Method Details | JP-STL 8YR |
| Method Type | Flat |
| Depreciation Basis | Cost |
| Depreciation Basis Rule | FLAT RATE EXTENSION |
| Depreciate in Year Retired | Yes |
| Excluding Salvage Value | No |
| Straight Line Method | No |
| Guarantee Rate Evaluation | No |
| Impairment Loss | 300,000 |
| Impairment Date | 31-Mar-2010 |
| Salvage Value after Impairment | Asset NNVB * 10% |
| FA: Annual Rounding | Yes |
Fiscal Year: April – March
On March 31, 2010, a profession evaluation was performed on the asset and an impairment loss was recorded on the asset.
The effect of the impairment is illustrated in the following table:
| Period | Cost | Depreciation Expense | Accumulated Depreciation Expense | Asset CNBV (End of Period | Asset NNBV | Depreciable Basis | Impairment Loss | Accumulated Impairment |
|---|---|---|---|---|---|---|---|---|
| 2006FY | 1,000,000 | 112,500 | 112,500 | 887,500 | 900,000 | |||
| 2007FY | 112,500 | 225,000 | 775,000 | 900,000 | ||||
| 2008FY | 112,500 | 337,500 | 662,500 | 900,000 | ||||
| 2009FY | 112,500 | 450,000 | 550,000 | 900,000 | ||||
| 2010FY | 112,500 | 562,500 | 437,500 | 900,000 | ||||
| Impairment | 137,500 | 300,000 | ||||||
| 2011FY | 15,468 | 577,968 | 122,032 | 123,750 | 300,000 | |||
| 2012FY | 15,468 | 593,436 | 106,564 | 123,750 | 300,000 | |||
| 2013FY | 15,468 | 608,904 | 91,096 | 123,750 | 300,000 | |||
| 2014FY | 15,468 | 624,372 | 75,628 | 123,750 | 300,000 | |||
| 2015FY | 15,468 | 639,840 | 60,160 | 123,750 | 300,000 | |||
| 2016FY | 10,160 | 650,000 | 50,000 | 123,750 | 300,000 |
When determining the impairment loss, the current period's (March 2010) is included in the CNBV calculation.
Impairment loss calculations are as follows:
Current Net Book Value (CNBV) = Cost + Cost Adjustment - Current Period Depreciation - Accumulated Depreciation - Accumulated Impairments - Retirements
437,500 = 1,000,000 – 9,375 – 553,125 – 0 – 0
Impairment Loss = 300,000
New Net Book Value = CNBV - Impairment Loss
137,500 = 437,500 – 300,000
Depreciable Basis = New Net Book Value
Depreciable Basis (Before Salvage Value Adjustment) = 137,500 – 100,000 = 37,500
Depreciable Basis (After Salvage Value Adjustment) = 137,500 – (137,500 * 10%) = 123,750
Since this impairment happen at the end of the fiscal year and depreciation for the current period is included in the impairment loss calculation, the depreciation expense is not recalculated until the next period.
Depreciation Expense for next fiscal year:
Depreciation Expense = (Depreciable Basis * 12.5%) = 15,468
Accounting Entries:
The following accounting entries are generated to record the impairment loss:
| Account Description | Debit | Credit |
|---|---|---|
| Impairment Loss Expense | 300,000 | |
| Accumulated Impairment | 300,000 |
At the end of the month, the following accounting entry is booked to record the depreciation expense for March 2010:
| Account Description | Debit | Credit |
|---|---|---|
| Depreciation Expense | 9,375 * | |
| Accumulated Depreciation | 9,375 |
* Since the current month depreciation is considered in the CNBV calculation, depreciation is not recalculated until the following month.
No Salvage Value or Depreciation Limit, DPIS After April 1, 2007
On April 1, 2007, an asset was recorded into Oracle Assets with the following details:
| Asset Item | Asset Information |
|---|---|
| Cost | 1,000,000 Yen |
| DPIS | 01-Apr-2007 |
| Salvage Value | 0 |
| Limit | 1 Yen |
| Months | |
| Adjusted Rate | 12.5% |
| Guarantee Rate | - |
| Guarantee Amount | - |
| Original Rate | - |
| Revised Rate | - |
| Depreciation Method Details | JP-STL 8YR |
| Method Type | Flat |
| Depreciation Basis | Cost |
| Depreciation Basis Rule | FLAT RATE EXTENSION |
| Depreciate in Year Retired | Yes |
| Excluding Salvage Value | No |
| Straight Line Method | No |
| Guarantee Rate Evaluation | No |
| Impairment Loss | 300,000 |
| Impairment Date | 31-Mar-2010 |
| FA: Annual Rounding | Yes |
Fiscal Year: April – Mar
On March 31, 2010, a profession evaluation was performed on the asset and an impairment loss was recorded on the asset.
The effect of the impairment is illustrated in the following table:
| Period | Cost | Depreciation Expense | Accumulated Depreciation Expense | Asset CNBV (End of Period | Asset NNBV | Depreciable Basis | Impairment Loss | Accumulated Impairment |
|---|---|---|---|---|---|---|---|---|
| 2008FY | 125,000 | 125,000 | 875,000 | 1,000,000 | ||||
| 2009FY | 125,000 | 250,000 | 750,000 | 1,000,000 | ||||
| 2010FY | 125,000 | 375,000 | 625,000 | 1,000,000 | ||||
| Impairment | 325,000 | 300,000 | ||||||
| 2011FY | 40,625 | 415,625 | 284,375 | 325,000 | 300,000 | |||
| 2012FY | 40,625 | 456,250 | 243,750 | 325,000 | 300,000 | |||
| 2013FY | 40,625 | 496,875 | 203,125 | 325,000 | 300,000 | |||
| 2014FY | 40,625 | 537,500 | 162,500 | 325,000 | 300,000 | |||
| 2015FY | 40,625 | 578,125 | 121,875 | 325,000 | 300,000 | |||
| 2016FY | 40,625 | 618,750 | 81,250 | 325,000 | 300,000 | |||
| 2017FY | 40,625 | 659,375 | 40,625 | 325,000 | 300,000 | |||
| 2018FY | 40,625 | 699,999 | 1 | 325,000 | 300,000 |
When determining the impairment loss, the current period's (March 2010) is included in the CNBV calculation.
Impairment loss calculations are as follows:
Current Net Book Value (CNBV) = Cost + Cost Adjustment - Current Period Depreciation - Accumulated Depreciation - Accumulated Impairments - Retirements
625,000 = 1,000,000 – 7,812 – 367,188 – 0 – 0
Impairment Loss = 300,000
New Net Book Value = CNBV - Impairment Loss
325,000 = 625,000 – 300,000
Depreciable Basis = New Net Book Value
Depreciable Basis = 325,000
Since this impairment happen at the end of the fiscal year and depreciation for the current period is included in the impairment loss calculation, the depreciation expense is not recalculated until the next period.
Depreciation Expense for next fiscal year:
Depreciation Expense = (325,000 * 0.125) = 40,625
Accounting Entries:
The following accounting entries are generated to record the impairment loss:
| Account Description | Debit | Credit |
|---|---|---|
| Impairment Loss Expense | 300,000 | |
| Accumulated Impairment | 300,000 |
At the end of the month, the following accounting entry is booked to record the depreciation expense for March 2010:
| Account Description | Debit | Credit |
|---|---|---|
| Depreciation Expense | 7,812 * | |
| Accumulated Depreciation | 7,812 |
* Since the current month depreciation is considered in the CNBV calculation, depreciation is not recalculated until the following month.
Japanese Extended Depreciation Method (JP-STL-EXTND) - Impairment at the End of Fiscal Year
Prior depreciation method JP-STL 8YR, date place in service before April 1, 2007, Depreciation limit reached, converted to extended depreciation on April 1, 2007.
On April 1, 2006, an asset was recorded into Oracle Assets with the following details:
| Asset Item | Asset Information |
|---|---|
| Cost | 1,000,000 Yen |
| DPIS | 01-Apr-1995 |
| Salvage Value | 10%, 100,000 |
| Limit | 95%, 50,000 |
| Extended | JP-STL 8YR =>JP-STL-EXTND |
| Adjusted Rate | 12.5% |
| Guarantee Rate | - |
| Guarantee Amount | - |
| Original Rate | - |
| Revised Rate | - |
| Depreciation Method Details | JP-STL-EXTND |
| Method Type | Calculated |
| Depreciation Basis | Cost |
| Depreciation Basis Rule | - |
| Depreciate in Year Retired | Yes |
| Excluding Salvage Value | Yes |
| Straight Line Method | Yes |
| Guarantee Rate Evaluation | No |
| Impairment Loss | 30,000 |
| Impairment Date | 31-Mar-2008 |
| Depreciation Limit | 1 Yen |
| FA: Annual Rounding | Yes |
Fiscal Year: April – March
The asset has reached its depreciation limit and is no longer depreciating. The asset's current net book value is 50,000. As a result of the 2007 tax reform, the asset's depreciation method was changed on April 1, 2007 and the remaining value is being depreciated using the Extended Straight Line Depreciation method. Then on March 31, 2008, a professional evaluation was performed on the asset and an impairment loss was recorded on the asset.
The effect of the impairment is illustrated in the following table:
| Period | Cost | Depreciation Expense | Accumulated Depreciation Expense | Asset CNBV (End of Period | Asset NNBV | Depreciable Basis | Impairment Loss | Accumulated Impairment |
|---|---|---|---|---|---|---|---|---|
| 2007FY | 1,000,000 | 0 | 950,000 | 50,000 | 900,000 | |||
| Extend STL Depreciation | ||||||||
| 2008FY | 9,999 | 959,999 | 40,001 | 49,999 | ||||
| Impairment | 10,001 | 30,000 | ||||||
| 2009FY | 2,500 | 962,499 | 7,501 | 10,000 | 30,000 | |||
| 2010FY | 2,500 | 964,999 | 5,001 | 10,000 | 30,000 | |||
| 2011FY | 2,500 | 967,499 | 2,501 | 10,000 | 30,000 | |||
| 2012FY | 2,500 | 969,999 | 1 | 10,000 | 30,000 |
When determining the impairment loss, the current period's (March 2010) is included in the CNBV calculation.
Impairment loss calculations are as follows:
Current Net Book Value (CNBV) = Cost + Cost Adjustment - Current Period Depreciation - Accumulated Depreciation - Accumulated Impairments - Retirements
40,001 = 1,000,000 – 833 – 959,166 – 0 – 0
Impairment Loss = 30,000
New Net Book Value = CNBV - Impairment Loss
10,001 = 40,001 – 30,000
Depreciable Basis = New Net Book Value
Depreciable Basis = 10,001 – 1 (Memorandum Price) = 10,000
Since this impairment happen at the end of the fiscal year and depreciation for the current period is included in the impairment loss calculation, the depreciation expense is not recalculated until the next period.
Depreciation Expense for next fiscal year:
Depreciation Expense = (10,000 / 4) = 2,500
Accounting Entries:
The following accounting entries are generated to record the impairment loss:
| Account Description | Debit | Credit |
|---|---|---|
| Impairment Loss Expense | 30,000 | |
| Accumulated Impairment | 30,000 |
At the end of the month, the following accounting entry is booked to record the depreciation expense for March 2010:
| Account Description | Debit | Credit |
|---|---|---|
| Depreciation Expense | 833 * | |
| Accumulated Depreciation | 833 |
* Since the current month depreciation is considered in the CNBV calculation, depreciation is not recalculated until the following month.
Fully Reserved Assets
Below details the processing events and accounting for impairment an asset after it has been fully reserved.
On April 1, 2000, an asset was recorded into Oracle Assets with the following details:
| Asset Item | Asset Information |
|---|---|
| Cost | 1,000,000 Yen |
| DPIS | 01-Apr-2000 |
| Salvage Value | 10%, 100,000 |
| Limit | 95%, 50,000 |
| Months | JP-STL 5YR |
| Adjusted Rate | 20% |
| Guarantee Rate | - |
| Guarantee Amount | - |
| Original Rate | - |
| Revised Rate | - |
| Depreciation Method Details | JP-STL 5YR |
| Method Type | Flat |
| Depreciation Basis | Cost |
| Depreciation Basis Rule | Flat Rate Extension |
| Depreciate in Year Retired | Yes |
| Excluding Salvage Value | No |
| Straight Line Method | No |
| Guarantee Rate Evaluation | No |
| Impairment Loss | 50,000 |
| Impairment Date | 31-Mar-2010 |
| Depreciation Limit | 50,000 Yen |
| FA: Annual Rounding | Yes |
Fiscal Year: April – Mar
As of March 2005, the asset has reached its depreciation limit and is no longer depreciating. The asset's current net book value is 50,000. Then on March 31, 2010, a professional evaluation was performed on the asset and a 50,000 impairment loss was recorded on the asset.
The effect of the impairment is illustrated in the following table:
| Period | Cost | Depreciation Expense | Accumulated Depreciation Expense | Asset CNBV (End of Period | Asset NNBV | Depreciable Basis | Impairment Loss | Accumulated Impairment |
|---|---|---|---|---|---|---|---|---|
| 2010-Q1 | 1,000,000 | 0 | 950,000 | 900,000 | ||||
| 2010-Q2 | 0 | 950,000 | ||||||
| 2010-Q3 | 0 | 950,000 | ||||||
| 2010-Q4 | 0 | 950,000 | 50,000 | |||||
| Impairment | 0 | 50,000 | ||||||
| 2010-Q1 | 0 | 950,000 | 0 | 0 | 50,000 |
Impairment loss calculations are as follows:
Current Net Book Value (CNBV) = Cost + Cost Adjustment - Current Period Depreciation - Accumulated Depreciation - Accumulated Impairments - Retirements
50,000 = 1,000,000 – 0 – 950,000 – 0 – 0
Impairment Loss = 50,000
New Net Book Value = CNBV - Impairment Loss
0 = 50,000 – 50,000
Depreciable Basis = New Net Book Value
Depreciable Basis = 0
Since the asset had reached its depreciation limit and stopped depreciating, the current and future period depreciation expense is zero.
Depreciation Expense for next fiscal year:
Depreciation Expense = 0
Accounting Entries:
The following accounting entries are generated to record the impairment loss:
| Account Description | Debit | Credit |
|---|---|---|
| Impairment Loss Expense | 50,000 | |
| Accumulated Impairment | 50,000 |
At the end of the month, the following accounting entry is booked to record the depreciation expense for March 2010:
| Account Description | Debit | Credit |
|---|---|---|
| Depreciation Expense | 0 * | |
| Accumulated Depreciation | 0 |
* Since the current month depreciation is considered in the CNBV calculation, depreciation is not recalculated until the following month.
Non-Depreciating Assets
Below details the processing events and accounting for impairing non-depreciating assets (Depreciation Flag is set to No).
On April 1, 2000, an asset was recorded into Oracle Assets with the following details:
| Asset Item | Asset Information |
|---|---|
| Cost | 1,000,000 Yen |
| DPIS | 01-Apr-2000 |
| Salvage Value | 10%, 100,000 |
| Limit | 95%, 50,000 |
| Months | JP-STL 5YR |
| Adjusted Rate | 20% |
| Guarantee Rate | - |
| Guarantee Amount | - |
| Original Rate | - |
| Revised Rate | - |
| Depreciation Method Details | JP-STL 5YR |
| Method Type | Flat |
| Depreciation Basis | Cost |
| Depreciation Basis Rule | Flat Rate Extension |
| Depreciate in Year Retired | Yes |
| Excluding Salvage Value | No |
| Straight Line Method | No |
| Guarantee Rate Evaluation | No |
| Impairment Loss | 50,000 |
| Impairment Date | 31-Mar-2010 |
| Depreciation Limit | 50,000 Yen |
| FA: Annual Rounding | Yes |
Fiscal Year: April – Mar
As of March 2004, the asset has been depreciated by 800,000 and the depreciation flag is manually set to No and is no longer depreciating. The asset's current net book value is 200,000. Then on March 31, 2010, a professional evaluation was performed on the asset and a 100,000 impairment loss was recorded on the asset.
The effect of the impairment is illustrated in the following table:
| Period | Cost | Depreciation Expense | Accumulated Depreciation Expense | Asset CNBV (End of Period | Asset NNBV | Depreciable Basis | Impairment Loss | Accumulated Impairment |
|---|---|---|---|---|---|---|---|---|
| 2000FY | 1,000,000 | 180,000 | 180,000 | 900,000 | ||||
| 2001FY | 180,000 | 360,000 | 900,000 | |||||
| 2002FY | 180,000 | 540,000 | 900,000 | |||||
| 2003FY | 180,000 | 720,000 | 900,000 | |||||
| 2004FY | 80,000 | 800,000 | 200,000 | 900,000 | ||||
| Impairment | 0 | 100,000 | ||||||
| 2010-Q1 | 0 | 800,000 | 100,000 | 100,000 | 100,000 |
Impairment loss calculations are as follows:
Current Net Book Value (CNBV) = Cost + Cost Adjustment - Current Period Depreciation - Accumulated Depreciation - Accumulated Impairments - Retirements
200,000 = 1,000,000 – 0 – 800,000 – 0 – 0
Impairment Loss = 100,000
New Net Book Value = CNBV - Impairment Loss
100,000 = 200,000 – 100,000
Depreciable Basis = Net Book Value - Salvage Value
0 = 100,000 – 100,000
Adjusted cost is recalculated after the posting of the impairment as:
Adjusted Cost = New Net Book Value – Salvage Value
0 = 100,000 – 100,000
Since the asset had reached its depreciation limit and stopped depreciating, the current and future period depreciation expense is zero.
Depreciation Expense for next fiscal year:
Depreciation Expense = 0
Accounting Entries:
The following accounting entries are generated to record the impairment loss:
| Account Description | Debit | Credit |
|---|---|---|
| Impairment Loss Expense | 100,000 | |
| Accumulated Impairment | 100,000 |
At the end of the month, the following accounting entry is booked to record the depreciation expense for March 2010:
| Account Description | Debit | Credit |
|---|---|---|
| Depreciation Expense | 0 * | |
| Accumulated Depreciation | 0 |
* Since the current month depreciation is considered in the CNBV calculation, depreciation is not recalculated until the following month.
Restarting Depreciation
On April 1, 2011, it was decided that the depreciation on the asset was to be restarted. To restart depreciation on a non-depreciating asset, perform the following:
-
In Asset Workbench, change the depreciation attributes as follows:
Attribute Value Depreciation Flag Yes Amortize Adjustment Yes Amortization Start Date April 1, 2011 -
Set the Salvage Value equal to the Net Book Value after impairment multiply by salvage rate.
Attribute Value Salvage Value 10,000 (100,000 * 10%) Amortize Adjustment Yes Amortization Start Date April 1, 2011 Adjusted Cost is calculated as:
Adjusted Cost = Net Book Value after impairment - Salvage Value
90,000 = 100,000 - 10,000
-
Create an adjustment to change the depreciation method to the new depreciation method to be used.
Attribute Value Depreciation Method Change JP-STL 5YR => JP-STL-2YR Amortize Adjustment Yes Amortization Start Date April 1, 2011 After completing these steps, depreciation will be determined using the following:
Attribute Value Adjusted Cost 90,000 Adjusted Rate 50% Annual Depreciation 45,000 -
After running depreciation for the period, the following entries will be generated to record the new depreciation expense:
Account Description Debit Credit Depreciation Expense 45,000 Accumulated Depreciation 45,000
Japan Depreciation Adjustment for DB Method in Corporate Tax Book
According to the Japanese tax legislations, if the depreciation method is Japanese Declining Balance method, depreciation can be expensed up to the accounted (depreciated) amount in the Corporate book or depreciated amount in Tax Book.
If the depreciation amount in the Corporate book (for example, 200) is less than the tax book (for example, 400), the depreciation can be expensed up to the corporate book amount of 200 for corporate tax reporting. The case also affects the depreciation calculation for the next fiscal year, if the asset has a depreciation method of Japanese DB methods (for example, JP-DB, JP-250DB, or JP-200DB).
The Japan Depreciation Adjustment for DB Method in Corporate Tax Book concurrent program is provided to extract eligible assets and post the adjustment data.
Process Flow
Use the Japan Depreciation Adjustment for DB Method in Corporate Tax Book concurrent program to create an adjustment automatically before finally closing the tax book, if the adjustment needs to be created with Japanese DB methods for calculating depreciation properly in the next fiscal year.
Process Flow Summary:
-
Prerequisites
-
Run Depreciation without closing Corporate Book and Tax Book in the last period of the fiscal year.
-
Run this concurrent program in the last period of the fiscal year.
-
-
Preview Adjustments
-
This concurrent program collects all eligible assets with Depreciation Method JP-DB, JP-250DB, JP-200DB in the selected Tax Book to process.
-
This concurrent program extracts the necessary NBV information, both of corporate book and TAX book, and creates the tax adjustment amount in the Interface table.
-
You can preview and check the adjustment amount by the output, which is created by this concurrent program in Preview mode.
-
-
Post Adjustments
-
In Post Mode, you can specify the Preview ID, which is created in Preview mode to post all adjustments as unplanned depreciation by the unplanned API.
-
Provides validation between the Preview mode and Post mode before finally posting the adjustment.
-
-
Alerts and Checks
-
Between the Preview mode and Post mode, if you execute the transaction to the asset, an error is raised for that asset.
-
Checks if this concurrent program should be executed after running the depreciation program without the last period of the fiscal year closing; an error is raised.
-
If you run the concurrent program for other than the last period of the fiscal year, an error is raised.
-
-
Confirm and Run Depreciations
-
Run depreciation without closing the Corporate and Tax Books and check if the adjustments were properly created.
-
Finally, run depreciation with closing the Corporate and Tax books.
-
Setting Up Depreciation Ceilings
You can set up or review expense, cost, and investment tax credit (ITC) ceilings. You can associate either an expense ceiling or a cost ceiling with an asset category. If you are subject to United States tax law, you must set up depreciation ceilings for your luxury automobiles.
To set up cost, expense, or investment tax credit ceilings:
-
Open the Asset Ceilings window.
-
Choose the type of ceiling you want to set up: Cost, Expense, or ITC.
-
Enter a Name and Description of the ceiling
-
Enter the Currency for which you are defining the depreciation expense ceiling.
-
Enter Start and End dates for which the ceiling is effective. If you leave the End Date field blank, the ceiling is effective indefinitely.
-
If you are defining a depreciation Expense ceiling, enter the fiscal year of life of the asset to which the ceiling applies.
-
Enter a Ceiling amount:
Expense: Enter the maximum annual depreciation allowance for each year of the asset life. Oracle Assets uses the ceiling from the last year you set up for each year thereafter.
Cost: Enter the maximum recoverable cost Oracle Assets can use to calculate depreciation expense.
Investment Tax Credit: Enter the maximum cost that Oracle Assets can use to calculate ITC.
-
Save your work.
Related Topics
Defining Investment Tax Credit Rates
You can set up and review your Investment Tax Credit (ITC) rates and recapture rates. Oracle Assets displays the rates in ascending order by year and life. Oracle Assets automatically recaptures a portion of the investment tax credit for assets with ITC that you retire before they are fully reserved. Once you set up your rates, you can claim ITC for an asset.
To define ITC rates:
-
Open the Investment Tax Credit Rates window.
-
Enter the year the ITC rate is effective.
You must set up ITC recapture rates for all tax years for which ITC recapture applies.
-
Enter the life for which this ITC rate applies.
-
Enter the ITC Amount Rate as a percentage. The ITC Basis for an asset is the lesser of its original cost and the ITC Ceiling, if one is used.
-
Enter the Basis Reduction Rate as a percentage. Oracle Assets uses the basis reduction rate to reduce the recoverable cost of the asset.
-
Save your work.
To define ITC recapture rates:
-
Open the Investment Tax Credit Recapture Rates window.
-
Enter the Tax Year the recapture rate is effective.
-
Enter the Year and Month of life to which the recapture rate applies.
-
Enter the Year of Retirement to which the rate applies. If you retire an asset during this year of life, it is subject to this recapture rate.
-
Enter the recapture rate as a percentage. Oracle Assets uses this rate to determine the amount of investment tax credit to recapture upon retirement.
-
Save your work.
Related Topics
Setting Up Depreciation (ITC) Ceilings
Specifying Dates for Prorate Conventions
You can set up or review prorate and retirement conventions in the Prorate Conventions window.
You must initially set up all your prorate conventions from the convention period corresponding to the oldest date placed in service through the end of the current fiscal year. At the end of each fiscal year, Oracle Assets automatically sets up your prorate conventions for the next fiscal year.
Prerequisites
-
Set up your Oldest Date Placed in Service. See: Specifying System Controls.
-
Set up your fiscal years. See: Creating Fiscal Years.
-
Set up your depreciation and prorate calendars. See: Specifying Dates for Calendar Periods.
To specify dates for prorate conventions:
-
Open the Prorate Conventions window
-
Enter a Convention name and Description.
-
Enter the Fiscal Year Name for which you want to set up this convention.
-
Select the Depreciate When Placed in Service check box if you want to start taking depreciation in the accounting period that corresponds to the date placed in service, instead of the period that corresponds to the prorate date.
This option determines over how many periods to spread the annual depreciation amount. For assets that use a calculated (straight-line) method, Oracle Assets ignores this option and always starts taking depreciation in the accounting period that corresponds to the prorate date.
-
Enter date ranges and corresponding prorate dates for assets where the date placed in service is between the From Date and the To Date.
Note: Your convention must include every date in your fiscal year; otherwise, Oracle Assets cannot calculate depreciation properly.
-
Save your work.
Related Topics
About Prorate and Retirement Conventions
About Prorate and Retirement Conventions
Oracle Assets uses the prorate convention to determine how much depreciation to take in the first and last year of an asset's life, based on when you place the asset in service. Since assets can be acquired at any time in a given period, there must be a convention for determining how much depreciation to take in each instance. The prorate convention and the date placed in service determine the prorate date.
Note: For assets to depreciate properly, prorate conventions must account for every date in the fiscal year.
Oracle Assets uses the prorate date to determine the prorate period in your prorate calendar. If you retire the asset before it is fully reserved, then Oracle Assets uses the prorate date from the retirement convention to determine how much depreciation to take in the asset's last year of life.
If you retire an asset before it is fully reserved, Oracle Assets uses the retirement convention to determine how much depreciation to take in the last year of life based on the retirement date.
Important: Remember that the prorate convention, retirement convention, and depreciation method work together to produce the depreciation amounts. You must set up depreciation rates for each prorate period.
User-Defined Conventions
Oracle Assets allows you to create your own prorate conventions.
Example 1
In this example, you create a prorate convention called Half-Quarter, in which you divide each quarter into two periods. This prorate convention requires you to create a total of eight prorate periods (two per quarter):
| Prorate Convention | Period | Prorate Date | # of Prorate Periods |
|---|---|---|---|
| Half-Quarter | 01-JAN-1998 to 15-FEB-1998 | 15-FEB-1998 | 8 |
| Half-Quarter | 16-FEB-1998 to 31-MAR-1998 | 31-MAR-1998 | 8 |
Example 2
In this example, you create a prorate convention called Following Half-Year, in which the prorate date is the first day of the following period:
| Prorate Convention | Period | Prorate Date | # of Prorate Periods |
|---|---|---|---|
| Following Half Year | 01-JAN-1998 to 30-JUN-1998 | 01-JUL-1998 | 2 |
| Following Half Year | 01-JUL-1998 to 31-DEC-1998 | 01-JAN-1999 | 2 |
Example 3
In this example, you create another half-year prorate convention called Mid-Half-Year, in which the prorate date falls at the half-way point of the period:
| Prorate Convention | Period | Prorate Date | # of Prorate Periods |
|---|---|---|---|
| Mid-Half Year | 01-JAN-1998 to 30-JUN-1998 | 31-MAR-1998 | 2 |
| Mid-Half Year | 01-JUL-1998 to 31-DEC-1998 | 30-SEP-1999 | 2 |
Prorate Convention Setup Examples
Month-to-Month
Month-to-month is the most common prorate convention and calendar setup. In this scenario:
-
The depreciation calendar and the prorate calendar are identical: a standard 12-month calendar with each period corresponding to a different month.
-
An asset with a date placed in service any time in a given month will have a full month of depreciation taken for that period.
-
You set up your depreciation calendar on the Asset Calendars window. You enter one depreciation period for each month as follows:
Period Date Depreciation Period 1 01-JAN - 31 JAN Depreciation Period 2 01 FEB - 28 FEB Depreciation Period 3 01 MAR - 31 MAR Depreciation Period 4 01-APR - 30-APR ... ... -
Next, you set up your prorate calendar. Since the prorate calendar and the depreciation calendar are the same, you can enter the same calendar name for both the depreciation calendar and the prorate calendar.
-
When adding an asset, choose the Current Month prorate convention on the Books window.
In this case, the prorate date is the last day of the period. For example:
Period Period Dates Prorate Date Period 1 01-JAN - 31 JAN 31-JAN Period 2 01 FEB - 28 FEB 28-FEB Period 3 01 MAR - 31 MAR 31-MAR ... ... ...
Mid-Month
When you use a mid-month prorate convention, half a month of depreciation is taken in the first and last periods of an asset's life. For a mid-month prorate convention, you need to set up a prorate calendar with semi-monthly periods.
-
Set up your depreciation calendar with monthly periods.
-
Set up a prorate calendar with 24 semi-monthly periods. For example:
Period Date Prorate Period 1 01-JAN - 15-JAN Prorate Period 2 16-JAN - 31-JAN Prorate Period 3 01-FEB - 15-FEB Prorate Period 4 16-FEB - 28-FEB ... ... -
Set up a prorate convention called Mid-Month with 24 semi-monthly periods.
Select the Depreciate When Placed in Service check box if you want to start taking depreciation in the accounting period that corresponds to the date placed in service, instead of the period that corresponds to the prorate date. This option determines over how many periods to spread the annual depreciation amount. For straight-line depreciating assets, Oracle Assets always starts taking depreciation in the accounting period that corresponds to the prorate date.
-
When adding an asset, you want to override the default prorate convention for the category and use the Mid-Month prorate convention you set up. On the Default Depreciation Rules region of the Asset Categories window, change the prorate convention to Mid-Month.
Period Period Dates Prorate Date Period Period Dates Prorate Date Period 1 01-JAN - 15-JAN 15-JAN Period 2 15-JAN - 31-JAN 31-JAN Period 3 01-FEB - 15-FEB 15-FEB Period 4 16-FEB - 28-FEB 28-FEB Period 5 01-MAR - 15-MAR 15-MAR ... ... ...
In this example, if an asset has a date placed in service in the first half of January (for example, 04-JAN-1998), an entire month of depreciation is taken for the period of addition. The depreciation is charged for the first prorate period, 01-JAN-1998 through 15-JAN-1998, as well as the second prorate period, 16-JAN-1998.
If the asset is retired in the first half of a depreciation period, no depreciation is taken for the last depreciation period of its life. That is, if the asset is retired one year later on 04-JAN-1999, no depreciation is taken during the depreciation period January 1999. If the asset is retired in the second half of the last depreciation period of the asset's life, half a month of depreciation is taken. For instance, if the asset is retired on 18-JAN-1998, depreciation is taken for the prorate period 01-JAN-1998 through 15-JAN-1998, but not for the prorate period 16-JAN-1998 through 31-JAN-1998.
If an asset is placed in service in the second half of January, for example, 18-JAN-1998, a half month of depreciation is taken in the period of addition (16-JAN-1998 through 31-JAN-1998).
If the asset is retired in the first half of a depreciation period, no depreciation is taken for the last depreciation period of its life. That is, if the asset is retired on 04-JAN-1999, no depreciation is taken for the depreciation period January 1999. If the asset is retired in the second half of the last depreciation period of the asset's life, a half a month of depreciation is taken. For instance, if the asset is retired on 18-JAN-1999, depreciation is taken for the prorate period 01-JAN-1999 through 15-JAN-1999, but not for the prorate period 16-JAN-1999 through 31-JAN-1999.
Daily
If you need to depreciate on a daily basis, you need to set up daily depreciation and prorate calendars (365 periods).
-
Set up your daily depreciation calendar as follows:
Period Date Depreciation Period 1 01-JAN - 01 JAN Depreciation Period 2 02-JAN - 02 JAN Depreciation Period 3 03-JAN - 03 JAN Depreciation Period 4 04-JAN - 04 JAN ... ... -
Set up a daily prorate calendar.
-
On the Prorate Conventions window, set up a prorate convention called Daily with the same daily periods as the prorate calendar you set up.
-
When adding assets that should use this prorate convention, choose the Daily prorate convention on the Books window.
Related Topics
Specifying Dates for Prorate Conventions
Specifying Dates for Calendar Periods
Defining Price Indexes
You must set up your price indexes before you can assign them to an asset category and book in the Asset Categories window. You can use one price index for several asset categories in the same or different books. Or you can have a different price index for each asset category in each depreciation book.
The Revalued Asset Retirement Report uses your price indexes to determine the revalued asset cost. It then uses this cost to calculate gains and losses for your retired assets. You can review all of the price indexes you defined by running the Price Index Listing.
If you want to actually revalue the cost of your assets in your books, you must revalue the asset or category.
To define price indexes:
-
Open the Price Indexes window.
-
Enter the name of the Index you want to define.
Tip: The name you enter appears in list of values windows which allow no more than 40 spaces. You may want to limit your name to 40 characters.
-
Enter the index value as a percentage.
-
Enter the dates that this index value is effective. If you leave the To Date blank, the index is effective indefinitely.
-
Save your work.
Related Topics
Asset Management in a Highly Inflationary Economy (Revaluation)
Revalued Asset Retirements Report
Setting Up Asset Categories
Category information is common for a group of assets. Oracle Assets defaults these depreciation rules when you add an asset, to help you add assets quickly. If the default does not apply, you can override many of the defaults for an individual asset in the Asset Details or Books windows. You set up default values for each category in each book. The default depreciation rules that you set up for a category also depend upon the date placed in service ranges you specify.
Prerequisites
-
Set up your Category Flexfield. See: Setting Up the Asset Category Flexfield.
-
Set up your Account segment values and combinations. See: Defining Accounts, Oracle General Ledger User Guide.
-
Set up your depreciation books. See: Defining Depreciation Books.
-
Set up your QuickCode values. See: Entering QuickCodes.
-
Set up your prorate conventions. See: Specifying Dates for Prorate Conventions.
-
Set up your depreciation methods. See: Defining Additional Depreciation Methods.
To set up an asset category:
-
Open the Asset Categories window.
-
Enter a Category name and Description to identify the asset category you want to set up.
Tip: The concatenated name you enter appears in fields which display 20 spaces. You may want to limit your name to 20 characters.
-
Check Enabled if you want to use this category.
-
Check Capitalize if you want to charge items in this category to an asset account when you pay for them and if you want to depreciate items in this category.
-
Check In Physical Inventory if you want assets in this category to be included in physical inventory comparisons.
-
Choose Lease, Leasehold Improvement, or Non-Lease from the Category Type poplist.
You can only enter lease information in the Asset Details window if you assign the asset to a Lease category type.
-
Choose Owned or Leased from the Ownership poplist.
-
Enter the Property Type and Class to which the assets in this category usually belong.
You set up your QuickCode values for Property Type in the QuickCodes window. If you have assets in the United States, enter 1245 for personal property and 1250 for real property.
-
Enter general ledger accounts. See: Entering General Ledger Accounts for the Category.
-
Enter default depreciation rules for each depreciation book for which the category is defined.
-
Enter default depreciation rules for each depreciation book for which the category is defined. See: Entering Default Depreciation Rules for a Category.
-
Save your work.
Related Topics
Adding an Asset Accepting Defaults (QuickAdditions)
Adding an Asset Specifying Details (Detail Additions)
Adding an Asset Automatically from External Sources (Mass Additions)
Asset Setup Processes (Additions)
Entering General Ledger Accounts for the Category
Tip: You may have to temporarily disable your cross-validation rules and allow dynamic insertion for the Account structure to be able to enter these accounts, since they may not be valid combinations.
Important: If you want to create journal entries using other segments in addition to the natural account from the combination you enter in the Asset Categories window, you must modify the default Account Generator values to fill in those segments from the category.
To enter general ledger accounts for a category:
-
In the Asset Categories window, enter the Book for which you want to set up this asset category.
-
Enter the Asset Cost account for this category and book.
Oracle Assets uses this account to reconcile asset costs to your general ledger. Oracle Assets creates journal entries for this account to reflect additions, retirements, cost changes, revaluations, transfers, reclassifications, and capitalizations.
-
Enter the Asset Clearing account for this category and book.
For manual asset additions and cost adjustments, Oracle Assets uses this account to reconcile your payables system and Oracle Assets.
For mass additions, it uses the complete Account combination that comes over with a mass addition line to reconcile the asset addition or cost adjustment with your payables system.
-
Enter the general ledger Depreciation Expense Segment to which you charge depreciation for assets in this category and book. This is the default value for the account segment of the depreciation expense account in the Assignment window.
-
If you have set up bonus rates, enter the Bonus Expense account. If you do not enter a value in this field, it defaults to the Depreciation Expense account.
-
Enter the Accumulated Depreciation account for this category and book. This account is the contra-account for the asset cost account for this category.
-
If you have set up bonus rates, enter the Bonus Reserve account. If you do not enter a value in this field, it defaults to the Accumulated Depreciation account.
-
Enter the Revaluation Reserve account for this category and book. This account is used for the change in net book value due to revaluation, if you revalue accumulated depreciation.
-
Enter the Revaluation Amortization account for this category and book. This account is used to amortize the revaluation reserve over the remaining life of the asset after you revalue it, if you amortize revaluation reserve.
-
Enter the CIP Cost account for this category and book. This account is used to reconcile CIP asset costs to your general ledger.
-
Enter the CIP Clearing account for this category and book if you entered a CIP Cost account.
-
Enter default depreciation rules for each depreciation book for which the category is defined.
-
Enter default depreciation rules for each depreciation book for which the category is defined. See: Entering Default Depreciation Rules for a Category.
Related Topics
Overview of the Mass Additions Process
Entering Default Depreciation Rules for a Category
To enter default depreciation rules for a category:
-
In the Default Depreciation Rules window, enter the date Placed in Service range for which these category defaults are effective. When you add an asset, the depreciation rules default according to the date placed in service of the asset, the category, and the book.
You can specify as many ranges of default depreciation rules as you wish. If you leave the end date blank, Oracle Assets uses that set of depreciation rules indefinitely. To add a new range of valid depreciation rules, terminate your current record by adding an end date, then choose Edit, New Record from the menu to add the new record.
-
Check Depreciate if you normally depreciate assets in this book and category.
Note: Oracle Assets does not depreciate EXPENSED assets, regardless of the default value you enter in this field.
-
Enter the depreciation Method that you normally use for assets in this book and category:
-
If you enter a life-based method, you must enter the asset Life in Years and Months. The method you enter must have the same number of periods as the prorate calendar for this book.
-
If you enter a flat-rate method, you must enter default values for the Basic Rate and Adjusted Rate that you normally use to depreciate assets in this book and category. If you are defining this category for a tax book, you also can enter a Bonus Rule.
-
If you enter a units of production method, you must enter the unit of measure (UOM) and production Capacity that you normally use to depreciate assets in this book and category. If you are defining this category a tax book, enter the UOM and capacity you entered for the corporate book.
-
-
Enter the bonus rule that you normally use for assets in this book and category. You can use bonus rules for corporate books and tax books, using all depreciation methods except UOM.
-
Enter the Prorate Convention and Retirement Convention that you normally assign to assets in this book and category.
-
If you chose Use Default Percent from the Salvage Value poplist in the Book Controls window for this book, you can enter a Default Salvage Value percentage for this category, book, and range of dates placed in service. See: Entering Accounting Rules for a Book and Defaulting Asset Salvage Value as a Percentage of Cost.
For example, if you want the salvage value to default to 10% of the cost, enter 10 in this field. When you perform transactions affecting asset cost, Oracle Assets uses this default percentage to calculate the salvage value according to the following formula:
Salvage Value = Cost * Default Percentage
-
If you are defining this category for a tax book, optionally enter either a depreciation expense or cost ceiling.
-
Enter a Price Index if you want to run reports that use the revalued asset cost to calculate gains and losses.
-
Enter a default subcomponent life Rule you want to use to determine the default life of the subcomponent asset based on the life of the parent asset.
Choose one of the following rules:
None (Leave field blank): There is no connection between the life of the subcomponent asset and the parent asset life. Oracle Assets defaults the subcomponent asset life from the asset category.
Same End Date (Without specifying a minimum life): The subcomponent asset becomes fully depreciated on the same day as the parent asset or at the end of the category default life, whichever is sooner. The default subcomponent asset life is based on the end of the parent asset life and the category default life. If the parent asset is fully reserved, Oracle Assets gives the subcomponent asset a default life of one month.
Same End Date (Specifying a minimum life): The subcomponent asset becomes fully depreciated on the same day as the parent asset, unless the parent asset life is shorter than the minimum life you specify. The subcomponent asset's life is determined based on the end of the parent asset's life, the category default life, and the minimum life. If the parent asset's remaining life and the category default life are both less than the minimum life you enter, Oracle Assets uses the minimum life for the subcomponent asset. Otherwise, it uses the lesser of the parent asset's remaining life and the category default life.
Same Life: The subcomponent asset uses the same life as the parent asset. It depreciates for the same total number of periods. If the subcomponent asset is acquired after the parent asset, it depreciates beyond the end date of the parent asset life.
-
If you choose Same End Date for the subcomponent life rule, you also can specify a minimum life for the subcomponent asset.
If the parent asset's remaining life and the category default life are both less than the minimum life you enter, Oracle Assets uses the minimum life for the subcomponent asset. Otherwise, it uses the lesser of the parent asset's remaining life and the category default life.
-
Check Straight Line for Retirements if you are setting up an asset category with a 1250 property class in a tax book. Oracle Assets uses a straight-line depreciation method in determining the gain or loss resulting from the retirement of 1250 (real) property.
If you check Straight Line For Retirements, enter the straight-line depreciation Method and Life you want to use for the Gain From Disposition of 1250 Property Report. This is the default method for your asset in the Retirements window and in the tax book if you use mass copy.
-
Check the Use Depreciation Limit check box if you want to depreciate an asset beyond its useful life. You can enter the default depreciation limit as a percentage or an amount. See: Depreciating Assets Beyond the Useful Life.
-
Enter the minimum time you must hold an asset for Oracle Assets to report it as a capital gain when you retire it.
If you want Oracle Assets to report a capital gain for all assets in this category when you retire them, enter zero. If you want to report a capital gain for assets which you have held for at least one year, such as for United States federal tax form 4797, enter one in the Years field and zero in the Months field. If you need a different capital gains threshold for different dates placed in service, such as for United States federal tax form 4797, set up the asset category several times for the different date placed in service ranges.
-
If you are defining this category for a tax book, indicate whether assets in this category are eligible for Investment Tax Credit (ITC), and whether assets in this category Use ITC Ceilings.
-
Check the Mass Property Eligible check box if you want to make assets added to this category eligible for mass property treatment.
-
In the Group Asset field, you can enter the group asset to which all assets added to this category will be assigned. If you enter a group asset number in this field, all capitalized and CIP assets using this category will be automatically assigned to the group asset entered.
-
Save your work.
Related Topics
Defining Additional Depreciation Methods
Defining Units of Measure, Oracle Inventory User Guide
Defining Depreciation Bonus Rules
Setting Up Depreciation Ceilings
Prorate and Retirement Conventions
Parent Asset Transactions Report
Defining Distribution Sets
Use this window to define default distribution sets. Then, when you add a new asset using the Detail Additions or Mass Additions process, you can choose a predefined distribution set from a poplist in the Assignments window to quickly assign the appropriate distributions to a new asset.
You can define a distribution set to allocate percentages of asset units to different depreciation expense accounts, locations, and employees. You can define one or more distributions in a set. You can also change the distribution information for a distribution set at any time.
Important: If you change the distribution information for a distribution set, note that it does not affect assets already assigned to that distribution set.
To define a distribution set:
-
Navigate to the Distribution Sets window.
-
Enter a unique Name and a Description of the Distribution Set you want to define.
-
Enter the corporate Book for the distribution set.
Note: You cannot assign distribution sets to assets in tax or budget books.
-
Optionally enter the date placed in service range this distribution set is effective. You can leave the to date blank if you want the distribution set to be effective indefinitely.
-
For each distribution in the set, enter the Units Percent, Depreciation Expense Account, and Location. Optionally enter the Employee Name or Number.
Units Percent: Enter the percentage of the asset you want to assign to this distribution. You can enter 100% for one distribution, or break up the total percentage into several distributions. The total percentage for the set must equal 100%.
-
Save your work.
Related Topics
Adding an Asset Specifying Details (Detail Additions)
Lease Analysis
Oracle Assets allows you to test leased assets in accordance with generally accepted accounting principles to determine whether to capitalize and depreciate your leased assets.
Note: The Financial Accounting Standards Board (FASB) has defined certain criteria used to determine whether a lease qualifies for capitalization. Many other countries use similar test criteria.
In addition, Oracle Assets lets you analyze alternate leasing strategies so you can structure your leases to best meet your business requirements.
Lease Capitalization Test
Many countries require that a leased asset be capitalized and depreciated if any one of the following four criteria is met:
-
The ownership of the asset transfers to the lessee at the end of the lease (Test 1)
-
A bargain purchase option exists (Test 2)
-
The term of the lease is more than 75% of the economic life of the leased asset (Test 3)
-
The present value of the minimum lease payments exceeds 90% of the fair market value of the asset at lease inception (Test 4)
When you set up a lease, you can enter information that Oracle Assets uses to automatically calculate the present value of the payment schedule, and to determine if any of the tests listed above are met. If your lease meets one of the four tests, Oracle Assets defaults the lease type to Capitalized, and the asset cost to the lessor of the fair value or the present value of the payment schedule for any assets assigned to the lease.
Payment Schedules
You can define and calculate the present value of a payment schedule. Oracle Assets can accommodate all types of lease payment structures and lease payment types. These include normal annuities, balloon payments, bargain purchase options, bargain renewal options, and guaranteed residual values, penalties, skipped payments, and overlapping payments.
Amortization Schedules
You can create amortization schedules that allocate capital lease payments between principal and interest based on the effective interest rate implicit in the lease contract.
Operating Leases
Oracle Assets tracks your payments under operating leases, or leases which do not meet any of the criteria, for informational purposes. You can use this information to create a schedule of future minimum payments under operating leases, information that may require disclosure in the footnotes of your financial statements.
Lease Evaluation
Oracle Assets allows you to evaluate alternate leasing strategies by manipulating variables such as the periodic lease payment, balloon payments, payment dates, and the fair value of the asset.
Example 1: Set Up Lease
Coastal Landscapes is entering a five year equipment lease with Marine Technologies on March 1, 1993. The fair value of the equipment is $100,000. The lessee's incremental borrowing rate is 12%. The minimum lease payments consist of monthly payments of $1,900 of which three payments are due at lease inception. The first regular payment is due on April 1, 1996. There is no bargain purchase option, and the title does not transfer to Coastal Landscapes at the end of the lease. The economic life of the asset is six years.
Before you add any of the assets to the lease, enter the following information in the Lease Details window to set up the lease:
| Lease Number | 325 |
| Description | Equipment Lease |
| Lessor | Marine Technologies |
| Payment Schedule | Marine Lease |
| Currency | USD |
| Transfer of Ownership | No |
| Bargain Purchase Option | No |
| Lease Type | Capitalized |
| Lease Term | 60 |
| Asset Life | 72 |
| Fair Value | 100,000 |
Note: You can choose a predefined payment schedule in the Lease Details window to attach to your lease.
If you have not already defined the lease's payment schedule, choose the Payment Schedule button from the Lease Details window to enter the payment schedule information for this asset and calculate the present value of the payment schedule. Enter the following Payment Schedule information:
| Payment Schedule | Marine Lease |
| Currency | USD |
| Present Value | - |
| Lease (inception) Date | 3/1/93 |
| Interest Rate | .12 |
| Compounding Frequency | Monthly |
Lease Payments
| Start Date | Payment Amount | Number | Payment Type | End Date |
|---|---|---|---|---|
| 3/1/93 | $5,700 | 1 | ||
| 4/1/93 | $1,900 | 57 | Annuity | 12/1/97 |
You can now choose the Calculate button to determine the present value of the payment schedule. The present value in this example is $87,945.53. Since $87,945.53 is less than $100,000 (fair value), it is also the cost to capitalize if one of the four tests is met.
Oracle Assets updates your lease information after calculation as follows:
| Payment Schedule | Marine Lease |
| Present Value | 87,945.53 |
| Lease (inception) Date | 3/1/93 |
| Interest Rate | .12 |
Lease Payments
| Start Date | Payment Amount | Number | Period | End Date |
|---|---|---|---|---|
| 3/1/93 | $5,700 | 1 | ||
| 4/1/93 | $5,700 | 57 | Monthly | 12/1/97 |
Once you calculate the present value, you can create an amortization schedule by choosing the View Amortization button on the Lease Payments window. In this example, the present value of the payment schedule is $87,945.53. The total amount to be paid under the lease is $114,000. The difference of $26,054.47 represents interest expense that must be recognized over the life of the lease. This example is illustrated below:
| Start Date | Payment | Interest (12% yr.) Portion of Payment | Reduction of Principal | Lease Obligation |
|---|---|---|---|---|
| (a) | (b) | (c) | ||
| 3/1/93 | 87,945.53 | |||
| 3/1/93 | 5,700.00 | 0 | 5,700.00 | 82,245.53 |
| 4/1/93 | 1,900.00 | 822.46 | 1,077.54 | 81,167.99 |
| 5/1/93 | 1,900.00 | 811.68 | 1,088.32 | 80,079.67 |
| ... | ... | ... | ... | ... |
| 11/1/97 | 1,900.00 | 37.44 | 1,862.56 | 1,881.19 |
| 12/1/97 | 1,900.00 | 18.81 | 1,900.00 | 0 |
| Total: | 114,000 | 26,054.47 | 87,945.53 | 0 |
(a) The interest rate per period (in this example, 12%/12=1%) multiplied by the prior period lease obligation, except for the 3/1/93 payment; since no time has elapsed, no interest has accrued.
(b) The Payment amount less (a).
(c) Prior period amount (c) less current period amount (b).
When you save the payment schedule, Oracle Assets automatically returns to the Lease Details window, where you can attach the schedule you just defined to your lease.
Note: To attach the payment schedule to the lease, you must also save the amortization schedule.
Note that Oracle Assets defaults the Present Value field in the Lease Details window from the attached payment schedule. The 90% test has not been met. The lease still qualifies for capitalization, however, as the economic life test was met. The cost to capitalize is $87,945.53, since this is the lesser of the present value of the payment schedule or the fair value. When you attach this lease to an asset, the Books window displays the cost to capitalize as the default value for current cost of the leased asset. You can change this value if necessary.
Example 2: Set Up Payment Schedule
Fremont Corporation has entered a lease agreement dated January 1, 1990. The term of the lease is five years, requiring equal rental payments of $20,000 at the beginning of each year. The equipment has a fair value of $100,000 and an economic life of ten years. The lease contains a bargain purchase option for $5,000. The lessee's incremental borrowing rate is 10%.
You would enter the following information in the Lease Payments window:
| Payment Schedule | Schedule 1 |
| Present Value | |
| Lease (inception) Date | 1/1/90 |
| Interest Rate | .10 |
| Compounding Frequency | Annually |
Lease Payments
| Start Date | Payment Amount | Number | Payment Type | End Date |
|---|---|---|---|---|
| 1/1/90 | $20,000 | 5 | Annuity | 1/1/94 |
| 1/1/95 | $5,000 | 1 |
The present value of the payment schedule is $86,501.92.
Example 3: Analyze Lease to Maximize Use of Existing Funds
CDI Technology has set aside $18,000 to finance the lease of chip manufacturing equipment. CDI wants to lease the equipment for four years. The money is currently deposited in an account that earns 10% interest compounded semi-annually. CDI wants the lease to commence immediately, with the first payment due six months from today (1/1/90). What is the maximum amount that CDI can pay in semi-annual lease payments over the next four years without exhausting the fund until the last payment?
You would enter the following information in the Lease Payments window:
| Payment Schedule | Chip costs |
| Currency | USD |
| Present Value | $18,000 |
| Lease (inception) Date | 1/1/90 |
| Interest Rate | .10 |
| Compounding Frequency | Semi-annually |
Lease Payment:
| Start Date | Payment Amount | Number | Payment Type | End Date |
|---|---|---|---|---|
| 7/1/90 | 2,784.99 | 8 | Annuity | 1/1/94 |
Once Oracle Assets calculates the present value, you can create an amortization schedule for the projection by choosing the View Amortization button on the Lease Payments window. In this example, the present value of the payment schedule is $18,000. The total amount to be paid under the lease is $22,279.22. The difference of $4,279.92 represents interest expense that must be recognized over the life of the lease. This example is illustrated below:
| Start Date | Payment | Interest (10% yr.) Portion of Payment | Reduction of Principal | Lease Obligation |
|---|---|---|---|---|
| (a) | (b) | (c) | ||
| 1/1/90 | 18,000.00 | |||
| 7/1/90 | 2,784.99 | 900.00 | 1,884.99 | 16,115.01 |
| 1/1/91 | 2,784.99 | 805.75 | 1,979.24 | 14,135.77 |
| 7/1/91 | 2,784.99 | 706.79 | 2,078.20 | 12,057.57 |
| 1/1/92 | 2,784.99 | 602.88 | 2,182.11 | 9,875.46 |
| 7/1/92 | 2,784.99 | 493.77 | 2,291.22 | 7,584.24 |
| 1/1/93 | 2,784.99 | 379.21 | 2,405.78 | 5,178.46 |
| 7/1/93 | 2,784.99 | 258.92 | 2,526.07 | 2,652.39 |
| 1/1/94 | 2,784.99 | 132.60 | 2,652.39 | 0 |
| Total: | 22,279.92 | 4,279.92 | 18,000.00 | 0 |
(a) The interest rate per period (in this example, 10%/2=5%) multiplied by the prior period lease obligation, except for the 3/1/93 payment; since no time has elapsed, no interest has accrued.
(b) The Payment amount less (a).
(c) Prior period amount (c) less current period amount (b).
Related Topics
Entering Leases
You can use the Lease Details window and the Lease Payments window to perform the following tasks:
-
Enter a Lease
-
Enter a Payment Schedule
-
Create an Amortization Schedule
Enter a Lease
Use the Lease Details window and Lease Payments window to define new leases. You cannot update or delete leases that are in use.
If you want Oracle Assets to test your lease to determine whether to capitalize and depreciate assets assigned to it, enter information in the Capitalization Test region of the Lease Details window. If you have already defined a payment schedule for your lease, attach it to the lease in the Lease Details window. Otherwise, you can navigate to the Lease Payments window to define a payment schedule and to calculate the present value of your lease payments. Oracle Assets depreciates Capitalized leased assets and expenses Operating leased assets. Oracle Assets will capitalize and depreciate leased assets if any one of the following criteria is met:
-
Test 1: The ownership of the asset transfers to the lessee at the end of the lease
-
Test 2: A bargain purchase option exists
-
Test 3: The term of the lease is more than 75% of the economic life of the leased asset
-
Test 4: The present value of the minimum lease payments exceeds 90% of the fair market value of the asset at lease inception
When you add leased assets using the Detail Additions process, you can attach the assets to leases you have previously defined. You can assign multiple assets to the same lease.
Create a Payment Schedule
Use the Lease Payments window to enter information Oracle Assets uses to calculate the present value of a given set of lease payments, or to analyze alternative leasing structures. After saving a payment schedule, you can attach it to a lease defined in the Lease Details window.
Create an Amortization Schedule
You create amortization schedules to allocate capital lease payments between principal and interest based on the effective interest rate implicit in the lease contract.
To define a lease:
-
Open the Lease Details window.
-
Enter the Lease Number and a Description.
-
Enter the Lessor.
-
Enter the Lessor Site, which is the location to which the payment will be sent. This field is required if you plan to export lease payments to Oracle Payables.
-
Choose a Lease Type of Capitalized or Operating. If you have already performed a capitalization test on this lease, you can use this field to manually override the test result displayed in the Test Determination field. Only capitalized leases can be set up for automatic lease payment to Oracle Payables.
-
You can choose from a list of predefined Payment Schedules to attach to this lease, or leave this field blank and choose the Payment Schedule button to define a schedule for this lease. See: To define a payment schedule.
If, after the lease start date, you want to change existing lease payments, you must enter a new lease, or manually adjust the individual payment lines to change the existing lease.
-
Enter the payment account. This field is required if you plan to export lease payments to Oracle Payables.
You must enter a lessor site before you can enter a payment account. This is because the lessor site determines the operating unit, which in turn determines the account structure.
-
Optionally enter a payment term.
Note: We strongly recommend that you set up an immediate payment term in Oracle Payables, and that you apply the Immediate payment term to any leases that will use the Exporting Lease Payments feature in Oracle Assets. If this payment term is not provided, then Oracle Payables defaults to the payment term associated with the lessor site. This can cause the payments to be issued late by Oracle Payables. See: Payment Terms., Oracle Payables User Guide
-
Enter the Currency you are using for this lease.
-
If you want to test this lease for capitalization, enter the following information in the Capitalization Test region:
Check Transfer of Ownership if the lease transfers ownership of the asset to the lessee at the end of the lease.
Check Bargain Purchase Option if a bargain purchase option is included in this lease.
Enter the Lease Term and the Asset Life in months for the leased asset. The Criterion Met check box indicates whether the term of the lease exceeds 75% of the economic life of the leased asset.
Enter the Fair Value of the leased asset.
Optionally enter the Present Value of the leased asset if you have previously calculated it outside of Oracle Assets. Otherwise, Oracle Assets will automatically populate this field when you select a lease payment schedule for the lease. The Criterion Met check box indicates whether the present value of the minimum lease payments exceeds 90% of the fair market value.
-
If you need to define a payment schedule for this lease, choose the Payment Schedule button. See: To define a payment schedule.
Oracle Assets displays the result of the capitalization test in the Test Determination field. If the lease qualifies for capitalization, Oracle Assets automatically populates the Cost to Capitalize field with the lesser of the fair value of the asset or the present value of the minimum lease payments. This amount also appears as the Current Cost for the asset in the Books window when you perform an asset addition.
-
Choose Done to save your work.
To define a payment schedule:
-
If you are defining a new lease in the Lease Details window, choose the Payment Schedule button. Alternatively, open the Lease Payments window directly from the Navigator window.
-
Enter the date the lease begins. This date must coincide with the first day of the month.
-
Enter the Interest Rate. The interest rate is the lesser of the lessee's incremental borrowing rate or the rate implicit in the lease contract.
-
Enter the Currency you are using for this payment schedule.
-
Enter the Compounding Frequency you want to use. For annuity events, select monthly, quarterly, semi-annual, or annual payment periods.
If you change the Compounding Frequency, Oracle Assets automatically recalculates the End Date for each payment line, but does not change the Start Date.
-
Enter one or more payment lines for your payment schedule. You can enter any combination of lump sum lease payments and annuities (homogeneous series of lease payments).
Start Date: Enter the date of this payment. The payment date should be the first day of the month.
Amount: Enter the amount of the individual lease payment.
You can leave this field blank for one of the payment lines, and allow Oracle Assets to calculate the amount for you. If you leave this field blank, you must specify a present value for the payment schedule in the Present Value field.
Number: Enter the number of payments you want to make as part of this event.
Payment Type: Choose a payment type of Annuity, Balloon Payment, Bargain Purchase Option, or Bargain Renewal Option.
End Date: The Compounding Frequency, Start Date, and Number of payments you enter determine the end date.
-
After you have defined the payment schedule, choose the Calculate button. Oracle Assets calculates the present value of the payment lines you entered.
When you save the payment schedule and return to the Lease Details window, attach the payment schedule to the lease. Once you attach a payment schedule to a lease, you cannot change it.
-
Save your work.
To create an amortization schedule:
-
Once you have calculated a lease payment schedule, choose the View Amortization button to create an amortization schedule for the lease. The difference between the present value of the minimum lease payments and the total amount to be paid under the lease represents the interest expense that must be recognized over the life of the asset.
Exporting Lease Payments to Oracle Payables
Oracle Assets allows you to send lease payments automatically to Oracle Payables. You do this by selecting the lease payment lines to be sent to Oracle Payables in the Export Lease Payments to Payables window, then choosing Export to run the Export Lease Payments to Payables concurrent process. The Export Lease Payments to Payables process imports the lease payment data into the Oracle Payables interface tables AP_INVOICES_INTERFACE and AP_INVOICE_LINES_INTERFACE.
You have the option to select all lease payment lines or only certain lease payment lines to be exported to Oracle Payables. For example, if you have paid the first two months and would like the final payment to be paid by another party, you can select only those lease payment lines that you want processed by Oracle Payables.
To export lease payments to Oracle Payables:
-
Choose Setup > Asset Systems > Leases > Lease Payments to Payables from the Navigator window.
-
Query the lease payments you want to export to Oracle Payables.
-
In the Export Lease Payments to Payables window, check the Export check box for each lease payment you want exported to Oracle Payables. When the Export check box is checked, the Status field updates to POST. If you uncheck an Export check box, the Status field resets to NEW. To check all lease payments, choose Select All from the Edit menu. If you have checked lease payments in error, you can choose Deselect All from the Edit menu.
-
Verify the due date, payment amount, lease number, and lessor name.
-
Enter, verify, or change the lessor site. The lessor site is required to export lease payments to Oracle Payables.
-
Verify or change the invoice number. The invoice number is required to export lease payments to Oracle Payables.
-
Enter, verify, or change the payment account. The payment account is required to export lease payments to Oracle Payables.
-
Optionally enter or change the payment term.
Note: We strongly recommend that you set up an immediate payment term in Oracle Payables, and that you apply the Immediate payment term to any leases that will use the Exporting Lease Payments feature in Oracle Assets. If this payment term is not provided, then Oracle Payables defaults to the payment term associated with the lessor site. This can cause the payments to be issued late by Oracle Payables. See: Payment Terms., Oracle Payables User Guide
We strongly recommend that you set up an immediate payment term in Oracle Payables, and that you apply the Immediate payment term to any leases that will use the Exporting Lease Payments feature in Oracle Assets. If this payment term is not provided, then Oracle Payables defaults to the payment term associated with the lessor site. This can cause the payments to be issued late by Oracle Payables. See: Payment Terms (Oracle Payables User Guide).
-
Optionally choose View Schedule to view the amortization schedule.
Note: You cannot make changes to an amortization schedule from the Export Lease Payments to Payables window.
-
Optionally choose Save to save changes without exporting the lines to Oracle Payables.
-
When you are ready to send payment lines to Oracle Payables, choose Export to populate the Oracle Payables interface tables, AP_INVOICES_INTERFACE and AP_INVOICE_LINES_INTERFACE.
Related Topics
Defining Asset Warranties
You can define and track descriptive information on manufacturer and vendor warranties in Oracle Assets. You define the warranty information in the Asset Warranties window. You can then assign assets to these previously defined warranties in the Asset Details window. You can assign any number of assets to the same warranty. If a warranty has any assets assigned to it, you cannot update or delete the warranty. You can attach the asset to a different warranty at any time.
To define warranties in Oracle Assets:
-
Navigate to the Asset Warranties window.
-
Enter a unique warranty number and a description of the warranty.
-
Optionally enter the start and end dates. If you enter one date, you must also enter the other date. If you specify start and end dates, any asset you assign to this warranty must have a date placed in service that falls between the specified start and end dates.
-
Enter the currency code. The currency code of the warranty must be the same as that of the asset you are assigning to the warranty.
-
Enter a cost of $0 or greater.
-
Check the Renewable check box if you want the warranty to be renewable. The Renewable check box is unchecked by default. If you do not specify an end date, the Renewable check box is disabled.
-
Optionally enter employee information.
-
Enter supplier information.
-
Save your work.
To assign an asset to a previously defined warranty:
-
Navigate to the Find Assets window.
-
Query the asset you are assigning to the warranty.
-
In the Asset Details window, enter a previously defined warranty number or select a warranty number from the list of values.
-
Save your work.
Overview of Asset Insurance
Oracle Assets provides a window and reports to help you manage insurance values and other insurance information for your assets. You can view and enter insurance information for an asset and assign more than one type of insurance to an asset. Asset insurance information includes insurance categories, current insurance value, and optional updates that affect the insurance value, such as additions or retirements.
Calculation Methods
Oracle Assets uses three methods to calculate the insurance value of an asset:
-
Value as New - This method calculates the base insurance value of the asset, based on acquisition/production costs. This value can be indexed annually to give a current insurance value. It can also incorporate the indexed value of transactions that affect the asset value.
-
Market Value - This method calculates the current market value of the asset. Oracle Assets automatically calculates the current value from the net book value of the asset, incorporating indexation factors and the indexed value of any transactions that affect the asset value.
-
Manual Value - This method allows you to manually enter an insurance value for an asset, usually in agreement with the insurer. With this calculation method you can also manually enter updates to the asset insurance value. Oracle Assets only updates the current insurance value automatically if you enter an optional maintenance date for the asset.
If an asset is partially retired, the insurance calculation process reduces the insurance value of the asset in the same proportion as the current cost is reduced for the partial retirement.
For certain types of assets, such as buildings, the Swiss business practice is that the insurance value may occasionally be reassessed by the insurance company, and manually redefined. Indexation of the insurance value can then recommence from this point. The manual update of an automatically calculated insurance value will only be allowed for these special Swiss assets, which must be flagged in the Asset Insurance window.
Reports
Oracle Assets provides two reports for reviewing asset insurance information. The Asset Insurance Data report lists all insurance policy data for an asset. The Asset Insurance Value report lists insurance values, current insurance amounts, and a calculation of the insurance coverage.
Entering Asset Insurance Information
Use the Fixed Asset Insurance window to enter insurance information for your assets, such as insurance policy information and calculation methods. You can enter multiple insurance policies for an asset for different categories of insurance. Oracle Assets uses the insurance information that you enter here to calculate the current insurance value of the asset.
Prerequisites
-
Enter suppliers in Oracle Payables with a supplier type of Insurance Company.
-
Set up Asset Price Indexes, if required.
-
Set up Insurance Category QuickCodes, such as Fire, Storm, Theft. See: Fixed Asset Insurance Policy Lines Window Reference.
-
Set up Hazard Class QuickCodes. See: Fixed Asset Insurance Policy Lines Window Reference.
-
Set the profile option FA: Allow Swiss Special Assets to Yes if you are planning to enter Swiss special case assets, such as Swiss buildings.
To enter insurance information for an asset:
-
Navigate to the Fixed Asset Insurance window.
-
Query the assets for which you want to enter insurance information.
-
In the Policy region, enter insurance information, such as Policy Number and Insurance Company.
-
Enter the Calculation Method to use for this asset insurance, either Value as New, Market Value, or Manual Value.
-
If the asset is a Swiss special-case asset, check the Special Swiss Asset check box.
-
In the Base Index Date field, enter the date that is used as the base date for indexation.
-
In the Insurance Index field, enter the name of the price index that is used to calculate the annual adjusted insurance value.
-
In the Base Insurance Value field, enter the base insurance value of the asset as defined in the insurance policy
-
If you chose the Manual Value calculation method or if you asset is flagged as a Swiss special-case asset, enter the current insurance value. Otherwise, this field displays the current insurance value of the asset, calculated automatically.
-
In the Insured Amount field, enter the amount for which the asset is insured under that policy.
To enter insurance policy information:
-
From the Fixed Asset Insurance window, choose the Lines button to display insurance policy line information.
-
At the Fixed Asset Insurance Policy Lines window, enter insurance policy information, such as the insurance policy line number, the insurance category, and the hazard class.
-
Enter any additional comments in the Comments field.
-
Save your work.
To enter insurance policy maintenance information:
-
From the Fixed Asset Insurance window, choose the Maintenance button.
-
In the Fixed Asset Insurance Policy Maintenance window, update any information that needs to be changed.
-
Save your changes.
Fixed Asset Insurance Window Reference
Assets Region
Asset Number. Contains the asset number of the asset on which you queried.
Description. Contains the description of the asset on which you queried.
Tag Number. Contains the tag number of the asset on which you queried.
Asset Key. Contains the asset key of the asset on which you queried.
Asset Book. Contains the asset depreciation book of the asset on which you queried.
Policy Region
Policy Number. Enter the insurance policy number.
Insurance Company. Enter a valid insurance company name. The list of values for this field will only display suppliers that have been set up in Oracle Payables with a supplier type of Insurance Company.
Supplier Site. Enter the supplier site for the insurance company.
Address. The company address for the supplier site displays automatically.
Calculation Method. Enter the method of calculation to use for this asset insurance:
-
Value as New - the base insurance value, which can be indexed annually.
-
Market Value - the current market value, calculated as the base insurance value less depreciation, which can be indexed annually.
-
Manual Value - a value you enter manually. This calculation method allows you to update the Current Value field.
Note: If you enter a duplicate policy to cover another asset with the same policy number and insurance company as an existing insurance record, the Calculation Method automatically defaults to the method that was defined on the existing policy. The Calculation Method must be the same for all occurrences of the same insurance policy.
Special Swiss Asset. If the asset is a Swiss special-case asset, check the Special Swiss Asset check box. This field will not be enabled unless you have set the profile option FA: Allow Swiss Special Assets to Yes. See: User Profiles in Oracle Assets.
If an asset is marked as a Swiss special asset, you will be able to update the Current Insurance Value, Insurance Index, and Base Index Date for the asset to reflect the reassessment of the insurance value by the insurance company.
The insurance company may provide a new series of indexation factors to be applied to the asset. You can record this by defining a new Price Index and then updating the Insurance Index field.
Record the new insurance value provided by the insurance company, by updating the Current Value field and recording the effective date for this new valuation in the Base Index Date field. If the Base Index Date is set to a date in the future, the insurance value will not be indexed again until that date is reached. The period up to this date represents a manual maintenance period for the asset. Any adjustments or retirements affecting the asset value during this period will not be incorporated into the new insurance value when the automatic insurance calculations begin again.
Base Index Date. Enter the date that is used as the base date for indexation. The Base Index Date must be one of the following:
-
For new assets, enter the date the asset was placed in service.
-
For assets purchased second-hand, enter the original date of construction of the asset.
-
For the Manual Value calculation method, you can enter a maintenance date. This represents the date the optional indexation of the manual value begins.
-
For updated Swiss assets, record the date on which automatic indexation of the insurance value will begin again. Until this date, you should maintain the insurance value manually
Insurance Index. Enter the name of the price index that is used to calculate the annual adjusted insurance value. If you want the Insurance Calculation process to automatically take account of cost adjustments, retirements, and so on, but you do not want indexation adjustment factors to be used, then enter a value in the Base Index Date field, but do not enter an Insurance Index.
Base Insurance Value. Enter the base insurance value of the asset as defined in the insurance policy. Enter one of the following:
-
For new assets, Oracle Assets displays the current cost of the asset. For Value as New assets, you can overwrite this default with another value. For Current Market Value assets, the value is shown in this field but is disabled. The value is disabled because the Base Insurance Value is not used in this asset insurance calculation; instead, the insurance value is derived from the asset net book value. For Manual Value assets, the Base Insurance Value field is disabled because the Base Insurance Value is not used; instead, you can manually enter a Current Value.
-
For assets purchased second-hand, enter the original construction cost of the asset.
Current Value. This field displays the current insurance value of the asset, calculated automatically, unless you chose the Manual Value calculation method or your asset is flagged as a Swiss special-case asset.
The value displayed depends upon the calculation method:
-
For Value as New, the value displayed is the indexed base insurance value. This value will also be updated to account for transactions, such as adjustments or retirements, that affect the asset value.
-
For Market Value, the value displayed is the indexed net book value of the asset (original cost less depreciation). This value will also be updated to account for transactions, such as adjustments or retirements, that affect the asset value.
-
For Manual Value, the value displayed can be updated. If you enter a maintenance date for the asset in the Base Index Date field, indexation of the manual value begins with this date, and then follows the Value as New calculation method.
-
For Swiss Assets with a calculation method of Value as New, the calculated value will be the same as for all other assets. For Swiss Assets with a calculation method of Current Market Value, the Current Value will calculate the insurance value following the Value as New calculation method and adjust this value using the fraction Asset Remaining Life / Asset Total Life. Also note that the calculated Current Value for Swiss Assets can be manually updated.
Insured Amount. Enter the amount for which the asset is insured under that policy. The information in this field is for reference only and is not used in the Oracle Assets calculations.
Last Indexation Date. This field displays the end date of the closed depreciation period for which the indexation process was last run.
Buttons
Maintenance. Use the Maintenance button to launch the Fixed Asset Insurance Policy Maintenance window.
Lines. Use the Lines button to launch the Fixed Asset Insurance Policy Lines window
Related Topics
Entering Asset Insurance Information
Fixed Asset Insurance Policy Lines Window Reference
Line. Enter the insurance policy line number for the category of insurance covered by the policy. The combination of policy number and policy line number must be unique. You cannot enter duplicate line numbers on the same policy, even if there are multiple occurrences of the same policy to cover a number of assets.
Insurance Category. Enter the insurance category in the Insurance Category field. Note that an asset can only be insured once for each category of insurance, even if it is covered by multiple insurance policies. You must have already defined your insurance category lookup values for the lookup type FA_INS_CATEGORY (Application Developer: Application > Validation > QuickCodes > Special).
Hazard Class. Enter the hazard class assigned to this policy line. You must have already defined your hazard class lookup values for the lookup type FA_INS_HAZARD (Application Developer: Application > Validation > QuickCodes > Special).
Comments. Enter any additional comments in the Comments field.
Related Topics
Entering Asset Insurance Information
Fixed Asset Insurance Policy Maintenance Window Reference
Use the Fixed Asset Insurance Policy Maintenance window to update the information for an insurance policy that covers more than one asset. The Fixed Asset Insurance Policy Maintenance window applies the policy information changes to all the assets covered by that policy.
Policy Number. This field defaults to the policy number for the current policy record. You can update the Insurance Company and Supplier Site for this policy. You can also update the Calculation Method, as long as the automatic calculation routine has not yet been run for any assets covered by this policy.
Insurance Company. This field displays the current insurance company for the policy number. In this window, you can update the Insurance Company.
Supplier Site. This field displays the current supplier site for the policy number. In this window, you can update the Supplier Site for this policy.
Calculation Method. This field displays the current calculation method for the policy number. From this window, you can update the Calculation Method, as long as the automatic calculation routine has not yet been run for any assets covered by this policy.
Related Topics
Entering Asset Insurance Information
Calculating Asset Insurance
Use the Insurance Calculation Routine program to automatically update the current insurance values of your assets. The Insurance Calculation Routine program takes into account indexation factors or transactions that affect the asset value, such as cost adjustments and retirements.
Normally, you should run the Insurance Calculation Routine program on a yearly basis to update all your asset insurance values.
If you run the program part way through a year, the calculation process will run up to the end of the last closed period in that year (i.e. the last period for which depreciation has been run). You can then run the process again later in the year, when it will incorporate any new cost adjustments, retirements, or reinstatements since the last run date, and it will also use a new indexation factor if the factor has changed since the last run date.
The Insurance Calculation Routine program does not produce any output. When the program finishes, the program updates the insurance values for all selected assets. You can review the new insurance values in the Asset Insurance window or by running the Asset Insurance Values report. See: Insurance Value Detail Report
Prerequisites
-
Set up insurance policy details using the Asset Insurance window. See: Overview of Asset Insurance.
-
Run depreciation for at least one period of the year for which you are running the process. See: Running Depreciation
-
Set up indexation factors for the year for which you are running the process. If you do not define an index factor for that year, the process will use the latest available index factor. See: Defining Price Indexes.
To run the Insurance Calculation Routine program:
-
Navigate to Assets > Insurance > Insurance Calculation Routine to open the Submit Request window.
See: Submitting a Request, Oracle Applications User's Guide
-
In the Parameters window, enter the depreciation book.
-
Enter the fiscal year for the report.
If you run the process for a year where all the depreciation periods are not yet closed, the process will run up to the end of the last closed period within the year. Before running the insurance calculation process, you must run depreciation for at least one period in this year. You cannot run the process for years prior to the current open year.
-
Optionally enter the insurance company.
If you do not enter a value, the report includes assets insured by all insurance companies. The list of values for this field will display suppliers that have been set up in Oracle Payables with a supplier type of Insurance Company.
-
Optionally enter an asset number range.
Reviewing Asset Insurance Information
Oracle Assets provides two reports to help you monitor your insurance information.
Insurance Data Report
Use the Insurance Data report to review insurance details for assets and to verify that the assignments for insurance records are correct. The Insurance Data report prints all insurance details for the selected assets.
Insurance Value Detail Report
Use the Insurance Value Detail Report to review calculations of insurance coverage for selected assets. The Insurance Value Detail Report prints all insurance amounts for the selected assets and displays totals at Balancing Segment level, Insurance Calculation Method level, Insurance Company level, and Insurance Policy Number level. The insurance coverage calculation indicates the differences between insured amounts and current insurance values.
Related Topics