Working with Measures
This chapter covers the following topics:
- About Measures
- Types of Measures
- Creating Forecast Measures
- Creating Combination Forecast Measures
- Averaging Existing Percentages to Forecasting Levels
- Copying Planning Percentages
- Creating Simple Copy Measures
- Creating Copy Multiple Measures
- Creating Accuracy Measures
- Creating Formula Measures
- Editing Measures
- Renaming Measures
- Viewing Measure Properties
- Deleting Measures
- Importing Data into a Measure from a Flat File
About Measures
A measure is a database object, such as a history or forecast, that stores or calculates data in Oracle Demand Planning. When you work as a demand planner or planning manager, you use measures to analyze, edit, share, and submit or upload data.
Certain measures are defined in the Demand Planning Server. Additional measures might be defined in the shared database and distributed by the Demand Planning Administrator. You can view shared measures and use them in data analyses. You can also define new measures, edit measure definitions, and delete measures.
This section describes how to create, modify, and delete measures.
Working with measures as a Demand Plan Manager
If your responsibility is Demand Plan Manager, you work with measures in the shared database. You have immediate access to any new measures that you create; planners will get access when the Demand Plan Administrator adds the measures to planners' assignments and runs a distribution. A full distribution distributes all measures; a quick distribution distributes selected measures.
Working with measures as a Demand Planner
If your responsibility is Demand Planner, you can work with shared measures that have been distributed to you. You can also create personal measures, to which only you have access.
Types of Measures
You can define two types of measures: stored measures and formula measures.
Stored measures
A stored measure is a variable for which calculations and properties are permanently stored in the database. Define a stored measure when you want to use Oracle Demand Planning to generate a statistical forecast, copy data from on or more measures, or create an estimate of statistical accuracy. You can also define a stored measure when you want to create a permanent variable that differs in some aspect from an existing measure.
Methods for defining stored measures
You can use the following methods to define a stored measure:
-
Create a forecast — Calculates a measure that forecasts data based on values in another measure. You might use this method to create a forecast measure based on Booking History. For more information, see "Creating Forecast Measures".
-
Create a Combination Forecast — Calculates a measure that uses different forecast methods for different products, and allows the demand for some products to be forecast statistically while the demand for other products are based on values copied from other measures. For more information, see "Creating Combination Forecast Measures".
-
Copy measure — Calculates a measure that is a copy of another measure. You might use this method to create a measure that copies all data from a measure and applies an event factor. Or you might create a measure that copies data from a measure and shifts the data backward or forward in time. For more information, see "Creating Simple Copy Measures".
-
Copy multiple measures — Calculates a measure that copies selected subsets of data in specified dimensions at specified levels from one or more measures. For example, you might use this method to create a measure that copies data at the month level from the Sales Opportunity Forecast for January through June of a given year and from the Forecast of Booking History for July through December of the same year. For more information, see "Creating Complex Copy Measures".
-
Create an accuracy measure — Calculates a measure that estimates the statistical accuracy of one measure when compared to another measure at specified levels for a specified time period. You can use this method to create an accuracy estimate to submit with a forecast. Oracle Inventory Optimization (IO) uses the forecast and its accuracy measure to calculate safety stocks. You might also use this method to statistically quantify the accuracy of any two measures. For more information, see "Creating Accuracy Measures".
Formula measures
A formula measure calculates values on the fly. You can base a formula measure on a stored measure or on another formula measure. A formula measure is not stored in the database, has no unit of measure association, and its values are never editable in worksheets. Because formula measures are calculated when accessed, there is no stored value to lock. Locks can only be applied to stored measures.
Formula measures do not impact storage or system performance. Define a formula measure when you want to change the value of a measure by applying a simple mathematical formula. For example, you might define a formula measure that lifts a stored measure by 5%. For more information, see "Creating Formula Measures".
Important: Consider storage space when selecting measure type
To enhance system performance and conserve storage space, Oracle recommends that you limit the number of stored measures that you define.
It is possible to use a single stored measure as the basis for multiple formula measures. For example, consider a situation in which you want to view a standard forecast and an optimistic forecast. Rather than create two stored forecast measures, you can create a single forecast measure and use it as the basis for a formula measure defined as the stored forecast lifted by a specified percentage.
The Measures Folder
Demand Planning has a Measures folder underneath which there are preseeded folders to help you organize the measures in your demand plan. These folders ensure that measures can be found and identified easily.
Oracle Demand Planning automatically assigns forecast, accuracy, and history measures to folders of their respective types. Any forecast or accuracy measure created by an administrator or distributed to a planner is assigned to the appropriate folder on startup.
In addition, if a planning manager or a planner creates a forecast or accuracy measure, the measure will immediately be assigned to the proper folder.
Measures that are not forecast, accuracy, or history measures remain under the main Measures folder.
In the Navigation List display, the Measures folder appears underneath the folders for your documents. The preseeded folders then appear in the order Accuracy, Forecast, History.
If you create a measure of another type, such as a Copy or Copy Multiple measure, the default location for the icon and description for that measure is beneath the History folder. You can assign new measures, of course, to folders that you create.
Formula measures appear as individual measures under the Measures folder, unless you assign them to specific folders.
The following important facts regarding the Measures folder and its dependent folders should be observed:
-
The root Measures folder cannot be deleted.
-
By default, planner measure folders are maintained, but the measures themselves are cleaned out during data download. The default folders are recreated if the database is rebuilt.
-
A demand planner can delete one or more measure folders, although a dialog will appear displaying information that measures stored in the folders will be deleted.
-
When a measure folder is deleted, the folder and all of its contents are removed. However, you cannot delete a folder when an open worksheet has unsaved data, unless the folder is already empty. This holds true for both regular and planning percentage worksheets.
Follow the procedure below to create a new folder in which to store measures.
-
On the Navigation toolbar, choose the New button.
-
From the popup menu, choose New Folder.
Demand Planning displays a submenu with the commands New Document Folder and New Measure Folder.
-
Select New Measure Folder.
-
Enter a folder name, and close the dialog box.
Creating Forecast Measures
Creating a forecast measure calculates a stored measure that is a statistical forecast based on data in another measure. For example, you might use this method to generate a forecast based on Booking History.
To create a forecast:
-
Access Oracle Demand Planning as a demand planner or planning manager.
-
On the Navigation toolbar, choose the New button.

-
Choose New Measure from the popup menu.
Alternatively, you can click the right mouse button on the Measures folder in the Navigation List. Then choose New Measure from the popup menu.
-
In the Create Measure dialog box, choose Stored Measure.
If you see the Measure Wizard — Introduction page, choose Next to continue. To suppress the display of this page in the future, clear the Show this page next time box before you continue.
Result: The Measure Wizard — Choose Method page opens.
-
Complete the Measure Wizard — Choose Method page.
-
Complete the Measure Wizard —Create Forecast page.
-
In the What measure to you want to base your forecast on? box, choose the measure that you want to use as the basis for the forecast. Oracle recommends that you choose a true history measure such as Booking History or Shipment History.
-
The Dimension/Level grid displays the levels at which Oracle Demand Planning will generate the forecast for each dimension in your database.
To change a level setting, click the Level column for the dimension, and select the level that you want to use. The dimension levels that you choose should relate to your individual business needs and processes.
Be careful not to set levels too low, or the variations in the data might be large, causing decreased accuracy. Inaccuracies might be magnified at aggregate levels. If you set levels too high, the aggregated forecasts might pick up localized trends and allocate them wrongly.
The default level setting for a dimension is the highest level for the dimension.
You can forecast at the day level for all forecast methods except Holt-Winters, which you can forecast at the week level. To use the Holt-Winters forecast method you must have at least 52 weeks of data.
Note: If you are generating a weekly forecast and want to use the Holt-Winters forecast method, you must specify a minimum of 52 weeks of historical data. Otherwise, the Holt-Winters forecast method is unavailable.
-
Choose the time period on which to base the forecast.
In the From box, select the earliest time period in the time range.
The defaults for From and To are based on the values for Horizon Start Date and the Horizon End Date defined for the scenario in the Demand Planning Server, projected back by the number of periods at the level that you chose for forecasting the Time dimension. If the demand plan definition includes more than one scenario, then the default is based on the horizon for the first scenario.
-
Choose the time period for the forecast. This is the output time period for the forecasted data.
In the From box, select the earliest time period to forecast.
In the To box, select the latest time period to forecast.
The defaults for From and To are based on the values for Horizon Start Date and the Horizon End Date defined for the scenario in the Demand Planning Server.
-
Choose Next to continue.
Result:The Measure Wizard —Select Forecast Method page opens.
-
-
On the Measure Wizard — Select Forecast Method page, choose a forecast method.
Automatic is the default method for a new measure. For more information about this and other forecasting methods, see "Forecast Methods".
After you choose a method, choose Next to continue.
Result: The Measure Wizard —Set Forecast Parameters page opens.
-
On the Measure Wizard —Set Forecast Parameters page, you can set statistical parameters for the forecast method you have chosen.
If you want to view or fine-tune the available statistical parameters for your forecast method, choose Advanced. This opens the Advanced Parameters dialog box, where you can view the current settings and modify values.
-
For an exponential smoothing forecast method, you can use the slider to indicate how you want to weight recent changes in alpha (for the Single Exponential Smoothing, Double Exponential Smoothing, and Holt-Winters methods), beta (for the Double Exponential Smoothing and Holt-Winters methods), and gamma (for the Holt-Winters method).
-
Choose OK to save your settings and return to the Measure Wizard —Set Forecast Parameters page.
Note: Setting forecast parameters is optional. For the Automatic method, the forecasting engine selects the optimal parameters when it runs the forecast. For all other methods, the engine uses default parameters.
For information about advanced statistical forecast parameters, see "Advanced Statistical Parameters".
-
Choose Next to continue.
Result: The Measure Wizard — Set Forecast Accuracy Info page opens.
-
-
You can use the Set Forecast Accuracy Info page to create one or more statistical accuracy measures for the forecast. You can also specify that the system save forecast information in text measures.
-
You can select one or more accuracy measures:
-
Mean Absolute Deviation (MAD) — Calculates the mean absolute deviation of forecasted values from the measure on which the forecast is based.
-
Mean Absolute Percentage Error (MAPE) — Divides MAD by the average.
-
Root Mean Squared Error (RMSE) — Summarizes the overall error of the forecast and reflects the variability in the data. The individual errors are squared, added together, divided by the number of individual errors, and then square rooted.
-
-
You can select one or both of the following informational text measures:
-
Forecast Methods — Describes the forecast method.
-
Forecast Parameters — Describes the forecast parameters.
-
-
Check the Backcasted Data box to create a backcast, which will be displayed as a graph, opened automatically, when the forecast is run. A backcast will give you an idea of how closely the forecast matches the last portion of historical data. Backcasting is described in the section Backcast Data.
-
Check the Smoothed History box to generate smoothed history at the specified forecasting levels and for all periods in the history. If you configure your forecast to include smoothed history, Demand Planning creates a forecast called [Forecast Name], Smoothed History, which you can view in reports and worksheets.
-
Check the Seasonal Factors box to generate seasonal factors at the specified forecasting levels and for all periods in the history. If you configure your forecast to include seasonal factors, Demand Planning creates a forecast called [Forecast Name], Seasonal Factors, which you can view in reports and worksheets.
-
Choose Next to continue.
Result: The Measure Wizard — Allocation page opens.
-
-
Use the Measure Wizard — Allocation page to select the forecast allocation method and the method that will be used to allocate new data.
-
In the topmost box, choose the algorithm that will be used to allocate data down to lower levels from the level at which the data is forecasted. Choose one of the following forecast allocation methods:
-
Allocate based on forecasted weights aggregated from the lowest level — The system uses the lowest allocation levels specified in the Demand Planning Server for the data stream on which the measure is based to allocate the results generated at the forecast levels that you chose earlier. Forecasts for intermediate levels (between specified and lowest available) are obtained by rolling up the results of the nodes after allocation. This method is the fastest and is the default for a new measure.
If you are generating a forecast at the weekly (or higher) level, but need to allocate to the day level, the specified forecast method is not always appropriate for forecasting at day level. This is due to the erratic nature of lowest-level data, and may result in the forecast method picking unwanted trends.
In this case, Demand Planning uses the automatic best-fit forecast method instead of the specified forecast method. Demand Planning chooses the best forecast method with which to allocate your data to the day level.
-
Allocate based on a forecast at each level — The system starts at the forecast levels that you chose earlier for each hierarchy, goes down one level at a time, and uses the results of the forecast on the level below to allocate the results on the level above. This process continues until the lowest available level is reached. Forecasts for levels above the specified level are achieved through rollup. This method is often the most accurate, but might involve substantial processing time.
-
Allocate based on historical weights for the last n periods — In this case n is an integer and period is the time level for the forecast. The system uses the number of historical time periods that you specified to determine weights for allocating data to the lower aggregate levels along each dimension. If there is no data for the specified periods, then the system uses the whole history. Forecasts at higher levels are achieved through rollup. This method does not adequately account for trends.
-
Allocate based on new data allocation settings specified below — The system uses the method for allocating new data that you subsequently choose to determine weights for allocating data to lower aggregate levels along each dimension. Any overrides that you specify will also apply. This method is useful when you are creating a measure that does not have adequate data at lower levels or when you want to allocate based on the data pattern in some other data stream. Note that this method can impact system performance. Also, if the forecast and history data do not match, the system will default to even allocation.
-
-
If you chose Allocate based on forecasted weights aggregated from the lowest level, Allocate based on a forecast at each level, or Allocate based on historical weights for the last n periods, the Override Time allocation using box is active. To allocate data based on the time allocation weights in another measure, choose the Override Time allocation using and select the measure that you want to use. This option is useful when you want to retain the historical weights for all dimensions except Time in order to allocate forecasts based on the workday patterns of several organizations. The weights in the Time dimension of the selected data stream will be used to allocate the forecast numbers.
Note: The selected data stream should have at least one other dimension in addition to the Time dimension.
-
In the Method box, choose the allocation method that will be used when new data is added to the measure. This allocation method applies when data for the measure is edited in worksheets. For example, if you edit an NA value at the All Products level in a worksheet, Oracle Demand Planning uses the allocation method to determine how the value will be allocated down to the Item level.
You can select one of the following allocation methods:
-
Weights in Another Measure — Allocates values based on ratios in another measure. In the Base Measure box, select the measure on which to base the weighting. This is the default for a new measure.
-
Avg Weight Based on History — Allocates values based on data in another measure for a specified number of time periods. In the Base Measure box, select the measure on which to base the weighting. In the Period box, enter the number of time periods to average.
-
None — Does not allocate values below the current level.
-
Even Allocation — Allocates values evenly. Note that this method can have a negative impact on database size and performance.
Note: Oracle recommends that unless you have a specific reason for selecting an alternate method, you should use Weights in Another Measure (the default for a new measure) or Avg Weight Based on History.
If data exists at the lowest available level within the measure, then the allocation weights will be calculated using that data. If data does not exist at the lowest available level, then the specified allocation will be used if valid non-NA allocation rules can be determined. If data does not exist at the lowest available level and the specified allocation method does not provide valid allocation rules (for example, there is no data in the base allocation measure), then even allocation will be used.
-
-
You can choose a different allocation method for one or more dimensions of the measure.
Note: Oracle recommends that you apply the same allocation method to all dimensions of the measure. Although you technically have the ability to set different allocation methods for dimensions, doing so can have a negative impact on system performance.
-
In the Dimension list, identify a dimension for which you want to change the default allocation method. In this case, the word "Default" refers to the allocation method that you chose earlier in this procedure.
-
In the Method box, choose the method that you want to use to allocate data for this dimension. If the method requires a base measure, select it in the Base Measure box. If the method requires a number of time periods, enter this in the Periods box.
-
To override the default for another dimension, repeat the previous steps.
-
-
Choose Next to continue.
Result: The Measure Wizard — Aggregation page opens.
-
-
Use the Measure Wizard — Aggregation page to specify how to roll data up through parent values when data for the measure is edited in worksheets. For example, if you edit a value at the Item level, Oracle Demand Planning will use the aggregation method to determine how the value will be aggregated up to the All Products level.
-
Choose one of the following aggregation options in the Method box:
-
Additive — Adds values. This is the default for a new measure.
-
Average — Averages values.
-
Minimum — Takes the minimum value at each child level. You might use this in a special case such as a population type measure.
-
Maximum — Takes the maximum value at each child level. You might use this in a special case, such as if you were aggregating population over time.
-
First — Takes the first value at each level. Recommended only for the Time dimension.
-
Last — Takes the last value at each level. Recommended only for the Time dimension.
-
Weighted Average — Averages values weighted by a specified measure. In the Based on box, select the measure on which to base the weighting.
-
-
You can choose a different aggregation method for one or more dimensions.
Note: Oracle recommends that you generally apply the same aggregation method to all dimensions of the measure. Although you technically have the ability to set different aggregation methods for dimensions, doing so can have a negative impact on system performance.
-
In the Dimension list, identify a dimension for which you want to change the default aggregation method. (Default ) refers to the aggregation method that you chose earlier in this procedure.)
-
In the Method box, choose the method that you want to use to aggregate data for this dimension.
-
To override the default for another dimension, repeat the previous steps.
-
-
Choose Next to continue.
Result: The Measure Wizard — Properties page opens.
-
-
On the Measure Wizard — Properties page, you can associate one or more properties with the measure.
-
To enable editing for the measure’s data in worksheets, check the Make the measure editable in worksheets box. If you will be associating a planning percentage with the measure, selecting this option also makes the associated planning percentages and dependent demand measures editable in the Planning Percentages worksheet.
-
To convert quantities to the base unit of measure for the plan when data is aggregated from the lowest available level of the Product dimension, check the Apply Unit of Measure (UOM) when aggregating data box. See
For information about this parameter, see "Measure Property: Unit of Measure Association"
-
Check the Apply persistent locks and adjustments from box to apply locks from another measure. Demand Planning uses cycle-persistent locking to carry data adjustments, locks, and comments in a measure from one cycle to another. Locking features are discussed in “Preserving Forecast Adjustments.” There are two radio buttons below the checkbox. One -- Previous cycle for the scenario -- enables you to select a particular cycle for the scenario. The other -- Selected measure -- enables you to select a particular measure.
-
Check the Overwrite existing data in the target measure box if you want the data in the measure from which locks and adjustments are being copied to overwrite cells in the target measure to which locks have been applied.
-
Choose Next to continue.
The Extended Analysis step box is displayed.
-
-
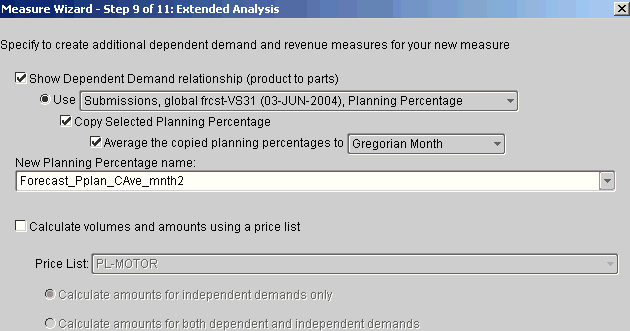
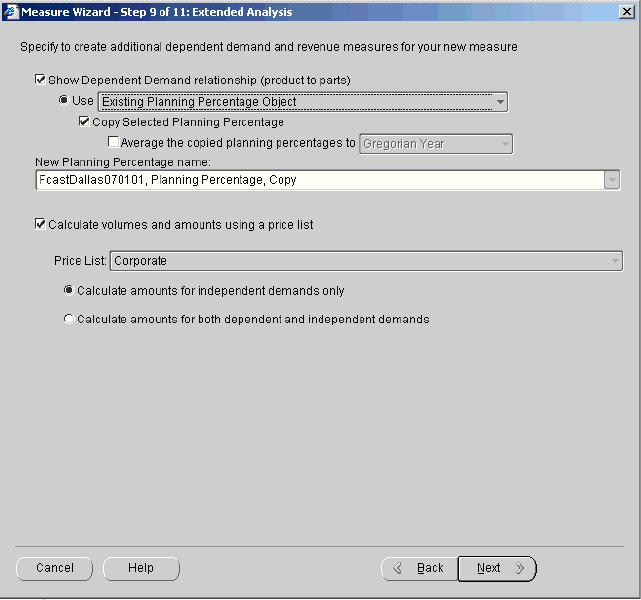
On the Measure Wizard — Extended Analysis page, you can create dependent demand and revenue measures for a new measure, or you can revise them for an existing measure. This step displays components for dependent demand in the form's upper half and components for price lists in the lower half. Some dialog box components may not be displayed if certain elements, such as dependent demand, are missing from the data stream on which the measures is based.
If dependent demand does not exist or cannot be used for the plan and if price lists do not exist for the plan, the Extended Analysis tab will not appear.
-
The Show Dependent Demand Relationship box appears if dependent demand has been enabled in the Demand Planning Server and model bills of material have been brought into Demand Planning. In addition, the lowest allocation level for the product and time dimensions must have been set to the leaf level.
Check this box to calculate measures for dependent demand and planning percentages. Clear this box if you do not want to create planning percentages and measures for dependent demand.
-
If you opt to create planning percentages, choose a planning percentage option. The Use Object or Measure option enables you to select an existing planning percentage object or a history measure (booking, shipping, etc.) from your plan.
-
The Copy Selected Planning Percentage box is enabled if the Use Object or Measureoption is selected. It enables you to copy the planning percentage object selected in the Use Object or Measurecheckbox..
-
The Average the copied planning percentages to level box is dependent on the Copy Selected Planning Percentage box. When the Average checkbox is checked, the created planning percentage is averaged at the level of time specified by the selected item in the drop-down list. When the measure type is Forecast, it's possible to set the default level at which to average to be the forecast level; for other measure types, no default will be set.
-
When your demand plan includes data streams which the history includes dependent history, the Measure Wizard displays two radio buttons above the New Planning percentage Name box. Create Planning Percentage based on forecasted dependent history is available when the basis for the forecast is a stream such as Booking History. The default name of the planning percentage is MeasureName, Planning Percentage, Forecast.
-
Create Planning Percentage based on historical weights for the last n periodscalculates planning percentages based on dependent history for the base measure for the number of previous periods that you specify.
-
If you create a new planning percentage with the name of an existing planning percentage, the result will be a repopulation of the existing planning percentage using the selected planning percentage options. You can accomplish this by selecting the name from the Use Object list box, or entering it in the New Planning Percentage Name box. If you do chose the name of an existing planning percentage, you see receive a warning when you choose Next or Finish in the measure wizard.
-
You can use the Calculate volumes and amounts using a price list box if a price list is associated with your demand plan in the Demand Planning Server. When you check this box, you create a Quantity measure and an Amount measure based on a price list. If a price list has been brought down from the Demand Planning Server, you can associate a price list with the new measure. (This indicates that you want to create the associated Quantity and Amount measures.)
-
The Price List box is enabled if you check the Calculate volumes and amounts box in the dialog box. You can select a price list from the drop-down list of those that are available. The price list will also be used during allocation calculations and during editing of NA cells (or any cell where the price is required but not otherwise available).
-
Choose the Calculate amounts for independent demands only option button to just calculate totals for independent variables.
-
Choose the Calculate amounts for both dependent and independent demands option button to create the two new variables, dependent amount and total amount.
-
Choose the Next button to accept the selections you have made in this step and proceed to the next step.
Result: The Measure Wizard displays the Events page.
-
-
On the Measure Wizard — Events page, you can choose one or more events and event groups to apply to the measure. Events are factors such as promotions, product introductions, and product phase outs that are expected to have a quantifiable impact on demand.
-
Select events as follows:
-
To add a single event or group, double-click its name in the left box
or
-
Highlight it and choose the single arrow button that points to the right box.
-
To add multiple nonsequential events or event groups, press and hold the CTRL key, select each event or event group that you want to add, and then choose the single arrow button that points to the right box.
-
To add multiple sequential events and event groups, select the first event or group that you want to add, press and hold the SHIFT key, select the event or group that you want to add, and then choose the single arrow button that points to the right box. You can also select the events to add by clicking and dragging the mouse.
-
To add all events, choose the double arrow button that points to the right box.
-
-
Choose Next to continue.
Result: The Measure Wizard —Number Formatting page opens.
-
-
On the Measure Wizard — Number Formatting page, you can specify how data for the measure will be displayed in documents.
Note: The default formats reflect settings established for the plan in the Demand Planning Server. Your changes will not impact how the data is written back to the Demand Planning Server.
If you associated a price list with the current measure, then you can choose formats for both Quantity and Amount. If no price list has been associated with the measure, then you can only choose the formats that are related to the base measure: if the forecast is based on a quantity measure, you can choose formats for Quantity; if the forecast is based on an amount measure, then you can choose formats for Amount.
-
You can set the following format options:
-
Decimal Digits — Specifies the number of decimal places to display. You can choose an alternate number.
-
Positive Values — Specifies the format for positive numbers. You can choose an alternate format.
-
Negative Values — Specifies the format for negative numbers. You can choose an alternate format.
-
Use Thousands Separator — Indicates whether to display the thousands separator. Check the box to display the thousands separator. Clear the box to suppress the thousands separator.
-
Display Leading Zero — Indicates whether to display leading zeros. Check the box to display leading zeros. Clear the box to suppress leading zeros.
As you make formatting choices, the Samples area displays their effect.
-
-
The Rounding Rule checkbox is the last component in the Number Formatting step of the Measure Wizard for three of the four types of measures. The text label says Cumulate fractional quantities within product level. There is a drop-down list box from which you can select a level in the product dimension. When you check this box, Oracle Demand Planning will round the forecast numbers by intelligently cumulating the fractional quantities across forecast time periods such that the total demand remains unchanged.
-
When your format choices are complete, choose Next to continue.
Result: The Measure Wizard — -- Summary page opens, showing the choices that you have made.
-
-
Choose Finish to save the measure.
Backcast Data
Demand Planning creates a backcast by using the forecast method already selected in the Measure Wizard to forecast data from the first part of the history range into the last part of the history range.
The history ranges used are specified by the demand planner or planning manager. History ranges are chosen in the Set Forecast Parameters step of the Measure Wizard, from which you access the Advanced Parameters dialog box.
The backcast calculates the differences between the backcast data and the history, summarized over time. Backcast data can be viewed and stored for forecast measures. The backcast data, however, is non-editable, and is not allocated or aggregated.
An advanced option enables you to request that the historical data be smoothed internally, before calculating forecast numbers, replacing outlying values with more normalized ones.
By calculating the difference between the backcast data and the history, you can determine the accuracy of the original forecast.
The backcast shows how well the forecast model fits the history data. It validates the selection of the forecast method that has been made either by Oracle Demand Planning (through the Automatic forecast method) or by the demand planner.
Features of the Backcast Graph
The graph of the backcast data is a preformatted graph that is displayed automatically after the forecast is calculated. The multi-line graph displays the forecast, history, and backcast variables (quantity measures), with time along the X-axis and with all other dimensions in the page position.
The graph’s dimension selections, for all dimensions, are at the forecast level. The time dimension is limited to the beginning of the history range through the end of the forecast.
The backcast graph is displayed even if other documents are open. You can save it or discard it.
Function of the Backcast Graph
When you select a combination of levels at which to forecast (for example, product family/customer), Oracle Demand Planning generates a time-series forecast for each level value combination.
At the end of the forecasting process, when Oracle Demand Planning displays the backcast graph, it selects the specific forecast for the level value combinations that is most accurate with respect to the history in the verification window. The history, forecast, and backcast for that level value combination is also displayed.
When the most accurate forecast is selected, the standard for the accuracy is based on an accuracy metric. The accuracy metric could be any or a combination of the following: root mean square error (RMSE), mean absolute deviation (MAD), or mean absolute percentage error (MAPE).
You select accuracy metrics in the course of creating the forecast. If you select more than one accuracy metric to display along with the forecast, then the accuracy measures are considered in the order RMSE, MAD, and MAPE. If you don’t select any accuracy measure to display along with the forecast, then RMSE is used as the default.
Setting Up a Backcast
Follow the steps below to setup your backcast.
-
Use the Measure Wizard to create a forecast or edit an existing forecast. You could, for example, use 36 months of history, selecting January 02 to December 04 as the forecast range. This is done in the Create Forecast step.
-
When you get to step 4 of the Wizard, Set Forecast Parameters, choose the Advanced button. The Advanced Parameters dialog box is displayed.
-
Set your verification window in the Verification Window Size box of the Advanced Parameters dialog box.
The verification window size, for all forecasting methods, provides a ratio that specifies the portion of the data used in the verification phase. This ratio is used to calculate forecast accuracy statistics (MAD, MAPE, and RMSE).
The ratio is set, by default, at 1/3 of the history periods. That default would be appropriate for this example, since it covers a year of history.
-
Window size can be reset, as described below:
Increasing the window size means that the forecasting engine will use a larger portion of the most recent historical data.
Decreasing the window size means that it will use a smaller portion of the data. The minimum value is1/26; the maximum value is 1/3.
-
Close the Advanced Parameters dialog and continue working with the wizard.
The backcast is calculated by using the time range January 02 to December 03 and forecasting into January 04 to December 04.
-
Make sure that the box for Backcasted Data is checked in the Set Forecast Accuracy Info step of the Measure Wizard.
-
In this case the accuracy statistics are calculated by calculating the accuracy between History (January 02 - December 03) and Backcast (January 04 – December 04.)
Oracle Demand Planning creates the backcast quantity variables and produces a preformatted graph of the backcasted data when the forecast is run.
Smoothed History
You can configure the Oracle Demand Planning forecasting engine to automatically output smoothed history at the specified forecasting levels and for all periods in the history. This option is available when the Smoothed History option is enabled.
If you configure your forecast to include smoothed history, Demand Planning creates a measure called [Forecast Name], Smoothed History. You can view this measure at the forecasting level in reports and worksheets.
Setting Up Smoothed History
To include smoothed history in the forecast, check the Smoothed History box in the Set Forecast Accuracy Info step of the Measure Wizard.
Seasonal Factors
You can configure the Oracle Demand Planning forecasting engine to automatically output seasonal factors at the specified forecasting levels and for all periods in the history. This option is available when you select the seasonal data filter in the Advanced Parameters window, or when you use the Automatic or Holt-Winters forecast methods. In both cases, the Seasonal factors checkbox must be checked on the Forecast Accuracy Info tab of the Measure Wizard. The measure created is [Forecast Name], Seasonal Factors.
If the history has been smoothed, Demand Planning outputs smoothed seasonal factors.
If you configure your forecast to include seasonal factors, Demand Planning creates a measure called [Forecast Name], Seasonal Factors. You can view this measure at the forecasting level in reports and worksheets.
Setting Up Seasonal Factors
Follow the steps below to include seasonal factors in the forecast.
-
Make sure that the Seasonal Filters option is selected in the Data drop-down list box in the Set Forecast Parameters step of the Measure Wizard.
-
Make sure that the Seasonal Filters box is checked in the Set Forecast Accuracy Info step of the Measure Wizard.
Rounding Fractional Quantities
When fractional quantities are forecast, and data is then allocated to lower hierarchical levels, the result is often fractional forecast numbers. Since the products cannot be sold in fractions, the fractional part of the demand needs to be rounded.
There is a Rounding Rule box on the Number Formatting tab of the Measure Wizard which enables you to turn intelligent rounding on or off for a particular measure.
How Measures are Affected by Rounding
Demand Planning rounds fractional quantities by cumulating fractions within a specified product level. It rounds figures up or down: 2.4 becomes 2, for example, and 2.6 becomes 3. Adjustments are made within the specified product level.
When the rounding rule is in effect, the numbers are rounded at any level higher than the allocation floor, and then aggregated up the Demand Planning hierarchies.
Note: Data loaded at the lowest level is not rounded.
After the rounding process, if a number is modified in the worksheet, the changes are allocated down, rounded again (at the allocation floor level) within the levels at which the data was modified, and then aggregated up.
To see whether intelligent rounding has been turned on for a particular measure and, if so, to see what that rule is, you can select the measure in the Navigation List and use the right-click menu to view the Properties dialog box for the measure. The Intelligent Rounding label is at the bottom of the Properties box. If a rounding rule has been enabled, the label will have a product level displayed to its right; if there is no rounding rule, the label will read None.
To specify intelligent rounding for a measure:
Follow these steps to turn intelligent rounding on or off for a particular measure. When it is turned on, Oracle Demand Planning will round fractional quantities for that measure.
-
Create a new measure or edit an existing measure, using the Measure Wizard.
-
When you get to the Number Formatting tab, there will be several columns of format settings in the Quantity Format frame. In the Rounding Rule frame, check the box labeled Cumulate fractional quantities within product dimension level.
-
Select a level from the drop-down list to the right of the checkbox. You select from the levels in the hierarchy that exists in the Product dimension of your plan.
It is recommended to round fractional quantities at the product family level. The Rounding Rule checkbox is enabled for all types of measures with the exception of forecast accuracy measures.
Measure Recalculation : Using the Measure Wizard Summary Page
The Summary step of the Measure Wizard enables you to see a summary of the steps with which you created or edited your measure.
You can review the properties that you have assigned to the measure. If you have created a forecast, for example, the summary will tell you the forecast method chosen, whether backcasting is enabled, allocation and aggregation methods, whether the measure is editable, and other important information.
The Summary step has a checkbox at the bottom of the screen, labelled Recalculate this Measure Now, which enables you to force a recalculation when you are editing a stored measure. There is more information about this feature in the topic that follows this one.
When the Recalculate this Measure Now box is checked , the message Your Measure will be recalculated when you click Finish will be displayed on the Summary page.
Forcing a Measure Recalculation
There are a number of situations when a demand planner may need to force a recalculation of a measure. For example:
-
A change in booking history would require its related forecast to be recalculated.
-
A change to an event would influence the measure with which that event is associated.
-
A change to a measure that has been copied needs to be reflected in the target measure.
When a planner is working with a worksheet, there is a Recalculate button on the document toolbar. Choosing this button with a worksheet open forces a recalculation of all measures in the worksheet that have unsaved changes.
There are two other methods of forcing a recalculation that don’t require you to have a document open.
-
You can select the measure in the Navigation List and select Recalculate from the right-click popup menu.
-
You can select the Recalculate this Measure Now checkbox on the Measure Wizard — Summary Page. Checking this box enables you to force a recalculation without making a critical change to the measure.
Creating Combination Forecast Measures
Creating a combination forecast calculates a measure that uses different forecast methods for different products, and allows the demand for some products to be forecast statistically while the demand for other products are based on values copied from other measures. For example, you might use this method to handle products with demands of different types, such as intermittent demand for some and seasonal trends for others.
When you create a combination forecast, forecast levels, accuracy measures, allocation and aggregation rules, properties, events, pricing considerations and dependant demand are designated once by the user and remain constant for all dimension values. Only the forecast method and parameters, history, and horizon time ranges vary by saved product groups.
To create a Combination Forecast Measure:
-
Access Oracle Demand Planning as a demand planner or planning manager.
-
On the Navigation toolbar, choose the New button.
-
Choose New Measure from the popup menu.
Alternatively, you can click the right mouse button on the Measures folder in the Navigation List. Then choose New Measure from the popup menu.
-
In the Create Measure dialog box, choose Stored Measure.
If you see the Measure Wizard — Introduction page, choose Next to continue. To suppress the display of this page in the future, clear the Show this page next time box before you continue.
Result: The Measure Wizard — Choose Method page opens.
-
Complete the Measure Wizard — Choose Method page.
-
In the Name box, enter a name for the measure, up to 70 characters long.
-
In the Method box, choose Combination Forecast Measure.
-
Choose Next to continue.
Result: The Measure Wizard — Create Combination Forecast page opens.
-
-
Complete the Measure Wizard — Create Combination Forecast page.
-
In the What levels do you want to forecast or copy for each dimension? box, the Dimension/Level grid displays the levels at which Oracle Demand Planning will generate the forecast for each dimension in your database.
To change a level setting, click the Level column for the dimension, and select the level that you want to use. The dimension levels that you choose should relate to your individual business needs and processes.
Be careful not to set levels too low, or the variations in the data might be large, causing decreased accuracy. Inaccuracies might be magnified at aggregate levels. If you set levels too high, the aggregated forecasts might pick up localized trends and allocate them wrongly.
Note: It is recommended that the product members of the Saved Selections be at the same level as the forecast dimension level for the product dimension.
The default level setting for the product dimension is the item level. The default level setting for all other dimensions is the highest level for the dimension. Forecast dimension levels cannot be lower than the lowest allocation floor of the base measures
-
For each product that you want to forecast, add a saved selection group and select the desired forecast parameters. Items that are not included in any saved selection group will not be forecast.
The actions are performed for the product saved selections in the order in which they appear. When the action is forecast, the source start and end date specify the history range. When the action is copy, the source start date specifies the date from which to start copying.
Calculations are performed in the order in which they are entered in the table.
-
Choose Add to add an action to the forecast.
Result: A default action appears. If you click a field for that action, a list of available options is displayed.
-
In the Action column, choose either copy or forecast.
-
In the Product Selection column, choose the product group for which the action applies.
-
In the Source Measure column, choose the measure that you want to use as the basis for the forecast.
-
In the Source Start Date and Source End Date columns, choose the time period on which you want to base your forecast.
-
In the Target Start Date and Target End Date columns, choose the time period that you want to forecast.
-
In the Method column, choose the forecast method that you want to apply to this action.
Note: This option is only available for forecast actions.
-
If you are defining a forecast action, choose Forecast Parameters to set statistical parameters for the forecast method you have chosen.
This opens the Parameters dialog box, where you can view the current settings and modify values. If you want to view or fine-tune the available statistical parameters for your forecast method, choose Show Advanced Parameters.
-
Choose OK to save your settings and return to the Measure Wizard — Create Combination Forecast page.
-
-
Repeat the steps above until you have all the actions required to generate the forecast.
-
If you have defined more than one action, choose Overlapping Values to generate an Overlapping Values report.
Time periods must be overlapping in two or more rows to cause an overlap for an item. For example, if a product is in a group that is forecast for Jan06-Mar06 with the Automatic Method and the same product is also in a group forecast with Croston’s Method for the same time horizon, then that product displays in the Overlapping Values report. The Overlapping Values report displays overlapping items at the lowest product level.
-
-
Choose Next to continue.
Result: The Measure Wizard — Create Combination Forecast page opens.
-
Use the Measure Wizard — Allocation page to select the forecast allocation method and the method that will be used to allocate new data.
-
In the topmost box, choose the algorithm that will be used to allocate data down to lower levels from the level at which the data is forecasted. Choose one of the following forecast allocation methods:
-
Allocate based on forecasted weights aggregated from the lowest level — The system uses the lowest allocation levels specified in the Demand Planning Server for the data stream on which the measure is based to allocate the results generated at the forecast levels that you chose earlier. Forecasts for intermediate levels (between specified and lowest available) are obtained by rolling up the results of the nodes after allocation. This method is the fastest and is the default for a new measure.
If you are generating a forecast at the weekly (or higher) level, but need to allocate to the day level, the specified forecast method is not always appropriate. This is due to the erratic nature of lowest-level data, and may result in the forecast method picking unwanted trends.
In this case, you can use the automatic best-fit forecast method instead of the specified forecast method. Demand Planning chooses the best forecast method with which to allocate your data to the day level.
-
Allocate based on a forecast at each level — The system starts at the forecast levels that you chose earlier for each hierarchy, goes down one level at a time, and uses the results of the forecast on the level below to allocate the results on the level above. This process continues until the lowest available level is reached. Forecasts for levels above the specified level are achieved through rollup. This method is often the most accurate, but might involve substantial processing time.
-
Allocate based on historical weights for the last n periods — In this case n is an integer and period is the time level for the forecast. The system uses the number of historical time periods that you specified to determine weights for allocating data to the lower aggregate levels along each dimension. If there is no data for the specified periods, then the system uses the default allocation method selected in the profile MSD: Use Classic Even Allocation. Forecasts at higher levels are achieved through rollup. This method does not adequately account for trends.
-
Allocate based on new data allocation settings specified below — The system uses the method for allocating new data that you subsequently choose to determine weights for allocating data to lower aggregate levels along each dimension. Any overrides that you specify will also apply. This method is useful when you are creating a measure that does not have adequate data at lower levels or when you want to allocate based on the data pattern in some other data stream. Note that this method can impact system performance. Also, if the forecast and history data do not match, the system will default to even allocation.
-
-
If you chose Allocate based on forecasted weights aggregated from the lowest level, Allocate based on a forecast at each level, or Allocate based on historical weights for the last n periods, the Override Time allocation using box is active. To allocate data based on the time allocation weights in another measure, choose the Override Time allocation using and select the measure that you want to use. This option is useful when you want to retain the historical weights for all dimensions except Time in order to allocate forecasts based on the workday patterns of several organizations. The weights in the Time dimension of the selected data stream will be used to allocate the forecast numbers.
Note: The selected data stream should have at least one other dimension in addition to the Time dimension.
-
In the Method box, choose the allocation method that will be used when new data is added to the measure. This allocation method applies when data for the measure is edited in worksheets. For example, if you edit an NA value at the All Products level in a worksheet, Oracle Demand Planning uses the allocation method to determine how the value will be allocated down to the Item level.
You can select one of the following allocation methods:
-
Weights in Another Measure — Allocates values based on ratios in another measure. In the Base Measure box, select the measure on which to base the weighting. This is the default for a new measure.
-
Avg Weight Based on History — Allocates values based on data in another measure for a specified number of time periods. In the Base Measure box, select the measure on which to base the weighting. In the Period box, enter the number of time periods to average.
-
None — Does not allocate values below the current level.
-
Even Allocation — Allocates values evenly. Note that this method can have a negative impact on database size and performance.
Note: Oracle recommends that unless you have a specific reason for selecting an alternate method, you should use Weights in Another Measure (the default for a new measure) or Avg Weight Based on History.
If data exists at the lowest available level within the measure, then the allocation weights will be calculated using that data. If data does not exist at the lowest available level, then the specified allocation will be used if valid non-NA allocation rules can be determined. If data does not exist at the lowest available level and the specified allocation method does not provide valid allocation rules (for example, there is no data in the base allocation measure), then even allocation will be used.
-
-
You can choose a different allocation method for one or more dimensions of the measure.
Note: Oracle recommends that you apply the same allocation method to all dimensions of the measure. Although you technically have the ability to set different allocation methods for dimensions, doing so can have a negative impact on system performance.
-
In the Dimension list, identify a dimension for which you want to change the default allocation method. In this case, the word "Default" refers to the allocation method that you chose earlier in this procedure.
-
In the Method box, choose the method that you want to use to allocate data for this dimension. If the method requires a base measure, select it in the Base Measure box. If the method requires a number of time periods, enter this in the Periods box.
-
To override the default for another dimension, repeat the previous steps.
-
-
Choose Next to continue.
Result: The Measure Wizard — Aggregation page opens.
-
-
Use the Measure Wizard — Aggregation page to specify how to roll data up through parent values when data for the measure is edited in worksheets. For example, if you edit a value at the Item level, Oracle Demand Planning will use the aggregation method to determine how the value will be aggregated up to the All Products level.
-
Choose one of the following aggregation options in the Method box:
-
Additive — Adds values. This is the default for a new measure.
-
Average — Averages values.
-
Minimum — Takes the minimum value at each child level. You might use this in a special case such as a population type measure.
-
Maximum — Takes the maximum value at each child level. You might use this in a special case, such as if you were aggregating population over time.
-
First — Takes the first value at each level. Recommended only for the Time dimension.
-
Last — Takes the last value at each level. Recommended only for the Time dimension.
-
Weighted Average — Averages values weighted by a specified measure. In the Based on box, select the measure on which to base the weighting.
-
-
You can choose a different aggregation method for one or more dimensions.
Note: Oracle recommends that you generally apply the same aggregation method to all dimensions of the measure. Although you technically have the ability to set different aggregation methods for dimensions, doing so can have a negative impact on system performance.
-
In the Dimension list, identify a dimension for which you want to change the default aggregation method. (Default ) refers to the aggregation method that you chose earlier in this procedure.)
-
In the Method box, choose the method that you want to use to aggregate data for this dimension.
-
To override the default for another dimension, repeat the previous steps.
-
-
Choose Next to continue.
Result: The Measure Wizard — Properties page opens.
-
-
On the Measure Wizard — Properties page, you can associate one or more properties with the measure.
-
To enable editing for the measure’s data in worksheets, check the Make the measure editable in worksheets box. If you will be associating a planning percentage with the measure, selecting this option also makes the associated planning percentages and dependent demand measures editable in the Planning Percentages worksheet.
-
To convert quantities to the base unit of measure for the plan when data is aggregated from the lowest available level of the Product dimension, check the Apply Unit of Measure (UOM) when aggregating data box. See
For information about this parameter, see "Measure Property: Unit of Measure Association"
-
Check the Apply persistent locks and adjustments from box to apply locks from another measure. Demand Planning uses cycle-persistent locking to carry data adjustments, locks, and comments in a measure from one cycle to another. Locking features are discussed in “Preserving Forecast Adjustments.” There are two radio buttons below the checkbox. One -- Previous cycle for the scenario -- enables you to select a particular cycle for the scenario. The other -- Selected measure -- enables you to select a particular measure.
-
Check the Overwrite existing data in the target measure box if you want the data in the measure from which locks and adjustments are being copied to overwrite cells in the target measure to which locks have been applied.
-
Choose Next to continue.
The Measure Wizard — Extended Analysis page is displayed.
-
-
On the Measure Wizard — Extended Analysis page, you can create dependent demand and revenue measures for a new measure, or you can revise them for an existing measure. This step displays components for dependent demand in the form's upper half and components for price lists in the lower half. Some dialog box components may not be displayed if certain elements, such as dependent demand, are missing from the data stream on which the measures is based.
If dependent demand does not exist or cannot be used for the plan and if price lists do not exist for the plan, the Extended Analysis tab will not appear.
-
The Show Dependent Demand Relationship box appears if dependent demand has been enabled in the Demand Planning Server and model bills of material have been brought into Demand Planning. In addition, the lowest allocation level for the product and time dimensions must have been set to the leaf level.
Check this box to calculate measures for dependent demand and planning percentages. Clear this box if you do not want to create planning percentages and measures for dependent demand.
-
If you opt to create planning percentages, choose a planning percentage option. The Use Object or Measure option enables you to select an existing planning percentage object or a history measure (booking, shipping, etc.) from your plan.
Note: Copying a new planning percentage object is only enabled if all action steps are forecast steps, and all history base measures have dependent demand.
-
The Copy Selected Planning Percentage box is enabled if the Use Object or Measureoption is selected. It enables you to copy the planning percentage object selected in the Use Object or Measurecheckbox..
-
The Average the copied planning percentages to level box is dependent on the Copy Selected Planning Percentage box. When the Average checkbox is checked, the created planning percentage is averaged at the level of time specified by the selected item in the drop-down list. When the measure type is Forecast, it's possible to set the default level at which to average to be the forecast level; for other measure types, no default will be set.
-
When your demand plan includes data streams which the history includes dependent history, the Measure Wizard displays two radio buttons above the New Planning percentage Name box. Create Planning Percentage based on forecasted dependent history is available when the basis for the forecast is a stream such as Booking History. The default name of the planning percentage is MeasureName, Planning Percentage, Forecast.
-
Create Planning Percentage based on historical weights for the last n periodscalculates planning percentages based on dependent history for the base measure for the number of previous periods that you specify.
-
If you create a new planning percentage with the name of an existing planning percentage, the result will be a repopulation of the existing planning percentage using the selected planning percentage options. You can accomplish this by selecting the name from the Use Object list box, or entering it in the New Planning Percentage Name box. If you do chose the name of an existing planning percentage, you see receive a warning when you choose Next or Finish in the measure wizard.
-
You can use the Calculate volumes and amounts using a price list box if a price list is associated with your demand plan in the Demand Planning Server. When you check this box, you create a Quantity measure and an Amount measure based on a price list. If a price list has been brought down from the Demand Planning Server, you can associate a price list with the new measure. (This indicates that you want to create the associated Quantity and Amount measures.)
-
The Price List box is enabled if you check the Calculate volumes and amounts box in the dialog box. You can select a price list from the drop-down list of those that are available. The price list will also be used during allocation calculations and during editing of NA cells (or any cell where the price is required but not otherwise available).
-
Choose the Calculate amounts for independent demands only option button to just calculate totals for independent variables.
-
Choose the Calculate amounts for both dependent and independent demands option button to create the two new variables, dependent amount and total amount.
-
Choose the Next button to accept the selections you have made in this step and proceed to the next step.
Result: The Measure Wizard displays the Events page.
-
-
On the Measure Wizard — Events page, you can choose one or more events and event groups to apply to the measure. Events are factors such as promotions, product introductions, and product phase outs that are expected to have a quantifiable impact on demand.
-
Select events as follows:
-
To add a single event or group, double-click its name in the left box
or
-
Highlight it and choose the single arrow button that points to the right box.
-
To add multiple nonsequential events or event groups, press and hold the CTRL key, select each event or event group that you want to add, and then choose the single arrow button that points to the right box.
-
To add multiple sequential events and event groups, select the first event or group that you want to add, press and hold the SHIFT key, select the event or group that you want to add, and then choose the single arrow button that points to the right box. You can also select the events to add by clicking and dragging the mouse.
-
To add all events, choose the double arrow button that points to the right box.
-
-
Choose Next to continue.
Result: The Measure Wizard —Number Formatting page opens.
-
-
On the Measure Wizard — Number Formatting page, you can specify how data for the measure will be displayed in documents.
Note: The default formats reflect settings established for the plan in the Demand Planning Server. Your changes will not impact how the data is written back to the Demand Planning Server.
If you associated a price list with the current measure, then you can choose formats for both Quantity and Amount. If no price list has been associated with the measure, then you can only choose the formats that are related to the base measure: if the forecast is based on a quantity measure, you can choose formats for Quantity; if the forecast is based on an amount measure, then you can choose formats for Amount.
-
You can set the following format options:
-
Decimal Digits — Specifies the number of decimal places to display. You can choose an alternate number.
-
Positive Values — Specifies the format for positive numbers. You can choose an alternate format.
-
Negative Values — Specifies the format for negative numbers. You can choose an alternate format.
-
Use Thousands Separator — Indicates whether to display the thousands separator. Check the box to display the thousands separator. Clear the box to suppress the thousands separator.
-
Display Leading Zero — Indicates whether to display leading zeros. Check the box to display leading zeros. Clear the box to suppress leading zeros.
As you make formatting choices, the Samples area displays their effect.
-
-
The Rounding Rule checkbox is the last component in the Number Formatting step of the Measure Wizard for three of the four types of measures. The text label says Cumulate fractional quantities within product level. There is a drop-down list box from which you can select a level in the product dimension. When you check this box, Oracle Demand Planning will round the forecast numbers by intelligently cumulating the fractional quantities across forecast time periods such that the total demand remains unchanged.
-
When your format choices are complete, choose Next to continue.
Result: The Measure Wizard — Summary page opens, showing the choices that you have made.
-
-
Choose Finish to save the measure.
Averaging Existing Percentages to Forecasting Levels
You may want to average or "smooth" a planning percentage to eliminate anomalies in your data resulting from seasonal factors, events, promotions, and so on. Oracle Demand Planning enables you to take an existing planning percentage and average it to a specified time level.
You can create the average/forecast planning percentage by using the Measure Wizard.
Why Average Planning Percentages?
The planning percentage brought in from your ERP and the planning percentage in your worksheet may have data at different levels because of the different circumstances in which they originate. The forecast may be at the month level, and data from the ERP may be at the week level.
The planning percentage of a forecast measure is only editable at the forecasting level. If you average an existing planning percentage, you can display and edit it at the forecasting level.
Thus, averaging an existing planning percentage enables you to better compare it with the forecast planning percentage that you calculate in the planning percentage worksheet.
If you modify an existing planning percentage to be editable at the forecasting level, you will still be able to display it at the lowest time level of the demand plan.
Average Planning Percentages - An Example
For an example, imagine a particular computer (the Laptop 123AB) as the model and its CPU and Monitor as options. The average planning percentage for the monitor for the first quarter might be 70 percent.
In order to see demand in greater granularity, you can either create a new measure, or you can copy the existing measure and average the planning percentage to the month level. It may then be seen that the planning percentage for monitors breaks down to 60% in April, 80% in May, and 70% in June, due to seasonal factors and promotions relating to school graduations.
Use the step to create the additional dependent demand and revenue measures for your new measure (ninth step) in the Measure Wizard to average a planning percentage.
-
There are several ways to average or smooth a planning percentage. One is to do so by creating a new forecast. Another method is to copy and edit an existing forecast. With either method, your use of the demand-plan-related components of the Extended Analysis step of the Measure Wizard will be the same as those described below.
Averaging a Planning Percentage -- Procedure (Creating a Forecast)
-
Open the Measure Wizard.
Choose the appropriate option in the Choose Method step of the Measure Wizard.
If you are copying an existing measure, it must be a forecast measure.
Whether you are creating a measure or copying a measure, you will not be able to use any dependent-demand related components of the Measure Wizard, unless dependent demand has been enabled in the Demand Planning Server and brought into Demand Planning.
-
Use the Measure Wizard to make your selections for forecast properties and characteristics such as method, parameters, allocation, aggregation, and so on.
-
In the Properties step, check the Make the measure editable in worksheets box.
-
In the Extended Analysis step, check the box labeled Show Dependent Demand relationship (product to parts)
-
Choose the Use Object option. This enables you to select an existing planning percentage object to average.
-
Select the name of the object from the Planning Percentage Object drop-down list box. Demand Planning will list all planning percentage objects in your personal database.
-
Check the box labeled Average the copied planning percentage to (time level).
-
Select a time level from the Time Level drop-down list box. In most cases, you will set the time to the forecasting level or to a lower level.
-
Enter a name, in the New Planning Percentage Name text box, for the planning percentage object you are creating.
-
Complete the remaining steps in the Measure Wizard.
Copying Planning Percentages
An existing planning percentage object, whether collected from ERP or created and saved by a manager or planner, can be copied and used under a different name. This is accomplished when creating or editing a forecast, copy, or copy multiple measure by using the Measure Wizard, following the steps described below.
-
Proceed to the Extended Analysis step or tab.
-
Check the Show Dependent Demand relationship box.
-
Choose the Use Planning Percentage Object box, which is a list box that displays the available planning percentage objects.
-
Select the planning percentage object that you want to copy.
-
Check the Copy Selected Planning Percentage box.
-
Enter a new name in the New Planning Percentage Name box.
-
Complete your tasks in the Measure Wizard and choose Finish.
Creating Simple Copy Measures
You can create a measure that copies data from another measure. For example, you might use this method to create a measure that copies data in the same time period and applies an event factor. Or you might create a measure that copies the data and shifts it backward or forward in time.
To create a simple copy measure:
-
Access Oracle Demand Planning as a Demand Planner or Demand Plan Manager.
-
On the Navigation toolbar, choose the New button.
-
Choose New Measure from the popup menu.
Alternatively, you can click the right mouse button on the Measures folder in the navigation list and choose New Measure from the popup menu.
Result: The Create Measure dialog box opens.
-
In the Create Measure dialog box, choose Stored Measure.
If you see the Measure Wizard — Introduction page, choose Next to continue.
Note: To suppress the display of this page in the future, clear the Show this page next time box before you continue.
Result: The Measure Wizard — Choose Method page opens.
-
Complete the Measure — Choose Method page.
-
In the Name box, enter a name for the measure, up to 70 characters long.
-
In the Method box, choose Copy Measure.
-
Choose Next to continue.
Result: The Measure Wizard — Copy Measure page opens.
-
-
Complete the Measure Wizard — Copy Measure page.
-
In the What measure do you want to copy your data from? box, choose from the following options:
-
Stored Measure — Create a new measure based on an existing stored measure.
Select the measure to copy.
-
Formula Measure — Create a new measure based on an existing formula measure.
To modify the selected formula measure, choose Edit. To create a new formula measure, choose Create. For more information, see Creating Formula Measures.
-
-
Indicate how you want to copy the data. You can choose one of the following options:
-
Leave data in original time — Copies the data in the same time period as the base measure. This is the default for a new measure.
-
Shift data back by n periods (where n is an integer and periods is a time level) — Copies the data in the base measure and shifts it back in time. Enter the number of time periods in the text box and choose the time level from the drop-down list box.
-
Shift data forward by nperiods (where nis an integer and periods is a time level) — Copies the data in the base measure and shifts it forward in time. Enter the number of time periods and choose the time level.
-
-
Choose Next to continue.
Result: The Measure Wizard — Allocation page opens.
-
-
Use the Measure Wizard — Allocation page to select the allocation method that will be used when new data is added to the measure. The selected allocation method is used for both the initial calculation and during the editing process. For example, if you edit an NA value at the All Products level in a worksheet, Oracle Demand Planning uses the allocation method to determine how the value will be allocated down to the Item level. By default, Demand Planning uses the formula measure’s specified weighting.
-
In the Method box, choose one of the following methods:
-
Weights in Another Measure — Allocates values based on ratios in another measure. In the Base Measure box, select the measure on which to base the weighting. This is the default for a new measure.
-
Avg Weight Based on History — Allocates values based on data in another measure for a specified number of time periods. In the Base Measure box, select the measure on which to base the weighting. In the Period box, enter the number of time periods to average.
-
None — Does not allocate values below the current level. This option is only available if you selected Shift data back by n periods or Shift data forward by n periods.
-
Even Allocation — Allocates values evenly. Note that this method can have a negative impact on database size and performance.
Note: Oracle recommends that unless you have a specific reason for selecting an alternate method, you should use Weights in Another Measure (the default for a new measure) or Avg Weight Based on History. While even allocation is the default behavior in situations where allocation needs to occur but no base can be found, Oracle recommends that you try to specify a base.
If data exists at the lowest available level within the measure, then the allocation weights will be calculated using that data.
If data does not exist at the lowest available level, then the specified allocation will be used if valid non-NA allocation rules can be determined.
If data does not exist at the lowest available level and the specified allocation method does not provide valid allocation rules (for example, there is no data in the base allocation measure), then even allocation will be used.
-
-
You can choose a different allocation method for one or more dimensions.
Note: Oracle recommends that you usually apply the same allocation method to all dimensions of the measure. Although you technically have the ability to set different allocation methods for dimensions, doing so can have a negative impact on system performance.
-
To override the allocation method that you set for one or more dimensions, check the Do you want to override the default method of allocation of newly added data box and proceed as follows:
-
In the Dimension list, identify a dimension for which you want to change the default allocation method. ("Default" refers to the allocation method that you choose.)
-
In the Method box, choose the method that you want to use to allocate data for this dimension. If the method requires a base measure, select it in the Base Measure box. If the method requires a number of time periods, enter this in the Periods box.
-
To override the default for another dimension, repeat the previous steps.
-
-
Choose Next to continue.
Result:The Measure Wizard — Aggregation page opens.
-
-
For a measure that shifts data back or forward in time, use the Measure Wizard — Aggregation page to specify how to roll data up through parent values when data for the measure is edited in worksheets. The selected aggregation method is used for both the initial calculation and during the editing process. For example, if you edit a value at the Item level, Oracle Demand Planning will use the aggregation method to determine how the value will be aggregated up to the All Products level. By default, Demand Planning uses the formula measure’s specified aggregation method.
Note: You cannot select an aggregation method for data that is copied in original time. For this type of measure, aggregation is additive and cannot be changed.
-
Choose one of the following aggregation options in the Method box:
-
Additive — Adds values. This is the default for a new measure.
-
Average — Averages values.
-
Minimum — Takes the minimum value at each child level. You might use this in a special case such as a population type measure.
-
Maximum — Takes the maximum value at each child level .
You might use this in a special case, such as if you were aggregating population over time.
-
First — Takes the first value at each level. Recommended only for the Time dimension.
-
Last — Takes the last value at each level. Recommended only for the Time dimension.
-
Weighted Average — Averages values weighted by a specified measure. In the Based on box, select the measure on which to base the weighting.
-
None — Does not aggregate values.
-
-
You can choose a different aggregation method for one or more dimensions.
Note: Oracle recommends that you generally apply the same aggregation method to all dimensions of the measure. Although you technically have the ability to set different aggregation methods for dimensions, doing so can have a negative impact on system performance.
To override the aggregation method that you set for one or more dimensions, check the Do you want to override the default aggregation per dimension box and proceed as follows:
-
In the Dimension list, identify a dimension for which you want to change the default aggregation method. ("Default" refers to the aggregation method that you chose.)
-
In the Method box, choose the method that you want to use to aggregate data for this dimension.
-
To override the default for another dimension, repeat the previous steps.
-
-
Choose Next to continue.
Result: The Measure Wizard — Properties step opens.
-
-
On the Measure Wizard — Properties page, you can associate one or more properties with the measure.
-
To enable editing data for the measure in worksheets, check the Make the measure editable in worksheets box. If you will be associating a planning percentage with the measure, selecting this option also makes the associated measures for planning percentages and dependent demand editable in the Planning Percentages worksheet.
-
To convert quantities to the base unit of measure for the plan when data is aggregated from the lowest available level of the Product dimension, check the Apply Unit of Measure (UOM) when aggregating data box.
Note: This option is not available for a measure that is copied in original time.
For information about this parameter, see "Measure Property: Unit of Measure Association".
-
Check the Apply persistent locks and adjustments from box to apply locks from another measure. Demand Planning uses cycle-persistent locking to carry data adjustments, locks, and comments in a measure from one cycle to another. Locking features are discussed in “Preserving Forecast Adjustments.” There are two radio buttons below the checkbox. One -- Previous cycle for the scenario -- enables you to select a particular cycle for the scenario. The other -- Selected measure -- enables you to select a particular measure.
-
Check the Overwrite existing data in the target measure box if you want the data in the measure from which locks and adjustments are being copied to overwrite cells in the target measure to which locks have been applied.
-
Choose Next to continue.
The Extended Analysis step box is displayed.
-
-
On the Measure Wizard — Extended Analysis step, you can create dependent demand and revenue measures for a new measure, or you can revise them for an existing measure. This step displays components for dependent demand in the form's upper half and components for price lists in the lower half. Some dialog box components may not be displayed if certain elements, such as dependent demand, are missing from the data stream on which the measures is based.
If dependent demand does not exist or cannot be used for the plan and if price lists do not exist for the plan, the Extended Analysis tab will not appear.
-
The Show Dependent Demand Relationship box appears if dependent demand has been enabled in the Demand Planning Server and model bills of material have been brought into Demand Planning. In addition, the lowest allocation level for the product and time dimensions must have been set to the leaf level.
Check this box to calculate measures for dependent demand and planning percentages. Clear this box if you do not want to create planning percentages and measures for dependent demand.
-
If you opt to create planning percentages, choose a planning percentage option. The Use Object or Measure option enables you to select an existing planning percentage object or a history measure (booking, shipping, etc.) from your plan.
-
The Copy Selected Planning Percentage box is enabled if the Use Object or Measureoption is selected. It enables you to copy the planning percentage object selected in the Use Object or Measurecheckbox..
-
The Average the copied planning percentages to level box is dependent on the Copy Selected Planning Percentage box. When the Average checkbox is checked, the created planning percentage is averaged at the level of time specified by the selected item in the drop-down list. When the measure type is Forecast, it's possible to set the default level at which to average to be the forecast level; for other measure types, no default will be set.
-
When your demand plan includes data streams which the history includes dependent history, the Measure Wizard displays two radio buttons above the New Planning percentage Name box. Create Planning Percentage based on forecasted dependent history is available when the basis for the forecast is a stream such as Booking History. The default name of the planning percentage is MeasureName, Planning Percentage, Forecast.
-
Create Planning Percentage based on historical weights for the last n periodscalculates planning percentages based on dependent history for the base measure for the number of previous periods that you specify.
-
If you create a new planning percentage with the name of an existing planning percentage, the result will be a repopulation of the existing planning percentage using the selected planning percentage options. You can accomplish this by selecting the name from the Use Object list box, or entering it in the New Planning Percentage Name box. If you do chose the name of an existing planning percentage, you see receive a warning when you choose Next or Finish in the measure wizard.
-
You can use the Calculate volumes and amounts using a price list box if a price list is associated with your demand plan in the Demand Planning Server. When you check this box, you create a Quantity measure and an Amount measure based on a price list. If a price list has been brought down from the Demand Planning Server, you can associate a price list with the new measure. (This indicates that you want to create the associated Quantity and Amount measures.)
-
The Price List box is enabled if you check the Calculate volumes and amounts box in the dialog box. You can select a price list from the drop-down list of those that are available. The price list will also be used during allocation calculations and during editing of NA cells (or any cell where the price is required but not otherwise available).
-
Choose the Calculate amounts for independent demands only option button to just calculate totals for independent variables.
-
Choose the Calculate amounts for both dependent and independent demands option button to create the two new variables, dependent amount and total amount.
-
Choose the Next button to accept the selections you have made in this step and proceed to the next step.
Result: The Measure Wizard displays the Events page.
-
-
On the Measure Wizard — Events page, you can choose one or more events and event groups to apply to the measure. Events are factors such as promotions, product introductions, and product phase outs that are expected to have a quantifiable impact on demand.
-
Select events as follows:
-
To add a single event or group, double-click its name in the left box.
or
-
Highlight it and choose the single arrow button that points to the right box.
-
To add multiple nonsequential events or event groups, press and hold the CTRL key, choose each event or event group that you want to add, and then choose the single arrow button that points to the right box.
-
To add multiple sequential events and event groups, select the first event or group that you want to add, press and hold the SHIFTkey, select the event or group that you want to add, and then choose the single arrow button that points to the right box. You can also select the events to add by clicking and dragging the mouse.
-
To add all events, choose the double arrow button that points to the right box.
-
-
Choose Next to continue.
Result: The Measure Wizard — Number Formatting page opens.
-
-
On the Measure Wizard — Number Formatting page, you can specify how data for the measure will be displayed in documents.
Note: The default formats reflect settings established for the plan in the Demand Planning Server. Your changes will not impact how the data is written back to the Demand Planning Server.
If you associated a price list with the measure, then you can choose formats for both Quantity and Amount. If no price list has been associated with the measure, then you can only choose formats that are related to the base measure: if the new measure is based on a quantity measure, you can choose formats for Quantity; if the new measure is based on an amount measure, then you can choose formats for Amount.
-
You can set the following format options:
-
Decimal Digits — Specifies the number of decimal places to display. You can choose an alternate number.
-
Positive Values — Specifies the format for positive numbers. You can choose an alternate format.
-
Negative Values — Specifies the format for negative numbers. You can choose an alternate format.
-
Use Thousands Separator — Indicates whether to display the thousands separator. Check the box to display the thousands separator. Clear the box to suppress the thousands separator.
-
Display Leading Zero — Indicates whether to display leading zeros. Check the box to display leading zeros. Clear the box to suppress leading zeros.
As you make formatting choices, the Samples area displays their effect.
-
The Rounding Rule checkbox is the last component in the Number Formatting step of the Measure Wizard for three of the four types of measures. The text label says Cumulate fractional quantities within product level. There is a drop-down list box from which you can select a level in the product dimension. When you check this box, Oracle Demand Planning will round the forecast numbers by intelligently cumulating the fractional quantities across forecast time periods such that the total demand remains unchanged.
-
-
When your format choices are complete, choose Next to continue.
Result: The Measure Wizard — Summary page opens, showing the choices that you have made.
-
-
Choose Finish to save the measure.
Allocation Settings
When copying measures based on stored measures, the allocation settings will only apply to the allocation of data that is input into “NA” cells on a worksheet.
When copying measures based on formula measures, Demand Planning uses the allocation settings when the measure is calculated from the selected formula measure, and when you add new data to the measure using a worksheet.
Aggregation Settings
Aggregation settings are not available when defining measures that are copies of stored measures. Data is copied directly from the source measure at all levels and Demand Planning uses the source measure’s aggregation settings for subsequent recalculations.
If you are defining a copy measure based on a formula measure, you can specify which aggregation methods to include. These aggregation methods are used when calculating the measure from the selected formula measure, and when adding or editing measure data.
Creating Copy Multiple Measures
You can create measures that copy subsets of data from more than one dimension of more than one measure.
Following are some examples of when you might want to use this method:
-
You might want to create a measure that copies data at the month level from the Sales Opportunity Forecast for January through June of a given year and from the Forecast of Booking History for July through December of the same year.
-
You might want to create a measure that uses a statistical forecast for mature products and a "based on last submitted forecast" for products with transient customers.
-
You might want to create a measure that uses a statistical forecast for mature products for a defined customer population, a "based on last submitted forecast" for a specific customer product combination where the demand is not expected to evolve at all, and last years history (with appropriate lag or lead) for a few customers/products where you know the demand is not expected to evolve at all.
To create a stored measure that copies a measure depending on more than one dimension:
-
Access Oracle Demand Planning as a Demand Planner or Demand Plan Manager.
-
On the Navigation toolbar, choose the New button.
-
Choose New Measure from the popup menu.
Alternatively, you can click the right mouse button on the Measures folder in the Navigation list. Then choose New Measure from the popup menu.
-
In the Create Measure dialog box, choose Stored Measure.
If you see the Measure Wizard — Introduction page, choose Next to continue.
Note: To suppress the display of this page in the future, clear the Show this page next time box before you continue.
Result: The Measure Wizard — Choose Method page opens.
-
Complete the Measure Wizard — Choose Method page.
-
In the Measure Name box, enter a name for the measure, up to 70 characters long.
-
In the Method box, select Copy multiple measures.
Result: The Copy multiple measures page opens.
-
-
In the Copy multiple measures page, you must specify the levels at which to copy values for each dimension. Then you choose the values to copy.
-
The Dimension/Level grid displays defaults for levels in the dimension hierarchies. When you click on a panel in the Level column, you see a drop-down list of available levels.
Note: Set the levels at which you want to copy the data before you select specific measures and dimension values. If you change a level after you select measures and values, you will have to enter your selections again.
-
Choose Add to select a measure from which to copy data.
Result:A default measure appears in the Measure column of the Measure/Values box. If you click that measure, a list of all the available measures is displayed. Choose the first measure with which you want to work.
The list of available measures changes after you select the initial data subset. This occurs because each measure selected for copying must have the same properties for Unit of Measure and aggregation method as the first measure that you chose. For example, a measure that only has an amount portion can only be combined with other amount measures.
-
Repeat the step above until you have all the measures from which you will copy subsets.
-
Use the command buttons to the right of the Measure/Values box to select dimension values for the measures you have chosen. To select values for a measure, highlight the measure and choose Edit.
Result: The Select Data dialog box opens. The Available box lists values for one dimension of this measure.
-
The Select Data dialog box displays three buttons in place of the usual Selection Tools toolbar. The button on the left is the Attribute tool. You can use this button to access the Choose Values by Attribute dialog box. Use the Attribute tool to select values just as you would when working with the full Selector.
-
Use the steps below to select dimension values for your measures.
-
Select values for the current dimension (displayed in the Select Values for box). See the procedure"Techniques for selecting values from a list".
-
Select values for another dimension.
-
Repeat the selection process until you have selected at least one value for each dimension. This enables the OK button in the Select Data dialog box. Choose OK.
Result: You are returned to the Copy multiple measures page.
-
-
-
Select another measure and choose dimension values for that measure. Repeat the process until all your subsets are complete.
Result:Each entry in the Measure column now shows a corresponding entry in the Values column.
-
Choose Next to continue.
Result: The Measure Wizard — Allocation page opens.
-
Use the Measure Wizard —Allocation page to select the allocation method that will be used when new data is added to the measure.
The allocation method applies when data for the measure is edited in worksheets. For example, if you edit an NA value at the All Products level in a worksheet, Oracle Demand Planning uses the allocation method to determine how the value will be allocated down to the Item level.
-
Choose one of the following allocation methods:
-
Weights in Another Measure — Allocates values based on ratios in another measure. In the Base Measure box, select the measure on which to base the weighting. This is the default for a new measure.
-
Avg Weight Based on History — Allocates values based on data in another measure for a specified number of time periods. In the Base Measure box, select the measure on which to base the weighting. In the Period box, enter the number of time periods to average.
-
Even Allocation — Allocates values evenly. Note that this method can have a negative impact on database size and performance.
Note: Oracle recommends that unless you have a specific reason for selecting an alternate method, you should use Weights in Another Measure (the default for a new measure) or Avg Weight Based on History. While even allocation is the default behavior in situations where allocation needs to occur but no base can be found, Oracle recommends that you try to specify a base.
If data exists at the lowest available allocation level within the measure, then the allocation weights will be calculated using that data. If data does not exist at the lowest available level, then the specified allocation will be used if valid non-NA allocation rules can be determined.
If data does not exist at the lowest available level and the specified allocation method does not provide valid allocation rules, even allocation will be used.
-
-
You can choose a different allocation method for one or more dimensions.
Note: Oracle recommends that you usually apply the same allocation method to all dimensions of the measure. Although you technically have the ability to set different allocation methods for dimensions, doing so can have a negative impact on system performance.
To override the allocation method that you set earlier for one or more dimensions, check the Do you want to override the default method of allocation of newly added data box and change the allocation settings.
-
Choose Next to continue. Result:The Measure Wizard — Aggregation page opens.
-
-
Use the Measure Wizard — Aggregation page to specify how to roll data up through parent values when data for the measure is edited in worksheets. For example, if you edit a value at the Item level, Oracle Demand Planning will use the aggregation method to determine how the value will be aggregated up to the All Products level.
-
In the Method box, choose one of the following aggregation options:
-
Additive — Adds values. This is the default for a new measure.
-
Average — Averages values.
-
Minimum — Takes the minimum value at each child level. You might use this in a special case such as a population type measure.
-
Maximum — Takes the maximum value at each child level. You might use this in a special case, such as if you were aggregating population over time.
-
First — Takes the first value at each level. Recommended only for the Time dimension.
-
Last — Takes the last value at each level. Recommended only for the Time dimension.
-
Weighted Average — Averages values weighted by a specified measure. In the Based on box, select the measure on which to base the weighting.
-
None — Does not aggregate values.
-
-
You can choose a different aggregation method for one or more dimensions.
Note: Oracle recommends that you generally apply the same aggregation method to all dimensions of the measure. Although you technically have the ability to set different aggregation methods for dimensions, doing so can have a negative impact on system performance.
To override the aggregation method that you set earlier for one or more dimensions, check the Do you want to override the default aggregation per dimension box and change the aggregation settings.
-
Choose Next to continue.
Result:The Measure Wizard — Properties page opens.
-
-
On the Measure Wizard — Properties page, you can associate one or more properties with the measure.
-
To enable editing data for the measure in worksheets, check the Make the measure editable in worksheets box. If you will be associating a planning percentage with the measure, selecting this option also makes the associated measures for planning percentages and dependent demand editable in the Planning Percentages worksheet.
-
To convert quantities to the base unit of measure for the plan when data is aggregated from the lowest available level of the Product dimension, check the Apply Unit of Measure (UOM) when aggregating data box.
For information about this parameter, see "Measure Property: Unit of Measure Association".
-
Check the Apply persistent locks and adjustments from box to apply locks from another measure. Demand Planning uses cycle-persistent locking to carry data adjustments, locks, and comments in a measure from one cycle to another. There are radio buttons below the checkbox that enable you to select a particular cycle for the scenario (Previous cycle for the scenario) or a particular measure (Selected measure).
-
Check the Overwrite existing data in the target measure box if you want the data in the measure from which locks and adjustments are being copied to overwrite cells in the target measure to which locks have been applied.
-
To use a price list as the basis for calculating an amount measure from a quantity measure or a quantity measure from an amount measure, check the Calculate volumes and amounts using a price list box, and select the price list to use for the calculation.
Note: This option only appears if a price list is associated with the demand plan in the Demand Planning Server.
-
When you complete the Properties page, choose Next to continue.
Result:The Measure Wizard — Extended Analysis page opens.
-
-
On the Measure Wizard —- Extended Analysis step, you can create dependent demand and revenue measures for a new measure, or you can revise them for an existing measure. This step displays components for dependent demand in the form's upper half and components for price lists in the lower half. Some dialog box components may not be displayed if certain elements, such as dependent demand, are missing from the data stream on which the measures is based.
If dependent demand does not exist or cannot be used for the plan and if price lists do not exist for the plan, the Extended Analysis tab will not appear.
-
The Show Dependent Demand Relationship box appears if dependent demand has been enabled in the Demand Planning Server and model bills of material have been brought into Demand Planning. In addition, the lowest allocation level for the product and time dimensions must have been set to the leaf level.
Check this box to calculate measures for dependent demand and planning percentages. Clear this box if you do not want to create planning percentages and measures for dependent demand.
-
If you opt to create planning percentages, choose a planning percentage option. The Use Object or Measure option enables you to select an existing planning percentage object or a history measure (booking, shipping, etc.) from your plan.
-
The Copy Selected Planning Percentage box is enabled if the Use Object or Measureoption is selected. It enables you to copy the planning percentage object selected in the Use Object or Measurecheckbox.
-
The Average the copied planning percentages to level box is dependent on the Copy Selected Planning Percentage box. When the Average checkbox is checked, the created planning percentage is averaged at the level of time specified by the selected item in the drop-down list. When the measure type is Forecast, it's possible to set the default level at which to average to be the forecast level; for other measure types, no default will be set.
-
When your demand plan includes data streams which the history includes dependent history, the Measure Wizard displays two radio buttons above the New Planning percentage Name box. Create Planning Percentage based on forecasted dependent history is available when the basis for the forecast is a stream such as Booking History. The default name of the planning percentage is MeasureName, Planning Percentage, Forecast.
-
Create Planning Percentage based on historical weights for the last n periodscalculates planning percentages based on dependent history for the base measure for the number of previous periods that you specify.
-
If you create a new planning percentage with the name of an existing planning percentage, the result will be a repopulation of the existing planning percentage using the selected planning percentage options. You can accomplish this by selecting the name from the Use Object list box, or entering it in the New Planning Percentage Name box. If you do chose the name of an existing planning percentage, you see receive a warning when you choose Next or Finish in the measure wizard.
-
You can use the Calculate volumes and amounts using a price list box if a price list is associated with your demand plan in the Demand Planning Server. When you check this box, you create a Quantity measure and an Amount measure based on a price list. If a price list has been brought down from the Demand Planning Server, you can associate a price list with the new measure. (This indicates that you want to create the associated Quantity and Amount measures.)
-
The Price List box is enabled if you check the Calculate volumes and amounts box in the dialog box. You can select a price list from the drop-down list of those that are available. The price list will also be used during allocation calculations and during editing of NA cells (or any cell where the price is required but not otherwise available).
-
Choose the Calculate amounts for independent demands only option button to just calculate totals for independent variables.
-
Choose the Calculate amounts for both dependent and independent demands option button to create the two new variables, dependent amount and total amount.
-
Choose the Next button to accept the selections you have made in this step and proceed to the next step.
Result: The Measure Wizard displays the Events page.
-
-
On the Measure Wizard — Events page, you can choose one or more events and event groups to apply to the measure. Events are factors such as promotions, product introductions, and product phase outs that are expected to have a quantifiable impact on demand.
-
Select events as follows:
-
To add a single event or group, double-click its name in the left box
or
-
Highlight it and choose the single arrow button that points to the right box.
-
To add multiple nonsequential events or event groups, press and hold the CTRL key, choose each event or event group that you want to add, and then choose the single arrow button that points to the right box.
-
To add multiple sequential events and event groups, select the first event or group that you want to add, press and hold the SHIFT key, select the event or group that you want to add, and then choose the single arrow button that points to the right box. You can also select the events to add by clicking and dragging the mouse.
-
To add all events, choose the double arrow button that points to the right box.
-
-
Choose Next to continue.
Result:The Measure Wizard — Number Formatting page opens.
-
-
On the Measure Wizard —Number Formatting page, you can specify how data for the measure will be displayed in documents.
Note: The default formats reflect settings established for the plan in the Demand Planning Server. Your changes will not impact how the data is written back to the Demand Planning Server.
If you associated a price list with the current measure, then you can choose formats for both Quantity and Amount. If no price list has been associated with the measure, then you can only choose the formats that are related to the base measure: if the new measure is based on a quantity measure, you can choose formats for Quantity; if the new measure is based on an amount measure, then you can choose formats for Amount.
-
You can set the following format options:
-
Decimal Digits — Specifies the number of decimal places to display. You can choose an alternate number.
-
Positive Values — Specifies the format for positive numbers. You can select an alternate format.
-
Negative Values — Specifies the format for negative numbers. You can select an alternate format.
-
Use Thousands Separator — Indicates whether to display the thousands separator. Check the box to display the thousands separator. Clear the box to suppress the thousands separator.
-
Display Leading Zero — Indicates whether to display leading zeros. Check the box to display leading zeros. Clear the box to suppress leading zeros.
As you make formatting choices, the Samples area displays their effect.
-
-
The Rounding Rule checkbox is the last component in the Number Formatting step of the Measure Wizard for three of the four types of measures. The text label says Cumulate fractional quantities within product level. There is a drop-down list box from which you can select a level in the product dimension. When you check this box, Oracle Demand Planning will round the forecast numbers by intelligently cumulating the fractional quantities across forecast time periods such that the total demand remains unchanged
-
When your format choices are complete, choose Next to continue.
Result: The Measure Wizard — Summary page opens, showing the choices that you have made.
-
-
Choose Finish to save the measure.
Using the Attribute Tool when Creating Copy Multiple Measures
When you are using the Measure Wizard to create copy multiple measures, you can access the Attribute tool to use attributes as selection criteria for a subset of dimension values.
-
You can use attributes to select groups of products that share an attribute, such as color.
-
You can use attributes to select only dimension values that are in your Assignment scope.
You use attributes in the second step of the Measure Wizard, Copy Multiple Measures, after choosing Copy Multiple Measures in the Choose Method step.
Follow the steps below to use the Attribute tool in the Measure Wizard. The rest of the steps for creating your copy multiple measure are the same as those described in the procedure “Creating Copy Multiple Measures” earlier in this chapter.
-
In the Copy Multiple Measures step, use the Level column of the Dimension/Level grid to set the level for each dimension from which you intend to copy a subset of values.
-
Choose Add to add a measure. A default measure appears in the Measure column of the Measure/Values box.
-
If you do not want to use the default measure, click the default measure so that a drop-down list of (alternate) available measures is displayed. Choose the first measure with which you want to work.
-
Select the Values cell and choose Edit.
The Select Data dialog box is displayed. In place of the Selection tools toolbar, the Attribute tool and the Undo and Redo buttons are displayed.
-
For each dimension, you can select values from the list in the Available box, or you can use the Attribute tool to modify or create dimension value subsets.
When you make a dimension selection for a dimension, the dimension name is enabled in the Select values for box. However, the OK button in the Select Data dialog box is not enabled until you have selected values from every dimension and created a data ‘cube.’
-
Proceed to select subsets from all the dimensions for all the measures you want in your Copy Multiple measure.
-
Then choose Next to go to the Allocation step and continue building your measure.
Creating Accuracy Measures
At the conclusion of a planning cycle, Oracle Demand Planning publishes the final forecast numbers for supply and inventory planning to other Oracle applications such as Advanced Supply Chain Planning (ASCP).
If Demand Planning provides a measure of forecast accuracy, Inventory Optimization uses the forecast and its accuracy to calculate safety stocks. You can use the Stored Measure option to create these accuracy measures.
You can also use this option to quantify accuracy between any two measures at specified levels for a specified time period: for example, you might create an accuracy measure that compares a previous period forecast to new sales history. Or you might compare the forecast accuracy from one period to another. You can also create specific accuracy measures for various organization and product combinations.
To create an ad hoc accuracy measure:
-
Access Oracle Demand Planning as a planner or planning manager.
-
On the Navigation toolbar, choose the New button.
-
Choose New Measure.
Alternatively, you can click the right mouse button on the Measures folder in the Navigation list. Then choose New Measure from the popup menu.
-
In the Create Measure dialog box, choose Stored Measure.
If you see the Measure Wizard — Introduction page, choose Next to continue.
Note: To suppress the display of this page in the future, clear the Show this page next time box before you continue.
Result: The Measure Wizard —Choose Method page opens.
-
Complete the Measure Wizard — Choose Method page.
-
Enter a name for the measure, up to 70 characters long.
-
Choose Create an accuracy measure as the method for creating the measure.
-
Choose Next to continue.
Result: The Measure Wizard — Create Accuracy Measure page opens.
-
-
Complete the Measure Wizard — Create Accuracy Measure page.
-
Choose the type of accuracy measure that you want to create. You can choose one of the following:
-
Mean Absolute Deviation (MAD) — Calculates the mean absolute deviation between the base measure and the comparison measure.
-
Mean Absolute Percentage Error (MAPE) — Divides MAD by the average.
-
Root Mean Squared Error (RMSE) — Summarizes the overall error and reflects the variability in the data. The individual errors are squared, added together, divided by the number of individual errors, and then square rooted.
-
Cumulative Error (CE) — Provides a measure of the overall errors in a forecast when compared to actuals, or the difference between any two measures. This is calculated by summing the difference between the two measures.
-
Percent Bias (PB) — Provides a measure of the overall errors in a forecast when compared to actuals, or the difference between any two measures. This is calculated by summing the difference between two measures as a percentage of the base measure.
-
-
Choose the measure on which to base the accuracy calculation. The label says, What type of accuracy measure do you want to create? For example, you might choose a previous period forecast.
-
Choose the comparison measure for the calculation. The label says, What measure do you want to base the calculation on? For example, you might choose new sales history.
-
Choose a measure to compare to the base measure. The label saysWhat measure should be compared to the base measure?
-
The Dimension/Level grid displays the levels at which Oracle Demand Planning will generate the accuracy measure for each dimension in your database. To change a level setting, choose the Level column for the dimension and select the level that you want to use.
-
In the Start and End Date boxes, choose the time period over which to evaluate accuracy.
The default time periods are based on the level selection for Time. If you want to choose time values at specific level, ensure that you select that level before you set dates.
Note: Accuracy calculations will be performed at the selected dimension levels across the specified time range. If the base and comparison measures that you chose do not both have data at these levels within the time range, then the resulting accuracy measure will not contain data (it will be NA).
-
Choose Next to continue.
Result: The Measure Wizard — Properties page opens.
-
-
On the Measure Wizard — Properties page, you can specify whether data for the measure can be edited in worksheets. To make the measure editable, enable the Make the measure editable in worksheets box.
When you complete the Properties page, choose Next to continue.
Result: The Measure Wizard —Number Formatting page opens.
-
On the Measure Wizard — Number Formatting page, you can specify how data for the measure will be displayed in documents.
Note: The default formats reflect settings established for the plan in the Demand Planning Server. Your changes will not impact how the data is written back to the Demand Planning Server.
-
You can specify the following format options:
-
Decimal Digits — Specifies the number of decimal places to display. You can choose an alternate number.
-
Positive Values — Specifies the format for positive numbers. You can select an alternate format.
-
Negative Values — Specifies the format for negative numbers. You can select an alternate format.
-
Use Thousands Separator — Indicates whether to display the thousands separator. Check the box to display the thousands separator. Clear the box to suppress the thousands separator.
-
Display Leading Zero — Indicates whether to display leading zeros. Check the box to display leading zeros. Clear the box to suppress leading zeros.
As you make formatting choices, the Samples area on the left side of the page displays the effect of your choices.
-
-
Choose Next to continue.
Result: The Measure Wizard — Summary page opens, showing the choices that you have made.
-
-
Choose Finish to save the measure.
Creating Formula Measures
When you define a formula measure, you select the measure or measures on which to base the formula, specify the calculations to apply, and enter appropriate parameters.
To create a formula measure:
-
Access Oracle Demand Planning as a planner or planning manager.
-
On the Navigation toolbar, choose the New button.
-
Choose New Measure.
Alternatively, you can click the right mouse button on the Measures folder in the navigation list. Then choose New Measure from the popup menu.
Result: The Create Measure dialog box opens.
-
In the Create Measure dialog box, choose Formula Measure.
Result: The New Formula Measure dialog box opens.
-
In the name boxes, enter a short name and a long name for the measure.
The short name can be up to 16 characters long. The long name can be up to 70 characters long.
-
The Type box specifies the method and associated formula that will be used to calculate the measure. Choose the method that you want to use. You can select one of the following:
-
Change — Calculates the change in a measure's value between the current time period and a previous time period. You select the measure and specify the time period. You can choose Prior Period, Year Ago, or Custom.
If you choose Custom, enter the number of time periods.
-
Fiscal-Year-to-Date — Sums the value of a measure through the fiscal year to date. You select the measure.
-
Lag — Calculates a measure that lags data for a specified time period. You select the measure and specify the time level and time period for the lag. You can choose Prior Period, Year Ago, or Custom. If you choose Custom, enter the number of time periods.
-
Lead — Calculates a measure that leads data for a specified time period. You select the measure and specify the time level and time periods for the lead. You can choose Prior Period, Year Ago, or Custom. If you choose Custom, enter the number of enter the number of time periods
-
Moving Average — Averages the values of a measure over time. You select the measure and specify the number of time periods to consider.
-
Moving Maximum — Finds the maximum value for a measure over time. You select the measure and specify the number of time periods to consider.
-
Moving Minimum — Finds the minimum value for a measure over time. You select the measure and specify the number of time periods to consider.
-
Moving Total — Sums the values of a measure over time. You select the measure and specify the number of time periods to consider.
-
Percent Change — Calculates the percentage change in a measure's value between the current time period and a previous time period. You select the measure and specify the previous time period. You can choose "Prior Period," "Year Ago," or "Custom." If you choose Custom, enter the number of time periods.
-
Year-to-Date — Sums up the value of a measure through the current calendar year. You select the measure.
-
Difference — Subtracts the value of one measure from another. You select the measures.
-
Multiplication — Multiplies the value of a measure by a numeric literal. You select the measure and specify the multiplier.
-
Ratio — Divides the values of one measure by another. You select the measures.
-
Sum — Adds the value of one or more measures and a numeric literal. You select the measure and specify the value to add.
-
Index — Calculates the ratio between the current value for a dimension of the measure and a reference dimension value or level. You select the measure, the dimension, and the reference dimension value or level.
-
Nested — Performs simple nested formula calculations. These formulas take the form (A ? B) ? (C ? D), where you can replace each letter with a measure and each question mark with an arithmetic operator, qualified by a dimension value. You select the measures and specify the operators and the qualifying dimension values.
-
Variance — Calculates the difference between the current value for a dimension of the measure and a reference dimension value or level. You select the measure, the dimension, and the reference dimension value or level.
Result: The components of the Definition box change depending on the type of measure that you chose.
-
-
To specify a starting period for the formula measure, proceed as follows:
-
Check the Beginning Period box.
-
Do one of the following:
-
To use the current period as the start for your formula measure, choose the Current Period option.
-
To specify a specific starting period, click the Browse button and select one from the Date dialog box.
-
-
-
Complete the other fields in the Definition box. The information that you provide depends on the measure type.
For example, if you are defining a Difference measure, you select the base measure and the measure to subtract.
-
To specify an additional calculation to include in the formula, proceed as follows:
-
In the Additional Calculations box, select an operator and enter a number.
-
To specify that calculated values be positive, check Absolute Value.
-
-
To specify display formats for the data associated with this measure, choose Format.
Result: The Format Number dialog box opens.
-
In the Format Number dialog box, you can specify how data for the measure will be displayed in documents. You can specify the following format options:
-
Decimal Digits — Specifies the number of decimal places to display. You can select an alternate number.
-
Positive Values — Specifies the format for positive numbers. You can select an alternate format.
-
Negative Values — Specifies the format for negative numbers. You can select an alternate format.
-
Use Thousands Separator — Indicates whether to display the thousands separator. Check the box to display the thousands separator. Clear the box to suppress the thousands separator.
-
Display Leading Zero — Indicates whether to display leading zeros. Check the box to display leading zeros. Clear the box to suppress leading zeros.
As you make formatting choices, the Samples box shows you the effect your choices will have on the data.
-
-
If the Format Number dialog box is open, choose OK to close it.
Result: You are returned to the New Formula Measure dialog box.
-
Choose OK to save the measure.
Editing Measures
You can edit the definition of any measure that is displayed in the navigation list.
Note: Editing a measure definition is distinct from editing the data for the measure. You use the Measures function to modify the measure definition. You use a worksheet to edit measure data.
If your role is Demand Plan Manager, the modified definition will be made available to planners whose assignment includes the measure the next time a distribution runs, assuming that it is a full distribution or a quick distribution that includes the measure.
To edit a measure:
-
Access Oracle Demand Planning as a Demand Planner or Demand Plan Manager.
-
In the navigation list, identify the measure whose definition you want to change.
Note: To search for a measure, click the right mouse button on the Measures folder in the navigation list and choose Find from the popup menu. Then enter a name or name fragment. Alternatively, you can choose the Find button on the navigation toolbar.
-
Highlight the measure that you want to modify and choose Edit.
Result:If you are editing a stored measure, a tabbed page opens. If you are editing a formula measure, the Edit Formula Measure dialog box opens.
-
To edit a stored measure, use the tabs, the Next button, and the Back button to move through the measure definition to make your changes. You can also change the measure name.
Note: If the measure is a stored accuracy measure or a measure from the Planning Server, you can only edit the measure name, specify the numeric format, and change the property that determines whether data for the measure will be editable in worksheets.
Choose Finish to save your changes and close the measure definition.
-
To edit a formula measure, view and change the measure attributes in the Edit Formula Measure dialog box. You can also change the measure name.
Choose OK to save your changes.
Renaming Measures
You can give a new name to a measure in the navigation list. You can also rename a measure by editing it, as described in "Editing Measures".
To rename a measure in the navigation list:
-
Access Oracle Demand Planning as a Demand Planner or Demand Plan Manager.
-
In the navigation list, identify the measure that you want to rename.
Note: To search for a measure, click the right mouse button on the Measures folder in the navigation list and choose Find from the popup menu. Then enter a name or name fragment. Alternatively, you can choose the Find button on the navigation toolbar.
-
Click the right mouse button on the measure object and choose Rename from the popup menu.
-
Enter the new name. The name can be up to 70 characters long.
Viewing Measure Properties
You can use the Navigation list to view information about a measure.
Note: If you are viewing properties as a planner, you might see "Personal" as the Type for a measure. This means that you created the measure in your personal database (or edited a shared measure and saved it). Although you can work with personal measures in documents and submit them to the shared database, you will not be able share personal measures in a collaborative environment.
For a Planning Server measure, the following properties are displayed:
-
Name — Measure name
-
Source — Planning Server
-
Type — Quantity, Amount, or Quantity and Amount
-
Aggregate — Yes or No
-
Allocate — Yes or No
-
Editable — Yes or No
-
Price List — None
-
Events — None
-
Lowest Allocation Levels — For each dimension, specifies the lowest level to which data will be allocated
For a stored measure that is a forecast or a copy of one or more measures, the following properties are displayed:
-
Name — Measure name
-
Transformation — Method used to create the measure, for example: Forecast
-
Source — Shared or Personal
-
Type — Quantity, Amount, or Quantity and Amount
-
Aggregate — Yes or No
-
Allocate — Yes or No
-
Editable — Yes or No
-
Price List — Price list name or None
-
Events — Event names or None
-
Lowest Allocation Levels — For each dimension, specifies the lowest level to which data will be allocated (depends on the data stream on which the forecast or copy is based)
For a stored accuracy measure, the following properties are displayed:
-
Name — Measure name
-
Transformation Method — Accuracy
-
Source — Shared or Personal
-
Accuracy Measure Type — Type of accuracy measure, for example, Mean Absolute Percentage Error (MAPE)
-
Base Measure — Base measure for accuracy calculation
-
Comparison Measure — Comparison measure for accuracy calculation
-
Editable — Yes or No
For a formula measure, the following properties are displayed:
-
Name — Long name for the measure
-
Transformation — Formula
-
Source — Shared or Personal
To view measure properties:
-
Access Oracle Demand Planning as a Demand Planner or Demand Plan Manager.
-
In the navigation list, identify the measure whose information you want to view.
Note: To search for a measure, click the right mouse button on the Measures folder in the navigation list and choose Find from the popup menu. Then enter a name or name fragment. Alternatively, you can choose the Find button on the navigation toolbar.
-
Click the right mouse button on the measure object and choose Properties from the popup menu.
Deleting Measures
When you longer need access to a measure, you can delete it.
Note: Before you delete a measure, ensure that there are no saved objects that reference it. If you fail to do this, warning messages and errors can occur when you work with reports, graphs, worksheets, or alerts that contain the deleted measure. If your role is Demand Plan Manager, also ensure that planners do not have saved objects that reference the measure.
To delete a measure:
-
Access Oracle Demand Planning as a Demand Planner or Demand Plan Manager.
-
In the Navigation list, identify the measure that you want to delete.
Note: To search for a measure, click the right mouse button on the Measures folder in the navigation list and choose Find from the popup menu. Alternatively, you can choose the Find button on the navigation toolbar.
-
Click the measure object and choose the Delete button on the navigation toolbar.

-
Alternatively, you can click the right mouse button on the measure and choose Delete from the popup menu.
Result: You will be prompted to confirm the deletion.
Importing Data into a Measure from a Flat File
An import feature enables you “read” data from a flat file into a measure. You might use this feature to bring in data for a customer forecast that is in an ASCII file. You might also use this feature to integrate data from internal collaborators such as Sales or Marketing that has been converted to comma delimited (CSV) format.
General requirements for import file
Any file from which you import data must meet the following general requirements:
-
Data for each dimension must be consistent in terms of level. For example, time values must all be in days, or all in weeks, or all in months. You cannot import some time values in days and others in weeks or months.
-
Data must be within the time range of the measure that you define for the data.
-
Data must have a consistent unit of measure (quantity or amount) and must not be a negative number.
-
Data must have a display format that is consistent with the language setting for the browser.
Format requirements for import file
The first record of an import file is the template record. The template record defines the format for all of the records that follow. The required format for the template record is as follows:
-
delimiter space delimiter first dimension name delimiter second dimension name delimiter third dimension name delimiter (if the data model has four dimensions) fourth dimension name (if the data model has four dimensions) end delimiter
Format requirements for all records after the template record are as follows:
-
value of the first dimension delimiter value of the second dimension delimiter value of the third dimension delimiter value of the fourth dimension (if the data model has four dimensions) delimiter (if the data model has four dimensions) quantity or amount value delimiter (if optional comment is included) optional comment (not supported in this release)
Restrictions on Character Usage
There are certain characters that must not appear in import files. They are the following:
-
Single quote
-
Back slash
Also, the following rules apply for import files:
-
You may not use any alphanumeric character used in data or dimension names (0-9, a-z, A-Z) as a delimiter.
-
If you are importing decimal values, you can not use the decimal separator.
-
If you are importing values with a thousands separator, you can not use the thousands separator.
-
You can not use ',' or '.' as a separator.
To import data from a flat file into a measure:
-
Access Oracle Demand Planning as a Demand Planner or Demand Plan Manager.
-
Create a stored measure and ensure that the measure is editable. You will use this measure to “hold” the data from the flat file.
For example, you might create a measure that is a copy of another measure.
-
Ensure that the data in the import file meets requirements. For more information, see "General requirements for import file" and "Format requirements for import file".
-
On the navigation toolbar, choose the Tools button.

-
From the submenu, choose Import Data.
Result: The File to Import dialog box opens.
-
In the File to Import dialog box, browse to the flat file from which you want to import data and choose Open.
Result: the Select Measure dialog box opens.
-
In the Select Measure dialog box, select the measure that you created in Step 2 and proceed as follows:
-
Choose Quantity if the file contains values for quantity.
-
Choose Amount if the file contains values for amount.
-
-
Choose OK to import the file.
Result: The import process begins. If there are minor errors, the Import Errors dialog box opens, with a description of the problems. You can choose to terminate the import or to continue. If the file format does not meet requirements, an error message appears and data is not imported.
Example: Import file
The excerpt below is from a sample import file with four dimensions. Additional seeded dimensions could include the following:
-
Sales Channel
-
Sales Representative
-
User Defined Dimension1
-
User Defined Dimension2
:: ::Time::Product::Ship to Location::Geography
31-MAR-2003::CM25287::Boston Manufacturing::Vision-Boston::104
30-MAR-2003::CM25287::Boston Manufacturing::Vision-Boston::105
29-MAR-2003::CM25287::Boston Manufacturing::Vision-Boston::106
28-MAR-2003::CM25287::Boston Manufacturing::Vision-Boston::107
27-MAR-2003::CM25287::Boston Manufacturing::Vision-Boston::108
26-MAR-2003::CM25287::Boston Manufacturing::Vision-Boston::109
25-MAR-2003::CM25287::Boston Manufacturing::Vision-Boston::100
24-MAR-2003::CM25287::Boston Manufacturing::Vision-Boston::101
23-MAR-2003::CM25287::Boston Manufacturing::Vision-Boston::102
22-MAR-2003::CM25287::Boston Manufacturing::Vision-Boston::103
21-MAR-2003::CM25287::Boston Manufacturing::Vision-Boston::104
20-MAR-2003::CM25287::Boston Manufacturing::Vision-Boston::105
19-MAR-2003::CM25287::Boston Manufacturing::Vision-Boston::106
18-MAR-2003::CM25287::Boston Manufacturing::Vision-Boston::107
17-MAR-2003::CM25287::Boston Manufacturing::Vision-Boston::108
16-MAR-2003::CM25287::Boston Manufacturing::Vision-Boston::109
15-MAR-2003::CM25287::Boston Manufacturing::Vision-Boston::100
14-MAR-2003::CM25287::Boston Manufacturing::Vision-Boston::101
13-MAR-2003::CM25287::Boston Manufacturing::Vision-Boston::102
12-MAR-2003::CM25287::Boston Manufacturing::Vision-Boston::103
11-MAR-2003::CM25287::Boston Manufacturing::Vision-Boston::104
10-MAR-2003::CM25287::Boston Manufacturing::Vision-Boston::105
09-MAR-2003::CM25287::Boston Manufacturing::Vision-Boston::106
08-MAR-2003::CM25287::Boston Manufacturing::Vision-Boston::107
07-MAR-2003::CM25287::Boston Manufacturing::Vision-Boston::108
06-MAR-2003::CM25287::Boston Manufacturing::Vision-Boston::109
05-MAR-2003::CM25287::Boston Manufacturing::Vision-Boston::100