Viewing Output
This chapter details how to view the output after you run an inventory plan.
This chapter covers the following topics:
- Overview of Viewing Output
- Queries
- Creating Queries
- Editing and Maintaining Queries
- Executing Queries
- Setting Queries Preferences
- Performance Indicators
- Time-phased Supply and Demand
- Visibility to Forecast Variability
- Viewing the Demand Fulfillment Lead Time
- Safety Stock and Target Safety Stock
- Safety Stock Analysis - Viewing the Plan
- Resource Requirements
- Material/Resource Availability
- Reviewing Exception Messages
Overview of Viewing Output
You can view the output of your inventory plans using the Planner Workbench as well as the Analysis Workbench. The Analysis Workbench enables you to view and analyze the output both at the aggregate level and the detailed level. The Planner Workbench enables you to do a detailed analysis of the output.
For more information on the Analysis Workbench, see Overview of Analysis Workbench
This chapter explains how you can view the output through Planner Workbench using the following:
-
Horizontal plan
-
Vertical Plan
-
Performance Indicators
-
Time-phased Supply and Demand
-
Constrained and Unconstrained Safety Stocks
For information on the Horizontal Plan window and the Vertical Plan window, see Oracle Advanced Planning Implementation and User's Guide.
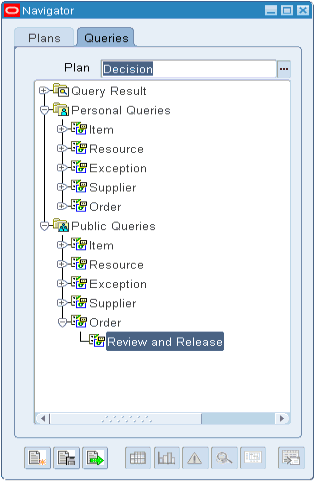
Queries
Inventory Optimization supports personal queries for orders. This allows planners to retrieve key demand and supply orders such as: forecasts for all items with service level violations. Queries can be specified as Public, and then shared with other planners.
In addition to retrieving orders on the basis of supply/demand attributes such as quantity, due date, planner code, and order type, planners can retrieve orders related to Inventory Optimization exceptions. The Match All and Match Any features are available for query criteria. Match All is similar to the 'and' logic condition, and Match Any is similar to the 'or' logic condition.
Planners can create multiple queries, with each query addressing a specific set of orders that need to be reviewed. Multiple sub queries can be combined to form a query. When the Order query is executed, all the sub queries within the Order query are executed. Thus, the displayed orders are the result of the union of all executed sub queries. Any of the individual query criteria can be made inactive by deselecting the 'Active' check box. This offers flexibility in restructuring the query.
Planners can selectively execute the queries, review the results directly, and take necessary actions using standard processes. Execution of the query opens the Supply and Demand window directly.
See:
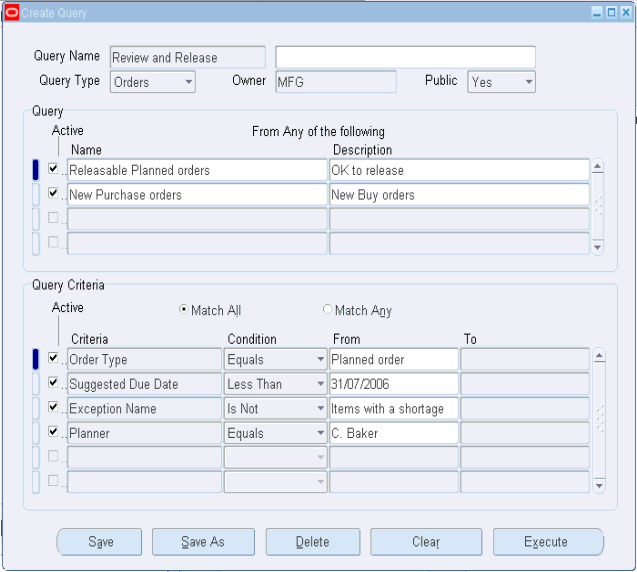
Creating Queries
Steps
-
Open the Planner Workbench. From the Inventory Planner responsibility, navigate:
Inventory Plan > Workbench
The Navigator window appears.
-
Switch to Queries Tab, if it has not been set as the default Tab in the Navigator Pane.
See Setting Queries Preferences.
-
Select the 'Create Query' icon located at the bottom left of the Navigator Pane.
The Create Query window appears.
-
Specify a Query Name and Description.
-
Select a Query Type, Owner, and specify whether this query will be available to the public.
-
(Optional) If this query includes existing sub-queries, in the Query region, list the Names of the sub queries.
Note: Multiple sub-queries can be entered, each with its own criteria Upon execution, all sub-queries will be executed
-
Select the Active check box for sub-queries that you want to be in effect.
-
In the Query Criteria region, enter the query criteria. Multiple criteria can be specified.
-
Select the Match All radio button to retrieve the intersection of all criteria.
-
Select the Match Any radio button to retrieve the union of all criteria.
-
-
Click Save.
Editing and Maintaining Queries
Steps
-
Open the planner work bench, and then switch to Queries tab if the Queries tab is not the default tab in the Navigator pane.
-
If the query is specified as a non public query, drill down to the query from the Personal Queries node.
-
If the query is specified as a Public query, drill down from the Public Queries node.
Note: Queries specified as Public can only be edited by the user who created the query. Other users can only view and use them.
-
Drill down to the required Order query from the Order Node. Highlight the required query. Right mouse click the query, and then select View Query from the right-click menu.
-
Edit the query, and then click Save.
Executing Queries
Steps
-
Open the planner work bench, and then switch to Queries tab if the Queries tab is not the default tab in the Navigator pane.
Drill down to the Order Query to be executed, and highlight the query.
-
Specify the Plan name against which the query should be executed.
-
Click the Execute Query icon.
The Supply/Demand Query Review and Release window appears.
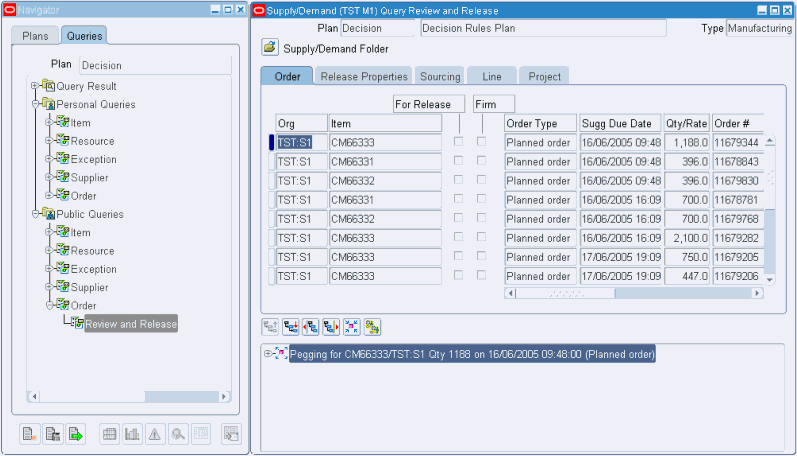
Note: Queries can also be executed using the right mouse menu option of “Execute Query”.
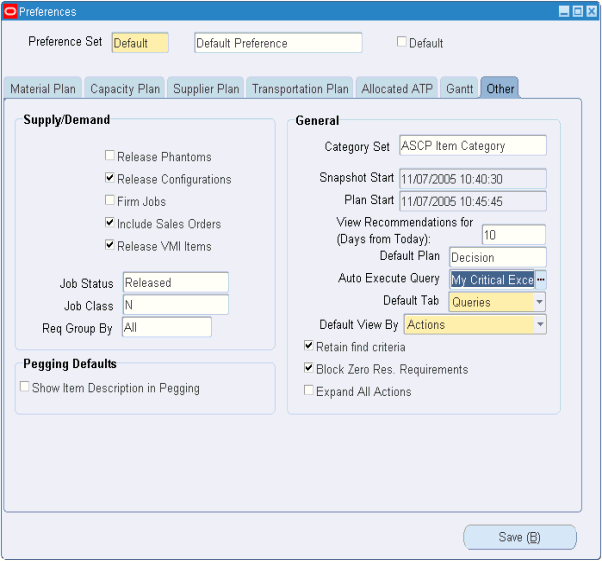
Setting Queries Preferences
-
Cause the navigator pane to open to the Queries tab instead of the Plans tab.
-
Specify the Auto Execute Query. Upon opening the workbench, the Auto Execute Query automatically runs, and results are shown in the Supply/Demand Query Review and Release window.
-
Specify the Default Plan. Auto Execute Query executes against the Default Plan.
To set query preferences.
Steps
-
Open the Planner Workbench. From the Inventory Planner responsibility, navigate:
Inventory Plan > Workbench
The Navigator window appears.
-
Navigate to the Preferences window.
Tools > Preferences
The Preferences window appears.
-
Select the Other tab.
-
In the Default Tab field, select Queries from the list of values.
-
In the Auto Execute Query field, select the query to automatically execute when the Workbench opens.
-
In the Default Plan field, enter the name of the default plan against which you want the automatic query to execute.
-
Click Save.
Performance Indicators
After you run a plan, you can evaluate its performance by comparing its parameters. For example, you can compare the plan's achievable service level with its target service level. This enables you to select the inventory plan that best meets your organizational objectives that you have defined.
The Key Indicators window is a summary chart that provides a graphical display of an inventory plan's key performance indicators. Using this window, you can see how the inventory plan performs relative to the following measures:
-
Inventory turns
-
Service level
-
Planned utilization
-
Margin
-
Margin percentage
-
Cost breakdown
-
Inventory value
To navigate to the Key Indicators window, select a plan in the Navigator and choose Key Indicators from the right-click popup menu.
For more information on performance indicators, see Oracle Advanced Planning Implementation and User's Guide.
Time-phased Supply and Demand
You can view time-phased supply and demand for all the items in your inventory plan using the Supply/Demand window. This enables you to analyze factors regarding supply and demand on a day-by-day or bucket-by-bucket basis. For example, you can find out how demands are met and how supplies are planned over a specify time frame. You can navigate to the Supply/Demand window from various node types such as items, organizations, and plans from the Navigator. In addition to the Navigator, you can also drill down to the Supply/Demand window from other windows such as the Vertical Plan window.
Supply/Demand window

For more information on navigating to the Supply/Demand window and its fields, see Oracle Advanced Planning Implementation and User's Guide.
Visibility to Forecast Variability
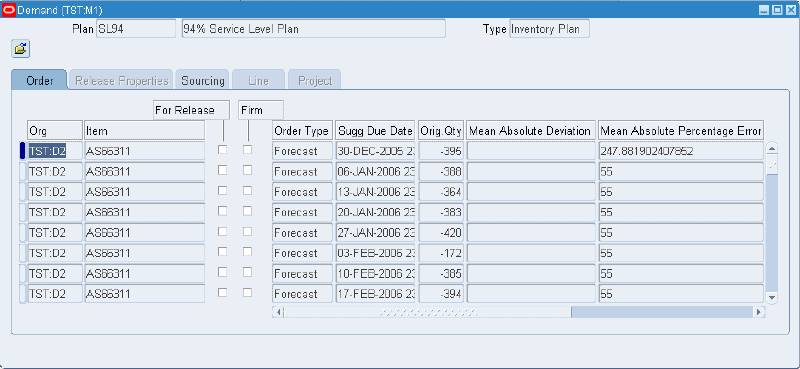
With Release 12, the mean absolute deviation (MAD) and the mean absolute percentage error (MAPE) metrics for forecasts calculated in Oracle Demand Planning and fed into Oracle Inventory Optimization are now visible in new columns of the Supply/Demand window of the Inventory Optimization Planner Workbench.
Viewing the Demand Fulfillment Lead Time
When reviewing a plan, the fulfillment lead time assigned at different levels can be viewed in the service levels folder of the analysis workbench. The fulfillment lead time shown is the value set by the user in the service level set at the particular level of aggregation being viewed. In the case where there is no assignment at the level at which the user is viewing the data, the results of default values, or assignments at more aggregate and less specific levels are not shown.
Steps
-
Navigate to the Service Level Breakdown page.
Inventory Analyst > Service Levels Folder
-
Select one or more Plans. Click Go.
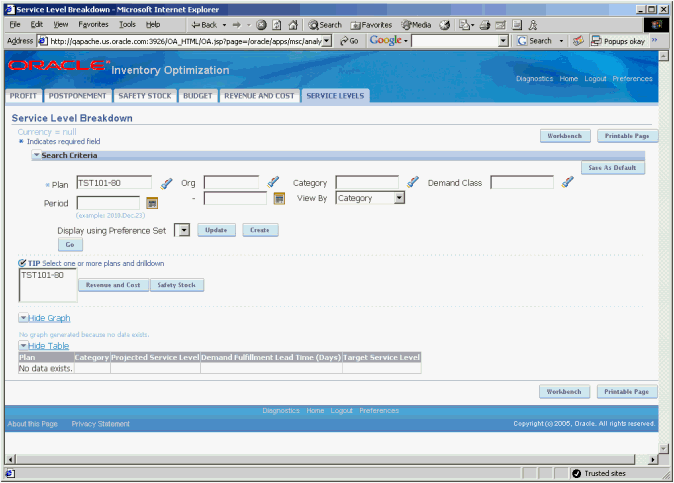
This folder shows the service levels and fulfillment lead times at the level that you are viewing the data.
Safety Stock and Target Safety Stock
Safety stock levels are the stock levels required to provide a specific service level. The plan constraints such as budget and capacity constraints are considered when the safety stock levels are calculated. Target safety stock levels are the safety stock levels without considering the plan constraints.
The inventory planning engine calculates and displays both safety stock and target safety stock levels. It calculates the target safety stock based on the target service level that you specify. It calculates the safety stock level after taking the constraints into account. Viewing the target safety stock and safety stock levels helps you find answers to the following questions:
-
What service level is achievable?
-
What do I need to do in order to achieve the target service level?
You can view the time-phased safety stock quantities for all items in a plan using the Horizontal Plan window. The values for the safety stock displayed in the Horizontal Plan and the Supply/Demand window may vary because the inventory planning engine rounds off the safety stock quantity in the horizontal plan. To access the Horizontal Plan window, click the Horizontal Plan icon in the Planner Workbench.
Horizontal Plan window
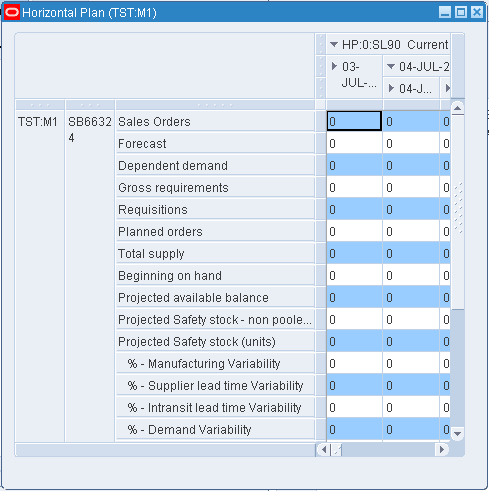
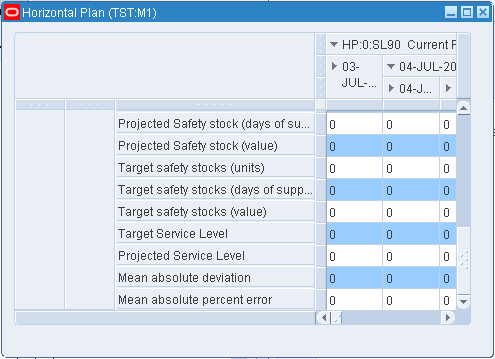
With Release 12, the horizontal plan of the Inventory Optimization Planner Workbench can now display the following additional rows:
-
Target Service Level, expressed in percent (%)
-
Achieved Service Level, expressed in percent (%)
-
Mean Absolute Deviation
-
Mean Absolute Percent Error
-
Safety stock - non pooled (units)
-
Safety stock units sub rows that show the percentage of safety stock to be carried to protect against the following types of variability:
-
Manufacturing variability
-
Supplier lead time variability
-
In-transit lead time variability
-
Demand variability
-
Note: If you want the inventory planning engine to consider an item as a purchased item, ensure that you have a sourcing rule specifying a buy source. If you do not define sourcing details for an item, the inventory planning engine considers the item as a make item. If an item is a buy item, the inventory planning engine considers the preprocessing, processing and postprocessing lead times to calculate the safety stock.
Safety Stock Analysis - Viewing the Plan
-
From the Inventory Analyst responsibility, navigate to the Safety Stock folder.
Click the Safety Stock tab
The safety stock tab of the Inventory Optimization page opens.
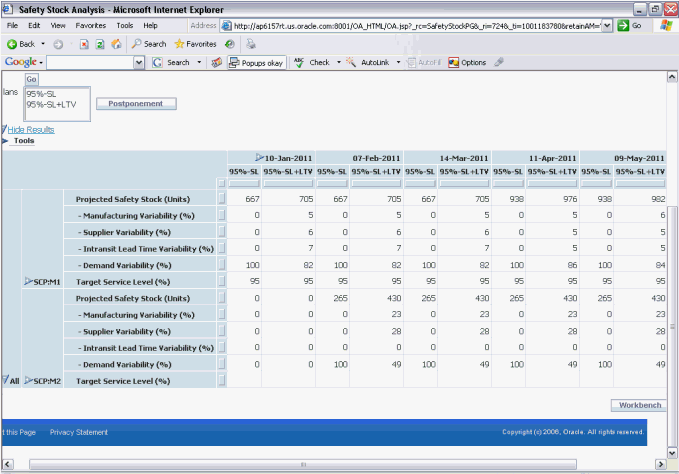
The Safety Stock folder in the analysis workbench displays the percent (%) contribution to safety stock from each source of variability (demand, manufacturing lead time, in-transit lead time, and supplier lead time variability).
Resource Requirements
Resource requirements are the number of hours for which resources are needed to process an order. You can view time-phased resource requirements for all resources in your inventory plan using the Resource Requirements window. This enables you to find out the specific resources and the time period for which these resources will be needed for each order. The resource requirements are set up Oracle Bills of Material application using routings.
You can navigate to the Resource Requirements window in one of the following ways:
-
From the Resources window, click the Requirements button.
-
From the Navigator, select a resource and choose Resource Requirements from the Resources right-click popup menu.
For more information on the Resources Requirements window and its fields, see Oracle Advanced Planning Implementation and User's Guide.
Note: You can only view resource requirements using Oracle Inventory Optimization. For information on modifying resource requirements, see Oracle Bills of Material User's Guide.
Material/Resource Availability
Material availability is the capacity of a supplier site to produce a specific item. This is set up in the Collections Workbench of Oracle Inventory Optimization. Resource availability is the number of hours a resource is available for production. This is set up in Oracle Bills of Material.
By viewing material and resource availability, you can find out how much can be manufactured without having to look at what is currently available. You can make changes to resource availability using the Oracle Bills of Material application and to material availability using the Collections Workbench. You can also make changes to these using the Planner Workbench, but these changes will be visible only in Oracle Advanced Supply Chain Planning and not in Oracle Inventory Optimization.
You can view time-phased material and resource availability for all items and resources in your inventory plan using the Resource Availability Summary window. You can navigate to the Resource Availability Summary window in one of the following ways:
-
From the Resources window, click the Availability button.
-
From the Navigator, select a resource and choose Resource Availability from the Resources right-click popup menu.
Resource Availability Summary window
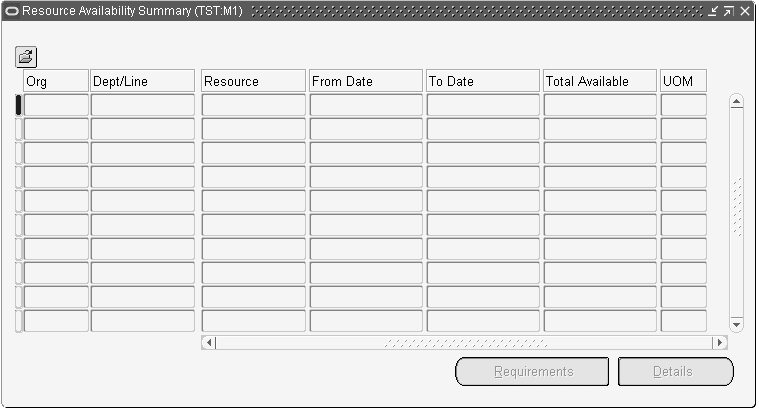
For more information on the Resource Availability Summary window and its fields, see Oracle Advanced Planning Implementation and User's Guide.
Reviewing Exception Messages
The inventory planning engine generates constraint exception messages to alert you about a specific situation that needs your intervention and also suggests actions to resolve the problem.
The exception messages generated in Inventory Optimization are the same as those available in Oracle Advanced Supply Chain Planning. For information on what exceptions are generated for which type of plans, how exceptions can be viewed and analyzed, and how exception situations potentially can be resolved, see Oracle Advanced Planning Implementation and User's Guide.
The following is a list of exceptions for Oracle Inventory Optimization:
-
Late Sales Orders and Forecasts
-
Past due transportation resource constraint
-
Past due forecast
-
-
Material and Resource Capacity
-
Material constraint
-
Resource constraint
-
Resource overloaded
-
Supplier capacity overloaded
-
Resource underloaded
-
-
Transportation and Distribution
-
Transportation resource overloaded
-
Transportation resource under loaded
-
-
Shortage and Excess
-
Item with a shortage
-
Item with excess inventory
-
-
Substitutes and Alternates Used
-
Planned order uses alternate BOM
-
Planned order uses alternate routing
-
Planned order uses substitute components
-
Planned order uses alternate resources
-
Order sourced from alternate facility
-
Order sourced from alternate supplier
-
-
Item Exceptions
-
Items with negative starting onhand
-
Items with no activity
Note: The inventory planning engine generates material and resource constraint exception messages only when the Enforce Capacity Constraints check box in the Constraints Tab of the Plan Options window is checked. In this option, the output contains both the target safety stock and the safety stock levels.
-