Horizontal Scaling
This chapter covers the following topics:
- Using Horizontal Scaling in Your Environment
- Performing Pre-Configuration Setup
- Creating the Engine Domain
- Starting the Engine Admin Server
- Configuring the JDBC Data Source for the Engine Domain
- Setting Up the Secondary Host Machine
- Setting Up Managed Servers
- Creating the JMS Servers, Subdeployments, and Queues
- Deploying and Starting the Engine Application
- Creating the Rapid Planning Input, Output, and Log Folders
- Performing a Fresh Installation
- Adding a New Managed Server
Using Horizontal Scaling in Your Environment
This chapter provides installation instructions for Oracle Rapid Planning that uses horizontal scaling.
Horizontal scaling is when your environment contains Managed Servers that span multiple machines. This architecture provides higher availability and easier expansion as Managed Servers are distributed across multiple machines and geographic locations.
As a part of horizontal scaling, one Rapid Planning Engine domain is created on one primary host, while Managed Servers are created on different machines (secondary hosts).
To achieve this, WebLogic Server needs to be installed on all machines, and the Node Manager Utility is required to be up and running on all hosts.
The Node Manager enables the following common operations tasks for a Managed Server regardless of its location with respect to its Administration Server:
-
Start and stop remote Managed Servers.
-
Monitor the self-reported health of Managed Servers and automatically terminate server instances whose health state is failed.
-
Automatically restart Managed Servers that have the failed health state or have shut down unexpectedly due to a system crash or reboot.
In order to achieve more concurrent plan runs, new Managed Servers can be added to existing or new machines and associate them to the Rapid Planning domain.
Note: For a horizontal scaled environment, perform all Managed Server setup and administration using the WebLogic Administration Console, not the Rapid Planning User Interface (UI).
Example Architecture
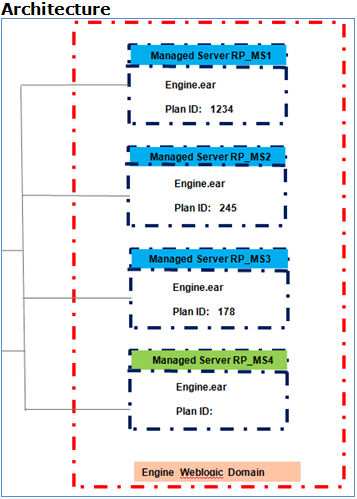
The preceding diagram displays Engine Domain architecture that uses horizontal scaling. Managed Servers RP_MS1, RP_MS2, RP_MS3 reside on one host, while RP_MS4 reside on a separate machine and the Engine WebLogic domain is hosted on a different machine.
There is no difference in terms of user experience. From a user perspective, they appear as if being hosted on same machine and user can run, load, and launch plans in the same manner.
Performing Pre-Configuration Setup
This section describes pre-configuration requirements for Oracle Rapid Planning. The tasks mentioned below need to be completed after applying Rapid Planning patch and before starting the installation.
-
Verify that WebLogic 11gR1 is installed.
WebLogic 11gR1 Patch set 5 (WebLogic 10.3.6.0) is required. Upgrade your WebLogic installation before you upgrade Oracle Rapid Planning.
For release 12.2 and later, install a separate WebLogic Server in a different home to create the Oracle Rapid Planning domains. Define the UI and engine domains and start WebLogic Server from the different home. Do not use any ports that E-Business Suite uses.
-
Cross mount the location for logs and files written by the concurrent programs with the WebLogic Server used for Rapid Planning. For more details on cross mount, refer to Enabling Access to APPLCSF.
-
The following profiles should be set up in EBS at site level (the EBS instance that the data source points to):
-
User Profile Name: MSC: Oracle Rapid Planning URL
Internal Profile Name: MSC_RP_HOST_URL
The port number provided in the profile value should be same as the port number for the User Interface Domain that is defined in Creating the User Interface Domain.
Syntax:
http://domain_name:port_number
Example:
http://rws60144rems.us.oracle.com:6087
-
User Profile Name: MSC: Rapid Planning UI Refresh Timeout
Internal Profile Name: MSC_RP_UI_TIMEOUT
The profile timeout value is in milliseconds. For example, provide profile value of 5000 to represent a 5 second timeout.
-
User Profile Name: MSC: Rapid Planning WebLogic Server Home
Internal Profile Name: MSC_RP_WLS_HOME
Provide the installation path to the <WLS_Home> directory.
Example:
/slot/user3536/wls/wlserver_10.3
Make the Rapid Planning WebLogic Server and Oracle e-Business Suite Server URLs in the same domain/subdomain for proper Single Sign-On (SSO) authentication.
-
User Profile Name: MSC: Rapid Planning Scripts Home
Internal Profile Name: MSC_RP_SCRIPTS_HOME
This profile should point to the directory where all the WLST_scripts will be kept.
Example:
/slot/ems5910/appmgr/WLS/user_projects/domains/WLST_Scripts
-
-
After applying the respective patches for Rapid Planning User Interface, Rapid Planning Administration, and Rapid Planning Engine, verify that the following ZIP files appear in the directory path $MSC_TOP/dist/orp.
Example:
/slot/ems4928/appmgr/apps/apps_st/appl/msc/12.0.0/dist/orp
-
RPAdmin.zip
-
ui.zip
-
engine.zip
For 12.2.3, if using Online Patching, there will be two APPL_TOPs, RUN tier and PATCH tier. Compare the ZIP files for both RUN and PATCH tier, and use the later version for deployment.
For example, fs1 is assigned to one tier, either RUN or PATCH. Use the command ident /u01/R122_EBS/fs1/EBSapps/appl/msc/12.0.0/dist/orp/engine.zip to obtain the file version.
-
-
Create a folder named ORPTEMP in a user-defined directory (for example, /tmp/ORPTEMP) on the host machine where WebLogic is installed. This folder is referenced as ORPTEMP in this document.
-
Copy the ZIP files to the folder ORPTEMP.
-
Extract all the ZIP files in the same folder.
Each unzipped file contains a respective EAR file. The EAR files will be selected from this location during deployment.
Refer to the following topics for procedures to deploy the applications:
-
To copy the class files, run the script InitialEngineSetup.sh in the folder WLST_scripts.
-
Log in to the machine where EBS is installed with username as APPL manager user or APPL TOP owner.
-
Set the environment variable $MSC_TOP to the path where you copied the patch.
Example:
/slot/ems4928/appmgr/apps/apps_st/appl/msc/12.0.0
-
Set the environment variable $JAVA_TOP to the path having Java classes.
Example:
/slot/ems2947/appmgr/apps/apps_st/comn/java/classes
-
-
After unzipping the file RPAdmin.zip, all the scripts are located in the folder RPAdmin/WLST_scripts. Copy the folder WLST_scripts to the path where Engine domain has been created:
Example:
<WLS_HOME>/user_projects/domains
<WLS_HOME> refers to the name of the directory where WebLogic has been installed.
If the directory domains is not present, create it manually.
All scripts should be run from this path only.
Ensure that the copied WLST_Scripts folder and the contents have rwx permissions for the UNIX session user launching the WebLogic Server.
Example:
chmod 777 *
The WebLogic admin user should have write permissions on the <WLS_HOME> folder and subfolders.
-
Use the following steps for enabling the Rapid Planning application access through EBS:
cd $FND_TOP/patch/115/bin
perl ojspCompile.pl --compile -s 'MscRPRedirect.jsp' --flush
-
After compiling, verify that the timestamp of file _MscRPRedirect.class under $COMMON_TOP/_pages is current.
-
After compilation, restart the EBS Middle Tier.
-
Once Rapid Planning patch is applied, assign Oracle Supply Chain Simulation Planner responsibility to the user account.
-
Assign Planning Organizations to Oracle Supply Chain Simulation Planner Responsibility.
-
Navigate to Advanced Planning Administrator > Admin > Organization Security.
-
Select Oracle Supply Chain Simulation Planner Responsibility.
-
Assign Organizations by moving the required organizations to the Selected list.
-
Save the assignments.
-
Creating the Engine Domain
Perform this procedure to create the Engine Domain.
-
Go to <WLS_HOME>/common/bin folder.
Syntax:
cd <installation_path..>/wlserver_10.3/common/bin
-
Run config.sh.
Example:
/config.sh

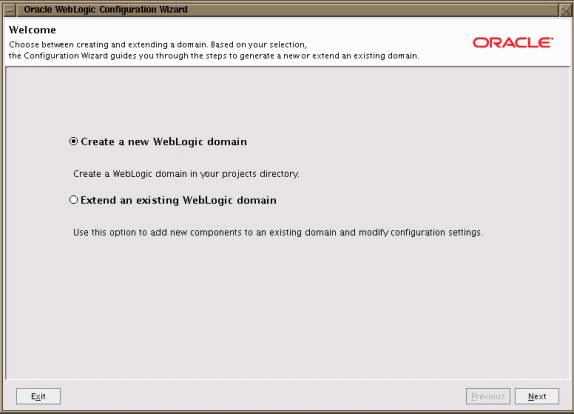
The Oracle WebLogic Configuration Wizard appears.
-
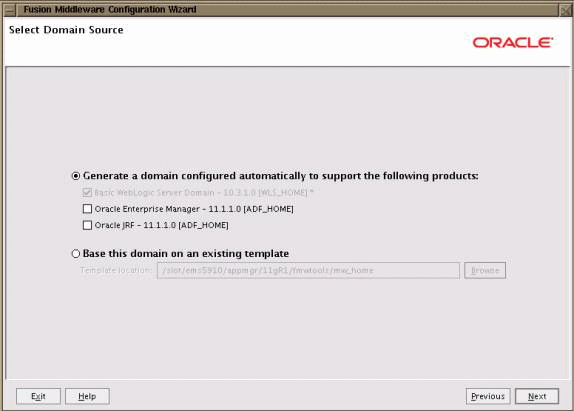
Select Create a new WebLogic domain, and click Next. The Select Domain Source screen appears.
-
Select Generate a domain configured automatically to support the following products. Do not select any check box options. Keep the default settings. Click Next. The Specify Domain Name and Location screen appears.
-
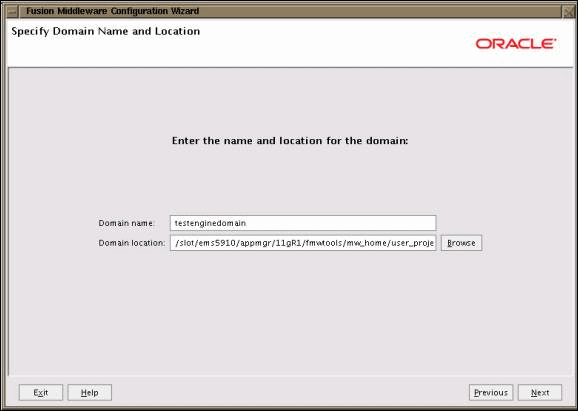
Enter the Domain name and Domain location. The domain location should be <WLS_HOME>/user_projects/domains. The Configure Administrator User Name and Password screen appears. Click Next.
-
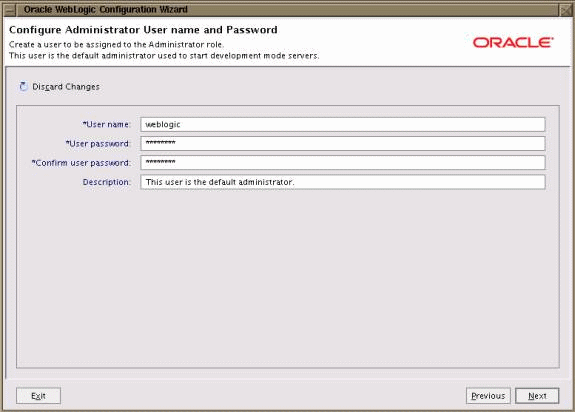
Enter the User name, User password and Confirm user password of your choice, and click Next. The password must be alphanumeric. The Configure Server Start Mode and JDK screen appears.
-
Perform the following:
-
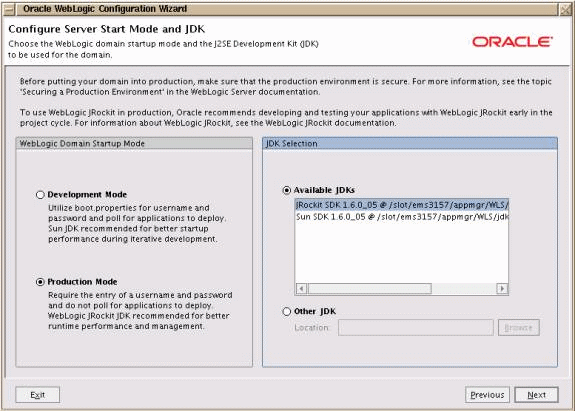
Select Production Mode.
-
In JDK Selection region, select Available JDKs and select JRockit SDK 1.6.0_05.
-
Click Next. The Select Optional Configuration screen appears.
-
-
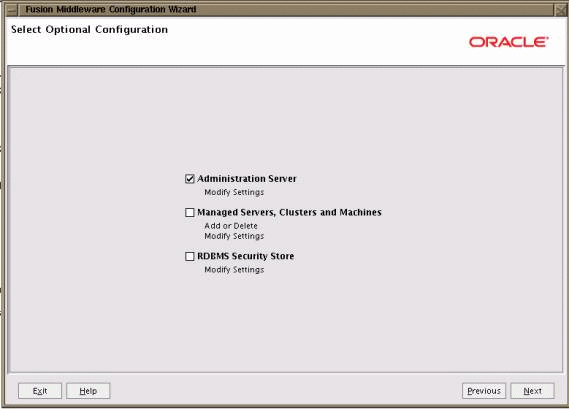
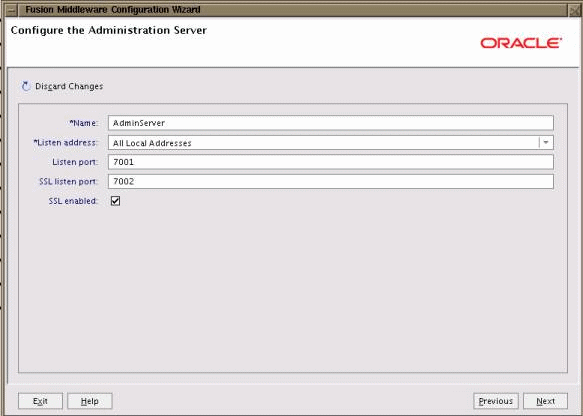
Select the Administration Server option only and click Next. The Configure the Administration Server screen appears.
-
Enter the following details and click Next:
-
Name - Enter the name of the Admin Server.
-
Listen Address - The Admin Server listen port address.
-
Listen Port - Enter the server listen port. Check the availability of the port number before entering a value.
-
SSL listen port - Enter the SSL Listen Port. Check the availability of the port number before entering a value.
-
Check the SSL enabled option.
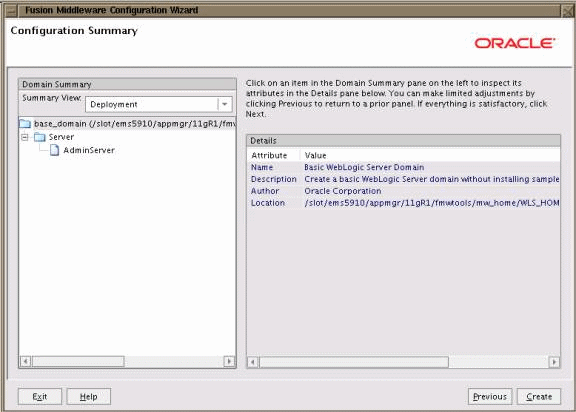
The Configuration Summary screen appears.
-
-
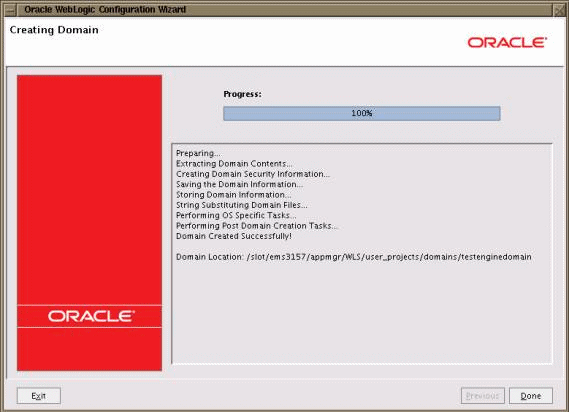
Review the details. If you want to modify any settings, use the Previous button to return to the appropriate screen. If no changes are required, click Create. The Creating Domain screen appears to display the system progress.
-
When the domain is complete, click Done.
Starting the Engine Admin Server
Perform the following procedure to start the Engine Admin Server.
-
Under <WLS_HOME>, go to the directory user_projects/domains/<ENGINEDOMAINNAME>/
Example:
/slot/ems3157/appmgr/user_projects/domains/testenginedomain
-
Run the script startWeblogic.sh to start the Admin Server.

-
The console requests the username and password. Enter the Engine Domain credentials.

The console displays “Server started in RUNNING mode”.

-
Open a web browser and type in the URL/address in the format below:
http://<Machine_Name>:<Port_No>/console
where <MACHINE_NAME> is the host name of the machine on which the WebLogic Server is running (for example, rws60144rems.us.oracle.com) and <Port_No> is the Admin Server Listen port number specified when the Engine domain was created.
Example:
http://rws60144rems:7901/console

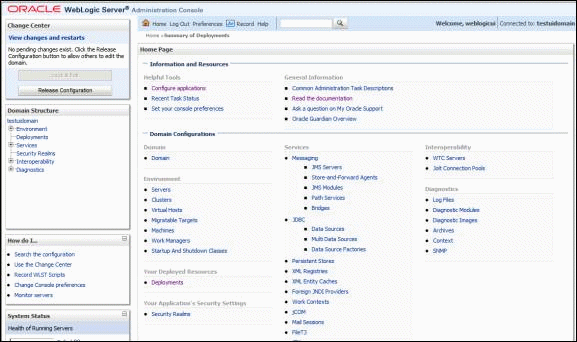
The WebLogic Server Administration Console appears.
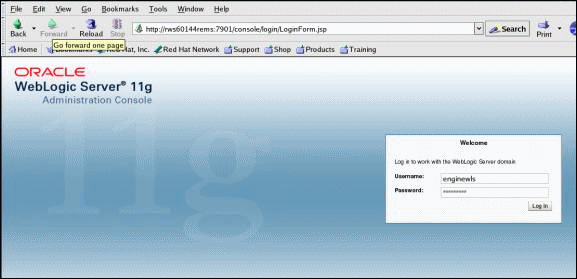
-
Enter the Admin Server Username and Password, and click Log In. The WebLogic Administration Console home page appears.
Configuring the JDBC Data Source for the Engine Domain
Perform this procedure to configure the JDBC data source for the Engine Domain. Verify that the Engine Domain Admin Server is up and running before performing this procedure.
-
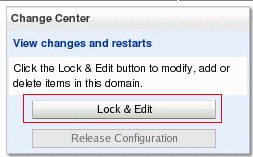
Click Lock & Edit from the Change Center region in top left corner to change the domain configuration.
-
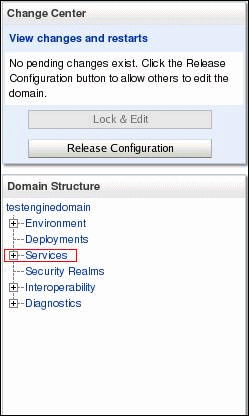
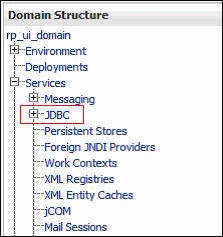
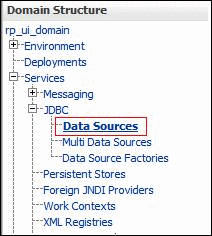
From the Domain Structure region, expand the Services tree node.
-
From Services tree, expand the JDBC tree node.
-
Select Data Sources.
-
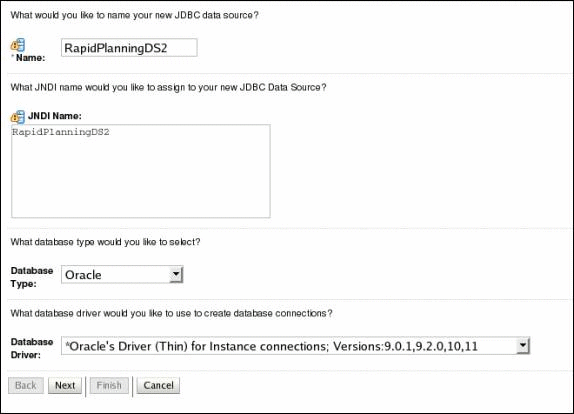
Click New and select Generic Data Source.

-
Enter the information as shown below, and click Next.
-
Name - Enter 'RapidPlanningDS2'.
-
JNDI Name - Enter 'RapidPlanningDS2'.
-
Database Type - Select Oracle.
-
Database Driver - Select Oracle's Driver (Thin) for instance connections: 9.0.1, 9.2.0, 10, 11.
Enter Name and JNDI Name as 'RapidPlanningDS2'. Check "Troubleshooting" for JDBC Driver specific issues.
-
-
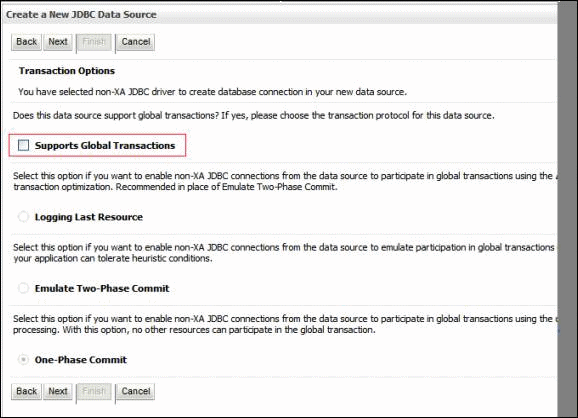
Deselect Supports Global Transaction and click Next.
-
Enter the information as shown below and click Next.
-
Database Name - Enter the database name (example, ma0dv220).
-
Host Name - Enter the host name (example, rws60147rems.us.oracle.com ).
-
Port - Enter the port number (example, 1555).
-
Database User Name - Enter the database user name.
-
Password - Enter the database user name password.
-
Confirm Password - Re-enter the password.
-
-
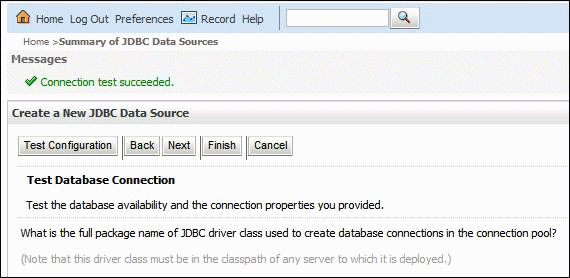
Click Test Configuration.

If JDBC is set up correctly, then a message "Connection test succeeded" appears.
-
Click Next.
-
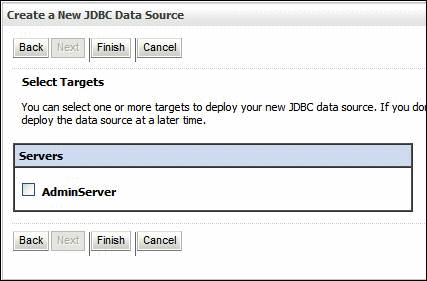
Do not select any target servers. Click Finish.
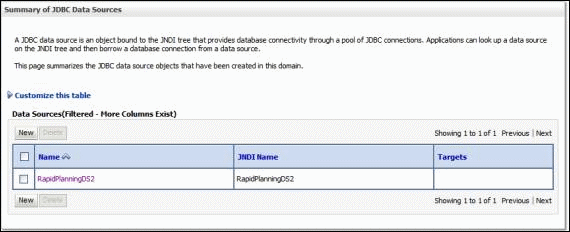
The Summary of JDBC Data Source page appears. The data source appears on the page.
-
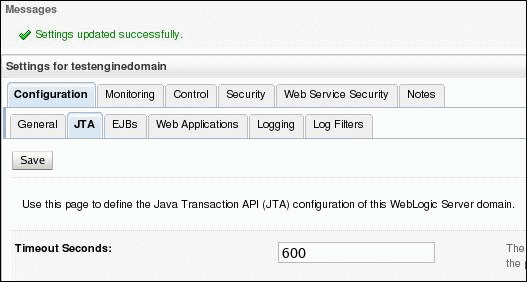
In the Domain Structure region, navigate to Services > JTA. Select the Configuration tab, and then select the JTA tab.

-
Set Timeout Seconds to 600 seconds, as shown below, and click Save.
-
From the Change Center, click Activate Changes.
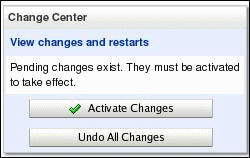
Once Activation is complete, the message "All changes have been activated. No restarts are necessary." appears.
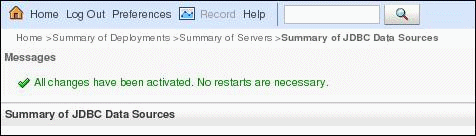
The JDBC Resource has been successfully set up.
Setting Up the Secondary Host Machine
Setting up the secondary host consists of the following procedures:
-
Transferring files to the secondary host
-
Registering the Node Manager and setting up the Node Manager properties file
-
Adding machines and Node Manager to the WebLogic Console
Transferring Files to the Secondary Host
Use this procedure to copy the template JAR file and the setDomainEnv.sh file from the primary host to the secondary host.
-
On the primary host, navigate to the following location:
<WLS_HOME>/common/bin
-
Run the following command:
./pack.sh -managed=true -domain=<DOMAIN_HOME> -<Template_Name.jar> -template_name="Template_Description"
Example:
./pack.sh -managed=true -domain=/slot/ems3102/oracle/mwhome/user_projects/domain/testenginedomain/
-template=/slot/ems3102/oracle/mwhome/user_projects/domain/testenginedomain/testRPTemplate.jar
-template_name="testRPDomain template"
-
Transfer the template file to the secondary host location where you want to copy the domain files.
-
On the secondary host, navigate to the location where template file has been copied and run the following command:
<WLS_HOME>/common/bin/unpack.sh –domain=<full path where the domain needs to be created/Domian_Name> -template=<Template_Name>
Example:
/slot/ems6386/oracle/mwhome/wlserver_10.3/common/bin/unpack.sh -domain=/slot/ems3102/oracle/mwhome/user_projects/domain/testenginedomain/
-template=./ testRPDomain template
-
Copy setDomainEnv.sh file from the primary host to the secondary host. This file is not copied over with an unpack command. Transfer the file to the secondary host by FTP. Back up the original setDomainEnv.sh file, and overwrite it with the file from primary host. The setDomainEnv.sh file on the primary host is in the following location:
<DOMAIN_HOME>/bin
Registering the Node Manager and Setting Up the Node Manager Properties File
-
On the primary host, navigate to the following location:
<WLS_HOME>/common/bin
-
Run the Node Manager as follows:
nohup ./startNodeManager.sh &
-
Navigate to the following location:
<WLS_HOME>/common/nodemanager/
-
Open the nodemanager.properties file and edit the value of the StartScriptEnabled to true, as shown in the example below.
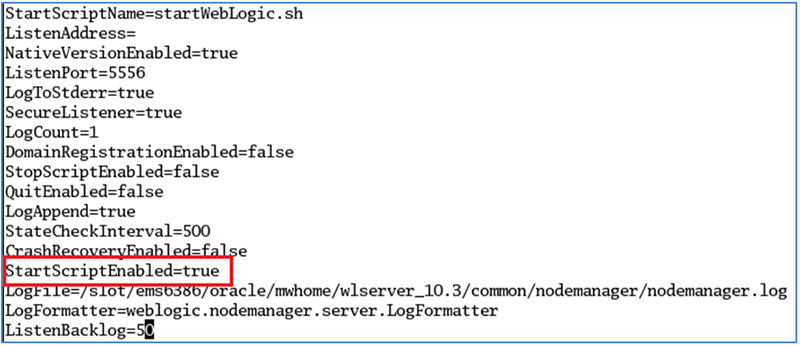
-
Stop and start the Node Manager for the changes to take effect, as shown in the example below.

Initial starting and stopping of the Node Manager is necessary for generating properties files.
-
Repeat this procedure for all host machines.
Adding Machines and Node Manager to the WebLogic Console
-
Log in to the WebLogic Administration Console from your browser.
-
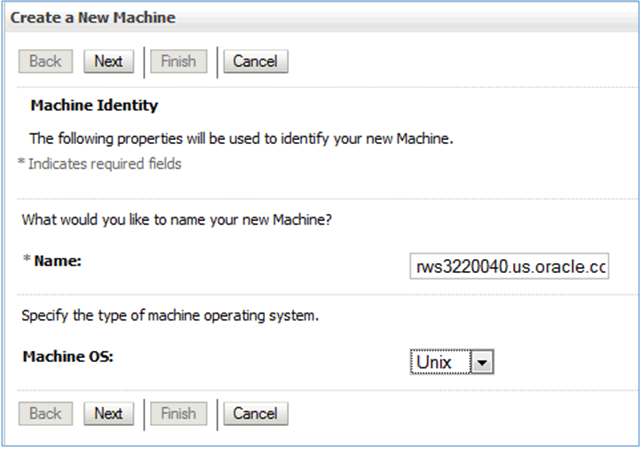
From the Domain Structure region, expand the Environment node and select Machines.
-
Click New.

-
Enter the following information, and click Next.
-
Name - Enter the machine name.
-
Machine OS - Select Unix.
-
-
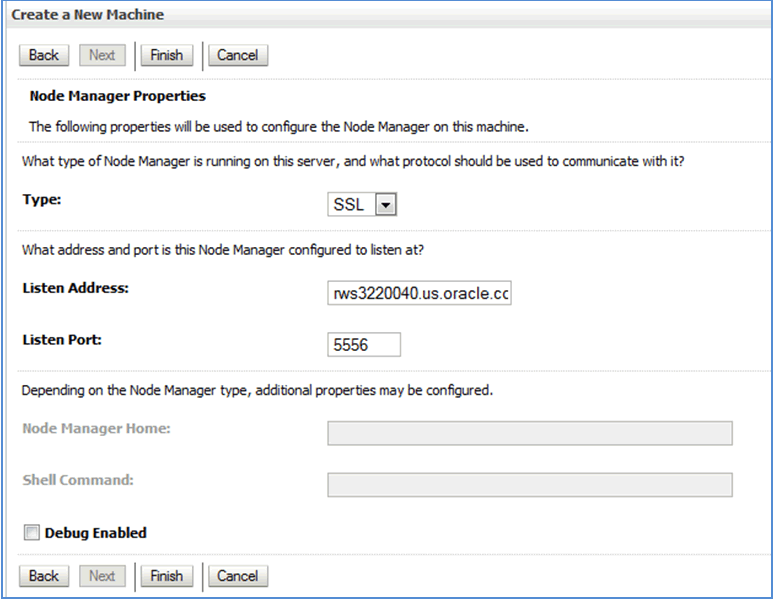
Enter the following information, and click Finish.
-
Type - Select SSL.
-
Listen Address - Enter the Node Manager's listen address.
-
Listen Port - Enter '5556' as the Node Manager's listen port.
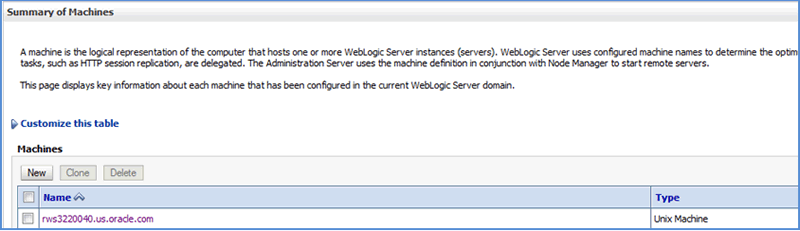
The Summary of Machine page appears and displays the new machine.
-
-
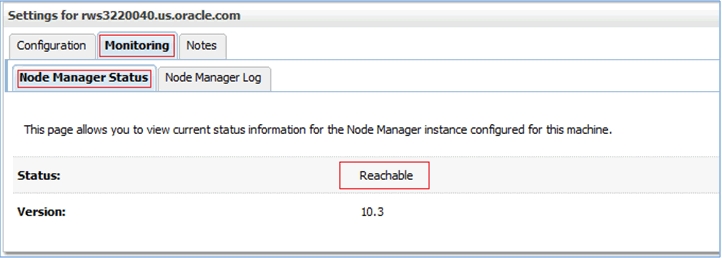
Check the status of Node Manager for the machine by selecting the new machine displayed on the page.
-
Select the Monitoring tab, and click the Node Manager Status tab. The Status field displays "Reachable".
-
Repeat the procedure to add machines for all the hosts.
-
From Change Center region, click Activate Changes.
Once activation is complete the following message appears:
"All changes have been activated. No restarts are necessary."
Setting Up Managed Servers
Setting up the Managed Servers consists of the following procedures:
-
Creating a Managed Server
-
Updating the machine information for the Managed Server
Note: For a horizontal scaled environment, perform all Managed Server setup and administration using the WebLogic Administration Console, not the Rapid Planning User Interface (UI).
Creating a Managed Server
Verify that the Engine Domain Admin Server is up and running before performing this procedure.
-
Click Lock & Edit from the Change Center region in top left corner to change the domain configuration.
-
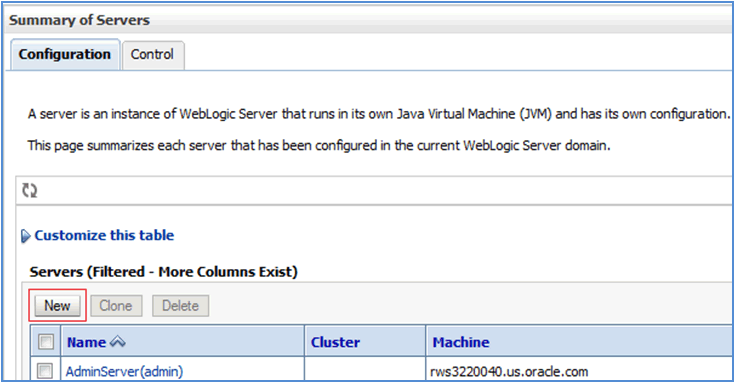
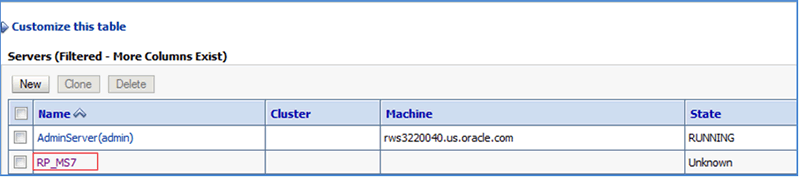
From the Domain Structure region, expand the Environment tree node and select Servers.
-
Click New.
-
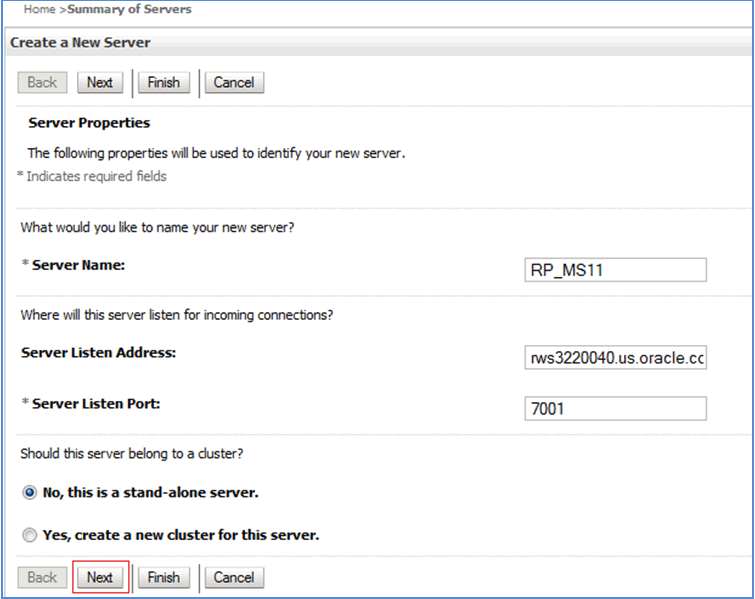
Enter the following information, and click Next.
-
Server Name - Enter the name of the Managed Server.
-
Server Listen Address - Enter the Listen Address for Managed Server.
-
Server Listen Port - Enter the Server Listen Port for Managed Server. Verify the port number assigned to each Managed Server is unique across all your Managed Servers across all machines.
-
Should this server belong to a cluster? - Select No. The Rapid Planning User Interface and Engine do not support cluster configuration.
-
-
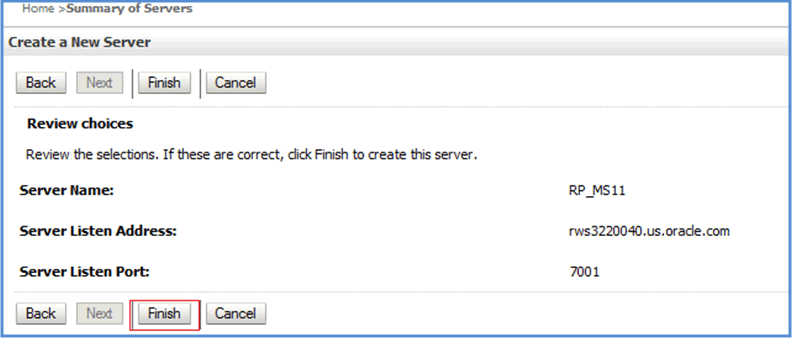
Verify the information and click Finish.
-
From the Change Center region, click Activate Changes.
Updating the Machine Information for Managed Server
-
Click Lock & Edit from the Change Center region in top left corner to change the domain configuration.
-
From the Domain Structure region, expand the Environment tree node, and select Servers.
-
Select the Managed Server name.
The General subtab under the Configuration tab appears.
-
Select the machine name from the Machine list and click Save.
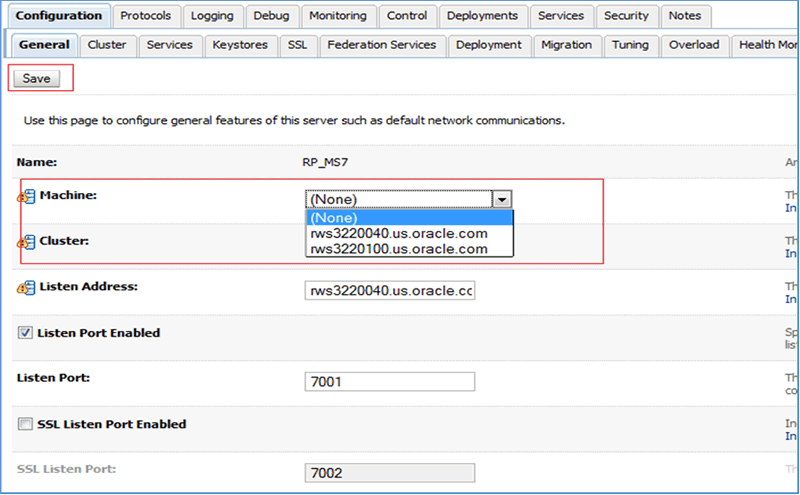
The machine is assigned to the Managed Server.
-
Repeat this procedure to assign all machines to the Managed Servers.
-
From the Change Center region, click Activate Changes.
Creating the JMS Servers, Subdeployments, and Queues
Creating the JMS Servers, Subdeployments, and Queues consists of the following procedures:
-
Starting the Manager Servers
-
Creating the JMS Server
-
Creating the subdeployments for the JMS module
-
Creating the queues
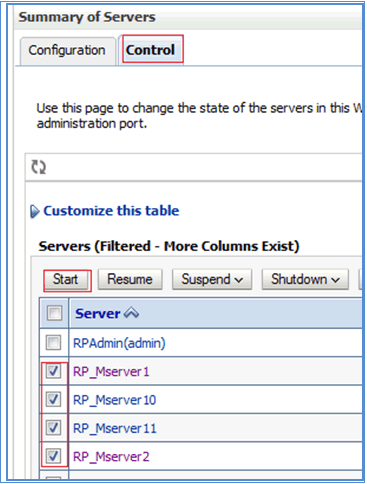
Starting the Managed Servers
-
Click Lock & Edit in the Change Center region in the top left corner to change the domain configuration.
-
From the Domain Structure region, expand the Environment tree node and select Servers.
-
Navigate to the Control tab, select the Managed Servers that you want to start, and click Start.
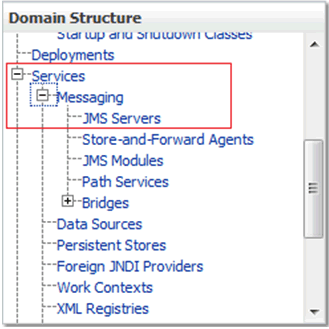
Creating the JMS Server
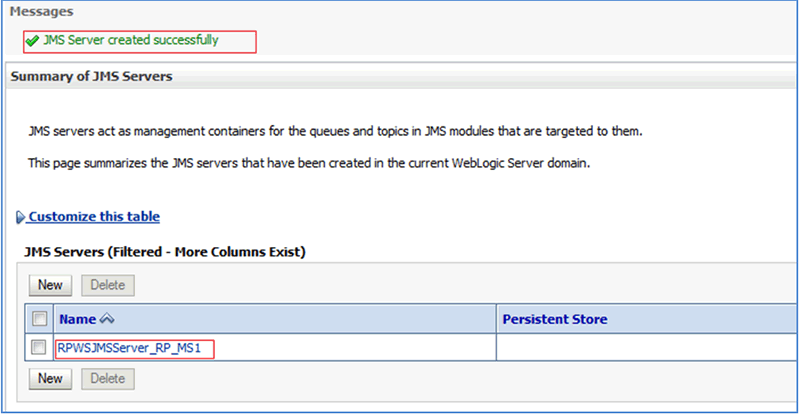
Create a JMS Server for each Rapid Planning Managed Server. The JMS servers act as management containers for the queues and topics in the JMS modules that are targeted to them. The JMS servers defined are created in the current WebLogic Server domain.
-
Click Lock & Edit in the Change Center region in the top left corner to change the domain configuration.
-
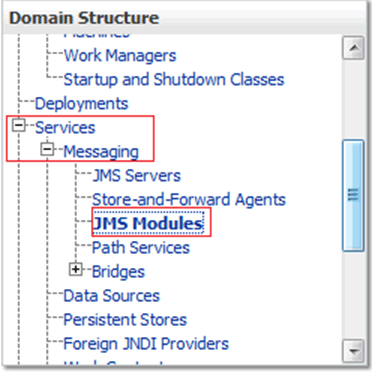
From the Domain Structure region, expand the Services tree node, expand the Messaging node, and select JMS Servers.
-
Click New.
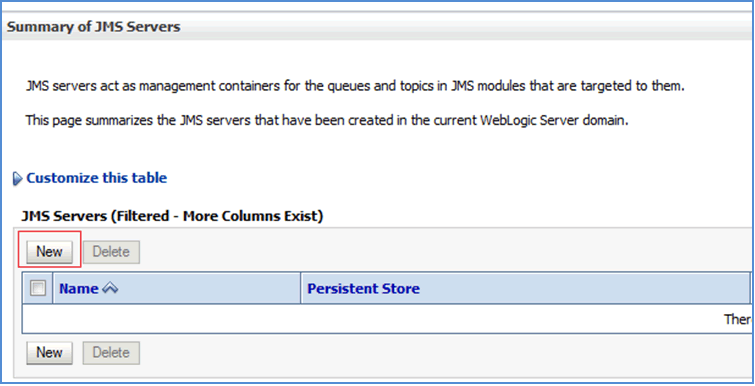
-
Enter the JMS Server name, as shown below. Click Next and select the same Managed Server as the target. Click Finish.
Enter the JMS Server name using the following format: RPWSJMSServer_<Managed_Server_Name>.
Example:
For Managed Server RP_MS1, enter 'RPWSJMSServer_RP_MS1'.
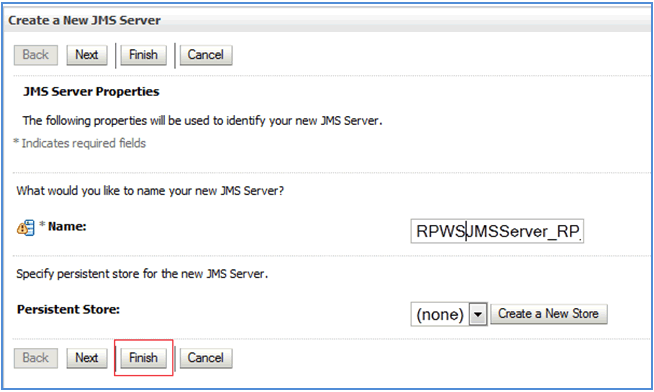
The following message appears:
"JMS Server created successfully."
-
Repeat the process to define a Rapid Planning JMS Server for each of the Rapid Planning Managed Servers in your environment.
-
In the Change Center region, click Activate Changes.
Creating the JMS Module
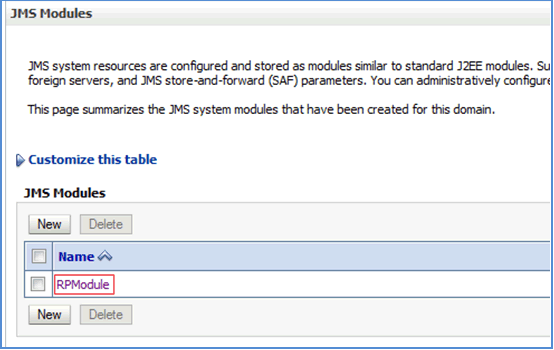
Use this procedure to create the JMS module for Rapid Planning named 'RPModule'. JMS modules are application-related definitions that are independent of the domain environment. You create and manage JMS resources either as system modules or as application modules. Use the Administration Console as described below to create your JMS module.
If JMS Module is already present, do not re-create a new module. Update the existing RPModule by adding the new Rapid Planning Managed Servers as targets for RPModule.
-
Click Lock & Edit in the Change Center region in the top left corner to change the domain configuration.
-
From the Domain Structure region, expand the Services tree node, expand the Messaging node, and select JMS Modules.
-
Click New.
-
Enter 'RPModule' in the Name field, and click Next.
-
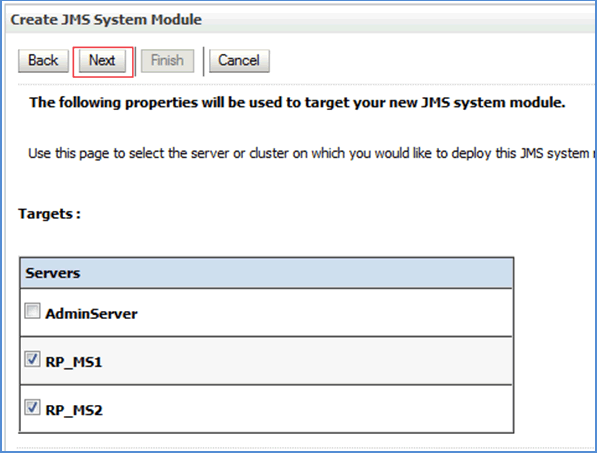
Select the target Rapid Planning Managed Servers, and click Next. The selected target Rapid Planning Managed Servers are mapped to the JMS Module 'RPModule'.
-
Click Finish.
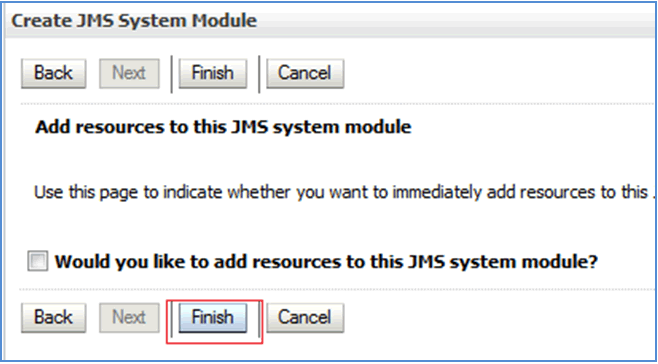
The following message appears:
"The JMS module was successfully created."

-
In the Change Center region, click Activate Changes.
Creating the Subdeployments for the JMS Module
Use the following procedure to create one subdeployment for each Rapid Planning Managed Server. A subdeployment is assigned to a JMS Module, which in this case is the RPModule you previously created.
-
Click Lock & Edit in the Change Center region in the top left corner to change the domain configuration.
-
From the Domain Structure region, expand the Services tree node, expand the Messaging node, and select JMS Modules.
-
Select the existing JMS Module (for example, RPModule).

-
Navigate to the Subdeployments tab, and click New.
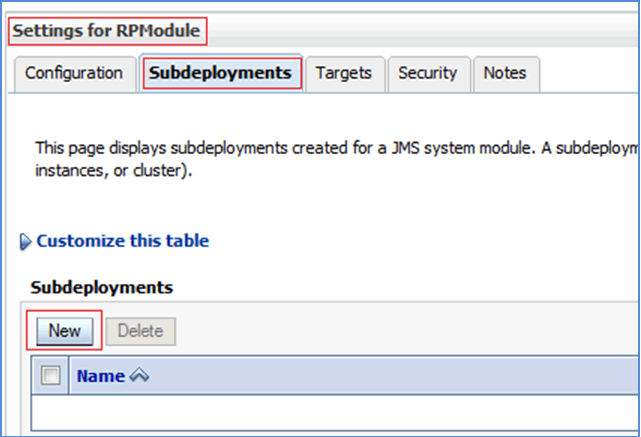
-
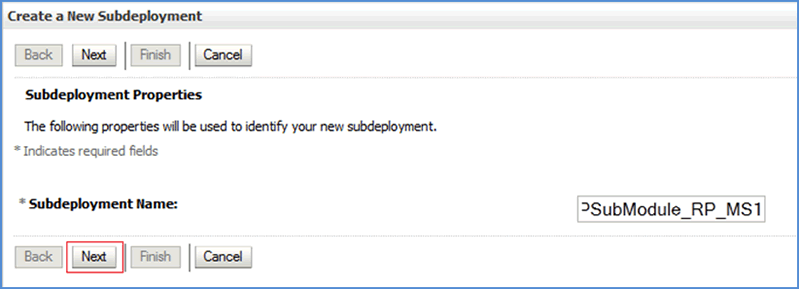
Enter the Subdeployment Name, as shown below, and click Finish.
Enter the Subdeployment Name using the following format: RPSubModule_<Managed_Server_Name>.
Example:
For Rapid Planning Managed Server RP_MS1, enter 'RPSubModule_RP_MS1'.
-
Click Finish. Do not select any Targets Servers or JMS Servers options.
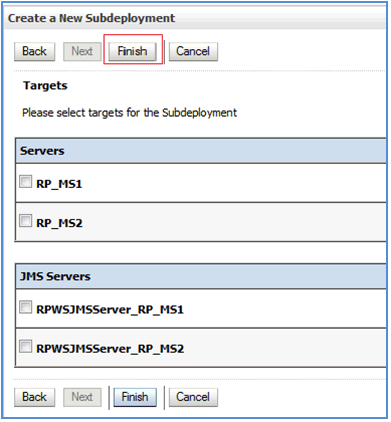
The subdeployment is created.
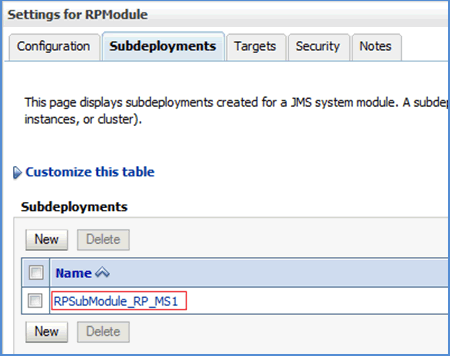
-
Repeat the procedure until one subdeployment has been defined for each of the Rapid Planning Managed Servers.
-
From Change Center region, click Activate Changes.
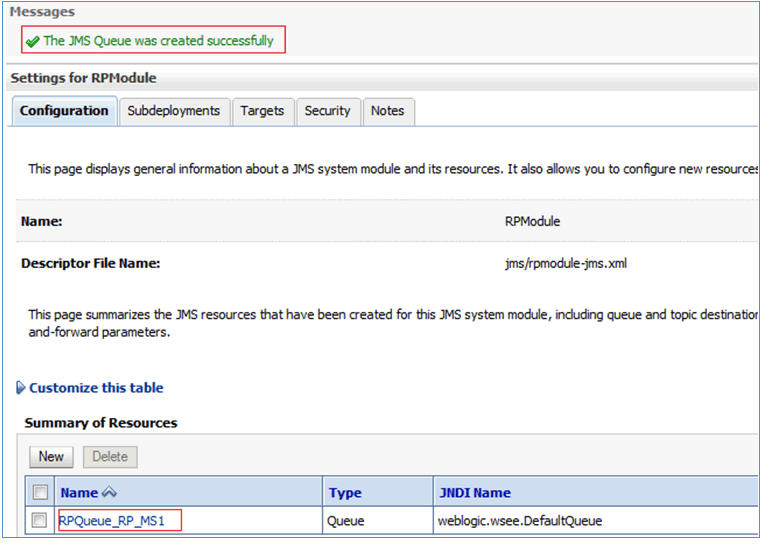
Creating the Queues
Use the following procedure to create one queue for each of the Rapid Planning Managed Servers in your environment. These queues are all assigned as resources to the single Rapid Planning JMS module, RPModule in this example.
-
Click Lock & Edit in the Change Center region in the top left corner to change the domain configuration.
-
From the Domain Structure region, expand the Services tree node, expand the Messaging node, and select JMS Modules.
-
Select the existing JMS Module (for example, RPModule).
-
Navigate to the Configuration tab and click New.
-
Perform the following, and click Next.
-
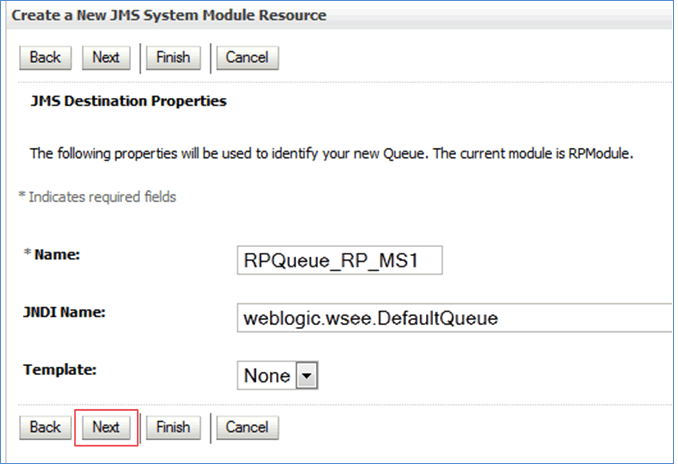
Name - Enter the queue Name using the following format: RPQueue_<Managed_Server_Name>.
Example:
For Managed Server RP_MS1, enter 'RPQueue _RP_MS1'.
-
JNDI Name - Enter 'weblogic.wsee.DefaultQueue'.
-
Template - Select None.
-
-
Enter the following information, and click Finish.
-
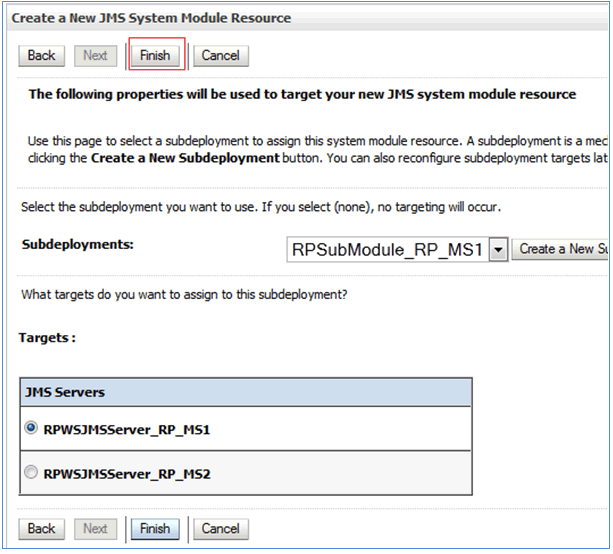
Subdeployments - Select the matching RPSubModule_<Managed_Server_Name> from the Subdeployments list.
-
For Targets - JMS Servers - Select the matching RPWSJMSServer_<Managed_Server_Name> from the JMS Servers table.
Example:
If you created a the queue RPQueue_RP_MS1, which is the queue for Managed Server RP_MS1, then select RPSubModule_RP_MS1 from the Subdeployments list, and select RPWSJMSServer_RP_MS1 from the JMS Servers table.
The following message appears:
The JMS Queue was created successfully.
-
-
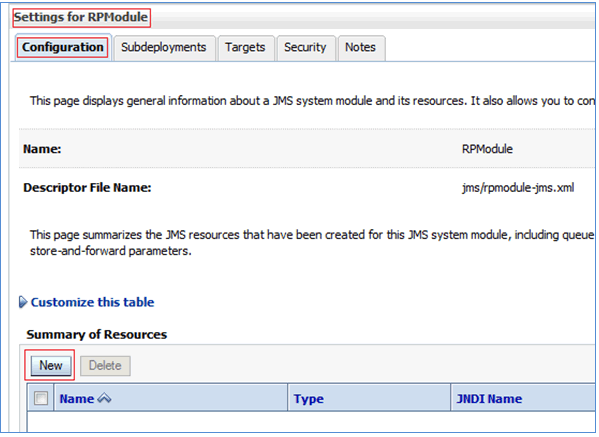
Repeat the procedure until one queue has been defined for each of the Rapid Planning Managed Servers. When complete, the Settings for RPModule page displays all your Rapid Planning queues.
-
In the Change Center region, click Activate Changes.
Deploying and Starting the Engine Application
Verify the Engine Domain Admin Server is up and running before performing this procedure.
To start the Engine Admin Server, refer to Starting the Engine Admin Server.
-
Click Lock & Edit in the Change Center region in the top left corner to change the domain configuration.
-
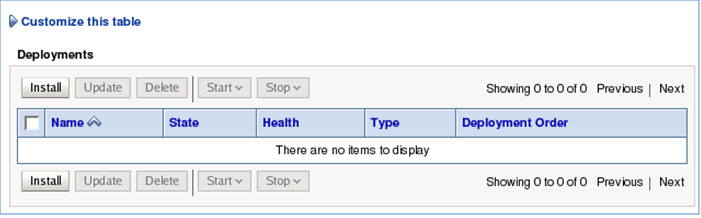
From the Domain Structure region, click Deployments . The Deployments page appears.
-
Click Install.
-
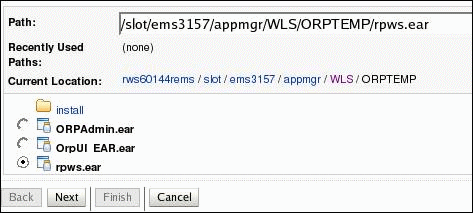
Navigate to the path where the EAR file is located, select the rpws.ear file, and click Next. The EAR file is located in the ORPTEMP location as mentioned in Performing Pre-Configuration Setup.
-
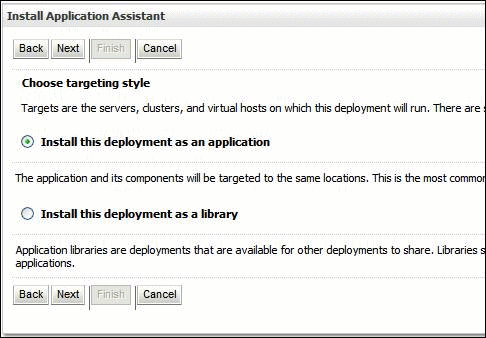
Select Install this deployment as an application, and click Next.
-
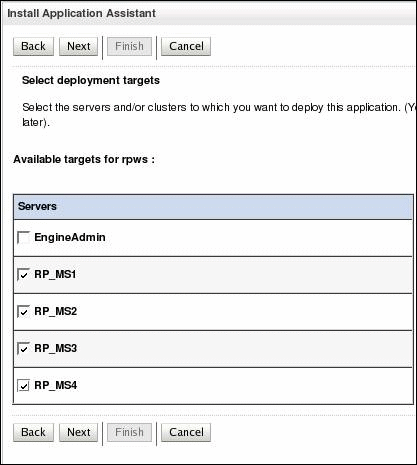
Select all the Rapid Planning Managed Servers as the targets for the application, and click Next. Do not select the Admin Server. The Optional Settings page appears.
-
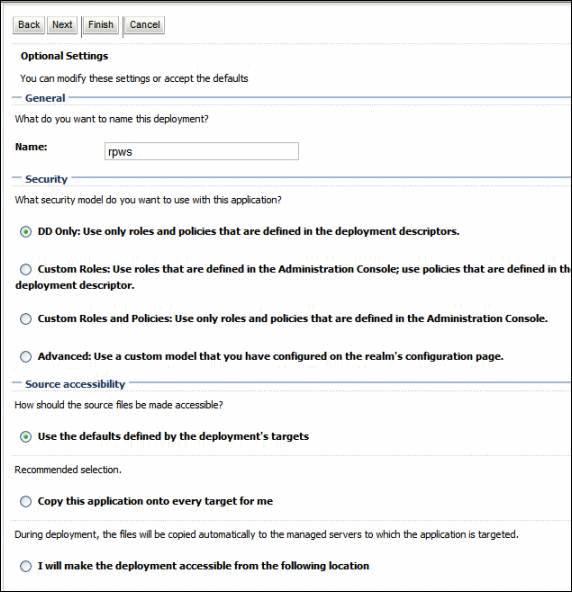
On the Optional Settings page, keep the default settings, and click Next.
-
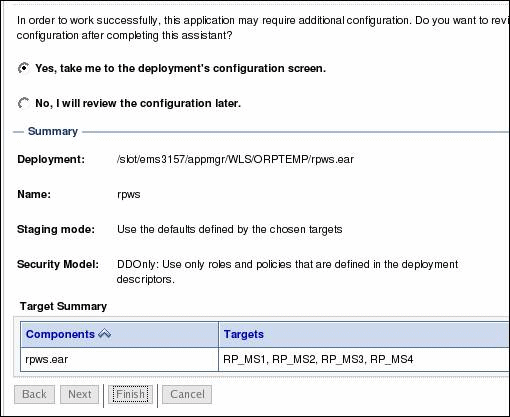
Click Finish and then click Save.
-
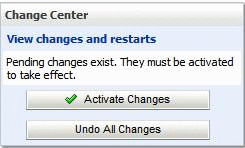
Click Activate Changes.
Use the Deployments page to control and modify deployments.
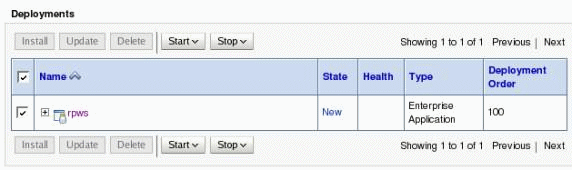
-
Select the check box for rpws. Click Start > Servicing all requests. Click Next. The Start Application Assistant page appears.
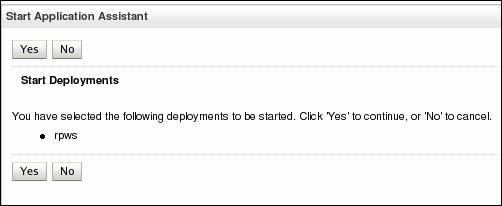
-
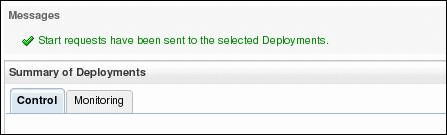
Click Yes.
A message appears to inform you that the start requests have been sent to the selected deployments.
-
Log in to the application using following format in your web browser:
http://<Machine_Name>.us.oracle.com:<Port_No>/rapidplanning/faces/RPMainUI
Example:
http://rws60144rems.us.oracle.com:7001/rapidplanning/faces/RPMainUI
The Oracle Application Login page appears.
-
Enter 'mfg' in the Username field, and enter 'welcome' in the Password field.
-
From the home page, select Oracle Supply Chain Simulation Planner. The Plans page appears.
-
From the Plans pane, select a plan to start working on it. The plan details appear on screen.
Creating the Rapid Planning Input, Output, and Log Folders
Creating Log and Output Folders
-
Create log and output folder in a central location. Make sure the location is accessible from all hosts, through proper mounting.
Example:
On the primary host, navigate to the location /slot/ems3102/oracle.
Create output and log folders as follows:
mkdir -m 777 RP_Output/
mkdir -m 777 RP_Log/
-
Make sure all secondary hosts have mounting with write access these folders.
-
Navigate to the domain directory of the host and create soft links for the RP_Output and RP_Log folder, as shown in the example below.
Example:
cd <DOMAIN_HOME>/<Domain_Name>
ln  -s <Path_to_Output_folder>output
ln  -s <Path_to_Log_folder>log
Example:
ln -s /slot/ems3102/oracle/RP_OUTPUT/ output
ln -s /slot/ems3102/oracle/RP_Log/  log
-
Repeat the previous step to create the necessary soft links for all hosts.
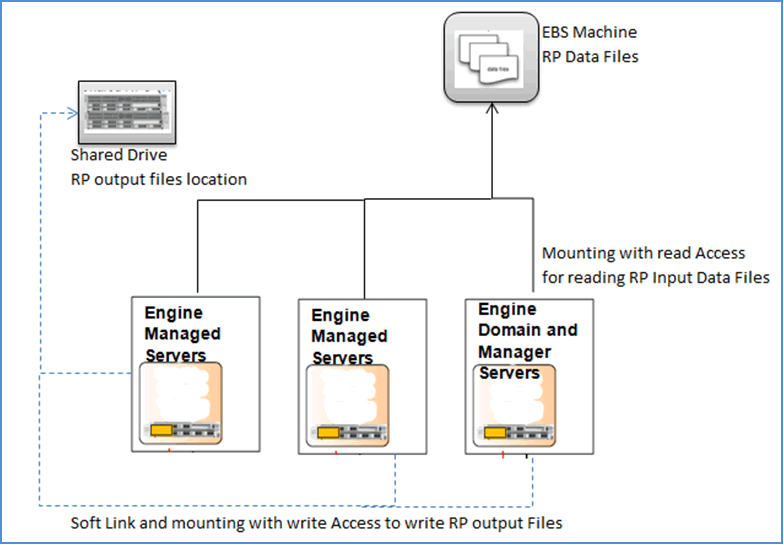
Enabling Access to APPLCSF
This procedure is necessary only if EBS is installed on a different machine than the WebLogic Server and the APPLCSF directory is not set up as a shared folder across EBS and WebLogic Server machines.
APPLCSF is the path where the Rapid Planning input files are located.
Mounting of this location must be done on all host machines so the Rapid Planning Engine can read input files.
In the event the mount point is different then the actual path, the following procedure must be performed to add –DAPPSCSF property to setDomainEnv.sh file.
-
Navigate to <DOMAIN_HOME>/bin location.
-
Open setDomainEnv.sh file.
-
Add the following lines:
RP_INPUT_FILES_PATH="-DAPPLCSF=<Location_of_Data_Files>"
Example:
The data files reside on machine EBS_MACHINE at location /slot/ems9526/appmgr/inst/apps/ma0yd213_rws60145rems/logs/appl/conc/out.
On WebLogic Server host, the folder /slot/ems9220 of EBS_MACHINE is mounted with mount point ma0yd213.
Path to access Rapid Planning input files on this WebLogic Server host is as follows:
/ma0yd213/appmgr/inst/apps/ma0yd213_rws60145rems/logs/appl/conc/out
Therefore, set the value as:
RP_INPUT_FILES_PATH="-DAPPLCSF=/ma0yd213/appmgr/inst/apps/ma0yd213_rws60145rems/logs/appl/conc/out"
-
Add RP_INPUT_FILES_PATH to JAVA_PROPERTIES. JAVA_PROPERTIES="${JAVA_PROPERTIES} ${WLP_JAVA_PROPERTIES} ${RP_INPUT_FILES_PATH}"
In the previous example for secondary host, the path to access RP_OUTPUT and RP_LOG folder will depend on mount point.
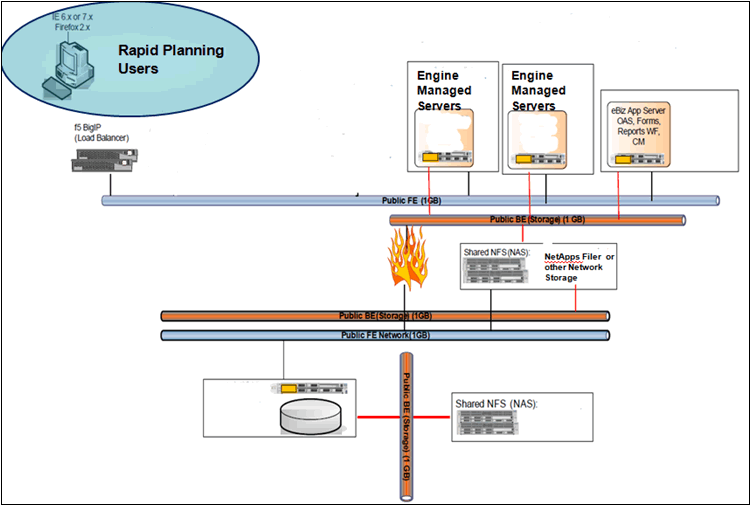
The figure illustrates the various mounting and soft links required in a horizontally scaled architecture.
Performing a Fresh Installation
In the event of a new install, follow all the steps in sequence as mentioned in this guide
Adding a New Managed Server
If you want to perform scaling by adding a Managed Server on new or existing machine, the production servers do not need to be taken offline.
If a Managed Server is being added to existing machine, then you need to perform the following:
If Managed Server is being added to new machine, then you need to perform the following: