Stores
This chapter covers the following topics:
- Stores
- Delivering Material from Stores to a Work Order
- Returning Material to Inventory
- Issuing Multiple Rebuildable Items
Stores
Material issue to work orders and returns to inventory are typical store room functions and can be performed by using the Maintenance Super User - Stores tab.
There are two activities involved in delivering material from stores to a work order.
-
A Material Issue Request is generated to request the material to a work order. This process is automated upon work order release by selecting a check box in the Enterprise Asset Management Parameters (See: Defining eAM Parameters).
-
The Material Issue Verification is generated when you access the Stores tab and select material for a work order, based on available, unprocessed move orders.
Note: A one-step material issue is a substitute for these two activities; a request is not created.
There are two primary methods used to issue material to a work order:
-
One Step Issue method - Used to issue one-off or ad hoc material to a work order. This method does not involve the prior requesting of material and can be executed for both planned and unplanned material.
-
Two Step Issue method involves two steps:
-
The maintenance planner or user requests material from store.
-
The stores room person delivers the material to the work order.
-
You can return material to inventory from a maintenance work order. If excess or defective material is issued to a work order, it needs to be returned.
The section includes the following topics:
Delivering Material from Stores to a Work Order
There are two activities involved in delivering material from stores to a work order:
-
Material Issue Request is generated (move order in Oracle Inventory) to request the material to a work order.
You may automate this process upon work order release by selecting the Enable Material Issue Requests check box in the Enterprise Asset Management Parameters (See: Defining eAM Parameters). You may override this setting at the work order level. The Auto Request Material check box is located in the Material Requirements window. (See: Routine Work Orders).
-
The Material Issue Verification (move order in Oracle Inventory) is generated when you access the Stores tab and select material for a work order, based on available, unprocessed move orders.
A one-step material issue is a substitute for these two activities; a request is not created.
If you want to issue multiple rebuildable items in a single transaction, select Yes in the Allocate Serial Numbers field in the Organization Parameters: Revision, Lot, Serial Number, LPN page. See Issuing Multiple Rebuildable Items for more information.
If the Material Issue Request process is not automated, you can perform a manual request within the Request All Materials page, located on the Work Orders tab.
You can also run the Work Order Component Pick Release concurrent program to perform the material allocation for a group of work orders.
You can also run the EAM Work Orders Component Pick Release concurrent process from the Reports tab under the Maintenance Super User (self-service) responsibility.
To perform the required setup steps for the two-step material delivery process
Prerequisites
-
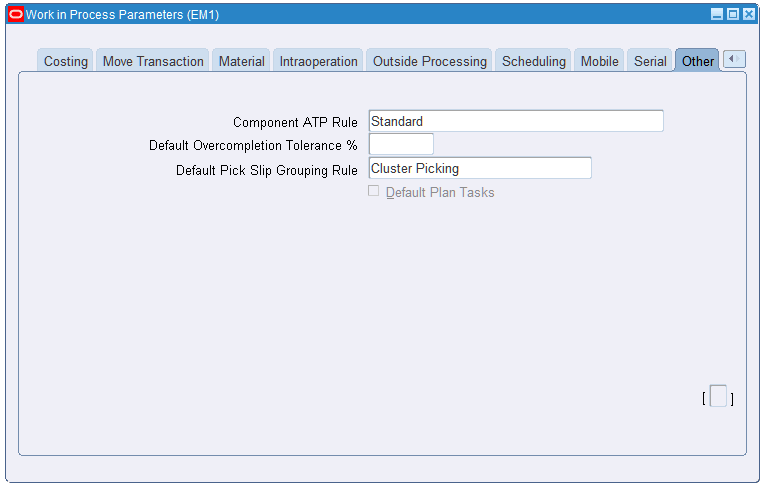
Define a Default Pick Slip Grouping Rule within the WIP Parameters window.
This information is used when pick slips are created for the material issue requests, detailing subinventory and locator information.
-
Decide if your organization will allocate serial numbers.
If No, then the quantity of the material issued is allocated and no serial numbers are allocated. The picker then enters the picked serial numbers from the available serial numbers.
If Yes, then the serial numbers are allocated during the material request, and therefore, are not available for any other transaction.
-
Navigate to the Work In Process Parameters window.
-
Select the Other tab.
Work in Process Parameters
-
Select a Default Pick Slip Grouping Rule. This information is used when pick slips are created for the material issue requests, detailing subinventory and locator information.
-
Save your work.
-
Navigate to the Organization Parameters window.
-
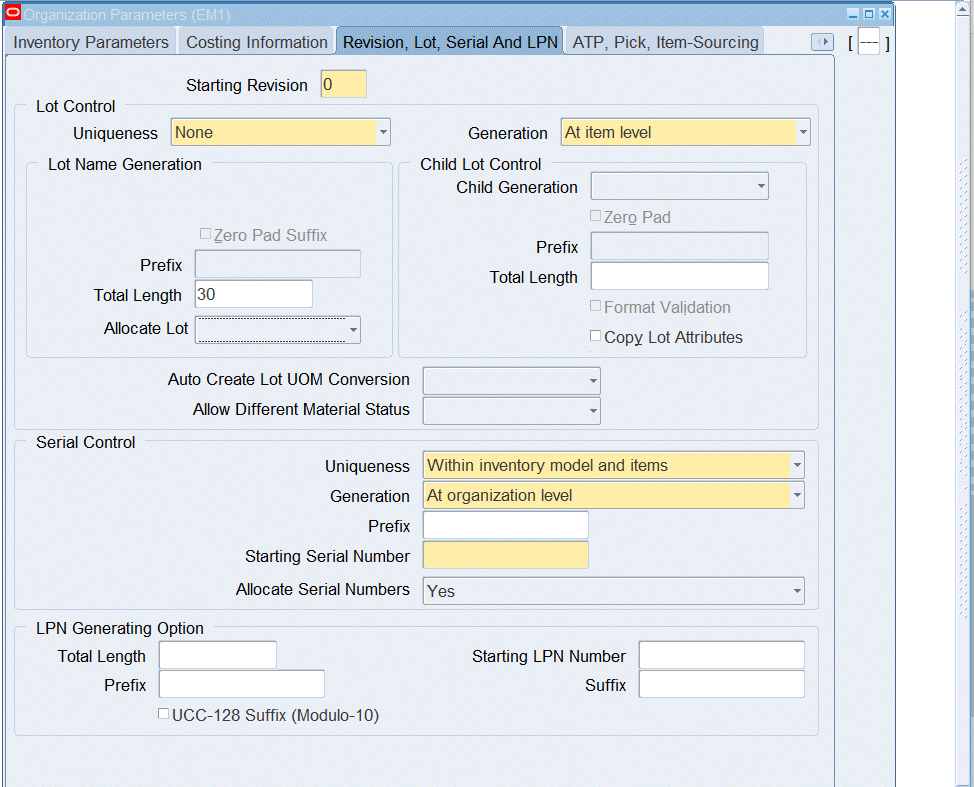
Select the Revision, Lot, Serial tab.
Organization Parameters
-
Select an Allocate Serial Numbers value. If you select No, the quantity is allocated, but individual serial numbers are not. If you select Yes, you can allocate multiple serial numbers when material requests are created. These serial numbers are not available to any other transaction.
Organizations typically select No, enabling the picker to enter the picked serial numbers. In most cases, the requestor is not partial to specific serial numbers.
-
Save your work.
Running the Work Order Component Pick Release Concurrent Program
The work orders must meet the following criteria:
-
Work order has a status of Released.
-
The Enable Material Issue Requests option is selected at the work order level.
There is an open quantity for the material requirements.
-
The Auto Request Material option is selected for the material requirement lines.
The concurrent program will select only the material requirement lines from work orders that have the Auto Request Material option set to Yes.
Using this concurrent program enables you to perform material allocation for work orders that were released earlier with insufficient on-hand material, but now have sufficient on-hand quantity for the material allocation.
Follow these steps to run the Work Order Component Pick Release concurrent program.
-
Navigate to Enterprise Asset Management > Work Orders > Work Order Component Pick Release or Maintenance Super User > Reports > EAM Work Orders Component Pick Release.
-
Select the work orders to which you want to perform material allocations.
Only work orders with a status of Released and that have open material quantity are available for selection.
The following list of parameters will be used to select work orders to perform material requirement allocations:
Parameter Type Default Value Field/LOV Days forward Mandatory 1 To enter Number of days Pick slip grouping rule Mandatory Default rule specified in WIP parameters (PICKSLIP_GROUPING_RULE_NAME in WIP_PARAMETERS_V) Pickslip grouping rules LOV (PICK_SLIP_RULES in WSH_PICK_GROUPING_RULES Print Pick slips Optional Yes LOV values 'Yes' and 'No' Example
Days forward: The number of days into the future to consider material requirements for the pick release.
If the Days forward value is entered as 3, then the program selects the work order material lines whose Date Required is less than or equal to the 'sys date + 3'.
-
Click the Submit button.
To generate a Material Issue Verification
Assuming that you have set the eAM Parameters to automatically create a Material Issue Request upon work order release, the following procedures execute the Material Issue Request; they physically allocate material to a work order.
Note: Ensure that the requested material is available in subinventories that are enabled for picking. Enabled subinventories might be governed by picking rules. See: Defining Picking Rules, Oracle Inventory User's Guide.
-
Navigate to the Stores tab (Maintenance Super User: Stores tab).
-
Click the Material Issue link, and the Simple Search page appears.
You can also use the Advanced Search page.
-
Optionally enter at least one of the following fields in both the Simple and Advanced Search modes.
-
Material Request Number - to include results for a specific material request number.
-
Work Order Number - to include only requests for a specific work order.
-
Material - to include requests for specific a material.
-
Subinventory - to include requests for a specific Subinventory.
-
Line Number - if using the Advanced search mode (Advanced button), to include only specified lines on a request.
-
Operation number - to include requests or a specific operation on a work order.
-
Add Another search option from the list of values, and then choose Add.
-
Locator - if a subinventory was selected and requires a locator.
-
Created By value - to include the person who created the material request.
-
-
-
Choose Go to display material issue request information in the Results region.
Material Issue
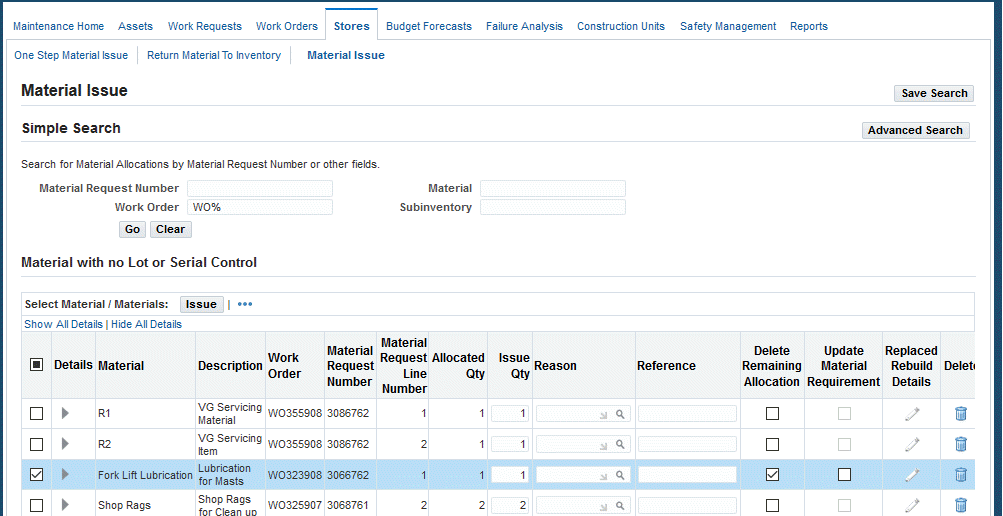
The results region is divided between Material with no Lot or Serial Control and Material with Lot or Serial Control.
-
Optionally update the default Issue Qty.
-
Optionally select a Reason for the Material Issue.
-
Optionally enter a Reference.
-
Optionally select the Delete Remaining Allocation check box to delete the remaining, unissued quantity, if the Issue Qty is lower than the allocated amount within the material requirements.
Conditional Action: The Update Material Requirements check box is also available.
-
Optionally select the Update Material Requirement check box if you want to revise the material requirements for the work order.
Conditional Action: You must select the Delete Remaining Allocation check box before the Update Material Requirements check box is available.
-
Click the Issue button to issue the material, and apply any changes to the remaining allocation and material requirements for the work order.
-
Optionally update the fields in the Material with Lot or Serial Control region of the page.
If the material is a rebuild item, the default value for the check box in the Repair Work Order column is selected. Clear the check box if you do not want the system to automatically create a repair work order for the rebuild item.
For more information regarding repair work orders, see To perform a one step material issue.
-
If the material is Rebuildable Inventory, the Replaced Rebuild Details icon is available. Click this icon to access the Replace Rebuild Details page to enter the replacement rebuildable item information. Note that the default values are associated with the current rebuildable item.
If you specify a replaced rebuildable item, the system generates a work order because it is most likely problematic and you can have it repaired. If a serial number is provided for the replaced rebuildable item, the serial number is removed from the assets hierarchy and the configuration history updates. If nothing is specified within the Replaced Rebuild Details page, the replaced rebuild defaults as the same rebuild item that you are issuing.
-
Select the following information on the Replaced Rebuild Details page:
-
Rebuild Item - Default value appears as the current Rebuild Item; however, you can update it.
-
Rebuild Serial Number - Optionally enter if you know what the specific serial number (for serialized rebuilds).
-
Rebuild Activity - The activity you want to associate with the created rebuild work order.
-
Rebuild Work Order Name - The name of the work order created for the replaced Rebuildable Item.
-
-
Click Apply, and a work order is automatically created for the replaced rebuild item.
Important: For serial and lot controlled items, the system creates a work order for the item with a quantity of 1.
The system returns to the One Step Material Issue page.
-
-
For results within the Material with no Lot or Serial Control region, optionally select the Replace Rebuild Details pencil icon to specify a rebuildable to issue to the current work order. The default value for this check box is selected if the associated work order is for rebuildable inventory maintenance. You can unselect the check box. If you unselect the check box, the system will not create a repair work order.
If you are issuing material for multiple rebuildable serialized numbers, the Replaced Rebuild Details region is unavailable.
Material for multiple rebuildable items can then be issued in a single transaction. See Issuing Multiple Rebuildable Items.
If you are issuing material for one serialized rebuildable, indicate the following within the Replaced Rebuild Details region:
-
Rebuild Item - defaults as the current Rebuild Item; you can update it.
-
Rebuild Serial Number - optionally enter if you know what serial number is coming out (for serialized rebuilds only).
-
Rebuild Activity - the activity you want to associate with the created rebuild work order.
-
Rebuild Work Order Name - the name of the work order created for the replaced rebuildable item.
If you specify a replaced rebuildable item, the system generates a work order for the replaced rebuildable item because it is most likely problematic, and you can have it repaired. If a serial number is provided for the replaced Rebuildable Item, it is removed from the asset hierarchy and the configuration history is updated.
If nothing is specified within the Replaced Rebuild Details page, the rebuild item is issued for the selected work order. The rebuild work order is automatically created only if the replaced rebuild details are entered.
-
-
Optionally select the Delete icon to delete the current material allocation. You might want to use this feature if you want to free material and use it within the One-Step process.
-
Click the Issue button to issue the material to the work order.
-
Optionally for results within the Material with Lot or Serial Control region, perform these steps to issue material, delete remaining allocation, and update material requirements to the current work order:
-
Select the material.
-
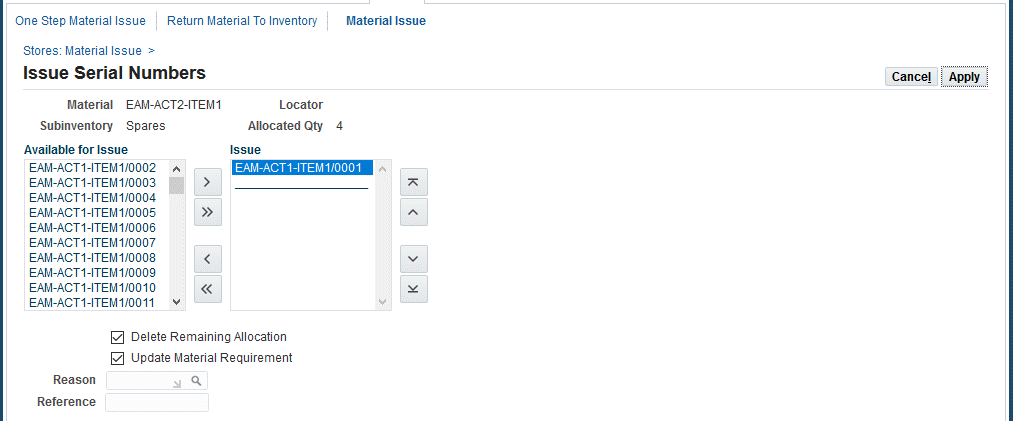
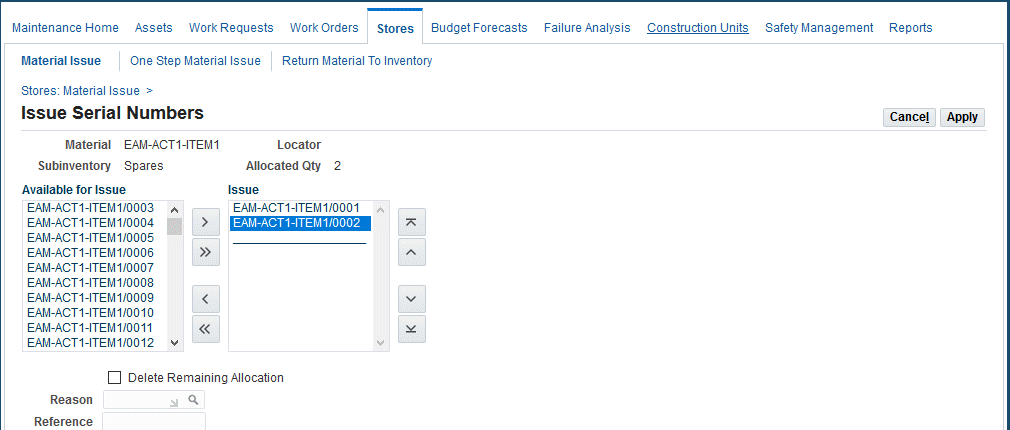
Click the Proceed to Issue button, and the Issue Serial (Lot Control) Numbers page appears.
-
Select the item in the Available for Issue check box that you want to issue.
You must select each specific serial or lot controlled item.
-
Click the right arrow to move the item into the Issue region.
-
Optionally select the Delete Remaining Allocation check box.
The Update Material Requirements button is available.
-
Optionally select the Update Material Requirements check box.
You must select the Delete Remaining Allocation check box before the Update Material Requirements check box is available.
-
Select a Reason and a Reference.
-
Click the Apply button.
This action will issue the material, and if selected, delete any remaining material allocation, and update material requirements for the work order.
-
-
A confirmation message appears that the material was successfully issued.
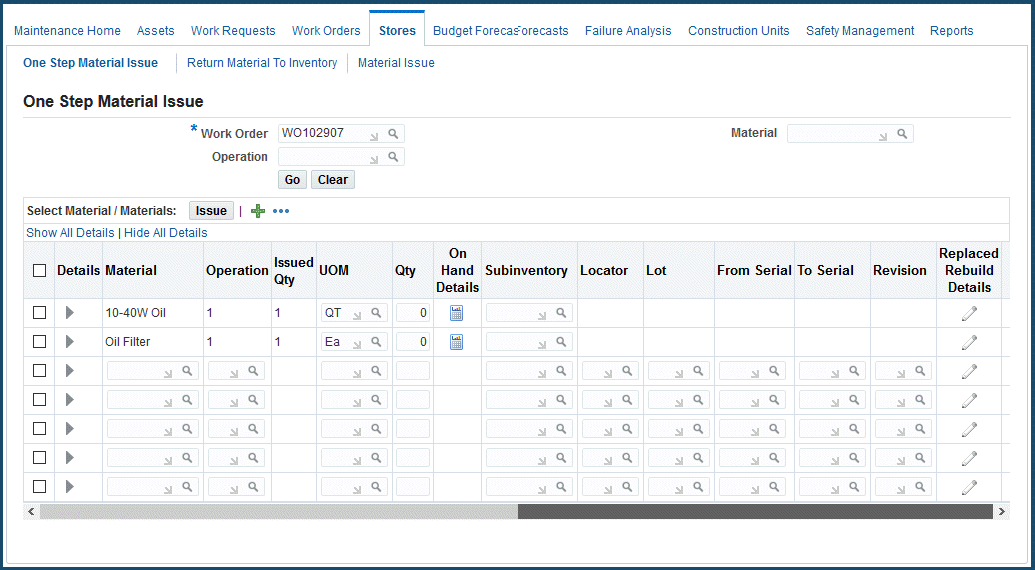
To perform a one step material issue
A one-step material issue is a substitute for the Material Issue Request and Material Issue Verification activities; a separate request is not created. This is performed if the Enable Material Issue Requests check box is not selected in the eAM Parameters (See: Defining eAM Parameters).
-
Navigate to the Stores tab.
-
Select the One Step Material Issue sub-tab.
-
Select the work order that you wish to issue material. It must be enabled for material issue requests. See: Routine Work Orders.
Click the Go button.
-
If the material is Rebuildable Inventory, the check box in the Repair Work Order column is selected (default).
One Step Material Issue page
-
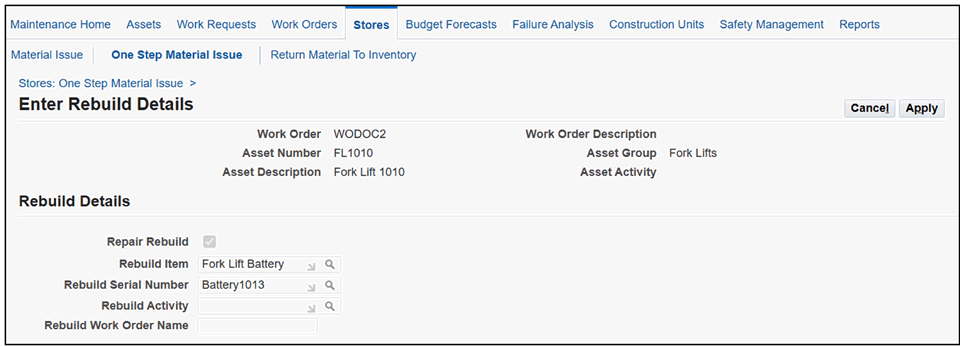
If the material is Rebuildable Inventory, the Replaced Rebuild Details icon is available. Click this icon to access the Replace Rebuild Details page to enter the replacement rebuildable item information. Note that the default values are associated with the current rebuildable item.
Important: For serial and lot controlled items, you must enter a quantity of 1.
Select the following information on the Replaced Rebuild Details page:
-
-
Rebuild Item - Default value appears as the current Rebuild Item; however, you can update it.
-
Rebuild Serial Number - Optionally enter if you know what the specific serial number (for serialized rebuilds).
-
Rebuild Activity - The activity you want to associate with the created rebuild work order.
-
Rebuild Work Order Name - The name of the work order created for the replaced Rebuildable Item.
If you specify a replaced rebuildable item, a work order generates for the replaced rebuildable item because it is most likely problematic and you can have it repaired. If a serial number is provided for the replaced Rebuildable Item, it is removed from the assets hierarchy and the configuration history updates. If nothing is specified within the Replaced Rebuild Details page, the replaced rebuild defaults as the same rebuild item that you are issuing.
Click Apply, and a work order is automatically created for the replaced rebuild item.
The One Step Material Issue page appears.
-
-
-
You can perform one-step material issues to work orders in different units of measure (UOMs).
Click the UOM field for the specific material issue; all other UOMs defined for that material will be available for selection.
If the default UOM is changed, then the Issued Qty field will display the default issued quantity converted to the new UOM.
-
Click the Show/Hide link for the material to view material details.
Details associated with the default UOM appear.
The converted quantity based on the transaction (new) UOM displays in the Required Qty, Allocated Qty, and Open Qty fields.
-
Click the icon in the On Hand Details column to view the on-hand quantity details for the material.
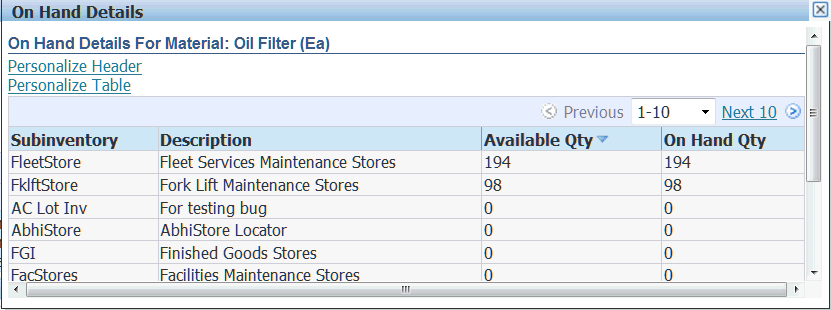
The system displays on hand quantity for the material issue in the user-selected transaction UOM.
Close the popup window.
Enter values for the subinventory, locator, lot, serial information, and so on.
-
You can search to add inventory items by using one of these options:
-
Item
-
Description
-
Cross Reference
-
Cross Reference Description
-
Manufacturer
-
Manufacturer Part Number
Click the Select radiobutton for the item to be added.
Click the Select button.
-
-
Optionally select the specific Operation to view results on existing one step material issues that were issued to that operation. Only operations existing within the selected work order are available.
-
Optionally select a specific Material if your query is to view the existing one step material issues.
-
Click the Go button.
All planned material appears in the Select Material(s) region. Planned material is material that exists in the material requirements for the work order. See: Defining Inventory Material Requirements.
-
Within the Select Material(s) region, optionally select unplanned Material (material not part of the material requirements) to issue to the current work order.
-
Select an Operation to which to issue the material. The UOM default value comes from the current material.
-
-
Select the Quantity of the material that you are issuing to the work order.
-
Optionally select a Subinventory to pull the material from in Inventory.
-
If you previously selected a Subinventory requiring a Locator, select a Locator.
-
If the current material is lot controlled, select a Lot.
-
If the current material is serial controlled, select From and To Serial numbers.
-
Optionally select a Revision.
-
If the material is Rebuildable Inventory, optionally click the Replaced Rebuild Details button to specify the replacement Rebuildable Item information for the current Rebuildable Item. After selected, you can indicate the following within the Replaced Rebuild Details page:
-
Rebuild Item - defaults as the current Rebuild Item; you can update it.
-
Rebuild Serial Number - optionally enter if you know what serial number is coming out (for serialized rebuilds only).
-
Rebuild Activity - the activity you want to associate with the created rebuild work order.
-
Rebuild Work Order Name - the name of the work order created for the replaced Rebuildable Item.
If you specify a replaced rebuildable item, a work order generates for the replaced rebuildable item because it is most likely problematic and you can have it repaired. If a serial number is provided for the replaced Rebuildable Item, it is removed from the asset hierarchy and the configuration history is updated.
If nothing is specified within the Replaced Rebuild Details page, the replaced rebuild defaults as the same rebuild item that you are issuing. A work order is created for the replaced rebuild item.
-
-
Optionally select the Details Show/Hide toggle button.
-
Optionally select a Reason for the current issue.
-
Select the Date required for the material to the work order. Default values for Today's date and time appear.
-
Optionally enter a Reference.
-
-
Click the Select check box next to the lines you are issuing to the current work order.
-
Click the Issue button, and the system displays a confirmation message at the top of the page.
Related Topics
Overview of Move Orders, Oracle Inventory User's Guide
Returning Material to Inventory
You can return material to inventory from a maintenance work order. If excess or defective material is issued to a work order, it needs to be returned. Only material issued to work orders can be returned to inventory. The quantity returned cannot exceed the quantity issued; it must be 1 if the material is serial controlled.
To return material to inventory
-
Navigate to the Stores tab.
-
Select the Return Material To Inventory sub-tab.
-
Optionally select a work order to narrow your results to one work order.
-
Optionally select a Material value to narrow your results to all work orders containing it as a material requirement.
-
Optionally select a Lot Number to narrow your results to all work order containing the previous Material with the current Lot Number.
-
Optionally select a specific Operation contained in the previously selected work order.
-
Optionally select a Serial Number to narrow your selection criteria to only work orders containing it as part of their material requirements.
-
Click the Go button.
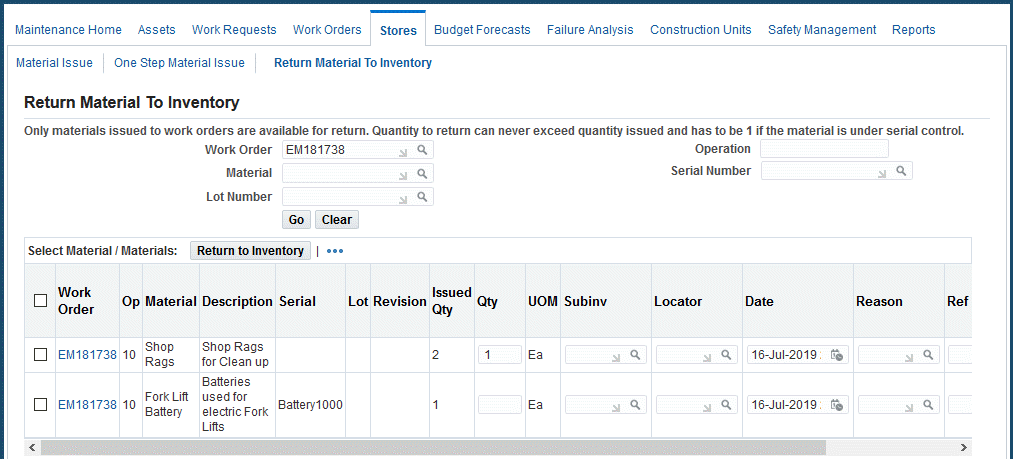
-
Enter the return Quantity for each work order.
-
Select the Subinventory to which to return the material.
-
If the previous Subinventory requires a Locator, select a Locator.
-
Optionally select a Date to return the material. The default value is the current system date and time.
-
Optionally select a Reason code to indicate the reason the material is not needed.
-
Optionally enter Reference information.
-
Enable the Select check box to include the work order rows from which material is being returned.
-
The Delete Allocation & Material Requirements check box for the material line of the work order indicates that you want to delete all the outstanding (unused) material allocation. The default for this check box is selected.
This check box enables the following actions to occur when the return to inventory process is performed:
-
Deletes the open and unused material allocation of the work order.
-
Updates the material requirement quantity of the work order to reflect the net issued quantity (Qty Issued - Qty Returned).
Optionally clear this check box if you do not want to perform these functions.
-
-
Click the Return to Inventory button.
Issuing Multiple Rebuildable Items
You can issue multiple rebuildable items in one transaction, using the one-step or two-step issue methods. The rebuildable items include serial, non-serial, lot and non lot-controlled items.
To perform multiple rebuildable issues for non-serial or non lot-controlled items
-
Create a work order (status of Released) with non serial or lot rebuildable items with the quantity greater than 1 (Maintenance Super User > Home > Work Orders).
See Creating Work Orders.
-
Allocate the material for issue (See Materials).
-
Navigate to the Material Issue page (Maintenance Super User > Home > Stores > Material Issue), and search for the work order with multiple rebuildable lot numbers.
-
Note that the Repair Work Order check box is selected; however, you can unselect it. This check box indicates that you want the system to automatically create repair work orders based on the information on the Enter Repair Build Details page.
If you do not enter details on the Enter Rebuild Details page, the system creates repair work orders based on the default work order.
The Replace Rebuild icon will be available for non serialized and non lot-controlled items with a quantity of 1 or more.
-
Click the Replaced Rebuild Details icon to enter values for the following information:
-
Rebuild Item
-
Rebuild Serial Number
-
Rebuild Activity
-
Rebuild Work Order Name
For more information on these fields, see To perform a one step material issue.
Click Apply.
A rebuild work order is automatically created based on the details entered on the Enter Rebuild Details page.
-
-
Allocate material for issue for the work order (See Materials).
-
Perform a one-step material issue for the work order. See To perform a one step material issue.
-
Click Apply.
To perform multiple rebuildable issues for serial controlled items in a single transaction
-
Create a work order (status of Released) with rebuildable items with the quantity greater than 1.
See Creating Work Orders.
-
Allocate material for issue for the work order (See Materials).
-
Navigate to the Material Issue page (Maintenance Super User > Home > Stores > Material Issue), and search for the work order with multiple rebuildable serial numbers.
-
Click the One Step Material Issue subtab.
-
Enter the quantity for each rebuildable item.
Note: The Replace Rebuild icon is unavailable if multiple serial numbers are entered for issue.
-
Click the Replace Rebuild icon to generate automatic rebuildable work orders.
-
Click Apply.
To perform multiple rebuildable issues for serial controlled items using the two-step method
-
Create a work order (status of Released) with rebuildable items with the quantity greater than 1.
See Creating Work Orders.
-
Allocate the material for issue (See Materials).
-
Navigate to the Material Issue page (Maintenance Super User > Home > Stores > Material Issue), and search for the work order with multiple rebuildable serial numbers.
-
Select the serial numbers to be issued.
The Issue Serial Number page appears.
-
Click Apply.
To perform multiple rebuildable issues for lot controlled items using the one-step method
-
Create a work order (status of Released) with rebuildable items with the quantity greater than 1.
See Creating Work Orders.
-
Allocate the material for issue (See Materials).
-
Navigate to the Material Issue page (Maintenance Super User > Home > Stores > Material Issue), and search for the work order with multiple rebuildable lot numbers.
-
Select the lot controlled material in the Material with Lot or Serial Control region.
-
Select the lot numbers to be issued.
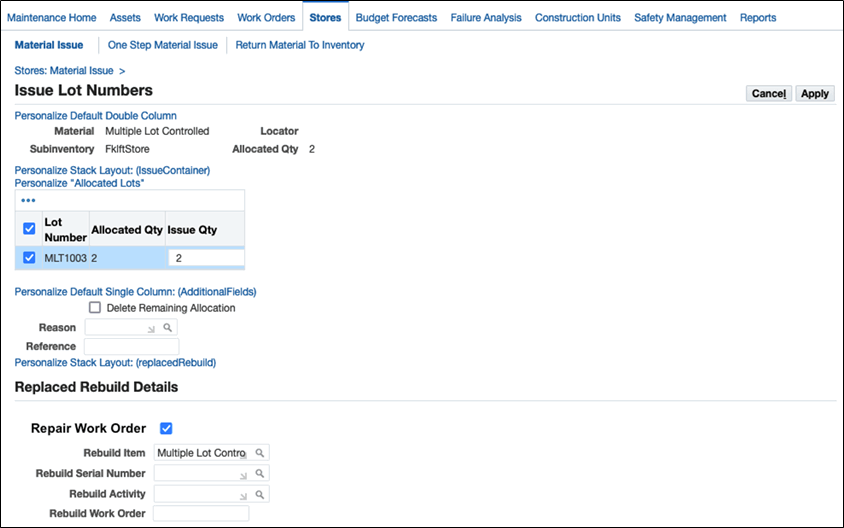
-
Unselect (clear) the Repair Work Order check box if you do not want the system to automatically create a repair work order.
-
Click Apply to accept the default Rebuild Item. Note that you can select a different rebuild item.
-
Click Apply.