Failure Analysis
This chapter covers the following topics:
- Failure Analysis Overview
- Defining Failure Codes and Sets
- Collecting Failure Information
- Analyzing Failure Information
- Setting Up Failure Tracking Associations Using WebADI
Failure Analysis Overview
Failure Analysis enables you to track an asset failure from the time it is reported until its resolution. Statistics from your collected failure data provide you with information on why an event occurs and causes your asset failure. You can then take the necessary steps to eliminate that event. Additionally, you can use the failure statistics, among others, to help you formulate your Reliability-Centered Maintenance (RCM) program. Failure hierarchies that support multiple-level failure reporting provide effective root cause and reliability analysis. For specific asset groups or rebuildable items, each failure (problem) has a defined number of root causes, with each root cause having a defined number of resolutions (remedies).
When failure is reported, each work order represents one single failure occurrence (event) for the asset specified on the work order. The cost to repair an asset that fails to a normal, operational state is assumed to be the charges accumulated in the work order that is associated with the failure. If the repair is outsourced to an external party and requisitioned on a purchase order, a work order must be created to collect the repair costs for failure analysis to pick it up.
You can also link the Failure, Cause, Resolution Code associations with asset groups using the Failure Setup Web ADI self-service page (Failure Analysis > Failure Tracing Setup > Failure Setup Web ADI > Create Document).
Failure Analysis topics include the following:
Defining Failure Codes and Sets
A work order represents one single failure occurrence (event) for the asset specified on the work order. There are three main Failure Code Types: Failure Code, Cause Code, and Resolution Code. When creating a work order, these failure codes are specified on the work order, for example, Compressor Shaft Damage (Failure), Vibration (Cause), and Replacement and Re-calibration (Resolution).
Note: You can optionally update these codes' meanings. See: Failure Code Types.
User-defined failure codes, cause codes and resolution codes are organized into multiple tree structures called Failure Code Sets, which are then assigned to asset groups. Each set provides asset group-specific information on the possible failures of an asset group, the possible causes of each failure, and the possible resolutions for each cause. Assets within an asset group inherit the assigned Failure Code Set. At the work order level, Failure Tracking codes are entered to report a failure, its cause, and resolution. The assigned sets provide a disciplined methodology to collect failure data on assets. Inquiries on failure data are performed, based on user-entered criteria, such as date range, asset groups, assets, departments, or areas. Mean Time Between Failure (MTBF) and Mean Time To Repair (MTTR) are calculated with each inquiry.
To define failure codes
-
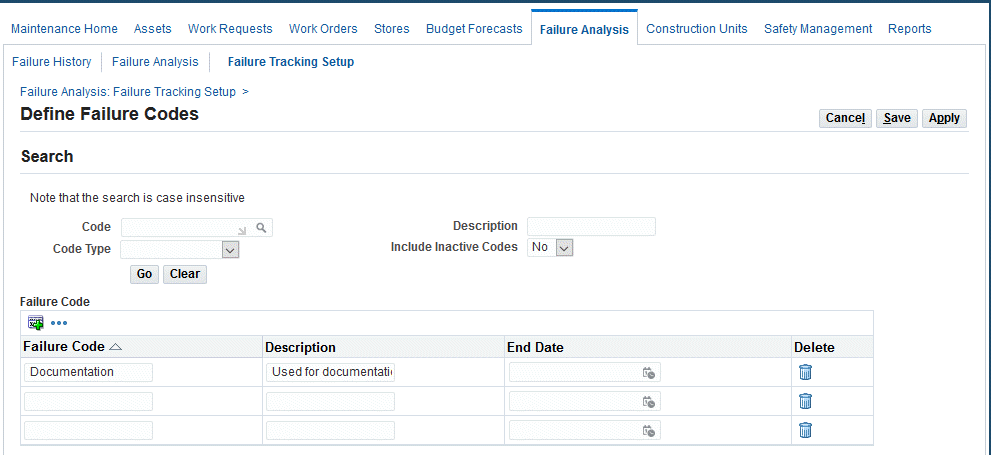
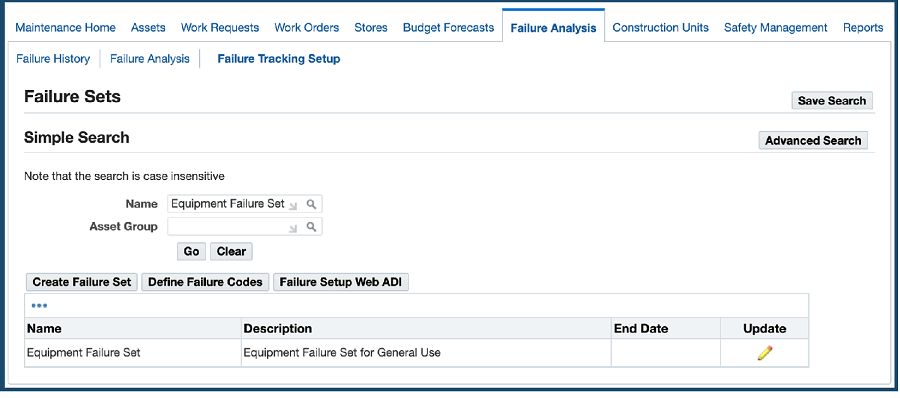
Navigate to the Failure Sets page (Maintenance Super User: Failure Analysis > Failure Tracking Setup).
-
Choose Define Failure Codes.
-
Select the appropriate Code Type, such as Failure Code (See: Failure Code Types).
-
Enter the Code, for example, Mechanical.
-
Enter the code Description, for example, Mechanical Parts Failure.
-
Optionally enter an End Date, to apply an expiration for the current code.

-
Optionally choose Save to create the codes and remain on the current page.
-
Click the Apply button to create the codes and return to the previous page.
To define a failure set
-
Navigate to the Failure Sets page.
-
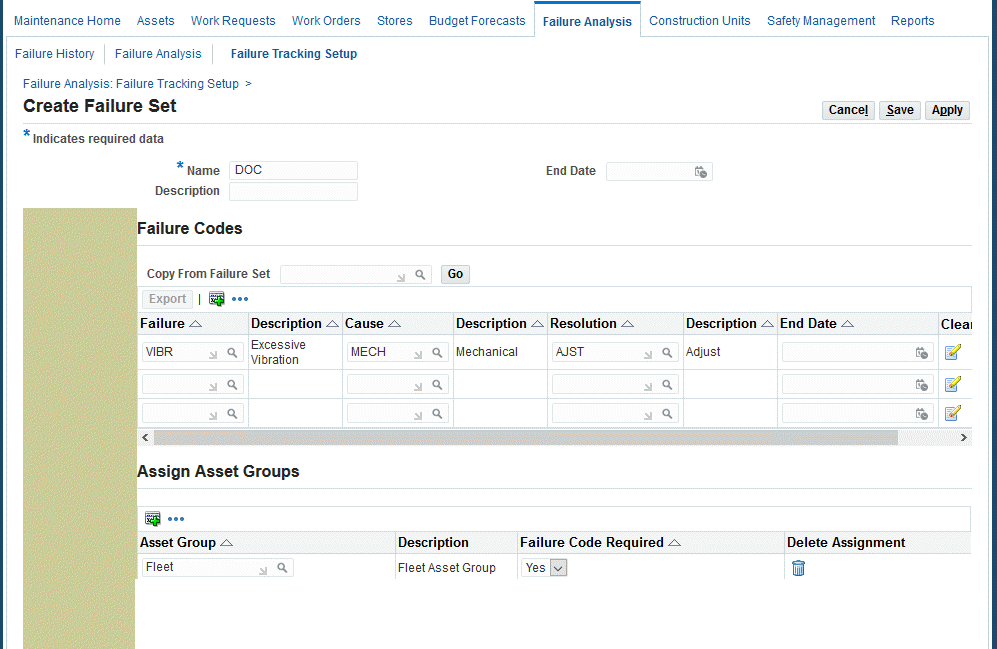
Choose Create Failure Set.

-
Enter the Name for the failure set.
-
Optionally enter a Description for the failure set.
-
Optionally enter an End Date, to apply an expiration for the current failure set.
-
Optionally select an existing failure set from the Copy From Failure Set list of values.
If the failure set that you are creating is similar to an existing failure set, you can copy failure codes from an existing failure set, aiding in multiple failure set entry. To copy the failure hierarchy from another failure set, you can use the Copy From Failure Set field. The list of values includes active failure sets.
Click the Go button and the failure combinations of the selected failure set appear. You can delete any unwanted combinations.
-
Select a Failure code, and the description default value appears.
-
Select a Cause code, and the description default value appears.
-
Select a Resolution code, and the description default value appears.
-
Optionally enter an End Date to apply an expiration for the current group of codes.
-
Assign the current failure set to an asset group or rebuildable item.
Asset numbers or rebuildable serial numbers within an asset group or rebuildable item, respectively, inherit the assigned Failure Code Set.
-
Select an asset group from the list of values.
The Description default value comes from the asset group definition.
-
Select whether Failure Code entry is required on work orders created for assets within the current asset group.
For example, select Yes from the Failure Code Required list of values to ensure that Failure Codes are entered when creating work orders for assets within the current asset group. The Failure Code Required value defaults to the work order, but you can optionally change it.
-
-
Optionally click the Save button to create the failure set and remain on the current page.
-
Click the Apply button to create the failure set and return to the previous page.
Collecting Failure Information
Failure reporting for an asset is performed by entering failure tracking codes, when creating the failure work order or when completing it. Asset failure history is available after the work order is completed. This information assists in the maintenance management decisions and provides data for reliability analysis.
Related Topics
Analyzing Failure Information
You can analyze failures that are reported against assets with the Failure History and Failure Analysis pages. The Failure History page displays detailed failure data, reported at the work order level. The Failure Analysis page aggregates failure data, based on the user-selected View By and displayed measures, such as Mean Time Between Failures (MTBF), and Mean Time To Repair (MTTR).
The three main measurements for asset maintainability and reliability are:
-
Mean Time Between Failures (MTBF): Average elapsed time between failures. MTBF is the duration in days between two asset failure dates, and is a reliability metric indicating how often an asset fails.
-
Mean Time To Repair (MTTR): Average time between when an asset fails (reported failure date) and when it is repaired to its normal operating condition (actual work order completion date). MTTR is a maintainability metric, indicating how fast repair is completed after a failure is reported.
-
Mean Time Between Repairs (MTBR): Average duration when an asset is in acceptable functional condition. The calculation is as follows:
MTBR = MTBF - MTTR
Note: Only completed work orders are included in Failure History and Failure Analysis.
To analyze failure history information
-
Navigate to the Failure History page (Failure Analysis tab > Failure History sub-tab).
-
Enter an asset number (or Rebuildable Serial Number).
-
Optionally enter a range of failure reporting dates.
-
If there is a Primary Failure Meter specified for the asset, its readings appear in the Search Result table.
However, you can select any Required meters that are associated with the asset from the Display Readings from Meter list of values, to have the selected meter's readings appear in Failure History. This field is enabled only for the Simple Search, with a specified asset number.
-
Click the Go button.
Additional Information: When calculating Mean Costs to Repair, all work orders that are associated with the failure results are included, if their costs are in the same currency. An asset can move between organizations if work orders have multiple currencies. All work order costs that are expressed in a currency that is different than the current maintenance organization's primary currency are excluded. A warning icon appears, informing you that there are repair costs that are not included because they are not in the current maintenance organization's currency.
To analyze failure information
Based on your search criteria, work order failure data is filtered for analysis. The View By selection determines how the failure data is aggregated for the MTBF, MTTR, and Mean Cost To Repair calculations. If there is a Primary Failure meter or if a Required meter is selected, the Mean Readings Between Failures are also calculated. You can compare MTBF, frequency, and MTTR calculations by Asset Number, Asset Group, Asset Category, or Failure.
-
Navigate to the Failure Analysis page (Maintenance Super User: Failure Analysis tab > Failure Analysis sub-tab).
-
Optionally enter an asset number or rebuildable serial number.
-
Optionally enter an asset group or rebuildable item.
-
Optionally select an Asset Category of the selected asset group or rebuildable item that is assigned to the current organization.
-
Select the Include Children option to include child assets in the inquiry results, even if they do not meet the search criteria.
-
Enter a value in the Include Position Code list of values to include assets associated with a specific position code in the functional location hierarchy.
-
Optionally select a View By value. You can view failure information by Asset Number, Asset Group, Asset Category, or Failure Code.
Note: Use Advanced Search if you want to search by other criteria such as Area. You cannot add View By values.
-
Optionally select a Display Readings from Meter value to display meter readings from a non-primary meter.
Meters that are associated with the selected asset, with the Required check box selected, and that are identified as a non-primary meter, are available for selection. By default, readings from the primary meter, if it exists, appear. This field is enabled only for the Simple Search, with a specified asset number and if you View By asset number.
-
Optionally select a failure code to further narrow your failure results by code.
-
Optionally enter a range of failure reporting dates.
-
Click the Go button.
The number of failure occurrences appear. A link from the Failure Count value provides a drill down to the Failure History information.
Setting Up Failure Tracking Associations Using WebADI
Using the Failure Tracking WebADI, if the failure, cause, resolution codes are not available, the application will also create the codes and then create the failure, cause, resolution code association with the asset group. In addition, use this WebADI to make changes to the existing setup using the same set of information in different organizations.
To create failure, cause and resolution code associations using the Failure Setup Tracking WebADI:
-
Navigate to the Failure Setup Tracking WebADI page (Maintenance Super User > Maintenance Home > Failure Analysis > Failure Tracking Setup > Failure Setup Web ADI).
Failure Sets - Search

-
Search for a specific failure set, and then click Go.
-
Click the Update icon for the failure set.
-
The Create Document page appears.
Failure Setup Tracking WebADI - Create Document

-
Select the viewer.
-
Click Create, and the following message appears:

-
Open the file, and click the Enable Content button.
-
Enter information in the columns to create the complete setup of codes and asset group associations.
-
Save your work.
-
Click the Upload button, and the Upload Page appears.
-
Select the values for the upload parameters:
-
Rows to Upload: All Rows or Flagged Rows
-
Commit Rows: Validate Before Upload, All Rows, Each Row, Automatically Submit Import
-
-
Click Upload.