Setting Up Source and Destination Instances
This chapter covers the following topics:
- Overview
- Setting Up the EBS Source Instance
- Creating a VCP Destination Instance
- Cloning an Instance
- Moving From a Centralized to a Decentralized Installation
- Resolving a Corrupted Instance
Overview
The setup for Value Chain Planning consists of steps for the EBS source instance and steps for the VCP destination instance.
In Oracle Value Chain Planning where you have a distributed installation with separate EBS source and Planning Server (VCP destination instance), there is support for disparate database releases in all supported Oracle RDBMS releases. For instance, you could have an 11.5.10 EBS source instance on 10gR2 and your 12.1 VCP destination on 11gR2.s
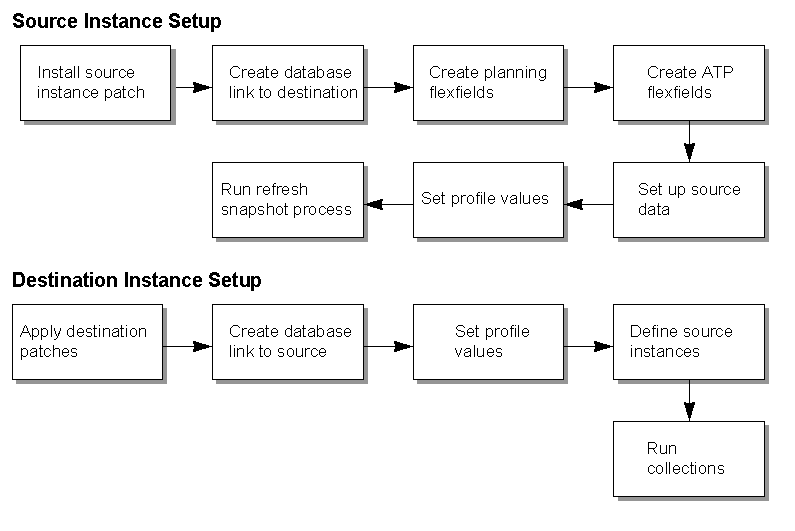
The following figure is a flowchart illustrating the source and destination setup steps.
Source and Destination Instance Setup
Setting Up the EBS Source Instance
Before data collections can be run, the EBS source must be properly configured. In particular, the following steps need to be addressed before configuring the destination instance:
-
Setting security
-
Creating a link to the destination instance
-
Setting up planning flexfields
-
Entry of source data
-
Configuring EBS profile options
-
Running the Planning Manager in certain business cases to collect the data for PO and WIP entities. Please review My Oracle Support #790125.1 -- "When Does the Planning Manager Need to be Running?" for more information.
In a centralized install, you can assign the user Advanced Supply Chain Planner responsibility and they will be able to perform all steps to run collections, run ASCP plans, and release recommendations. For other types of planning (IO, DRP, SPP), their respective responsibilities also perform the same functions. The VCP super user would need the Advanced Planning Administrator responsibility to define the instance and set organization security for each responsibility. In a distributed installation where the EBS source instance is release 12.1 or higher, users must have the responsibility APS COLLECTIONS on the source instance to run collections and APS RELEASE on the source instance to release planned orders.
-
Create a database link pointing to the planning server.
A database link must be established on the EBS Source instance that points to the APS Destination (planning) instances, MRP: ATP Database Link. This database link will also be used, along with a database link established on the destination instance, in setting up the instances on the planning server.
-
Create Advanced Supply Chain Planner responsibilities in the source instance related to the collections process. See Defining Source Link.
-
The Create Planning Flexfields concurrent program creates new segment definitions in existing descriptive flexfields to hold data that may be required for constrained and/or optimized planning. The program also populates profile values with the value corresponding to the descriptive flexfield attribute number for each attribute (planning parameter) created. The collections process uses the profile values for the flexfield attribute to collect any values for entities (such as items and bills of material) when you populate them in the source instance.
Note: These values are not required at the item level. If they are not set at the item level, they will be defaulted at the plan level by the constrained planning engine. Oracle recommends that you use the plan level constraints until you have found a specific need to modify at a lower level.
See Appendix A.3 -- Flex Field Profile Options for more details.
Launch the Create Planning Flexfields report from the System Administration responsibility. The parameters that must be set for the report are the attributes that you wish to utilize for the new flexfield definitions. The list of values for each parameter lists only the available attributes in the subject descriptive flexfield.
Note: Keep track of the attribute number that you select for each flexfield segment. You will need to verify that each corresponding profile option was populated with the correct attribute number when the process completes.
After submitting the program, eleven additional processes should be spawned. These jobs are compiling the descriptive flexfield views.
Check that the profile values corresponding to each flexfield attribute were populated with the correct attribute number. Some profile values may retain the value of "unassigned" after the Create Planning Flexfield program completed. You must change any unassigned profiles to the attribute number corresponding to the flexfield attribute where the new segment was defined. For more details, see Appendix A.4 -- Flex Field Profile Options.
-
Set profile values. For more details about the key profile options, see Appendix A.2 -- Profile Options.
Important: Verify two profiles: MSC: Share Plan Partition set to No (set on the APS destination in a distributed install), and the MSC: Source Setup Required profile is set to Yes (set on EBS Source in a distributed install)
-
Set up source data with BOMs, resources, routings, supplier data, flexfields, purchasing information, item masters, Oracle BIS targets, and any other data required by your plans.
Defining Source Link
This describes the details of Advanced Supply Chain Planner responsibilities in the source instance related to the collections process.
Source Instance Prior to Release 12.1
You must assign this Advanced Supply Chain Planner Responsibility with the specifications listed below to the User who will launch Collections and Release from the workbench:
-
Responsibility Name: Advanced Supply Chain Planner
-
Application: Advanced Supply Chain Planning
-
Description: Used for running Refresh Collection Snapshots
-
Menu: MSC_TOP_4.0
-
Data Group Name: Standard
-
Application: Advanced Supply Chain Planning
-
Request Group: All MSC Reports
-
Application: Advanced Supply Chain Planning
-
Oracle Advanced Supply Chain Planning uses this responsibility to run the concurrent program Refresh Snapshot during all data collection runs.
Warning: If you create custom responsibilities for your users on the APS Destination to launch Data Collection or Release planned orders from the Planner Workbench, then you must also define those responsibilities on the EBS Source instance. When creating those responsibilities, the following fields must match exactly or the Release process will fail: Responsibility Name, Application, Responsibility Key, and Description.
For other fields, you should use the same fields used for Advanced Supply Chain Planner. The user will not use this responsibility for any data processing. It must exist only for processes launched on the APS destination which must have this information on the EBS Source to complete processing successfully.
Source Instance At Release 12.1 or Later
You must assign this Advanced Supply Chain Planner Responsibility, with the specifications listed below, to the User who will launch Collections and Release from the workbench:
-
First Responsibility Name: APS Collections
-
Application: Advanced Supply Chain Planning
-
Description: APS Collections Responsibility
-
Menu: MSC_COLL_REL_MENU
-
Data Group Name: Standard
-
Application: Advanced Supply Chain Planning
-
Request Group: All MSC Reports
-
Application: Advanced Supply Chain Planning
-
Assign the responsibility to user names in the source instance that are authorized to run the APS collection processes.
-
Second Responsibility Name: APS Release
-
Application: Advanced Supply Chain Planning
-
Description: APS Collections & Release
-
Menu: MSC_COLL_REL_MENU
-
Data Group Name: Standard
-
Application: Advanced Supply Chain Planning
-
Request Group: All MSC Reports
-
Application: Advanced Supply Chain Planning
-
Assign the responsibility to user names in the source instance that are authorized to run the APS release processes.
Creating a VCP Destination Instance
After setting up and configuring the EBS source instance, define the VCP destination instance.
To set up a VCP destination instance:
-
Use either of these GUIs:
To use Oracle Forms, select responsibility Advanced Planning Administrator and select Admin > Instances. Do not access this form while the collections process is running; it locks a table that the collections process needs to complete successfully. The Application Instances window appears
To use the Advanced Supply Chain Planning Supply Planning Work Area, see chapter Supply Planning Work Area, Manage Instances in Oracle Advanced Supply Chain Planning Implementation and User's Guide.
-
Enter for each of the EBS source instances that you want the Planning Server planning engine to plan.
-
Complete the fields and flags in the Application Instances window as shown in the table below.
Note: You are only required to set up VCP destination instances before the first time you perform data collection.
Field/Flag Description Instance Code This is a user-defined 1-3 character name for the EBS source instance to be planned. It appears in front of organization names and other designators. For example, if two EBS source instances TA1 and TA2 are to be planned, and both instances have an internal organization named M1, ASCP will display TA1's organization as TA1:M1 and TA2's organization and TA2:M1.
In some of the SQL examples in this guide, V86 was used when setting up INSTANCE_ID 81.Instance Type The valid values here are Discrete, Process, Discrete and Process, and Others (for Legacy collection instances). This controls whether discrete manufacturing data or process manufacturing data (or both) are collected from the EBS source instance to the planner server for planning. Only use choices that include Process if you have implemented Oracle Process Manufacturing on this instance. Legacy is used when collecting from the applications other than E-Business Suite (EBS) application. Version The Oracle Application version of the EBS source instance. The Planning Data Pull program adjusts how it interacts with the source based on this setting. From Source to APS Application Database Link Name: Used in a distributed installation. Define a link to connect the EBS source instance to the VCP destination instance. This link is determined by the database administrator. This database link is defined on the EBS source transaction instance and points to the VCP destination planning server. This link is used to publish releases from the VCP destination instance back to the EBS source instance such as purchase orders or work orders.
For legacy and centralized installations, leave blank.From APS to Source Planning Database Link Name: Used in a distributed installation. Enter the link created on the VCP destination server that points to the EBS source transaction server. This link is determined by the database administrator. This link is used to find and collect the EBS source transaction data to be collected for planning.
For legacy and centralized installations, leave blank.Enable Flag Select this option to enable the collection process. Allow ATP When enabled, the planning engine performs the ATP process in the destination instance specified, taking into consideration the plans selected for ATP in the Plan Names form.
You can select the Allow ATP check box for only one of the destinations that are associated with a single source. The planning engine displays an error message if you attempt to select more than one destination for ATP.
For more details about how this field works in a multiple destination scenario, see Example: Using the Allow ATP Option With Multiple Destination Instances.
ATP-able instances are displayed in the EBS source table MRP_AP_APPS_INSTANCES_ALL.Staging Instance This flag enables dual collection processes from an EBS source instance to both an VCP destination instance and a RP (Rapid Planning) instance at the same time. Only for use with Rapid Planning collections. Allow Release Select the Allow Release check box for the destination instances that are allowed to release automatically to the source instance. The Allow Release check box is used for both auto release and manual release processes.
To trigger release, the Production checkbox must be selected in the plan options.
For more details about how the Allow Release option works in a multiple destination scenario, see Example: Using the Allow Release Option With Multiple Destination Instances.GMT Difference The difference between planning server time zone and GMT. For example, if your server is in the Eastern Standard Time zone (EST) , enter -5. Note: This setting is ignored in the 12.2 Planning Data Collection releases.
Currency Enter your currency code. For example, for US currency, enter 'USD'. Assignment Set Optionally, enter the default assignment set for this instance. The assignment is used to resolve sourcing for order promising inquiries.
Leave blank if you are working with multiple assignment sets.Collect All Category Sets Use this field to specify the category sets to be collected for each instance. See Category-Specific Collections. -
Enter the organizations on each of the defined EBS source instances from which to collect planning data by clicking Organizations.
-
Select the organizations for each instance. Depending on your Family Pack level, all of the organizations for each source instance should be visible or available by clicking on the Organization lookup.
-
Collection group -- a free form field to assign a name to be used to collect only specific organizations when running data collections. The option to choose a collection group is one of the Planning Data Pull Parameters.
-
Be sure to select the master organization and enable the organization to be used for ATO and inline forecast explosion during the ASCP plan.
-
-
Close the Organization window.
-
Save the Instance Definition setup.
-
Verify that the new destination instance is ready for collections by using SQL #3 -- Show Instance Partitions Created and Assigned to an EBS Source Instance to make sure that MSC_APPS_INSTANCES.ST_STATUS=0 for the INSTANCE_CODE.. If the ST_STATUS is not 0 for the INSTANCE_CODE, run Planning Data Collection - Purge Staging Tables with the parameter Validation = No to reset the status and clean up the collection tables.
ST_STATUS values:
0 = No source pull or collection is in process.
1 = Pull and collection process has begun.
2 = Pull has ended and is waiting for load to begin.
3 = Load has begun.
4 = Load has ended and staging tables are being purged.
Example: Using the Allow ATP Option With Multiple Destination Instances
We allow a single EBS source to be connected to multiple APS destination instances. For example: A single source instance S that is associated to two destination instances D1 and D2:
-
When you define the instance S in D1 destination instance, the Allow ATP check box is selected for destination instance D1.
-
Now you go to instance D2 and also define connection to the same source S, and then check the Allow ATP flag. Validation occurs and you get the error message "Source instance S already has a designated ATP destination instance. Please uncheck first the 'Allow ATP' flag in the destination instance corresponding to the source APS".
Conclusion: You cannot set up two different APS instances with Allow ATP for the same EBS source.
Example: Using the Allow Release Option With Multiple Destination Instances
-
A single source instance S that is associated to two destination instances D1 and D2.
-
The Allow Release check box is selected for D2 and not for D1.
The plans in D2 with the Production check boxes selected in the Plan Options form trigger the Auto Release process to source.
You can select the Production check boxes for plans in D1 but they will not trigger any Auto Release process to source. This is because the Allow Release check box is not checked for D1 in the Application Instances form.
Conclusion: You can select the Allow Release check box for multiple destinations that are associated to a single source.
Cloning an Instance
There are times when you want to clone an instance, like when you want to create an duplicate instance for testing purposes. The procedures differ depending on whether it is a centralized or decentralized installation.
Centralized Installation
When you have a centralized installation, then you do not have to consider any steps after cloning your instance and can proceed with normal operations of running data collections and most VCP applications. However, if after cloning you want to change the instance code in the Applications Instances form, you must follow steps in Instance Cleanup and Reset to clean up all the old data before you create a new instance.
Warning: If you just change the instance code in the form, then this will cause data corruption.
Decentralized Installation
There are many different strategies to cloning when you have a distributed installation such as using separate databases for VCP and EBS applications.
When you create the line in the Applications Instances form on the VCP destination (navigation: Advanced Planning Administrator/Admin/Instances), you are:
-
Using an INSTANCE_ID from MSC_INST_PARTITIONS where FREE_FLAG = 1 to store information on these setups you define in the form.
-
Inserting a line into MSC_APPS_INSTANCES on the VCP destination instance with the Instance Code and INSTANCE_ID.
-
Inserting a line into the MRP_AP_APPS_INSTANCES_ALL table on the EBS source instance.
When creating orgs in the Organizations region of the Applications Instances form, you are inserting rows in the VCP destination table MSC_APPS_INSTANCE_ORGS for that INSTANCE_ID.
In MSC_INST_PARTITIONS, FREE_FLAG = 1 means that the instance_id is not yet used. Once the INSTANCE_ID is used, the FREE_FLAG = 2. You should not manually change the FREE_FLAG using SQL. Create a new instance partition using the Create APS Partition request with parameters Instance partition = 1 and Plan partition = 0. We do not recommend creating extra instance partitions, since this creates many objects in the database that are not required. If the previous collected data and plan data from the old instance is not required, then it should be removed from the system.
Key Points:
-
You will have to manually manipulate the EBS source instance table MRP_AP_APPS_INSTANCES_ALL.
-
You cannot have two instances which have the combination of: Instance_id, Instance_code, and a2m_dblink in the EBS source table MRP_AP_APPS_INSTANCES_ALL
-
You cannot have two instances which have the same Instance_id, Instance_code, m2a_dblink in the VCP destination table MSC_APPS_INSTANCES.
Cloning Your Existing Instance
In most cases, the clone is performed before any data is purged to avoid downtime. Complete the following steps:
-
On both the EBS source instance and VCP destination instances, purge all ASCP plans in the system, drop the plan and instance partitions. See Instance Cleanup and Reset for more information.
-
On the VCP destination instance, finish the cleanup of the VCP destination instance using SQL #6 -- Delete All Tables Where the INSTANCE_ID Column Appears and SQL 7 -- Delete All Tables Where the SR_INSTANCE_ID Column Appears. For instances with Oracle Demand Planning (ODP) data, also see SQL #13 -- Delete All Tables Where the INSTANCE_ID Column Appears for ODP Data, SQL #14 -- Delete All Tables Where INSTANCE_ID Column Appears for ODP Data, and SQL #14b -- Delete All Tables Where the Instance Column Appears for ODP Data.
-
Add an ODS partition by submitting the request Create APS Partitions with plan_partition_count = 0 and inst_partition_count = 1. See ODS Tables and Instance Partitions for more information.
-
Set up the new instance to be collected from within the application. See Setting Up the EBS Source Instance for more details.
-
Launch Gather Schema Statistics on the VCP destination instance. The Gather Schema Statistics program generates statistics that quantify the data distribution and storage characteristics of tables, columns, indexes, and partitions.
-
Set profile MSC: Source Setup Required = Yes on the EBS source instance.
-
Launch data collections with a complete refresh to collect data to the new APS destination.
-
Create and launch your ASCP plans. If the plan fails, then re-run it once more. If failure continues and it was working fine with the same code on the previous instance, then run Gather Schema Statistics again with 50% and then try the plan once more.
Tip: Once you have a very clear understanding of setting up partitions and the ways to manipulate instance codes and instance ids, you may want to refer to Section XV of My Oracle Support Note 137293.1 - "How to Manage APS Partitions in the MSC Schema" which provides details of an untested advanced cloning approach.
Moving From a Centralized to a Decentralized Installation
There are two options for this installation.
-
Perform a fresh installation of the application on the VCP destination machine and set up VCP. The advantage is that it takes much less disk space and there's less chance of corrupting the instance. The disadvantage is that additional setup time is needed.
-
Clone your existing instance onto a new server and then clean up the data on the EBS source and VCP destination instances in the MSC schema. The advantage is that much of the setup is accomplished through the cloning process. The disadvantage is all the disk space needed for all the unused data residing in other schemas. See Cloning an Instance for more information about cloning.
To perform a fresh installation of the application on the VCP destination machine, do the following:
-
On the EBS source instance, purge all ASCP plans in the system, drop the plan and instance partitions. See Using Drop Partition Request for more information.
-
Install applications in the new instance and set up your employees, users, etc. for basic applications access.
-
Set up the VCP destination instance as if it was a brand new installation. See Defining Destination Link for more information.
Resolving a Corrupted Instance
If the backup of the instance does not seem to have stable data, then all partitions should be dropped and then recreated.
-
Clean up all the data using SQL #6 -- Delete All Tables Where the INSTANCE_ID Column Appears and SQL #7 -- Delete All Tables Where the SR_INSTANCE_ID Column Appears.
-
Check the tables using SQL #1 -- List Partitioned Tables in the System and keep a copy of that information.
-
Use Drop Partition with parameter Plan = No to remove the instance partition.
-
Submit Create APS Partition request with instance partitions = 1 and plan partitions = 0.
Note: Do not create more partitions than necessary.
-
Use SQL #10 -- Check MRP_AP_APPS_INSTANCES Table on the EBS Source Instanceannd Delete Line to remove the line from MRP_AP_APPS_INSTANCES_ALL in the EBS source instance.
-
Set up a destination instance. See Creating a VCP Destination Instance for more information.
-
Run a complete refresh of the data collection. See Running Standard Collections.