Oracle Order Management Command Center
This chapter covers the following topics:
- Order Management Command Center Overview
- Orders Dashboard
- Credit Check Analyzer
- Returns Dashboard
- 360 View Dashboard
- Quotes Dashboard
Order Management Command Center
Order Management Command Center Overview
The Oracle Order Management Command Center presents customer service representatives (CSRs) and supply chain analysts with data about orders and returns. Search and filter orders and returns information using various metrics, charts, graphs, and tables.
The command center contains the following dashboards:
Use the command center to:
-
Review and analyze outbound orders and return orders.
-
Monitor outbound orders, return orders, alerts, and exceptions to take timely actions on order fulfillment.
-
Identify and fulfill sales order lines that are backordered.
-
Find reserved orders and transfer demand to speed up fulfillment.
-
-
Act on order management concerns to improve customer satisfaction and revenue.
-
-
Use the Credit Check Analyzer, a single interface, to review all sales orders and sales order lines that are on credit check hold.
-
Review the applicable credit check rule, credit limits, and transaction details such as invoices and sales orders that contribute to the credit exposure amount.
-
Gain insight into the overall exposure and order level exposure amounts in credit limit currency for all the identified sales orders and sales order lines that are on credit check hold.
-
Use the analytical data to take informed decisions about using the credit limits while honoring customer priority sales orders.
-
Act on resolving credit check hold to fulfil priority sales orders.
-
-
Gain actionable insight and visibility into the sales order lifecycle using the 360 View capability.
-
Expedite order fulfillment.
-
Use integration with Purchasing, Manufacturing, Inventory, and Receivables Command Centers to analyze sales orders data across products.
-
Track sales orders throughout the order-to-cash lifecycle.
-
Review and resolve fulfillment delays.
-
-
Analyze quote trends and optimize the supply chain process.
-
Review open quotes, converted quotes, and the average time to convert a quote to an order.
-
Expedite the quote-to-sales order conversion process.
-
-
Review and analyze returns data.
-
Identify reasons for and sources of returns.
-
Gain insight into monthly returns trends and follow up on returns.
-
Address issues to reduce operational costs and to improve the supply chain process.
-
Note: You can use the Order Management Command Center only after the installation and common configurations are completed as described in My Oracle Support Knowledge Document 2495053.1, Installing Oracle Enterprise Command Center Framework, Release 12.2. For additional ECC overview information, see Overview of Enterprise Command Centers, Oracle E-Business Suite User's Guide.
Searching Enterprise Command Center Dashboards
Use the dashboard sidebar to refine (filter) the data on each dashboard. You can select a value or record from the Available Refinements component, or use Search to find a keyword, a value, or a specific record. The type-ahead feature suggests matches for your entry that correspond to the available refinements. When you submit a search, the search term is added to the Selected Refinements list, and the dashboard data is refined to include only records that match the search. You can add multiple refinements and remove any of them at any time. Use Saved Search to create and save your search. You can edit, delete, or refer to this saved search. You can also use data sets to further refine your search.
Use an asterisk (*) or percent (%) to perform a partial keyword or record search that matches any string of zero or more characters. You can also use a question mark (?) to perform a partial search that matches any single character.
Additional Information: For more information about searching for and refining data in enterprise command centers, see Search in Highlights of an Enterprise Command Center, Oracle E-Business Suite User's Guide.
Orders Dashboard
See Order Management Command Center Overview.
Use the Orders Dashboard to analyze order management data. From the Orders Dashboard, you can:
-
Review orders that are not assigned to customer service representatives and act on them.
-
Review assigned orders.
-
Review and prioritize sales order lines that are backordered.
-
Fulfill the backorders by navigating to the Transfer Demand page of Oracle Inventory.
-
-
Review and book orders to meet customer requirements.
-
Act on potential delays or issues.
-
Validate that draft orders are correct prior to booking and book the orders.
-
Monitor order alerts such as order holds, and take the necessary follow-up action.
-
Monitor exceptions related to order fulfillment and take the necessary follow-up action.
-
Quickly and efficiently search orders based on various attributes across the entire record.
-
Analyze credit check hold for sales orders and sales order lines.
-
Review credit limit and exposure.
-
Review the applicable credit check rule.
-
Review the exposure details, such as sales orders, invoices, receipts, commitments applied, and past-due invoices.
-
Edit details of a selected sales order on the Sales Order HTML page.
-
-
Prioritize shipments to meet revenue goals.
-
Review returns by products and return reasons.
-
Use this information to review the status of credits or replacements related to RMAs.
-
Access the Orders Dashboard using the following navigation:
Order Management, HTML User Interface responsibility > Command Center
Note: If the OM: ECC Prefilter by CSR profile option is set to Yes or blank, then when you log in to the Orders Dashboard, the dashboard displays your orders by default. To view orders that are assigned to other customer service representatives, remove the Customer Service Rep filter in Selected Refinements. The security setup in your enterprise determines your access to orders of other customer service representatives.
In the Orders results table, if no customer service representative is assigned to an order, then the Customer Service Rep column shows No Value for that order. To search for orders that do not have customer service reps assigned to them, in Available Refinements, select Order, and then Customer Service Rep. Select the No Value filter.
Viewing Real-Time Data After Updates in Order Management
To update orders and order lines, click the link icons in the results tables or select actions from Options and navigate to the relevant windows and HTML pages in Order Management. If the push update model is enabled, then when you initiate changes to orders from the dashboard, the dashboard displays real-time data.
When push updates occur, only the following information is pushed to the ECC data store:
-
The orders that you select on the dashboard prior to initiating changes
-
The lines that you select on the dashboard prior to initiating changes and other changed lines from the same order.
If you update orders in HTML pages in Oracle Order Management, then the push update is direct. If, on the other hand, you make updates in the Order Organizer or Sales Orders windows, then the OM Command Center Push Update concurrent program is launched automatically to push updates to the ECC data store.
For information about pages and windows from where push updates occur, see Push Updates from Oracle Order Management to the ECC Data Store, Oracle Order Management Implementation Manual.
Viewing Orders Data for Operating Units After the Sequential Data Load
To enable you to view the orders data for specific operating units, your system administrator runs the sequential data load. As soon as the data load is complete, the data of these operating units is immediately available on the Orders Dashboard.
Viewing Return Orders
You can view return orders depending on the value set for the OM: ECC Show Return Orders in Orders Dashboard profile option.
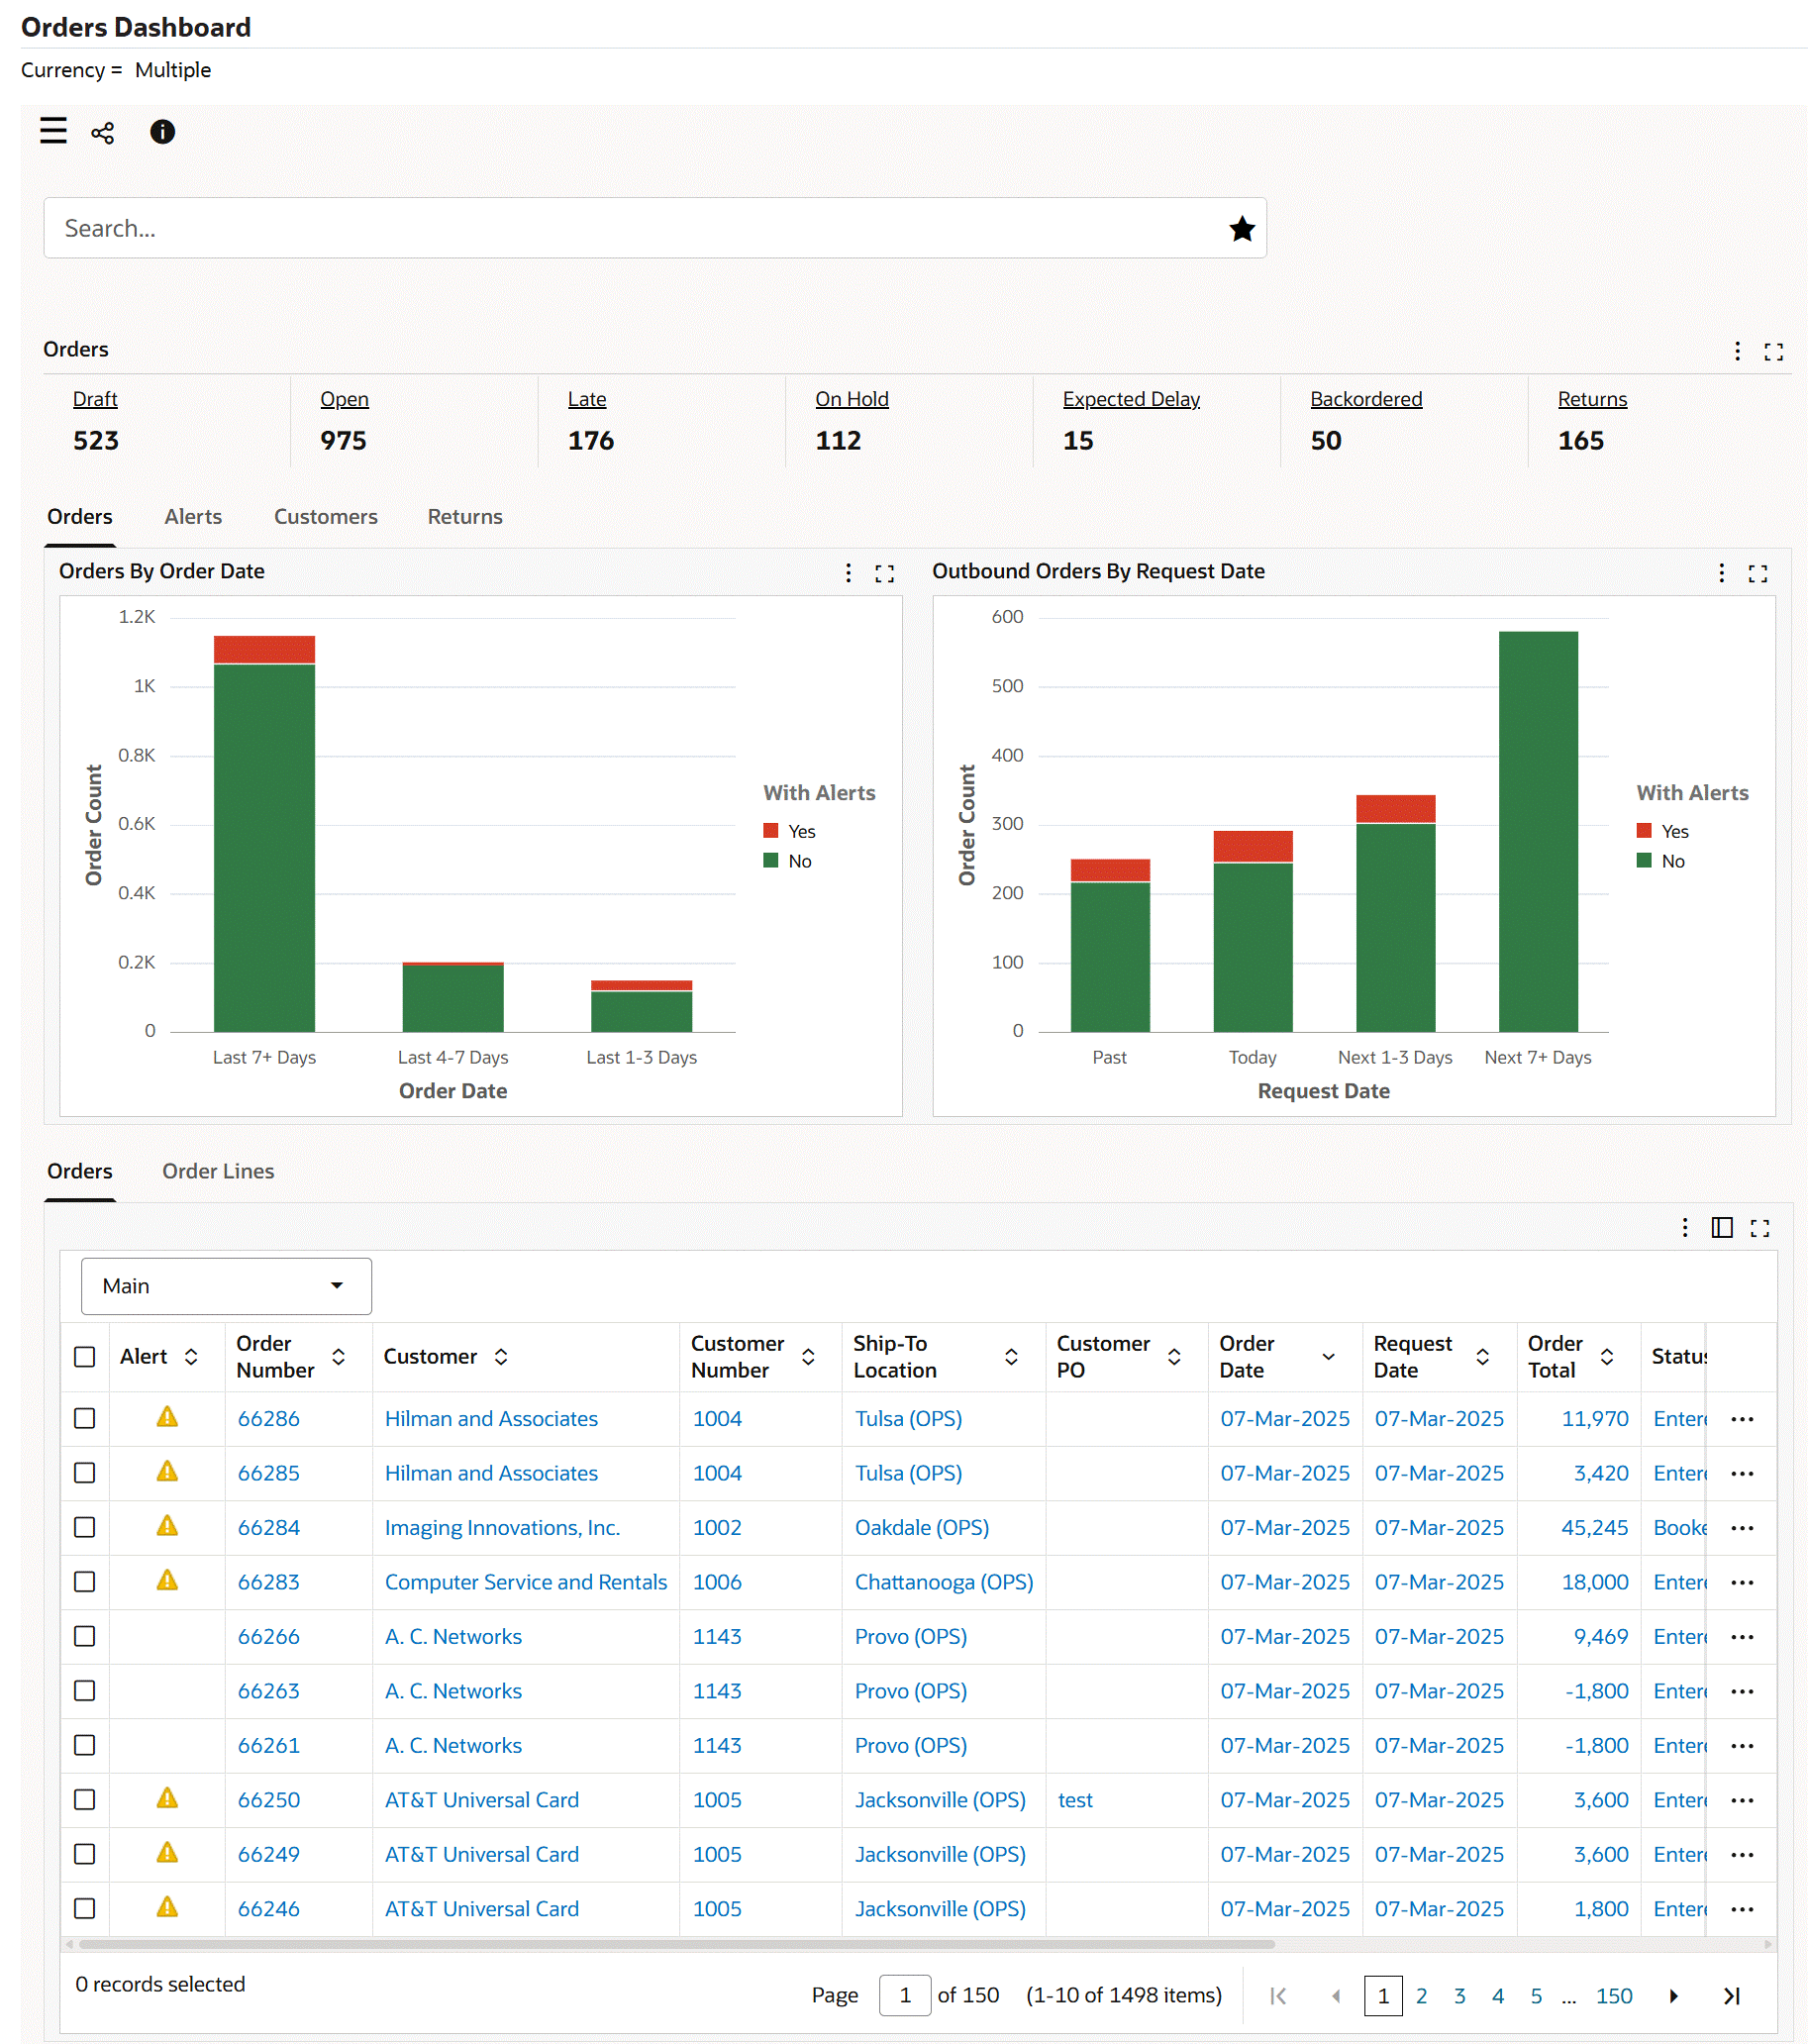
Orders Dashboard
Orders Dashboard - Seeded Search

Orders Dashboard - Seeded Search Results

Orders Tab Row-Level Actions
Order Lines Tab Row-Level Actions
The following table describes the dashboard:
| Component | Description |
|---|---|
| Seeded Search |
|
| Orders (summary bar) | This summary bar displays key metrics. You can further refine the data by clicking a metric. When you do this, a refinement is added to the Selected Refinements list and the application refines data across orders and order lines. To refine data and view only orders or only returns, select the Line Category filter from Available Refinements, Order.
|
| Orders (tab) | This tab displays the following charts:
|
| Alerts (tab) | This tab displays the following charts:
|
| Customers (tab) | This tab displays the Orders By Customer chart. This chart displays information about orders (both with and without alerts) for each customer by total line amount. Select a different dimension to view the order count for each customer by line category (order or return). Select a different metric to view order count for each customer. |
| Returns (tab) | This tab displays the following charts:
|
| Orders (results table) | For details, see Orders Results Table. |
| Order Lines (results table) | For details, see Order Lines Results Table. |
| Options (table-level actions) | For details, see Performing Table-Level Actions. |
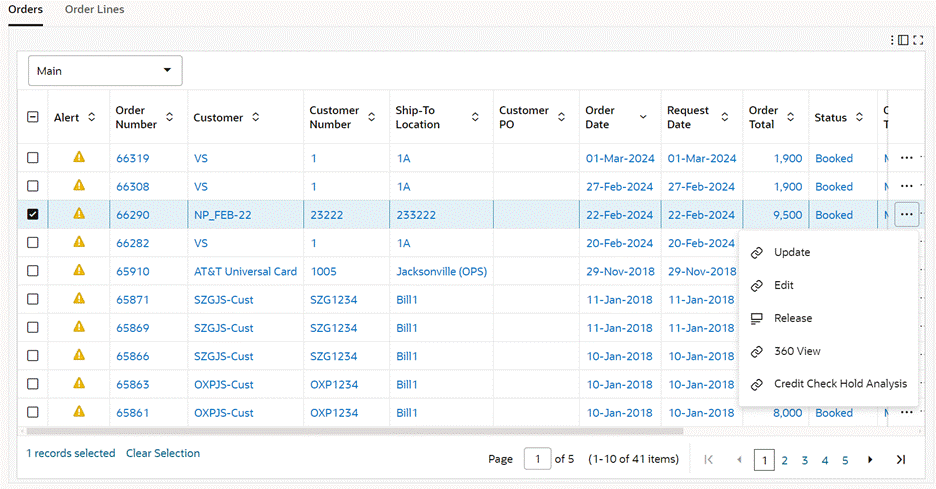
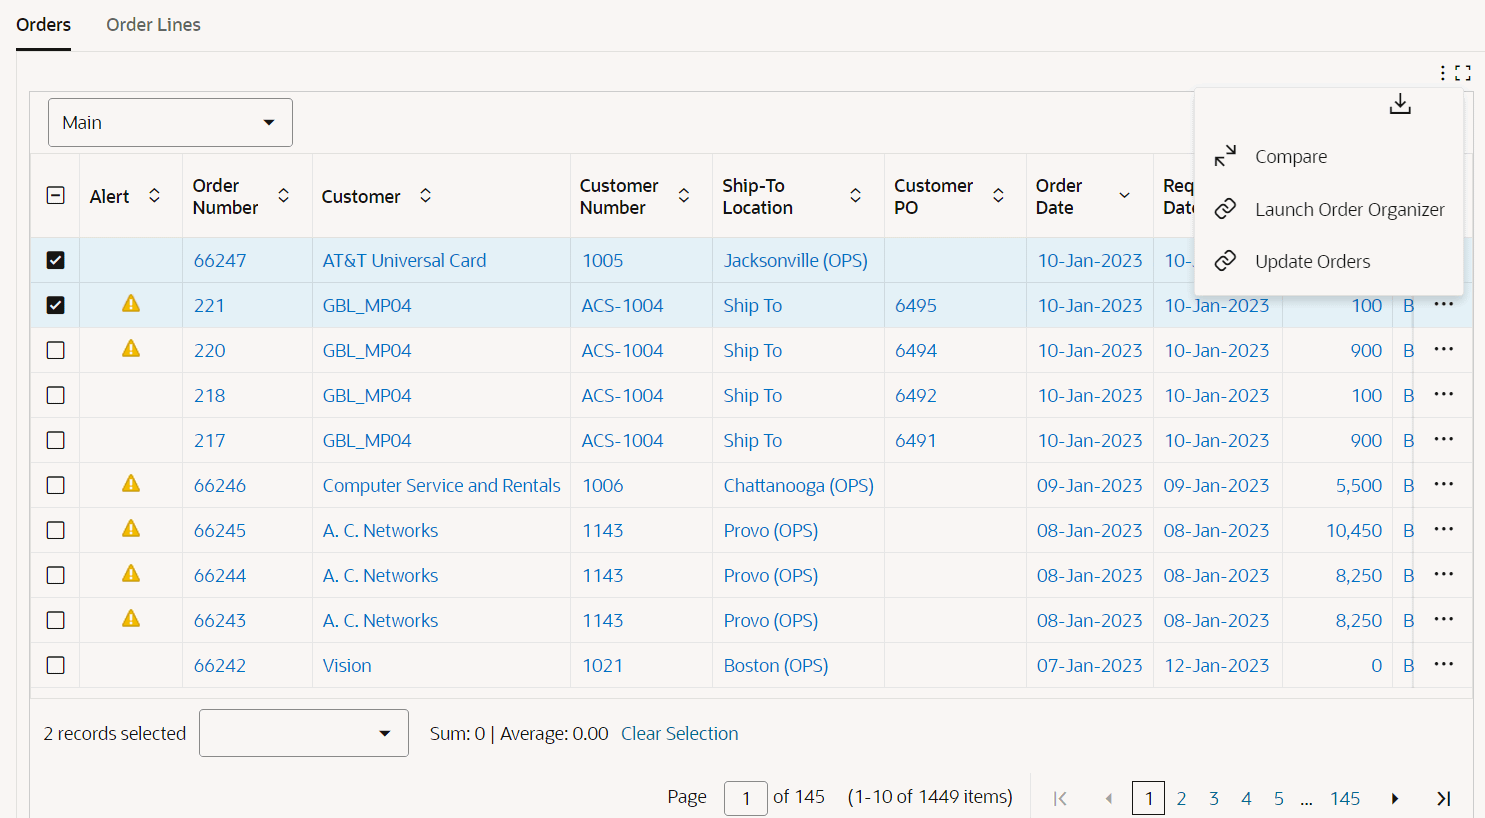
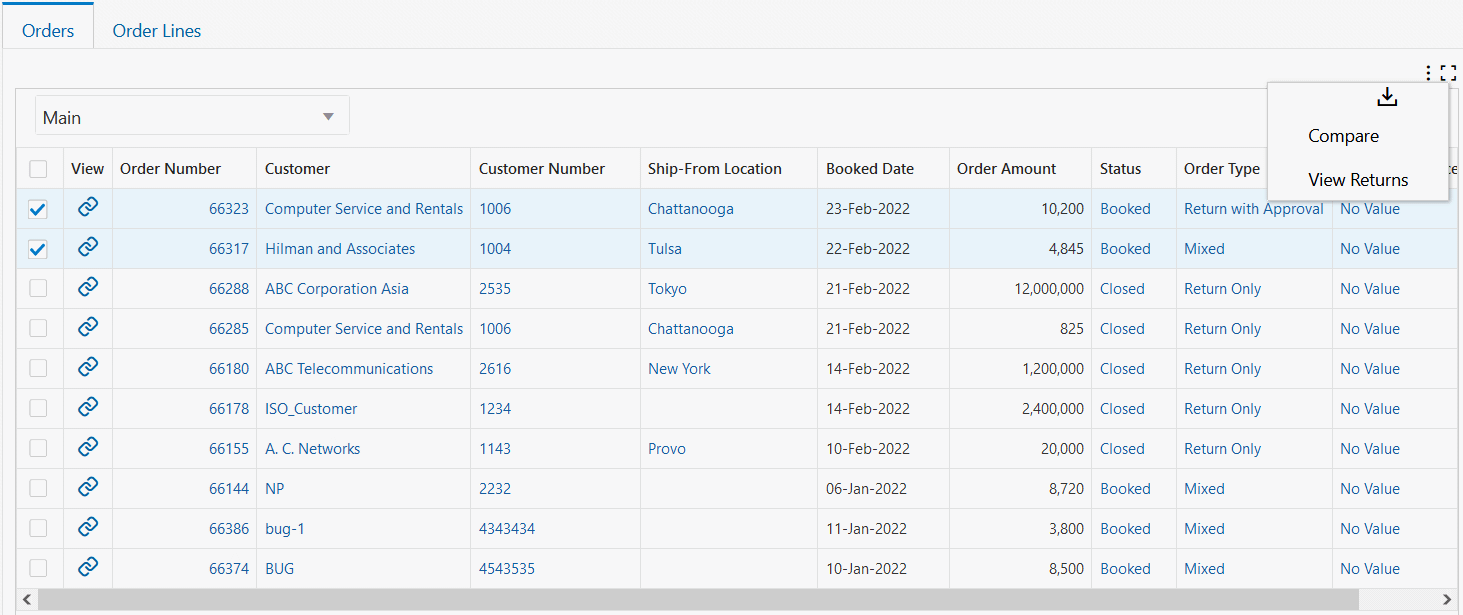
Orders Results Table
This table displays details for all orders based on the selected refinement. For example, if you click the Returns metric, then this table displays only those orders that have return lines.
To filter orders based on a customer service representative, click the customer service rep name in the results table. If no customer service rep is assigned to an order, then the Customer Service Rep column shows No Value for that order.
The following table lists the row-level and table-level actions that are available for outbound orders and returns.
| Action | Outbound Order | Return Order |
|---|---|---|
| Launch Order Organizer | Yes | Yes |
| Update Orders | Yes | Yes |
| Update | Yes | Yes |
| Edit | Yes | Yes |
| Release | Yes | Yes |
| 360 View | Yes | No |
| Credit Check Hold Analysis | Yes | No |
To perform the following actions for orders and returns, click the row-level Actions icon and select an action:
-
To act based on an order status, select Update to navigate to the Order Management HTML User Interface page.
-
To edit details for an order, select Edit to navigate to the Sales Orders window in Order Management.
-
To release the hold on an order, select Release. In the Release Holds dialog box, select a reason to release the hold. Entering comments is optional. Select the Progress Workflow check box if you want to automatically progress the workflow to the next activity when the hold is released. When you click Continue, a confirmation message appears and the application automatically updates the records to display real-time data on the dashboard.
-
To review the supply status of a sales order through a network diagram, select 360 View to navigate to the 360 View dashboard. This action is not available for selection if all lines in the sales order are return lines. See 360 View Dashboard.
-
To review details for a sales order that is placed on hold for credit check failure, select Credit Check Hold Analysis. This action is not available for selection if all lines in the sales order are return lines. The Credit Check Hold Analysis page appears. See Credit Check Analyzer.
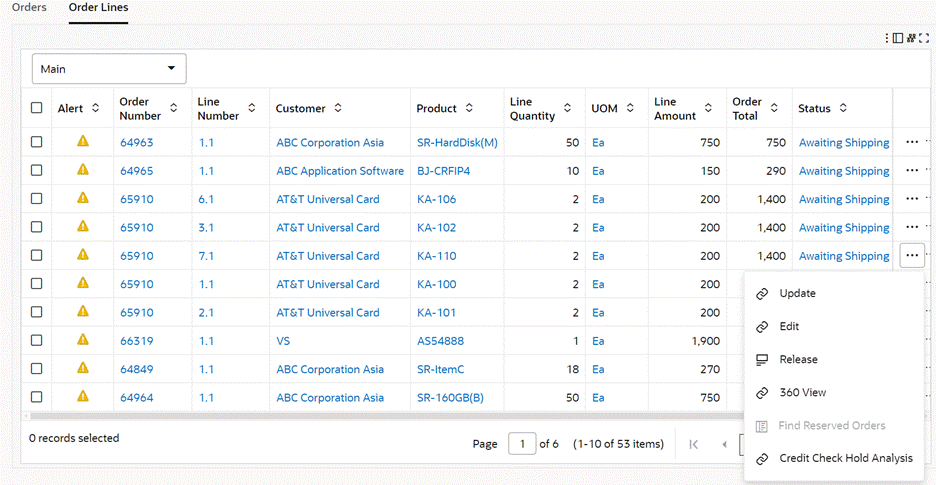
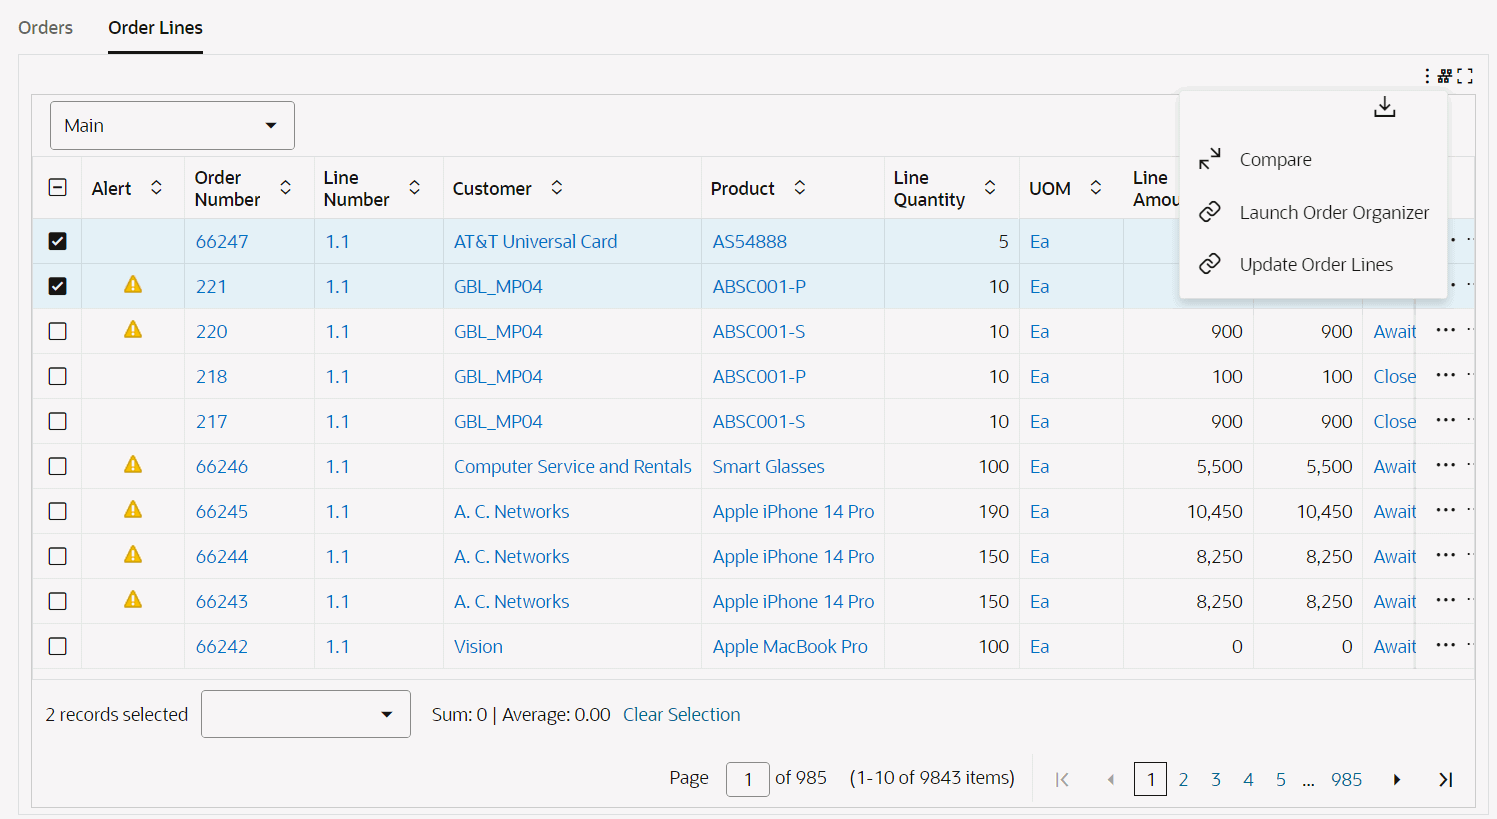
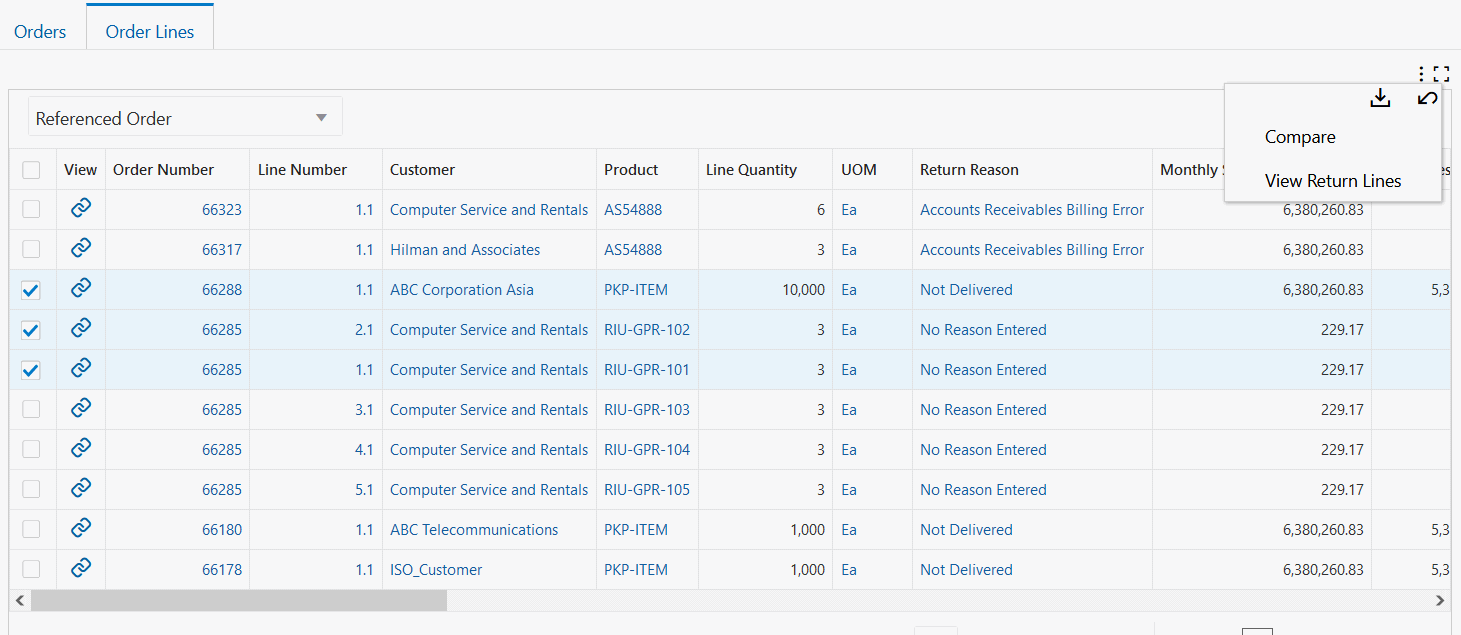
Order Lines Results Table
This table displays the details for order lines or return lines based on the selected filter. Use the Line Category column to identify an order or a return. Select the Return Information option to view information for return lines such as return reason.
To view details, select Table View or Timeline View. Switch between the views using icons.
-
Table View
The table view is the default view.
The following table lists the row-level and table-level actions that are available for outbound orders and returns.
Action Outbound Order Return Order Launch Order Organizer Yes Yes Update Orders Yes Yes Update Yes Yes Edit Yes Yes Release Yes Yes 360 View Yes No Credit Check Hold Analysis Yes No From the table view, you can perform the following row-level actions:
-
To act based on a line status, select Update to navigate to the Order Management HTML User Interface page.
-
To edit the details for an order line, select Edit to navigate to the Order Organizer window in Oracle Order Management.
-
To release the hold on an order line, select Release. In the Release Holds dialog box, select a reason to release the hold. Entering comments is optional. Select the Progress Workflow check box if you want to automatically progress the workflow to the next activity when the hold is released. When you click Continue, a confirmation message appears and the application automatically updates the records to display real-time data on the dashboard.
-
To review the supply status of a sales order line through a network diagram, select 360 View to navigate to the 360 View dashboard. This action is not available for selection if the sales order line is a return line.See 360 View Dashboard.
-
To fulfill a backordered sales order line, select Find Reserved Orders to open the Reserved Orders and Shipments drawer. Use this action to search for order lines that have reserved the stock for the same item in the same warehouse. See Managing Backorders. The Find Reserved Orders action is available only for sales order lines with the "Backordered" status. This action is not available for selection if the sales order line is a return line.
-
To review details for a sales order line that is placed on hold for credit check failure, select Credit Check Hold Analysis. This action is not available for selection if all lines in the sales orde r are return lines. The Credit Check Hold Analysis page appears. See Credit Check Analyzer.
-
-
Timeline View
To view scheduled shipments that are based on the scheduled ship date, click the Timeline View icon. Each event node displays the order number in the title and the line amount, the ordered item, and the scheduled ship date in the description. The Timeline View is especially useful as a visual representation of late orders, after filtering by the Late metric in the Orders summary bar.
Right-click an event to perform the following actions.
-
Update
-
Edit
-
Release
-
360 View
-
Find Reserved Order. See Managing Backorders
-
Credit Check Hold Analysis. See Credit Check Analyzer.
These are the same actions as the table view row-level actions.
-
Managing Backorders
When you select the Find Reserved Orders action for a sales order line in the Order Lines results table, the Reserved Orders and Shipments drawer appears.
Use this drawer to:
-
Get insight into reserved orders.
-
Analyze past shipments.
-
Use the Transfer Reservations action to act on sales order lines that are backordered. For example, you can fulfil a high priority sales order line that is backordered by transferring the reservation from a future low priority sales order line.
The Selected Refinements component, if expanded, displays the Ship From Org ID, inventory item ID, and the UOM of the selected sales order line. Consequently, all components in the drawer are filtered by the warehouse, product, and UOM of the originating sales order line in the Order Lines result table.
Reserved Orders and Shipments Drawer
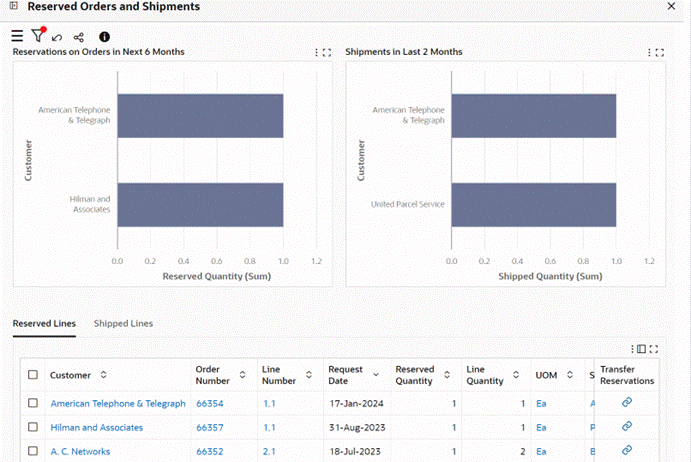
The following section describes components on the Reserved Orders and Shipments drawer.
-
Reservations on Orders in Next 6 Months (chart): This chart shows the top 10 customers by the sum of reserved quantity in the next six months.
-
Shipments in Last 2 Months (chart): This chart shows the top 10 customers by the sum of shipped quantity in the last two months.
-
Reserved Lines (results table): This table shows all reserved lines and is independent of the Reservations on Orders in Next 6 Months (chart). You can view details for reserved lines such as request date, reserved quantity, line quantity, and status.
To transfer the reserved quantity from a sales order line:
-
In the Reserved Lines table, identify the sales order line from which you want to transfer reservation by reviewing the request date, reserved quantity, line amount, order total or any other relevant attributes.
-
Click the Transfer Reservations link icon for the sales order line that you identified.
Important: The Transfer Reservations action is enabled with Oracle E-Business Suite release 12.2.10 and later. You must have access to the current inventory organization (warehouse) to perform actions on Transfer Demand and Search Reservation pages. For more information, see Reservations Workbench, Oracle Inventory User's Guide.
-
If the selected sales order line has a single reservation, then the Transfer Demand page of Oracle Inventory appears with the single reservation record for the selected sales order line.
-
If the selected sales order line has multiple reservations, then the Search Reservations page appears, which displays multiple reservation records for the selected sales order line. For the appropriate reservation record, click the Transfer Demand icon to display the Transfer Demand page. Note that when you navigate from the Orders Dashboard to the Search Reservations page, only the Transfer Demand action is available to perform.
-
-
On the Transfer Demand page, in the To Demand region, click Find to display order lines that are eligible for transfer.
-
Locate the backordered line that you had selected in the Order Lines results table. This backordered line is the transfer target line.
-
Review the demand quantity and reserved quantity of the backordered line.
-
Enter the transfer quantity to transfer the reservation.
-
Click Apply. This action transfers the reservation to the backordered sales order line that you had selected in the Order Lines results table. The sales order line becomes eligible for pick release and shipping.
Important: After you complete the transfer reservation process, your system administrator must run the OM Command Center Data Load concurrent program with the Incremental Load option to reflect the latest data for the Backordered lines on the Orders dashboard.
-
-
Shipped Lines (results table): This table shows data for shipped lines such as actual shipment date, shipped quantity, UOM, and status.
Performing Table-Level Actions
Actions for Order Lines
The following table describes the actions that are available from the Options icon in the results tables. Select one or more rows and click the Options icon to act on your selection.
| Results Table | Action | Description |
|---|---|---|
| Orders, Order Lines | Compare | Use this action to select multiple rows and to compare information for orders and order lines. |
| Orders, Order Lines | Export | Use this action to export the search results in a comma-separated values (CSV) file. |
| Orders, Order Lines | Launch Order Organizer | Use this action to act on orders and orders lines in the Order Organizer window. See Overview of Order Organizer. |
| Orders | Update Orders | Use this action to update details for orders in the Orders page in Order Management, HTML User Interface. See Actions on Orders. |
| Order Lines | Update Order Lines | Use this action to update details for order lines in the Order Lines page in Order Management, HTML User Interface. See Actions on Order Lines. |
Credit Check Analyzer
See Order Management Command Center Overview.
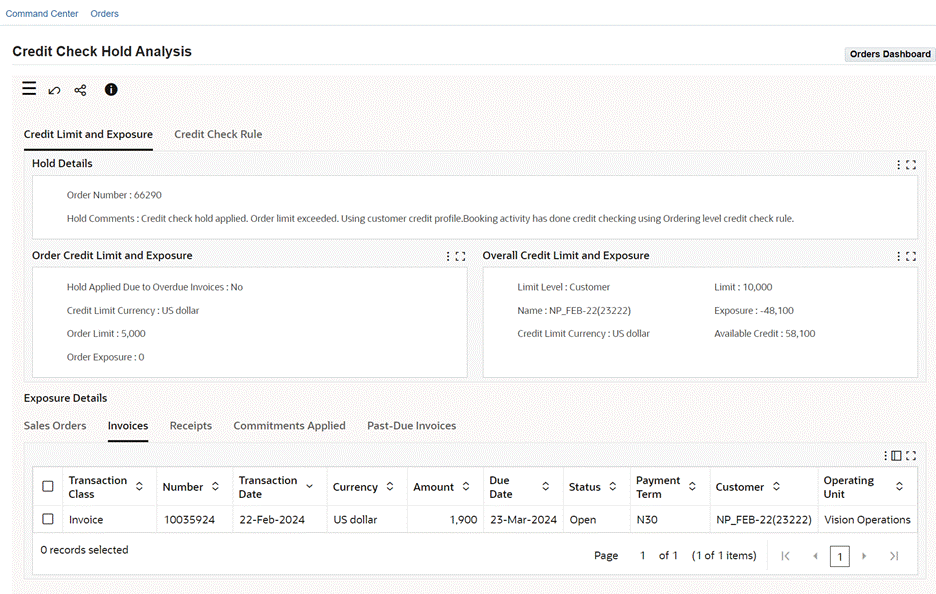
Use the Credit Check Hold Analysis page to gain insights into the hold details, credit limits and exposure summary, applicable credit check rule, and details of credit exposure (calculated from open balances in Oracle Receivables and open orders in Oracle Order Management) for each Sales Order or Sales Order Line that is on credit check failure hold.
Credit Check Hold - Calculations
-
The calculation of the overall exposure is as follows:
Uninvoiced Sales Orders + Open Accounts Receivable Balance + External Exposure – Commitments
-
The calculation of Open Accounts Receivable Balance is as follows:
Invoices + Debit Memos – Credit Memos – Receipts
-
Commitments are Customer Deposits that are applied on Sales Orders.
For more information about holds due to credit check failure, see "Credit Checking" in Overview of Holds.
The Credit Check Hold Analysis page supports:
-
Credit checking against the pre-calculated summary exposure amounts only.
-
Credit checking at these levels: Party, Customer, and Site.
-
Multi-currency credit checking.
Use the Credit Check Hold Analysis page to:
-
Review applicable credit limits alongside credit exposure.
-
Evaluate whether the order amount exceeds the order credit limit.
-
Assess the overall credit limit and exposure.
-
View information about the credit check hold source.
-
-
View credit check rule definition for a given credit check hold.
-
View transaction details that contribute to the credit exposure amounts.
-
Sales orders
-
Invoices
-
Receipts
-
Commitments applied
-
Past-due invoices
-
-
Update the sales orders on the HTML page by performing the row-level action.
Access the Credit Check Hold Analysis page using the following navigation.
Orders Dashboard > select "Orders on Credit Check Hold" seeded search in the Search component > Orders or Order Lines results table > Credit Check Hold Analysis (row-level) action.
Important
-
Your system administrator must run the OM Command Center Credit Check Data Load program so that the credit check hold details are available. Otherwise, credit details for the selected sales order or sales order line are not displayed on the page.
-
The Credit Check Hold Analysis page does not support:
-
Online credit checking
-
Item category credit limit, or operating unit credit limit.
-
Credit hold, if enabled in the customer site, customer, or party profile
-
Party hierarchy
-
The data security of the transaction details shown under the Exposure Details results tables is controlled by the Multi-Org Access Control (MOAC) set up by your administrator. Based on the set up, you can view the Exposure Details from all the accessible operating units.
Credit Check Hold Analysis Page
Credit Check Rule Tab
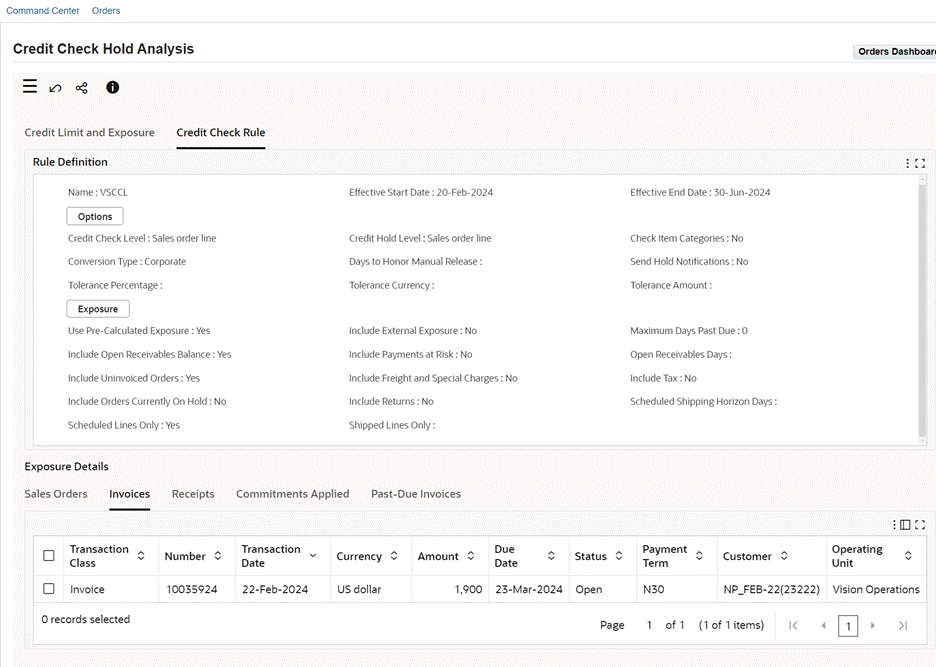
| Component | Description |
|---|---|
| Credit Limit and Exposure (tab) | This tab includes the following results grids:
|
| Credit Check Rule (tab) | This tab contains results grid with columns to show all the fields of the credit check rule that is setup. |
| Exposure Details (tabbed region) Sales Orders (results table) |
This table shows transaction details of sales orders contributing to the credit exposure amount. You can review information such as order number, order date, status, and operating unit. To edit details of a selected sales order on the Sales Order HTML page, click the row-level action, Update. For example, you can review priority orders and reduce the overall credit exposure by unscheduling non-priority orders or pushing out their request or schedule dates outside the Scheduled Shipping Horizon. After your administrator runs the OM Command Center Credit Check Data Load program, the Exposure field in the Overall Credit Limit and Exposure result grid displays the recomputed credit balance. You can then release credit check hold on the priority orders and expedite their fulfillment. |
| Exposure Details (tabbed region) Invoices (results table) | This table shows transaction details of invoices contributing to the credit exposure amount. You can review information such as transaction class, transaction date, currency, amount, due date, status, payment term, customer, and operating unit.
Note: The Invoices tab will always list all the eligible invoices. Out of these invoices, if any record surpasses the "Maximum Days Past Due" validation, then the same records are shown in the "Past-Due Invoices" tab also. |
| Exposure Details (tabbed region) Receipts (results table) |
This table shows transaction details of receipts and credit memos contributing to the credit exposure amount. You can review information such as transaction class, transaction date, currency, amount, customer, and operating unit. |
| Exposure Details (tabbed region) Commitments Applied (results table) |
This table shows transaction details of applied commitments contributing to the credit exposure amount. You can review information such as order number, currency, applied amount, and operating unit. |
| Exposure Details (tabbed region) Past-Due Invoices (results table) |
This table shows transaction details of past-due invoices. Note: The Past-Due Invoices tab shows data only when there are past-due invoices. The Past-Due Days is a calculated field. The calculation is as follows: (System Date -Due Date) – Max Days Past Due (according to the Credit Check Rule) For example:
The Past-Due Days is calculated as 4 = (24-November-2023 - 15-November-2023) – 5 |
Returns Dashboard
See Order Management Command Center Overview.
Use the Returns Dashboard to:
-
Gain insight into historic returns data and analyze returns trends.
-
Review reasons for and sources of returns using attributes such as warehouse, return reason, customer, product, and carrier.
-
Improve returns management.
-
Track and address customer issues.
-
Identify bottlenecks and address concerns in the supply chain process.
-
Reduce operational costs and revenue leakage.
-
Access the Returns Dashboard using the following navigation:
Order Management, HTML User Interface responsibility > Command Center
Returns Dashboard

Understanding Metrics and Chart Dimensions on the Returns Dashboard
Important: The Returns Dashboard considers only the closed return lines that are not canceled.
The following sections explain how the dashboard calculates the metrics and chart dimensions.
Rolling Sales
Rolling sales is the monthly average sales or the sum of outbound order lines for a given period that ends with the given month. For example, if 3 months is the period, then Rolling Sales for month Oct-21 will be the total of sales for Aug-21, Sep-21 and Oct-21, divided by 3.
Total (Overall) Sales
Total (overall) sales is the sum of rolling monthly sales.
For example, if the OM: ECC Months of Returns to Load profile option is set to 12, then the calculation is as follows:
Total (overall) Sales = Sum of Rolling Monthly Sales for the last 12 completed months
Return %
The Return % metric represents the percentage of sales that has turned into returns. The Return % calculation is different in the Monthly Trend and Top Attribute by Return % charts. The following subsections describe the calculations.
-
Return % Calculation in the Monthly Trend Chart
The calculation of Return % in the Monthly Trend chart is as follows:
Return % = (Return Lines Total / Rolling Sales) * 100
For example, the return month is October 2021 and the OM: ECC Rolling Sales Period profile option is set to 3.
The application calculates Return % for monthly trend as follows:
-
Calculates the return lines total in the currency that is specified in the OM: ECC Currency for Returns profile option for the October month.
-
Calculates the average monthly sales total (rolling sales) in the currency that is specified in the OM: ECC Currency for Returns profile option for the months of October, September and August.
Note that for the calculation of sales totals, the application considers all outbound lines that are eligible to be invoiced except the service items.
-
Divides the return total by the sales total.
-
Multiplies the result by 100.
Return% = (Return Lines total for Oct-21 / Rolling Sales for Oct-21) * 100
-
-
Return % Calculation in the Top Attribute by Return % Chart
The Returns Dashboard contains the following Top Attribute by Return % charts:
-
Top Return Reasons by Return %
-
Top Customers by Return %
-
Top Products by Return %
-
Top Warehouses by Return %
-
Top Carriers by Return %
The calculation of Return % in these charts is as follows:
Return % = (Return Lines Total / Total (Overall) Sales) * 100
-
Average Turnaround Time
The average time taken to complete the returns in days.
This example explains the calculation of the average turnaround time.
The following table shows the data that is available for return lines with the date and activity.
| Date | Activity |
|---|---|
| 19-November-2021 | Create a new return order with two lines 1.1 and 2.1. Book the order. |
| 19-November-2021 | Process line 1.1 to closure, which means that the line is in the Closed status. |
| 20-November-2021 | Enter a new line 3.1. |
| 22-November-2021 | Process line 2.1 to the Closed status. |
| 27-November-2021 | Process line 3.1 to the Closed status. |
This table shows the calculation of the average turnaround time.
| Line Number | Entered Date* | Order Booked Date | Returned Date* | Turnaround Time in Days |
|---|---|---|---|---|
| 1.1 | 19-April | 19-April | 19-April | 0 |
| 2.1 | 19-April | 19-April | 22-April | 3 |
| 3.1 | 20-April | 19-April | 27-April | 7 |
Important: * Entered Date and Returned Date are not fields in Oracle Order Management. The application derives these dates for the purpose of the dimension calculation. The entered date is the line creation date and the returned date is the last update date of the closed return line.
Formula for turnaround time calculation = Returned Date - Maximum of (Booked Date or Entered Date)
Average turnaround time calculation = Sum of individual turnaround time in days (10 Days) / Number of return lines (3) = 3.33 Days (rounded up to two decimals)
Returns Dashboard
The following table describes the dashboard:
| Component | Description |
|---|---|
| Return Orders (summary bar) | This summary bar displays key metrics. You can further refine the data by clicking a metric. When you do this, a refinement is added to the Selected Refinements list and the application refines data across return lines.
|
| By Return Reason (tab) | This tab displays the following charts:
|
| By Customer (tab) | This tab displays the following charts:
|
| By Product (tab) | This tab displays the following charts:
|
| By Warehouse (tab) | This tab displays the following charts:
|
| By Carrier (tab) | This tab displays the following charts:
Note: The value for carrier is taken from the referenced outbound sales order line. If it is missing there, it is taken from the corresponding delivery. |
| Turnaround Time (tab) | This tab displays the following charts:
|
| Orders (results table) | This table displays details for return orders, such as return order, line number, customer, and return reason. To view the details for a return order, click the link icon in the View column to navigate to the Sales Order page. |
| Order Lines (results table) | This table displays details for return order lines, such as return order, line number, customer, and return reason. For referenced lines, the results table displays the original sales order number. To view the details for a return line, click the link icon in the View column to navigate to the Line Details page. |
| Options (table-level actions) | See Performing Actions. |
Performing Actions
The following table describes the actions that are available from the Options icon in the results tables. Select one or more rows and click the Options icon to act on your selection.
Actions for Return Orders
Actions for Return Order Lines
| Results Table | Action | Description |
|---|---|---|
| Orders, Order Lines | Compare | Use this action to select multiple rows and to compare information for return orders and return order lines. |
| Orders | View Returns | Use this action to navigate to the Orders HTML page and view details for the return order. |
| Order Lines | View Return Lines | Use this action to navigate to the Orders HTML page and view details for the return order lines. |
360 View Dashboard
See Order Management Command Center Overview.
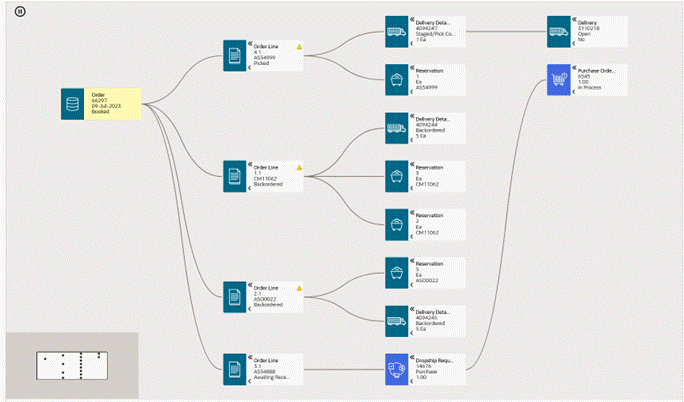
The 360 View dashboard provides you a complete view of the supply status of a sales order or sales order line in a network diagram.
Use the dashboard to:
-
Gain an end-to-end visibility into the data related to a given sales order (line).
-
Visualize the order-to-cash information comprising of order, order lines, reservations, delivery details, deliveries, requisitions, purchase orders, work orders, payment history, and receivables.
-
Access the corresponding ECC dashboard or the product page directly on the 360 View page for additional details or to initiate transactions.
-
Review the supply status information to investigate and resolve issues in the fulfillment process. For example, you can investigate the reason for a delivery with exceptions and work with the logistics manager to expedite the order delivery.
Access the 360 View dashboard using the following navigation.
Orders Dashboard > Orders results table or Order Lines results table > 360 View (row-level) action: If you use this navigation, then Selected Refinements and network diagram on the 360 View dashboard show the sales order details in the context of the selected sales order or sales order line.
Important: Ensure that you use the Orders Dashboard to navigate to the 360 View dashboard. See Orders Dashboard.
360 View
Details of Data Loads for 360 View
Using the Network Diagram
The following table describes the dashboard:
| Component | Description |
|---|---|
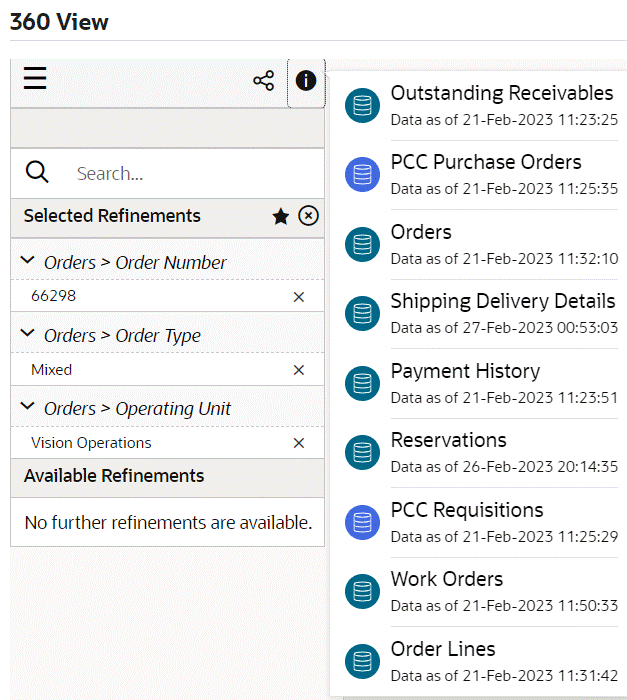
| Data Sets (summary bar) | To display the network viewer nodes, the dashboard uses the following data sets:
Click the Information icon to access the last successful run of the data loads with the time stamp. Important: Your system administrator must schedule data load programs to run regularly for the product data sets so that the 360 View network diagram displays the corresponding nodes. |
| 360 View (Network diagram) | The 360 View network diagram shows the supply status of a sales order through the following network nodes.
|
When reviewing the nodes on the network diagram, consider the following points:
-
For an Assemble-to-Order (ATO) sales order line with the Production Open status, you can track the related work order through a reservation. After the work order is complete, the work order node is no longer available in the network diagram.
-
For a sales order line, you can track Delivery through Delivery Details.
-
For a back-to-back sales order line with External Req Open status, use the Reservation node to track the business process from a sales order line to the purchase requisition.
-
For a back-to-back sales order line with PO Open status, use the Reservation node to track the business process from a sales order line to the purchase order.
-
For a drop-ship sales order, you can track the purchase order line through a requisition line node.
Performing Node-Specific Actions
Reservation Node Actions
Delivery Detail Node Actions
Delivery Node Actions
Payment History Node Actions
Receivables Node Actions
Requisition Node Actions
Purchase Order Node Actions
Work Order Node Actions
The following table lists actions that are available from network diagram nodes. When you click an action, the corresponding command center dashboard or the application page appears directly on the 360 View dashboard with the details of the selected refinement.
| Node | Action | Description |
|---|---|---|
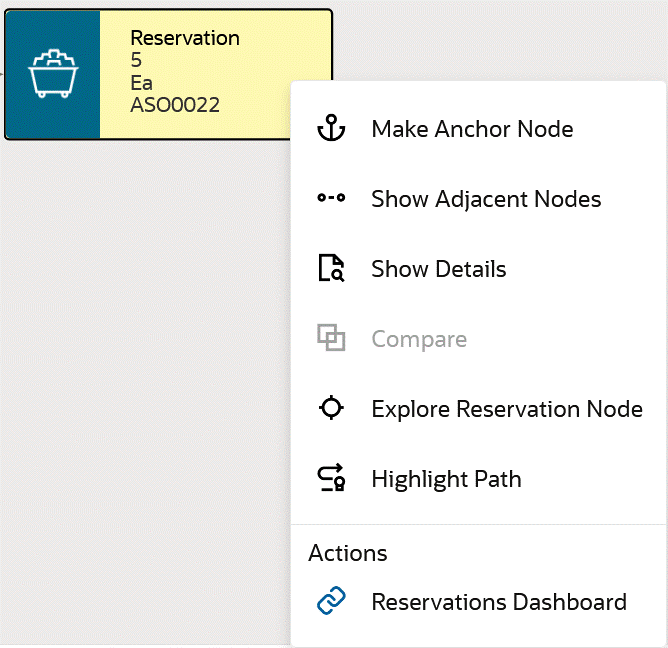
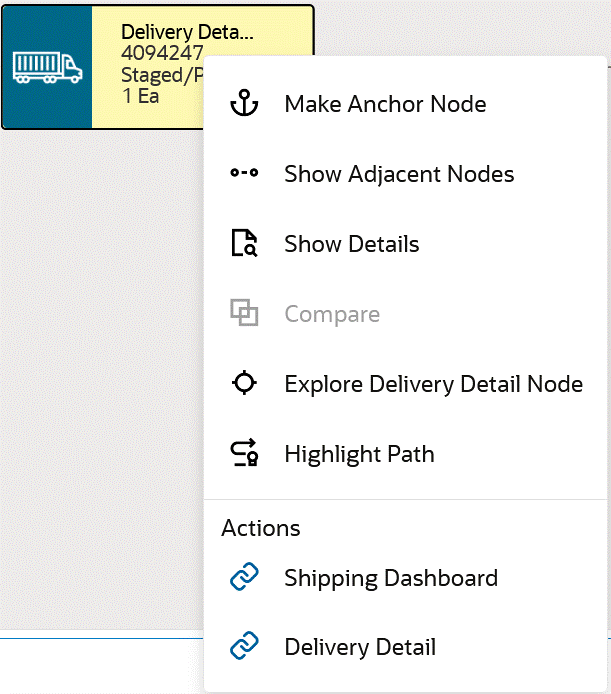
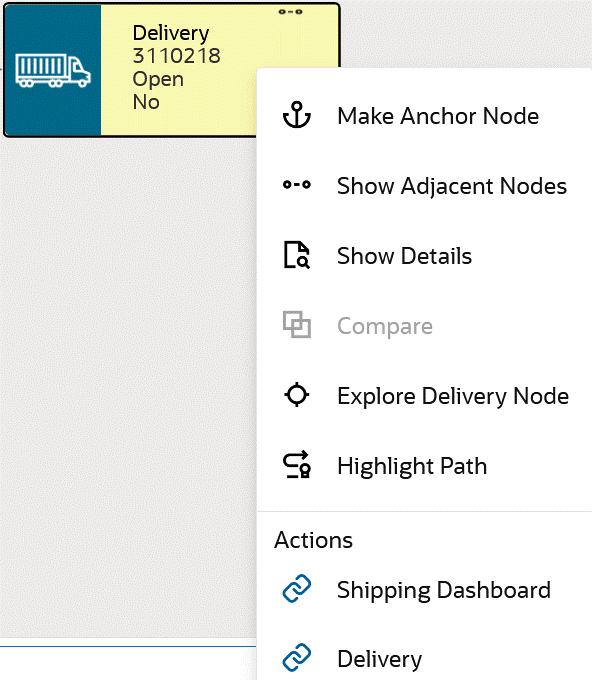
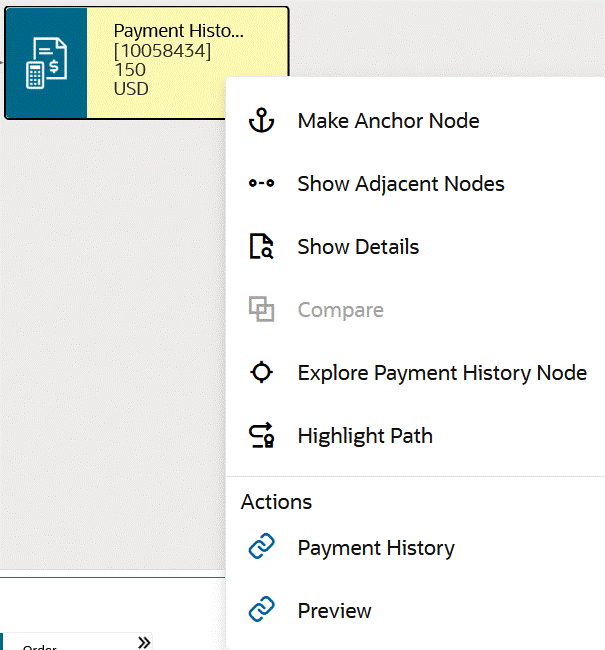
| Reservation | Reservations Dashboard | Review the reservation details on the Inventory Management Command Center's Reservations Dashboard. See Reservations Dashboard, Oracle Inventory User's Guide. |
| Delivery Detail Delivery |
Shipping Dashboard | Review the delivery details or information for delivery on the Inventory Management Command Center's Shipping Dashboard. See Shipping Dashboard, Oracle Inventory User's Guide. |
| Delivery Detail | Delivery Detail | Perform shipping related actions on the Detail Results page of Oracle Shipping Execution. For example, you can select the Auto-create Deliveries action to fulfil a sales order. See Overview of Deliveries, Oracle Shipping Execution User's Guide.
Note: Only users granted the Upgrade Role are allowed to perform update transactions in Shipping Execution. See Roles and Users, Oracle Order Management Implementation Manual. |
| Delivery | Delivery | Perform shipping related actions on the Delivery Results page of Oracle Shipping Execution. See Overview of Deliveries, Oracle Shipping Execution User's Guide. |
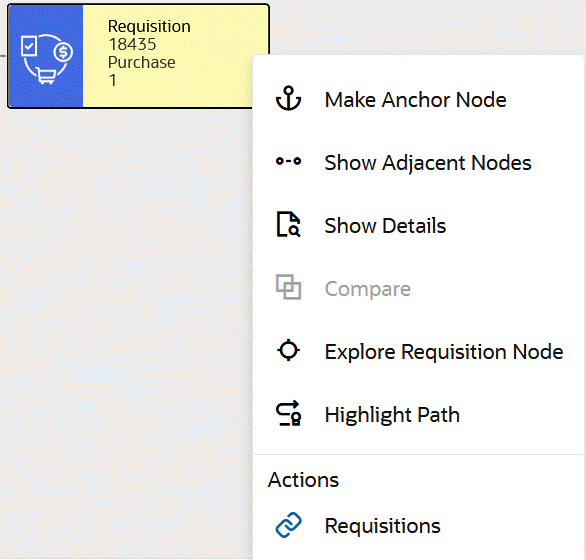
| Requisition Internal Requisition Drop-Ship Requisition |
Requisitions | Review the requisition information on the Procurement Command Center's Requisitions dashboard. See Requisitions Dashboard, Oracle Purchasing User's Guide. |
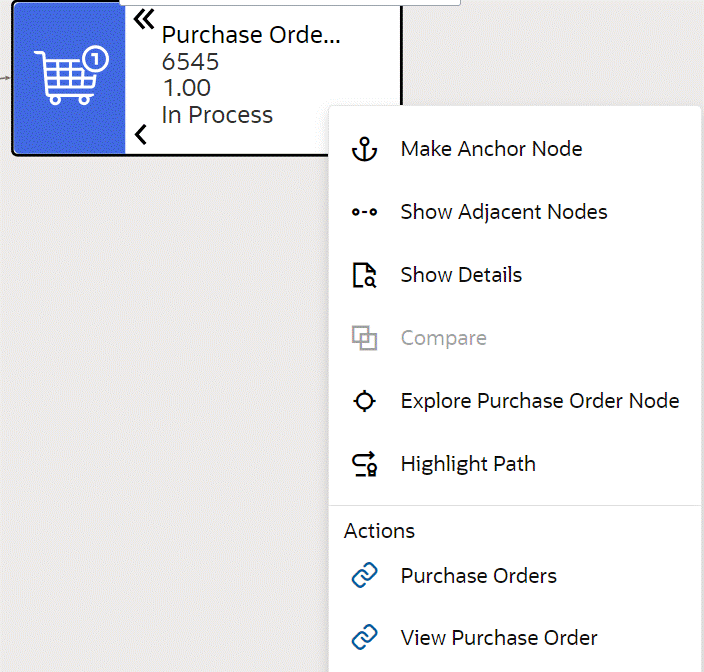
| Purchase Order | Purchase Orders | Review the purchase order information on the Procurement Command Center's Orders dashboard. See Orders Dashboard, Oracle Purchasing User's Guide. |
| Purchase Order | View Purchase Order | Review and edit the purchase order information on the Standard Purchase Order page of Oracle Purchasing. See Purchase Order, Oracle Purchasing User's Guide. |
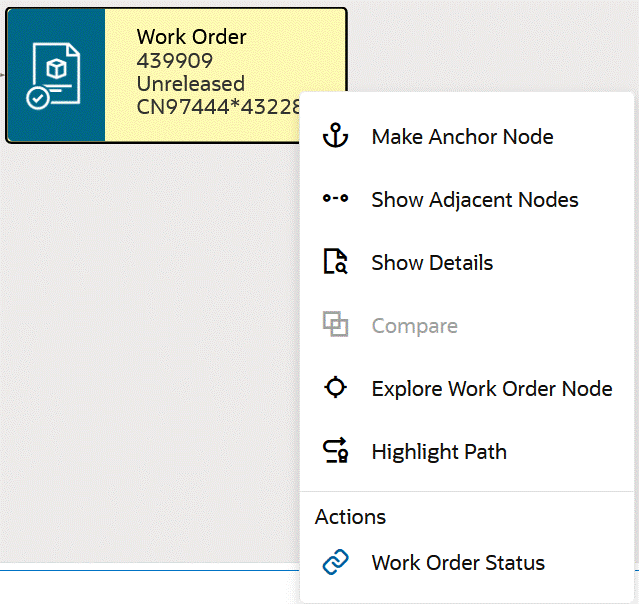
| Work Order | Work Order Status | Review the related work order details on the Discrete Manufacturing Command Center's Work Order Status dashboard. See Work Order Status Dashboard, Oracle Work in Process User's Guide. |
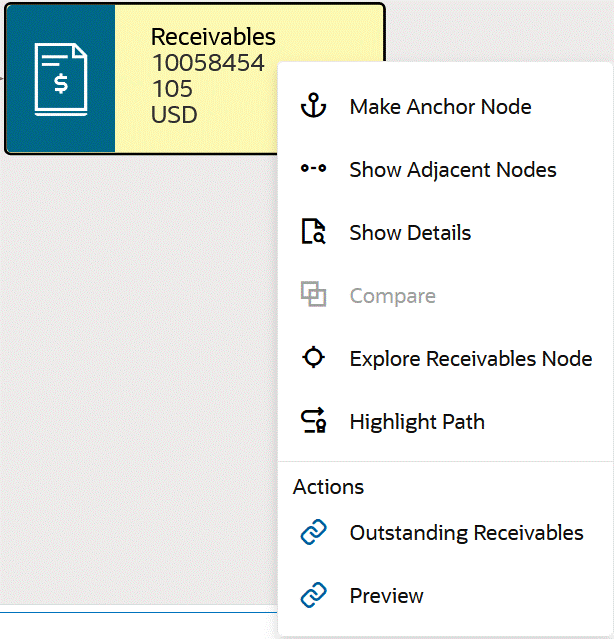
| Payment History | Payment History | Review the payment history on the Receivables Command Center's Payment History dashboard. See Payment History Dashboard, Oracle Receivables User Guide. |
| Payment History | Preview | Preview the customer invoice and view details on the Customer Invoice page of Oracle Receivables. |
| Receivables | Outstanding Receivables | Review the transaction details on the Receivables Command Center's Outstanding Receivables dashboard. See Outstanding Receivables Dashboard, Oracle Receivables User Guide. |
| Receivables | Preview | Preview the customer invoice and view details on the Customer Invoice page of Oracle Receivables. |
Common Actions from a Node
Right-click a node to select the following options that are available for a node:
-
Make Anchor Node: Select this option to set the selected entity as the primary display node with adjacent nodes only.
-
Show Adjacent Nodes: Select this option to narrow the viewer to adjacent nodes only.
-
Show Details: Select this to view details for a node. On the Details window that opens, you can select multiple filters and then perform the following actions:
-
Click Find Similar to apply selected filters to the diagram.
-
Click Search Within to search within the network diagram using the selected attribute in the Details dialog box. Displays only those child nodes that meet the search conditions.
-
-
Explore Node: Depending on the node that you select, click this option to explore that specific node.
-
Highlight Path: Select this option to highlight the complete path for a clear visual.
Additional actions include:
-
Export to Image: Export the network diagram as a svg or png image file.
-
Export to CSV: Export the network diagram in a Comma-Separated Values (CSV) file.
-
Export to PDF: Export the full network diagram in PDF format.
-
Row Expander: Converts the network diagram to text format with action icons that display details within a dialog box.
Examples of Using the Network Viewer Diagram
The following examples explain how you can use the network diagram to identify issues in the fulfillment process.
Example 1: Expedite a late order
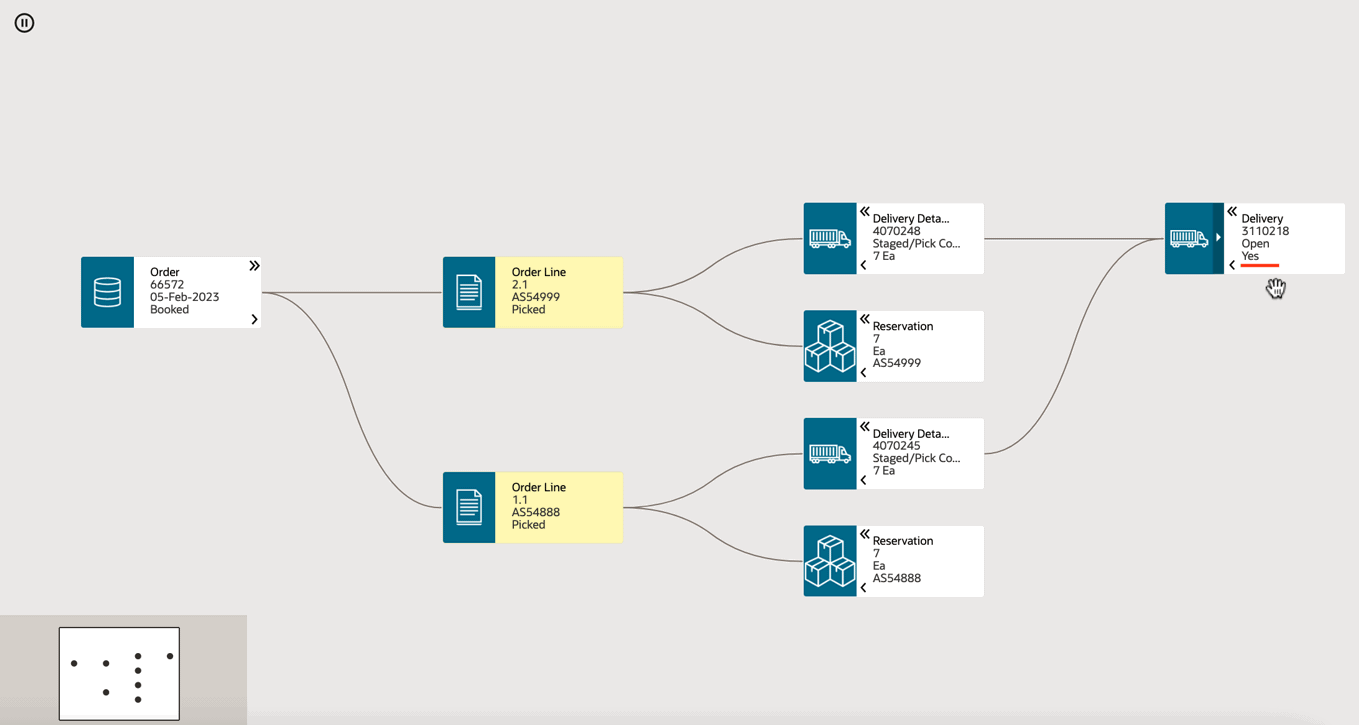
In this example, the customer sales rep reviews late orders and focuses investigation on a late order with the order number 66572.
The steps that the customer sales representative performs are as follows:
-
Navigates to the Orders Dashboard.
-
Reviews the Late metric.
-
Clicks the Late metric to refine the dashboard data.
-
In the Orders results table, clicks the Actions icon for the order number 66572.
-
Selects 360 View. The 360 View dashboard appears.
-
Reviews the network nodes and observes that on the Delivery node, Exceptions is set to Yes.
Delivery Node Details
-
To view exceptions, right-clicks the Delivery node and selects the Delivery action.
Delivery Node Actions
The Delivery Results page appears.
-
Reviews the exception message on the Delivery Results page, Update Exception: Delivery region.
-
Understands that changes were made in Oracle Order Management after the material was picked and staged. Therefore, a system exception was logged, which requires a review and manual intervention.
-
Works with the concerned order fulfillment manager to close the exception and free the order for shipping.
Example 2: Prioritize a Drop Ship Order
In this example, the customer sales rep is monitoring a drop ship order with the order number 66556 to ensure that the fulfillment is progressed.
The steps that the customer sales representative performs are as follows:
-
Navigates to the Orders Dashboard.
-
Searches for the order using the Order Number refinement.
-
In the Orders results table, clicks the Actions icon for the order 66556.
-
Selects 360 View. The 360 View dashboard appears.
360 View
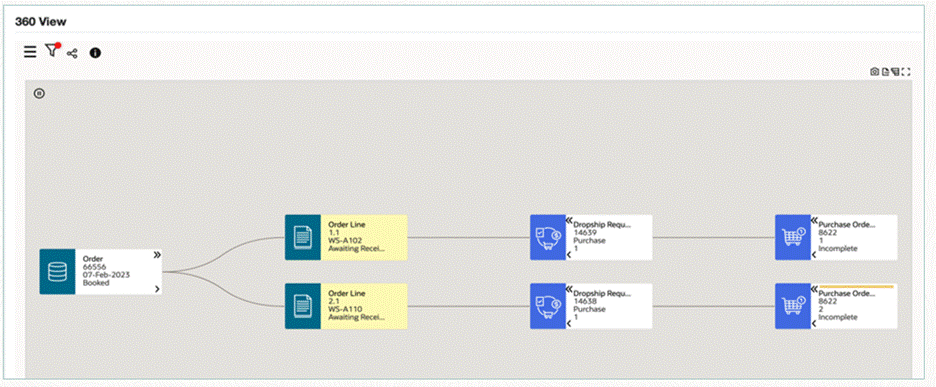
-
Reviews the sales order lines, supply, and the fulfillment progress.
-
Identifies that Purchase Order nodes show the status as Incomplete.
-
To resolve the issue, works with the purchasing manager to get the purchase orders approved and released to the supplier.
Quotes Dashboard
See Order Management Command Center Overview.
The Quotes Dashboard enables you to review and analyze quote trends to improve the quote-to-sales order conversion and efficiently manage the supply chain process.
Use the Quotes Dashboard to:
-
Review quotes data.
-
Search for quotes using the quote header and quote line attributes.
-
Review open quotes and the amount for open quotes.
-
-
Streamline the quote-to-sales order process.
-
Track performance metrics such as quote conversion and the average time to convert a quote to a sales order.
-
Use the quote-to-sales order conversion metric to identify the issues in the approval process for quotes.
-
-
Gain insight into the various attributes of quotes management.
-
Focus on the quotes that require attention based on the expiration date.
-
Monitor the number of days in which quotes are in a specific quote stage.
-
Review the number of quotes at each quote status.
-
Focus on customer specific quotes and the corresponding quote stages.
-
Review quotes by products.
-
Identify salespersons for quotes and the corresponding quote stages.
-
-
Expedite the quote-to-sales order conversion process.
-
Open the Orders Dashboard to review selected orders.
-
Update orders in the Sales Order HTML page.
-
Drill down to the Quotes window to edit active quotes.
-
Access the Quotes Dashboard using the following navigation:
Order Management HTML User Interface, responsibility > Command Center
Important: Your access to quotes from operating units depends on the security set up in your enterprise.
Quotes Dashboard
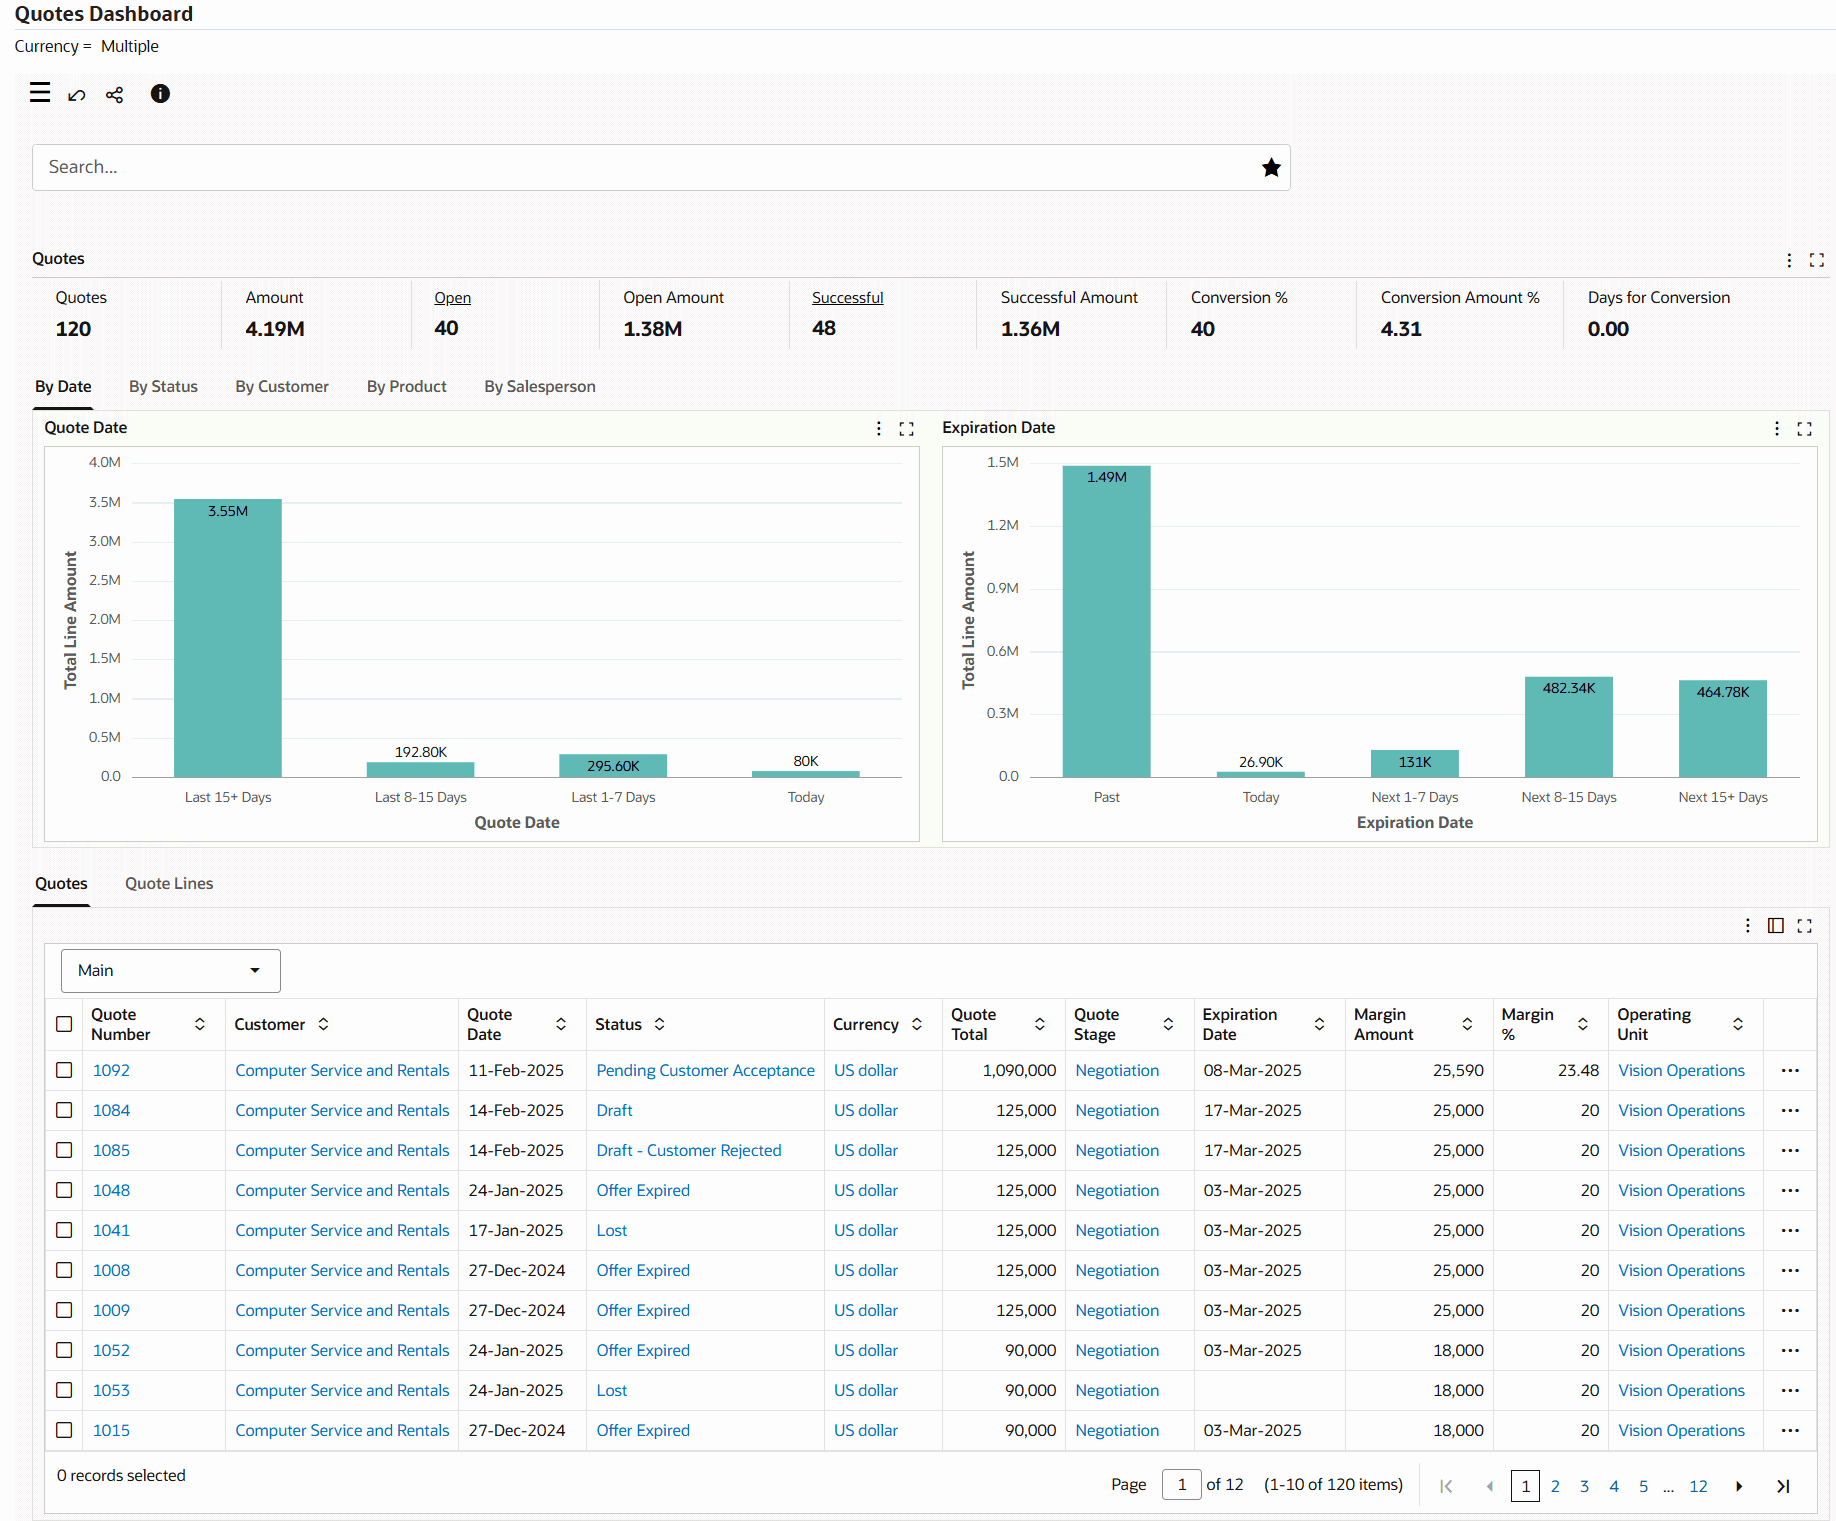
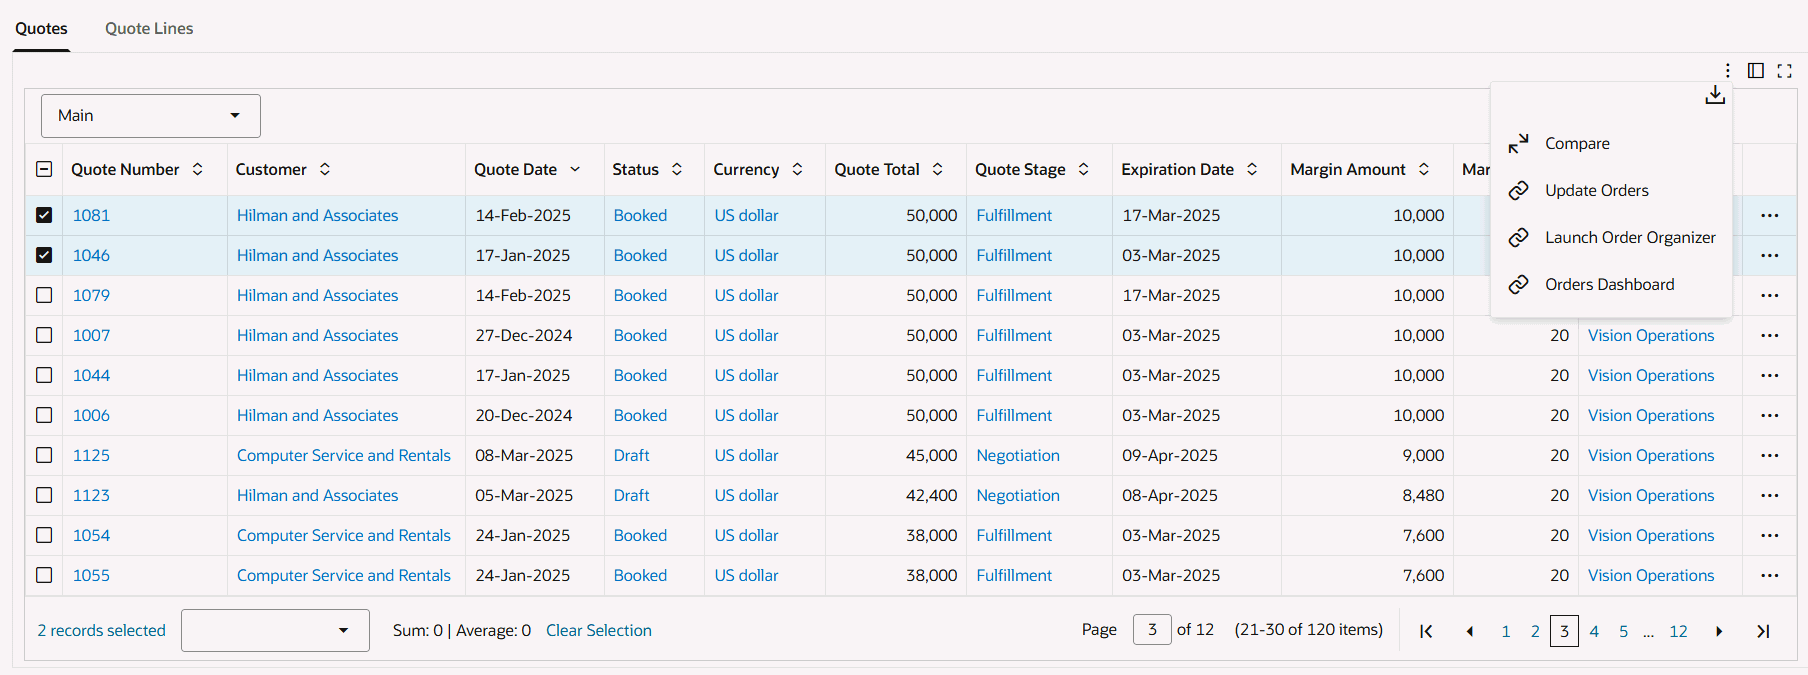
Quotes Tab Table-Level Actions
The following table describe the dashboard:
| Components | Description |
|---|---|
| Quotes (summary bar) | This summary bar displays key metrics.
|
| By Date (tab) | This tab displays the following charts:
|
| By Status (tab) | This tab includes the following chart: Quotes By Status: By default, this chart shows the total quotes in each quote status. The count includes quotes that are converted to sales orders. Select a different metric to view the total line amount by quote status. |
| By Customer (tab) | This tab includes the following chart: Quotes By Customer: By default, this chart shows the total quotes in each quote stage for a customer. The count includes quotes at all quote stages including quotes that are converted to sales orders. Select a different metric to view the total line amount by quote stage for each customer. |
| By Product (tab) | This tab includes the following chart: Quotes By Product: By default, this chart shows the total quotes for a product. The count includes quotes that are converted to sales orders. Select a different metric to view the total line amount for each product. |
| By Salesperson (tab) | This tab includes the following chart: Quotes By Salesperson: By default, this chart shows the total quotes in each quote stage for a salesperson. The count includes quotes at all quote stages including quotes that are converted to sales orders. Select a different metric to view the total line amount by each quote stage for a salesperson. |
| Quotes (results table) | This table displays details for all quotes based on the selected refinement. For example, if you click the Open metric, then this table displays only those quotes that are open. The following actions are available.
Note: The OM HTML UI pages and Orders Dashboard do not display quotes. |
| Quotes Lines (results table) | This table displays the details for quotes lines based on the selected filter. |